Ever since the first public release of the iPhone SDK, applications have always had the ability to send e-mail. Unfortunately, prior to iPhone SDK 3.0, doing so meant crafting a special URL and then launching the iPhone's Mail application, which has the side effect of quitting your own application. This is obviously less than ideal, forcing a user to choose between sending an e-mail and continuing to use your application. Fortunately, the new MessageUI framework allows your user access to e-mail without leaving your application. Let's take a look at how this works.
In this chapter, we're going to build an application that lets the user take a picture using their iPhone's camera or, if they don't have a camera because they're using an iPod touch or the Simulator, then we'll allow them to select an image from their photo library. We'll then take the resulting image and use the MessageUI framework to let our user e-mail the picture to a friend without leaving our application.
Our application's interface will be quite simple (Figure 12-1). It will feature a single button to start the whole thing going, and a label to give feedback to the user, once the e-mail attempt is made. Tapping the button will bring up the camera picker controller, in a manner similar to the sample program in Chapter 16 of Beginning iPhone 3 Development (Apress, 2009). Once our user has taken or selected an image, they'll be able to crop and/or scale the image (Figure 12-2). Assuming they don't cancel, the image picker will return an image, and we'll display the mail compose view (Figure 12-3), which allows the user to compose their e-mail message. We'll pre-populate that view with text and the selected image. Our user will be able to select recipients and change the subject or message body before sending the message. When they're all done, we'll use the label in our interface to give feedback about whether the e-mail was sent.
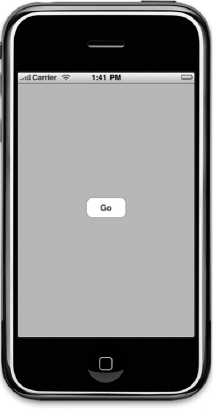
Figure 12.1. Our chapter's application has a very simple user interface consisting of a button and a single label (not shown here)

Figure 12.2. The user can take a picture with the camera or select an image from their photo library, and then crop and scale the image
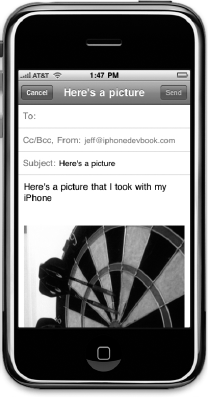
Figure 12.3. After selecting and editing the image, we present the mail compose view modally and let our user send the e-mail
Warning
The application in this chapter will run in the simulator, but instead of using the camera, it will allow you to select an image from your Simulator's photo library. If you've ever used the Reset Contents and Settings menu item in the simulator, then you have probably lost the photo album's default contents and will have no images available. You can rectify this by launching Mobile Safari in the simulator and navigating to an image on the Web. Make sure the image you are looking at is not a link, but a static image. This technique will not work with a linked image. Click and hold the mouse button with your cursor over an image, and an action sheet will pop up. One of the options will be Save Image. This will add the selected image to your iPhone's photo library.
In addition, note that you will not be able to send e-mail from within the simulator. You'll be able to create the e-mail, and the simulator will say it sent it, but it's all lies. The e-mail just ends up in the circular file.
In-application e-mail services are provided by the MessageUI Framework, which is one of the smallest frameworks in the iPhone SDK. It's composed of exactly one class, a view controller that lets the user send e-mail, and a protocol that defines the delegate methods for that view controller.
The view controller class is called MFMailComposeViewController, and it's used similarly to the way the camera picker is used. You create an instance of it, set its delegate, set any properties that you wish to pre-populate, and then you present it modally. When the user is done with their e-mail and taps either the Send or Cancel button, the mail compose view controller notifies its delegate, which is responsible for dismissing the modal view. Here's how you create a mail compose view controller and set its delegate:
MFMailComposeViewController *mc = [[MFMailComposeViewController alloc] init];
mc.mailComposeDelegate = self;Before you present the mail compose view, you can pre-configure the various fields of the mail compose view controller, such as the subject and recipients (to:, cc:, and bcc:), as well as the body. You can prepopulate the subject by calling the method setSubject: on the instance of MFMailComposeViewController, like this:
[mc setSubject:@"Hello, World!"];
E-mails can go to three types of recipients. The main recipients of the e-mail are called the to: recipients and go on the line labeled to:. Recipients who are being cc:ed on the e-mail go on the cc: line. If you want to include somebody on the e-mail, but not let the other recipients know that person is also receiving the e-mail, you can use the bcc: line, which stands for "blind carbon copy." You can prepopulate all three of these fields when using MFMailComposeViewController.
To set the main recipients, use the method setToRecipients: and pass in an NSArray instance containing the e-mail addresses of all the recipients. Here's an example:
[mc setToRecipients:[NSArray arrayWithObjects:@"[email protected]",
        "@[email protected]", nil];
Set the other two types of recipients in the same manner, though you'll use the methods setCcRecipients: for cc: recipients and setBccRecipients: for bcc: recipients.
[mc setCcRecipients:[NSArray arrayWithObject:@"[email protected]"]];
    [mc setBccRecipients:[NSArray arrayWithObject:@"[email protected]"]];
You can also prepopulate the message body with any text you'd like. You can either use a regular string to create a plain text e-mail, or you can use HTML to create a formatted e-mail. To supply the mail compose view controller with a message body, use the method setMessageBody:isHTML:. If the string you pass in is plain text, you should pass NO as the second parameter, but if you're providing HTML markup in the first argument rather than a plain string, then you should pass YES in the second argument so your markup will be parsed before it is shown to the user.
[mc setMessageBody:@"Watson!!!

Come here, I need you!" isHTML:NO];
    [mc setMessageBody:@"<HTML><B>Hello, Joe!</B><BR/>What do you know?</HTML>"
isHTML:YES];You can also add attachments to outgoing e-mails. In order to do that, you have to provide an instance of NSData containing the data to be attached, along with the mime type of the attachment and the file name to be used for the attachment. Mime types, which we discussed briefly back in Chapter 10 when we talked about interacting with web servers, are strings that define the type of data being transferred over the Internet. They're used when retrieving or sending files to a web server, and they're also used when sending e-mail attachments. To add an attachment to an outgoing e-mail, use the method addAttachmentData:mimeType:fileName:. Here's an example of adding an image stored in your application's bundle as an attachment:
NSString *path = [[NSBundle mainBundle] pathForResource:@"blood_orange"
        ofType:@"png"];
    NSData *data = [NSData dataWithContentsOfFile:path];
[mc addAttachmentData:data mimeType:@"image/png" fileName:@"blood_orange"];Once you've configured the controller with all the data you want prepopulated, you'll present the controller's view modally, as we've done before:
[self presentModalViewController:mc animated:YES];
    [mc release];
It's common to release the controller once it's presented, as there's no further need to keep it around, and your delegate method will be passed a reference to the controller later, so you can dismiss it.
The mail compose view controller delegate's method is contained in the formal protocol MFMailComposeViewControllerDelegate. Regardless of whether the user sends or cancels, and regardless of whether the system was able to send the message or not, the method mailComposeController:didFinishWithResult:error: gets called. As with most delegate methods, the first parameter is a pointer to the object that called the delegate method. The second parameter is a result code that tells us the fate of the outgoing e-mail, and the third is an NSError instance that will give us more detailed information if a problem was encountered. Regardless of what result code you received, it is your responsibility in this method to dismiss the mail compose view controller by calling dismissModalViewControllerAnimated:.
If the user tapped the Cancel button, your delegate will be sent the result code MFMailComposeResultCancelled. In that situation, the user changed their mind and decided not to send the e-mail. If the user tapped the Send button, the result code is going to depend on whether the MessageUI framework was able to successfully send the e-mail. If it was able to send the message, the result code will be MFMailComposeResultSent. If it tried, and failed, the result code will be MFMailComposeResultFailed, in which case, you probably want to check the provided NSError instance to see what went wrong. If the message couldn't be sent because there's currently no Internet connection, but the message was saved into the outbox to be sent later, you will get a result code of MFMailComposeResultSaved.
Here is a very simple implementation of the delegate method that just logs what happened:
- (void)mailComposeController:(MFMailComposeViewController*)controller
        didFinishWithResult:(MFMailComposeResult)result
        error:(NSError*)error {
    switch (result)
    {
        case MFMailComposeResultCancelled:
            NSLog(@"Mail send canceled...");
            break;
        case MFMailComposeResultSaved:
            NSLog(@"Mail saved...");
            break;
        case MFMailComposeResultSent:
            NSLog(@"Mail sent...");
            break;
        case MFMailComposeResultFailed:
            NSLog(@"Mail send errored: %@...", [error localizedDescription]);
            break;
        default:
            break;
    }
    [self dismissModalViewControllerAnimated:YES];
}Now that we have a handle on the details, the next step is to put that knowledge to work building a mail-sending application of our own. Create a new project in Xcode using the View-based Application template. Call the project MailPic.
Once the project opens up, expand the Classes folder and single-click MailPicViewController.h. Before we design our interface, we need to declare our outlets and actions. Replace the contents of MailPicViewController.h with this version:
#import <UIKit/UIKit.h>
#import <MessageUI/MessageUI.h>

@interface MailPicViewController : UIViewController
    <MFMailComposeViewControllerDelegate, UIImagePickerControllerDelegate,
       UINavigationControllerDelegate> {
    UILabel *message;
}

@property (nonatomic, retain) IBOutlet UILabel *message;
- (IBAction)selectAndMailPic;
- (void)mailImage:(UIImage *)image;

@end
This is pretty straightforward. We import the header <MessageUI/MessageUI.h> so the compiler has access to the class and protocol definitions that we need to use the Message UI framework. Then we conform our class to three protocols. We conform to MFMailComposeViewControllerDelegate because this class will be acting as the mail compose view controller's delegate. We also conform to the UIImagePickerControllerDelegate because we're going to use the image picker controller to get an image, and need to be the picker's delegate to do that. We conform to UINavigationControllerDelegate because UIImagePickerController is a subclass of UINavigationController, and we need to conform to this protocol to avoid compiler warnings, even though we won't actually implement any of that protocol's methods.
We have a single instance variable and property for the label that we'll use to provide feedback to the user, as well as two methods. The first method is an action method that will get triggered when the user taps the button on our interface. The second method will be used to actually present the mail compose view controller so the user can send the e-mail. We need a method separate from the image picker delegate methods to do that because we can't present a new modal view until the previous one has been dismissed. We dismiss the image picker in the image picker delegate methods, and will use performSelector:withObject:afterDelay: to call the mailImage: method after the camera picker view has been fully dismissed.
Save MailPicViewController.h and then expand the Resources folder in the Groups & Files pane. Double-click MailPicViewController.xib to launch Interface Builder.
From the library, drag over a Round Rect Button and place it anywhere on the window titled View. Double-click the button and give it a title of Go. Control-drag from the button to File's Owner and select the selectAndMailPic action.
Next, grab a Label from the library and drag it to the View window as well. Place the label above the button and resize it so it stretches from the left margin to the right margin. After you place the label, control-drag from File's Owner to the new label and select the message outlet. Double-click the new label and press delete to erase the word Label.
Save the nib file, close Interface Builder, and go back to Xcode.
Single-click on MailPicViewController.m. Replace the existing contents with this new version. We'll step through it when you're done:
#import "MailPicViewController.h"

@implementation MailPicViewController
@synthesize message;

- (IBAction)selectAndMailPic {
    UIImagePickerControllerSourceType sourceType =
        UIImagePickerControllerSourceTypeCamera;
    if (![UIImagePickerController isSourceTypeAvailable:
          UIImagePickerControllerSourceTypeCamera]) {
        sourceType = UIImagePickerControllerSourceTypePhotoLibrary;
    }

    UIImagePickerController *picker =
    [[UIImagePickerController alloc] init];
    picker.delegate = self;
    picker.allowsEditing = YES;
    picker.sourceType = sourceType;
    [self presentModalViewController:picker animated:YES];
    [picker release];
}

- (void)mailImage:(UIImage *)image {
    if ([MFMailComposeViewController canSendMail]) {
        MFMailComposeViewController *mailComposer =
            [[MFMailComposeViewController alloc] init];
        mailComposer.mailComposeDelegate = self;
        [mailComposer setSubject:NSLocalizedString(@"Here's a picture...",
            @"Here's a picture...")];
        [mailComposer addAttachmentData:UIImagePNGRepresentation(image)
            mimeType:@"image/png" fileName:@"image"];
        [mailComposer setMessageBody:NSLocalizedString(
            @"Here's a picture that I took with my iPhone.",
            @"Here's a picture that I took with my iPhone.") isHTML:NO];
        [self presentModalViewController:mailComposer animated:YES];
        [mailComposer release];
    }
    else
        message.text = NSLocalizedString(@"Can't send e-mail...",
            @"Can't send e-mail...");
}
- (void)viewDidUnload {
self.message = nil;
}
- (void)dealloc {
[message release];
[super dealloc];
}
#pragma mark -
#pragma mark Camera Picker Delegate Methods
- (void)imagePickerController:(UIImagePickerController *)picker
didFinishPickingMediaWithInfo:(NSDictionary *)info {
[picker dismissModalViewControllerAnimated:YES];
UIImage *image = [info objectForKey:
UIImagePickerControllerEditedImage];
[self performSelector:@selector(mailImage:)
withObject:image
afterDelay:0.5];
message.text = @"";
}
- (void)imagePickerControllerDidCancel:(UIImagePickerController *)picker {
[picker dismissModalViewControllerAnimated:YES];
message.text = NSLocalizedString(@"Cancelled...", @"Cancelled...");
}
#pragma mark -
#pragma mark Mail Compose Delegate Methods
- (void)mailComposeController:(MFMailComposeViewController*)controller
didFinishWithResult:(MFMailComposeResult)result
error:(NSError*)error {
switch (result)
{
case MFMailComposeResultCancelled:
message.text = NSLocalizedString(@"Canceled...", @"Canceled...");
break;
case MFMailComposeResultSaved:
message.text = NSLocalizedString(@"Saved to send later...",
@"Saved to send later...");
break;
case MFMailComposeResultSent:
message.text = NSLocalizedString(@"Mail sent...", @"Mail sent...");
break;
case MFMailComposeResultFailed: {
UIAlertView *alert = [[UIAlertView alloc] initWithTitle:
NSLocalizedString(@"Error sending mail...",
@"Error sending mail...")
message:[error localizedDescription]
delegate:nil
cancelButtonTitle:NSLocalizedString(@"Bummer", @"Bummer")
otherButtonTitles:nil];
[alert show];
[alert release];
message.text = NSLocalizedString(@"Send failed...", @"Send failed...");
break;
}default:
break;
}
[self dismissModalViewControllerAnimated:YES];
}
@endThe first method in our implementation file is the action method that's triggered when the user taps the Go button. We first need to determine which image picker source type to use (camera or photo library) by finding out if the device we're running on has a camera. If it does, we set sourceType to UIImagePickerControllerSourceTypeCamera. Otherwise, we use UIImagePickerControllerSourceTypePhotoLibrary, which will let the user pick an existing photo from their photo library.
- (IBAction)selectAndMailPic {
    UIImagePickerControllerSourceType sourceType =
        UIImagePickerControllerSourceTypeCamera;
    if (![UIImagePickerController isSourceTypeAvailable:
          UIImagePickerControllerSourceTypeCamera]) {
        sourceType = UIImagePickerControllerSourceTypePhotoLibrary;
    }
Then we create the image picker, configure it, and present it to the user.
UIImagePickerController *picker =
    [[UIImagePickerController alloc] init];
    picker.delegate = self;
    picker.allowsEditing = YES;
    picker.sourceType = sourceType;
    [self presentModalViewController:picker animated:YES];
    [picker release];
}
The next method gets called after the user has selected an image and the image picker view has been dismissed. In it, we first check to make sure that the device we're on can actually send mail. Currently, all iPhone OS devices are capable of sending mail, but that may not always be the case, so we make sure this device supports e-mail before launching the mail compose view.
- (void)mailImage:(UIImage *)image {
    if ([MFMailComposeViewController canSendMail]) {
Then we create an instance of MFMailComposeViewController and set its delegate to self.
MFMailComposeViewController *mailComposer =
            [[MFMailComposeViewController alloc] init];
        mailComposer.mailComposeDelegate = self;
We prepopulate the subject field with Here's a picture. Our user will be able to change this value, but they won't have to.
[mailComposer setSubject:NSLocalizedString(@"Here's a picture...",
            @"Here's a picture...")];
Next, we use a function called UIImagePNGRepresentation() that returns an NSData with a PNG representation of a UIImage instance and pass in the image that the user took or selected. We also set the mime type to the appropriate type for a PNG image, and give the image file a generic name of image, since we don't have access to the name the camera assigned.
[mailComposer addAttachmentData:UIImagePNGRepresentation(image)
            mimeType:@"image/png" fileName:@"image"];
We also set the body of the mail to a short message.
[mailComposer setMessageBody:NSLocalizedString(
            @"Here's a picture that I took with my iPhone.",
            @"Here's a picture that I took with my iPhone.") isHTML:NO];
And finally, we present the mail compose view modally and clean up our memory.
[self presentModalViewController:mailComposer animated:YES];
        [mailComposer release];
}
If the device we're running on can't send e-mail, we just notify the user by setting the text field's label.
else
        message.text = NSLocalizedString(@"Can't send e-mail...",
            @"Can't send e-mail...");
}
There's no point in discussing viewDidUnload or dealloc, as they are both standard implementations, so the next method to look at is the camera picker delegate methods. The next method gets called when the user selects a picture. In it, we dismiss the image picker, grab the selected image out of the info dictionary, retaining it so it won't get autoreleased before we're done with it. Then we use performSelector:withObject:afterDelay: to call the mailImage: method half-a-second in the future, which will cause it to run right after the image picker is finished dismissing. Why the delay? We cannot put up a modal view until after our previous modal view has finished being dismissed. Because the first modal view animates out, we tell the run loop to wait half-a-second (that's the default animation timing) to make sure our second view doesn't step on the first.
- (void)imagePickerController:(UIImagePickerController
*)picker
        didFinishPickingMediaWithInfo:(NSDictionary
*)info {
    [picker dismissModalViewControllerAnimated:YES];
    UIImage *image = [info objectForKey:
        UIImagePickerControllerEditedImage];
    [self performSelector:@selector(mailImage:)
               withObject:image
               afterDelay:0.5];
    message.text = @"";
}
Note
In Beginning iPhone 3 Development, we implemented a different delegate method called imagePickerController:didFinishPickingImage:editingInfo:. That method has been deprecated in favor of the newer method imagePickerController:didFinish PickingMediaWithInfo: that we've used here. They both serve the same exact function, but the newer method is capable of returning video in addition to still images, at least on phones that support video. For the foreseeable future, imagePickerController:didFinish PickingImage:editingInfo: will continue to work, but you should use imagePicker Controller:didFinishPickingMediaWithInfo: for all new development.
If the user chose not to take a picture or select an image, we just dismiss the image picker view and set the label to identify the fact that they cancelled.
- (void)imagePickerControllerDidCancel:(UIImagePickerController *)picker {
    [picker dismissModalViewControllerAnimated:YES];
    message.text = NSLocalizedString(@"Cancelled...", @"Cancelled...");
}
Finally, the pièce de résistance, the mail compose view controller delegate method. In it, we check the result code and update the label to inform the user whether their mail was sent or saved or if the user cancelled. If an error was encountered, we show an alert view with the description of the error that was encountered.
- (void)mailComposeController:(MFMailComposeViewController*)controller
          didFinishWithResult:(MFMailComposeResult)result
                        error:(NSError*)error {
    switch (result)
    {
        case MFMailComposeResultCancelled:
            message.text = NSLocalizedString(@"Canceled...",@"Canceled...");
            break;
        case MFMailComposeResultSaved:
            message.text = NSLocalizedString(@"Saved to send later...",
                @"Saved to send later...");
            break;
        case MFMailComposeResultSent:
            message.text = NSLocalizedString(@"Mail sent...", @"Mail sent...");
            break;
        case MFMailComposeResultFailed: {
            UIAlertView *alert = [[UIAlertView alloc] initWithTitle:
                NSLocalizedString(@"Error sending mail...",@"Error sending mail...")
                message:[error localizedDescription]
                delegate:nil
                cancelButtonTitle:NSLocalizedString(@"Bummer", @"Bummer")
                otherButtonTitles:nil];
            [alert show];
            [alert release];
            message.text = NSLocalizedString(@"Send failed...", @"Send failed...");
            break;
        }
        default:
            break;
    }
[self dismissModalViewControllerAnimated:YES]; } @end
And that's all there is to that. There's just one more step before we can build and run it.
In the course of this chapter, you've seen how to use the MessageUI framework's in-application e-mail services. You've seen how to prepopulate the message compose view with recipients, a subject, a body, and even attachments. You should now be equipped to add e-mail to any of your applications. When you're ready to move on, turn the page and we'll learn the art of iPod Fu.