
C H A P T E R 16
![]()
Advanced Theming
One of the best things about Drupal's theme layer is the sheer amount of flexibility it provides. In the previous chapter you learned the basics of creating a theme: working with .info files, template files, and theme functions. When implementing more custom themes, sometimes these tools alone are not enough and you need to dig deeper. This is the point where the line between front-end developer and back-end developer gets a little blurry, but stay with us.
By the time you finish reading this chapter you'll know how to work with variables in preprocess functions, customize forms, and use the new render API. I'll also cover the ins and outs of working with CSS files and the basics of subtheming, and leave you with basics rules for creating sustainable Drupal themes. You'll be transformed into a theming ninja in no time.
Finding Available Variables in the Theme Layer
When working in the theme layer, you'll find that the variables are different depending on the type of entity with which you are working. You'll also find that the various templates and theme functions don't use or document all of the variables that are available, so one of the things you'll often need to do is print the contents of arrays to the screen.
There are various ways to print arrays using PHP. One of the most common ways is to use the print_r() function. There's also var_dump(), get_defined_vars() and Drupal's own debug(). These functions are great for small arrays, but Drupal's arrays are known for being tremendous, thus using these functions while coding the front end of a site is annoying, to say the least. Luckily, thanks to the Devel module (http://drupal.org/project/devel) and the Krumo library, printing compact and easily readable arrays is a piece of cake. Upon installing the Devel module, you'll have access to functions like dpm() and kpr() among others.
When working with templates and preprocess functions, you'll usually print $variables using dsm() or dsm(). As an example, try adding <?php dpm($variables); ?> to the top of your node.tpl.php file.

Figure 16–1. The result of printing <?php dpm($variables); ?> in node.tpl.php
In Figure 16–1, you see the result of printing the contents of the $variables array using the dpm() function. What's nice about using dpm() is that the array is neatly printed using the $messages variable in page.tpl.php, which is where system status messages are located. As shown in Figure 16–2, you can click the heading and expand the contents of each part one by one.
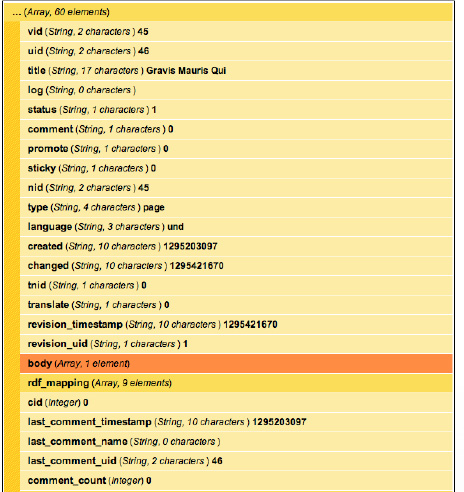
Figure 16–2. An expanded array printed using the dpm() function
When working inside template files, these variables are made available as top-level variables. This is done as a convenience for theme developers. For example, instead of printing $variables['status'], just print $status in templates. When working inside functions, such as theme functions or preprocess functions, use $variables['status'].
Using the Theme Developer Module
Of course, when you're first starting out with Drupal, you'll need to get an idea of where the code is located and what you need to override in the first place. The Theme Developer module (http://drupal.org/project/devel_themer) is the perfect tool to help you figure this out. Once enabled, a checkbox will appear in the bottom right corner of the page. When clicked, a semi-transparent, resizable, and draggable window appears in the top right corner of the page. You can then move it around and click on any element of the page and the window will populate with all the information you need to know—and more (see Figure 16–3).
For example, when clicking a node, the following information is made available in the window:
- The parent functions and templates that affect the element
- The template or theme hook suggestions (candidates)
- The preprocess and process functions being used
- A printout of the variables available
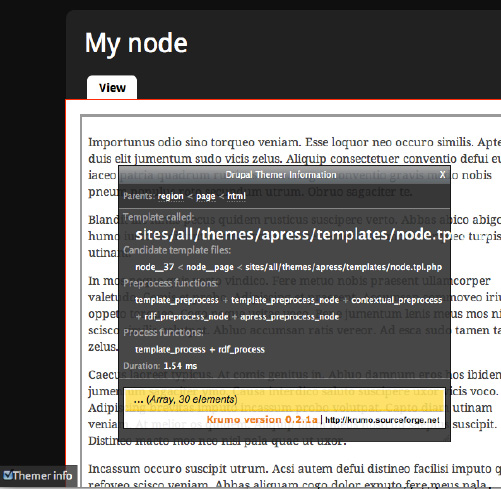
Figure 16–3. The Theme Developer window shows theme-related information about the element that was clicked (a node in this case).
Preprocess and Process Functions
Preprocess functions are a theme developer's best friend. There are so many use cases where preprocess functions can make your life easier, your code more efficient, and your template files clean and crisp. If you haven't used them before, either because you think you don't need them or are afraid of delving too deep into PHP, you are truly missing out. We hope to change that.
By now you are familiar with the general purpose of template files, which is mainly to provide markup and print variables. But what if you'd like to change those variables or add your own? Your first inclination might be to create a template file and do everything there, but that is often the wrong way to go.
Preprocess functions were designed for this exact purpose. When implementing a preprocess or process function you are basically telling Drupal, “Hey, wait! I have some changes to make to this data before you send it off for rendering.” It's sort of like an editor getting a final review of an article before it's allowed to be published. By definition, “preprocess” is a phase of processing that happens before templates are rendered. “Process” functions, which are new in Drupal 7, serve the same purpose, with the only difference being that they run later (after preprocess) in the processing cycle.
A good example of how Drupal uses preprocess and process functions is the $classes_array and $classes variables. In template_preprocess() in Listing 16–1, which is the default implementation of preprocess by Drupal and the first preprocess function called, the $classes_array variable is initialized; see http://api.drupal.org/api/function/template_preprocess/7.
Listing 16–1. Excerpt from template_preprocess() Where $classes_array Is Defined
<?php

function template_preprocess(&$variables, $hook) {

  // Initialize html class attribute for the current hook.

  $variables['classes_array'] = array(drupal_html_class($hook));

}

?>
This first step provides a class indicating the hook that's being used. For example, if this preprocess function is being called for a node, this code will add the class node to this array. After this function runs, all modules and themes also have a chance to run it themselves and add or change any of the variables. Next up is the Node module, which implements template_preprocess_node(); seehttp://api.drupal.org/api/function/template_preprocess_node/7. As you can see in Listing 16–2, quite a few classes are added to this array.
Listing 16–2. Excerpt from template_preprocess_node() Where Additional Classes Are Added to the $classes_array Variable
<?php

function template_preprocess_node(&$variables) {

  // Gather node classes.

  $variables['classes_array'][] = drupal_html_class('node-' . $node->type);

  if ($variables['promote']) {

    $variables['classes_array'][] = 'node-promoted';

  }

  if ($variables['sticky']) {

    $variables['classes_array'][] = 'node-sticky';

  }

  if (!$variables['status']) {

    $variables['classes_array'][] = 'node-unpublished';

  }

  if ($variables['teaser']) {

    $variables['classes_array'][] = 'node-teaser';

  }

  if (isset($variables['preview'])) {

    $variables['classes_array'][] = 'node-preview';

  }

}

?>
Once again, after template_preprocess_node() runs, all modules and themes have a chance to implement their own version, making any changes or additions they want. Once all the preprocess functions have completed, the process functions have their chance. In Drupal core, there are only two process implementations for nodes: template_process(), the default implementation, and rdf_process(), an implementation by the RDF module.
In template_process(), after all the modules and themes have had a chance to modify it, a new variable called $classes is created. It contains a string version all of the classes provided in $classes_array. The $classes variable is printed in the class attribute of the wrapper <div> in the node.tpl.php template file. This is shown in Listing 16–3.
Listing 16–3. Excerpt from template_process() Where $classes Is Created from the $classes_array Variable
<?php

function template_process(&$variables, $hook) {

  // Flatten out classes.

  $variables['classes'] = implode(' ', $variables['classes_array']);

}

?>
Listings 16–1 through 16–3 illustrate some of the flexibility and power that Drupal provides with preprocess and process functions as well as the order in which these functions occur. The most important thing to understand is that in the theme layer, you've got the last call on all of these variables. You can easily add, modify, and remove any variables you please by simply implementing preprocess and process functions in your theme; this will be covered in more detail in the following pages.
The big advantage of using preprocess functions is that they allow you to keep most of the logic outside of your template files. This allows for cleaner and easier to understand template files plus more efficient themes that are easier to maintain, manage, and extend over time. There are many changes you can make, such as affecting classes and modifying existing variables, that don't require any changes to template files at all—just a few simple lines of code.
Implementing Preprocess and Process Hooks
Preprocess functions are implemented by creating a function that is named in a certain way. Listing 16–4 shows an example of this naming convention.
Listing16–4. Naming Convention for Preprocess and Process Hooks
<?php

/**

 * Implements template_preprocess_THEMEHOOK().

 */

function HOOK_preprocess_THEMEHOOK(&$variables) {

   // Changes go here.

}


/**

 * Implements template_process_THEMEHOOK().

 */

function HOOK_process_THEMEHOOK(&$variables) {

   // Changes go here.

}
There are four points to consider in naming these functions:
- The hook of a default implementation, usually created by a module, is “template.” In all other implementations, the hook is replaced by the system name of the module or theme implementing it.
- Which stage of the process do you want to affect? There are two options: the preprocess, which runs first, or process, which runs after all of the preprocess functions have been executed.
- The theme hook matches the theme hook as defined in
hook_theme(), which is ultimately output using either a theme function or a template file. - The
&$variablesparameter contains data needed by the theme function or template file rendering it. Since preprocess functions run before templates are rendered, you can make all sorts of changes and additions to its contents.
![]() Caution By default, only theme hooks that have been explicitly defined in
Caution By default, only theme hooks that have been explicitly defined in hook_theme() are able to use preprocess hooks. For example, hook_preprocess_node() is perfectly fine, but hook_preprocess_node__article() will not work. This is because node__article is a theme hook suggestion, which is a variation of a theme hook but is not actually a real theme hook.
Default Implementations
Listing 16–5 illustrates what a preprocess implementation for a default theme hook looks like, using template_preprocess_node(), which creates variables for the node.tpl.php template file as an example. This function resides in node.module along with a hook_theme() implementation, node_theme(), where it defines “node” as a theme hook.
Listing 16–5. Naming Convention for Default Implementations of Preprocess and Process Hooks
<?php

function template_preprocess_node(&$variables) {

   // Changes go here.

   // See http://api.drupal.org/api/function/template_preprocess_node/7 for contents.

}


function template_process_node(&$variables) {

   // Changes go here.

   // See http://api.drupal.org/api/function/template_process_node/7 for contents.

}
![]() Tip Browsing
Tip Browsing http://api.drupal.org and looking through the default implementations is a great way to learn how the variables were created.
Theme and Module Implementations
Both modules and themes are able to use preprocess functions in the same way, and a given theme hook can have many preprocess implementations, originating from both modules and themes. This introduces the opportunity for conflicts to occur, so keeping that in mind and knowing the order in which these functions run is important. Preprocess implementations from modules run first, and implementations by themes run last. When dealing with base and subthemes, the base theme will run first and the subtheme will run last. A good way to remember this is that the active theme always wins.
Preprocess functions implemented by Drupal core and modules reside in various files, such as modulename.module or theme.inc, and many others, while preprocess functions implemented by themes always reside in template.php.
As an example, implement a preprocess function for a theme called “dgd7” for the node theme hook. As shown in Listing 16–6, you simply place a function in template.php beginning with the theme name (the implementing hook), followed by _preprocess_ and the theme hook, which in this case is “node.” Finally, you pass in the &$variables parameter by reference (the & before the $ indicates a variable being passed by reference).
Listing 16–6. Implementation of template_preprocess_node() in a Theme
<?php

/**

 * Implements template_process_node().

 */

function dgd7_preprocess_node(&$variables) {

  // Changes go here.

}
The code in Listing 16–6 is all that's needed, along with a quick cache clear, for Drupal to pick up your preprocess function and run it before rendering a node. Now the fun can begin!
Finding the Contents of $variables
The contents of the $variables array are different for each theme hook; even the contents of the same theme hook vary based on other factors, such as the view mode or user role.
The first thing to do after creating the function is to print the array and find out what's inside for you to work with. As explained in the “Finding Available Variables in the Theme Layer” section, using the dpm() function is a great way to do this, as shown in Listing 16–7.
Listing 16–7. Printing Variables to the Screen for Debugging Purposes
<?php

/**

 * Implements template_preprocess_node().

 */

function dgd7_preprocess_node(&$variables) {

  dpm($variables);

}
![]() Caution Debugging functions should only be used temporarily during development.
Caution Debugging functions should only be used temporarily during development.
Preprocess Functions in Action
There are so many things you can change using preprocess functions that we can't possibly get into all of them. Now that you've got your preprocess function all set up and are aware of how to view existing variables, you are equipped with enough knowledge to start making some changes. Let's just jump right in and get started with a few practical examples of how to use preprocess functions.
Add Classes to Template Wrappers
In the DGD7 theme at http://definitivedrupal.org, the header, sidebar, and footer areas are black and the content area is white. In order to style the contents of each of those sections more easily, you can add a couple of helper classes to the region wrapper. To do this, you'll need to implement a preprocess function for the region theme hook in your template.php file; see Listing 16–8.
Listing 16–8. Adding Classes to Region Wrapper <div> Using the $classes_array Variable in template_preprocess_region()
<?php

/**

 * Implements template_preprocess_region().

 */

function dgd7_preprocess_region(&$variables) {

  $region = $variables['region'];

  // Sidebars and content area need a good class to style against. You should

  // not be using id's like #main or #main-wrapper to style contents.

  if (in_array($region, array('sidebar_first', 'sidebar_second', 'content'))) {

    $variables['classes_array'][] = 'main';

  }

  // Add a "clearfix" class to certain regions to clear floated elements inside them.

  if (in_array($region, array('footer', 'help', 'highlight'))) {

    $variables['classes_array'][] = 'clearfix';

  }

  // Add an "outer" class to the darker regions.

  if (in_array($region, array('header', 'footer', 'sidebar_first', 'sidebar_second'))) {

    $variables['classes_array'][] = 'outer';

  }

}
$variables['classes_array'] turns into $class in the process phase, and the class(es) added during preprocess are automatically modified as a result. So, just like that you've added a class to a region wrapper <div>.
The alternative in template files is lengthier. Adding logic to each affected template file would be required, which means you'd need to override the file, even if you didn't need to change the markup. If you have multiple template files for regions, the change would have to be made manually across all of them, which is clearly less efficient as you can see in Listing 16–9.
Listing 16–9. Adding Classes in Preprocess Functions Can Dramatically Increase the Efficiency of Your CSS Code.
/* Using classes and ID's provided by default. */

#header fieldset,

#footer fieldset,
.sidebar fieldset {

  border-color: #333

}


/* Using the class added in Listing 16–8, which is more efficient. */

.outer fieldset {

  border-color: #333;

}
![]() Tip This example changes classes for the region template, but this technique can be applied to any of the major templates, including
Tip This example changes classes for the region template, but this technique can be applied to any of the major templates, including html.tpl.php, block.tpl.php, node.tpl.php and comment.tpl.php in their respective preprocess functions.
Making Changes to Nodes
Listing 16–10 demonstrates making three changes:
- Drupal's page title prints in
page.tpl.php. When a node title prints inside of thenode.tpl.phpfile, it's usually because it's being viewed in teaser mode, and therefore, the node title is marked up with an<h2>by default. Usually, the content inside the node body also contains one or more<h2>tags. Adding a class to single out the node title can make styling easier. Listing 16–10 utilizes the$title_attributes_arrayto add anode-titleclass to help make styling easier. - When viewing a node that has a comment form directly under the node links, it doesn't make much sense to have an “Add new comment” link as well. In Listing 16–10, the comment links are hidden when the comment form is below it by using the
hide()function, which will be covered in more detail later in this chapter. - Designs often call for differences when viewing the teaser of a node versus the full page. Listing 16–10 demonstrates using
$variables['teaser']to suppress the$submittedinformation and truncate the node title to 70 characters when viewing in teaser mode.
Listing 16–10. Demonstrates Making Changes to the Display of Node Content During Preprocess
<?php

/**

 * Implements template_preprocess_node().

 */

function dgd7_preprocess_node(&$variables) {

  // Give the <h2> containing the teaser node title a better class.

  $variables['title_attributes_array']['class'][] = 'node-title';


// Remove the "Add new comment" link when the form is below it.

  if (!empty($variables['content']['comments']['comment_form'])) {

    hide($variables['content']['links']['comment']);

  }
  // Make some changes when in teaser mode.

  if ($variables['teaser']) {

    // Don't display author or date information.

    $variables['display_submitted'] = FALSE;

    // Trim the node title and append an ellipsis.

    $variables['title'] = truncate_utf8($variables['title'], 70, TRUE, TRUE);

  }

}
Add a Change Picture Link Underneath the User Photo
As you've probably noticed by now, there are many variables available to you within the $variables array. These variables can be used to create new variables very easily. You know the path to edit a user profile is user/UID/edit, so you can use the information inside of $variables to determine whether or not the user viewing the page is the account holder. Once you've determined this, you can easily create a variable containing a link for the user to edit the photo everywhere it appears on the site by implementing template_preprocess_user_picture(), as shown in Listing 16–11. Once you do this, you'll be able to print it in the corresponding template, user-picture.tpl.php, as shown in Listing 16–12.
Listing 16–11. Creating a Custom Variable for the user-picture.tpl.php by Implementing template_preprocess_user_picture().
<?php

/**

 * Implements template_preprocess_user_picture().

 * - Add "change picture" link to be placed underneath the user image.

 */

function dgd7_preprocess_user_picture(&$vars) {

  // Create a variable with an empty string to prevent PHP notices when

  // attempting to print the variable

  $vars['edit_picture'] = '';

  // The account object contains the information of the user whose photo is

  // being processed. Compare that to the user id of the user object which

  // represents the currently logged in user.

  if ($vars['account']->uid == $vars['user']->uid) {

    // Create a variable containing a link to the user profile, with a class

    // "change-user-picture" to style against with CSS.

    $vars['edit_picture'] = l('Change picture', 'user/' . $vars['account']->uid . '/edit',

array(

      'fragment' => 'edit-picture',

      'attributes' => array('class' => array('change-user-picture')),

      )

    );

  }

}
Listing 16–12. Printing Your Custom Variable Into the user-picture.tpl.php File, Which You've Copied Into Your Theme to Override
<?php if ($user_picture): ?>

  <div class="user-picture">

    <?php print $user_picture; ?>


    <?php print $edit_picture; ?>


  </div>

<?php endif; ?>
Using the Render API
What Is a Render Array?
Many of the variables in template files are straightforward, but you'll notice that some of the variables are printed along with a function called render(). Render arrays are structured arrays that contain nested data and other information needed by Drupal to turn them into HTML using Drupal's Render API. Variables that are render arrays are generally easy to spot in template files because they are printed using a function called render().
In page.tpl.php, you'll notice that all of the regions are printed using the render() function. Each region is an element (another array) nested inside the $page array. The code in Listing 16–13 is all that's needed to render each region. Each render() call returns fully formatted HTML for all the contents of the render array.
Listing 16–13. Printing Regions in page.tpl.php Using the render() Function
<?php print render($page['sidebar_first']); ?>
In prior versions of Drupal, you would just include <?php print $sidebar_first; ?>, which contained a fully formatted HTML string ready for printing. This worked, of course, but it wasn't very flexible. Let's face it; there are only so many things you can do with a big glob of HTML markup at that stage.
In Drupal 7, these variables are sent to templates as nicely structured arrays. Instead of a glob of HTML markup, you get an array containing all sorts of information about the content inside it, down to attributes of specific links deep inside of it. This makes it incredibly easy to target specific content of the arrays and make any sort of changes you want to it at the last possible minute before it's rendered in the first place.
To find out what's inside this array, use the dpm() function provided with the Devel module to print it inside of page.tpl.php: <?php dpm($page['sidebar_first']); ?>. As you can see in Figure 16–4, there are two top-level render elements inside this array, the Search form block and the Navigation block, which are currently printing in the first sidebar.

Figure 16–4. Contents of the $page['sidebar_first'] render array printed from page.tpl.php using dpm()
Identifying Render Elements
An easy way to identify arrays as render elements is the presence of properties. Render elements are always arrays, and they always contain properties that always begin with a hash tag. In Figure 16–4, you can immediately tell that $page['sidebar_first'] is a render element because it contains a few properties: #sorted, #theme_wrappers, and #region. These properties are used by drupal_render() which is called when using drupal_render() to determine how to render the output. For details about drupal_render() see http://api.drupal.org/api/function/render/7.
As themers, you won't be getting deep into the more developer-centric properties, but there are a few that will be helpful for you to make sense of out what these arrays mean. These are described in Table 16–1.
Table 16– 1. Helpful Render Element Properties
| Property | Description |
#theme |
Specifies the theme hook, which can be either a function or a template to use when rendering the element. |
#theme_wrappers |
An array containing theme hook(s) to be used to wrap the rendered children of the element. For example, when theming a block, the #theme property would be block and the #theme_wrappers property would contain region. This ensures that after the block(s) are rendered, the children would be run through the region template as well. |
#type |
The type of element that will be rendered. The default properties for element types are defined in hook_element_info() implementations. |
#prefix & #suffix |
A string containing markup to be placed before (prefix) or after (suffix) the rendered element. |
#weight |
A number that is used to sort the elements to determine the order in which they will print. |
#sorted |
A Boolean (TRUE or FALSE) that indicates whether or not the children have been sorted. For example, this is used in conjunction with the #weight property to sort the blocks in a region. When reordering blocks in a theme via hook_page_alter(), you'll need to specify #sorted => FALSE in addition to the #weight to trigger a new sort when you need to move a block to any other position than below the already sorted elements. |
#attached |
The #attached property is used to specify corresponding CSS, JavaScript, or libraries to load when the element is rendered. |
See the documentation at http://api.drupal.org/api/function/drupal_render/7 for more information.
Manipulating the Output of Render Elements
As mentioned, having a structured array to work with is far more flexible than a bunch of HTML. This allows you to make only the changes you want to make with ease, whether big or small, without having to re-write code from scratch.
The prospect of using render arrays to generate markup and using alter hooks in general are completely new concepts to Drupal theme developers. It's very different than what you are used to, in a good way, but it takes some getting used to. In a lot of ways it's easier than creating templates and theme functions for one-off implementations. The biggest issues front-end developers face when using the Render API are:
- Thinking about generating markup differently.
- Figuring out how to modify the content of a render array.
- Getting comfortable with implementing alter hooks.
Unlike theme hooks, render arrays are modified using alter hooks, not preprocess functions and templates. This can be confusing at first because render arrays are similar to theme hooks in that their purpose is to ultimately generate HTML markup, and they use templates and theme functions to do so. With render arrays, the #theme property, which allows you to define which theme function or template should be used to render the element, is just one of many properties used and can be changed at any time. In general, you'll use templates and theme functions to modify the markup itself, and you'll use alter hooks to modify contents, structure, or placement of the elements before it's rendered.
The following sections contain a few examples of things you can do with render arrays.
Generate New Content on the Fly
Generating new content is as simple as adding a new element to the page array. Listing 16–14 shows the addition of a new element called “new_stuff” to the pre-existing Highlighted region by implementing hook_page_alter() in a theme's template.php.
Listing 16–14. Adding a New Element to the Highlighted Region
<?php

/**

* Implements hook_page_alter().

*/

function mytheme_page_alter(&$page) {

  $page['highlighted']['new_stuff'] = array(

    '#type' => 'container',

    '#attributes' => array('class' => 'my-container'),

  );

  $page['highlighted']['new_stuff']['heading'] = array(

    '#type' => 'html_tag',

    '#tag' => 'h2',

    '#value' => t('Heading'),

    '#attributes' => array('id' => 'my-heading'),

  );

  $page['highlighted']['new_stuff']['list'] = array(

    '#theme' => 'item_list',

    '#items' => array(

      'First item',

      'Second item',

      'Third item',

    ),

  );

}
The first thing you did was name your new element “new_stuff,” gave it a #type of container, and defined a class attribute of my-container. Note that container is an element, defined in system_element_info(), which uses the theme_container() theme function as a theme wrapper by default. This means the children of your element (heading and list) will be run through theme_container(). The resulting markup is shown in Listing 16–15.
Listing16–15. The Output Generated for $page['highlighted']['new_stuff'] by theme_container()
<div class="my-container">

  ...

</div>
Then you added a subelement called “heading” and specified the #type element property as html_tag. This will cause the element to use theme_html_tag() when rendering. You also specified #tag, #value, and #attributes properties. These are parameters of the theme_html_tag() function as you can see at http://api.drupal.org/api/function/theme_html_tag/7. The resulting markup is shown in Listing 16–16.
Listing 16–16. The Output Generated for $page['highlighted']['new_stuff']['heading'] by theme_html_tag()
<h2 id="my-heading">Heading</h2>
Finally, you added a subelement called “list.” Here you specified item_list as the #theme property and included an array containing your #items, which is a required parameter for theme_item_list(). The resulting markup is shown in Listing 16–17.
Listing 16–17. The Output Generated for $page['highlighted']['new_stuff']['list'] by theme_item_list()
<div class="item-list">

  <ul>

    <li class="first">First item</li>

    <li>Second item</li>

    <li class="last">Third item</li>

  </ul>

</div>
When the Highlighted region is rendered, the code in Listing 16–14 produces the final result shown in Listing 16–18.
Listing 16–18. The Final Rendered Result of Listing 16–14
<div class="my-container">

  <h2 id="my-heading">Heading</h2>

  <div class="item-list">

    <ul>

      <li class="first">First item</li>

      <li>Second item</li>

      <li class="last">Third item</li>

    </ul>

  </div>

</div>
![]() Caution The previous examples are meant to illustrate how the Render API works to generate content. However, it's worth noting that it should not be abused to output every piece of HTML on a page as separate elements because there can be serious performance implications. Using the
Caution The previous examples are meant to illustrate how the Render API works to generate content. However, it's worth noting that it should not be abused to output every piece of HTML on a page as separate elements because there can be serious performance implications. Using the markup #type is preferred for small bits of markup, such as headings, instead of html_tag, as it requires the theme_html_tag() theme function to determine the output.
Move Content from One Region to Another
Inside a hook_page_alter() implementation, you can move the content of regions around at will. Listing 16–19 contains a few simple lines of code that move the contents of the entire first sidebar to the second sidebar, which results in the layout changing from a left sidebar layout to a right sidebar layout on full node pages. In Listing 16–19, you've also moved the breadcrumbs to the bottom of the footer region.
Listing 16–19. Relocating the sidebar_first Region to sidebar_second and Adding Breadcrumbs to a New Element in the Footer Region
<?php

/**

* Implements hook_page_alter().

*/

function dgd7_page_alter(&$page) {

  // Check that you are viewing a full page node.

  if (node_is_page(menu_get_object())) {

    // Assign the contents of sidebar_first to sidebar_second.

    $page['sidebar_second'] = $page['sidebar_first'];

    // Unset sidebar_first.

    unset($page['sidebar_first']);

  }


  // Add the breadcrumbs to the bottom of the footer region.

$page['footer']['breadcrumbs'] = array(

    '#type' => 'container',

    '#attributes' => array('class' => array('breadcrumb-wrapper', 'clearfix')),

    '#weight' => 10,

  );

  $page['footer']['breadcrumbs']['breadcrumb'] = array(

    '#theme' => 'breadcrumb',

    '#breadcrumb' => drupal_get_breadcrumb(),

  );

  // Trigger the contents of the region to be re-sorted.

  $page['footer']['#sorted'] = FALSE;

}
Altering Content Inside a Render Array
Altering the contents of a render array to change bits and pieces of the actual content is where you get into a very gray area. It could be argued that a change like this belongs inside a module. When making changes like this, it's important to ask yourself whether or not the changes you are making should still apply when the theme you are developing is not active. Listing 16–20 changes the View and Edit tabs to read Profile and Edit profile on user profile pages.
Listing16–20. Implements hook_menu_local_tasks_alter() to Change Tab Names on User Profile Pages
<?php

/**

* Implements hook_menu_local_tasks_alter().

*/

function dgd7_menu_local_tasks_alter(&$data, $router_item, $root_path) {

  if ($root_path == 'user/%') {

    // Change the first tab title from 'View' to 'Profile'.

    if ($data['tabs'][0]['output'][0]['#link']['title'] == t('View')) {

      $data['tabs'][0]['output'][0]['#link']['title'] = t('Profile'),

    }

    // Change the second tab title from 'Edit' to 'Edit profile'.

    if ($data['tabs'][0]['output'][1]['#link']['title'] == t('Edit')) {

      $data['tabs'][0]['output'][1]['#link']['title'] = t('Edit profile'),

    }

  }

}
Notable Render Arrays in Core Templates
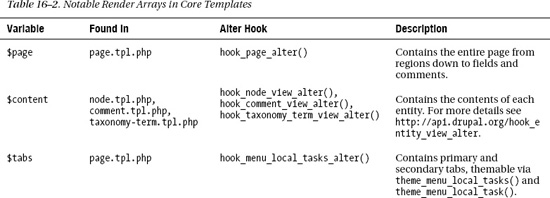
There are quite a few render array variables scattered across core templates that are worth noting. hook_page_alter() contains the entire page so it can always be used to alter anything. However, finding that particular anything is not always trivial as other modules can move stuff around, so using more specific alters is advised. Table 16–2 is a quick reference of notable render arrays. This is by no means a full list, but it covers quite a bit and should give you an idea of how to begin figuring out where to look to edit these things.

Introducing render(), hide(), and show()
One of the best new theming features of Drupal 7 is the ability to selectively render bits of content in templates. As detailed in the previous sections, the content of some variables (render arrays) is sent to templates as structured arrays instead of chunks of HTML. This is really awesome news for the theme layer.
To understand just how awesome this is, you need to look into the past. In prior versions of Drupal, theming complex nodes with fields wasn't the easiest task. Fields were lumped into the $content variable, and while they could be printed and manipulated individually, there were issues. You had to be very careful to properly sanitize variables, and once you decided to break up the content variable, you needed to rebuild it entirely. This was not future-proof, as the addition of new fields would often require going back to the template file and printing the new field.
In Drupal 7, those problems have been solved quite gracefully. You now have the ability to very easily render individual pieces of content, such as fields, with three new functions called render(), hide(), and show(). They can be used inside theme functions and templates files as well as preprocess and process functions. All three of these functions take a single argument, which is the element (or child) you wish to target.
- hide(): Hides a render element or part of a render element by tricking
drupal_render()into thinking it has already been printed. Example usage:<?php hide($element['something']); ?> - show(): Does the opposite of
hide(). It can be useful to revert a previously appliedhide()status. Example usage:<?php show($element['something']); ?> - render(): Converts a render array to HTML markup. It returns HTML, so it should be used along with
printin templates. Example usage:<?php print render($element); ?>
To illustrate these functions in action, look at node.tpl.php (see Listing 16–21).
Listing 16–21. Excerpt from the Default node.tpl.php Template
<div id="node-<?php print $node->nid; ?>" class="<?php print $classes; ?> clearfix"<?php print

$attributes; ?>>

  <?php print $user_picture; ?>

  <?php print render($title_prefix); ?>

  <?php if (!$page): ?>

    <h2<?php print $title_attributes; ?>><a href="<?php print $node_url; ?>"><?php print $title; ?></a></h2>

  <?php endif; ?>

  <?php print render($title_suffix); ?>

  <?php if ($display_submitted): ?>

    <div class="submitted">

      <?php print $submitted; ?>

    </div>

  <?php endif; ?>

  <div class="content"<?php print $content_attributes; ?>>

    <?php

      // Hide the comments and links now. so they can be rendered later.

      hide($content['comments']);

      hide($content['links']);

      print render($content);

    ?>

  </div>

  <?php print render($content['links']); ?>

  <?php print render($content['comments']); ?>

</div>
As you can see in Listing 16–21, this template is already making use of both render() and hide() functions out of the box. There are three render arrays in this node template: $title_prefix, $title_suffix, and $content. Inside the <div class="content"> wrapper, both $content['links'] and $content['comments'] are hidden using hide(), and then $content is rendered directly underneath.
The reason that the comments and links are hidden is to break them out of the $content variable and allow them to be placed outside of the <div class="content"> wrapper. Both of the items are then rendered afterward using render() individually.
Of course, the fun doesn't have to stop at top-level variables. These functions work as deep into the array as you can go. As long as you pass in a proper render element (see the “Render API” section), you'll be able to manipulate it with these functions.
As an example, say you wanted to hide the “Add new comment” link when viewing a node that has a comment form on the page you're viewing. You can simply check to see if the form exists in your array, and then hide that specific link group (comment). The code in Listing 16–22 demonstrates how to do this.
Listing 16–22. Hiding the “Add new comment” Link when the Comment Form Is Present
<?php

// Hide the "Add new comment" link when the comment form is present.

if (!empty($vars['content']['comments']['comment_form'])) {

  hide($vars['content']['links']['comment']);

}

// Print the rendered links afterward.

print render($content['links']);
Because the show() function resets the print status but does not print anything, it can be helpful to revert a previously applied hide(). In most cases, you'll likely just use render() because it will allow you to print the element as many times as you need, as shown in Listing 16–23.
Listing 16–23. Hiding the “Add new comment” Link when the Comment Form Is Present, but Showing It Again if Some Other Condition Is Met
<?php

// Hide the "Add new comment" link when the comment form is present.

if (!empty($content['comments']['comment_form'])) {

  hide($content['links']['comment']);

  if ($some_exception) {

    show($content['links']['comment']);

  }

}

// Print the rendered links afterward.

print render($content['links']);
![]() Tip For complex templates, this code begins to get very messy in templates files. In those situations, it's best to do these operations in preprocess or process functions in order to keep your templates clean and more manageable.
Tip For complex templates, this code begins to get very messy in templates files. In those situations, it's best to do these operations in preprocess or process functions in order to keep your templates clean and more manageable.
Theming Forms
Theming forms is a little different than working with the usual template file or theme function. Form markup is generated using Drupal's Form API. This makes it really easy for modules to build forms and guarantees consistency among generated elements. While the process of theming forms is quite different from what most front-end developers are used to, we think you'll begin to appreciate the consistency and flexibility of theming Drupal's forms.
One thing Drupal is famous for is the ability to accomplish a single task in many different ways. Although none of Drupal's forms ship with template files, they can easily be made to use them. Forms can also use preprocess functions, process functions, and alter hooks. So, how do you know when to use one over the other? This section will explain how forms are generated and will present a couple of examples using each method.
How Form Markup Is Generated
Forms are generated by modules. The simple function shown in Listing 16–24 is all that is required to generate form markup. It looks really easy, doesn't it? It is. Of course, there is more to the process to make it functional, such as validating the form and saving the submitted values, but the rest is not your concern in the theme layer. What's important to you is the structure of a form and how it's transformed from the $form array to actual markup.
Listing 16–24. A Simple Unsubscribe Form
<?php

function exampleform_unsubscribe(&$form, $form_state) {

  $form['email'] = array(

    '#type' => 'textfield',

    '#title' => t('E-mail address'),

    '#required' => TRUE,

  );

  $form['submit'] = array(

    '#type' => 'submit',

    '#value' => t('Remove me!'),

  );

  return $form;

}
In Listing 16–24, you define a very simple form with two elements: a textfield for the e-mail address and a Submit button. When rendered, the result looks like those in Figure 16–5. The resulting markup is shown in Listing 16–25.
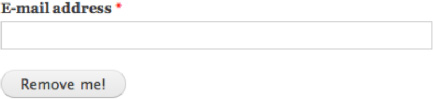
Figure 16–5. Rendered form based on the code from Listing 16–24
Listing 16–25. The Markup Generated by Drupal for the exampleform_unsubscribe() form in Listing 16–24
<form action="/example/unsubscribe" method="post" id="exampleform-unsubscribe" accept-

charset="UTF-8">

  <div>

    <div class="form-item form-type-textfield form-item-email">

      <label for="edit-email">E-mail address

        <span class="form-required" title="This field is required.">*</span>

      </label>

      <input type="text" id="edit-email" name="email" value="" size="60" maxlength="128" class="form-text required" />

    </div>

    <input type="submit" id="edit-submit" name="op" value="Remove me!" class="form-submit" />

    <input type="hidden" name="form_build_id" value="form-jKkl1KLWJLnv0hM4DSVd8-

40boTgBQAzWWhUn44c15Q" />

    <input type="hidden" name="form_token" value="LB07DqsDXK9idWdOHLxUen7jKxm52JqTyHiR7-pNumA"

/>

    <input type="hidden" name="form_id" value="exampleform_unsubscribe" />

  </div>

</form>
Form API Elements and Default Properties
In the exampleform_unsubscribe() form, you've defined two form elements: the e-mail address and the submit element. The e-mail element's #type property is textfield, which provides a single line text input . The submit element's #type is submit, which is the Form API equivalent of <input type="submit" />.
If you look closely at the generated markup in Listing 16–25, you'll see that you only set two properties in each element, but your markup ended up with some additional attributes. This is because Drupal assigns a default set of properties to each element. In this case, you are using form, textfield, and submit elements, which are defined in system_element_info(), as shown in Listing 16–26. When the form is processed, Drupal merges the properties defined in the form with the default properties.
Listing 16–26. Default Element Properties As Defined in system_element_info() for Textfield and Submit Elements
<?php

$types['form'] = array(

  '#method' => 'post',

  '#action' => request_uri(),

  '#theme_wrappers' => array('form'),

);

$types['textfield'] = array(

  '#input' => TRUE,

  '#size' => 60,

  '#maxlength' => 128,

  '#autocomplete_path' => FALSE,

  '#process' => array('ajax_process_form'),

  '#theme' => 'textfield',

  '#theme_wrappers' => array('form_element'),

);

$types['submit'] = array(

  '#input' => TRUE,

  '#name' => 'op',

  '#button_type' => 'submit',

  '#executes_submit_callback' => TRUE,

  '#limit_validation_errors' => FALSE,

  '#process' => array('ajax_process_form'),

  '#theme_wrappers' => array('button'),

);
![]() Tip This form only touches on a few of form elements, but Drupal has many of them. For a full list of elements available through the Form API and their default properties, see
Tip This form only touches on a few of form elements, but Drupal has many of them. For a full list of elements available through the Form API and their default properties, see http://api.drupal.org/api/file/developer/topics/forms_api_reference.html/7.
Rendering of Form Elements
The element properties contain critical information required to render them. Of these properties, two are very important in the theme layer: #theme and #theme_wrappers. When it's time to render the form, these properties tell Drupal which theme functions to use. There's also the option to use the #pre_render property to define a function(s) that should run prior to rendering.
#theme: Specifies the theme function to use when rendering the element.#theme_wrappers: Specifies a theme function or functions that should be used to wrap the rendered children of the element.
To illustrate this process, let's use the $form['email'] field from the previous form to walk through the process:
theme('textfield', array('element' => $form['email']))is called. This results in the following markup:<input type="text" id="edit-email" name="email" value="" size="60" maxlength="128" class="form-text required" />theme('form_element', array('element' => $form['email']))is called. This results in the following markup:<div class="form-item form-type-textfield form-item-email">
<label for="edit-email">E-mail address
<span class="form-required" title="This field is required.">*</span>
</label>
<input type="text" id="edit-email" name="email" value="" size="60" maxlength="128" class="form-text required" />
<!-- RESULT OF THE RENDERED TEXTFIELD -->
</div>- Finally, after all of the form elements are rendered, the form itself is run through
theme_form(), which is specified as the#theme_wrappersin the form element. Thetheme_form()function takes care of generating the rest of the form markup, including the hidden elementsform_build_id,form_token, andform_id.
![]() Caution As mentioned previously, you never use
Caution As mentioned previously, you never use theme_ to call a theme function directly, and similarly theme functions are entered in #theme and #theme_wrappers without the prefix theme_.
First Steps for Theming Forms
Find the Form ID
Before you can do anything, you'll need to find the ID of the form you're working with. It appears in the following two places in the markup of every form:
- There's a hidden field near the bottom of the form named
form_idthat contains what you're looking for.<input type="hidden" name="form_id" value="exampleform_unsubscribe" /> - Although it's not copy/paste ready because it contains dashes instead of underscores to separate words, the
<form>‘s ID attribute also contains the form ID.<form id="exampleform-unsubscribe">
Each Form ID has a corresponding function, which follows Drupal module naming conventions. In this example, exampleform is the module name and unsubscribe is what the form is named by the module.
Sometimes it helps to look at the original form and code comments when theming. You'll often find the original function that generates the form in the .module file of the module that created the form. If you find that the form doesn't exist in the .module file, it's definitely inside the module somewhere, but you may have to look around. Sometimes developers use .inc files for organization and code efficiency purposes.
Implement hook_theme()
In order to be able to use template files, preprocess, or process functions with forms, the first thing you'll need to do is register the form ID as a theme hook. This is necessary so that Drupal knows about the theme hook. Drupal core does this for some forms in core, mostly for administrative forms that use tables, but chances are you'll need to do this manually.
In your theme's template.php file, you'll create an implementation of hook_theme(), with your theme's name in place of the hook prefix. As an example, you'll theme the contact form located at /contact when the Contact module is enabled, whose form ID is contact_site_form. Inside you'll specify the form ID as the key and the render element as form, as shown in Listing 16–27. The render element key is required for theme hooks that use the render API to generate markup, such as forms. Its value indicates the name of the variable that holds renderable element, which in this case is form.
Listing16–27. A hook_theme() Implementation that Defines the contact_site_form() Theme Hook As Render Element “form”
<?php

/**

* Implements hook_theme().

*/

function THEMENAME_theme() {

  return array(

    // Defines the form ID as a theme hook.

    'contact_site_form' => array(

      // Specifies 'form' as a render element.

      'render element' => 'form',

    ),

  );

}
After doing this and clearing the cache, you'll be able to create a theme function and use preprocess and process functions for this form, which you'll get into later in the chapter.
![]() Tip When registering theme hooks, if you are unsure what to enter, look at some of the default implementations. In this case, you are dealing with a form, so a quick look at
Tip When registering theme hooks, if you are unsure what to enter, look at some of the default implementations. In this case, you are dealing with a form, so a quick look at http://api.drupal.org/api/function/drupal_common_theme/7 reveals the defaults for the original form theme hook, which are exactly what you need here.
Theming Forms with Theme Functions
The decision of whether to use a theme function or a template file is a personal/team preference. If you're comfortable using PHP, you might be inclined to use theme functions. If not, you'll probably prefer a template file, which is explained in the next section.
As discussed above, you'll need a hook_theme() implementation, without a template or path index, as shown in Listing 16–28. After doing this, hook_contact_site_form() is an official theme hook that can be overridden like any other theme function. Even though a theme_contact_site_form() function doesn't exist, you still name it as you would any other theme function override: THEMENAME_contact_site_form().
Listing 16–28. The Basic Required Code for Theming a Form with a Theme Function
<?php

/**

 * Implements hook_theme().

 */

function dgd7_theme() {

  return array(

    'contact_site_form' => array(

      'render element' => 'form',

    ),

  );

}


/**

 * Implements theme_forms_contact_site_form().

 */

function dgd7_contact_site_form($variables) {

  // Renders all elements of a form.

  return drupal_render_children($variables['form']);

}
Using drupal_render_children() Is a Must!
drupal_render_children() takes care of rendering all of the children of the form. This function alone will result in the exact same code Drupal would have provided without your theme function, which makes the function in Listing 16–28 pretty useless by itself, but it's worth stressing that it's VERY important to always use drupal_render_children($variables['form']) at the bottom of your function.
Even if you call render() on every element you have added to the form, Drupal will have added some important hidden elements identifying the form and those need to be rendered, too. So calling drupal_render_children($form) at the end of the theme function is mandatory. This won't re-print $form['foo'] because drupal_render() knows it has printed already. As an added bonus, it will take care of any additional elements added by other modules.
Manipulating Form Elements in Theme Functions
Now that you've gotten that out of the way, let's make some changes to the markup. Just like any theme function, the code this function returns will be inserted directly into the page markup. Since forms are render elements you need to render them. The code in Listing 16–29, does the following:
- Changes the labels of the name and mail elements.
- Renders the name and mail elements individually.
- Arranges the markup and individually rendered elements in a variable called
$output. - Includes
drupal_render_children($form)in the$outputat the bottom of the theme function. - Finally, it returns the
$output.
Listing16–29. Implements theme_contact_site_form()
<?php

/**

 * Implements theme_contact_site_form().

 */

function dgd7_contact_site_form($variables) {


  // Hide the subject field. It's not required.

  hide($variables['form']['subject']);


  // Change the labels of the "name" and "mail" textfields.

  $variables['form']['name']['#title'] = t('Name'),

  $variables['form']['mail']['#title'] = t('E-mail'),


  // Create output any way you want.

  $output = '<div class="something">';

  $output .= '<p class="note">'. t("We'd love hear from you. Expect to hear back from us in 1-

2 business days.") .'</p>';

  $output .= render($variables['form']['name']);

  $output .= render($variables['form']['mail']);

  $output .= '</div>';


  // Be sure to include a rendered version of the remaining form items.

  $output .= drupal_render_children($variables['form']);


  // Return the output.

  return $output;

}
Forms and their contents are render elements, so you can use hide(), show(), and render() functions to manipulate the elements of the form. When using hide() or making changes to the form array inside the theme function, you'll need to make sure you do so before attempting to render. There are a lot of other things that can be done here. We can't possibly cover all of them, but here are a few quick examples of what can be done:
- Adjust the
#weightproperty of an element to change the order in which they print. The following code would cause the message element to print at the top of the form:$variables['form']['message']['#weight] = -10;
$variables['form']['message']['#sorted] = FALSE; - Add a description underneath an element by setting the element
#descriptionproperty, like so:$variables['form']['mail']['#description'] = t(" We won't share your e-mail with anyone. "); - Set the default value of form element, such as checking the "Send yourself a copy" checkbox, by default setting the
#checkedproperty toTRUE, like so:$variables['form']['copy']['#checked'] = TRUE; - Unset the
#theme_wrappersproperty to remove the label and wrapper<div>and re-create the markup exactly the way you want it, like so:unset($variables['form']['mail']['#theme_wrappers]); - More advanced changes include making the form display in a table by using the theme_table() function.
- ... and so on!
![]() Tip Using theme functions over templates is slightly faster performance-wise, but the difference is very minimal. Performance isn't something you should worry about when deciding whether to use a template file over a theme function.
Tip Using theme functions over templates is slightly faster performance-wise, but the difference is very minimal. Performance isn't something you should worry about when deciding whether to use a template file over a theme function.
Theming Forms with Template Files
Creating template files for forms is surprisingly easy given what you've already learned. As mentioned in the “First Steps for Theming Forms” section, you'll need to open template.php and implement a hook_theme() function. Instead of just defining the render element, you'll need to add two more things, as shown in Listing 16–30:
- A path key (optional) that contains the path to where the template file is located in your theme.
- A template key that contains the name of the template file, without the
.tpl.phpsuffix.
![]() Caution Template files defined this way are not auto-discovered. If the path is omitted, Drupal will only look for your template file in the root of the theme. Specifying the path of the template directory is only required if your file exists in a subdirectory of your theme.
Caution Template files defined this way are not auto-discovered. If the path is omitted, Drupal will only look for your template file in the root of the theme. Specifying the path of the template directory is only required if your file exists in a subdirectory of your theme.
Listing 16–30. hook_theme() Implementation for Using Templates with Forms
<?php

/**

* Implements hook_theme().

*/

function mytheme_theme() {

  return array(

    'contact_site_form' => array(

      'render element' => 'form',

      'path' =>  drupal_get_path('theme', 'mytheme') . '/templates',

      'template' => 'contact-site-form',

    ),

  );

}
After creating the hook_theme() function shown in Listing 16–30, you'll need to create the template file. In this case, it's located in the templates directory within your theme:
sites/all/themes/mytheme/templates/contact-site-form.tpl.php.Once that's complete, simply clear the cache and Drupal will begin using your template file.
If there's nothing in your file to begin with, you'll get a blank page where the form used to be. The first thing you should do is add this line back to the template file: <?php print drupal_render_children($form); ?>. This will get the entire form back, and even though you may not want to keep everything in the form, you need to print the contents of this at the bottom of the form to ensure everything works properly as we detailed in the “Using drupal_render_children() is a Must!” section.
Manipulating Form Elements in Template Files
For the sake of covering this topic in detail, let's use the example from the “Manipulating Form Elements in Theme Functions” section. The code in Listing 16–31 represents the result of completing the following tasks:
- Changing the labels for the name and mail elements.
- Rendering the name and mail elements individually.
- Arranging your markup and individually rendered elements as you want them.
- Finally, printing
drupal_render_children($form)at the bottom of the template.
Listing 16–31. contact-site-form.tpl.php Implementation of the Contact Form
<?php // Change the labels of the "name" and "mail" textfields.

$form['name']['#title'] = t('Name'),

$form['mail']['#title'] = t('E-mail'),
?>


<?php // Render the "name" and "mail" elements individually and add markup. ?>

<div class="name-and-email">

  <p><?php print t("We'd love hear from you. Expect to hear back from us in 1-2 business days.") ?></p>

  <?php print render($form['name']); ?>

  <?php print render($form['mail']); ?>

</div>


<?php // Be sure to render the remaining form items. ?>

<?php print drupal_render_children($form); ?>
While there are slight differences, it's mostly the same (with less PHP). All of the possibilities that apply in theme functions apply just as well in template files. The variables themselves are slightly different. In theme functions and preprocess functions, the name element would be located in $variables['form']['name']. In template files, that same variable would be $form['name']. This is done specifically to make Drupal's monster arrays easier on template authors.
![]() Caution Be sure not to hide or omit required form elements. In Drupal, presentation is totally separate from form processing. Drupal will expect those elements and prevent the form from being submitted if they are not filled in. These types of changes should be done in a
Caution Be sure not to hide or omit required form elements. In Drupal, presentation is totally separate from form processing. Drupal will expect those elements and prevent the form from being submitted if they are not filled in. These types of changes should be done in a hook_form_alter() implementation, using the #access property. See the “Modifying Forms Using Alter Hooks” section and Chapter 22 for more information.
Keep Your Template Cleaner with Preprocess Functions
In our example of theming a form with a template file, the template is quite messy. The definition of a clean template file is one that contains hardly any logic and that simply prints variables and maybe an occasional IF statement. If you are dissatisfied with the appearance of the template file, this is a perfect opportunity to use preprocess functions. To make this really clean, you'd do the following in a preprocess function:
- Perform all modifications to the form array.
Create any new variables.
Render each field individually and provide easy variables for templates.
Of course, this is not something you'd want to do on every form on your site. However, it's very useful and convenient for highly styled user-facing forms that you want to take extra care to get right, such as the login, registration, and contact forms. The process of doing this is very easy, as demonstrated in Listing 16–32 with the contact form.
Listing 16–32. Using a Preprocess Function to Do the Heavy Lifting for the Template
<?php

/**

* Implements hook_preprocess_contact_site_form().

*/

function mytheme_preprocess_contact_site_form(&$variables) {
  // Shorten the form variable name for easier access.

  $form = $variables['form'];


  // Change labels for the 'mail' and 'name' elements.

  $form['name']['#title'] = t('Name'),

  $form['mail']['#title'] = t('E-mail'),


  // Create a new variable for your note.

  $variables['note'] = t("We'd love hear from you. Expect to hear back from us in 1-2 business days.");


  // Create variables for individual elements.

  $variables['name'] = render($form['name']);

  $variables['email'] = render($form['mail']);

  $variables['subject'] = render($form['subject']);

  $variables['message'] = render($form['message']);

  $variables['copy'] = render($form['copy']);


  // Be sure to print the remaining rendered form items.

  $variables['children'] = drupal_render_children($form);

}
Because you've done all the work in the preprocess function, the template file in Listing 16–33 is crispy clean. Adding markup and classes and moving elements around is a piece of cake, and it's very easy to see what this template file does at first glance.
Listing 16–33. A Preprocess Function Can Provide a Clean, Minimal Template for the Contact Form.
<p class="note"><?php print $note; ?></p>

<p><span class="form-required">*</span><?php print t("Denotes required fields."); ?></p>

<ol>

  <li><?php print $name; ?></li>

  <li><?php print $email; ?></li>

  <li><?php print $subject; ?></li>

  <li><?php print $message; ?></li>

  <li><?php print $copy; ?></li>

</ol>

<?php print $children; ?>
Modifying Forms Using Alter Hooks
The ability of themes to use alter hooks is new in Drupal 7. Templates are great for situations where you want to have a lot of control over the markup itself, but there are quite a few situations where simply using hook_form_alter() can make things a lot easier, especially if you are comfortable with Drupal's form markup either by default, or in combination with changes you can make site-wide via theme functions. Using an alter hook is perfect for quick changes like:
- Simple changes to form labels, descriptions, and other properties.
- Changing the order in which the form elements print using the
#weightproperty. - Wrapping a few elements in a
<div>or<fieldset>. - Hiding or removing form elements that are not required.
- Adding some markup to a form.
It's also arguably easier because there are fewer steps involved in the process. You don't need to implement hook_theme(). You also get full control over the elements. There are certain limitations to the changes you can make within theme functions, as it's already too late in the process.
Technically, there are two hooks you can use.
hook_form_alter(): Runs for all forms.
hook_form_FORM_ID_alter(): Runs for a specific form ID.
There are reasons for using hook_form_alter() over hook_form_FORM_ID_alter() all the time, but those reasons mainly apply to the tasks a module developer needs to perform. Unless you are specifically targeting more than one form to do the same thing, as shown in Listing 16–34, it's probably best to use hook_form_FORM_ID_alter(), as shown in Listing16–35.
Listing 16–34. Implementation of hook_form_alter() to Target all or Multiple Forms
<?php

/**

* Implements hook_form_alter().

*/

function mytheme_form_alter(&$form, &$form_state, $form_id) {

  // Changes made in here affect ALL forms.

  if (!empty($form['title']) && $form['title']['#type'] == 'textfield') {

    $form['title']['#size'] = 40;

  }

}
Listing 16–35. Implementation of hook_form_FORM_ID_alter() to Target a Specific Form
<?php

/**

* Implements hook_form_FORM_ID_alter().

*/

function mytheme_form_contact_site_form_alter(&$form, &$form_state) {

  // Add a #markup element containing your note and make it display at the top.

  $form['note']['#markup'] = t("We'd love hear from you. Expect to hear back from us in 1-2 business days.");

  $form['note']['#weight'] = -1;


  // Change labels for the 'mail' and 'name' elements.

  $form['name']['#title'] = t('Name'),

  $form['mail']['#title'] = t('E-mail'),


  // Hide the subject field and give it a standard subject for value.

  $form['subject']['#type'] = 'hidden';

  $form['subject']['#value'] = t('Contact Form Submission'),


}
Managing CSS Files
Every good Drupal theme needs a stylesheet or two, or ten! You might be caught off guard by the sheer number of CSS files that Drupal loads, before you even start on your theme. Being the modular framework that it is, Drupal uses that same approach for CSS stylesheets and JavaScript files. CSS and JavaScript files are provided separately by module—and sometimes a few per module. This is done on purpose for the following reasons:
- It's easier to read and understand the purpose of the code and what module it belongs to.
- It allows Drupal to load only the code needed on a given page.
- It's easier for Drupal to maintain these files and their contents.
That said, in Drupal's theme layer you have full control over all stylesheets and scripts. You can do whatever you want with them, literally. If you decide you don't want to load any stylesheets from modules, you can remove them all. If you aren't happy with a few files, you can override them individually by removing them or override them and change the contents within the theme. You can even change the order in which the files load if you want to. This section will show you how to do all of that.
Aggregation and Compression
As mentioned, Drupal has many stylesheets. Of course, you want to keep the number of files at a minimum on your live sites for performance reasons, so Drupal has a way of handling this. During development, it's normal to deal with anywhere from 10-40 CSS files, and even more if you are working on sites in languages that display text in right-to-left order. In the Performance section at admin/config/development/performance there are options to aggregate and compress CSS and JavaScript files. When turned on, Drupal will minify and combine the files into as few automatically generated files as possible. This also effectively works around the Internet Explorer 31 stylesheet limit bug. Drupal aggregates files in two ways: it creates a per-site aggregation file from files that would be loaded on every page, and it creates a per-page aggregation files for the remaining files that are conditionally loaded depending on the page. For CSS files, it further aggregates by media type. To remain correct, if the contents of CSS and JavaScript files are changed, when the site cache is cleared Drupal will regenerate the aggregated versions of the files and give them a different name. Enabling aggregation and compression for CSS files on all live sites is highly recommended, as it will speed up page loads quite a bit. This process is very effective and allows themers and developers to continue developing sites in a modular manner, without having to worry about the number of CSS files.
![]() Caution Do NOT use the
Caution Do NOT use the @import directive to load CSS files manually within Drupal. Doing so will cause performance and possible aggregation issues when combined with <link> 'ed stylesheets and will cause the files to be excluded from override features.
Patterns and Naming Conventions
In your theme, you are free to name your CSS files whatever you want. Many themes tend to create a directory called “css” in which they place a few stylesheets. It's very common to create a layout.css for page layout styles and style.css for the rest. Some themes, like Zen, take it much further with almost 30 stylesheets. How you decide to organize your CSS is completely up to you. There are no restrictions on how many stylesheets a theme can have. Most front-end developers have their own way of working, and Drupal is happy to oblige.
Core and Module CSS Files
Most modules that provide CSS will typically include a file in the root of the module directory called module-name.css. Some of the modules have a few CSS files, and the better modules create a separate file for any CSS used to style the administrative user interface. Modules are not restricted to any number or specific organization of CSS files, but developers are generally urged to be conservative and style elements as little as possible.
It's also worth mentioning that Drupal's System module, located in modules/system, contains quite a few CSS files that seem to all be dumped there because there is no better place to put them. Table 16–3 is a quick description of each, so you have an idea of what their purpose is and can decide whether or not to keep them in your theme.
Table 16– 3. System Module's CSS files, Excluding RTL Versions
| CSS File | Purpose | Loads… |
system.base.css |
Contains CSS that is heavily relied upon by JavaScript for certain functionality, including collapsible fieldsets, autocomplete fields, resizable textareas, and progress bars. | Every page. |
system.theme.css |
Contains general styles for many generic HTML and Drupal elements. | Every page. |
system.menus.css |
Contains default styling for menu tree lists, tabs, and node links. | Every page. |
system.messages.css |
Contains default styling for error, warning, and status messages. | Every page. |
system.admin.css |
Contains styles needed on administrative pages throughout Drupal. | Admin pages. |
system.maintenance.css |
Contains styles for installation, maintenance, and update tasks. | Maintenance pages. |
Bi-Directional Text Support
One of the things Drupal is known for is its superb language support. This includes bi-directional text support. While most languages display text from left-to-right (LTR) on screen, certain languages, such as Arabic and Hebrew, display text from right-to-left (RTL) on screen. Browsers handle much of the styling differences needed by reading the dir attribute defined in the <html> tag and using User Agent CSS files, but many times CSS floats, text alignment, and padding need to be accounted for in CSS, especially when you are running a site with multiple languages.
Drupal handles RTL stylesheets in an automated way based on CSS file naming conventions. If you have a stylesheet named style.css, which contains the CSS for the LTR version of the site, you can simply create another file called style-rtl.css to contain the necessary tweaks to fix the display for the RTL version. Drupal will automatically load it when needed, directly after the original file so that the same selectors can be used and RTL styles will override the LTR styles, taking advantage of the natural CSS cascade. When writing CSS for a site that will support both LTR and RTL displays, it is customary to write the CSS for the LTR version first, while keeping track of what will need to change (per property) with a comment. This is one of the coding standards Drupal has adopted for core and contributed CSS files. Listing 16–36 shows an example.
Listing 16–36. Example CSS Denoting a LTR Property and the RTL Version
// In style.css:

// .my-selector floats content to the left, which is LTR-specific, so an inline comment is

added to note this.

.my-selector {

  border: solid 1px #ccc;

  float: left; /* LTR */

}


// In style-rtl.css:

// The RTL version of .my-selector needs to be overriden and floated right instead of left.

.my-selector {

  float: right;

}
Adding, Removing, and Replacing CSS Files
There are three ways to manipulate CSS files within Drupal themes. This section will explain what the implementation options are, the reasons for each method, and when it's advantageous to use certain methods over others.
Quick and Dirty Stylesheets via .info Files
Adding stylesheets via your theme's .info file is the easiest way to add a CSS file to your theme; see Listing 16–37 and Listing 16–38. However, there are a few drawbacks to doing this in certain situations.
- Any stylesheet you define in the
.infofile will load on every page. - You don't have the full use of the features available in
drupal_add_css(). For example, you can't add conditional stylesheets for Internet Explorer or change the weight of a module's CSS file in your.infofile.
Listing 16–38. Typical .info Stylesheet Definition Example
stylesheets[all][] = css/layout.css

stylesheets[all][] = css/style.css

stylesheets[print][] = css/print.css
![]() Caution Stylesheets may also be removed via
Caution Stylesheets may also be removed via .info files by creating an entry for a file as if you were overriding it, but then not actually including the file in the theme directory. However, there is a bug that allows these stylesheets to return when AJAX rendering occurs. To be safe it's best to remove stylesheets in hook_css_alter(); this is explained later in this section.
Conditionally Loading Stylesheets with drupal_add_css()
drupal_add_css() is the main function used by modules and themes to add CSS files via PHP code. Some themes use it in their template.php file, typically within preprocess functions. One of the advantages of using drupal_add_css() in the theme layer as opposed to defining CSS files in a .info file is that files can be conditionally loaded based on certain criteria or context. For example, you may want to create a special CSS file that only loads on your site's home page. In your theme's template.php, you could do this within template_preprocess_html(), as shown in Listing 16–39.
Listing 16–39. Adding a Stylesheet that Loads Only on the Home Page
<?php

function mytheme_preprocess_html(&$variables) {

  // Add a stylesheet that prints only on the homepage.

  if ($variables['is_front']) {

    drupal_add_css(path_to_theme() . '/css/homepage.css', array('weight' => CSS_THEME));

  }

}
There are many different options for adding CSS to your pages in Drupal using drupal_add_css(), some of which include:
- Specifying the type as “inline” to print a block of CSS code within
<head>, as opposed to adding a CSS file. - Specifying the group of a file to determine where the file should appear using constants such as
CSS_SYSTEM(top),CSS_DEFAULT(middle), andCSS_THEME(bottom). - Specifying the weight of a file to control the order in which it loads within its group.
- Adding conditional stylesheets to serve different files to different browsers.
- Adding externally hosted CSS files.
- Forcing a CSS file to be excluded from the aggregation and compression process.
Adding Conditional Stylesheets for Internet Explorer
According to Wikipedia at the time of this writing, about 43 percent of users are visiting web pages using Internet Explorer. This statistic varies from source to source, but for many of you, supporting older versions of Internet Explorer is a fact of life. Using conditional stylesheets is considered a best practice when the need arises to write CSS that targets Internet Explorer.
One of the great new features in Drupal 7 is that conditional stylesheets can be added using drupal_add_css(). In fact, all three of Drupal's core themes do this in template_preprocess_html(). The reason this is done in template.php is that .info files only have very basic support for drupal_add_css(). Listing 16–40 and Listing 16–41 demonstrate how this works using code from the Seven theme as an example.
Listing 16–40. Excerpt from the Seven Theme, Using drupal_add_css() to Add Conditional Stylesheets for IE in template_preprocess_html()
<?php

function seven_preprocess_html(&$vars) {

// Add conditional CSS for IE8 and below.

  drupal_add_css(path_to_theme() . '/ie.css', array('group' => CSS_THEME, 'browsers' => array('IE' => 'lte IE 8', '!IE' => FALSE), 'preprocess' => FALSE));

  // Add conditional CSS for IE6.

  drupal_add_css(path_to_theme() . '/ie9781430231356.css', array('group' => CSS_THEME, 'browsers' => array('IE' => 'lt IE 7', '!IE' => FALSE), 'preprocess' => FALSE));

}
Listing 16–41. The Source Code that Results from Adding IE Conditional Stylesheets
<!--[if lte IE 8]>

<link type="text/css" rel="stylesheet" href="http://drupal-7/themes/seven/ie.css?l40z2j" media="all" />

<![endif]-->


<!--[if lt IE 7]>

<link type="text/css" rel="stylesheet" href="http://drupal-7/themes/seven/ie9781430231356.css?l40z2j" media="all" />

<![endif]-->
The code in Listing 16–40 and Listing 16–41 gives you two conditional stylesheets that will load for Internet Explorer only. The first stylesheet will load for Internet Explorer 8 and under, and the second stylesheet will load for versions of Internet Explorer prior to IE7.
Completely Control Stylesheets Using hook_css_alter()
Drupal core and modules add CSS files individually via the drupal_add_css() function. During template_process_html(), a variable called $styles is created; it contains the fully formatted HTML output for all the stylesheets that are specified for each page. This variable is eventually printed inside the <head> tags in the html.tpl.php template file, as shown in Listing 16–42.
Listing16–42. $styles Variable Is Created in template_process_html() for Use in html.tpl.php
<?php

/**

* Implements template_process_hmtl().
*/

function template_process_html(&$variables) {

  ...

  $variables['styles'] = drupal_get_css();

  ...

}
During the call to drupal_get_css(), Drupal gathers up all the CSS files previously added, and then provides an opportunity for any modules or themes to make changes by calling drupal_alter('css', $css). At this time, Drupal looks for functions in modules and themes that fit the naming pattern hook_css_alter(), where the word “hook” in the function name is replaced by the module or theme name implementing it. This function allows for the most granular control over all aspects of your CSS files.
An example of why a module might want to implement hook_css_alter() can be found in the Locale module. The Locale module checks to see if the language direction is right-to-left, and if so, finds the related RTL versions of the CSS files and adds them to the page.
In themes, the main reasons to implement hook_css_alter() is to remove or override CSS files provided by modules. An example of this can be found at the bottom of Seven theme's template.php file (see Listing 16–43). Seven chooses to override the stylesheet vertical-tabs.css file provided by core with its own version.
Listing 16–43. The Seven Theme's hook_css_alter() Implementation
<?php

/**

 * Implements hook_css_alter().

 */

function seven_css_alter(&$css) {

  // Use Seven's vertical tabs style instead of the default one.

  if (isset($css['misc/vertical-tabs.css'])) {

    $css['misc/vertical-tabs.css']['data'] = drupal_get_path('theme', 'seven') . '/vertical-

tabs.css';

  }

  // Use Seven's jQuery UI theme style instead of the default one.

  if (isset($css['misc/ui/jquery.ui.theme.css'])) {

    $css['misc/ui/jquery.ui.theme.css']['data'] = drupal_get_path('theme', 'seven') .

'/jquery.ui.theme.css';

  }

}
![]() Caution Overriding a module's CSS files in
Caution Overriding a module's CSS files in .info files (creating an entry with the same CSS file name) will work, but not always in an efficient way. Stylesheets that are defined in .info files will load on every page. Whether or not they are actually needed is never taken into account. This is not the case when using hook_css_alter() as you are given the opportunity to make sure the file is set to load before attempting to replace it.
MANAGING STYLESHEETS IN YOUR THEME
Working with Base and Subthemes
Chances are you have a certain way you do things. You may tend to structure your markup similarly in all your themes. You might frequently override certain theme functions, or have special way you like to style forms, or maybe you tend to use a certain grid framework for your layout. These are all great reasons to take advantage of Drupal's base and subtheming functionality.
Subthemes share a special relationship with their base (parent) theme(s). They inherit template files and assets from their parent themes. This makes them a great tool to help streamline your theming workflow and essentially create your own “frameworks” or “resets” for theming Drupal sites. Of course, you can also use an existing base theme. Drupal offers quite a few base themes, which we'll tell you more about later in this section.
Creating a Subtheme
Both base and subthemes are regular Drupal themes as far as characteristics go, and any theme can be a base theme. The process of creating a subtheme is very straightforward.
- Start by creating the shell of a new theme. Create a directory for it, and create the
.infofile containing at least thenameandcoreproperties. - In the
.infofile, add the “base theme” property containing the name of the theme you want to use as a base, like so:base theme=basethemename - If the base theme has regions and/or features defined in the
.infofile, you'll need to copy those to the subtheme as well.
For basic Drupal themes, these three steps are all you'll need to do to create your subtheme. Once you've done this, you'll be able to enable the theme on the admin/appearance page. It's also worth noting that the base theme you are using does not need to be enabled in the UI to function properly.
![]() Caution Most of the popular contributed base themes require a little more to setup. Themes like Zen, Omega, and Fusion come with a starterkit or starter directory, which you can copy and use to start your subtheme. Make sure you refer to each theme's README. txt file for full instructions on how to begin using it, as each is different.
Caution Most of the popular contributed base themes require a little more to setup. Themes like Zen, Omega, and Fusion come with a starterkit or starter directory, which you can copy and use to start your subtheme. Make sure you refer to each theme's README. txt file for full instructions on how to begin using it, as each is different.
Inheritance and How It Works
You already know that Drupal provides a lot of markup in its modules, and that this markup comes in the form of templates, theme functions, or the Render API. In Drupal themes you have the opportunity to override and take over this behavior. So, technically, you are inheriting it in the first place. Using subthemes allows you to add one more step to the process. When using a parent theme, all of the assets—including template files, CSS files, JavaScript files, theme functions, and pretty much everything in template.php —are inherited.
CSS, JavaScript, template files, and theme functions defined in a base theme will automatically be available for the subtheme. The subtheme doesn't have to do anything for this to happen. It just works. Preprocess and process functions will run for both the base and the subtheme, so they can be used in both themes simultaneously without issue. Of course, the subtheme can override anything the base theme has done.
Some things don't work this well. Regions are not inherited, and neither are features or theme settings. In order for these to work properly, you'll have to copy the information from the base theme into the subtheme's .info file. Table 16–4 shows which assets are automatically inherited and which ones are not.
Table 16– 4. Inheritance of Assets from Base Theme to Subthemes
| Asset | Automatically Inherited? |
| CSS files | Yes |
| JavaScript files | Yes |
| Template files | Yes |
| Theme Screenshot | Yes |
| Regions | No |
| Theme Settings | No |
Finding a Good Base Theme
Thousands of contributed themes are available at http://drupal.org/project/Themes. Unfortunately, Drupal themes have a reputation for being ugly. While there is some truth to that, there are many gems out there; you just need to know what to look for. Themes on drupal.org are sorted by popularity, based on project usage stats, so it is easy to see which themes are the most popular. However, popularity is not always the best measure. There are a few things you should understand when evaluating a contributed Drupal theme.
- Type: All of the themes on
drupal.orgare lumped together into one, uncategorized list. As you can see onhttp://drupal.org/project/themes, a large portion of the themes on the first page are base themes. While any theme can technically be used as a base theme, it's important to read the project information so you know what to expect. Maintainers will be a lot less inclined to help you with a problem if you're not using the theme how they intended. - Maintenance and development status: Each project has a Maintenance and a Development status which can be viewed on the project page. These will give you a good idea of how the module is supported. If the project has an “Actively maintained” maintenance status and an “Under active development” development status, chances are that the module developer intends to fix bugs and will entertain feature requests made in the issue queue.
- Usage statistics: On each project page, the Project Information section contains the number of reported installations and a link called “View usage statistics” that shows a long term graph and table of this data and how it has changed over time. Usage statistics can be a good indication of whether or not a theme has been well tested. If many people are using it or it shows steady growth, chances are that it's a better theme.
- Issue queue: Most projects contain issues queues where users can report bugs and request features. Reading through the issue queue is a good way to gauge the community participation in a project. It is also a great way to learn what bugs the theme may have and how quickly the community and maintainer(s) respond to such issues.
Popular Base Themes
There are many great base themes available from seasoned theme developers on drupal.org. A comprehensive list of available base or “starter” themes is available at http://drupal.org/node/323993. Some of the most popular base themes available for Drupal 7 include:
Zen:
http://drupal.org/project/zenFusion:
http://drupal.org/project/fusionAdaptiveTheme:
http://drupal.org/project/adaptivethemeGenesis:
http://drupal.org/project/genesisBasic:
http://drupal.org/project/basicBlueprint:
http://drupal.org/project/blueprintNineSixty:
http://drupal.org/project/ninesixtyOmega:
http://drupal.org/project/omegaMothership:
http://drupal.org/project/mothership
Tips for Creating Your Own Base Themes
- Don't do too much: It's important not to make too many assumptions in your base themes. Ask yourself if what you are doing will fit in well on any project you work on. If the answer is no or maybe, it's likely not a feature you should include in your base theme.
- Look at contributed themes: Looking at what other contributed themes have done is one of the best ways to learn. Chances are you'll find some things you like and some things you don't from each of them. Don't be afraid to mix and match.
- Provide styles for layout and others structural elements: Take care of things that you consistently do on each project. For example, normalize font sizes, provide CSS resets, and make sure that the general padding and margins are set so blocks and nodes are not on top of each other.
- Use multiple CSS files: Aggregation and compression will take care of combining these files automatically, so don't be afraid of using a few CSS files. This will allow you to easily choose between what you want and don't want in your subthemes.
Sustainability and Best Practices
Drupal contains many, many template files. For a front-end developer, these are one of your greatest tools in taking over a Drupal theme and turning it into exactly what you need it to be. However, with power comes responsibility. Because working with template files is so easy, it's also an area where you can get in trouble quickly.
Most front-end developers experience some frustration working with Drupal's markup. Because it's relatively easy to go in and make changes, doing exactly that is often a first reflex. Resist it. While you'll definitely feel the power and control you have over things, changing too many template files is often the wrong approach. Just because you can change things doesn't always mean you should.
Start With a Good Base
A great way to ensure minimal template overrides is to define your markup in such a way that it is flexible enough to work in most cases. Think of the major template files like node.tpl.php, views-view.tpl.php and block.tpl.php, for example, as having two purposes. The first is to provide a container and the second is the actual content, which can include any number of different elements inside it. Drupal does this reasonably well to begin with, but there is always room for improvement, and your needs may vary from site to site depending on the design.
As an example, look at the contents of the block.tpl.php file, shown in Listing 16–44, which is provided by Drupal's Block module and can be found in modules/block/block.tpl.php. Most blocks, even those produced by other modules, will use this template file to output their contents. There could be a menu inside the block, a few paragraphs in a custom block, a snippet of JavaScript that will load an advertisement, a poll, a user listing, and so many other possibilities.
Listing 16–44. Default block.tpl.php Implementation
<div id="<?php print $block_html_id; ?>" class="<?php print $classes; ?>"<?php print $attributes; ?>>

  <?php print render($title_prefix); ?>

  <?php if ($block->subject): ?>
   <h2<?php print $title_attributes; ?>><?php print $block->subject ?></h2>

  <?php endif;?>

  <?php print render($title_suffix); ?>

  <div class="content"<?php print $content_attributes; ?>>

   <?php print $content; ?>

  </div>

</div>
![]() Tip The Bartik theme uses Drupal's default
Tip The Bartik theme uses Drupal's default block.tpl.php template file. This is easy to determine because the Bartik theme does not include a block.tpl.php file in its directory.
Using a simple custom block as an example, the template code in Listing 16–44 translates to the output in Listing 16–45.
Listing 16–45. Block Output Using the Default block.tpl.php Implementation
<div id="block-block-1" class="block block-block first last odd">

  <h2>Block title</h2>

  <div class="content">

    <p>Block content.</p>

  </div>

</div>
The resulting code is pretty minimal. In most cases, when creating custom themes, you will not want these to look the same, so you will use CSS to style them differently. It may not be immediately apparent, but there are some potential problem areas to take note of with the default block.tpl.php implementation. Certain design aspects need more flexible markup. Some examples of this include:
- Grids: You may choose to lay out your blocks within regions using a CSS grid framework. This will prevent you from adding left and right padding directly to the
.blockclass. - Background images: Your design might require adding multiple background images to achieve a design for the block that is content agnostic. Sounds easy enough, right? The top and tiling background image can be declared in
.block,but where can the bottom background image be defined? As soon as you add padding to the.blockclass itself, you lose the ability to place the second background image on the existing .contentclass.
The previous examples are a small taste of what you might encounter while coding a Drupal theme. You may be tempted to take the minimalist markup approach and deal with problems as they arise, and this is where we would stop you! As mentioned, these main template files are responsible for containing many types of content. You don't want to create a new template file for every different kind just to modify structural aspects. It's much more sustainable, not to mention easier to code, to create solid and flexible defaults and deal with exceptions as they arise.
This can be achieved fairly easily by separating structure from content. As shown in Listing 16–46, by simply adding <div class="inner"> to surround the contents, you can solve many potential problems before they arise. In the example of grids, padding can be applied to the <div class="inner">. As for background images, the top background image can be applied to .block, and the bottom can be applied to .block .inner or vice versa.
Listing 16–46. Modified block.tpl.php Containing a More Flexible Container Structure
<div id="<?php print $block_html_id; ?>" class="<?php print $classes; ?>"<?php print

$attributes; ?>>

  <div class="inner">

    <?php print render($title_prefix); ?>

    <?php if ($block->subject): ?>

      <h2<?php print $title_attributes; ?>><?php print $block->subject ?></h2>

    <?php endif;?>

    <?php print render($title_suffix); ?>

    <div class="content"<?php print $content_attributes; ?>>

      <?php print $content; ?>

    </div>

  </div>

</div>
Override Template Files with Purpose
While core template files are less likely to change during the course of a major release cycle, there are usually massive changes to template files for each major Drupal release, and contributed modules are a constantly moving target. Template files can change at any time, and sometimes drastically. There are many potential reasons for these changes. A module developer may decide to take a different approach, there might be new features or security updates, or there may be no good reason at all. The point is that once you override a template file by adding it to your theme, you are responsible for maintaining it. This can easily get out of hand if you have too many template files.
Another thing to remember is that Drupal is a framework. The whole idea of using Drupal is to take advantage of its modularity. Having too many template files in your theme can essentially remove that modularity; once that happens, your theme can become more of a hassle to maintain than all of Drupal and whatever custom modules you have combined. The key to avoiding this problem is to use overrides sparingly and take advantage of the many tools that Drupal provides.
Just adding the <div class="inner"> as you did in Listing 16–46 can go a long way in saving you the need to create additional template files. The following tips will help you stay out of trouble when working with templates in Drupal themes:
- Structure for the majority. Explore options for handling one-offs separately by using preprocess functions where possible.
- Take advantage of theme hook suggestions. When the differences between the markup warrant it, use
node--article.tpl.phpto style article nodes and usetheme_links__node()to target only node links. - Take advantage of CSS classes as arrays. If all you need is a class, don't create a new template file. For example, block titles are output in a simple
<h2>tag by default. When applying even minimal CSSto .block h2, you run the risk of affecting<h2>tags that may end up inside<div class="content">. Add a class to the title to style against, so you can prevent these issues.
Leverage Default CSS Classes
Don't just rip out or change CSS classes without good reason for doing so. Think about it. While many front-end developers and web designers gasp at the sight of all the CSS classes that Drupal makes available, there really is a purpose to the madness. These classes (especially body classes) not only provide helpful information that guides you through figuring out what is generating the markup and what characteristics the contents of a given <div> might have, but they are designed to give you the opportunity to do a large portion of your theme development within the CSS.
Keep in mind, especially when using contributed modules, that you will need to update and likely upgrade your site at some point in the future, and that you can't control the changes that may be made to templates and often to the classes applied inside them. It's also important to note that modules may rely on classes and certain CSS files, such as system.base.css to be loaded in order to function properly. Of course, you can try to manage these things, but we can report from experience that this can easily turn into a frustrating waste of time. We're not saying there's not room for improvement or that you shouldn't code your site the way you want to. We simply want to make you aware of some of the risks involved when stripping markup down to barebones.
Do My Changes Belong in a Module?
With each new release of Drupal, the theme layer becomes more and more powerful. With the advent of Render API and the ability to use alter hooks in themes, Drupal 7 is packed with more power than ever. As powerful as Drupal themes can be, there are still many things that just do not belong in the theme layer. As you are plugging away coding your awesome Drupal theme, constantly ask yourself these questions:
- Does what you are trying to accomplish require an SQL query? These should never be in a theme. Period.
- Does your task seem particularly difficult to accomplish? Are you completely rebuilding data?
- Are your changes really theme-specific? For example, if you are changing form labels and descriptions, shouldn't these be available if you were to disable your theme?
If the answer to any of these questions is yes, then your changes belong in a module.
Summary
Throughout this chapter we've coveredmore of the many different methods you can use to bend Drupal themes to your will. We've covered almost everything you'll need to know to create truly awesome and sustainable themes, including how to:
- Find the variables that are available to you in the theme layer.
- Understand and use preprocess and process functions.
- Use and alter contents of render arrays.
- Theme forms with templates, theme functions, and alter hooks.
- Manage CSS and JavaScript files in your theme.
- Work with base and subthemes.
It's easy to become overwhelmed with Drupal's theme layer in the beginning. Just remember that your themes can be as simple or as complex as you need them or want to be. We hope that you'll take this knowledge and use it to create awesome Drupal themes, and contribute them back to the community.