
C H A P T E R 12
![]()
Development Environment
Pay special attention to this chapter. The topic may be as glamorous as visiting Home Depot on a first date, but this chapter will spare you reinventing the wheel. Whether you intend it or not, when you start a project of any sort, you set up a development environment: you choose tools and create spaces that define your processes and either limit or advance your efforts. So here's your chance to capitalize on the mistakes of others. In this chapter, I'll look at efficient, interrelated tools and appropriately defined spaces. I will focus on a handful of possible approaches, each of which takesminimal setup and maintenance. The result will be a development environment that positions your projects to run smoothly, that builds in flexibility for changes in size and complexity of projects and teams, and that lets you focus your energy on deliverables rather than on tinkering with an inadequate setup.
For people who have no experience with programming and want to get started with the bare necessities, go to the section called “The Most Basic Development Environment” for the bare-bonesset of tools needed to complete essential tasks like uploading and installing a site. You can start there and return to other sections of the chapter to expand your development environment as your familiarity and needs grow. In short, here's what is covered in this chapter:
- Quickstart, a full-fledged, pre-configured development environment that is ready to use on startup. Download it, add credentials, add your project, and you're up and running with a powerful local setup. (For experienced developers as well as beginners who are on a developer career track.)
- Adding key tools to your existing development environment and the reasons for including these additions. (For experienced developers.)
- Signing up for and configuring a web hosting account and domain registration. (For beginners and non-programmers.)
- Installing and configuring basic graphical user interface (GUI) tools needed to create and maintain a simple Drupal site. (For beginners and non-programmers.)
![]() Note The options for setting up your development environment are nearly limitless. This chapter describes two broad approaches: using a fully stocked Linux build in a virtual environment and using tools native to Windows or Mac. See
Note The options for setting up your development environment are nearly limitless. This chapter describes two broad approaches: using a fully stocked Linux build in a virtual environment and using tools native to Windows or Mac. See dgd7.org/devenv for more approaches.
Starting with Quickstart
Quickstart (drupal.org/project/quickstart) is a virtual appliancefor Mac and Windows machines that launches a preconfigured, LAMP-centric development environment in just a few steps. It eliminates hours of work, handing you a very well thought-out and thoroughly assembled environment that takes minutes to set up. Like Drubuntu (a Drush script that sets up a pre-configured development environment on Ubuntu; see Appendix G), Quickstart offers the considerable bonus of Drupal-specific documentation (drupal.org/node/788080), issue queue (drupal.org/project/issues/quickstart) and usergroup (groups.drupal.org/quickstart-drupal-development-environment)—in other words, all the benefits of a growing developer community that shares common tools in addition to codebase. Quickstart uses VirtualBox with Ubuntu, and is open source through and through.
As with most virtualization solutions, Quickstart can have performance challenges and requires significant resources. The Virtual Box application needs at least 1024MB RAM, and the Quickstart image will take 18GB of disk space as shipped, so check first whether you need to make room or install more RAM. Regarding performance, users on a variety of machines and host operating systems have complained of slowness. In a casual test, Quickstart ran flawlessly within Windows XP Pro on an older Intel Core Duo machine with only 2GB RAM. Yet a newer, more powerful machine had performance concerns (albeit mild ones): on a well-furnished MacBook Pro i7 (Snow Leopard, 8GB RAM, solid state drive), screen refresh was just jerky enough that the mouse was hard to use. Typical tasks like resizing a window required extra focus and patience. Brief experiments with upping base memory, video memory, and number of processors did not eliminate the jerkiness (see drupal.org/node/819720 for a few brief instructions on making Quickstart faster).
If you've not used a well-assembled development environment before, it's worth dealing with performance concerns to get familiar with this one. You can then choose what you find most valuable and take the time to install it on your preferred development OS. Here are the installation steps described on the drupal.org project page (drupal.org/project/quickstart). Note that installation requires importing an appliance rather than creating a new machine (when VirtualBox finishes installing, it will prompt you to create a new machine; you will need to cancel that operation and follow the directions here).
- Download Quickstart 0.9.1 virtual machine with bittorrent. (Need a client? uTorrent (Win and Mac) from
www.utorrent.com) - Install Virtualbox (version 4.0.4+).
- Import Quickstart virtual machine.
- Start Virtualbox.
- File
 Import Appliance Choose file (select the downloaded ova file)
 - Set RAM to 50% of your system RAM (min 1024MB, max 2048MB).
- Import (wait for import to finish).
- Start the new machine from the list.
- Username: Passwords
- Unix = quickstart:quickstart
- MySQL = root:quickstart
- Drupal = admin:admin
- Update to latest official versions: drush, drush make, drush Quickstart, etc. To get the latest updates to drush commands:
Once Quickstart is operational, open the readme file (shown in Figure 12–1) for links to documentation, tutorials, and a few of the browser-based developer tools. It's worth clicking through these links as well as looking closely at the Firefox toolbars that open above the page.
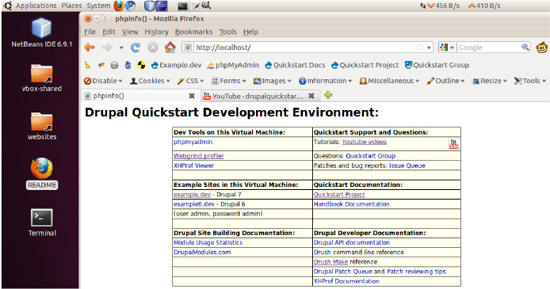
Figure 12–1. The readme file contains useful links to documentation, tutorials, and a few of the browser-based tools.
Virtualization has additional benefits. See the upcoming section on browser testing for a challenge particularly well addressed by virtual machines. If virtualization is not the direction you wish to take, though, continue to the next section of this chapter, which has instructions oninstalling several of the key components of a Drupal-friendly IDE on Windows and Mac operating systems.
Enhancing Your Existing Dev Environment
There's a developer tool for almost any task. The more often you perform a task, the more useful the “right” tool becomes and the more individualized your setup. This section will cover setting up some of the more common tools and look at the factors that might lead you to include them in your custom-assembled dev environment. I'll touch on the following major development needs:
- Hosting your site locally.
- Accessing the command line.
- Working with rendered HTML, CSS, and JavaScript.
- Testing for browser and device compatibility.
- Working with PHP files.
Hosting Your Site Locally
Hosting the site you are developing on your local machine is generally recognized both as a matter of convenience and as a best practice. With Git to facilitate the work of merging a team of developers' efforts, local development instances allow each team member to work with their own copies of files, database, and server software. This setup lets each team member experiment more freely and work out the kinks before uploading partially formed modifications that might interfere with other team members' work. As a bonus, local development travels with developers whether they are online or not, and network outages don't stop the entire team from working (both reasons for the lone developer also to adopt the practice).
Several reliable, comprehensive solutions for running the LAMP stack locally on Mac and Windows have been bundled into well-tested installation packages. The various systems each have somewhat different approaches and tools for the task; this book provides an appendix dedicated to each of the four common solutions.
- Appendix F covers local hosting on Windows with WAMP.
- Appendix G covers the setup of Drubuntu on Linux.
- Appendix H focuses on MAMP for the Mac.
- Appendix I focuses on Acquia Dev Desktop, which works on both Windows and Mac.
Another option on Windows is Microsoft WebMatrix (microsoft.com/web/drupal), which sets up Drupal to run locally on IIS.
Accessing the Command Line
From a distance, the command line strikes some developers as a relic of the dark ages, a pre-GUI tool probably used for torture. Despite its unfriendly appearance, the command line is an important, efficient, and powerful element of your development environment.
Mac and Linux ship with Terminal, the “go-to” command line interface. To open Terminal on the Mac, go to Applications ![]() Utilities
Utilities ![]() Terminal; on Ubuntu go to Applications
Terminal; on Ubuntu go to Applications ![]() Accessories
Accessories ![]() Terminal.
Terminal.
There are a few options for using Terminal with Windows. The two most common are hosting Linux via virtualization (e.g., Quickstart) or installing a Linux emulator. Cygwin (cygwin.com/) is widely used for the latter approach.
To install Cygwin, follow these steps:
- Download the installer at
cygwin.com/setup.exe. - Run
setup.exe, accept the defaults, and follow the on-screen instructions until you reach the package selection screen - On the package selection screen, locate and enable the following choices (clicking once on a package selects the most recent version and clicking again selects a previous version, so resist the urge to double click):
- In Shells, “rxvt: VT102 terminal emulator for both X and Windows”.
- In Net, “openssh: The OpenSSH server and client programs”.
- In Archive, “unzip: Info-ZIP decompression utility”.
- In Editors, “nano: A pico clone text editor with extensions” (you may also want to add vim).
- In Web, “wget: Utility to retrieve files from the WWW via HTTP and FTP”.
![]() Note Terminal doesn't interpret spaces in file and directory names as Windowsand Mac operating systems do. Use a backslash to escape spaces when you are entering paths, like so:
Note Terminal doesn't interpret spaces in file and directory names as Windowsand Mac operating systems do. Use a backslash to escape spaces when you are entering paths, like so:
$ cd Documents and Settings
As an alternative to typing the full path of a file or directory, you can drag its icon onto a Terminal window.
When you have completed installing Cygwin, open Terminal by launching the Cygwin program. Type help to get a list of command-line functions. See other chapters in this book for instructions on using the command line.
Working with Rendered HTML, CSS, and JavaScript
The single most valuable tool for front-end developers is the Firebug plug-in (http://getfirebug.com/). At its most basic implementation, Firebug allows web developers to inspect and experimentally change setting in the CSS and HTML of a page while it runs in a web browser. Full functionality requires the popular open source Firefox web browser, though versions of the tool are available that provide partial functionality in other browsers. Some other browsers also implement their own tools that provide similar functionality, notably the Safari Developer Tools (to use these, turn on the Develop Menu in the menu Safari ![]() Preferences
Preferences ![]() Advanced).
Advanced).
![]() NoteBefore you begin working with Firebug, ensure that
NoteBefore you begin working with Firebug, ensure that CSS and JavaScript aggregation for your site is off at Administration ![]() Configuration
Configuration ![]() Development
Development ![]() Performance
Performance (admin/config/development/performance).
To enable Firebug, first add it to Firefox (browse with Firefox to getfirebug.com and click Install Firebug), then activate it by going to the menu Tools ![]() Firebug
Firebug ![]() Open Firebug. By default, Firebug opens with an HTML view in the left pane and the styles associated with the highlighted element in the right pane. Styles are listed in order of precedence: styles at the top of the list supersede those listed lower down (note that this display order is the reverse of CSS stylesheets, well suited to the purpose of on-screen readability). Navigate the code either by expanding and selecting HTML elements or by enabling the inspector zoom tool (icon in upper left corner of the Firebug panel showing a mouse pointer and rectangle). To use the zoom tool, click the inspector zoom tool, then hover over the web page until the area you want to inspect is highlighted. Click the page and the HTML view will zoom to the nested HTML element associated with the highlighted area.
Open Firebug. By default, Firebug opens with an HTML view in the left pane and the styles associated with the highlighted element in the right pane. Styles are listed in order of precedence: styles at the top of the list supersede those listed lower down (note that this display order is the reverse of CSS stylesheets, well suited to the purpose of on-screen readability). Navigate the code either by expanding and selecting HTML elements or by enabling the inspector zoom tool (icon in upper left corner of the Firebug panel showing a mouse pointer and rectangle). To use the zoom tool, click the inspector zoom tool, then hover over the web page until the area you want to inspect is highlighted. Click the page and the HTML view will zoom to the nested HTML element associated with the highlighted area.
Once you are on the HTML element you wish to affect, you can change the values shown in the Style pane or in the HTML pane. Changes will immediately affect the loaded page accordingly. However, Firebug does not save these changes. The changes affect only the loaded instance of the page (that is to say, you leave the changed page in its existing window and open a new instance of the page in another window, you will see that the changes you made do not apply in the new window or tab).
To implement the changes you want to keep, open the related PHP or CSS documents in your text editor. As you develop the desired settings, modify the related PHP/CSS document accordingly. Remember only to modify your own custom theme or module files, not core or contributed code; see Chapters 15 and 16 on theming for the correct way to override rendered HTML, CSS, and JavaScript. Also keep in mind that best practice is to avoid making changes to the code of a live site; be sure to carry out your changes on a development server, then deploy to staging and production servers as appropriate.
Also check out the Drupal for Firebug module, which adds Drupal debugging and SQL query information to the Firebug window (see drupal.org/project/drupalforfirebug).
Browser and Device Compatibility Testing
As you fine-tune a site's theme, it is crucial to test the site thoroughly in each of the browsers and on each of the devices used by your target audience. As amazing as it may seemto the uninitiated, the display of a site can vary significantly between Internet Explorer and Firefox, the two most popular browsers available. It can also be disastrously different across IE versions themselves (IE6 has been very tenacious in certain markets, reportedly still with more than 15% of IE usage overall, even though IE9 is now available). Note, too, that some industries, and certainly academia, are more prone than others to continuing the use of old browsers rather than upgrading. As choices among web-enabled mobile devices grows, the challenge to test sites thoroughly becomes greater.
Limiting the breadth of the testing effort can be useful. Start by identifying which browsers and devices are most important. There are various sources of statistics on current browser market share; en.wikipedia.org/wiki/Usage_share_of_web_browsers references a good list of such sources. In the end, the best indicator of which browsers and devices you should test are statistics collected for the specific target audience of your project. If you are working with an existing site, you can typically get such data from the host's site statistics; you can also add the Browscap module to your Drupal install to capture browser version information (drupal.org/project/browscap). Keep in mind the rapid growth in mobile Internet use as you view historical data.
Even once you have identified a limited set of browsers and devices you need to account for, it can be a challenge to execute the tests. The most methodical approach to testing compatibility for desktop- and laptop-based browsers is to run (virtual) machines that host each combination of operating system and browser release of interest. For mobile devices, device manufacturers typically release emulators with their developer tools; visit their web sites for downloads and instructions.
Not everyone can justify the labor that goes into building and maintaining this array of test beds, and third party services can be engaged to handle testing. However, here are some potential shortcuts for desktop browser versions:
- Utilu IE Collection is a download of all the major releases of Microsoft Internet Explorer set up to run simultaneously on the same machine; find it at
utilu.com/IECollection. - Mozilla maintains a directory of Firefox releases at
releases.mozilla.org/pub/mozilla.org/firefox. - Multi-Safari offers individual downloads of Apple Safari, bundling the corresponding Web Kit framework of each version into the application (see description on the site;
michelf.com/multi-safari); Apple also appears to leave the download pages in place for previous versions, findable via search engines. - Opera maintains a number of downloadable releases at
opera.com/docs/history. - A resource for previous releases of Google Chrome has not yet surfaced.
When testing browsers, keep in mind that there may be different plug-ins installed on your target users' machines that can affect display and performance, not to mention the effect of screen resolutions and sizes, and the fact that visitors can resize windows (for the latter concern, be sure you resize the browser window on each test platform to ensure that any fluid or undefined widths behave as expected).
Working with PHP Files
Eclipse and Netbeans are two open source Integrated Development Environments (IDEs) well suited to the needs of Drupal development. They are quick to install and configure, and they provide a great way to navigate and modify your Drupal modules and themes. Get Eclipse PDT (PHP Development Tools) from eclipse.org/pdt; get Netbeans from netbeans.org. Here are the basic steps to get the Eclipse PDT package set up on your machine:
- Start Eclipse. On the startup splash page, select Workbench.
- Set preferences to recognize Drupal PHP content types at Window Preferences General Content Types; enter the following document types individually starting with the dot: .engine, .install, .inc, .module, .profile, .theme, .test)
- Set text encoding and line delimiters at Window Preferences General Workspace; at the bottom of the window use Text file encoding Other UTF-8 and New text file line delimiter Other Unix
- Set tabs to be converted to two spaces at Window Preferences General Editors; set Displayed tab width to two, and select Insert spaces for tabs.
The Most Basic Development Environment
This section is intended to help beginners and non-programmers put together a set of tools for occasional use.
Let's say you've never worked with Drupal, and you have no programming experience. You've heard the first step is to download a Drupal distribution (see Chapter 34), but for now you're still in the bookstore with this book in your hand. It's fallen open to this page. You want to know what tools are required when Drupal is in your plans: the essential set.
Here's the short list. Most computer owners today already have the majority of these things, but if you're new to web development, pay special attention to the last four on the list.
- A computer able to connect to the Internet.
- An Internet connection.
- A small amount of free disk space (you can do quite a lot with Drupal in 100MB, though you'll also need to account for file sizes of any media like video, audio, or large images).
- A web browser (the latest version of Firefox is strongly recommended).
- A code or text editor (important distinction: typical word processors are unsuitable for this work).
- A program for uncompressing gzip/zip files.
- To take your site online, you will also need:
- A domain name (registered and managed either by your web site host or by a registrar).
- A web server with database capabilities (typically a remote web server; Linux is the most common choice of operating system, Apache the most common web server, and MariaDB/MySQL the most common database; see
drupal.org/requirementsfor system requirements). - A way to transfer files to and from a remote server (Drupal 7 provides a method for adding modules and themes through the administrative pages; it requires your server to have FTP properly configured, as most hosted servers do; you can also use software known as an FTP client).
The list of tools you need to get started is stunningly basic. Drupal and contributed modules provide the tools you will use most often, especially as you start out. All the other basic tools you need, and a good number of the advanced tools, are available as open source software (no matter what your operating system).
Each component in this section of the development environment chapteris relatively easy to set up and learn, so new users can focus their energy on climbing the Drupal learning curve. If you do the tasks repetitively, you will want to add some more complexity to your toolkit in exchange for greater efficiency.
You may also find you will try out a few FTP clients and text editors before identifying one you like. There are a lot of possibilities, especially with text editors, and many published discussions on the merits of certain solutions over others. For the sake of simplicity, I'll only look at a couple of good, all-purpose choices.
![]() Tip Host your production website with a professional host; hosting it yourself requires significant expertise and time. When choosing your host, be sure to refer to the recommendations at
Tip Host your production website with a professional host; hosting it yourself requires significant expertise and time. When choosing your host, be sure to refer to the recommendations at drupal.org/requirements.
Select Hosting Service
There are a lot of options when it comes to hosting configurations, and a large number of providers. See drupal.org/hosting; the providers listed are likely all to meet the minimum requirements to host Drupal. However, once those requirements are met, there are several important considerations and a few simple tasks you need to be able to complete. Here are some guidelines on choosing and setting up your host.
Choose a Host According to Performance and Service Needs
Right-sizing your hosting arrangement for the performance you will need is an important first step. Consider the expense and hassle that can go into changing hosts, or even changing server arrangements with the same host, choose a service that leaves roomfor increases in requirements. Here are some general categories of hosting with broad expectations of performance:
- Providers of Drupal as a Service (also known as Drupal SaaS) provide attractive combinations of price and performance; be sure to check that the specific functionality you need is part of their offering.
- If you are creating a basic Drupal site, can live with slower page loads, and expect light traffic (say not more than a few dozen simultaneous visitors), you can get by with one of the many readily available, inexpensive, shared hosting accounts.
- If you need fast page loads and capacity for higher traffic, the best balance of performance and budget is likely to be a virtual private server (VPS).
- If your site serves gigabytes of media to an international audience, you will likely need a content distribution network (CDN).
- If you anticipate severe traffic spikes, you will need an auto-scaling solution that is typical of cloud-based hosting.
Be sure that your host provides any services you are unable to provide. Some provide server space but leave the rest to you. You can get more details by comparing the services lists and reported up-time of various providers. (Review sites regarding hosts do not generally appear to be reliable). Key attributes include:
- A well-capitalized, well-run company.
- Adequately housed servers with complete, correctly configured software and equipment.
- 24×7 server software and equipment monitoring and issue resolution.
- Proactive performance of security and maintenance tasks.
- Adequate customer support.
- Acquisition of new infrastructure and expertise as appropriate.
In addition to hosting, you also need to register a domain and have it propagate to domain name servers. Not all hosts provide these services. If yours does not, you will need to sign up for an account with a registrar. Expect to pay around $10/year for this service (it is often included free with a hosting account). ICANN, the body responsible for coordinating internet addresses, also accredits registrars. They maintain a list of registrars at icann.org/en/registrars/accredited-list.html.
Once you have selected a host, the registration process is typically quick. Look for an e-mail once registration is complete. It will contain important information for the next steps. If you have a separate account with a registrar, the e-mail will also contain instructions on pointing your new URL to your hosting account (look for instructions regarding Domain Name Servers, also referred to as DNS).
FTP Client Setup
FTP clients let you transfer files between your local computer and a remote server. Start the setup of your FTP client after you receive a confirmation e-mail from your host provider. It will typically contain the URL, username, and password needed to access your online files.
A popular choice of standalone FTP utilities, Cyberduck is a powerful open source FTP client for both Mac and Windows (cyberduck.ch). A popular choice among Firefox add-ons is FireFTP (fireftp.mozdev.org). Setup of FTP connections is similar once these clients are installed, and both offer various ways to log in and transfer files.
The following sections show how to access your remote server.
1. Create a Bookmark with Your Server Access Settings
In Cyberduck: create a bookmark for your hosted account via the menu Bookmark ![]() New Bookmark.
New Bookmark.
In FireFTP: click Create an account in the upper left corner of the window, as shown in Figure 12–2.
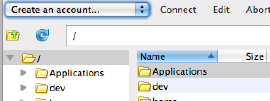
Figure 12–2. In FireFTP, click Create an account to save your FTP login credentials.
Always give the bookmark a clear nickname so you know at a glance where you are connected. Servers look identical when you are inside the file structures, so the nickname is often your surest landmark. The best nicknames contain the name of the project and indicate whether the server hosts a live, staged, or development version of your site.
2. Select a Security Protocol
In Cyberduck: select security protocols from the drop-down menu at the top of the New Bookmark window (see Figure 12–3).
In FireFTP: security settings are under the Connection tab of the bookmark window.
If your host offers SSH, you should be able to connect with SFTP using your SSH credentials. If it offers FTP-SSL, you should be able to connect with your FTP credentials. If it's not clear how to make a secure FTP connection, get in touch with their support.
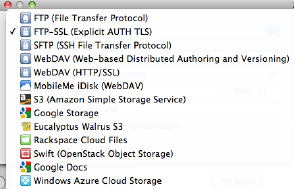
Figure 12–3. Cyberduck connection types
![]() Tip Most hosts provide a secure method of file transfer. Traditional FTP sends your password as plaintext, and broadly-available software makes it easy to record, especially on a shared network such as your favorite coffeehouse wireless hookup.
Tip Most hosts provide a secure method of file transfer. Traditional FTP sends your password as plaintext, and broadly-available software makes it easy to record, especially on a shared network such as your favorite coffeehouse wireless hookup.
3. Enter Login Credentials Provided by Your Host
In the e-mail you receive from your host, you will find the server address, username, and password appropriate for the type of connection you have chosen. The various pieces of information may be named different ways. The server address may be called the host address or URL. For file transfer over SSH, the e-mail may use the acronym SCP. No matter the nomenclature, you should be able to recognize the pieces you need: a server address typically resembles a web URL; a username sometimes looks like an e-mail address; the password is typically a mix of letters, numbers, and symbols.
Fill in these pieces of information and be careful not to alter other settings in the window unless you have specific instructions to do so. Make sure the Anonymous Login box stays unchecked. Note that Cyberduck doesn't have a password field on this screen; once you click connect, it will ask for a password.
Save these settings. When you need to connect in the future, you will only need to click the bookmark.
4. Start a Connection and Upload Files
Click the bookmark. You should get a new screen showing a tree of files and directories. You will typically work within a directory labeled either public_HTML or www (sometimes both are listed and go to the same subdirectory).
You are now ready to upload your files. Both Cyberduck and FireFTP let you drag files from a local directory and drop them on the remote directory into which you want them loaded. See Chapter 1 for the steps to set Drupal in a directory on your server; the “Implementation” section provides the details.
If your connection fails, confirm that you have entered all credentials exactly as the host provided them. Small deviations can be hard to spot but almost always explain the problem (check that caps lock is off and that you are entering upper and lowercase letters as shown). The security protocol can be another source of trouble. To ensure you have the credentials entered correctly, you can also try with no security protocol. If you successfully connect with plain FTP but not with a secure protocol, contact your host about the correct settings.
5. Basic Text Editor Setup
Most every programmer has a favorite, no-frills text editor, even if they also have full-fledged Integrated Development Environments (IDEs) as well as high-end desktop publishing tools. A good, basic text editor is as handy as a Swiss Army knife.
The defacto standard for Windows machines is Notepad++ (sourceforge.net/projects/notepad-plus); Windows also ships with Notepad, which will suffice for small editing tasks in a pinch. If you use Notepad, be sure to save your documents with the UTF-8 encoding (see the drop-down menu in the Save dialog box).
For Mac, a very good choice is TextWrangler (free but not open source); the Mac also ships with TextEdit, which can be set to plaintext and is serviceable.
Linux users wanting a GUI-based text editor should try gEdit.
Don't attempt to use a word processor like Microsoft Word, WordPad, or OpenDoc. Servers and browsers can't easily digest the output of these programs. Sometimes you'll get instant feedback on their shortcomings (the page displays incorrectly or you get error messages). In the worst case you never see the problems on your own computer and only your site visitors experience the variety of issues that arise.
6. Configure Text Editor Preferences
Notepad++ and many other text editors typically need a few adjustments to the Preferences. TextWrangler and gEdit, on the other hand, ship with the default settings needed for web development. In Notepad++, go to Settings ![]() Preferences
Preferences ![]() New Document/Default Directory. Set the New Document Format to Unix and set the Encoding to UTF-8.
New Document/Default Directory. Set the New Document Format to Unix and set the Encoding to UTF-8.
One warning: TextWrangler, gEdit, and Notepad++ each inserts tab characters when you hit the tab key. Tab characters may produce unexpected results, often appearing as single spaces or collapsing with spaces around them. They do not typically cause fatal errors, but a better practice is to use two spaces to indent lines of code and to use CSS to indent lines of text.
7. Set Your FTP Client to Use Your Text Editor
At times, using your local text editor to modify a file that is on your remote development or staging servers can be the most efficient way to get things done (note that this practice is not recommended on production servers). FTP clients like Cyberduck and FireFTP let you associate file types (including images) with appropriate editing programs.
For Cyberduck: go to Edit ![]() Preferences, click the Editor tab, and select the program you want to use from the list. If the program isn't listed, click Add program.
Preferences, click the Editor tab, and select the program you want to use from the list. If the program isn't listed, click Add program.
For FireFTP: right-click any file in the FireFTP file view area, select Open With ![]() Add Programs. Under the Extensions window, click Add, and type an extension such as .txt. With the extension highlighted, click Add under the Programs window. Click Browse and locate your program. Type a name (e.g., Notepad++) and click Apply.
Add Programs. Under the Extensions window, click Add, and type an extension such as .txt. With the extension highlighted, click Add under the Programs window. Click Browse and locate your program. Type a name (e.g., Notepad++) and click Apply.
Uncompressing Archives
Most modern operating systems ship with a utility for uncompressing archives. If you've installed a command line interface on Windows (e.g., Cygwin, as described earlier in this chapter), one of the recommended packages is unzip. In Terminal, the command looks like $ unzip filename.
If you don't have a command line interface, the archive files you download from drupal.org will need to have a program associated with them(see Figure 12–4), and you may need to download one. (Double-click an archive to open it; if it doesn't open, you'll be invited to select a program to open it with). A popular open source utility for uncompressing common archive types is 7zip (sourceforge.net/projects/sevenzip/).
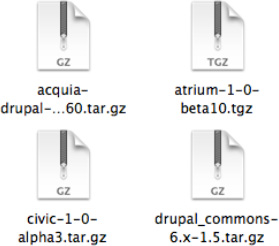
Figure 12–4. When a program is properly associated with archives, the archives typically show a zipper icon.
Server-Side Tasks and Tools
Once you have the aforementioned basic tools, your next tasks are to set up a database, upload files, and run the Drupal installer. The Introduction of this book and Chapter 1 describe these tasks in general terms. Since different hosts provide different tools and methods for completing these tasks, I'll cover a few common setups here in more detail. Some of the tools provided by hosts can actually introduce critical issues for Drupal, so we will look briefly at workarounds. If your host offers one-click installation, skip to the “Circumventing the One-Click Installers” section.
![]() Tip More details about creating a database can be found at
Tip More details about creating a database can be found at drupal.org/documentation/install/create-database.
Database Setup with phpMyAdmin
Setting up a database can be quite simple. If your server includes direct access to the database creation features of phpMyAdmin, the broadly distributed open source database manager, the process requires these few steps:
- Start phpMyAdmin, go to the Privileges tab, and click Add a New User.
- Enter a username that relates to your project and phase (if you create several databases, a recognizable name will help you single it out if the need arises); note the name you use.
- Select Local as the host and enter a password (or click Generate to have one created for you); note the password—you will be prompted for username and password when you run the Drupal installer.
- In the box labeled Database for user, select Create database with same name and grant all privileges, then click Go at the bottom of the page.
- In the left sidebar, click on the name of the database you created, then go to the Operations tab.
- Set the collation to utf8_general_ci and click Go.
- Upload your files and launch the Drupal installer as described in Chapter 1.
Database Setup with Wizards and Manual Tools
Hosts commonly provide a dedicated utility for database and user creation and disable the related tools in phpMyAdmin. In the best of situations, the host implements a manual form or a wizard that requests the same inputs described above.
Circumventing the One-Click Installers
The greatest pitfalls in setting up your Drupal site on a hosted server are likely to come in the guise of one-click installation utilities. You will typically be forced to use them if they are present. Unfortunately, they frequently introduce wholly avoidable issues that are relatively difficult to discover and fix. Fantastico and SimpleScripts are broadly used utilities of this sort. Each has its own problems. To add to the confusion, manual/wizard methods are frequently available alongside one-click installers. When both methods are available, the manual/wizard methods typically also result in installs that don't work. The best workaround appears to be to use the one-click utility. It will set up database, user, and the required non-Drupal files. You can then remove the Drupal files and tables created by the installer and proceed with a normal install.
Here are the steps for this workaround when you are forced to use a one-click install utility:
- Follow the host's directions for installing Drupal; when it instructs you to create a new subdirectory for this version, give it an easily recognized name (e.g., fantastico-drupal7)
- Once installation is complete, follow the 1-click installer'sdirections for launching the site; ensure the installation works as expected (you will see the front page as pictured in Chapter 1); if it doesn't, contact the host for support.
- After confirming that the installation works, use your FTP client to place your own Drupal distribution in a different directory (e.g., public_HTML) as described in Chapter 1.
- Navigate to the subdirectory created by the installation script(the one I suggested naming fantastico-drupal7 in step 1); inside the directory, navigate to
sites/default/settings.php; open the file; and note the database name, username, password, host, and port, as shown in Figure 12–5.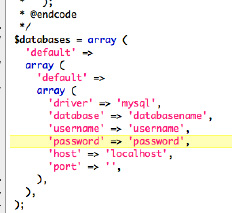
Figure 12–5. The settings.php file showing the connection information to note for use when running the Drupal installer
- Next, launch phpMyAdmin and click the database name in the left sidebar that you noted from
settings.php. - Scroll to the bottom of the list of database tables and click Check All; in the adjacent drop-down menu labeled With selected, choose Drop, then confirm your choice.
- Click on the to the Operations tab, set the collation to utf8_general_ci, and click Go
- Launch Drupal install as described in Chapter 1 of this book and enter the connection information recorded from
settings.php.
Summary
In this chapter we have explored a few possible approaches to setting up your development environment. Most of the chapter focuses on two ways to build advanced suites of tools that offer significant gains in efficiency but also have a relatively steep learning curve. The last section of the chapter (Your Most Basic Development Environment) presents a vastly simplified setup suitable for occasional use, for casual beginners, and for non-programmers. We cover the basics of selecting, signing up for, and configuring a web hosting account and domain registration. Throughout, we touch on best practices and on workarounds for known issues related to development and shared web hosting. Further information on topics related to development environments can be found on the book's website, www.dgd7.com.