
P A R T V
![]()
Back-End Development
Chapters 18, 19, and 20 form one unit, originally written as one chapter, covering everything you need to know to get started writing your own modules.
Chapter 21 covers porting a Drupal 6 module to Drupal 7, which can be a great way to learn module development.
Chapter 22 provides another good onramp to writing modules—“glue code,” or site-specific modules, to make the final tweaks you cannot quite achieve with configuration. This chapter can be read without reading any of the previous chapters first.
Chapter 23 covers writing tests for your module, an essential part of reliable and sustainable code.
Chapter 24 introduces the concept of an API module and goes into some of the strategy of writing these building blocks of Drupal functionality.
C H A P T E R 18
![]()
Introduction to Module Development
By now, you know that Drupal is a powerful and modular system. Indeed, much of Drupal's power is in its modules, dynamos of drop-in functionality that build on Drupal's base system and on one another to do wonderful things.
How do you tap into this power to add your own original features? You can write a module. All you need to do is make two files. The first file tells Drupal about the module; it's not code. The second file can have as little as three lines of code in it. In the first section of this chapter, you'll create the contents of both these files, thereby making a working module. Making a module is something that anyone can do. There are many (mostly simple) rules to follow and tons of tools to use—and lots of exploration to do. Every person developing a module is still learning.
This chapter is an introduction to module building, and Chapters 19 and 20 will build on it. This chapter provides the following:
- The basics of a module and how Drupal uses hooks in nearly everything it does to allow modules to extend and modify Drupal.
- An overview of technical skills required to develop a module, including PHP basics and Drupal coding standards.
A Very Simple Module
In this section, you'll take a quick spin through a small module, and then you'll come back and revisit the route in detail. When feature-complete at the end of Chapter 19, this module will help site builders and module developers investigate sites; ideally, they'll see the skeletal structure of a site, so the module is called X-ray. This module will print the form ID at the top of each form on a site.
Two Files in a Folder
The simplest module is composed of two files together in a folder: one to identify the module, and the other containing the code (the instructions for what the module should do). The information file is named for the module followed by .info (pronounced “dot info”) while the file with the code is the module name followed by .module (pronounced “dot module”). Your module can have any human-readable name, but the name needed at the start is its machine name: a lowercase version of the name without spaces or special characters. You will use this name consistently for the folder and file names and the functions within the code. So in this case, the machine name of X-ray module will be xray, so xray.info and xray.module files, defined in Listings 18–1 and 18–2, should go in a folder called xray. You will cover this and the code in detail later.
Listing 18–1. The xray.info File
name = X-ray

description = Shows internal structures and connections of the web site.

core = 7.x
Listing 18–2. The xray.module File, Including Comments (Text between /** and */)
<?php

/**

 * @file

 * Helps site builders and module developers investigate a site.

 */


/**

 * Implements hook_form_alter() to show each form's identifier.

 */

function xray_form_alter(&$form, &$form_state, $form_id) {

  $form['xray_display_form_id'] = array(

    '#type' => 'item',

    '#title' => t('Form ID'),

    '#markup' => $form_id,

    '#weight' => -100,

  );

}
Now you know you can make a module! The whole thing fits on a half page and you will know what the code means by the end of this section. To use the module, do the same thing you would do with a module someone else wrote: put it within a directory where Drupal looks for modules and enable it. Within your development site, put the xray folder in a modules folder such as sites/all/modules/custom (creating the “custom” directory if necessary). Then, use your browser to view your development site and enable the X-ray module on the Administration ![]() Modules (
Modules (admin/modules) page. (Sure, you could enable it with Drush, but the first time you enable a module you've made, it feels good to see it on the Modules page and do it manually.) X-ray works as soon as you turn it on. You'll see the changes right on the modules page: X-ray alters forms on the site, making them print their internal form ID; the Modules administration page is one big form provided, you now know, by the system_modules() function (see Figure 18–1).
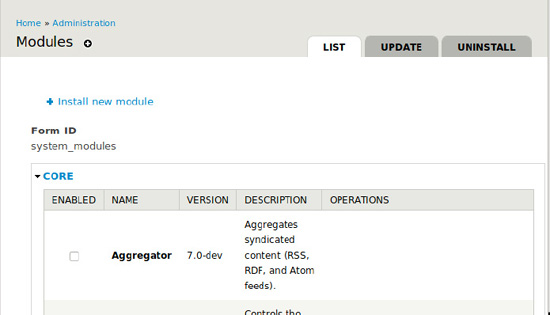
Figure 18–1. The internal form ID system_modules (the name of the function producing the form) printed at the top of the modules administration form
It's not the most exciting module, granted, but a fully-functional module all the same, affecting your site with only a few lines of code. The mythology of module development as the exclusive domain of Drupal ninjas has been definitively smashed. You can proceed with confidence. You will gain the knowledge needed to put extra power under the hood of your Drupal site with modules you make yourself.
![]() Note Don't get caught up in trying to do something unique or awesome or even particularly useful with your first module. A module created as a learning exercise doesn't have to something never done before; all it needs to be is new to you. See Chapter 20 to make modules that are both simple and useful.
Note Don't get caught up in trying to do something unique or awesome or even particularly useful with your first module. A module created as a learning exercise doesn't have to something never done before; all it needs to be is new to you. See Chapter 20 to make modules that are both simple and useful.
Still, that was a bit exciting. A very little code and you're adding something to every form on your site! How does it work? Let's do a slow-motion replay, with a play-by-play analysis and lots of color commentary for background information.
Where to Put a Custom Module
Your module is self-contained in its folder and can be put anywhere Drupal looks for modules, just like modules you get from drupal.org. But, where should you put it?
You know you want it somewhere within the sites folder because every customization you make to a Drupal distribution belongs in sites. This chapter follows the practice of putting custom modules in sites/all/modules/custom, which will need to be created the first time you put a module there.
![]() Note When making your own distributions, as in Chapter 34, you can bundle modules with your installation profile. Modules included with the example_profile would end up placed in
Note When making your own distributions, as in Chapter 34, you can bundle modules with your installation profile. Modules included with the example_profile would end up placed in profiles/example_profile/modules.
Every module downloaded from drupal.org can go in the sites/all/modules/contrib directory (as shown in Chapter 4 for placing manually downloaded or drushed modules; once you create a sites/all/modules/contrib directory, Drush will automatically put modules it downloads from drupal.org there).
As an alternative to putting custom modules in sites/all/modules/custom, many developers adopt a convention of placing custom modules in sites/default/modules and contributed modules directly in sites/all/modules). This works well as long as you aren't using Drupal's multisite capability. (Multisite means using a single installation of Drupal to serve multiple sites by putting additional folders in sites. Often, multiple installations of Drupal will serve you as well or better than multiple sites on one installation. However, some methods for deploying many Drupal sites, such as Aegir (aegirproject.org) do make heavy use of multisite. See INSTALL.txt in the web root of any copy of Drupal for instructions on setting up your own multisite.)
Table 18–1 lists recommended directories for custom modules.
![]() NoteIn the directories in which Drupal looks for modules, it does a serious job looking: it will keep burrowing down through all nested subdirectories and find any modules that are there. Therefore, because Drupal looks for modules in
NoteIn the directories in which Drupal looks for modules, it does a serious job looking: it will keep burrowing down through all nested subdirectories and find any modules that are there. Therefore, because Drupal looks for modules in sites/all/modules, it will also find John Albin Wilkin's Bad Judgment module if you put it in sites/all/modules/contrib/experiments/set_a/johnalbin/amusements/bad_judgment. But that doesn't mean you should put it, or any other module, there. (Module projects that contain multiple modules necessarily make use of this feature to have Drupal find additional modules in their project folder, and some will put sub-modules nested a layer or two deeper, such as in a modulessub-directory, an approach used by core's Field module.)
Table 18–1. Recommended Locations for Custom Modules
| Directory | Use case |
sites/all/modules/custom/ |
For a single site or to be available for all sites in a multisite installation. |
sites/example.com/modules/custom/ |
To be available for only one site, example.com, in a multisite installation. |
sites/default/modules/ |
Acceptable shortcut location for custom modules when using a single-site installation. |
You will be developing the X-ray module within a local development site that is a single-site install, so any of these will work. (Such a local site is also called a sandbox site, meaning it's a playground and is not used for production.)
![]() Tip To develop your module, you should have a working Drupal site on your computer. If you don't have this yet, see Chapter 12 on setting up your development environment and Appendix F (Windows), G (Linux), H (Mac), or I (for the cross-platform Drupal stack installer from Acquia) for serving web pages locally. Alternatively, some developers do all their work SSHing or FTPing into a remote development server.
Tip To develop your module, you should have a working Drupal site on your computer. If you don't have this yet, see Chapter 12 on setting up your development environment and Appendix F (Windows), G (Linux), H (Mac), or I (for the cross-platform Drupal stack installer from Acquia) for serving web pages locally. Alternatively, some developers do all their work SSHing or FTPing into a remote development server.
USING THE COMMAND LINE
While you can create folders with a graphical file management tool (such as the Mac OS X Finder or the Microsoft Windows Explorer), this chapter shows how to do this with the command line (see Listing 18–3). It will help make you a better and faster developer, and it probably builds character, too.
Listing 18–3. Commands to Create the xray Folder, Its Parent Folder Called modules, and Change Directory to It
mkdir -p sites/default/modules/xray

cd sites/default/modules/xray
Create a Repository for Your Module
This step has nothing to do with making your module work and everything to do with your workflow when making your module. Chapter 2 introduced version control with Git and Chapter 14 expounded on its benefits for achieving a state of flow as a developer: you want to feel free to try anything and always know you can get back to a working state. You want to develop your module while using source control and to commit your changes constantly.
From the root of the module you are developing (in this case, in the folder xray; on my computer, this directory is at ~/code/dgd7/web/sites/all/modules/custom/xray), initialize a Git repository. Then make your first commit, which can be as soon as you've created your first file, like so:
it init
![]() NoteYou can create a repository in your module's directory even if it is already in a web site project that is version controlled. This will let you separate your module from your site for sharing the module with the world.
NoteYou can create a repository in your module's directory even if it is already in a web site project that is version controlled. This will let you separate your module from your site for sharing the module with the world.
After initializing the repository, add and commit the changes you've made in your module directory. These are steps you will do again and again and again at each juncture or pause or breath you take while coding your module, ensuring that you can get back to any step of the journey should you need to.
git add .

git commit -m "Basic xray.info and .module files."
In Chapter 14, Károly Négyesi, one of the most prolific contributors to Drupal core, said not to worry about what the commit message says. The most important thing is to make recording all your changes effortless and natural. (I commit frequently but don't yet follow this practice myself. You can see every commit made in the development of X-ray module at drupal.org/node/953650/commits.)
Another great benefit of version control is that you can now easily share your work with the world. See Chapter 37 for how to link your module with a sandbox project on drupal.org so that anyone can try out your work. Chapter 37 also has much, much more on using Git to track changes, share code, and collaborate with other developers.
The .info File
This file only tells Drupal about your module, but there's still a lot to look at there. A .info file tells Drupal “Hey, this is something you can play with.” Drupal reads only the .info and ignores the rest of the module until the module is enabled. The information Drupal displays on the Modules administration page (admin/modules) therefore comes entirely from the .info file for modules that are not enabled. (Once a given module is enabled, Help, Permissions, and Configure links, which are dependent on the module's code to work, may appear).
Basic .info Directives
The contents of the .info file are simple and formulaic. I will cover many common directives in the next few pages, but all directives can be found at drupal.org/node/542202. The following is the minimum contents of a .info file as self-describing examples, as would be found in machine_name.info:
name = Human-readable name of our module

description = Describes what our module does in a sentence or two.

core = 7.x
There can be additional values, but these are the essentials. The syntax is a simple label equals value pairing. It's always the label (or name) and the value, separated by a space, an equals sign, and another space. For instance, in the last directive (or property) above, core is the label and 7.x is the value.
![]() Note As of Drupal 7, there's no need to show
Note As of Drupal 7, there's no need to show $Id$. The old version control system used by drupal.org, CVS, required that every file hosted on cvs.drupal.org have an $Id$ comment at the top which it replaced with the time when it was committed and the name of who committed it. This is unnecessary now with Git and git.drupal.org, but Git still knows who committed what and when.
The human-readable name is required for the module to be selected (and thus enabled) on the Module administration page. There is no machine name directive; this is read from the .info file name. Though not technically required, including a description is minimum module developer courtesy. The core directive must be set to 7.x or Drupal 7 will refuse to work with the module. (Drupal doesn't currently allow modules to require a certain minor “point release” version of Drupal, but you can work around this by declaring a certain version of core's system module as a dependency of your module. The dependencies directive is covered next.)
dependencies[]
One of the most common optional directives is the dependencies[] directive, which lists the system names of any modules required by your module to work. If you decided to make the previous example dependent on the Views module, you would add the line dependencies[] = views to the .info file.
You should only list immediate dependencies. For instance, Views depends on CTools, but you should only list CTools in your module if your module directly uses CTools. This helps you avoid listing false (outdated) dependencies. By the same token, if you change your module so it is no longer dependent on another, remove that from the dependencies so that site builders aren't forced to install the extra module.
What's with the brackets? When a directive can have multiple values, the name has array notation, [], appended to it so that the directive can be repeated as many times as necessary. Thus, a module that depends on both the core Help module and the contributed Views module would repeat the dependencies[] directive twice, as shown in Listing 18–4.
![]() Note As of Drupal 7, each dependency must be listed on a separate line, repeating
Note As of Drupal 7, each dependency must be listed on a separate line, repeating dependencies[] = system_name for the system name of each module on which your module relies.
Listing 18–4. A .info File of a Module Requiring Two Other Modules
; Require the core Help module and the contrib Views module to be enabled.

dependencies[] = help

dependencies[] = views
The first line in Listing 18–4 is a comment. In .info files, comments are indicated by a semicolon (;) at the very beginning of a line. So any line beginning with a semicolon in a .info file will be ignored by Drupal. Comments aren't usually necessary in module .info files because .info files are so simple and self-explanatory. The next two lines in Listing 18–4 are the two dependencies, the machine names of the Help and Views modules. (Remember that the machine name can vary greatly from the human-readable name. The machine name for Views Bulk Operations module, for instance, is vbo.)
Version-Specific Dependencies
Dependencies can specify particular versions of modules, such as >=3.x for any major version 3 or above. For contributed modules, this is the second part of a module's version string, after the Drupal version, so dependencies[] = views (>=3.x) will allow Views 7.x-3.0 (and the 4.x series, when that exists) but not Views 7.x-2.9. Note that the parentheses are required even for the most simple version string. The following is an example of a complex version-aware dependency specification, courtesy Károly Négyesi (chx):
dependencies[] = foo (>=2.x, <4.17, !=3.7).
It means that you need foo module's major version to be at least 2 and any version up to (but not including) 4.17, aside from 3.7 which was horribly buggy.
As mentioned, you can use this form of the dependencies[] directive to require certain versions of Drupal core. If a bug in Drupal 7.0 that prevents your module from working properly is fixed in Drupal 7.1, you can require that system module (a core module which is required to always be enabled) be version 7.1 or above, like so:
dependencies[] = system (>=7.1)
configure
The configure directive, optional but highly recommended, lets you provide the path to your module's configuration page. Drupal uses this path to provide a link on the Modules administration page when the module is enabled. The following is an example of a configure directive from the core search module:
configure = admin/config/search/settings
(The X-ray .info file does not have a configure line at this point, but you will add one when you create a configuration page to link to later.)
![]() Note As of Drupal 7, the
Note As of Drupal 7, the configure directive greatly improves the experience of site builders by providing a link to a module's configuration page from its listing on the modules page. (I really like the configure link.)
package
Another optional directive is package, which is used to group modules on the Modules administration page (admin/modules). If you don't know what to put as your module's package, you are encouraged to skip it entirely. Leaving package out will group your module in the “Other” category. If your module belongs with a group of modules, you can place it with them by using the same package.
![]() Note The best approach to grouping modules with the package directive is not a settled matter in Drupal. Keep an eye on the handbook page (
Note The best approach to grouping modules with the package directive is not a settled matter in Drupal. Keep an eye on the handbook page (drupal.org/node/542202#package) for updates to policy and the other eye on the package wiki page (groups.drupal.org/node/97054) for the choices module maintainers are making. As noted, when in doubt, leave it out.
You'll put your X-ray module in the Development package, which is the suggested location for development-related modules. You can create and edit your module's .info file using any code- or plain-text editor; do not use a rich text editor or word processor. (See dgd7.org/vi for a little information on how to use the Vim editor, which is present in most webserving environments.) Create or edit the .info file for your X-ray module to include the package directive set to “Development”, as shown in Listing 18–5. (Note that this directive, unlike dependencies[] but like name and description, uses proper capitalization.)
Listing 18–5. The xray.info File with Added Package Information
name = X-ray

description = Shows internal structures and connections of the web site.

package = Development

core = 7.x
There you have it—a .info file that tells Drupal your module's name, its description, what package it belongs to for grouping on the Administration ![]() Modules page, and the version of core with which it works. Your module is all set to rock Drupal's world; the only thing it's lacking is... code.
Modules page, and the version of core with which it works. Your module is all set to rock Drupal's world; the only thing it's lacking is... code.
![]() Hint If you're not near this book or another reference when you need to write a
Hint If you're not near this book or another reference when you need to write a .info file for a new module, you can look at a core module's .info file or another contributed module's .info file (and ignore everything below the “Information added by drupal.org packaging script” line), or you can find the handbook page on Drupal 7 .info files at drupal.org/node/542202.
The .module File
The second file, a .module (“dot module”) file, is what tells your module to do something. Its importance doesn't dictate length; it can be even shorter than the .info! (Admittedly, it is usually much longer.)
The .module file must have the same machine name as the .info file, which for both should be the same name as the folder they are in. (Modules do not have to be named the same as the folder they are in, but it is common courtesy to do so for the sake of site builders and other module developers. Even for projects that include multiple modules, each module ought to receive its own folder, and the machine name of all modules in a multi-module project should begin with the project name.)
For the X-ray module, the project name, folder name, and machine name are all xray, and so the main module file name will be xray.module. Open your .module file, as you do every PHP code file, with the full <?php tag that identifies the file as containing PHP code to process, like so:
<?php
I emphasize this because numerous code samples in this book will not include this line, but all code is presumed to go in a file that starts with the <?php line. No PHP code will work without an opening line.
Next, for the .module and every code file, add a comment explaining the purpose of the entire file. It uses docblock comments, one of the two PHP comment styles approved by Drupal coding standards. Comments are so important that they are described in their own section of this chapter.
Code Comments
The one-line style of comment that begins with // is for use inside functions, such as the function xray_form_alter(). Everything following the two slashes to the end of the line is ignored, so inline comments that span multiple lines need to have each line begin with //. The X-ray module does not have an example of inline comments inside functions yet, but you will see and write plenty very soon.
The first lines of the .module file are comments of a different kind, called docblock for documentation block. Let's break them down. The first is the @file notation that describes the purpose of the file as a whole (see Listing 18–6). For a .module file, it will often be similar to the module description from the .info file.
Listing 18–6. Code Comments in Docblock Format at the Beginning of a File and Before a Function
/**

 * @file

 * Helps site builders and module developers investigate a site.

 */


/**
* Implements hook_form_alter() to show each form's identifier.

 */

function xray_form_alter(&$form, &$form_state, $form_id) {

  // This is an inline comment telling you the code has been removed.

}
PHP's /* */ C-style commenting goes from the beginning /* to the ending */, commenting out everything in between, and can span multiple lines. In Drupal, it is only used outside of functions and usually to introduce functions. In Listing 18–6, this block style of comment introduces the file with the aid of the @file identifier. Note that Drupal coding standards require more than simply opening and closing comment tags: the start of the comment has an extra asterisk (/**); each line of the comment is prefaced by an indent of one space, an asterisk, and another space ( * ); the closing is indented one space ( */).
The same docblock notation is used to introduce the one function you have in your module so far. This comment must be immediately above the function, with no blank lines between them. Its first sentence must fit on a single line, including the period it must end with, and additional lines of description or explanation must be separated by an empty comment line. In this case, as a simple hook implementation, a single-line sentence of documentation can be the only line. The comment informs anyone reading the code that the function xray_form_alter() implements hook_form_alter().
Wait, “implements hook_form_alter()”? What is that even supposed to mean?
Hooks
Hooks are the magic portals that let any module, including your module, appear in another part of Drupal and do something. When Drupal takes an action it considers important (loading content, saving a user account, displaying a comment, etc.), it takes a moment to invite any installed module to observe or intervene. Every hook is an opportunity for your module to take action in response to something Drupal is doing—and there are 251 hooks in Drupal core, according to the list at api.drupal.org/hooks.
The “hook” in a hook name is a placeholder for the short name of the implementing module. It signifies the naming convention that allows functions to behave in this special way. When a typical hook is invoked, Drupal looks through all enabled modules for functions that start with the module name and end with the hook name, not including the word “hook.” Thus, to implement a hook, take the “hook” part off the front of the hook name and replace it with your module's short (machine) name. This is why hook_form_alter() is implemented in the X-ray module by the function xray_form_alter().
![]() Tip If you see a function
Tip If you see a function hook_anything_whatsoever(), it's a demonstration of how to use that hook (and as such should live in an .api.php file such as modules/system/system.api.php). Your module's functions will not start with the word “hook.” A function that implements a hook will say which hook it is implementing in its documentation block comment, but the function name itself will use the module's short name in place of the word “hook.”
In computer science terms, Drupal's hooks fit the event-driven design pattern in the Inversion of Control family of design patterns. Every use of module_invoke_all() (or a variant method of invoking hooks) is an event that other parts of Drupal, including contributed modules, can respond to (or not respond to; that's also perfectly fine). For example, when comment module shows a comment, it runs this code
module_invoke_all('comment_view', $comment, $view_mode, $langcode);
to give any module a chance to act on the comment by implementing hook_comment_view(). The comment object is passed to implementing functions by reference so that changes can be made on it directly. The view mode and language code are provided as context that can be taken into account when reacting to the comment being viewed. The hook function signature describes what is passed to a hook, and every function signature can be seen on api.drupal.org. For instance, hook_comment_view()'s definition can be found at api.drupal.org/hook_comment_view. Each hook's API documentation will also explain if and what a hook implementation should return.
Larry Garfield (crell) writes that in a procedural system, which PHP applications historically are, this hook method is a very good way to keep code loosely coupled, meaning that your code doesn't have to know squat about how the code you're talking to works, as long as you know what the other code wants. For more about approaches to programming and how some of them relate to Drupal, you can read crell's blog at garfieldtech.com/blog/language-tradeoffs. For what this means for your module, read the sidebar on how Drupal displays help text on a page.
![]() Tip The best way to learn how to use hooks is to download several contributed Drupal modules and find where the hooks are really used, says Drupal developer and educator Chacha Sikes. Then you can compare the hooks in use to the hook definitions on
Tip The best way to learn how to use hooks is to download several contributed Drupal modules and find where the hooks are really used, says Drupal developer and educator Chacha Sikes. Then you can compare the hooks in use to the hook definitions on api.drupal.org to see how the module developer figured out how to implement the hook.
All hooks defined in Drupal core can be looked up at api.drupal.org. Many that are defined in contributed modules can be looked up at drupalcontrib.org. All this documentation is being generated by comments in Drupal's code, so you can put in some work yourself to install the (currently Drupal 6) API module (drupal.org/project/api) or simply look at the code of the module you are interested in. If a module defines hooks, it should have a .api.php module with examples of how to use them.
HOW DRUPAL USES HOOKS TO DISPLAY HELP TEXT ON A PAGE
The X-ray module will make heavy use of hook_help() to show text in the help region on pages it investigates. Placing the following code in the xray.module file is sufficient to add text to the help block when visiting the page Administration ![]() Structure (
Structure (admin/structure):
<?php

// [Existing code not shown due to space considerations]...

/**

 * Implements hook_help().

 */

function xray_help($path, $arg) {

  if ($path == 'admin/structure') {

    return t('This site has stuff!'),

  }

}
Displaying the text “This site has stuff!” at the top of the Structure administration page seems like a simple task—all right, it is a simple task—yet the complexity of how that text gets there is the secret source of Drupal's power. You don't need to know how hooks work to use them, but understanding how Drupal works never hurts (much). Let's take a short tour of how Drupal puts help text on a page.
Drupal Turning Paths into Pages: hook_menu()
Drupal is going about its business, which usually means displaying a web page. You've clicked on the Structure link in the toolbar (admin/structure). Your browser tells Drupal that's where you want to go. Every path ultimately matches up to a menu item with a page callback function that has chief responsibility for displaying the page at that path. These menu items are provided by implementations of hook_menu() and stored in the menu_router table. (The menu system is covered in greater detail in Chapter 29.)
Menu items can include information to calculate whether the user requesting the page has access or not, and if there is any file that should be included before calling the page callback function. Having taken care of the main content (typically a renderable array or chunk of HTML that, in this case, is a list of the administrative links within the Structure section), Drupal looks to load up all the other regions of the page, too. It gets the regions available from the theme in use at the time, and it gets the blocks assigned to each region of that theme from the block system. All that information is provided by Drupal calling hooks. Other parts of Drupal's core code or contributed or custom code you've added answer the calls with functions that implement those hooks.
And you still have another major hook to go before you reach your little help hook.
Drupal Showing a Block: hook_block_view()
When the system_help block (which by default assigns itself to the help region) is reached, Drupal calls a specific implementation of hook_block_view(). That is, rather than following the common pattern of invoking a hook in all modules that implement it, Drupal here follows an alternate pattern of invoking the hook as implemented in only one specific module. Drupal constructs a function name from the name of the module providing the block (system)and the hook's name(block_view). The naming convention of calling a function based on the combination of a module's name and the hook name is the same one used when invoking a hook in multiple modules. It allows you to say that the function system_block_view()implementshook_block_view(). (Some distinguish this from true hooks by calling them callbacks; see drupal.org/node/1114032 to see if this gets done in Drupal 8.)
When invoking system module's implementation of hook_block_view() for the system_help block, Drupal passes in the text “help” as a parameter. Inside the function system_block_view() is a switch statement that decides what code gets run. When the parameter given is “help,” the switch statement (and subsequently the function) gives back information for the system_help block. It sets the title of the block to nothing and sets the body of the block to the value returned by the function menu_get_active_help().
Drupal Gathering Help for a Page: hook_help()
It is now that Drupal finally invokes the hook which your module implements, hook_help(). Inside the function menu_get_active_help(), Drupal gets the internal router path of the page that is currently being visited. Then it says, pretty much literally, “for each module that implements the hook “help,” give me what you've got for this path.” It takes what it receives, if anything, from all the implementations of hook_help() and combines them into a single string. It returns that output to be used as the body of the system_help block. Your module is named xray, the hook is named help. Therefore, you named your function xray_help() and stated in its code comment that it implements hook_help(). As noted, the entire hook system is based on this naming convention of module name plus hook name; if a function exists with that name, Drupal considers the hook to be implemented and calls that function when invoking the hook.
![]() Note The “for each module that implements hook x” step is the same thing that happens whenever Drupal calls
Note The “for each module that implements hook x” step is the same thing that happens whenever Drupal calls module_invoke_all('x'), where 'x' is the hook name without the preceding “hook.” Whether or not the function module_invoke_all() is used, something very similar occurs each time a hook is invoked.
The hook_help() function signature lets you know that your function will receive a parameter (you can think of a parameter or argument as a piece of information) represented by $path and that your function needs to return some text. The function signature for hook_help() is defined at api.drupal.org/hook_help and also in Drupal core's code at modules/help/help.api.php.
![]() Tip You can look up any hook the same way you look up any function—by searching for it on Drupal's API site at
Tip You can look up any hook the same way you look up any function—by searching for it on Drupal's API site at api.drupal.org. You can get to a function or hook, for instance hook_menu, by typing it into the search address directly (api.drupal.org/api/search/7/hook_menu) or, even more concisely when searching within the current version of Drupal, by simply adding the function name or hook name onto the API site's address: api.drupal.org/hook_menu. Be sure you are looking at the function or hook documentation for your version of Drupal; api.drupal.org provides tabs for Drupal 5, Drupal 6, and Drupal 7.
The function menu_get_active_help(), when called for the Structure administration page by the sequence of events I just went over, hands the parameter $path with the value admin/structure to each function that implements hook_help(). Block module's block_help() function checks and tells Drupal it has nothing for it at that path. Node module's node_help() also checks and reports nothing. Taxonomy module's taxonomy_help() function and all the other modules that implement hook_help() check to see if they have anything to say for the path admin/structure, and they all say no. (This doesn't have to be the case; they could all return text for a path and Drupal would combine the help text and display it on the page, but this is why admin/structure had no help on it before— all of this happens whether your module is enabled or not.) Finally, menu_get_active_help() asks X-ray module's xray_help() if it has anything for the path admin/structure.
function xray_help($path, $arg) {

  if ($path == 'admin/structure') {

     return t('This site has stuff!'),

  }

}
Inside xray_help(), it takes the $path parameter and checks if it is equal to the text “admin/structure”. Upon realizing that it is, your function exclaims OMG! and immediately returns the text “This site has stuff!” to menu_get_active_help(), which in turn passes the same text back up the stack to system_block_view(), which returns the same text, now combined with the empty title it set earlier, back to the Block module, which you last saw a half-dozen paragraphs ago, but fortunately Drupal works a lot faster than this story.
![]() Tip See the
Tip See the hook_help() function signature in Chapter 20 for details about the $path parameter and the as-yet unmentioned $arg parameter.
It worked to good dramatic effect, but X-ray module was only last to be asked about the path because it came last alphabetically. If you had a Zebra module with the function zebra_help(), or a module that has been intentionally set to a heavier weight, either of those would be called after your module. All implementations of hook_help() get called. The order doesn't make much difference, unless you care about whether your help text is before or after another module also providing help text on the same page. Also note that your xray_help() function gets called by this chain of events on every page, but on all those other pages it compares $path to “admin/structure”, realizes they are not equal and that it has nothing to say, and returns nothing.
Drupal Allowing Blocks to be Modified: hook_block_view_alter() and hook_block_BLOCK_ID_view_alter()
Block module, immediately after it receives its response from system_block_view(), builds the block. Then it fires off yet another hook using drupal_alter() to allow any module to implement hook_block_view_alter() and change the title or the body of the block, based on the block machine name (system_help in this case). Actually, Drupal gives you two alter hooks at this point; the second one is the precisely named hook_block_view_system_help_alter() for any module that wants to pinpoint the system_help block for changes. You don't implement either hook, and no other module does either, but the point is you could; it's one more way Drupal builds in flexibility and extensibility.
![]() Note Don't use alter hooks unless absolutely necessary. You could have given X-ray module a function named
Note Don't use alter hooks unless absolutely necessary. You could have given X-ray module a function named xray_block_view_system_help_alter() and tacked your text onto the help block's content by altering that specific block. This would have required you to figure out the path you are on yourself, but more importantly it's the wrong way to do it because it's farther outside the system Drupal has set up for help text. You should always do things at the first opportunity Drupal gives you to do them. Doing things later means missing out on tools Drupal provides for you and takes away opportunities for other modules to react to and act on what you're doing in your module.
Hooks Open Drupal to Change and Extension
You really get a sense of how Drupal thinks from the story of how Drupal uses hooks when it displays help text on a page. Drupal doesn't hardcode a set of regions for its pages; it gets that from a theme. It lets any module provide a block that can be put in any of those regions. And in its own code, when it provides the help block, it lets any module stick help messages in there. Then, for good measure, it lets any other module take a crack at modifying this block. (The page rendering layer gives still another chance to alter parts of the page before it is output.) In general, there's a hook for everything Drupal does, which is why, no matter what you need to do, there's a module for that—or soon will be!
![]() Note The previous story was told by a debugging tool. Chapter 12 and
Note The previous story was told by a debugging tool. Chapter 12 and dgd7.org/ide talk about the tools you need to read your own “Page request in the life of Drupal” adventure stories whenever you want.
Technical Skills
Even if you're familiar with PHP and Drupal's coding standards, it may be worth your while to skim this section. There's usually something you can pick up. In fact, I learned new things writing this section.
PHP Basics
Some would tell you that you should know PHP and SQL before embarking on a journey into Drupal's innards. To them, you can say you're sure the authors will remind you what those acronyms mean in a minute, and you'll be good to go. PHP is the programming language in which Drupal is written. (Its acronym doesn't stand for much of anything anymore; officially it is a recursive acronym for PHP: Hypertext Preprocessor.) PHP will run, and is likely to be found, nearly anywhere you can run a web server. SQL (Structured Query Language) is for communicating with relational databases, which is where Drupal stores its configuration and content by default.
Studying PHP and SQL is a good idea, certainly, but it is possible to get started with Drupal development and learn as you go. As this is one book, and not a multi-volume series, it takes the learn-it-all-through-Drupal approach. I will go over some PHP basics here; SQL will be touched on in the section on Drupal's database layer in Chapter 19.
Programming, with PHP or anything else, is just logic—almost literally—which makes it easy in some ways and hard in others. You can learn the fundamentals of any programming language by learning its syntax and applying a little logic. On the other hand, people get PhDs in logic, and that's without the quirks of different programming languages. But don't worry; you will jump in and learn the basics of PHP and apply it in practice within the structure of Drupal programming.
The best learning advice is to look at a lot of Drupal code. Whenever you see something and you don't understand what it's doing, look up the operator or function on php.net or, for Drupal-specific functions, on api.drupal.org. (If you see a function in Drupal core, and it's not on one of those sites, it's on the other.)
![]() Tip The official PHP web site—
Tip The official PHP web site—php.net—is an excellent resource with good documentation for every function and many comments by people who have been there and done that before you. Furthermore, it's easy to find function definitions by typing the function name directly after the site URL. To get the definition for the function substr(), you would enter into your browser php.net/substr or, if you didn't remember the function name exactly, you would give your best guess. Picking one of php.net's suggestions, and always checking out the See also section underneath most function definitions, is usually a faster way to find the function you need than searching the web as a whole. If I have a guess, I make php.net my first stop.
Terminology
There are some words in code that initially seem like they are just there to confuse things; however, after using them for a while you won't know how to speak without them.
- A string is literally a string of characters. It could be a word, a phrase, or a random group of characters. The closest non-jargon term is probably “chunk of text.” It could be a single character or there could be no text in a string at all, which is called an empty string.
- An integer is a whole number (no decimal places), positive or negative, or, as the PHP manual puts it, “a number of the set Z = {..., -2, -1, 0, 1, 2, ...}.” (
php.net/integer) - An array can hold any assortment of other variable types (strings, integers, objects) or it can hold more arrays! The latter happens disturbingly often in Drupal and is called nested arrays. An associative array has keys, which are integers or strings pointing to values, which, as mentioned, can be anything.
- An object is sometimes used in Drupal similarly to arrays to hold a collection of related data (such as the
$userobject or$nodeobject). Objects can do much more, such as inheriting information and functionality from a parent object and defining their own methods, which are functions specific to objects of that type. - A variable is a labeled holder for some value that can be changed. Variables in PHP have to start with a dollar sign, such as
$name_of_variable. A variable can be a string, number, array, object, or another variable type such as non-integer numbers, called floats. - A function is a set of code that can be called by name. It can receive variables (as parameters, covered next) and can return a value. You can define your own functions and each has a local scope for variables used within it, such that the function code is discrete from other code. All code written for a module should be within functions you define. Both
xray_form_alter()andxray_help(), already seen, are functions. - Parameters (also called arguments) allow the code calling a function to send information to that function. The parameter or parameters a function expects constitute that function's signature.
Although PHP only mildly complains if it comes across an empty variable that it has not been told about before, you should always initialize your variables. This means to define them before, or in the act of, your first use of them. Functions allow default parameters to be defined, which can have the effect of ensuring the initialization of those variables. For instance, a function with the name of example_takes_arguments and defined as function example_takes_arguments($text = 'Hi.') { ... } will have the variable $text available inside it (the code that would replace the ... here), set to the value ‘Hi.’
Operators and Conditional Statements
An operator is something that receives one or more values and returns a value. A value is also called an expression, which makes the point that any combination of things that returns a value is, indeed, a value.
Assignment Operators
The most common operator is the assignment operator (the equals sign), which is used to assign any variable a value or the result of an expression.
  $num = 5;

  $an_array = array(

    'a_number' => $num,

    'a_letter' => 'k',

  );

  $another_array = array(

    'a_letter' => "If merged this will overwrite k with a sentence. Oops.",

  );

  $function_result = array_merge($an_array, $another_array);
These silly examples all have the assignment operator, "=", in common, and indeed you will use it constantly to set the value of variables. Note that at the end, the variable $function_result has the value
array('a_number' => 5, 'a_letter' => If merged this will overwrite k with a sentence. Oops.",String Operators
String operators include the concatenation operator, which per Drupal coding standards is always separated on both sides by a space, like so:
  $end = " completion of string";

  $msg = "Start of string" . $end;
The concatenating assignment operator can take everything in the string already and add onto the end of it.
$msg .= "!!!";
The resulting string $msg is
Start of string completion of string!!!
Arithmetic Operators
From simple addition to getting the remainder in division, the operators work the same as the symbols on your calculator.
5 + 2returns75 - 2returns35 * 2returns105 / 2returns2.55 % 2returns1
Comparison Operators
Comparison operators compare two values. For instance:
5 == 2returnsFALSE(is equal to; don't forget both of the equals signs, or it becomes the assignment operator and so is always true when comparing a variable to a value or another variable) and"apple" == "apple"returnsTRUE.5 != 2returnsTRUE(is not equal to).5 < 2returnsFALSE(is less than).5 > 2returnsTRUE(is greater than).5 <= 2returnsFALSE(is less than or equal to), and3 <= 3returnsTRUE.5 >= 2returnsTRUE(is greater than or equal to), and3 >= 3returnsTRUE.
There are two more comparison operators that are quite important. These are the identity comparisons that check if two values are of the same type before trying to compare them. This means, for instance, that FALSE will not equal an empty array, and strings are not converted to integers for comparison (which is a nice bonus because that conversion can lead to unexpected results). They also are faster than the equality comparisons. Examples include:
1 === TRUE returns FALSE, and 1 === 1 returns TRUE.


'' !== array() returns TRUE.
Ternary Operator
The ternary operator is an occasionally allowed exception to Drupal's bias toward more spread out, easily understood code. The ternary operator is compact and confusing.
$resulting_value = ($condition) ? "If TRUE value" : "If FALSE value";
Let's start in the parenthesis (which aren't required, but are best practice). The expression in this first location is evaluated. It can be a simple variable or it can be a complex set of logic. Usually it will be a variable or a straightforward comparison such as ($maybe_seven == 7). If the evaluation is TRUE, then the value immediately following the question mark is returned. If the first expression evaluates to false, the value after the colon is returned. (Technically these latter two values could be expressions and so are called the second and third expressions.) For more information, see Comparison Operators page at php.net/ternary.
![]() Note You will frequently come across situations where you want to set a variable equal to a value if that value is non-empty or non-zero, such as
Note You will frequently come across situations where you want to set a variable equal to a value if that value is non-empty or non-zero, such as $result = ($value) ? $value : "default". In these situations, the ternary operator seems less than compact because you are repeating the variable for the test and for the assignment. All you can do is wait for Drupal 8: Drupal 7 requires a minimum PHP version of 5.2, and it is not until PHP 5.3 that you can leave out the middle part of the ternary operator. In PHP 5.3, the expression $value ?: "default" returns $value if $value evaluates to anything other than FALSE, and “default” otherwise. (If you have a more compelling reason to require PHP 5.3 and above, you can declare it the minimum version your module or theme will support by adding the line php = 5.3 in your .info file.)
Logical Operators
The more common comparison operators you will see in Drupal are the following:
$a && $b whichreturnsTRUEif both$aand$bareTRUE.$a || $breturnsTRUEif either$aor$bisTRUE.!$areturnsTRUEif$ais notTRUE.
The words “and” and “or” can also be used and act as lower-precedence (evaluated later) versions of && and ||, respectively. (There is one more logical operator, xor, that works such that the expression $a xor $b returns true if only one of $a and $b is true.)
You can find more kinds of operators (along with more detail on the ones covered) at php.net/operator.
Control Structures
PHP uses control structures to decide what code gets run, or executed. Often this decision is made with the help of conditional statements like equals ($a == $b), identical ($a === $b), is less than ($a < $b), is greater than or equal to ($a >= $b), etc., that were discussed in the previous section on comparison operators.
The if, elseif, and else Statements
An if statement can stand alone, it can be followed by an else statement that is executed instead if the conditional for the if statement evaluates to FALSE, or it can come in a chain of if statements using the elseif syntax. This can also end in an else statement, which gets used if none of the above evaluated to true. See Listing 18–7 for examples.
Listing 18–7. Chained if/else Statements
if ($advice == 'good') {

  $do = 'Follow it.';

}

elseif ($advice == 'bad') {

  $do = 'Don't follow it.';

}

else {

  $do = 'Who knows?  If all else fails, do as you please.';

}
![]() Caution Note the apostrophe in the string Don't follow it. It is escaped with a backslash (
Caution Note the apostrophe in the string Don't follow it. It is escaped with a backslash () because in plain text the apostrophe is the same character as a single quotation mark, which is the character used to indicate the start and end of the string. If you had used double quotation marks to bound your string, you wouldn't have needed to escape the single quotation mark—but you would have needed to use the backslash to escape any double quotation marks in the string.
These if() statements used comparison operators. An if() statement can also do an implied comparison when given just one expression to evaluate; if the expression has any non-zero, non-empty value the statement will evaluate to TRUE, so there's no need for an "== TRUE". Use simply
if ($condition) {

  // Take example action when condition is true.

  take_example_action();

}
A single exclamation point before an expression reverses its true/false evaluation, so for instance:
if (!$condition} {

  // Take example action when condition is false.

  take_example_action();

}
The switch and caseStatements
Another control structure, the switch statement, using any number of case statements inside it, doesn't do anything a chain of if, elseif, elseif, elseif... statements couldn't do, but it is considered a cleaner and more readable way to compare one value to multiple options.
You used to have a single case, handled by the statement if ($path == 'admin/structure')... Now, you're comparing the path variable to more possibilities (five in the Listing 18–8), so you have replaced the if statement with the switch/case syntax. (You've also offloaded the messages to helper functions. You'll look at what you're doing in them later.)
Listing 18–8. ASwitch Statement Used in One Version of xray_help()
switch ($path) {

    case 'admin/content':

      return _xray_help_admin_content();

    case 'admin/structure':

      return _xray_help_admin_structure();

    case 'admin/appearance':

      return _xray_help_admin_appearance();

    case 'admin/people':

      return _xray_help_admin_people();

    case 'admin/modules':

      return _xray_help_admin_modules();

  }
The switch statement does the equivalent of a ($path == 'admin/content') comparison for the first case statement, and if it evaluates to true, it executes the code beneath the case 'admin/content': line, and so on for each case statement. Note that when executing the code beneath a case statement, a break; statement is usually used to leave the switch after a case matches, but a return; statement ends the entire function and so makes anything else unnecessary. For more, see php.net/switch.
Loops
The other control structures you will see most commonly in Drupal are loops. A while ($expression) { ... } statement continues to run the code inside its brackets so long as $expression evaluates to TRUE; the value of variables in the expression must of course be changed by this code within the statement so that the loop will stop eventually. See php.net/while for more on while. A for ($i = 0; $i < 5; $i++) { ... } statement will execute the code within its brackets five times in this example, for the values of $i from zero to four; see php.net/for for more information. Finally, the special foreach ($array as $key => $value) { ... } will iterate over all the items in an array, providing the repeated code within the brackets with the key and value for each item. Listing the key is optional.
      foreach ($lumps as $lump) {

        $variables['extra'] .= krumo_ob($lump);

      }
Drupal Coding Standards
Why, one might ask, is how the code looks as important as how it works? PHP ignores extra white space, so you could write your entire module on one line if you wanted, and it would work. The code would also be unreadable. Sure, that's an extreme case—a straw man argument. But in Drupal, the standards are a lot higher than being able to read something yourself. Your code must be as clear as possible to other Drupalistas; following coding standards is very important for collaboration. And if beauty and logic are not enough to convince you to keep your code up to scratch, you'll be called out, repeatedly, when you violate the standards. This is the character-building chapter, and good coding habits are best formed early, so do the right thing.
Some Important Standards, Explained
Keeping code readable and maintainable is easier when you know what you need to do and why you should do it. The following commandments are among the most important when writing modules. More rules and explanation can be found at drupal.org/coding-standards.
Use <?php Opening Tag
Always use full <?php tags, not any of its abbreviations. Aside from being uncouth to the eye, anything other than <?php is not guaranteed to work in all configurations of PHP.
Don't End Files with the Closing PHP Tag
In most files, you don't use a closing PHP tag at all. Every module file (.module), include file (.inc), install file (.install), settings.php file, and template.php file (in themes) should have <?php immediately at the top and not have any closing PHP tag.
Leaving closing PHP tags off prevents a common problem caused by white space after a closing tag. It can be seen in the form of an error such as “Warning: Cannot modify header information - headers already sent by (output started at /var/www/example/drupal/sites/default/oops/oops.module.php:37) in/var/www/example/drupal/includes/bootstrap.inc on line 568”. Any white space after a closing PHP tag is sent to the browser and can interfere with when output is supposed to start.
Of course, there's an exception to this rule: template files (.tpl.php), which are already supposed to be sending output. Generally, a template file starts with HTML, dips into PHP, returns to HTML and goes back and forth between them, usually ending with HTML again. Therefore, closing PHP tags are not only allowed but necessary. The closing PHP tag is simply ?> and should only be used in templates.
Precede Internal Functions with an Underscore
Functions with names that start with an underscore, such as _function_name(), are meant for a module's internal use. They should not be called by other modules.
The underscore naming convention for private functions has two major benefits. First, it lets everyone know the function is for internal use and that if they use it, they are doing it wrong, because you reserve the right to remove or modify the function on a whim. You can also change non-underscored public API functions, but you should strive never to do this unless you are also releasing a new major branch of your module (for instance, changing the release number from 1.x to 2.x). Second, preceding internal functions with an underscore helps prevent you from accidentally implementing a Drupal hook (there are, remember, more than 250 hooks in core alone).
![]() Caution You still need to precede internal function names with your module's name as well as the underscore, in the form
Caution You still need to precede internal function names with your module's name as well as the underscore, in the form _modulename_function(), or you risk having a function with the same name as someone else's function. Two functions with the same name is a namespace collision that causes PHP to have a fatal error, which is nearly as bad as it sounds.
Indent Two Spaces
You should indent functions, control structures like loops and if statements, array definitions, and pretty much anything that looks indentable; and do so with two spaces, not a tab. (You can configure some IDEs and code editing tools to use two spaces whenever you hit the tab key; see Chapter 12 and dgd7.org/ide.)
Everything within a function, for instance, starts on a new line and is indented two spaces; everything within an if statement within that function is indented two more spaces, for a total of four.
All Control Statements, Including else, Start a New Line
The else clause in an if statements goes on a new line, starting fresh, following the closing bracket:
if ($following_coding_standards) {

  drupal_set_message("Good job!");

}

else {

  drupal_set_message("Follow this example!");

}
Use a Space Between Control Statements and Their Opening Parenthesis
To make these control statements more distinguishable from functions, separate their condition (in parenthesis) from the control statement name with a space; this can be seen in the if statement line in the previous example. As with functions, the opening curly brace is also separated with a space. That accounts for both spaces in the "if ($following_coding_standards) {" line. The same goes for foreach statements, while loops, etc.
Use Spaces Between Parameters
Put spaces between parameters in function definitions and function calls, like so:
function space_standard($parameter, $another_parameter, $last_parameter) {

  _space_standard($parameter, $another_parameter, $last_parameter);

}
Use Spaces on Either Side of All Binary Operators, Concatenators, and the Like
A binary operator is simply something that acts, or operates, on two values at once, to return a new value. This includes comparison operators such as == or >=, arithmetic operators such as + or /, string operators such as . or .=, logical operators such as && or ||, and assignment operators such as = or += (the latter is a combined arithmetic and assignment operator, as .= is a combined string and assignment operator). The general rule is whenever something is between two values, give it a single space on each side.
The following code is thick with operators. The point is that every single one of them is politely buffered by a single space on each side.
if ($budget < $money || ($is_broke && !$has_credit)) {

  $message = 'Your remaining $' . $money - $budget . ' is not enough.';

}
AN ASIDE ON WHAT THE CODE IS SAYING
Automating Adherence
Thanks to the fantastic work of Stella Power (stella), Doug Green (douggreen), and Jim Berry (solotandem), the art of conforming to coding standards can be automated. You'll get to see this in practice when you polish your module for contributing in Chapter 20.
Stella's Coder Review module (part of the Coder project at drupal.org/project/coder) will review source code files for code that does not satisfy Drupal coding standards, flagging each violation as having minor, normal, or critical severity. The use of this module is explained in Chapter 20, before you share your module with the world.
Solotandem's Grammar Parser library (drupal.org/project/grammar_parser) will go a step farther and put in an effort to rewrite a module file to conform to coding standards. This author, for the moment, eschews the Grammar Parser approach in favor of the “eat your veggies” philosophy and corrects coding standards lapses by hand (after Coder Review automatically points them out), but it's only a matter of time before the sheer awesomeness of the Grammar Parser contribution overwhelms all objections.
![]() Tip JavaScript also has coding standards. See
Tip JavaScript also has coding standards. See drupal.org/node/172169 and Chapter 17.
Development Tip #1: When Something Isn't Working, Clear Caches
For the sake of performance, Drupal has dozens of places where information is cached, or stored in an easily accessible way, rather than read and interpreted from the database and code every time it's needed. Therefore, when developing, if you don't see the changes you made in your code, it's not necessarily a problem with your code; it may be that Drupal's caches and registries are out of date.
You can manually clear caches and rebuild the theme and menu registries at Administration ![]() Configuration
Configuration ![]() Development
Development ![]() Performance (
Performance (admin/config/development/performance) by clicking the Clear all caches button. You may want to link to this page using the Shortcuts module, or use a module such as Admin menu that enables you to clear all caches with a single click on a link.
You can also clear caches by placing the function drupal_flush_all_caches(); in a part of your code that is run (that is, not where it is cached); a can't-miss spot is index.php between drupal_bootstrap() and menu_execute_active_handler() but remember to remove it later.
As usual, the most convenient way to clear all caches including the theme registry is with Drush: drush cc all (you can alias this in your shell to be even shorter, see dgd7.org/162).
However you clear caches, learn to like the method(s) you use, because you'll be doing it a lot.
![]() Tip See Chapter 27 for a way to disable caching entirely while developing. However, Drupal also has registries, including for
Tip See Chapter 27 for a way to disable caching entirely while developing. However, Drupal also has registries, including for hook_menu() and hook_theme(), that are rebuilt using the clear all caches methods mentioned previously.
Development Tip #2: When Anything's Missing, Check Permissions
You add a new page, block, or feature of any kind; you reload the page, clear the cache (see above), shift-reload the page to make sure it's not the browser cache, and still nothing. It's time to check access control and permissions. In code, when a page or tab isn't working, you should check if there is an access argument or access callback defined for the related menu item. When it comes to configuration, you want to be sure you've granted proper access to the user you are testing between the Permissions page (admin/people/permissions) and the roles assignment on the given user's edit page (user/[uid]/edit), where [uid] is the user's numeric ID.
![]() Tip If something works when you're logged in as the superuser or an administrator but not when you're logged out or logged in with a lesser role, the problem is pretty certainly in your permissions configuration.
Tip If something works when you're logged in as the superuser or an administrator but not when you're logged out or logged in with a lesser role, the problem is pretty certainly in your permissions configuration.
Development Tip #3: Set Your Site to Show All Errors
When developing a module, you want every bit of feedback as quickly as possible from the system. Adding the code in Listing 18–9 into your local settings.php should ensure that all notices and errors are immediately printed to the screen. (In Drupal 6 it's a little more work; see randyfay.com/node/76.)
Listing 18–9. Lines to Add to settings.php to Show All Notices and Errors
error_reporting(-1);

$conf['error_level'] = 2;

ini_set('display_errors', TRUE);

ini_set('display_startup_errors', TRUE);
The first line sets PHP to report every conceivable notice and error (the -1 is an undocumented shortcut). The second line tells Drupal to show all these notices and errors as messages on your screen (2 equals the constant ERROR_REPORTING_DISPLAY_ALL, but that constant is not defined yet when settings.php is loaded). The last two lines help ensure that the infamous “White Screen of Death” (WSOD) from PHP errors becomes instead a screen with the error printed on it.
Summary
This chapter introduces you to module building, and provides you with the basics of a module and how Drupal uses hooks in nearly everything it does to allow modules to extend and modify Drupal. It also includes an overview of technical skills required to develop a module, including PHP basics and Drupal coding standards, and it offers helpful development tips.
You're now ready to take on a full module, which is where Chapter 19 comes in.
![]() Tip More tips and discussion online at
Tip More tips and discussion online at dgd7.org/intromodule.