
C H A P T E R 2
![]()
Essential Tools: Drush and Git
“There is no knowledge that is not power.”
—Ralph Waldo Emerson
Whether building sites, developing themes or modules, or trying to make a Drupal distribution that can drive your car, Drush (the Drupal shell) and Git (the open source version control system) will help you get where you are going quickly and safely. This chapter will give you a brief overview of Drush and Git and then it will help you get started with these powerful tools. If you are already familiar with Drush, or want to go deeper into all of the things that you can do with it, check out Chapter 26, “Drush.”
Drush is easy to explain. It lets you perform all manner of repetitive Drupal tasks much, much faster. Need to upgrade your code? Use drush up. Need to download a new module? Use drush dl MODULE_NAME. Drush does the rest of the work—usually within a minute or two (see Figure 2-1).
Git may be a little harder to explain. The short explanation is that if you are not using version control, you need to. If you are the pesky type of person that expects reasons for doing things, here's a slightly longer explanation: have you ever wanted an undo or rewind button for life? That's version control. The best way to perform backups of your work is with a properly configured version control system (VCS), which you use constantly to record changes to a file or set of files over time so that you can revert to or compare specific versions later.
Like most developers, we made our first sites without version control. And like most developers, we have a tale or two of minor catastrophes, from the change that broke a site in Internet Explorer to the deleting of three days' work. But you get the benefit of our experience, and we're going to make you start off doing it right. Before we get into that, however, we need to set up some foundations. You need to install Drush and Git.
![]() Tip You can also use Git to track changes for non-Drupal projects, even folders with only one file in them.
Tip You can also use Git to track changes for non-Drupal projects, even folders with only one file in them.
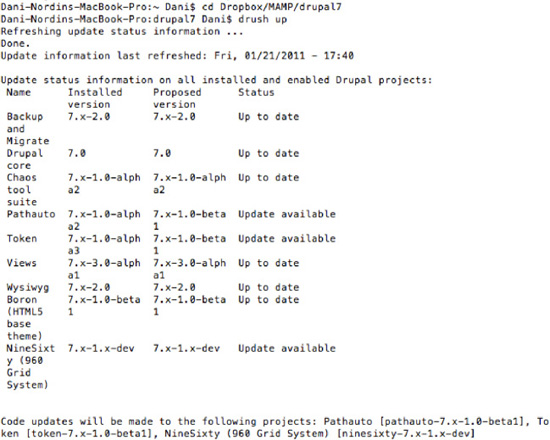
Figure 2-1. Upgrading Drupal with the drush up command. Total time? About 30 seconds. Manually? 15 minutes to a couple of hours, depending on how many modules need to be upgraded.
A Beginner's Guide to Installing Drush
Installing and using Drush—a command line tool that lets you do things on your Drupal site like update modules via two word commands—is a no-brainer. But even hard-core Drupal users have been late to experience the benefits of Drush because they put off the little bit of up-front work that would make their lives easier. For people new to Drupal, or those of us raised with a love of pixels and a distaste for the command line, the idea of installing Drush can be overwhelming.
This section provides a simple guide to installing Drush.
THINGS TO KNOW BEFORE YOU GET STARTED
- You're going to use the command line now.
- On Mac OSX or Ubuntu, you can open Terminal to reach the command line. If you're developing in Windows, see Appendix F on setting up a Windows development environment for instructions, or you could consider setting up a virtual machine running Ubuntu for your Drupal development environment (discussed in Appendix G).
- For this exercise, you're going to focus on local development. When working on sites that are staged on a remote host, you'll want to also install Drush and Git on the host servers and log into those servers on the command line. If you're on Mac OSX, Panic's Coda (www.panic.com/coda/) includes a Terminal editor that will let you do this automatically. If you're developing locally, you'll still have to use Terminal.
- Whether you're installing Drush locally or remotely, be ABSOLUTELY SURE to put Drush outside your web root (i.e. where your Drupal installation is stored). Putting a site with Drush inside it on a remote server could make it very easy for attackers to break into your Drupal site.
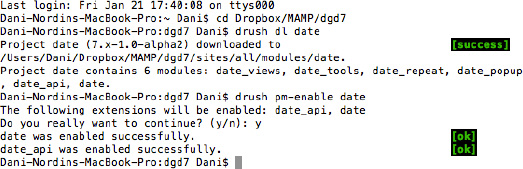
Once you have Drush installed (covered next), you'll be able to run many Drush commands from within folders containing the Drupalsite root. Once you're on the command line, using the command cd /path/to/drupal will get you there(where ‘/path/to/drupal' is replaced with the path to your Drupal site in your file system). Then you can execute Drush commands using drushcommandname. (If you run Drush commands from your Drupal folder, drush targets the default site on your installation (the one in sites/default); if you're running several sites on the same installation, navigate to your site directory [cd /path/to/drupal/sites/example.com] or add [-l http://example.com] to your drush command.) The following is an example of downloading and enabling the Date module using Drush. The first command, cd Dropbox/MAMP/dgd7, navigates you to the Drupal site's folder; the path will differ on your system:
The three steps that follow are adapted from a blog post by Laura Scott and used with permission; these steps walk you through the process of installing Drush. She installed Drush on Mac OS X, which the authors also develop in, and the instructions will work on any Unix-like system. If you're on Windows, see Appendix F to get started with a Windows development environment for Drupal or Appendix G to run Ubuntu Linux in a virtual machine (you can also considerusing Cygwin to mimic the UNIX environment).
1. Download Drush
GetDrush at drupal.org/project/drush. Drush works for every version of Drupal, so just find the latest version and download it (see Figure 2-2).(Drush may be the last project you need to download manually!)
Put the tarball into your working folder, which, ideally, is a folder in your home directory. We created a working folder called dev in our home directory.
Double-click on the tarball to open it up. When you go into the drush folder, you'll see a number of files, including the README.txt file. Read it!
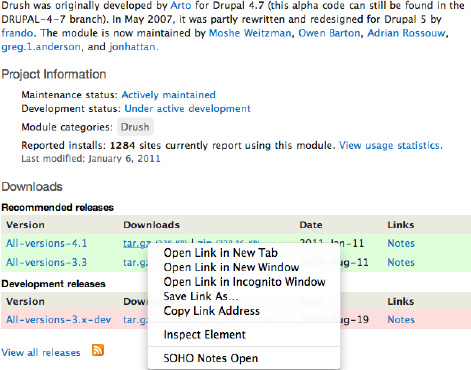
Figure 2-2. The Drush project page. The latest version under “Recommended releases” is the one you want.
If you're already comfortable with the command line, you can also do this via Terminal by copying the link to the tar.gz on the project page, then typing the following into Terminal from the home folder (see Figure 2-3). Note that comments are surrounded by **.
wget http://ftp.drupal.org/files/projects/drush-7.x-4.4.tar.gz

        ;** downloads the Drush tarball - replace what's after wget with the current link **

tar xzf drush-7.x-4.4.tar.gz

        ;** unpacks the tarball into your folder **

rm drush-7.x-4.4.tar.gz

       ;** removes the original tarball **
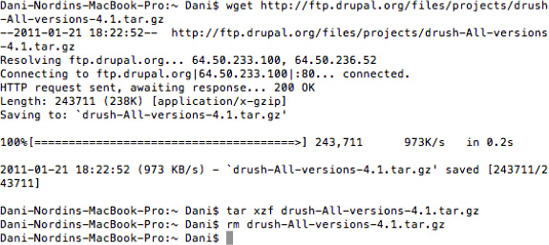
Figure 2-3. Installing Drush via the command line. This is highly useful when you have to install Drush on multiple servers, or for a new project.
2. Make Drush Executable
Now you venture into the command line. We hope that doesn't vex you, because Drush is a command line tool.
Open your Terminal. This opens up to your home directory, which corresponds to the Finder folder that bears your Mac username.
The path to your drush will depend upon where you put it.
You will want to type the command chmodu+x /path/to/drush/drush (replacing “/path/to/” with the actual path where you placed Drush). So in our case, with Drush residing in the dev folder, it's
chmod u+x dev/drush/drush
Now that you've made Drush executable, you want to set things up so you actually can execute the drush command outside of the actual Drush folder (such as in the working folder for the site you're building).
3. Create an Alias
This part may seem a bit mysterious, but it's really quite simple. You will be adding to your bash profile file the path to the drush command so that you can run the drush command from anywhere in your files ystem.
A handy UNIX shortcut to your home folder is “~” (the tilde character). You can use that in any path designation.
Find your bash profile file using the Terminal in your home directory.
If you're not there, go ahead and enter on the command line:
cd ~
The bash profile files are hidden from normal view, so to see what files you have in your home directory, enter this command:
ls -a
You'll get a list of all the files in that folder, similar to that in Figure 2-4. The hidden files start with a dot (.), so look for one of these files:
.profile

.bash_aliases

.bashrc

.bash_profile
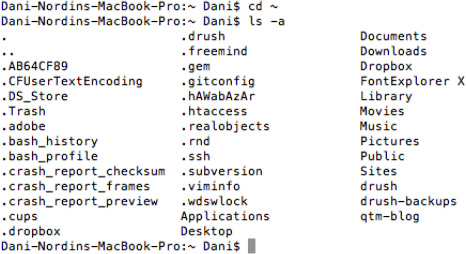
Figure 2-4. Use thelscommand to list the files in your home folder.
Your bash profile can have any of these four names. If you don't see any of these in your home folder, create one using the nano editor (the really simple, old school text editor that comes with UNIX); nano will create the file if it doesn't find one with that name.
Any one will do, so just pick an existing file. (We picked .bash_profile.)
To edit the file, enter nano [filename]. For us, that means
nano .bash_profile
This takes you into the editor. You might be looking at one or two lines of code. Cursor down to the end of the file; make sure you're on a new line, and add:
alias drush='/path/to/drush/drush'
Replace the “/path/to/” part with the actual path—but this time it needs to be relative to the system root. Remember that shortcut to the home directory? Now is a time to use it (see Figure 2-5).
alias drush='~/dev/drush/drush'
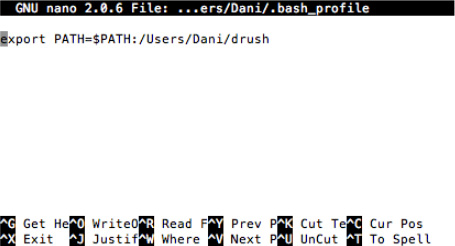
Figure 2-5. Another recommended approach to having the drush command at your fingertips: Add the path to the Drush folder to your shell's path, also done in a file such as .bash_profile or .profile.
Save the file using <control>-x, y(es), <enter>. Now you're back at your Terminal prompt.
Now all you need to do is reload the updated bash profile using source [filename]. In my case:
source .bash_profile
4. Test
Yes, we said it was three steps. But this is testing, an everpresent understood additional step. To test, type:
drush
You should get a long list of available Drush commands. You're done! (Or rather, now you can get started!) See Figure 2-6 for details.
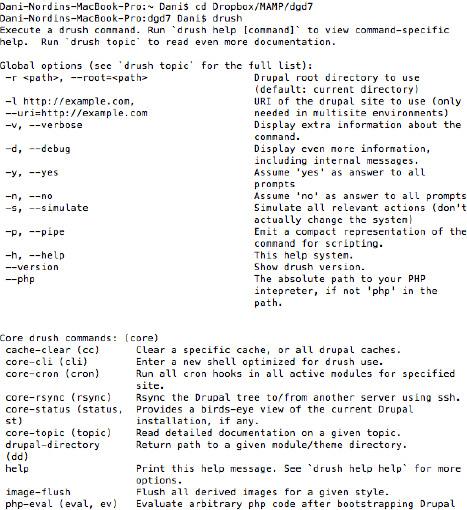
Now that you've got Drush installed, you can do all sorts of things that would take a long time through the Drupal interface. First, make sure you have a working Drupal installation on your system and navigate to it: cd /path/to/drupal. Now, need to install a module? Type drush dl projec tname. (Note that for Drush, the project name is the name of the folder containing the module or group of modules, not the human-readable module name. For example, if you want to install X-ray module, use its machine name xray.)Need to update your code? Type drush up. Be sure to check out Chapter 26 to see all the great things that Drush is capable of (and how you can extend it to do even more).
Git: Development Grease
Continually backing up your work is an essential practice for any web developer. Whether your workflow is based on downloading and installing modules, building custom themes, or writing code, putting everything in version control lets you focus on progress. You don't need to worry about taking the wrong route because you can always go back.
Version control is development grease. It makes everything run smoothly and helps you get in the zone. Chapter 14 discusses how to use version control (also called revision control)in achieving a state of optimal productivity.
Why Git?
There are many different version control systems for you to choose from. This book will focus on Git. Why? Because it's free, it's easy (ish) to use once you know a few basics, and Drupal.org has moved over to using it. This last part means that, once you get the hang of Git, contributing code to the community will be much easier. (And while getting the hang of Git—which will be a lifelong learning process—you can ask the Drupal community for help.)
![]() Note If you do choose another VCS, we highly recommend you make it a modern one—a distributed version control system, or DVCS. Bazaar and Mecurial are both ones that were considered by Drupal.org (the infrastructure team uses Bazaar) but the Drupal community had already voted for Git with its feet. In other words, many more people were already using Git.
Note If you do choose another VCS, we highly recommend you make it a modern one—a distributed version control system, or DVCS. Bazaar and Mecurial are both ones that were considered by Drupal.org (the infrastructure team uses Bazaar) but the Drupal community had already voted for Git with its feet. In other words, many more people were already using Git.
Installing Git
To install Git, the first thing you'll need to do is grab the installer. You can find the Git software at git-scm.com. Download the installer appropriate to your OS, indicated by the handy icons on the right side of the page (see Figure 2-7).
![]() Tip If you're using a UNIX-like OS with a package manager, you can use that to install Git; feel free to skip this section. For instance, on Debian or Ubuntu,
Tip If you're using a UNIX-like OS with a package manager, you can use that to install Git; feel free to skip this section. For instance, on Debian or Ubuntu, sudo apt-get install git will take care of it for you. If you're on Mac OS X and you want to enjoy the goodness of a package manager, set up Homebrew(mxcl.github.com/homebrew), the latest and greatest apt-get clone for Mac. If you're on Windows see Git for Windows (code.google.com/p/msysgit), or Cygwin will help you create a UNIX-like environment on your machine that will help you to use the command line effectively.
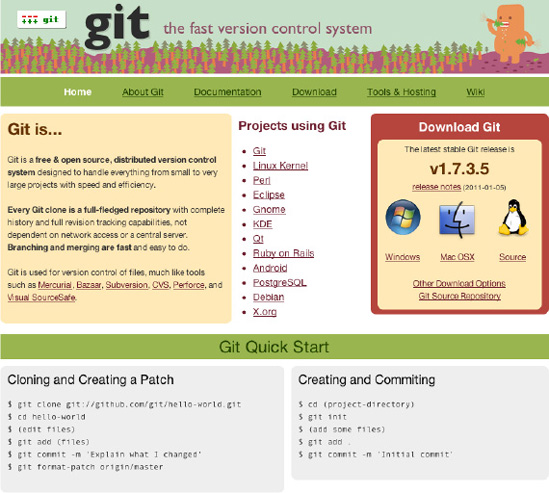
Figure 2-7. The Git homepage. The box in the upper-right corner provides a quick way to download the Git code for your OS.
Follow the instructions on the website to install the Git software. Git is a command-line program, which means that you won't find it in your Applications folder. To access it, you have to go into Terminal. (The Windows installer adds an icon to your start menu, which launches a Git terminal for you.)Once you're in there, just type git. You should see a handy list of commands, much like you did when you typed drush previously (see Figure 2-8).
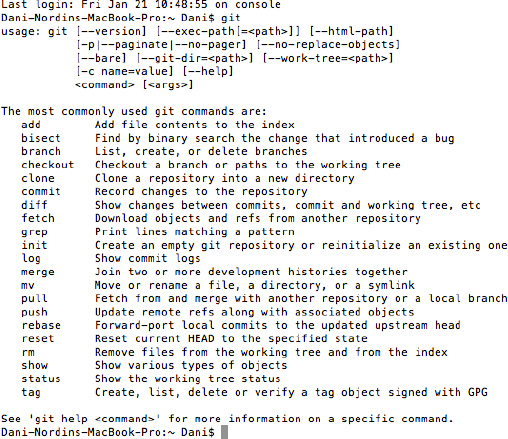
Figure 2-8. The git home screen within Terminal
![]() Note If the command
Note If the command git doesn't work after installing, try quitting Terminal (File > Quit in most operating systems, or Cmd+Q on the Mac) and re-opening the program.
Working with Git
Git is primarily a command line tool and is very easy to use on the command line. We recommend learning Git on the command-line first, before trying the visual tools. Knowing the command-line gives you a common vocabulary with other Drupal git users. The basic steps to get started are discussed in the following sections. It is possible, however, to find some clients that will create a GUI for you. See drupal.org/node/777182 for some examples, including SmartGit and (for Mac OS X only, proprietary) Tower (git-tower.com).
![]() Tip See
Tip See dgd7.org/git for common Git commands and useful tricks.
Bonus One-time Step: Identify Yourself
To properly identify yourself for every commit in case you share your code later, you should use these two commands:
git config --global user.name "Your Name"

git config --global user.email [email protected]
You will only have to do this once.
Creating a Repository
In order to start using Git, the first thing you need to do is create a repository. This repository should be in your project folder. You create the repository with the command git init. (You can navigate to the folder using the command cd). This only needs to be done once per project.
We'll go over some of the additional commands here in a moment; but say you were starting with the DGD7 web site project you created in Chapter 1, you would use these commands in succession to create your repository:
cd ~/code/dgd7

git init
This creates a new .git folder in your Drupal project (see Figure 2-9), which will store all of your code versions.

Figure 2-9. Creating your Git repository
While developing, it's important to put your code in the repository as early and often as possible. We recommend committing each time you make a change to your project, such as adding a module, updating the CSS on a site theme, or changing functionality in code. Once you've created a repository, all the files that you are working with are considered the working copy of that repository. It can be clean (all your changes are committed) or changed. Currently, with no files committed, it is considered in a changed state.
The first step to committing your code is to add it to “stage.” The stage temporarily holds your changes until you commit them. To add your changes to stage, use the command git add. from within your working copy of the site project. The final period is important—it tells Git to prepare to add everything that's changed in your code in that directory (and any directory nested below it) to the repository. You can see what you are about to commit (and what's still not staged for committing) with git status(see Figure 2-10).
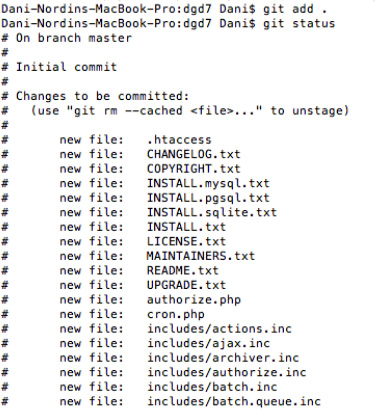
Figure 2-10. Adding your DGD7 site code to stage and viewing the status
Next, you actually commit your code to the repository. This is done using the command git commit(see Figure 2-11). No path name is needed here; Git will commit everything that you just added. You can also add a message to your commit by using -m “Messagegoeshere” where “Messagegoeshere” is the text of your message. The message should inform anyone who downloads your code what they're downloading (e.g., “Initial build of DGD7 demo site”). In practice, the act of adding and committing code would happen in succession, like so:
git add .

git status

git commit -m "Added photo of kittens to the theme header per client request."
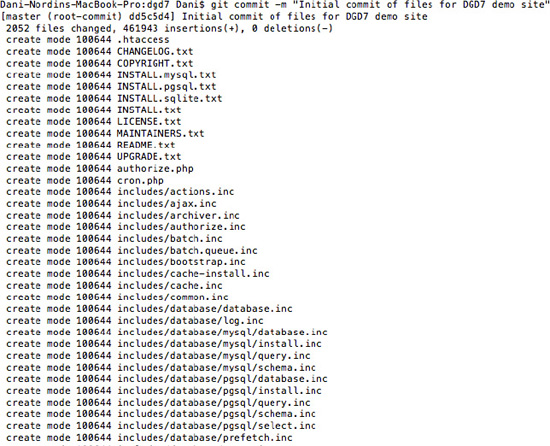
Figure 2-11. Committing your DGD7 code for the first time
This will commit any code in your site that has changed since the last time you committed. It's worth noting that if you're adding code for the first time, the process might take some time; Git will be copying every file and piece of code to stage.
Ideally, you commit constantly (see Chapter 14). At the very least commit after you've made any major change to your site's files (for example, after downloading a module or theme) or periodically while writing custom modules for your site.
What to Do When Things Go Wrong—Throwing Away Changes and Reverting in Git
There are many ways to fix your mistakes in Git while you're developing. If, while you're developing, you realize that you don't want to save what you just did at all, and you haven't yet committed your changes, you can use the following command:
git reset --hard HEAD
If you don't want to replace all of your code, but retrieve just one file, you can use the following command:
git checkout -- path/to/filename.php
This command will restore filename.php to the last committed revision. If you've already committed your code, you can use this command
git revert HEAD
to return your code to the last committed revision. If you want to go back one further (i.e. the next-to-last revision), you can amend it to
git revert HEAD^.
Other Useful Git Commands
Now that you have the lay of the land, here are some other Git commands that you might find useful:
git statusshows what you're about to commit.git logprovides a list of what you've committed. Variations of this command, such asgit log --pretty=oneline, are a lot more practical. Andgit log --pretty=oneline -n5gives you the last 5 commits, useful when you have hundreds. Also, “:q” might have to be typed in order to get back to the command line after viewing the log.git checkout mymodule.infolets you check out (i.e., download) a specific file or revision.
For a full list of Git commands, type man git into Terminal.
Database Backup Tools
While Git will help you keep your files and code backed up via version control, it is also important to back up your database regularly. This is vitally important for a site being used by other people, such as clients. Since much of Drupal websites (including content) resides in the database, not backing up could have serious consequences if things go wrong.
The Drupal Git Backup Drush script, available at github.com/scor/dgb, can be used to easily export the database tables you care about and commit them to version control. This is covered more in Chapter 12.
If the setup is too much for you—heck, even if you do nothing else in this chapter—please install the Backup and Migrate module (drupal.org/project/backup_migrate), which will allow you to easily and regularly back up your entire database into a folder that you set up in the configuration settings.
Another way of backing up your database using Drush directly is the command
drush sql-dump > /path/to/filename.sql
This will create a backup of your database file in the location of your choosing. One thing that Drush doesn't do automatically, however, is empty the cache tables; this can cause the database backups to be overly large, which will fill up your repository quickly. The Drupal Git Backup script addresses this, and Chapter 26 explains how to exclude selected tables from export. Another approach is to simply clear your cache using the command drush cc all before making a database backup. This command will clear all of the database cache tables.
Summary
We hope that this chapter has given you a quick overview of how important (and how easy!) it is to keep your code in version control and your database backed up during development. By setting up a few key processes up front, you can save yourself hours of headaches down the line; ask anyone who has ever taken their programming down the wrong path or dealt with a crashed site. You'll thank us later.
![]() Note Get the essential updates to the tools and tips we missed as people correct us at
Note Get the essential updates to the tools and tips we missed as people correct us at dgd7.org/essential.