
C H A P T E R 37
![]()
Maintaining a Project
“Talk is silver, code is gold.”
This principle – a slightly nicer version of “Put up or shut up”—has driven the Drupal community since it was barely big enough to deserve the community label. As the project has gotten bigger, the meaning of code has expanded to something more like contribution, encompassing the essential work of designers, documenters, and trainers without whom Drupal wouldn’t be book-worthy. In this chapter, though, we’re going to focus on that original definition: contributing code; more specifically, creating and maintaining a project on Drupal.org. We’ll also talk a bit about recommended development workflows, in particular ways to leverage Drupal’s chosen version control system, Git.
![]() Caution Drupal only recently adopted Git for version control. Consequently, some of the user interface and processes discussed in this chapter may deviate from what ultimately becomes production. The inconsistencies should be minor, but we have nevertheless done our best to provide links to the relevant canonical handbook documentation. In fact there are a number of improvements to Git integration that are being rolled out as part of “Phase Next” of the migration.
Caution Drupal only recently adopted Git for version control. Consequently, some of the user interface and processes discussed in this chapter may deviate from what ultimately becomes production. The inconsistencies should be minor, but we have nevertheless done our best to provide links to the relevant canonical handbook documentation. In fact there are a number of improvements to Git integration that are being rolled out as part of “Phase Next” of the migration.
What’s a Drupal Project?
Drupal projects are bundles of code that can be downloaded as .zip or .tar files and installed on Drupal sites, as well as the satellite features, version control repositories, issue queues. Each project has its own project page on Drupal.org at /project/PROJECTNAME. So, for example, the token module’s project page would be at drupal.org/project/token.
Drupal projects come in several different flavors:
- Modules: The architectural building blocks that make Drupal go. Some 85-90% of all contributed projects are modules. Their development is covered in Part 5.
- Themes: Front-end development, look and feel, skinning—different words with the same idea: themes are in charge of generating markup. Around 10-15% of contributed projects are themes. Theming is covered in Chapters 15 and 16.
- Installation Profiles: Packages of modules, themes, and initial installation logic, they are covered in detail in Chapter 34. These make up just more than 1% of contributed projects.
- Translations: Translations of core and/or of Drupal modules are no longer handled as projects on Drupal.org but instead through
localize.drupal.org. The process for translations is quite different, so see there anddgd7.org/translatefor more information on translations. - Theme Engines: Theme templating engines—e.g., PHPTemplate, Smarty, PHPTAL. Fewer than 10 of these exist, and most of those have been abandoned for years. For good reason: PHPTemplate is the de facto standard theme engine. The overwhelming majority of themes are built on it. While the instructions in this chapter do apply to theme engines, making a new one is exceptionally unlikely.
The process for project creation and maintenance is almost identical for all the types of projects hosted on Drupal.org, so for simplicity’s sake this chapter will refer generically to “projects.” In any situation where something works differently for modules, themes, or installation profiles, we’ll make a note of it.
Whatever type of project you’re creating, releasing a project on d.o carries with it certain responsibilities. It’s not like publishing a project to a public code repository system like GitHub—your project becomes a part of the Drupal community’s offering to the entire world, and, as such, your stewardship of it reflects not only on you but on the community as a whole. If your module largely duplicates the functionality of another module, it makes finding the right tool for the job more difficult. If your project has security holes, it means more work for the already-overworked Drupal.org security team and a security advisory—which is always a little egg on the face of the community. As we’ll discuss a little later, the project “sandbox” stage helps with this, but you should still keep it in mind whenever contemplating a new project you’d like to contribute to Drupal.org.
Set Up Your Drupal.org Account for Contributing
Creating a new Drupal project is a multi-step process. You’ll need to agree to the conditions of having your code hosted on Drupal.org and configure your Drurpal.org account for Git access. Then you can choose a project namespace and upload your code to the project’s sandbox. After you have a project sandbox you’ll be able to request your project be approved to package a full release. Note that all sandbox code is associated with a specific user’s account, which is slightly different from full project code, which has a maintainer, but is not subordinated to that user’s account. Also there is no provision for “company” accounts, so each Drupal.org account has to be set up by/for an individual, not a group.
Once you have your Drupal.org account the first step is to log into it, and read and agree to the conditions for uploading your code. These conditions are found under your profile tab, under the Edit ![]() Git access tab (See Figure 37-1).
Git access tab (See Figure 37-1).
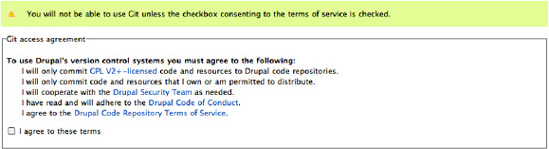
Figure 37-1. The conditions for uploading your code
The documents in these links lay out the Drupal community’s philosophy on contributions, elaborate into greater detail on the responsibilities and expectations associated with project maintenance, and explain the legal requirements for putting code on Drupal.org.
Those legal requirements are simple, but particularly essential, so we’ll paraphrase here what it means when it says that all code put on Drupal.org must be GPLv2+ compatible. In practice, that entails three conditions:
- First, if you want to include an external library with your project you can only store that code directly in your project’s Git repository if it’s compatibly-licensed.
- Second, the act of pushing your own otherwise-unlicensed code into a Git repository on the Drupal.org’s servers has the effect of licensing that code as GPLv2. This legal agreement is packed automatically with your release
- Third, if you put someone else’s incompatibly-licensed code into a Drupal.org repository, the code will be removed. People who repeatedly disregard the GPLv2 requirement may have their account suspended. This is the only legal requirement the community has for contributions, but it’s an essential one.
Once you’ve agreed, by checking the box and clicking Save, you advance to the second step, creating a Git username (see Figure 37-2) Typically this will match your Drupal.org username, limited to URL-safe characters; however, that’s not a requirement. Likewise you can set your password to be the same or different from your Drupal account itself.
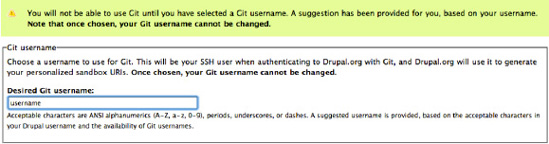
Figure 37-2. Creating a Git username
Creating a Sandbox Project
With one-time setup steps completed, it’s time to dig in and create a project—to be precise, a sandbox project. Drupal.org uses sandbox projects as a way of letting anyone contribute code to Drupal while preventing global namespace squatting and minimizing the chance of insecure (or malicious) code making its way into sites being built by unsuspecting users. There’s a community approval process you’ll need to go through before you can create fully functioning projects in the global namespace.
Until you have completed this community approval process, your sandbox project will differ in a few crucial ways from full projects, with the main difference being the use of a numeric value in place of the project shortname. (Project shortnames are used in the Drupal hook system to prefix functions, but this numeric substitution shouldn’t cause any problems with this.)
We’ll get into the details of that approval process a little later, but creating sandboxes is almost identical to creating full projects, so the instructions are pretty much interchangeable.
![]() Note More information about how sandbox projects work can be found at
Note More information about how sandbox projects work can be found at drupal.org/node/1011196.
Head over to drupal.org/node/add/project-project, where you’ll be presented with the project creation form.
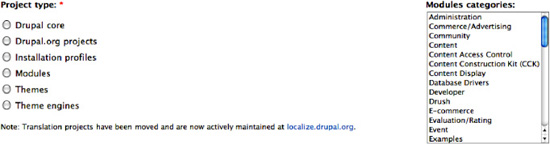
Figure 37-3.Project categories
Status
In most cases new projects should be marked Maintenance status and Development status as Actively maintained and Under active development, respectively. Projects not intended to have a full release might also be uploaded to your Drupal.org sandbox, for example, to share code with another, similar project. Sharing your code in this manner allows you to take advantage of Drupal.org’s integrated Git tools for highly collaborative code viewing and tracking.
Project Information
Your sandbox project begins its life with a number for a name: instead of your chosen name for the project, your sandbox project will use a temporary numeric name for referencing. This is used as a solution to a larger namespacing issue, but it does add a touch of complication. To work with the hook system and to prevent collisions with functions in other modules, full projects prefix their function names with the shortname of their project. Your sandbox’s numeric name won’t do for that; instead use a prefix that corresponds in a meaningful way to your Project title and is unique in the Drupal namespace. There’s no guarantee that what you choose will still be available when you prepare to release, but, if it is, you’ll save a step (see Figure 37-4).
- Project title: The human-readable name for the sandbox. This field can be updated.
- Sandbox: Until you have applied for or been granted a full Git account, sandbox will be checked by default and will be your only choice. We’ll talk about this process later. Even when you do have full access it is still a good idea to start your project as a sandbox project; that way, when you do make it a full project, it already has code and is ready for use.
- Description: The description is the primary place for communicating the project’s purpose to Drupal.org visitors. Well-written descriptions clearly express the purpose or use cases the project is intended to serve. If your project has dependencies (either external libraries or other Drupal projects), provide links. If your project is in a similar problem space as another pre-existing Drupal project, provide a link to that project, as well as an explanation of how your project differs. Of course, you might not know all this when creating a new project, especially your very first one—fear not, you can always update the description later! Once you’re done, submit the form; your project page will be created, and a new Git repository will be spun up on the Drupal.org servers, ready to accept your code.

Figure 37-4. Project information
![]() Note About namespaces: To determine if the function name prefix you’re going to use is available, visit Drupal.org and add
Note About namespaces: To determine if the function name prefix you’re going to use is available, visit Drupal.org and add project/desired_name to the end of the URL. If you land on a project, that namespace is occupied. File not Found is an indication that the namespace may be available when you release. Keep in mind, however, that another sandbox project may have already reserved this namespace, even if it doesn’t yet have a full release (and thus a project shortname).
Digging in with Git
Git is a powerful beast, and using it sometimes feels like grocery shopping in a Ferrari. We introduced its use for personal version control in Chapter 2, but that was a drive around the block and—while covering what is your most constant use of Git—didn’t begin to touch on its full range of capabilities. Git can be daunting, even for people accustomed to other types of source control; it has unfamiliar names for some common actions, and it can take a while to really understand how your local repository interacts with other Git repositories (called remotes). But the Drupal community opted for it to be the version control system of choice for a reason: if you persevere, you’ll find Git highly capable of managing not only your project’s code but codebases for individual Drupal sites, or even large, highly complex Drupal-based systems run across server clusters and integrated with external tools and deployment strategies.
All this talk of codebases and tools and systems should not distract from what maintaining an open source free software project is all about. The real reason for using a distributed version control system such as Git is so that you can work effectively with other people to build awesome things.
The web has a nigh-bottomless supply of resources for learning Git commands—you can jump right in with the commands provided on a tab at your project’s drupal.org page—but learning how Git works is invaluable for using it to maintain projects in collaboration with other people.
We’ll talk about a few commands and useful techniques in the rest of this chapter, but our focus here is really on the key steps for project maintenance, those steps that help you push your code to Drupal.org and create releases. If you want to learn more, there’s an appendix of Git resources at the end of this book. Keep in mind that, when browsing around the web for “git + drupal,” anything written before 2011 may not be particularly helpful. Drupal was still using CVS, and much of the talk prior to the switch was focused on making Git work with CVS. And Git itself has changed just enough in recent releases that you’ll want to make sure you have the most up-to-date information (and, of course, the most up-to-date version of Git).
To access that repository, you’ll need to use SSH (Secure SHell), so we’ll make a quick detour through getting all that set up.
Managing SSH
Drupal.org uses SSH for all authenticated communication with Git repositories, so you’ll need to make sure you’re set up properly with SSH. Until you set up your SSH keys you’ll need to type in your password every time you interact with the server (assuming you’re working from the CLI—many GUIs will store your SSH password for you). If you choose to stick with password authentication, your SSH addresses for interacting with your Drupal sandbox repositories will look something like this:
$ git clone [email protected]:sandbox/dgd7/1041111.git

Cloning into 1041111...

[email protected]'s password:
![]() Note Your sandbox is identified by your username (dgd7 in this example), and the project is represented by its assigned numeric string (1041111.git in the example) instead of its project shortname.
Note Your sandbox is identified by your username (dgd7 in this example), and the project is represented by its assigned numeric string (1041111.git in the example) instead of its project shortname.
If your password is accepted and you have access to the named project, the previous command will clone the repository to your local system (more on cloning later.) If you find passwords cumbersome or insecure, then you can opt to use key-based authentication instead, for which you will need to generate a key on your local machine and add it to your account on Drupal.org.
![]() Note We’re going to skip over discussing how to create SSH keys, as it’s somewhat platform-specific and there are loads of good tutorials out there. GitHubs are particularly focused on the steps necessary for getting Git configured:
Note We’re going to skip over discussing how to create SSH keys, as it’s somewhat platform-specific and there are loads of good tutorials out there. GitHubs are particularly focused on the steps necessary for getting Git configured: github.com/guides/providing-your-ssh-key and are a good starting point.
Once you have your public key, go to your d.o profile and click the SSH Keys tab. You’ll be presented with an interface for managing your public keys. Add your key, and it’ll be ready for use immediately with all git commands. With key-based authentication, you need not specify your username in your SSH commands, so the previous command becomes a bit simpler:
$ git clone [email protected]:sandbox/dgd7/1041111.git

Cloning into dgd7_example...
Because key-based SSH addresses have one less awkward variable, we’re going to use them in examples throughout the chapter. If you’re using username and password-based authentication, fear not—simply substitute your username for git in the examples. However, you will probably find that once you have set key-based commit authentication you will wonder why anyone still uses the more cumbersome password-based authentication.
Hack on Your Project
Now that you have a sandbox project waiting and SSH all configured, you’re ready to start writing and contributing code. The first step is to get your local Git repository set up. To do that, we’ll need to clone it over SSH from Drupal.org:
$ git clone [email protected]:sandbox/dgd7/1041111.git

Cloning into 1041111...

warning: You appear to have cloned an empty repository.
The warning is normal—encouraging, really, because it indicates that the repository you just cloned is brand new, freshly created, and empty. In this example you are cloning a project you’ve just created, so there’s nothing there yet. However, you should realize that cloning a repository makes a full copy of the entire repository contents—that is, the project’s entire history—and places it on your local machine. Cloning, for example, can be a bandwidth-intensive operation, especially for large projects (at the launch of Drupal 7, core’s repository was around 50MB). However, having the full history is crucial to Git’s decentralized, distributed functionality, so we bite the bullet on the size of the initial clone
Now that you have the repository, you can get to work adding, changing, and committing files—all of those Git basics that are covered in Chapter 2 and the Git resources listed earlier. Just as a quick recap, though, let’s add and commit some files into the new repository. For brevity’s sake the following example uses <?php> as a placeholder for your code:
$ echo 'name = "DGD7 Example Module"' > 1041111.info

$ echo '<?php>’ dgd7_example.module
Or add these files using your graphical editor of choice. After building your code, git status should show that you have untracked files as follows:
$ git status

# On branch master

#

# Initial commit

#

# Untracked files:

#   (use "git add <file>..." to include in what will be committed)

#

#       dgd7_example.info

#       dgd7_example.module

nothing added to commit but untracked files present (use "git add" to track)
These files are currently on your working tree (i.e., working directory or working copy) only and not in your index (i.e., staging area). Next, we’ll add the files to the staging area index and then we will commit them. Note that the SHA1 hash in your message will be different—the hash is computed using repository contents (which are the same) but also the time the commit was made (which is different).
$ git add dgd7_example.info dgd7_example.module

$ git commit -m 'Initial commit'

[master (root-commit) c8a69f9] Initial commit

 2 files changed, 2 insertions(+), 0 deletions(-)

 create mode 100644 dgd7_example.info

 create mode 100644 dgd7_example.module
This gets us as far as we went in Chapter 2 as all the operations so far have been local. (This is one of the most important ways Git differs from its non-DVCS predecessors: your code is stored in a local repository.) Next we’re going to take the additional step of pushing this commit to a remote repository, in this case our Drupal sandbox back on d.o:
$ git push origin master

Counting objects: 4, done.

Delta compression using up to 2 threads.

Compressing objects: 100% (2/2), done.

Writing objects: 100% (4/4), 300 bytes, done.

Total 4 (delta 0), reused 0 (delta 0)

Unpacking objects: 100% (4/4), done.

To [email protected]:sandbox/dgd7/dgd7_example.git

 * [new branch]      master -> master
Congratulations—you’ve just put your first bit of code onto Drupal.org! Note this is just the start of your new Drupal project or projects. Drupal sandboxes are intended to be a development space where you can actively work on and commit your code. Remember to commit early and commit often. This will give your sandbox a richer history that allows the module review team to get a sense of your coding style when you apply for active status. Don’t just wait until you want a full release and then upload the final version of your code! Perfection isn’t prized here as much as process.
There’s not a lot else to say about generic project maintaining at this point—what you do with your sandbox is really up to you. If you’re just tinkering around and have no intention of ever really sharing your code with the wider world, that’s fine—the only restrictions imposed on sandboxes are some size limitations, and those mostly to prevent abuse.
If you want to really share your project with the wider Drupal world, though, you’ll need to take the next step and have your sandbox promoted to full project status, which is a requirement for having an official release.
From Sandboxville to Projectopolis
So you’ve been happily hacking away at your module (or other project) committing fast and free locally, and pushing back to Drupal.org whenever you reach a suitable point, and you’re starting to think it’s time your project graduated from sandbox status and joined the ranks of full, user-facing projects. Great! This is a crucial juncture in the life cycle of your project.
Once you have code in your sandbox you can then apply for permission to promote it to full status as a first-class module. This approval is required for your project to have an official release on Drupal.org. However, you only have to apply once, for the first time you wish to promote a project. Specifically, you are not applying to have a single project promoted; you are applying for yourself to be granted the role that enables you to promote your projects (using the code in your sandbox to demonstrate that you understand and it fulfills the basic requirements of Drupal). After you are granted this role the first time, you will be able to promote any of your sandbox projects when you need to, provided your code always adheres to the basic standards set forth by Drupal.org
One of the main benefits you’ll get from a full release is sandbox access to Drupal’s full testing environment. At the time of this writing sandbox projects aren’t able to take advantage of Drupal.org’s automated testing framework.
In order to ensure that developers have familiarized themselves with Drupal’s coding standards and are writing secure code, the first time you wish to promote an experimental project you’ll be required to apply for full Git privileges. This involves:
- Preparing a branch for consideration.
- Preparing your project for review.
- Applying at
drupal.org/project/projectapplications. - Participating in peer review for coding standards compliance and security considerations.
- Being assigned the appropriate role on Drupal.org.
About Branches and Tags on Drupal.org
Branches and tags, collectively known as refs in Git and sometimes referred to as labels on Drupal.org, are a crucial building block in Git and are also an essential part of the packaging and release systems used on Drupal.org. Drupal’s packaging system requires only a basic understanding of how branches and tags work (fortunately), but it’s worth sticking with it beyond the basics. Git’s real strength lies in its cheap branching, and so while we won’t go that far into it here, you’ll want to delve deeper into the developmental efficiencies Git enables in order to take advantage of Git’s power. (And look forward to some of the best use cases making their way into Drupal’s “Phase Next” Git rollout.)
So, what’s so special about refs? First, they are used by the Drupal.org packaging and release system, and only branches and tags conforming to certain naming conventions will be approved for release. Once you grok how branching and tagging conventions work, you’ll have a much better understanding of the developmental structure underlying Drupal project versions.
Preparing a Branch for Your Application
If you have a pre-existing Git repository that you’re all ready to put onto d.o, all you have to do is add git.drupal.org as a new remote to the repository, then push:
$ git remote add origin [email protected]:project/<projectname>.git

$ git push --all origin
In this example we are adding it as origin, which is a default remote used by your Git repository. If you already have an origin set (for example, your main development server) chances are you already know to name the remote repository at git.drupal.org anything you like. Since Git has excellent support for tab completion, we recommend giving it the name git.drupal.org. To see what remotes your local repository is aware of, you can use cat .git/config.
After setting git.drupal.org as a remote, use git push—all to copy your complete code from your local repository into your project space on Drupal.org. Note that this will push all of the branches in your local repository.
Preparing Your Project for Review
The main part of the application process is a review of the code you have submitted to confirm that it is not a duplicate of already existing Drupal functionality and that it meets certain code and licensing requirements. These code requirements are intended to ensure that all code officially released on Drupal.org is secure, well-documented, and meets the specific coding standards set forth by Drupal’s legendary collaborative development community, and that it will be free from any licensing issues that could adversely affect other Drupal users.
Coding Standards
Drupalhas a very specific, detailed, and well-documented set of coding standards available at drupal.org/coding-standards. Experienced coders from other PHP frameworks or languages may disagree with some of the choices we’ve made, but coding standards are a crucial part of community collaboration. By adhering to coding standards, all of us can read each other’s code more easily, we’re saved countless hours of bickering over syntax choices or rewriting code based on varying preferences, and those who support Drupal out in the world benefit from the consistency these standards provide.
Fortunately, thanks to the Coder module (drupal.org/project/coder), adhering to Drupal coding standards is a cinch. Coder can even do a lot of the work for you, reading in what you’ve written and spitting out standards-compliant code. Whether you study and internalize the coding standards or clean up with Coder at the end, presenting standards-compliant code is the first step toward readying your module for the public.
Here are some examples of coding standards for Drupal. This is not an exhaustive list, but it is intended to illustrate some of the specific requirements your code will be expected to adhere to:
- All classes should be commented.
- All functions should be commented.
- Simple test should be implemented (and passed!).
- All code revisions and patches should be commented.
Security
Security issues can be harder to spot, especially for novice programmers. Coder module can be of some assistance here, too, as it will highlight certain security holes—improper escaping of database queries or user input, for example. It isn’t much help with subtler issues, though, so familiarize yourself with common web application vulnerabilities (XSRF, XSS, etc.) and try to ensure your code doesn’t have such problems. Novice programmers and people new to Drupal will find an excellent starting point at Drupal.org’s “Writing secure code” at drupal.org/writing-secure-code(also see Chapter 6).
Licensing
When you originally set up your Git access you agreed to only upload GPL licensed code to your sandbox. Thus all code submitted as part of your application should already meet Drupal’s licensing requirements.
Project Description
Review your project description to ensure it provides a detailed description of exactly what your project does. If your project is similar to another project on d.o. you’ll want elaborate exactly how it is different, and why such functionality is being duplicated. Make sure that all data is up-to-date, clear, and proof-read before you submit your application. Don’t forget to include a link to your project page, and, if your project is a theme, include a screenshot.
Applying for Access
The application itself isn’t complicated: file an issue in the Drupal.org Project applications at drupal.org/project/issues/projectapplications.
Because the review process uses Drupal’s project issue tracker, you’ll need to fill out the following form fields:
- Component: “new project application” and Category: “task”
- Status: “needs review”
- Title: your project’s title
- Description: your project description (as above)
Once given the sign off, you will be granted permissions both to create full projects and to promote sandbox projects to full projects. If for some reason your code is found not to meet the requirements you will be informed of the reason and given the opportunity to make the necessary fixes. While some of the reasons should be obvious, beginning Drupal developers sometimes miss less obvious, but no less impactful, requirements.
For a more exhaustive list of reasons code is typically sent back for improvement, see drupal.org/node/539608.
Receiving Access
Subscribe to the issue queue to receive feedback on your application and to receive notification when your access is granted. Once you have access, the interface for adding or updating a project changes. Now when you edit your project for promotion, you’ll see new choices, as shown in Figure 37-5.

Figure 37-5. Editing your project for promotion
Summary
If you’ve followed the instructions outlined in this chapter you will have been able to enable Git access on your Drupal.org account, create your own project sandbox and upload code to it, and have your Drupal projects (whether you are contributing modules, themes, or documentation) promoted to a first-class Drupal release status.
![]() Note Check out
Note Check out dgd7.org/maintain for links to resources on maintaining projects on Drupal.org.