
C H A P T E R 5
![]()
Fixing Problems in Images
In This Chapter
- How to assess problems in images
- How to fix a range of problems in images
As a beginner, you may want to improve a digital image but are unsure of the best way to do this with GIMP. Maybe you have some scanned photos or digital images that need a little improvement. This chapter will show you where to find the tools to reduce or eliminate a problem in your image.
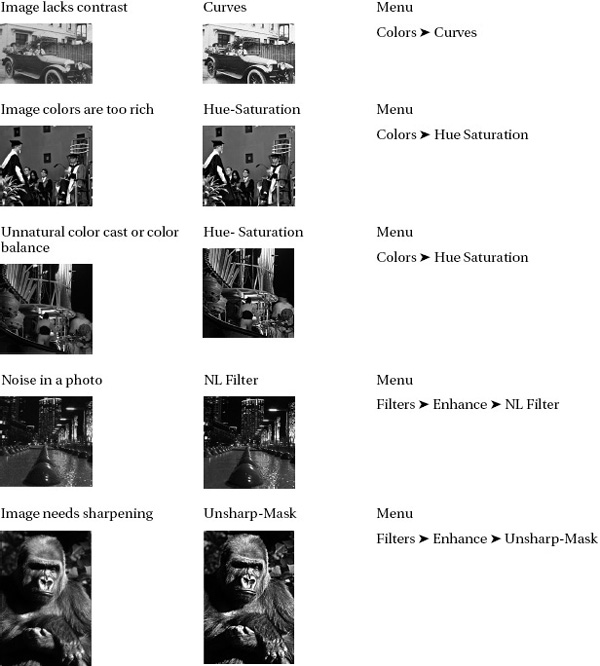
To help you assess problems with your images, this chapter has a gallery of photos with common problems and their solutions. Some of the images are recent and some of the images are over a hundred years old. They include images that are too bright, too dark, are lacking in color, have too much color, or are flat and dull. The gallery also has examples of sharpening, removing spots, removing red eye, and whitening teeth.
Assessing Images
You don't need to be an expert to assess the faulty areas of a photo. It just takes common sense. Open the image you would like to improve in GIMP and take a good look at the image. (See Chapter 2 if you need help with opening an image). Ask yourself the following questions:
- Is the image too bright?
- Is the image too dark?
- Is the image dull or lacking in contrast?
- Is the image lacking sharpness; in other words, is it out of focus or unclear?
Look through the pictures in the gallery below and see if you can spot a similar problem to your problem.
Image Assessment Gallery
The gallery in Table 5-1 shows images with problems. There is often more than one way to improve an image. GIMP is packed full of options. You can take easy steps or steps that are more complex. Most of the more complex tools give you a greater degree of control. The easy options are listed first. Most of these tasks are fun to do, particularly when you make real improvements to favorite images.
The quality of your result depends on the quality of your original image.

Assessing Brightness and Darkness
Take a good look at a photo you wish to work on. To help you assess the faults in your images, we will explore some terms a little further.
Too Bright (Overexposed)
In Figure 5-1, the top photo has blown highlights and pale colors; it lacks contrast. The bottom image has been edited in GIMP. It is not a perfect repair. However, the process improves a 30-year-old image.
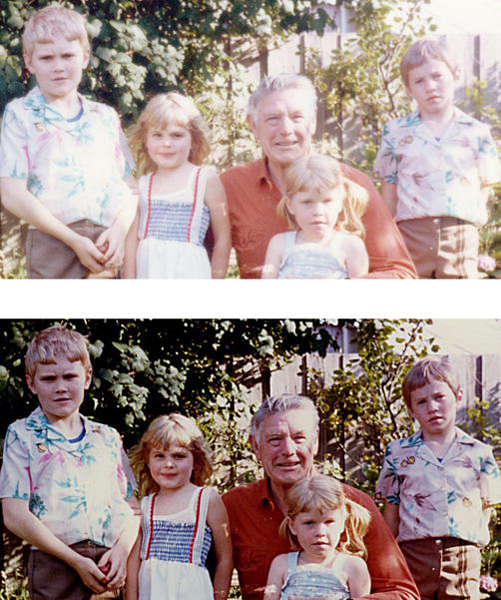
Figure 5-1. Notice the blown highlights in the taller boy's shirt and on the grandfather's head in the top photo; it also lacks contrast. The bottom photo is the result of corrections made in GIMP.
Too Dark (Underexposed)
The top image in Figure 5-2 is very dark. This is an example of an underexposed image. The bottom image is the same image after editing in GIMP.
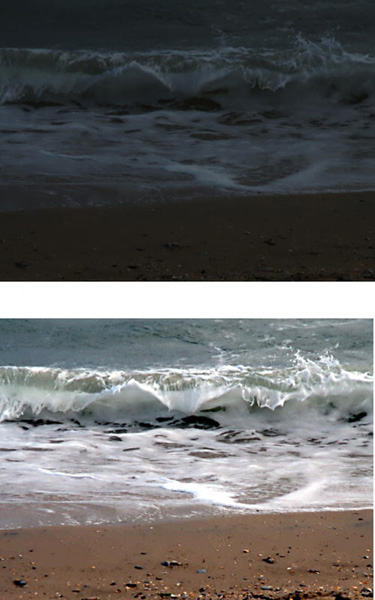
Figure 5-2. The top image was taken with a two-year-old digital camera; it was underexposed, resulting in a very dark image. The bottom photo is the same image after editing in GIMP.
Image Too Dull (Lacking Contrast)
An image that is dull has poor contrast and lacks snap. A dull image usually lacks black. Look at the top image in Figure 5-3 below; there are dark tones but not a deep black. Similarly, although the photo contains some white in the clouds and in the caps on two of the tourists, that white is dull.
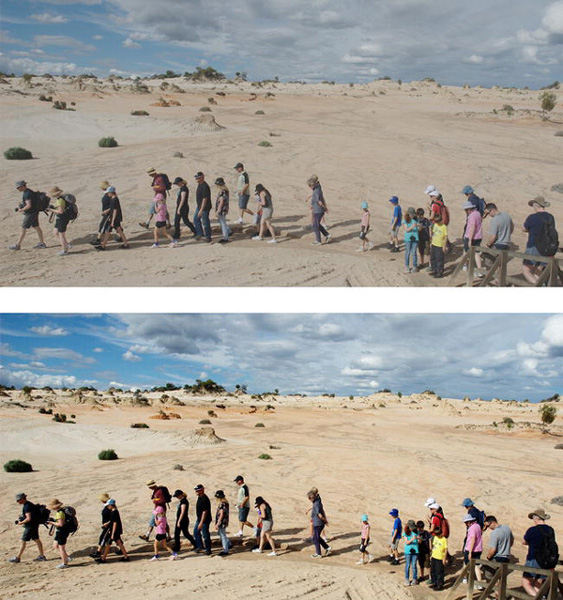
Figure 5-3. The top image is flat; it lacks contrast. The bottom image has been edited in GIMP.
Assessing Your Editing
After assessing the problems in your image, the next step is to start editing the image in GIMP. When working on your images, zoom to 100% (to zoom to 100%, type 1 on your keyboard). Chapter 2 has more information on zooming. There are times when you may want to zoom in more than 100%, particularly when you are working on fine details.
Before you save or export your image, you need to decide where the image will go. Is it to be a printed image or will the image be shown on a digital frame, a web page, or e-mailed to friends? The wrong choice of resolution and image file type might waste a lot of your editing time. Go to Chapter 3 if you need help in choosing the best resolution and file type for your image.
Editing Checklist
As you start to correct your image, check that you can see details in the highlights, midtones, and shadows. If you overcorrect, some parts of the image may look great but this change may adversely affect other parts of the image. For example, you may be able to bring a lot of detail back into a washed out area but lose definition in darker areas of an image. If this does happen to you, do not despair, these problems can sometimes occur when you edit the whole image. In Chapter 6, we show you how to adjust part of an image, using selections, while leaving other parts untouched.
Areas of GIMP Used in This Chapter
Most of the activity in this chapter takes places in the Colors menu. Figure 5-4 shows you where the Brightness-Contrast, Levels, and Curves options are located in the Colors menu.
When we give a direction such as go to Colors ![]() Brightness-Contrast, it means go to the Colors menu as seen in Figure 5-4 and click the word “Colors” to open the menu. Scroll down the menu list until you come to Brightness-Contrast. Click Brightness-Contrast to open a small Brightness Contrast dialog window.
Brightness-Contrast, it means go to the Colors menu as seen in Figure 5-4 and click the word “Colors” to open the menu. Scroll down the menu list until you come to Brightness-Contrast. Click Brightness-Contrast to open a small Brightness Contrast dialog window.
Undoing an Edit with Undo History
When editing, you can change your mind using GIMP's Undo History. See Figure 5-4. Each mouse click results in a temporary thumbnail image in Undo History. To move back, click on a thumbnail image in your Undo History.
The Undo History is not saved when you export or save your image. See Chapter 10 to increase the number of undo steps.
The keyboard shortcut to undo one action is Control+Z or Command+Z for Mac.
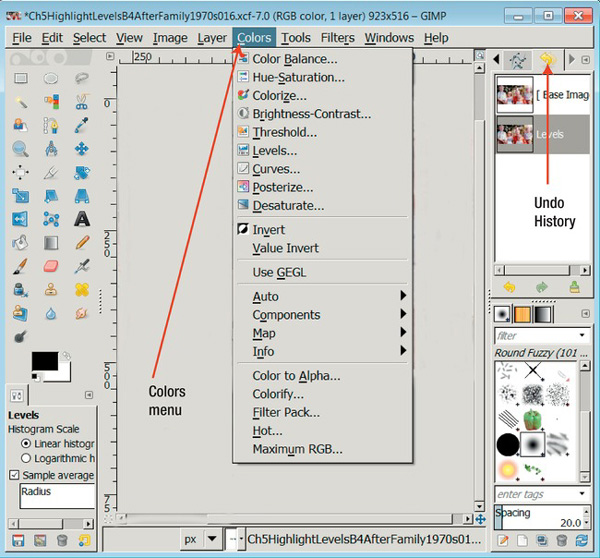
Figure 5-4. The Colors menu and the Undo History area. Some menu items will be grayed out if you look at them without having an image open in GIMP.
Correcting with Brightness (Contrast)
Brightness-Contrast is a convenient tool for beginners. It consists of two easy-to-use sliders. (GIMP has two other solutions that are more powerful: Levels and Curves.)
Keep in mind the aim as you edit is to increase the contrast without losing fine details in the photo.
- Open your image in GIMP.
- Go to the Colors menu, scroll down and click on Brightness Contrast (see Figure 5-5). This screenshot shows the GIMP workspace in single-window mode with three images open. To access single-window mode, go to Windows
Single-Window Mode. If you have more than one version of an image open, you can click from one image to the other to compare your edits.
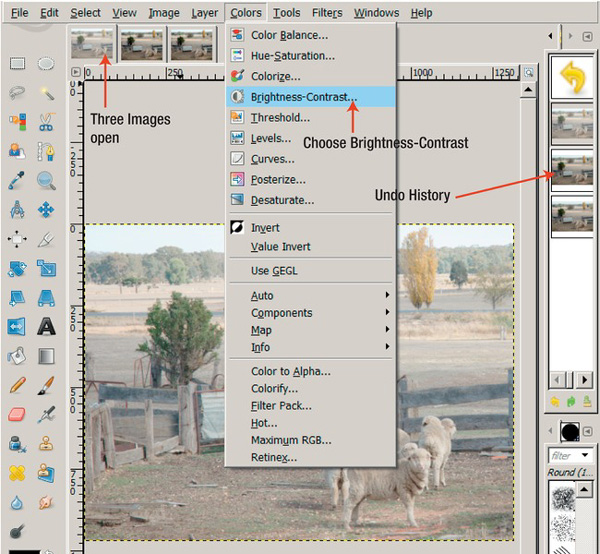
Figure 5-5. Brightness-Contrast is located in the Colors menu. Notice the Undo History on the right. You can click back to undo an edit. You can also have more than one image open and click on an image to compare it.
- Figure 5-6 shows the Adjust Brightness and Contrast dialog window. This is how the Adjust dialog looks before any adjustments.
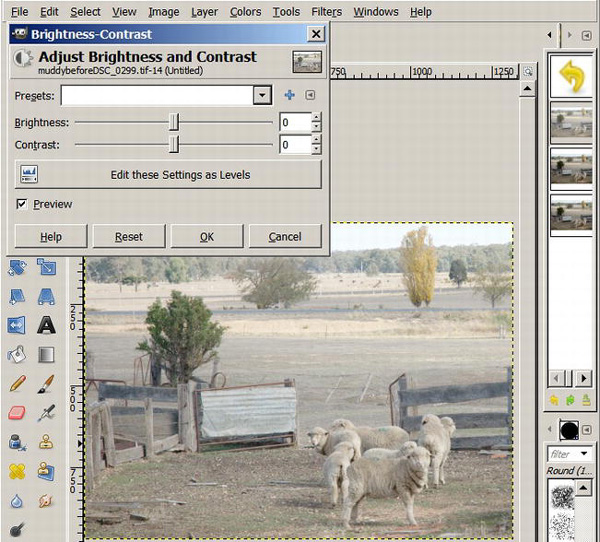
Figure 5-6. The Adjust Brightness and Contrast dialog window with no adjustments. Ticking the Preview box will allow you to see the changes to the image on your screen.
- Tick the Preview box in the Adjust Brightness and Contrast window. This will allow you to see the changes you make to your photo when you move the sliders.
- For an image that is too bright, try moving the Brightness slider to the left. If you have an image that is too dark, move the Brightness slider to the right. If your image lacks contrast, try moving the Brightness slider to the left and the Contrast slider to the right (see Figure 5-7).
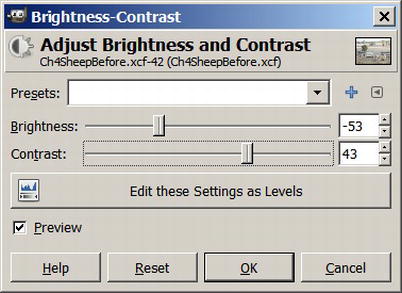
Figure 5-7. Example adjustments for an image lacking in contrast.
- To check your adjustments, click Preview on an off. If you are unhappy with the adjustments, click the Reset button to reset the sliders back to zero.
- When you are happy with your adjustments, click OK. Then click File
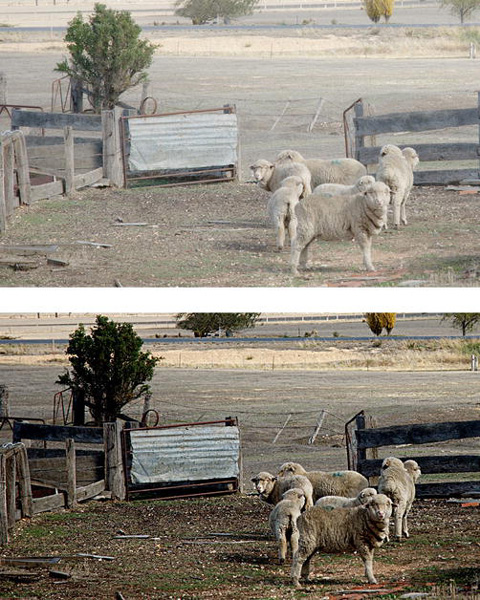
Figure 5-8. The top photo before editing; the bottom photo after using Brightness-Contrast.
Improving Tones in Images with Levels
In addition to Brightness-Contrast, Levels and Curves are two more options available in GIMP for adjusting tones in an image. They are useful for repairing images that are overexposed (too light), underexposed (too dark), and lacking in contrast (too dull). This section looks at using Levels to improve your image.
The Levels option is relatively new. There are many ways to use Levels, some techniques are quite complex. This section looks at a couple of easy ways of improving photos with Levels. The Levels option is located at Colors ![]() Levels (see Figure 5-9).
Levels (see Figure 5-9).
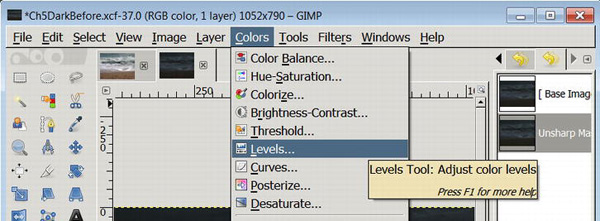
Figure 5-9. To get to Levels, click Colors, scroll down, and click on Levels
Look at the Levels pop-up dialog window in Figure 5-10. The graph you see is called a histogram. The histogram gives visual measurements of the tones in your image. At the left end of the histogram are the dark-to-black tones and at the right end of the histogram are the lighter-to-white tones. The height of the graph indicates the amount of a tone in the image.
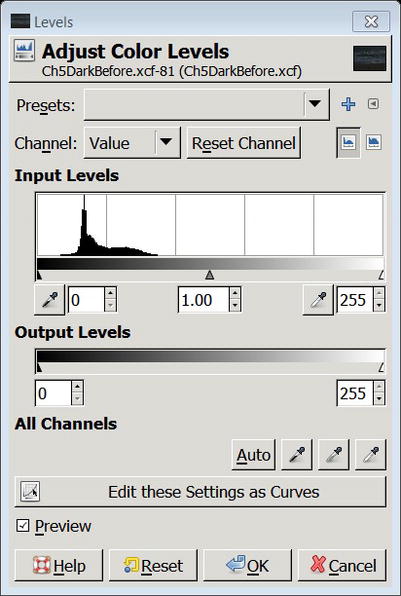
Figure 5-10. The Levels pop-up window or dialog. This histogram is showing most information at the dark end of the spectrum.
When working with Levels, the focus for beginners is on the Input Levels. A lot is possible using the Input Levels area. Output Levels is not intuitive and perhaps not for beginners.
![]() Note Channels: In GIMP, digital color images are made from a mixture of red, green and blue (RGB). Color is stored in red, green and blue channels. In some GIMP's editing options such as Levels and Curves, you can edit individual channels for greater control. Value refers to the combined output from the RGB channels. The Alpha channel (when present) controls the amount of transparency in an image.
Note Channels: In GIMP, digital color images are made from a mixture of red, green and blue (RGB). Color is stored in red, green and blue channels. In some GIMP's editing options such as Levels and Curves, you can edit individual channels for greater control. Value refers to the combined output from the RGB channels. The Alpha channel (when present) controls the amount of transparency in an image.
The Channel Area is set to Value by default, this is a mix of the red, green and blue channels. However, once you are confident using Levels, you can experiment by opening the drop-down Channel list and try altering the red, blue, or green channels separately. Every image is different so this is an area where playing around with individual channels may bring something useful for your image.
Improving a Low Contrast Image with Levels
- Open your image in GIMP and access Levels in the menu system by going to Colors
- Here is a reminder in case you are not working in single-window mode: to access it, go to Windows
- The Levels pop-up dialog is shown in Figure 5-10.
- Make sure the Preview box is ticked in the Levels dialog box so you can see the effects as soon as you make adjustments.
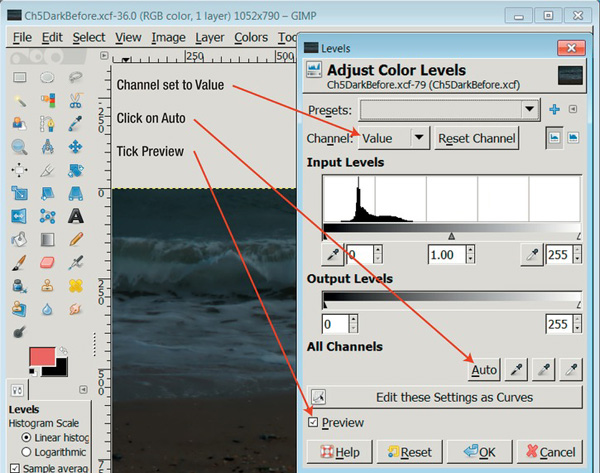
Figure 5-11. The Levels dialog window. Make sure Preview is checked so you can see the changes on your screen.
- In the Levels window, check that Channel is set to Value (see Figure 5-11).
- Then click Auto (see Figure 5-11).
- Now try moving the middle slider, as shown in Figure 5-12. You can judge how far you need to move the slider by looking at its effect on the image. Click the Reset button if you are unhappy with your choices.
- When you are pleased with the image, click OK.
- Then save or export your image.
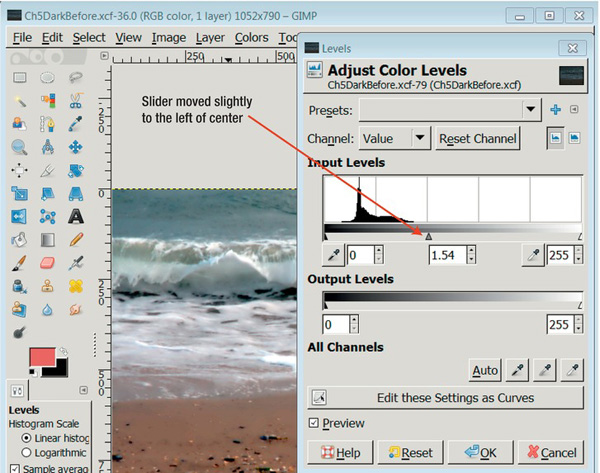
Figure 5-12. After Auto was applied to the image, the middle slider was moved until the image looked good.
![]() Tip Black and White Images in GIMP
Tip Black and White Images in GIMP
If you are working with black and white images, don't be put off by the Colors menu. The Colors section works just well with black and white images because it works on tones. Tones exist in color and black and white images.
Improving an Old Photo with Levels
The image in Figure 5-13 was found in an old box of papers. It had darkened over the years and seemed beyond repair. After scanning, the image was edited in GIMP. Sometimes an image is not aesthetically brilliant but is still of value to family members as a rare glimpse of a past time.
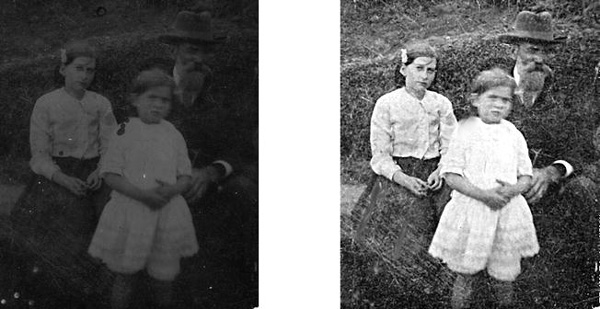
Figure 5-13. On the left is a dark, scratched image from 1915; on the right is the same image after Levels were adjusted.
Levels Disadvantage
Using Levels produces a good tonal range but sometimes there is a noticeable loss of color. Of course, this is not a concern if your image is black and white. One of GIMP's most popular and effective color tools is next: Curves.
![]() Tip The Curves Tool is one of GIMP's most popular tools because it offers a lot of control over tones and colors. It's worth trying.
Tip The Curves Tool is one of GIMP's most popular tools because it offers a lot of control over tones and colors. It's worth trying.
Correcting a Dull Image with Curves
Many people say Curves is their favorite tool in GIMP. It has some simple options for beginners and more complex options for the adventurous. The Curves Tool works on every tone in an image. It can make changes to the brightest part of the image as well as the dark areas. Like the Levels Tool, you can work on the whole image or work on the red, blue, and green color channels separately. People generally work on all channels together.
The S Curve
To add some contrast to a dull image, follow these steps:
- In the top menu, go to Colors and click Curves (see Figure 5-14). The Curves dialog or window will open.
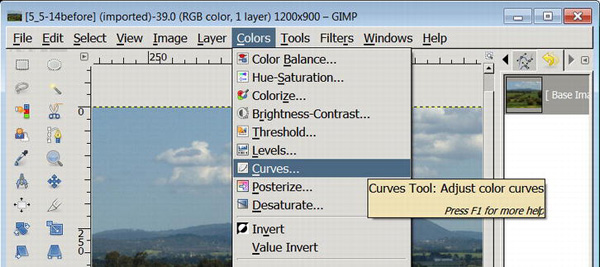
Figure 5-14. To access Curves, go Colors, scroll down, and click Curves.
- In the Curves pop-up window, tick the Preview box (see Figure 5-15). This will allow you to see changes you make directly on the screen. The peaks in your histogram show you where the tones are in your image. A peak in the graph towards the left of your screen represents the dark tones; a peak in the middle is the middle or grayish tones. Peaks at the extreme right end of the graph shows the amount of highlights in an image.
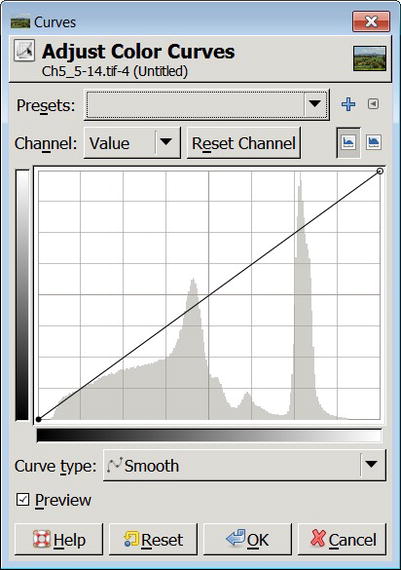
Figure 5-15. Curves has a graph known as a histogram. The left side shows the darkest tones; the right side shows the white end of the range. Note that the Preview box is ticked.
- Use your mouse on the central line in the histogram to make a small S shape, as shown in Figure 5-16.
- Click Preview on and off so you can compare your changes with the original image.
- How small or big your S curve needs to be depends on the image. Keep checking the screen as you work to make sure you are adding the correct amount of brightness and darkness. If you start to lose details in the image, you've moved the line too far.
- Click OK when you have improved the contrast and kept details in the highlights and shadows.
- Save or Export your image. See Chapter 3 if you are unsure how to Save.
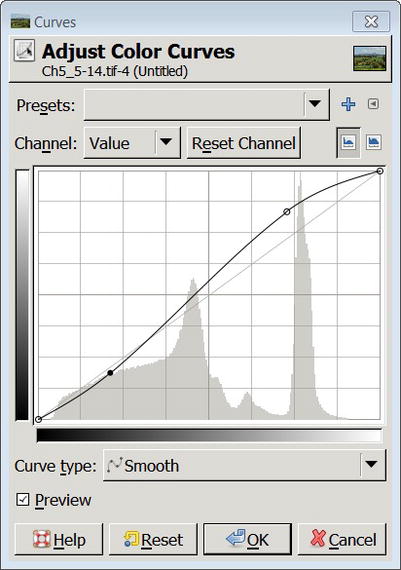
Figure 5-16. The center line in the Curves histogram is now a gentle S shape.
See Figure 5-17 for a before and after example using Curves.
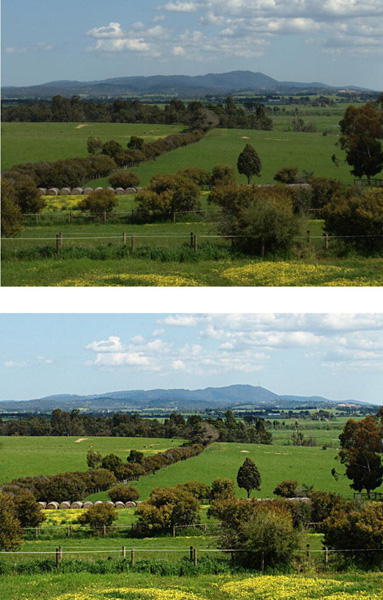
Figure 5-17. The top photo before editing in Curves; the bottom photo after a gentle S curve was applied.
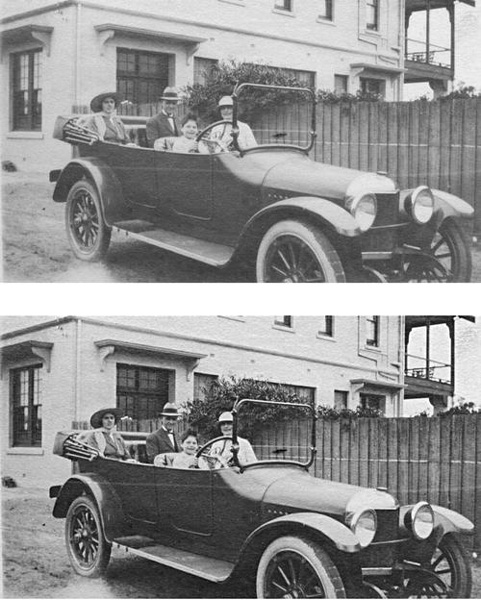
Figure 5-18. A photo from 1915. In the bottom photo, the contrast has been improved by applying a small S curve in Curves.
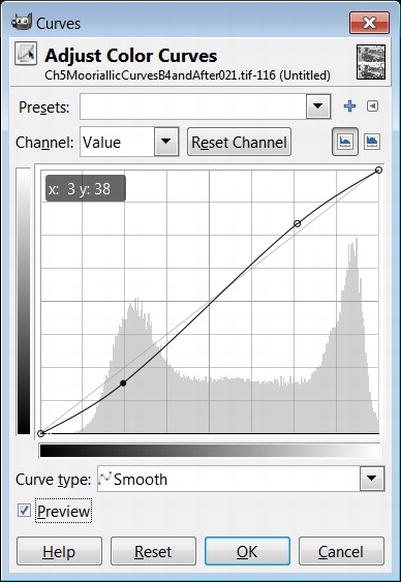
Figure 5-19. The curve graph for the photo in Figure 5-18. Notice the very slight S curve.
Improving Color and Tone with Curves
Extending the Histogram
There is another easy way to improve the tone and color of a photo using Curves. This method involves moving the brightest point and the darkest point towards the middle of the histogram. You will be extending the tonal range of the photo by removing tones without information in them. Try this exercise; you will see a difference in your image.
- Go to Colors
- In the Curves pop-up window, click the Preview button so you can see changes you make to the graph in your image (see Figure 5-20).
- In the Curves Histogram, move each end of the diagonal line to the start of the image information. For an example look at the lower histogram in Figure 5-20.
- Check your changes with the original image by clicking on the Preview box.
- Click OK when the image looks brighter and more natural.

Figure 5-20. The top shows the image and graph before using curves to improve brightness and tonality; the bottom image is the result of applying Curves.
Color Too Strong (Oversaturated)
The top image in Figure 5-21 is oversaturated; the red colors don't look natural. One of the easiest ways to correct oversaturation is using GIMP's Hue-Saturation.
Hue-Saturation
The Hue-Saturation Tool is useful for reducing the amount of color in an image. The top image in Figure 5-21 is oversaturated or has too much color.

Figure 5-21. The lower image has been desaturated using Hue-Saturation
Removing Strong Colors
To desaturate or reduce color that is too strong and unnatural in an image, follow these steps:
- Open your saturated image in GIMP.
- Go to Colors and click Hue-Saturation (see Figure 5-22).
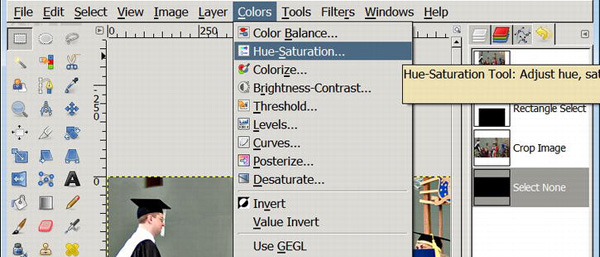
Figure 5-22. Hue-Saturation is located under the Colors menu.
- The Hue-Saturation dialog window will open (see Figure 5-23).
- Click the Preview button, to see the changes you make directly on the image.
- Slide the Saturation slider to the left. This takes some of the color from your photo. This may be all you need to do. However, you may find that the colors then don't look natural. Try moving the Hue slider to the left and or right to correct the colors (see Figure 5-23).
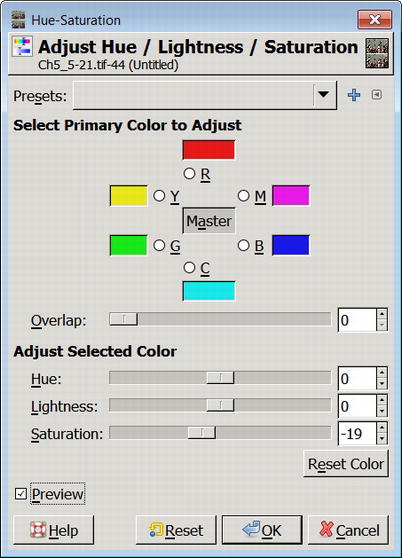
Figure 5-23. The Saturation slider moved to -19.
- When the colors in your image look natural, click OK. Then Save or Export your image.
Color Cast and Color Balance
The top image in Figure 5-24 below has a red color cast. The unnatural color balance can be corrected using GIMP's Hue-Saturation Tool.
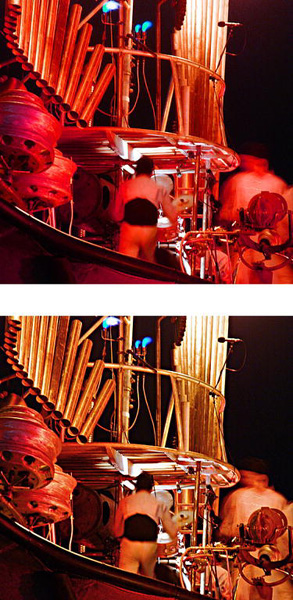
Figure 5-24. The top image has a red color cast; the lower image was corrected using Hue-Saturation.
Noisy Image
A noisy image is an image that has a large number of unwanted tiny colored dots scattered throughout a photo. If there is noise in a photo, it will be most noticeable in the dark areas. In Figure 5-25, the top image has noise scattered all over it.
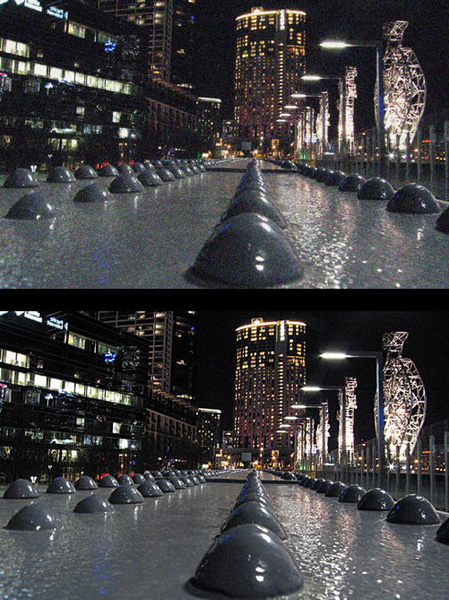
Figure 5-25. The top image is noisy; it has tiny unwanted colored pixels sprinkled over the image. The lower image has had the noise reduced using GIMP's NL Filter
A noisy image can occur when you are taking photos in low light. Noise can also occur on images when you wind the sensitivity or ISO up on your digital camera. The NL Filter is a good noise reduction filter. This filter works on the whole image; in comparison, the Filters ![]() Enhance
Enhance ![]() Despeckle Filter can work on a selected area of an image.
Despeckle Filter can work on a selected area of an image.
Noise Reduction NL Filter
The NL (Non Linear) Filter is useful for reducing or removing noise in an image.
- Go to Filters
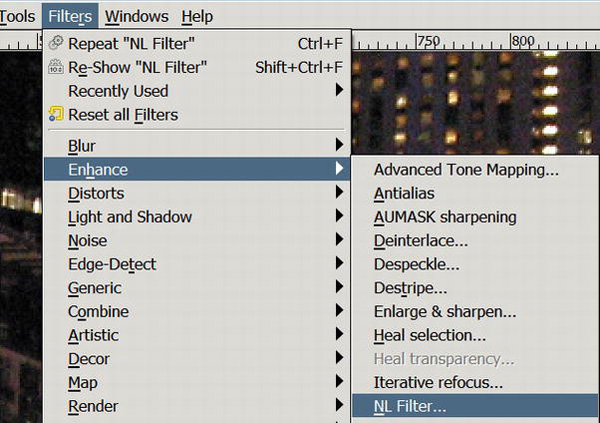
- Tick the Preview box so you can see the changes in the pop-up NL Filter box (Figure 5-27 below).
- Choose the filter setting “Alpha trimmed mean.” See Figure 5-27.With this setting, the filter looks at tiny groups of pixels and removes any pixels not like its neighbors.
- Choose Alpha slider: .0
- For Radius, try between .50 and 1.0. Check the effect on the dark areas of your photo in the Preview area. Adjust the radius until you see the best reduction of color noise.
- Click Ok when you see the image has less noise. Then Export or Save your image.
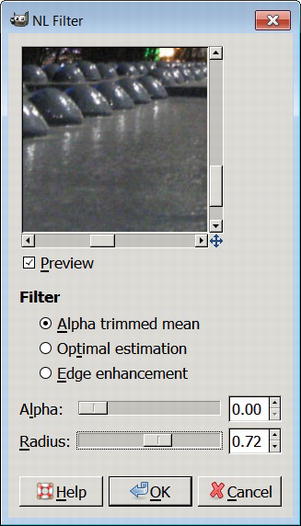
Figure 5-27. Try using the NL Filter to reduce noise in your photos.
If you can't see your NF filter once selected, or if it disappears, go to Filters ![]() Reshow Filter. This will bring the selected filter action box back to the top layer of your desktop.
Reshow Filter. This will bring the selected filter action box back to the top layer of your desktop.
Sharpening an Image
The aim of digital sharpening tools is to improve the sharpness of images. An image that is badly out of focus can't be repaired but an image that is slightly soft can be improved in GIMP.
If you aren't sure what sharpening can do, look at the two images in Figure 5-28. The image on the left is slightly soft compared to the image on the right, which looks clearer. The photo on the right in Figure 2-28 was sharpened in GIMP.
So when should you use a sharpening tool?
- After you resize an image, sharpening will improve the clarity of the image.
- If you have a converted RAW file, no sharpening is applied to the image in the camera. A sharpening tool will improve the image.
- If your photo is a JPG, it will have had some sharpening in the camera and may not need more sharpening.
- If an image is soft, it is worth trying a sharpening tool.
The important thing to note about sharpening an image is that it should be the last editing process carried out on the image. Any editing on the image after sharpening will lessen the effect of the sharpening. As a rule, sharpen your image as the last step in your digital editing process.
Figure 5-28. The image on the left is slightly out of focus; the image on the right has been edited with Unsharp Mask.
A very nice sharpening tool in GIMP is the very unhelpfully named Unsharp Mask Tool (Figure 5-29). It gives a lot of control and the possibility of a good outcome. Unsharp Mask is a confusing term; it is a sharpening method that originated in Germany in the 1930s. Both GIMP and Photoshop use a digital version of this process. In contrast, Sharpen, which is also a GIMP sharpening tool, provides a limited amount of sharpening control. Use Unsharp Mask for best results.
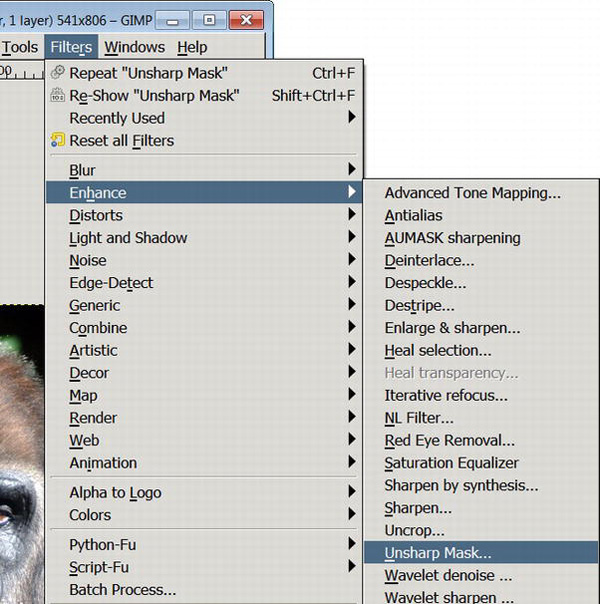
Figure 5-29. GIMP's best sharpening method, Unsharp Mask, is located in the Filters ![]() Enhance menu.
Enhance menu.
To Sharpen an Image with Unsharp Mask
- Zoom in so you are at 100%. Pressing the number 1 on your keyboard will zoom your image 100%.
- Go to Filters
- When the pop-up dialog window opens, tick the Preview box so you can view your sharpening efforts in that window (See Figure 5-30 below).
- Try the default setting of Radius: 5.0, Amount: .50, and Theshold: 0. This may be too harsh and overly sharp; if so, try a lower number in the Radius and Amount boxes. You can see the settings have a lower number in Figure 5-30; the default settings were too harsh for the picture taken at the zoo.

- Check the effect of your sharpening by turning Preview on and off.
- See Figure 5-31 for an example of an oversharpened image. Every image requires slightly different settings, so it is best to experiment with the sliders. Usually the best sharpening effects come from the application of a small amount of sharpening.
- When you are satisfied with the sharpening, click OK.
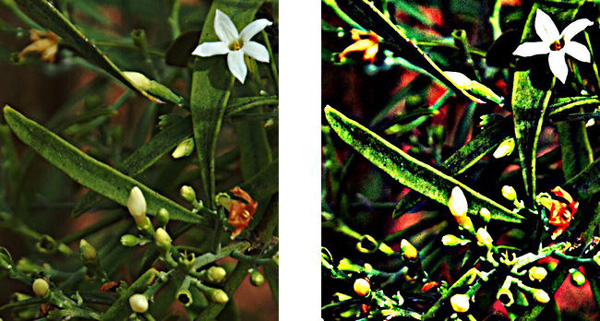
Figure 5-31. The photo on the left has had a small amount of Unsharp Mask; the photo on the right has been oversharpened in Unsharp Mask.
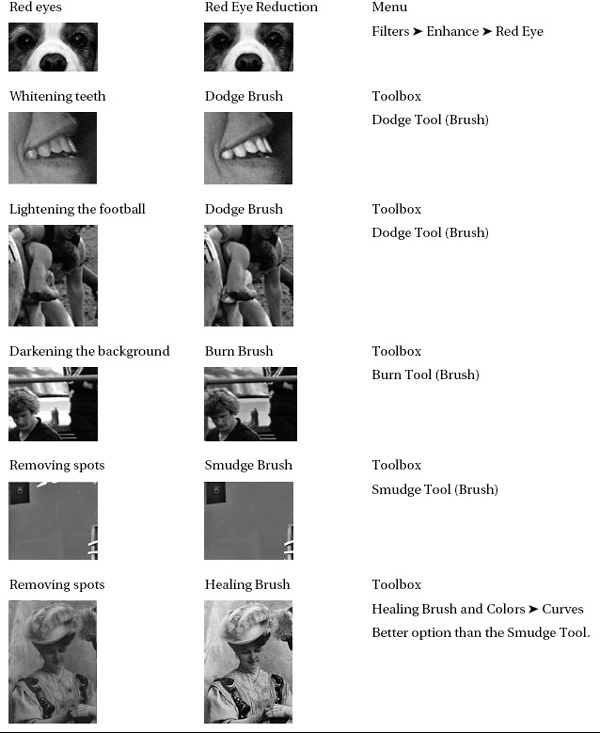
Removing Red Eye
Red eye is a photographic effect that accidently gives a person or animal red pupils (see Figure 5-32). This occurs when a flash is fired directly in front of the subject's face. GIMP can remove red eyes in images. The way to avoid red eye in the future is to not use a flash in front of a face. If possible, bounce the flash off a ceiling or nearby wall.
Selections
To remove red eye in GIMP, involves selecting each eye and then applying the fix. Knowing how to select parts of a photo opens up a world of editing possibilities, which we explore more fully in the next chapter.
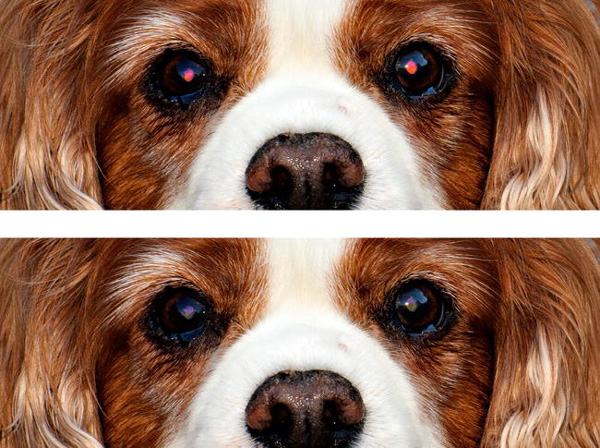
Figure 5-32. Top photo before Red Eye Removal; bottom photo after Red Eye Removal.
Red Eye Removal
Removing red eye from a photo is a two-step process. First, the eyes are selected. Then the Red Eye Removal Filter is applied to the selection.
- Zoom into your image so you are seeing it at 100% or greater. Pressing the number 1 on your keyboard will zoom your image 100%.
- In the Toolbox, select the Ellipse tool (Figure 5-33). The tool selects an area of a picture.
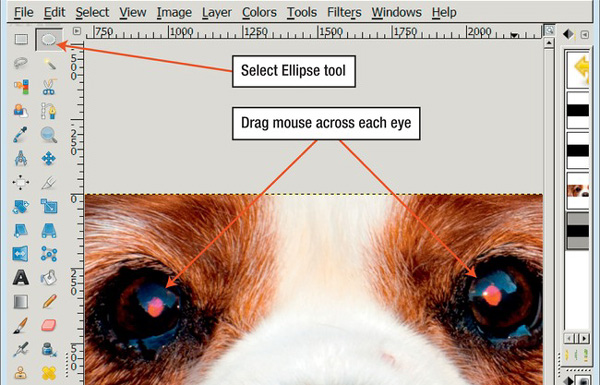
Figure 5-33. Zoom in to see the eyes clearly, select the Ellipse Tool, and drag your mouse across an eye.
- With your mouse, drag an ellipse over one eye in your photo, hold the shift button, and then select the other eye. In this way you select both eyes and can work on them at the same time. If you have trouble selecting the two eyes, select one eye and complete the steps in this exercise. Then select the other eye and repeat the steps. The selection/s will allow you to apply the Red Eye Removal filter the eyes rather than to the whole image. Applying the filter without selecting the eyes would result in unusual color changes for the rest of the image.
- To access Red Eye Removal, go to the menu Filters
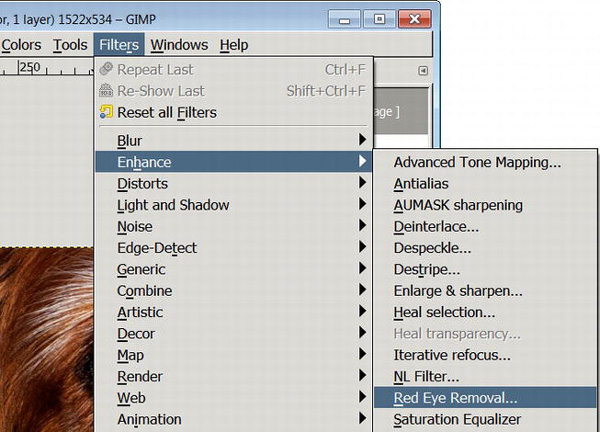
Figure 5-34. The Red Eye Removal filter is located at Filters
Enhance
- In the pop-up Red Eye Removal window, tick the Preview box (Figure 5-35). This will allow you to see the changes as you move the Threshold slider. The default setting (the Threshold at 50) may work for you. If you can still see redness in the eye, increase the Threshold amount.
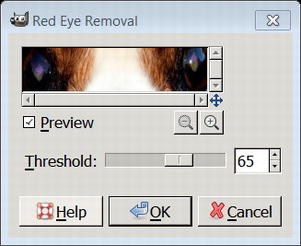
Figure 5-35. The Red Eye Removal box
- Click OK.
- To remove the selections, go to Select
- Save or export your image.
Using Brushes to Repair Images
The rest of this chapter looks at repairing images with GIMP's brushes. GIMP has a range of brushes that are very useful for touching up photos. The advantage of a brush is that you are only affecting the part of the image your brush is moving over. You can choose the shape and thickness of the brush. You can choose how much of a brush stroke is visible and what percentage of the stroke is transparent. You can decide to make the brush dynamic so that the pressure and speed of your strokes behaves like a real brush. For beginners, we show you how to start using the default settings for each brush. Only change the brush options if you are not happy with the result or if you feel like experimenting.
Whitening Teeth
This is a simple way to whiten teeth using the Dodge Brush. The Dodge Brush just affects the area stroked by the Brush; it doesn't change the whole image (Figure 5-36).
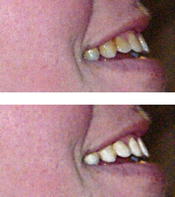
Figure 5-36. The top photo before teeth whitening; the bottom photo after teeth whitening using the Dodge Brush
To Whiten Teeth
To whiten teeth:
- Open the image in GIMP.
- Zoom in so that the teeth are very large. Try the number 4 on your keyboard to zoom in 400%. When you wish to compare at 100%, type the number 1 on your keyboard.
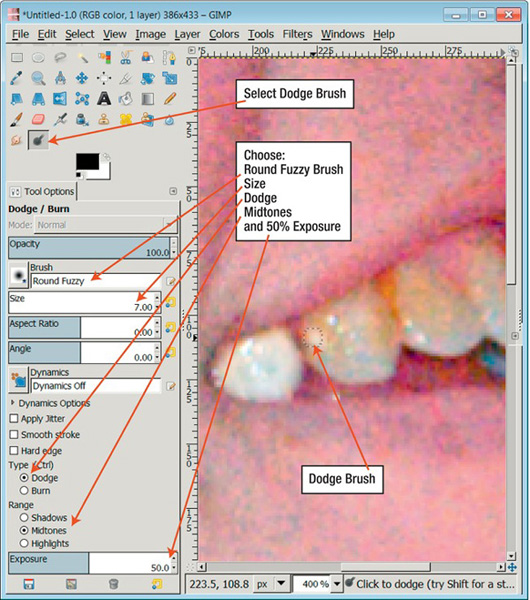
- Click on the Dodge Brush in the Toolbox (Figure 5-37).
- Located below the Toolbox are the Dodge Brush options. (When you click a tool in the Toolbox, the options below change according to the tool selected.)
- In the Tool Options, choose Round Fuzzy Brush, Size 7.0, Dodge, Midtones, and 50% exposure.
- In Figure 5-37, you can see the outline of the Dodge Brush over a tooth. To make your Dodge Brush smaller, choose a smaller number in the Size box in the Tool Options area (see Figure 5-37).
- Brush once over the teeth to whiten them. If you make a mistake, use your Undo History to go back a step or two. You can also go back a step by clicking Control+Z.
- If you find your efforts too white, change the Exposure in the Tool Options to 40% or less and try again.
Brightening Part of a Photo (Dodging)
The Dodge Brush allows you to lighten a small part of a photo without affecting the rest of the photo. The Dodge Brush is located in the Toolbox. It may be used to brighten part of a photo, such as the football in Figure 5-38, however the brush can't add in details not there in the first place.
For further information on dodging follow the example above for whitening teeth.

Figure 5-38. The top photo is the original; the bottom photo shows dodging on the football. The football is under the arm of the kneeling player.
Darkening or Burning part of an Image
To burn an image is to darken part of an image. You might want to darken something in the photo so that it doesn't distract the viewer from the main subject. In Figure 5-40 below, the white car was darkened with the Burn Brush.
Note that using the Burn Brush only affects the pixels the brush touches. It leaves the rest of the image unchanged. However, if you darken a washed out area too much, it will look unnatural and will not provide missing details.
- Open your image in GIMP.
- Click on the Dodge/Burn Brush in the Toolbox (Figure 5-39).

Figure 5-39. The Dodge/Burn Brush is located in the Toolbox.
- In the Dodge/Burn Options box located below the Toolbox, choose Burn to darken part of your image.
- Adjust the size of your brush using the up or down arrow in the Size area in the Tool Options. Alternatively make the brush larger by clicking ] on your keyboard a few times; to make the brush smaller, click [.
- In the Range area, choose whether you wish to work on shadows, midtones, or highlights.
- Choose the Round Fuzzy Brush, and try the Exposure at 50%. Increasing the Exposure will increase the effect.
- Zoom into your image by typing the number 2 or 3 on your keyboard.
- Brush over the area you wish to darken.
- Click on Undo History on the left of your screen if you need to undo the effect. Or type Control+Z.
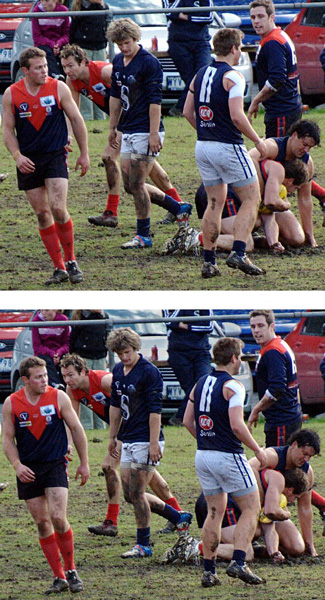
Figure 5-40. The top image is unedited. The silver car in the bottom image has been darkened with the Burn Tool.
Unwanted Spots or Blotches
You can remove an unwanted spot in GIMP using the Smudge Brush, the Healing Brush, or the Clone Tool.
Removing Spots with the Smudge Brush
The Smudge Brush is quite easy to use but is not effective in all situations (see Figure 5-41).
Figure 5-41. Top image has a distracting white mark high on the wall; the mark was removed in the bottom image with GIMP's Smudge Brush.
- Open your image in GIMP
- Select the Smudge Brush from the Toolbox (Figure 5-42).
- Make you brush size larger than the area you wish to smudge. In Toolbox Options located below the Toolbox, change the number in the Size area to make your brush bigger.
- Drag the mouse over the unwanted spot with the Smudge Brush.
- Click Control+Z on your keyboard if you wish to undo your smudge and try again.
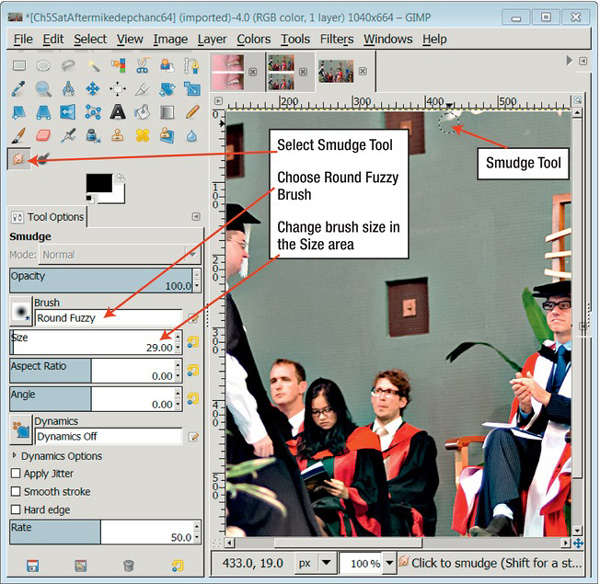
Figure 5-42. The SmudgeTtool is located in the Toolbox. It has its own Tool Options located below the Toolbox.
Removing Spots with the Healing Brush
Old photos can show signs of their age. They may contain unwanted spots or stains (Figure 5-43).
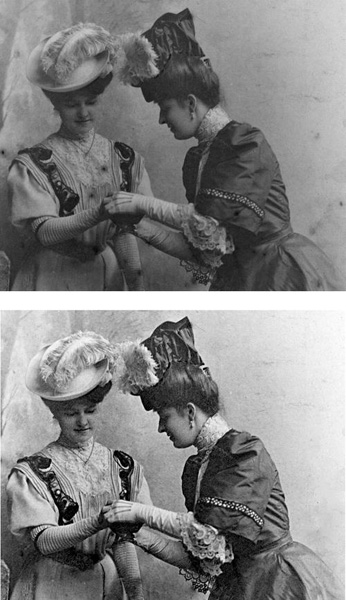
Figure 5-43. The top image has unwanted spots and stains on the dress and throughout the 120-year-old scanned image. The image on the bottom shows the results after using the Healing Brush. The contrast was improved using Curves.
The scanned photo in Figure 5-43 is 120 years old. It has mildew and some unwanted spots on the dress and wall in the background. Using the Healing Brush on the image helps to repair the damage of time. You could also use this technique for a color photo. The Healing Brush is useful for removing skin blemishes, spots off curtains and walls, etc.
Spot Removing with the Healing Brush
To remove spots from your image using the Healing Brush:
- Open your spotty image.
- Zoom into your image 150% or more. One way of zooming is to use the drop down selector shown in Figure 5-44.
- Select the Healing Brush from the Toolbox (Figure 5-44).
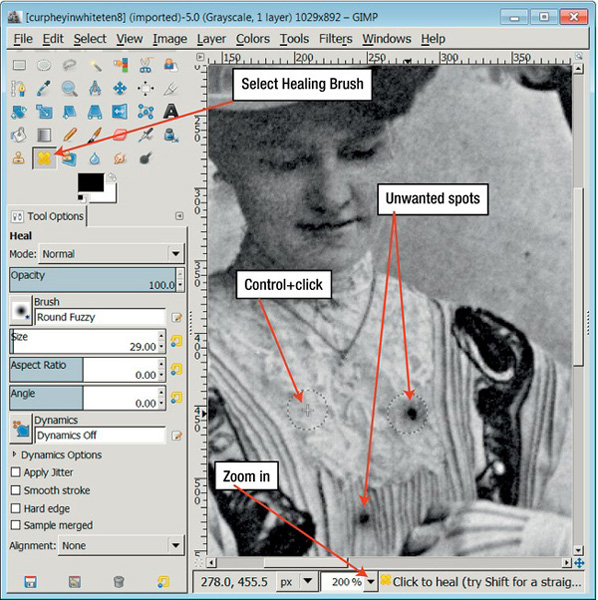
Figure 5-44. Zoom in to 100 - 150% so you can clearly see the problem area, Control+click on an area with similar texture and color to the area you want to repair.
- The Healing Brush will not work until you activate it. Find an area of your image with the same texture, color, and tone as your damaged area. Control+click with your mouse to select that area as the healing source. Figure 5-44 shows the healing source for the lace blouse. A separate part of the blouse was selected to remove the spot from the pleated area of the blouse.
- Move your mouse over the unwanted spot to remove the spot and replace it with the characteristics of the source area.
- When you are happy with your efforts, Save or Export your image.
Making Brushes Dynamic
If you want to get slightly more adventurous, you can make your brushes sensitive to pressure and speed. This option works for all brushes. In the Tool Options for your brush, click on the icon next to Dynamics and choose Basic Dynamics (Figure 5-45).
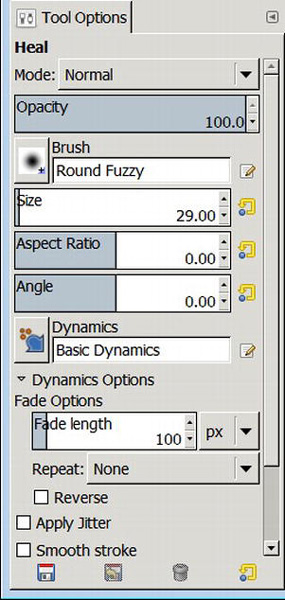
Figure 5-45. To make a brush dynamic, click on the icon next to Dynamics and choose Basic Dynamics.
Summary
Fixing problems in images can be rewarding and fun. The image gallery is there to help you identify common problems with images. The rest of the chapter showed you how to improve your images. The techniques in the first part of the chapter changed the whole image while the digital brushes shown later in the chapter only affect the areas touched by the brush. If you enjoyed working with brushes, making them dynamic gives you a lot of control.
The next chapter takes a leap into the world of digital creativity. It shows you more ways to select part of an image to perform a task. You can also be creative by adding photos together in layers.