
C H A P T E R 8
![]()
Digital Art: Painting in GIMP
GIMP is not only for editing digital photographs, the tools used for photo editing are also effective for digital painting and drawing. Digital art has many facets and different styles. While you are bound by the restrictions of your camera and environment, a white canvas enforces no rules—which leaves you to paint anything that comes to your mind. As with any other creative art form, painting is a way of expressing yourself; therefore, this chapter can only tell you techniques and ways to use GIMP.
This chapter will teach you about the tools you need. If you have set up a digital tablet as described in Chapter 7, now is the time to use it.
In This Chapter
- Paint tools in GIMP
- The advantages of digital painting
- Color basics
- Using paint tools
- Layers
- Filling in the details
Paint Tools in GIMP
GIMP provides a variety of paint tools. You may have already used some of them for sketching, on photos, or for manipulating. Here we show you the purpose of the paint tools for digital painting. Most of the paint tools simulate their real-life counterparts. The pencil, for example, paints with hard edges, whereas the airbrush tool will paint with soft edges and transitions. The paint tools can be divided into three groups: the basic set, specialized paint tools, and assistive paint tools.
The basic set of paint tools includes the following:
The following special paint tools also simulate their real-life counterparts:
- Airbrush: Draws fuzzy lines
- Ink: Writes lines calligraphy-style
The third set of paint tools can be used as assistive paint tools. These tools help the painter render seamless transitions or apply particular effects to the painting.
- Clone: Duplicates areas of the image
- Heal: Removes small spots in photos
- Perspective Clone: Duplicates areas of an image by keeping the perspective
- Blur/Sharpen: Sharpens or blurs edges in a painting or photo
- Smudge: Smears and creates seamless transitions between objects
- Dodge/Burn: Lightens or darkens areas in an image
Is This Chapter for Me?
In this book, we distinguish painting from drawing. This distinction is important because of the way GIMP tools are used and how a chapter is applicable to you.
Chapter 8 is most suitable if you are painting with a graphics tablet. Of course you can use a mouse to get the feel of digital painting. However for more serious digital artists using a pen with a graphics tablet will give you much greater control over your strokes.
Chapter 9 will be suitable for the digital drawer, who uses GIMP tools to emulate free strokes. If you don’t own a graphics tablet, you can still create artwork—such as icons or small paintings—with GIMP.
Digital Painting: The Advantages
There are no messy brushes to clean, no paint to run or smudge and no wet canvases that could be accidentally stood on.
Digital painting in GIMP provides the following:
- A range of brushes, pencils, and airbrushes with options such as size, shape, tilt, pressure sensitivity, and opacity
- A huge range of colors to choose from
- The ability to redo or undo strokes with the press of a couple of keys
- Layers for greater artistic control: use a background layer, sketch layer, color layer, blending layer, duplicate or inverse layer, filter layer, mode layer, and so on
- The option to turn layers on or off to help the creative process
- The ability to create and save brushes and options, if needed
- The ability to copy, print, share, or publish projects to the internet
The Canvas
The canvas is a synonym for the digital image that you will paint on (see Figure 8-1). If you use GIMP with default settings, a newly created canvas will be white because the background color is white.
Later in this chapter, we will introduce layers.
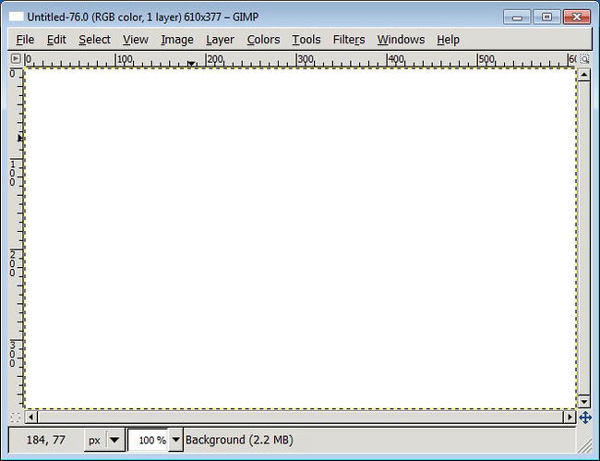
Figure 8-1. A blank image; also known as a blank canvas
Creating a New Canvas
Similar to the real world, where you need a canvas to paint on, you also work on a canvas in GIMP. As first described in “Creating a Blank Image” in Chapter 2, a new canvas is created by performing the following steps.
- Open the Create New Image dialog box (see Figure 8-2).
- If you create a painting with the intention of printing it or using a lot of detail, create the image with a higher resolution and dimensions. Use a width and height that is bigger than 1000 pixels.
- Click the Advanced Options button to change the resolution of the painting. Use a resolution that is greater than 150 pixels per inch. Higher resolutions are important if you like to print your painting.
- Click OK.
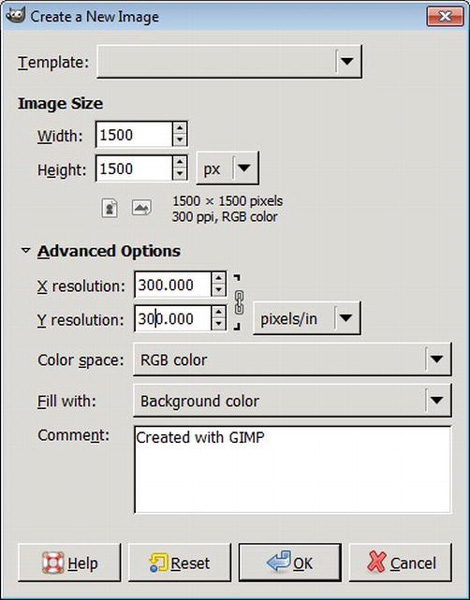
Figure 8-2. The Create New Image dialog for creating a new canvas
Navigation and Zooming
Depending on your style of painting, you will need quick access to tools and different zoom levels, as well as the total screen space that you have available.
How to Maximize the Work Area
GIMP allows you to focus on your canvas without losing control of your dialogs and the toolbox. If you are not using the single-window mode, you can toggle between your canvas and dialogs by using the Tab key while painting.
When painting big images, you want to use as much of the screen you can. By pressing the F11 key, you can toggle quickly between a maximized canvas and the normal canvas size. Alternatively, you can also access View ![]() Fullscreen to achieve the same effect.
Fullscreen to achieve the same effect.
Zooming and Panning the Work Area
If you paint details, you sometimes need to zoom in very quickly or alternate between different zoom levels. Zoom levels are accessible with the following numbers on your keyboard:
- 1 (100%)
- 2 (200%)
- 3 (400%)
- 4 (800%)
- 5 (1600%)
Furthermore, if you are working on details in your painting, you can pan the canvas by pressing the Space key on your keyboard or by using the second button on your pen, depending on the configuration.
Color Basics
The GIMP toolbox shows two color indicators (see Figure 8-3), representing the foreground and background colors. When creating a new image, GIMP uses the selected background as the canvas color. The foreground color will be determined by your selected paint tool.
All basic paint tools make use of the foreground and background color, indicated by the toolbox. The foreground color is set to black and the background color is set to white by default. The paper resembles the white background color and the pencil the dark pencil color, similar to the real things.
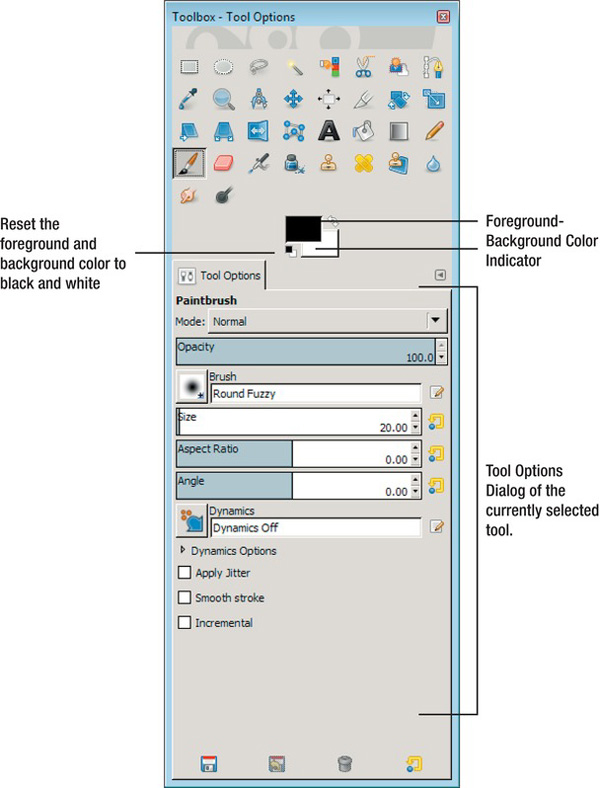
Figure 8-3. The GIMP toolbox with the tool options dialog attached
Choosing a New Color: The Color Dialog
A dialog box will appear if you click on the foreground or background color indicator in the toolbox (see Figure 8-4). The dialog provides different ways to choose a new color.
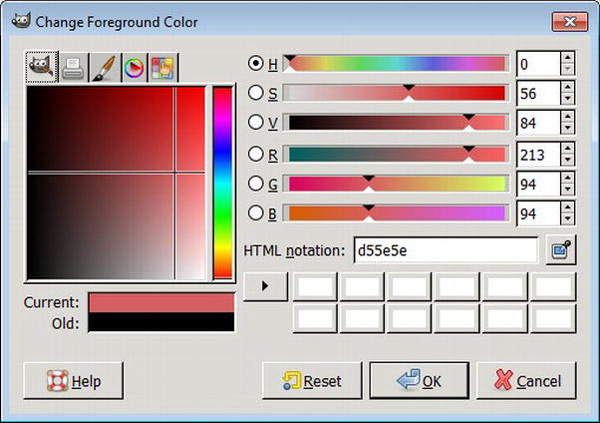
Figure 8-4. The color dialog to select either a foreground or background color
Colors are represented by different color models—systems that use various ways to describe colors. GIMP shows colors for different systems in the left area of the dialog box. Each color system displays all the possible colors available on your computer.
The Bucket Fill Tool
The bucket fill tool can be used for filling large areas of an image, selections, and closed areas if you are painting comics, for example. By default, the tool uses the foreground color, which is black if you just started GIMP. You can select the bucket fill tool in the toolbox or press the SHIFT+B key combination.
The tool is not only used to fill areas with the foreground or background colors; it also makes patterns that can be selected in the bucket fill tool options. You can access the tool options by double-clicking on the bucket fill tool icon in the toolbox.
Changing the Background Color
Changing the background color of the newly-created image with the bucket fill tool is easy.
- Create a blank image. (See the “Creating a Blank Image” section in Chapter 2 if you are unsure of how to create a new image.) By default, the foreground color is set to black; the background color is set to white. The background color of your image should now be white (see Figure 8-5).

Figure 8-5. The single-window mode setup. The color indicators open the color dialog with a mouse click.
- Click the foreground color indicator of the toolbox to open the color dialog (see Figure 8-6).
- Select red as a new foreground color by clicking in the red color area. Click OK.

- The foreground color indicator of the toolbox should now be red (see Figure 8-7).
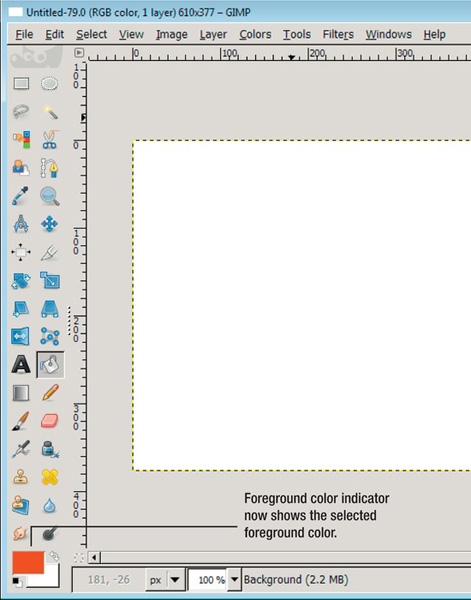
Figure 8-7. The selected color is shown in the foreground color dialog
- Select the bucket fill tool in the GIMP toolbox with a mouse click (see Figure 8-8).
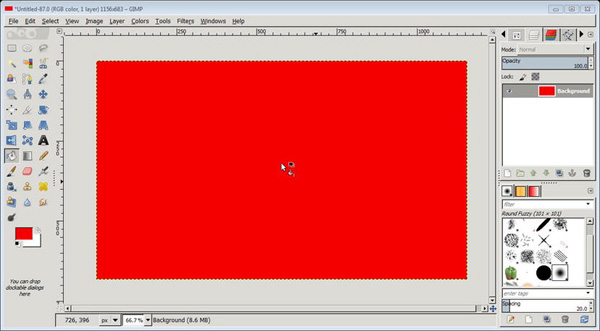
Figure 8-8. The background color of the canvas has been filled by the bucket fill tool.
- Fill the canvas of the image with a mouse click. It will turn red. You can now practice and change the background color by selecting different foreground colors.
Managing Colors: Palettes
Color is a very important aspect in paintings. When painting, fairly often you need to switch between colors. GIMP provides functionality to manage the colors that you need to access again and again. Next, we will show you a variety of ways to select colors in GIMP.
The Palettes Dialog
To allow easy access, GIMP provides a way to save the colors that you’ve previously chosen. A range of colors can be saved in a color table, called a palette. The palette dialog allows you to browse pre-defined color tables. You access the palettes dialog from the image menu by selecting Windows ![]() Dockable Dialogs
Dockable Dialogs ![]() Palettes.
Palettes.
As shown in Figure 8-9, the Default (23) palette is selected by default. The editor of the selected palette is opened by double-clicking. The number in parentheses next to the entry indicates the number of colors.
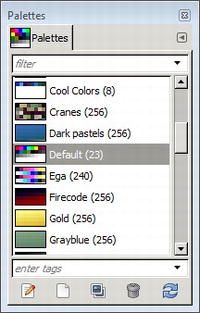
Figure 8-9. The palettes dialog
The Palettes Editor
The color information in the palettes dialog is accessible by double-clicking on a selected palette, which opens the palettes editor (see Figure 8-10).
The editor works similar to the color dialog; the color you select in the editor will be set as the foreground color. The color picker tool completes the dialog, which is the central tool to add new colors to the palette.
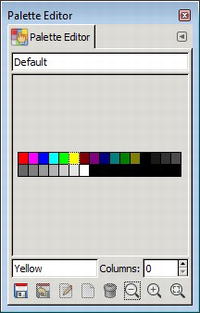
Figure 8-10. The palettes editor allows you to manage the colors you use frequently.
![]() Tip A palette is kept independently from an image. You can always use the same palette for different paintings.
Tip A palette is kept independently from an image. You can always use the same palette for different paintings.
The Color Picker Tool
The color picker tool (see Figure 8-11) allows you to retrieve color values from your current image. This is very important during painting, as you may like to continue painting with a particular color from your image.
By default, the color picker tool sets the foreground color indicator to the color that you apply it to. The tool options allow adjusting the behavior to either, as follows:
- Pick only: Retrieves only the color information
- Set the foreground- or background color indicator
- Add to palette: Adds the selected color to the current palette
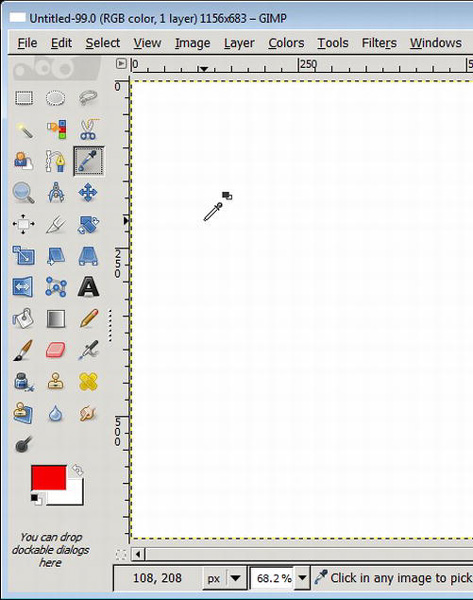
Figure 8-11. The GIMP toolbox with the color picker tool selected. The mouse pointer changes to a pipette to reflect the selected color picker tool.
Creating a Palette with Colors
Palettes allow easy access to the colors that you’re using to paint. We’ll show you how to manage your own palette.
- Open the palettes dialog from the image menu by selecting Windows
Dockable Dialogs
- Click the “Create a new palette” button to create a new entry in the palette dialog (see Figure 8-12).
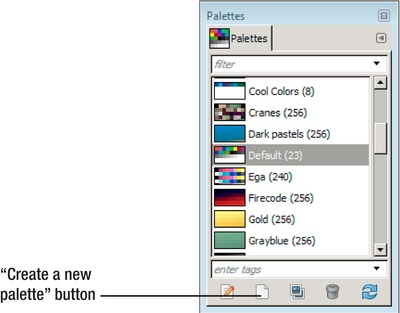
Figure 8-12. Create an empty color palette with the “Create a new palette” button located on the bottom left of the dialog.
- The palette editor will be displayed if it is not already open. The palette dialog will have a new entry titled “Untitled” and the palette editor will show an empty, gray dialog (see Figure 8-13).
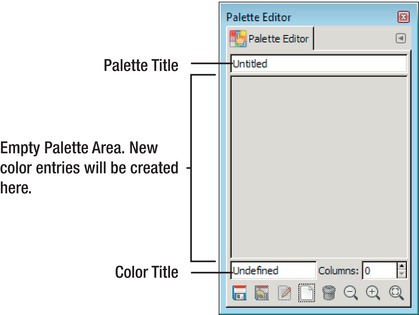
Figure 8-13. A new palette entry shown in the palette editor
- Choose a red foreground color, as described earlier in the “Changing the Background Color” exercise.
- Using the red foreground color, create a new palette entry by clicking on the “Create a new entry from the foreground color” button. A new color entry is created in the “Untitled” palette (see Figure 8-14). (If you click this button after GIMP started a new black color entry is created. By following this exercise, a new red color entry should appear.)
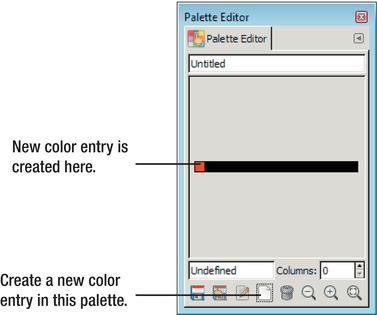
Figure 8-14. The Palette Editor
![]() Tip New entries can also be created by using drag and drop, which currently works best in Linux. Simply click the background color indicator of the toolbox, press and hold the left mouse button, and drag the color onto the Palette Editor.
Tip New entries can also be created by using drag and drop, which currently works best in Linux. Simply click the background color indicator of the toolbox, press and hold the left mouse button, and drag the color onto the Palette Editor.
Becoming a Digital Painter: Using Paint Tools
In this section we will show you how to use the basic paint tools to sketch and paint.
The Eraser Tool
The eraser in GIMP is a basic paint tool. The tool’s preliminary function is to change the pixel color to the background color in order to simulate an “erasing” effect. By default, the eraser uses a fuzzy shape for painting.
![]() Tip Do not confuse the eraser tool with the undo functionality.
Tip Do not confuse the eraser tool with the undo functionality.
How to Erase
To use the full potential of the eraser tool, you will need to understand how the tool works.
- Create a new image. Verify the two color indicators in the toolbox: the background color indicator should be white and the foreground color indicator black.
- Change the foreground color to red by clicking on the foreground color indicator in the toolbox. Choose a red color from the color panel in the color dialog and click OK. (If you are unsure about how to do this, see the “Changing the Background Color” exercise.)
- Select the bucket fill tool from the toolbox.
- Fill the image with the red foreground color by clicking on the canvas (see Figure 8-15).

Figure 8-15. The background color of the canvas after it has been filled with the color red
- Select the eraser tool from the toolbox.
- Draw a line on the red canvas. You should see that the eraser “paints” white because the background color has not been changed and still shows white (see Figure 8-16).

Figure 8-16. The eraser uses the selected background color, which is white by default
- Now change the background color by clicking on the background color indicator. In the color dialog, select a dark color and click OK (see Figure 8-17).
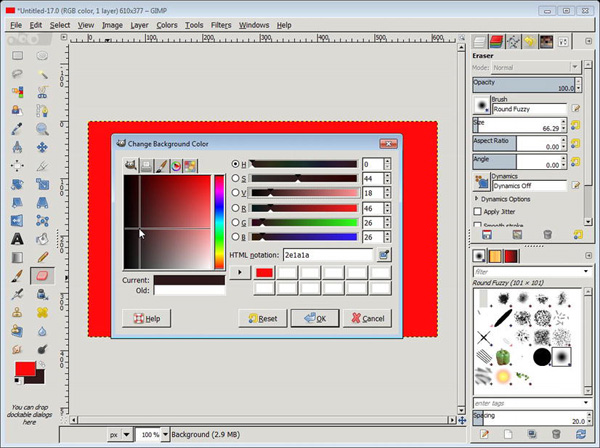
Figure 8-17. The background color indicator immediately reflects the color selection in the color dialog.
- Draw another line on the red canvas. As you can see, now the eraser will paint with a dark background color (see Figure 8-18).

Figure 8-18. After changing the background color, the eraser now paints with a dark color instead of the default white.
The Paintbrush Tool
The paintbrush tool uses a soft-edged brush shape by default. Therefore, it is ideal for sketching and painting.
Controlling Your Brush Size, Shape, and Angle
You’ve already had a quick introduction to the brush and scale tool options. Now it is time to learn more about the tool options and how they can help you paint.
The tool options for the paint tools allow altering how the brush you’re painting with behaves in size and shape. If you own a graphics tablet, most of the tool options are controlled by the tablet itself and you can simply start painting. For example, the size of the brush will increase or decrease with the amount of physical pressure you apply to the tablet pen. But still, you need to control the initial size and the shape of your brush.
Brush Shape
The brush option in the tool options dialog allows you to pick a brush shape. This can be compared to the brush that you pick as a painter in real life. It influences how you paint (see Figure 8-19). GIMP provides different brush shapes. You can choose a new brush by clicking on the shape indicator and selecting another brush from the dialog.
The “Doing More with Brushes” section later in this chapter goes into more detail about creating brushes.
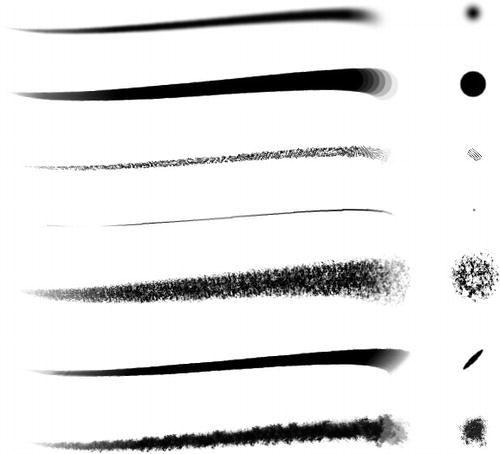
Figure 8-19. Brush comparison of the paintbrush tool (round fuzzy, round, pencil sketch, felt pen, chalk, calligraphic, acrylic)
Size
The size option allows you to control the size of the brush. This option is the best way to get a very tiny or a very large brush shape to paint with.
Aspect Ratio
With this option, you can twist and bend the brush shape into various degrees, altering the way the brush will paint. Figure 8-20 illustrates how the brush shape changes when you change the aspect ratio in the tool options.

Figure 8-20. The change of the aspect ratio slider from left to right and how it affects the brush shape
Angle
The angle controls the rotation of the brush shape. If you select circular brushes, this option will not have a real affect of the brush, because rotating circles will not change the brush. If you choose different brush shapes, you will be able to rotate the brush and influence the painting functionality.
![]() Tip If you changed a lot of the options in the tool options dialog and you want to return to the GIMP default, use the “Reset to default” icon located on the bottom-right of the tool options dialog. You can also reset all tool options in the Preferences dialog, which you can access through Edit
Tip If you changed a lot of the options in the tool options dialog and you want to return to the GIMP default, use the “Reset to default” icon located on the bottom-right of the tool options dialog. You can also reset all tool options in the Preferences dialog, which you can access through Edit ![]() Preferences.
Preferences.
Sketching
Digital painting is almost similar to painting with real colors on canvas. It is recommended to create a sketch first, before you add any color to your painting and refine it. There is no recommended tool suitable for sketching. Choose either pencil or paintbrush or whatever suits your sketching needs.
- Create a new canvas with a width and height of 1500 pixels or more by using the Create a New Image dialog (see Figure 8-21).
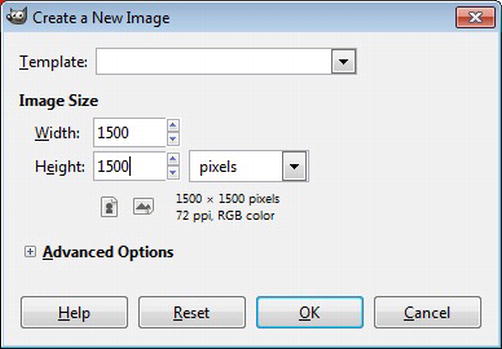
Figure 8-21. The new image dialog to create a canvas with a bigger size for sketching.
- Select the paintbrush tool and open the tool options. If you can’t see the tool options dialog, double-click the paintbrush tool icon in the toolbox to open the dialog (see Figure 8-22).
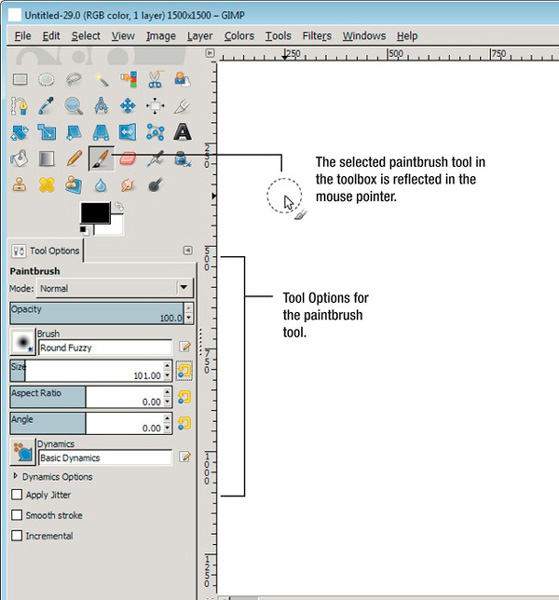
Figure 8-22. The size of the brush of the selected paint tool is represented on the canvas.
- Verify the brush shape in the paintbrush tool options. The shape of the brush should be set to Round (see Figure 8-23).
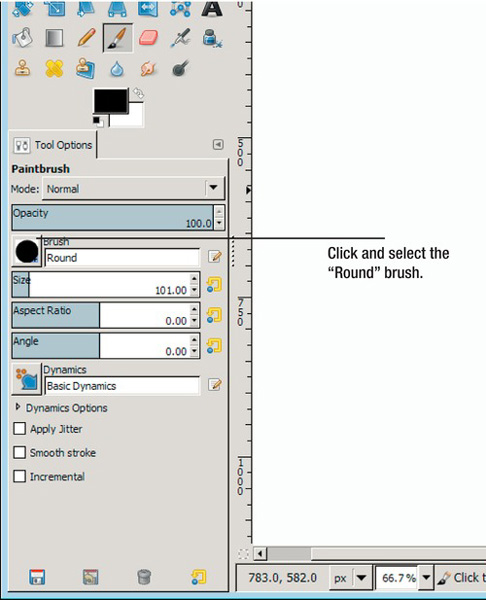
Figure 8-23. Select the Round brush, as this will give you enough “fuzziness” without making your sketches look dull.
- The size of the brush should be very small. You can mark the current value with the mouse and enter “1” or slide the bar to the left with a pressed mouse button (see Figure 8-24). Verify that the Dynamics option is set to “Basic Dynamics” if you use a graphics tablet.
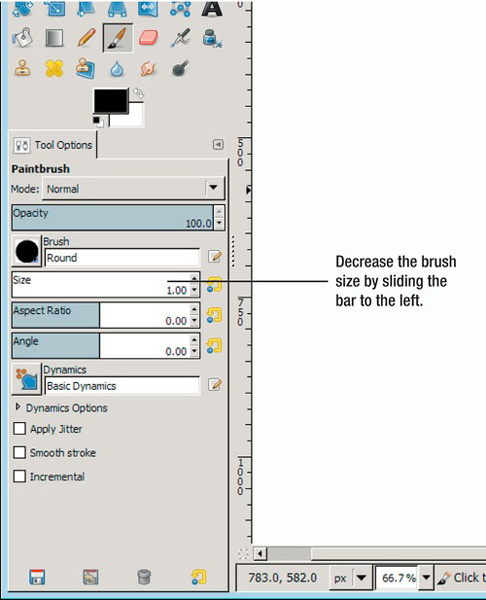
Figure 8-24. Decreasing the brush size is important, as it will allow you to sketch with a thin line.
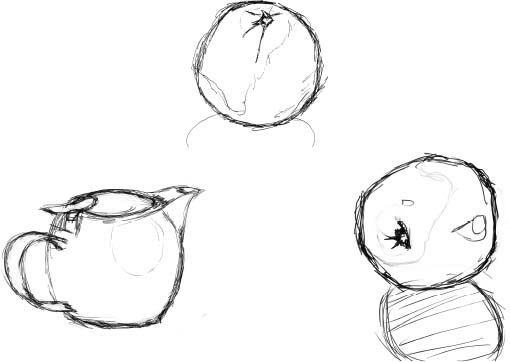
- Start sketching an object found in your living room or kitchen (for example, an apple or an orange). Keep the sketch very basic and the details to a minimum, like those shown in Figure 8-25.
The sketching abilities of GIMP are limitless. Figure 8-26 shows more advanced sketches you can create. The more you practice sketching, the more you get a feel on how much detail you want to put in your sketches.
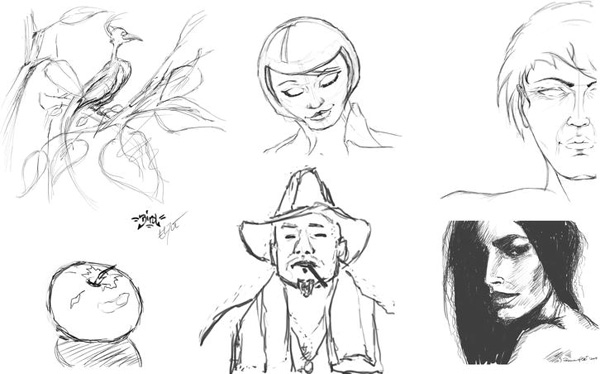
Figure 8-26. Sketches created with more detail.
Doing More with Brushes
Although GIMP provides a wide range of different brushes for you to paint with, it may be necessary to create your own custom brush shape.
The Brush Selection Dialog
We’ve already introduced how to select different brush shapes. The brushes dialog is accessible from the paint tool options and allows you to create your own brush shapes (see Figure 8-27). You can obtain the brush selection dialog by selecting Windows ![]() Dockable Dialogs
Dockable Dialogs ![]() Brushes or pressing SHIFT+CTRL+B.
Brushes or pressing SHIFT+CTRL+B.

Figure 8-27. The brushes dialog
![]() Note The default brush shapes in GIMP cannot be customized. You will need to create your own brush shape.
Note The default brush shapes in GIMP cannot be customized. You will need to create your own brush shape.
Create a New Brush Shape
The default brushes shipped with GIMP cannot be edited. If you like to tweak your own artistic brushes, create a copy of an existing brush and change it to fit your own needs.
- Open the brush selection dialog.
- Click the “Create new brush” button. The brush editor dialog will appear (see Figure 8-28).
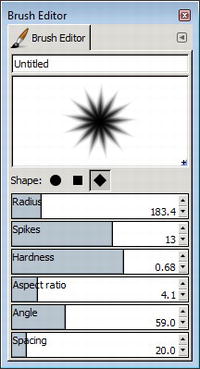
Figure 8-28. The brush editor dialog showing a newly created, diamond-shaped brush with 13 spikes and a high hardness value
- Choose the basic shape of the brush as a circle, square, or diamond.
- Depending on which brush you’re trying to create, play with the editor’s options to finalize your brush shape.
- Switch to the brush selection dialog once you are satisfied with your brush shape. The new brush is automatically saved.
- Create a new image and try your new brush shape.
Brush Shape Attributes
Figures 8-29, 8-30, and 8-31 show a few, handpicked brush attributes and how they influence the painting style.
Hardness
Software brushes paint more subtly than real brushes. Use a soft brush to create very soft edges or to blend colors. Use a hard brush for outlines of objects.
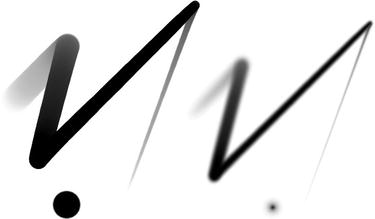
Figure 8-29. The difference between a hard and a soft brush.
Aspect Ratio/Spikes
Spikes attached to brushes paint more artistically than simple, rounded brushes. Use a high aspect ratio to emphasize the spikes more.
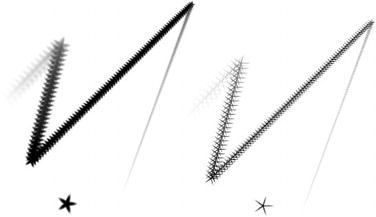
Figure 8-30. A brush with five spikes; the left line uses a small aspect ratio, the right line uses a high aspect ratio
Spacing
Small spacing creates a seamless line, while big-brush spacing creates dotted lines. You typically want small spacing for sketching and painting.
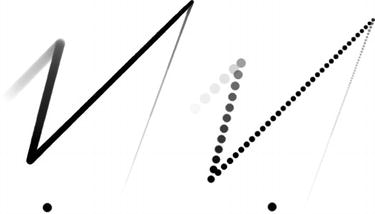
Figure 8-31. The difference between a small spacing and a big spacing
Layers
Layers in GIMP allow you to paint an image with more flexibility. Chapter 6 gave a basic introduction on how to use layers. This section will show you what you need to know about layers specifically for painting.
The Canvas Revised
In the beginning of this chapter, you learned that the “canvas” is a synonym for the digital image that you are painting on.
The canvas in GIMP will provide by default one layer—the background layer. That’s why you have two menus in the image menu: Image and Layer. All layers created compose the image.
For example, you can resize the canvas, which will not resize all layers. In turn, you can resize one layer, which will not affect the size of other layers or the size of the image itself.
As shown in Figure 8-32, the size of a layer is always bound by the size of the image; therefore, the size of the digital image on the top of the illustration remains the same, even though one layer is larger than all layers and the image. An image size can be larger than all layers, as shown at the bottom half of Figure 8-32, which results in a larger image, although it can hold smaller-sized layers.
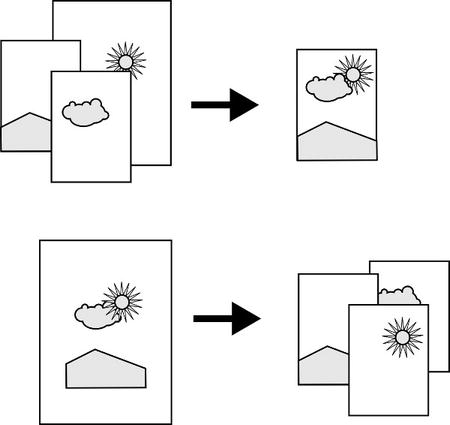
Figure 8-32. Layers in regard to the digital image, or canvas
Repositioning the Canvas
You often need to reposition the canvas because you need more space. If you simply start sketching on a blank canvas, you will paint on the background layer.
- Open one of your sketches. If you don’t have one, simply create a new image and use the default width and height of 610 × 377 pixels in the Create a New Image dialog (see Figure 8-33).

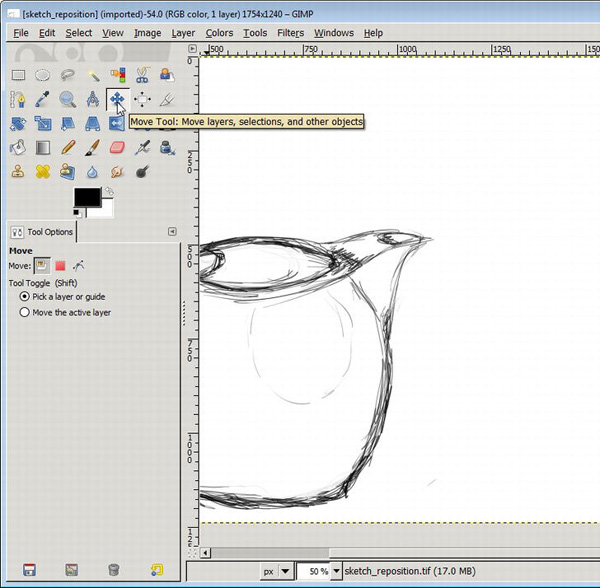
Figure 8-33. The canvas before repositioning; there is not enough room to add any shadows to the sketched teapot
- Select the Move tool from the toolbox window, or press the M key (see Figure 8-34).
- Use the Move tool to reposition your image. Click on the image, press and hold the left mouse button, and move the image to where you want it repositioned. Release the left mouse button when you are confident you reached the right position (see Figure 8-35).

- You will now see parts of the canvas as a checkerboard and you will not be able to paint. Therefore, you need to resize your canvas to the image size (see Figure 8-36).

Figure 8-36. The repositioned canvas after the layer has been resized
- Select Layer
![]() Note If you created more than one layer in an image, you can also reduce all layers to one background layer. This is called flattening an image, which will resize any layer in the image. It is a solution if you don’t need more than the background layer. To flatten an image, select Image
Note If you created more than one layer in an image, you can also reduce all layers to one background layer. This is called flattening an image, which will resize any layer in the image. It is a solution if you don’t need more than the background layer. To flatten an image, select Image ![]() Flatten Image.
Flatten Image.
Resizing the Canvas
From time to time, it is necessary to resize the canvas to add more painting space. This can be easily achieved with the Canvas Size dialog.
![]() Note Scaling will increase or decrease the size of the painting, whereas resizing will add or remove painting space from the image.
Note Scaling will increase or decrease the size of the painting, whereas resizing will add or remove painting space from the image.
- Open an image or create a new image with the default sizes of 610 × 377 pixels in the Create a New Image dialog (see Figure 8-37).
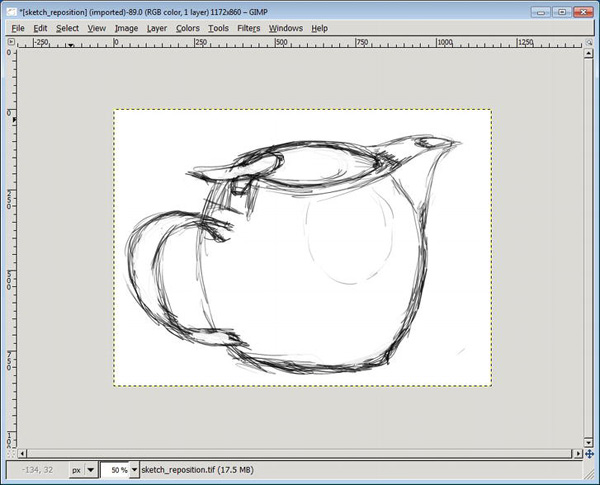
Figure 8-37. The canvas before we resize it; if we want to add more objects to the painting, we will need to add more canvas space.
- Resize the canvas by selecting Image
- The dialog allows you to change the canvas size. Increase the size by entering bigger values in the width box. Make sure the chain icon isn’t broken because it keeps the aspect ratio of the image (see Figure 8-38).

Figure 8-38. The Set Image Canvas Size dialog
- Decide the position of the background layer on the new, resized canvas. Center the background layer by clicking on the Center button.
- Click the Resize button (see Figure 8-39).
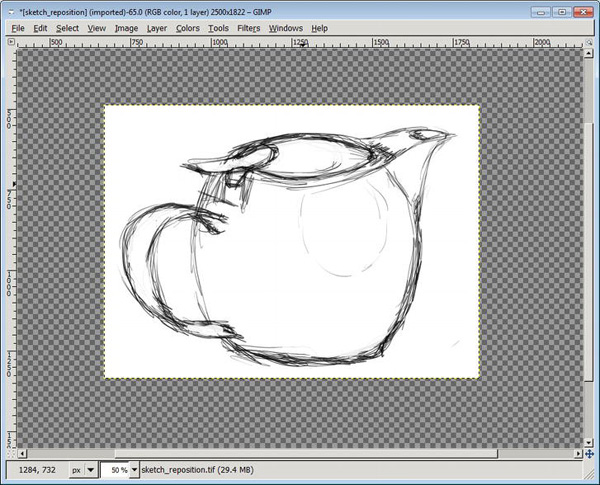
Figure 8-39. The background layer of the resized canvas has not been resized, so the checkerboard shows
- Select Layer
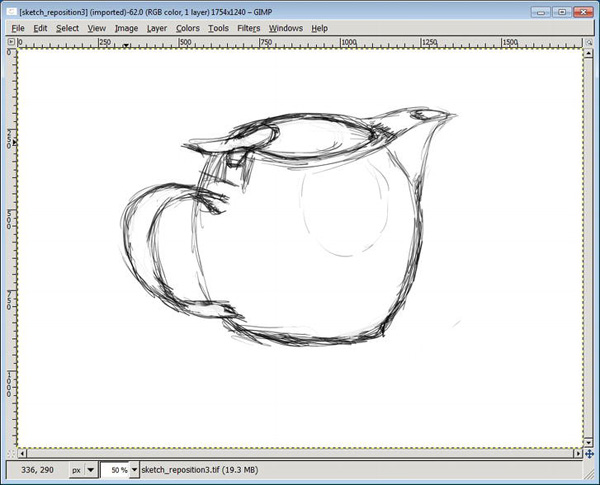
Figure 8-40. The resized canvas with more painting space
Managing Layers with the Layer Dialog
The Layers dialog is opened by default when GIMP starts (see Figure 8-41). You can open the layer dialog again by pressing CTRL+l or selecting Windows ![]() Dockable Dialogs
Dockable Dialogs ![]() Layers from the image menu. When you create a new image, the layer dialog shows one layer, called Background.
Layers from the image menu. When you create a new image, the layer dialog shows one layer, called Background.
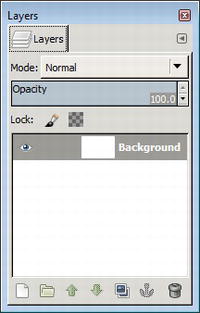
Figure 8-41. The layer dialog showing the background layer
The background layer is created with every new canvas. All other layers are added on top of the current selected layer.
Hiding Layers
Layers can be hidden; either by using the eye icon next to the layer title or by reducing the opacity of the layer to a minimum (see Figure 8-42). By hiding layers, you can try different compositions of image elements without exporting them to different images.
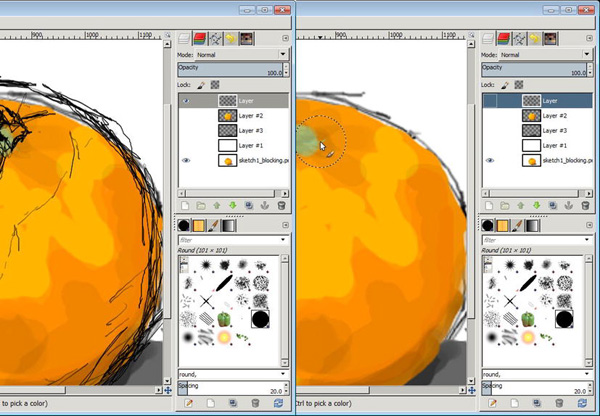
Figure 8-42. All layers are visible in the left image; the color layer is hidden in the right image
Coloring Your Sketch
Now that you’ve learned how to use GIMP to create a sketch, it is now time to apply color to the sketch. Make use of the layer dialog, as this will make it easier to leave your sketch untouched, but try different colors.
- Create a new image.
- Create a new layer in the layer dialog. The label should be “sketch” and the fill type should be transparent.
- Create a new sketch on the newly-created “sketch” layer (see Figure 8-43).

Figure 8-43. An example sketch to illustrate the coloring process
- Depending on what you want to paint, adding color may not be as easy as it appears. Try to focus on picking the right color and start coloring the biggest areas. (It is advisable to create a new palette for your painting, but not necessary.)
- Choose a new foreground color by clicking on the foreground color indicator.
- Resize the brush to a medium size in comparison to the painting. Once again, you don’t want to paint details.
- Create a new layer, name it Color. Move this layer below your sketch layer to use your sketch as a guide (see Figure 8-44).
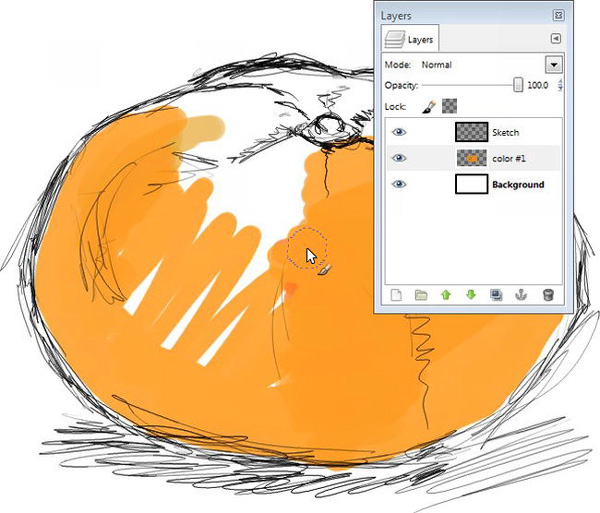
Figure 8-44. Apply the color in its own layer, below your sketch; that way you can use your sketch as a guide.
- Start applying the color.
- Pick different shades of the color that you are applying, depending on your painting (see Figure 8-45). If you use a palette, always register the new color in your palette. If you don’t use a palette, just use a small color dot in one edge of your painting; that way, you can always pick your color again.
![]() Tip To quickly toggle between pipette and paint tool, hold CTRL pressed. This will change to the pipette tool with which you can set the foreground color indicator.
Tip To quickly toggle between pipette and paint tool, hold CTRL pressed. This will change to the pipette tool with which you can set the foreground color indicator.
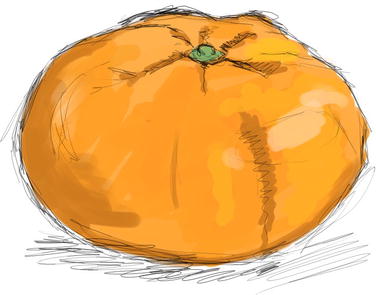
Figure 8-45. The colored sketch without colored details
Doing More with Layers
Layers can be a very extensive topic in image manipulation, especially because their ability to keep image elements separate makes them so useful. The following sections will show you more advanced uses of layers.
Select the Outline of the Painting
While sketching or applying colors to your painting, it sometimes becomes necessary to select the outline of the painting on a specific layer. To help with this, GIMP provides a selection method called Alpha to Selection.
![]() Note This method will only work on transparent layers, as GIMP uses transparency to distinguish the outline of the painting from the layer.
Note This method will only work on transparent layers, as GIMP uses transparency to distinguish the outline of the painting from the layer.
- Open the image with the painting that you’d like to use (see Figure 8-46).
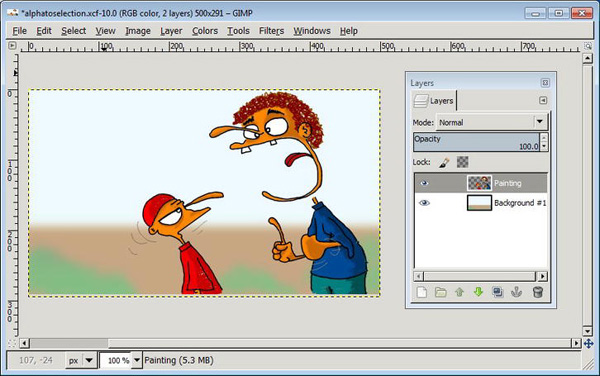
Figure 8-46. Selecting the painting layer (with a transparent background) and the background layer (solid color)
- Select the layer from which you would like to perform a selection of the painting outlines.
- Select on Layer
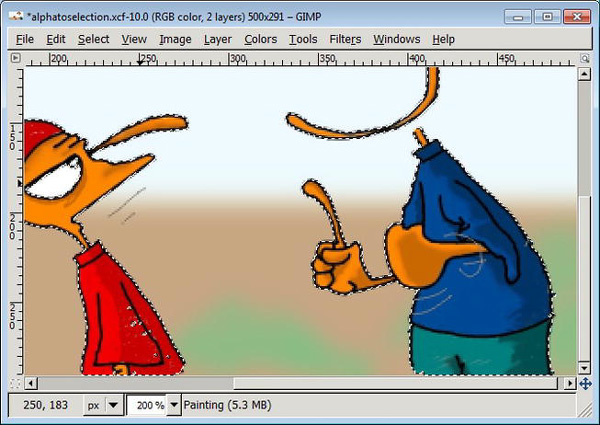
Figure 8-47. A selection based on the transparency information of the layer, which can be the outline of the painting
![]() Note This method will also select half-transparent pixels. You will need to adjust the selection if it happens. See Chapter 9 for more information about how to use selections for drawing.
Note This method will also select half-transparent pixels. You will need to adjust the selection if it happens. See Chapter 9 for more information about how to use selections for drawing.
Exchanging Paintings Between Layers
While painting, it is possible to cut and paste painted elements into other layers. This is very useful, as sometimes you want a strict separation between shadows, colors, and your sketch. With this method, you can rectify mistakes like coloring on the wrong layer.
Before you can exchange paintings between layers, you will need to select your painting.
- Create a selection of the painting that you would like to exchange.
- Cut the selected area with either Edit
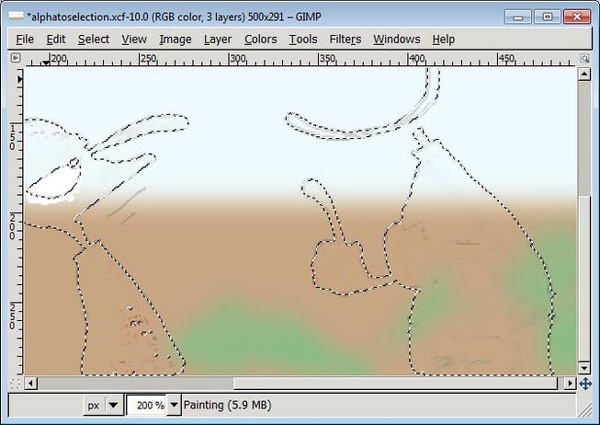
Figure 8-48. The painting has been cut out; only the selection border remains.
- Select the layer that you want to paste the painted area into (see Figure 8-49). This should be a different layer.
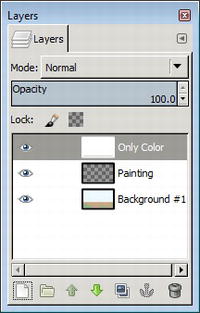
Figure 8-49. The layer labeled “Only Color” is selected and filled with white for demonstration purposes
- Remove the selection by choosing Select
- Paste what you have cut with either Edit

Figure 8-50. The pasted painting appears as a floating selection in the layer menu. This can be very frustrating for new users who are not aware that it behaves like a layer.
- Select the Move tool from the toolbox or choose Tools
- Select your painting to move it around by holding your left mouse button pressed. Keep an eye on the layer dialog to be sure you move the correct layer.
- Anchor the selection by clicking either outside of the floating selection boundaries or by selecting Layer
![]() Note Anchoring the layer is a very tricky part and needs patience to master it.
Note Anchoring the layer is a very tricky part and needs patience to master it.
Repositioning a Layer
Similar to repositioning a canvas, layers can be repositioned too. Often, you start to sketch out an item on your background or first layer and need to reposition it.
This exercise works best with an image containing more than one layer. You may open one of your previous sketches.
- Open the layers dialog by selecting Windows
- Create a new layer. You should now have at least two layers. Select the top layer. Fill this layer with a dark color using the bucket fill tool.
- Select the Move tool from the toolbox window or press M.
- Use the Move tool to reposition your layer. Click on the layer, press and hold the left mouse button, and move in the direction where you want your layer repositioned. Release the left mouse button.
- Resize your layer to the image by selecting Layer
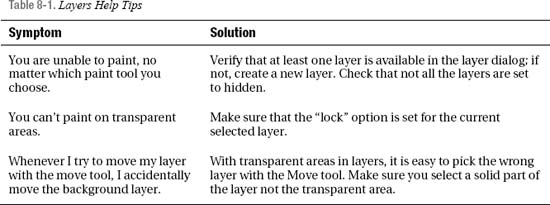
Problems with Layers
For any potential problems that may arise regarding layers, Table 8-1 provides quick help tips.
Filling in the Details
You are constantly picking different colors and different hues of a color to add details to your painting. More detail can be added to the painting by using the paintbrush tool. GIMP provides the following three paint tools to make your life easier:
- Smudge: Blends colors
- Blur/Sharpen: Refines the depth of objects
- Dodge/Burn: Darkens colors or adds highlights
Blending Colors
You started adding colors in the “Coloring your Sketch” exercise.
For the refining task of the sketch you need to know which tools to use to blend colors together. For this task the smudge tool and the blur/sharpen tool can be used. Both tools allow blending colors in a different manner (see Figure 8-51).
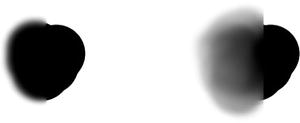
Figure 8-51. Illustration of using the blur tool (left) and the smudge tool (right). The blur tool only blurs the edges of a spot until a maximum, whereas you can smudge edges continuously.
The blur tool is used to blur edges or make objects of a painting disappear in the background. The smudge tool allows you to blend colors together.
Tool Options: Rate
The blur and smudge tool options has a “Rate” slider at the bottom of the dialog. If you increase the rate, GIMP will blend more colors under the smudge brush. If you decrease the rate, GIMP will, obviously, blend fewer colors. Or, in other words, a smaller rate blends less than a higher rate. Keep that in mind if you want to be very cautious in blending colors together.
How to Blend Colors with the Smudge Tool
This exercise will show you how to blend colors with the smudge tool.
- Load one of your colored sketches.
- Choose the smudge tool and slowly smudge the colors together. Add new details in form of new colors and continue smudging.
- Continue with refining by adding new color. Smudge/blend the colors together until the sketch becomes a seamless shape (see Figure 8-52).
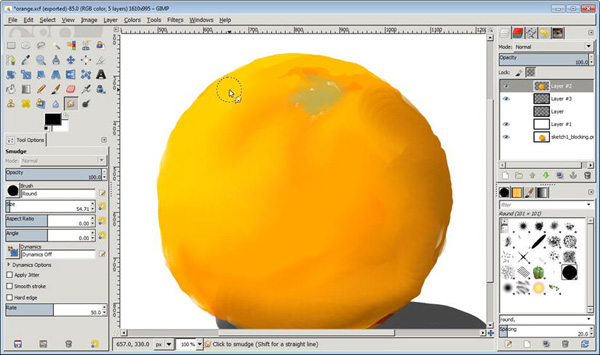
Figure 8-52. Blending colors with the smudge tool
Blending colors can be a cumbersome task and may take a long time. You will need patience and practice for this though, as you will start with a “blurry” looking object. Keep on adding details and refine them.
![]() Tip Use the Lock option in the Layers dialog to prevent smudging your paint into transparent areas. This option is very useful if you divide your painting into separate layers.
Tip Use the Lock option in the Layers dialog to prevent smudging your paint into transparent areas. This option is very useful if you divide your painting into separate layers.
Lightening and Darkening Colors
The Dodge/Burn tool is widely used to manipulate the exposure of objects in a photo, but it can also be very useful to manipulate the colors of your painting. The main difference between dodge and burn is that the dodge mode will lighten color areas, whereas the burn mode will darken color areas (see Figure 8-53).
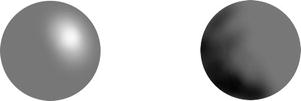
Figure 8-53. The effects of dodge (left) and burn (right) to add depth to a plain circle
In Figure 8-53, a “round fuzzy” brush shape was used to add highlights on the left circle, which turns it into a sphere. On the right circle, shadows were added with the burn mode.
Tool Options: Range
Colors can be lightened and darkened at different levels, which is reflected by the range setting in the Dodge/Burn tool options.
- Shadows affect the majority of lighter areas. In dodge mode, colors become “lighter” until they are white. In burn mode, colors become “darker” until they are black.
- Midtones affect the majority of middle tones. In dodge mode, colors get less hue. In burn mode, colors get more hue.
- Highlights affect the majority of darker areas. In dodge mode, colors get less hue. In burn mode, colors get more hue.
![]() Tip If you are unsure which mode will best fit your needs, stay with the default of the tool, the Midtones option.
Tip If you are unsure which mode will best fit your needs, stay with the default of the tool, the Midtones option.
What makes this tool so special (compared to other GIMP functionalities) in darkening or lightening an image? You can adjust the pressure and the size and, therefore, control the affected area of the image. Furthermore, the Dodge/Burn tool can be applied accumulatively to paint a gradient from lighter to darker colors.
Re-using Tool Options: The Tool Presets Dialog
If you are frequently changing tools during your painting sessions, the tool presets dialog can be very helpful. Tool Presets is found under Windows ![]() Dockable Dialogs
Dockable Dialogs ![]() Tool Presets. For example if you choose a paint brush preset, the brush, the brush size and the brush shape can be preset.
Tool Presets. For example if you choose a paint brush preset, the brush, the brush size and the brush shape can be preset.
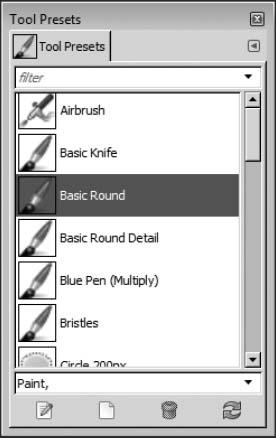
Figure 8-54. The Tool Presets Dialog
Choose each preset by clicking on the entry in the dialog. GIMP changes the tool and it's option.
Summary
In this chapter, we introduced you to using GIMP for digital painting. Similar to painting on an actual canvas, we showed you how to create sketches, add color, and make final touches to your painting. The use of layers can be very beneficial to the digital painter. If you don’t own a graphics tablet, Chapter 9 will introduce you to digital art using GIMP alone.