
BizTalk has been moving into the EDI (Electronic Document Interchange) space for a number of years. In early versions of BizTalk, EDI was accomplished with third-party adapters and a lot of development and configuration performed outside of the platform. With the release of BizTalk Server 2006 R2, EDI became a prominent part of the platform. With the advent of BizTalk Server 2010, all aspects of the EDI life cycle, including schemas, mapping, workflow processing, and trading partner management are fully developed and available.
The most compelling new functionality in the 2010 version of the product is how trading partners are managed. While managing partners was possible in previous editions, the new user interface and underlying data modeling allows users and administrators to easily create complex partner relationships and allows for multiple document types to be sent over numerous protocols to any combination of partner locations.
This chapter will introduce the core components of implementing EDI solutions in BizTalk Server. Some of the most complex solutions to implement are EDI, due primarily to the intricate nature of some of the maps. The X12 837 healthcare claim, for example, is a massive schema with hundreds of nodes and elements, many of which are virtually identical. Versioning adds to the complexity, with some solution requiring both the 4010 and the new fully compliant HIPAA 5010 versions.
This chapter introduces all of the key features of working with EDI solutions. If you know BizTalk Server, jumping into EDI won't be too much of a stretch. However, don't underestimate the complexity of your first BizTalk EDI solution. There is a lot to work through (much of it outside of BizTalk), and you should approach it methodically and with a well-thought-out development approach. Maps, schemas, and orchestrations will all be familiar, but considerably more complex (as they would be on any platform, not just with BizTalk) and trading partner configuration and management will prove to be an area of BizTalk that you will not have used for other types of solutions.
You are developing an EDI solution that will use the HIPAA–compliant X12 00401 837 Professional and Institutional schemas. You need to add these schemas to your project so that documents conforming to the 837 schema can be routed and mapped in BizTalk.
To add the BizTalk 837 schema to a Visual Studio project, take the following steps:
Right-click the project in Visual Studio, and select Add→Existing Item.
Browse to the
$Program FilesMicrosoft BizTalk Server 2010XSD_SchemaEDIHIPAA�0401A1folder. You will see folders for the various health care claims. Select theX12_00401_837_P.xsdfile, and click the Add button. Repeat this for theX12_00401_837_I.xsdfile.
Note
You will need to extract the schemas using the MicrosoftEdiXSDTemplates.exe file, located in the root of the XSD_SchemaEDI folder.
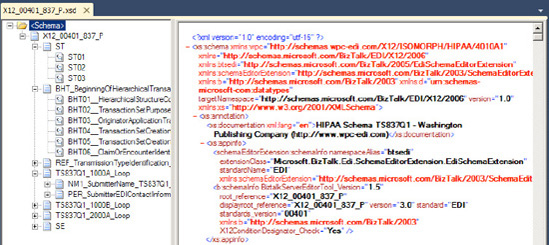
Once added, the schemas can be referenced and used like any other schema. Figure 8-1 shows the 837 Professional schema in Visual Studio.
There is no difference between an EDI schema and a standard BizTalk schema, except that the EDI schemas ship with BizTalk and are fully defined and ready to use. There are literally thousands of EDI related schemas available to choose from. EDI schemas generally are more complex than other types of schemas and come with a large amount of field restriction and validation on them.
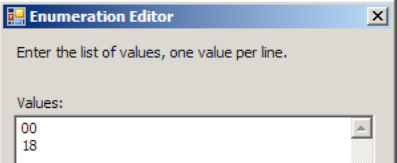
For example, several of the elements in BHT_BeginningOfHierarchicalTransaction_TS837Q1 have specific enumerations that are allowed. Figure 8-2 shows one of these enumerations. Data being processed through the EDI pipelines would fail validation if a value were in a field that didn't match one of the options in the enumeration.
Note
There is generally no need to modify the EDI schemas. On the off chance that one does need to be modified, it is sometimes easiest to modify in a text editor. The BizTalk schema editor can become slow with some of the larger EDI schemas (many are multiple megabytes in size).
You simply need to add a map to your Visual Studio project that contains the source and target schemas. Take the following steps to add a new map to your project:
Note
There is a great book that covers EDI mapping in BizTalk Server, titled Pro Mapping in BizTalk Server 2009 by Jim Dawson and John Wainwright (Apress 2009). All of the concepts related to EDI apply to the BizTalk Server 2010 platform.
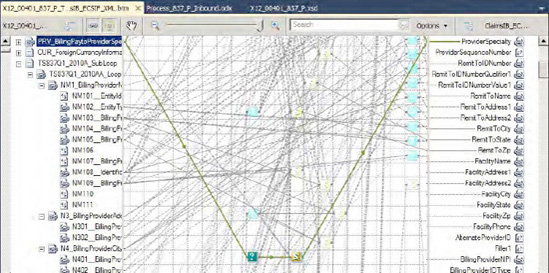
EDI maps are often notoriously complex. Some document types that are quite simple and don't require much in the way of mapping, but many EDI schemas are extremely complex and require careful planning, thoughtful development, many hours (or days or weeks!) of development, and a great deal of patience for administration and maintenance. An example of a complex EDI map is shown in Figure 8-3. Such a map is not an uncommon sight when you're walking into an existing EDI solution.
Note
When developing EDI maps, always think of the next person who is going to have to work with your map. If you can't remember where a functoid is or how a set of mappings works, you can't expect someone six months from now to understand what you have done. If a map becomes too complex, you can always work in a custom XSLT document, a .NET component, or other alternative mapping interface.
In this solution, we will move all processing in the map to an external XSLT style sheet. Take these steps to accomplish this:
Create a new map, and specify the source and target schemas. This is the end of the traditional mapper; it is used simply to define the source and target schemas and house the external XSLT code
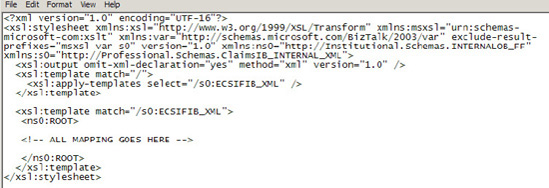
Create an XSLT document, and implement your mapping. An example of the header of an external XSLT document is shown in Figure 8-4.
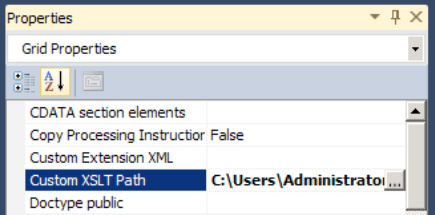
To reference this file, click anywhere on the map surface, and look at the properties of the map. In the
Custom XSLT Pathproperty, set the path to your XSLT file (see Figure 8-5).
When working with EDI maps, you will invariably encounter challenges that are difficult (or impossible) to solve with functoids. You will need to learn (or brush up on) your XSLT skills and approach mapping issues creatively. Using external XSLT is great for many activities, but for not all. Database lookups, callouts to .NET assemblies, and other similar processes are not possible. In many cases, more than a single map may be needed to successfully map a complex EDI document.
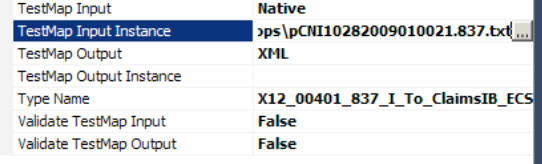
Testing maps with external XSLT documents is quite simple. Use the standard mapper functionality to test a map by defining the input document and other properties (see Figure 8-6). Note that it is very useful to not validate the inbound and outbound documents during development—make sure and set the Validate TestMap Input and Validate TestMap Output properties to False. Once you're ready, right-click the map file in Visual Studio, and select the Test Map option.
You are ready to begin trading EDI documents with an external trading partner. You need to configure this party's information in BizTalk in order to route documents properly.
Setting up and configuring a trading partner consists of several key elements: a BizTalk party, one or more business profiles on that party, and one or more agreements associated with that business profile. To make sense of this, think of the party as an organization, such as a supermarket chain. This supermarket chain may consist of one or more divisions, for example, North American and South American headquarters. These divisions are business profiles. Each division has individual agreements with vendors and suppliers, and trades EDI documents with each, which are configured as agreements on each business profile.
Note
In many cases, you may have a single business profile with a single agreement for each party you configure.
To configure each of these components, take the following steps:
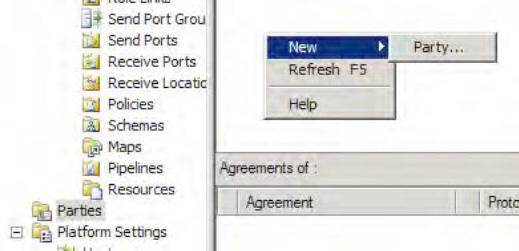
Create a new BizTalk party that represents the sender by clicking the
Partiesfolder in the BizTalk Administration console. Right-click the white area in Parties and Business Profiles window, and select New
To create a Business Profile, right-click the party you just created, and select New
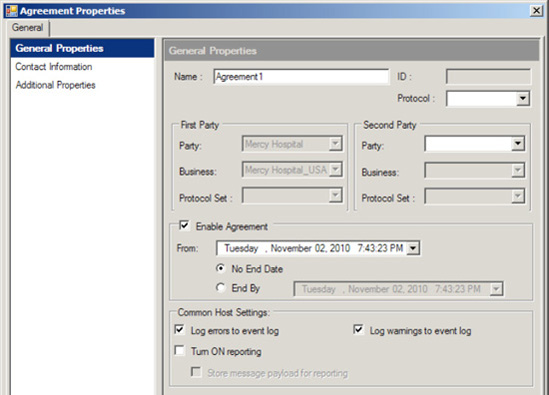
Once the business profile has been created, you can set up an agreement, which is where the real heart of EDI configuration sits. Right-click the business profile you just created, and select Agreement. The Agreement Properties window will open (see Figure 8-9).
Give the agreement a descriptive name, and then set the key properties identifying what this agreement represents; also supply the Protocol and the Second Party settings. Protocol can be set to X12. The Second Party settings need to be set to a second BizTalk party (if you haven't created one, go ahead and create one now—just give it a name, and you are finished).
Once Party and Business have been set in the Second Party settings, you will notice two additional tabs appear within the Agreement Properties window (see Figure 8-10). These tabs represent the configurations for data flow between the parties.

The organization of parties, business profiles, and agreements allows for the configuration of any kind of document interchange between trading partners. Previous versions of BizTalk did not allow for the kind of flexibility and functionality that BizTalk 2010 provides. The entire trading partner management user interface is entirely new and is packed with features that ease setup, configuration, and maintenance.
Note
There is no direct migration path of EDI trading partners between BizTalk 2010 and previous versions of BizTalk. The hierarchy and architecture is completely different, so a manual migration will be necessary.
You need to configure BizTalk to populate the header and footer segments in outbound documents.
Sending an EDI document from BizTalk requires more configuration than a standard XML or flat file document. In addition to the standard adapter and port setup, and mapping, you also have to configure a BizTalk party and set up an agreement and related artifacts. Before we look at the steps involved in configuring an EDI envelope, let's look at what the envelope is. Listing 8-1 shows the document envelope of an 837 Professional file.
Example 8.1. 837 Professional Envelope
ISA*00* *00* *ZZ*PROF123 *ZZ*Merc123USA *091028*1300*U*00401*000000701*0*P*<~
GS*HC* PROF123* Merc123USA *20091028*1300*701*X*004010X098A1~
ST*837*0001
[BODY CONTENT]
SE*32*0001~
GE*1*701~
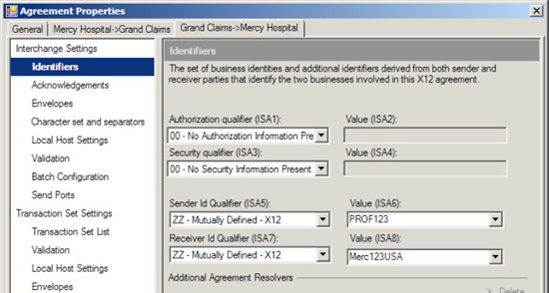
IEA*1*000000701~The envelope identifies a number of things about the document, most importantly, who the receiver and sender are. These values are stored in the sixth and eight positions of the ISA segment (ISA06 and ISA08). In the instance shown in Listing 8-1, these values are PROF123 (the sender identifier) and Merc123USA (the receiver identifier).
To set this up, take the following steps. This solution assumes that parties, a business profile, and an agreement have already been configured.
Open an agreement, and click one of the two tabs allowing for configuration of interchange information.
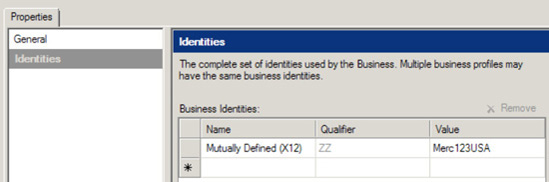
Click the Identifiers tab, and set the ISA properties as required (see Figure 8-11).
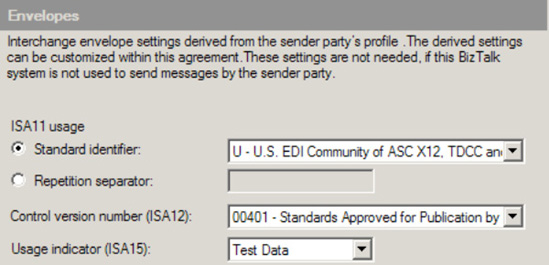
Click the Envelopes tab, and set the identifiers, version, and usage ISA properties (ISA11, ISA12, and ISA15), as shown in Figure 8-12.
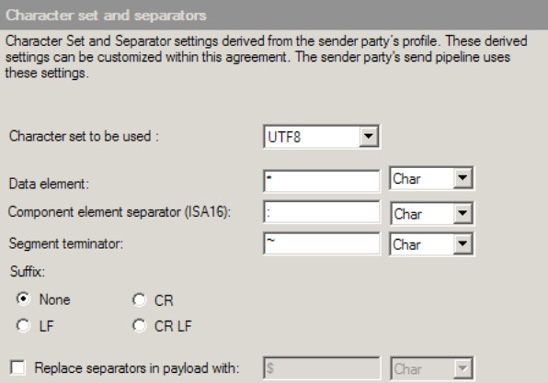
Click the Character set and separators tab. The character sets and separators define how an envelope (and the entire body of the document) is laid out. For example, setting the "Data element" field to an asterisk (*) ensures that each element of a segment is separated with this character (see Figure 8-13).
Once all of the properties have been configured as desired, click the OK button. Properties can be changed at any time and will immediately take effect.
A large number of properties can be set on an agreement. Often, these properties will be common to all trading partners that you will do business with. Once you have worked through the configuration of a few agreements, you may decide that you don't want to set these up from scratch each time. If you have a configuration that is common, and you want to use as a starting point for other trading partners, simply export the settings as a template by clicking the Save As Template button at the bottom of the Agreement Properties window (see Figure 8-14). This template can be loaded and used when configuring future agreements.

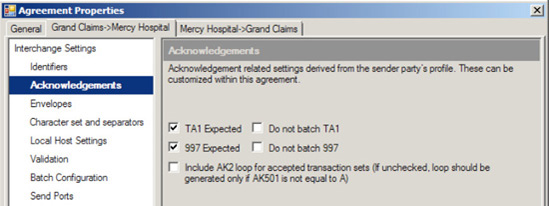
You want to automatically send a 997 acknowledgement when an inbound EDI document has been received by BizTalk.
Configuring acknowledgements to trigger automatically is very straightforward. There are a number of options available on an agreement. Simply open an agreement, and click the Acknowledgements tab in the Interchange settings. Figure 8-15 shows a sample configuration.
When BizTalk creates the acknowledgement, it drops it as a message on the MessageBox and treats it exactly like any other message. The only difference between an acknowledgement and other document types is that it is automatically generated by BizTalk. To configure the routing of a 997 to a file drop, take the following steps:
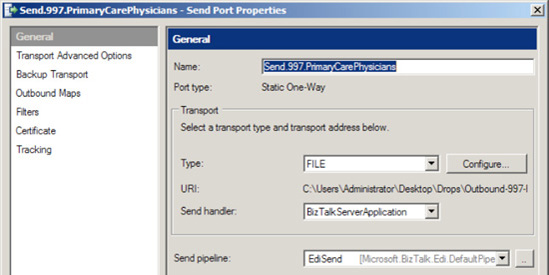
Create a new Send Port.
Set the Transport Type to FILE, and configure it to write to an appropriate folder.
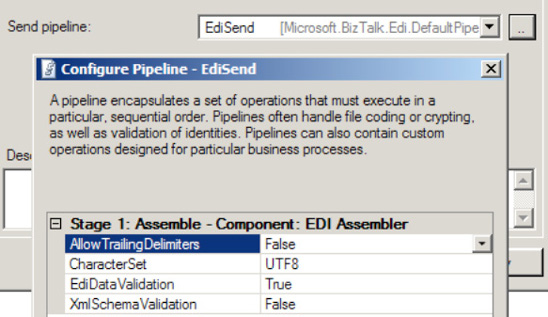
Set the "Send pipelin"e field to EdiSend, as shown in Figure 8-16.
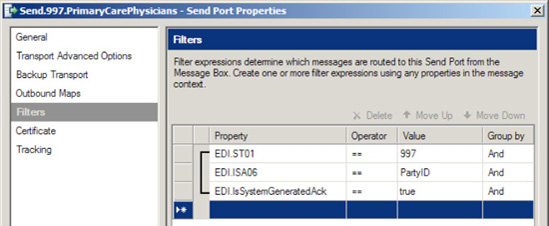
Now, click the Filters tab. This is where the Send port will be configured to subscribe to all 997s on the MessageBox for a specific trading partner. Configure the filter as shown in Figure 8-17, where
EDI.ISA06is set to the ID of the trading partner that the 997 will be routed to.
You need to send and receive documents using the EDI pipelines to ensure that EDI validation takes place and that the envelopes of the documents are created correctly.
There are two primary steps in using the EDI pipelines. The first is to select the appropriate pipeline on the port that is being used. When you are sending documents, the port should be configured with the EdiSend pipeline. When you're receiving documents, it should have the EdiReceive pipeline. These pipelines have a number of configuration settings on them. Figure 8-18 shows the configurable properties of the EdiSend pipeline.
Note
There is a property on EDI pipelines named EdiDataValidation. While setting this to False would seem to cause EDI validation to be turned off, it doesn't always work that way. Make sure to test this functionality before you decide to use it. You schema and configuration may impact whether this setting has any effect or not.
The pipelines perform validation, party resolution, envelope interpretation and creation and cause acknowledgements to be automatically created. The flow of the pipelines is as follows:
EDIReceivepipelineExamine the document type. This step interrogates the document to determine if X12 or EDIFACT and what the character set is. Properties are promoted on the document at this point (for routing purposes).
Resolve parties. This step determines which party in BizTalk the document is intended for.
Resolve and validate schemas. The document is validated against the schemas that have been deployed.
Create an acknowledgement (if doing so is configured in the agreement).
EDISendpipelineResolve parties, and match the context. When a document is sent, the envelope is attached in the pipeline. All of the settings for the envelope are determined at this stage.
Resolve and validate schemas. The document is validated against the schema. If the document fails validation, it will be suspended.
You want to add decryption as a stage in your processing of inbound EDI documents. The standard EdiReceive pipeline does not support this, and you need to create a custom pipeline.
This solution does not provide the code for the decryption custom pipeline component, but it does show how to reference a custom pipeline component and the EDI pipeline components to create a custom pipeline.
In your Visual Studio project, add a new pipeline by right-clicking the project, and selecting Add
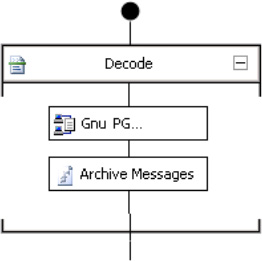
The Decode stage is where you will want to do the decryption. An inbound file must be decrypted before it can be run through the EDI components. Drag the decryption custom pipeline component from the Visual Studio toolbox to the Decode stage of the pipeline. Figure 8-19 shows the Decode stage with both a decryption and an archiving component.
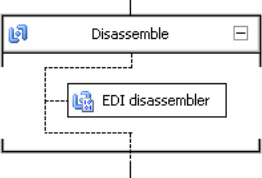
Next, drag and drop the EDI disassembler component onto the Disassemble stage of the pipeline, as shown in Figure 8-20.
Set the EDI disassembler properties to the default values that you want. Note that these can all be overridden once the pipeline has been deployed, so these are just being set for the defaults. This can be done by right-clicking the EDI disassembler and selecting Properties. The properties are shown in Figure 8-21.

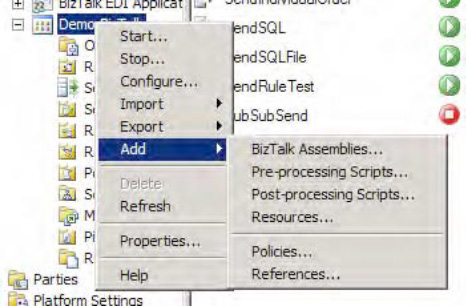
Creating custom pipelines is fairly easy; creating custom pipeline components is not. In this case, you want to create both a custom pipeline component (for decryption) and a custom pipeline (to house this custom component and to execute the standard EDI disassembly that occurs). Once the pipeline is fully configured and built, it can be deployed just like any other BizTalk artifact. The easiest thing to do is to right-click the BizTalk application where you want to deploy it and select Add
You are receiving a large number of EDI documents from many different trading partners. You have an orchestration that you want to configure to subscribe to only EDI documents from a specific trading partner.
To filter what values are picked up by the orchestration, take these steps:
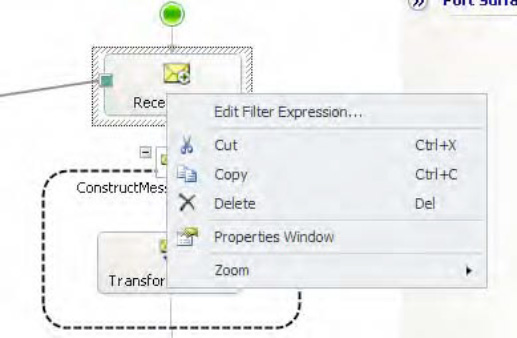
Right-click the initial Receive shape of the orchestration, and select Edit Filter Expression (shown in Figure 8-23). This receive shape should be subscribing to an EDI schema type. If it is not, no EDI properties will be promoted.
In the filter that opens, select the
EDI.ISA06property from the drop-down menu, and configure it to subscribe to the trading partner ID desired (see Figure 8-24).

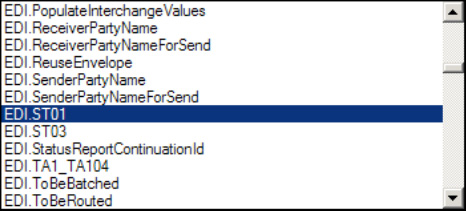
A large number of EDI properties are promoted on a document. Among these are properties that pertain to the envelope. In this case, the orchestration needs to subscribe to the ISA06 property, which indicates the trading partner ID that is sending the document. There are many other fields available, some of which are shown in Figure 8-25.
This solution showed how to configure an orchestration, but a send port can also be configured to subscribe to promoted EDI properties. To do this, open the send port, and click on the Filters tab, as shown in Figure 8-26.
