
C H A P T E R 5
Validating Data
There's an old saying in IT: garbage in, garbage out. You may have heard this saying or perhaps even a stronger variation of the same adage. In essence, it means that if you enter nonsense data into a computer system, the results of any processing will also be rubbish. Any robust computer system needs to ensure that quality data is entered into the system.
Fortunately, LightSwitch allows you to apply validation and business rules in several places throughout your application. First, you can easily apply validation declaratively by using the table designer. Any screens that you create in LightSwitch will then automatically validate the data type and length of the data that you have defined. If the data length of a property is subsequently changed, LightSwitch handles all of this automatically for you without you having to do a thing. For more-complex scenarios, you can write your own custom validation rules. These rules can be applied at a property or entity level.
When designing screens, validation can be performed at a screen level. This allows you to perform validation that is specific to the function of a particular screen. Finally, any validation that is present at the storage level will also be applied. An example of this is a database constraint defined at the SQL Server level.
Where Is Validation Performed?
Validation is performed both on the client and server. Figure 5-1 illustrates the workflow.
On the client, screen and entity validation is carried out. All predefined entity rules are performed on the client as soon as data changes occur, and this means that validation errors are shown immediately to the user. For example, if text is entered that exceeds the maximum length, the user is alerted to this error as soon as the focus leaves the text box.
Validation errors must be corrected before the data can be submitted to the server for a save. After the server receives the data, the same entity validation is repeated. The screen validation will not be carried out again because the screen object does not exist on the server. From a practical point of view, this means that any local screen properties that you define will not be revalidated on the server.
After the data is validated on the server, it is submitted to the data-storage layer (which typically is SQL Server). If any validation errors are detected here, they are returned to the server, which ultimately returns the error to the user in the form of an error message.
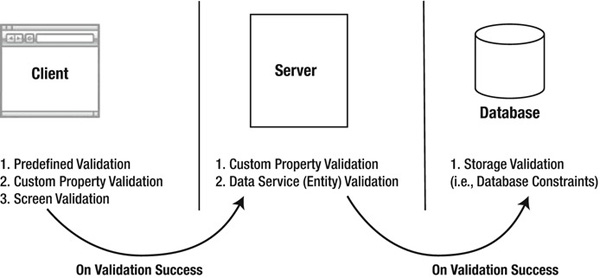
Figure 5-1. Validation workflow
Predefined Validation
LightSwitch does much of the work for you by allowing you to specify validation rules declaratively through the table designer. Figure 5-2 shows how various aspects of validation can be applied by using the properties pane for a field in a table.
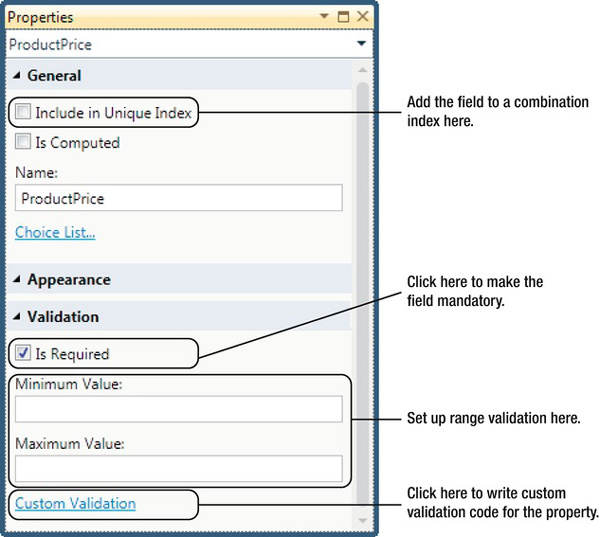
Figure 5-2. Setting validation properties at a field level
Because the field is of data type Double, LightSwitch automatically ensures that only numeric data can be entered. Data type validation will also occur for all other data types that are available in LightSwitch.
![]() Note LightSwitch creates storage constraints for many of these settings. This ensures that validation is also carried out at the server. For example, if the Include in Unique Index check box is selected, a unique index is created in the SQL Server database.
Note LightSwitch creates storage constraints for many of these settings. This ensures that validation is also carried out at the server. For example, if the Include in Unique Index check box is selected, a unique index is created in the SQL Server database.
Data Length Validation
The String data type allows you to specify a maximum length. As mentioned in Chapter 3, the default maximum field size is set to 255 characters. If you want to allow the user to enter unlimited text, you can simply clear the maximum field size text box.
Range Validation
The Numeric and Date data types allow you to perform range validation by specifying the Minimum Value and Maximum Value properties. This type of range validation applies to the data types Date, DateTime, Decimal, Double, Money, and all Integer types.
Required Field Validation
Selecting the Is Required check box makes a property mandatory. Behind the scenes, LightSwitch creates a NOT NULL constraint on the database column.
Custom Validation
Although predefined validation is fine for simple validation scenarios, you likely will want to enforce more-complex validation rules. This is achieved by writing custom validation, which you can apply at a property or entity level (as part of the save pipeline).
![]() Note Some of the code samples here contain LINQ (Language Integrated Query) syntax that may be unfamiliar to you. Don't worry if you struggle to understand this code. All of this is described in more detail in Chapter 6.
Note Some of the code samples here contain LINQ (Language Integrated Query) syntax that may be unfamiliar to you. Don't worry if you struggle to understand this code. All of this is described in more detail in Chapter 6.
How to Write Client/Server/Common Validation Code
In LightSwitch, validation can run on the client, on the server, or on both the client and server. It is important to target the validation at the right tier. For example if you want to write validation that relies heavily on data, you don't want to download lots of data onto the client just to perform this task. This is likely to impede performance and is better done server side.
To further help you understand where validation is performed, Figure 5-3 illustrates the LightSwitch IDE and shows you where the validation is carried out.
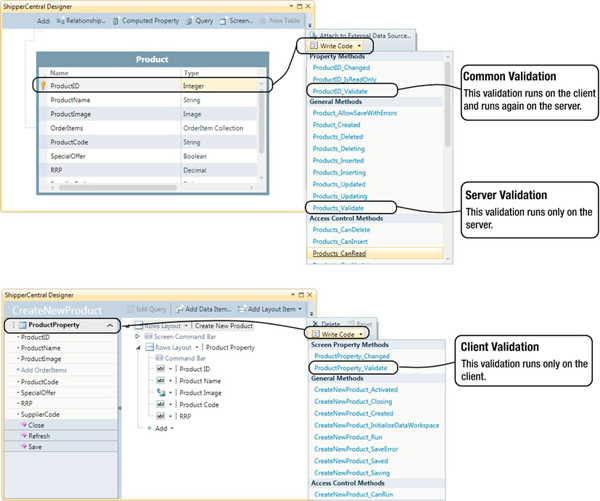
Figure 5-3. Where validation is performed in relation to the designer
Creating Validation Rules and Warnings
After clicking the Custom Validation link, the code window opens. A method stub is automatically created that contains the commented-out line results.AddPropertyError("<Error-Message>"). Uncommenting this line generates a property validation error. You can construct validation rules by writing conditional logic around this line of code.
The results parameter is of type EntityValidationResultsBuilder. Table 5-1 summarizes the methods that are available to you.
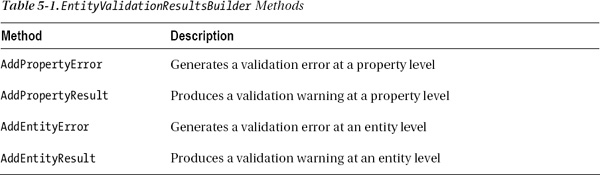
If the AddPropertyError or AddEntityError methods are used, records cannot be saved to the data source until the validation conditions are met.
At times you might want to display a validation warning but still allow the user to save the record. In this situation, you can use the AddPropertyResult and AddEntityResult methods. The second parameter of these methods accepts a severity level that can be either ValidationSeverity.Informational or ValidationSeverity.Warning. A different icon is shown on the screen depending on the severity level, as illustrated in Figure 5-4.
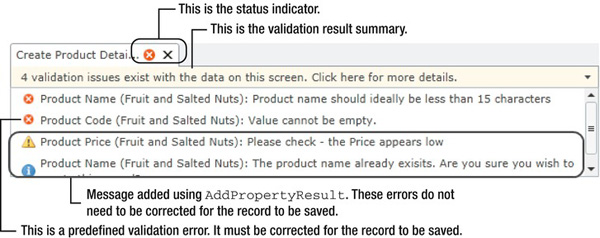
Figure 5-4. Severity icons that are shown
![]() Note At a screen level, you have seen how entity validation occurs immediately, as soon a user leaves a text box or control. Some LightSwitch developers have taken an imaginative approach to this and have written logic in the validate method in scenarios where an immediate response is required. For example, logic might be written in the
Note At a screen level, you have seen how entity validation occurs immediately, as soon a user leaves a text box or control. Some LightSwitch developers have taken an imaginative approach to this and have written logic in the validate method in scenarios where an immediate response is required. For example, logic might be written in the Surname_Validate method to change the surname characters to uppercase, and this logic will run as soon the user leaves the surname text box. In Chapter 8, you'll learn how to use INotifyPropertyChanged. When the value of a property changes, this provides a better way to control the values of other properties in your application.
The Validation Engine
This section briefly explains how client-side validation works in LightSwitch. LightSwitch includes an efficient client-side validation engine. In particular, validation results are cached after they are first derived. This avoids having to rerun all validation rules when just one single rule fails validation. Behind the scenes, LightSwitch uses a system of dependency tracking. This is illustrated in Figure 5-5.
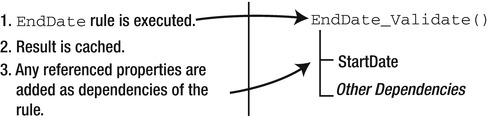
Figure 5-5. Validation dependency applied in client-side validation
Let's suppose you create a validation rule on a field/property called EndDate. The rule specifies that EndDate must be greater than StartDate. When the validation rule is first executed, LightSwitch registers StartDate as a validation dependency of the EndDate validation rule. If the StartDate property changes afterward, LightSwitch schedules the validation rule for reevaluation.
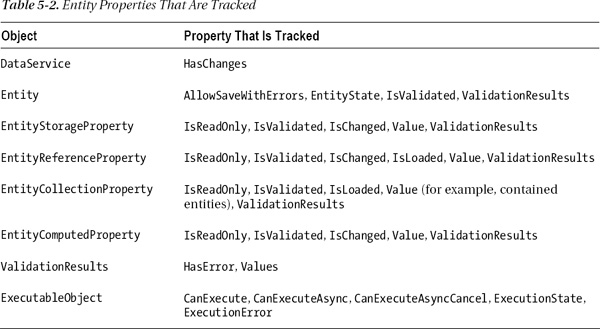
The validation engine can track most properties that are exposed by the LightSwitch API. In addition to entity and screen properties, the engine also tracks details properties such as IsReadOnly, SelectedItem, and ValidationResults.
To further reduce overhead, the validation engine does not compute results for unmodified properties. For example, say you've created a customer entity and the surname property is set to Is Required. If you open a new data screen based on this customer entity, the screen does not report the surname as missing, even though it is. This is because the rule is evaluated only when the surname property is modified. You need to type something into the surname text box and modify the value before the rule is executed.
Properties Tracked by the Dependency Engine
We've mentioned that most properties are tracked by the LightSwitch dependency engine. These include most of the properties that you can access using the details API. The entity properties that are tracked are shown in Table 5-2.
Examples of properties that are not tracked include the OriginalValue property on the EntityStorageProperty and EntityReferenceProperty objects. Regular .NET properties are also not tracked by the dependency engine. If you create your own .NET objects, for example, these will not be tracked.
Silverlight Implementation
When validation fails, the corresponding control is surrounded with a red border to indicate this failure to the user. But how exactly does this work?
In Chapter 1, you learned how the MVVM pattern is implemented within LightSwitch. The red highlighting is a function of the View part of MVVM, and this is presented to the user as a Silverlight control.
During runtime, a screen layout is created that contains a tree of content items. A content item forms the View-Model part of MVVM. At compile time, .NET classes are generated for each content item. The Silverlight controls are then data bound to the content items.
The generated .NET class for each content item implements the INotifyDataErrorInfo interface. This enables the content item (the View-Model model) to expose the error to the Silverlight control (the View). The Silverlight control can then act accordingly and perform the presentational tasks needed to alert the user to the validation error.
Accessing Validation Results in Code
When writing code, you may want to access the validation results programmatically. You can do this at the screen or entity level by using the details API. Listing 5-1 provides some example syntax.
Listing 5-1. Programatically Accessing Validation Results
VB:

File: ShipperCentralCommonUserCodeProductDetail.vb


' Examples of calling the IsValidated and HasErrors properties

Dim firstnameValid As Boolean = Me.Details.Properties.Firstname.IsValidated

Dim firstnameHasErrors As Boolean =

    Me.Details.Properties.Firstname.ValidationResults.HasErrors


' Get a count of all results with a severity of 'Error'.

Dim errorCount As Integer = Me.Details.ValidationResults.Errors.Count


' Concatenate the error messages into a single string.

Dim allErrors As String = ""

For Each result In Me.Details.ValidationResults

    allErrors += result.Message + " "

Next


C#:

File: ShipperCentralCommonUserCodeProductDetail.cs


// Examples of calling the IsValidated and HasErrors properties

bool firstnameValid = this.Details.Properties.Firstname.IsValidated;

bool firstnameHasErrors = this.Details.Properties.Firstname.ValidationResults.HasErrors;


// Get a count of all results with a severity of 'Error'.

int errorCount = this.Details.ValidationResults.Errors.Count();


// Concatenate the error messages into a single string.

string allErrors="";

foreach (ValidationResult result in  this.Details.ValidationResults ){

    allErrors += result.Message  + " ";

}
You can use the Properties object to return only those errors for a specific property (for example, Details.Properties.Firstname). The IsValidated property indicates whether a property has been validated. As mentioned earlier, properties are validated only when they are modified. The HasErrors property indicates whether there are any errors with a severity level of Error.
Finally, the validation results are exposed through a ValidationResults collection that you can loop through. Accessing ValidationResults causes validation to be carried out on objects that have not already been validated.
Custom Validation Examples
This section presents various code examples to help you get a feel for the type of validation that you can write.
We'll show you how to apply validation based on the values of other fields in the same record, and show you how to prevent the entry of duplicate records. We'll also show you how to use regular expressions, validate file sizes, and show you how to validate a property based on related data.
Required Validation Based on Other Conditions
Making fields mandatory is simple: just select the Is Required check box for the property in the entity designer. You may want to make some fields mandatory based on some other condition, and custom validation can be written to achieve this.
For example, imagine an Employee table that contains a Country of Residence field and a Social Security Number field. If the Country of Residence field is set to US, the Social Security Number field becomes mandatory. Otherwise, that field is optional. Listing 5-2 shows the property validation code that would be written for the Social Security Number field to apply this validation.
To do this, open the table in the entity designer and select the property that you wish to base your validation on. Click the Write Code button and select the validate method that is shown in the Property Methods group.
Listing 5-2. Making Fields Required Based on Some Condition
VB:

File: ShipperCentralCommonUserCodeEmployeeDetail.vb


Private Sub SocialSecurityNumber_Validate(results As EntityValidationResultsBuilder)

    If CountryOfResidence = "US" AndAlso Len(SocialSecurityNumber) = 0 Then

        results.AddPropertyError ("Social Security Number must be entered")

    End If

End Sub


C#:

File: ShipperCentralCommonUserCodeEmployeeDetail.cs


partial void SocialSecurityNumber_Validate(EntityValidationResultsBuilder results)

{

    if (CountryOfResidence == "US" && string.IsNullOrEmpty(SocialSecurityNumber) ) {

         results.AddPropertyError("Social Security Number must be entered");

    }

}
![]() Note You must select the property (for example,
Note You must select the property (for example, SocialSecurityNumber) before clicking the Write Code button. If you don't, the property's validate method (SocialSecurityNumber_Validate) will not appear in the drop-down of available options. Developers new to LightSwitch are sometimes surprised by this and struggle to find the validate method after clicking the Write Code button.
Enforcing Uniqueness and Preventing Duplicates
LightSwitch allows you to specify uniqueness by selecting the Is Unique check box in the fields in the entity designer. If the Is Unique check box is selected for more than one field in a table, a combination index is created for the set of fields that have been selected.
You may want to enforce uniqueness on two or more fields independently within a table. Listing 5-3 shows how this can be done. In this example, the product table contains a product code and a supplier code. For each row that is entered, both of these fields must be unique.
To use this code, open the table in the entity designer and select the property that you want to base your validation on. In this example, we have chosen the ProductCode property. Click the Write Code button and select the validate method that is shown in the Property Methods group.
Listing 5-3. Enforcing Unique Records
VB:


File : ShipperCentralCommonUserCodeProduct.vb


Private Sub ProductName_Validate(results As EntityValidationResultsBuilder)


    If Len(Me.ProductName) > 0 Then

        Dim duplicateOnServer = (

            From prod In Me.DataWorkspace.ApplicationData.Products.Cast(Of Product)()

            Where

            prod.ProductID <> Me.ProductID AndAlso

            prod.ProductName.Equals(Me.ProductName,

                StringComparison.CurrentCultureIgnoreCase)

            ).ToArray()


        Dim duplicateOnClients = (

            From prod In Me.DataWorkspace.ApplicationData.Details.GetChanges().

               OfType(Of Product)()

            Where

            prod IsNot Me AndAlso

            prod.ProductName.Equals(Me.ProductName,

               StringComparison.CurrentCultureIgnoreCase)

            ).ToArray()


        Dim deleltedOnClient = Me.DataWorkspace.ApplicationData.Details.GetChanges().

            DeletedEntities.OfType(Of Product)().ToArray()


        Dim anyDuplicates = duplicateOnServer.Union(duplicateOnClients).Distinct().

            Except(deleltedOnClient).Any()


        If anyDuplicates Then

            results.AddPropertyError("The product name already exists")

        End If


      End If


  End Sub
C#:


File : ShipperCentralCommonUserCodeProduct.cs


partial void ProductName_Validate(EntityValidationResultsBuilder results)

{

    if (this.ProductName.Length > 0)

    {

        var duplicatesOnServer = (

            from prod in this.DataWorkspace.ApplicationData.Products.Cast<Product>()

            where (prod.ProductID != this.ProductID) &&

            prod.ProductName.Equals(this.ProductName,

                StringComparison.CurrentCultureIgnoreCase)

            select prod

                ).ToArray();


        var duplicatesOnClient = (

            from prod in this.DataWorkspace.ApplicationData.Details.GetChanges().

               OfType<Product>()

            where (prod != this) &&

            prod.ProductName.Equals(this.ProductName,

               StringComparison.CurrentCultureIgnoreCase)

            select prod

                ).ToArray();


        var deleltedOnClient =

           this.DataWorkspace.ApplicationData.Details.GetChanges().

              DeletedEntities.OfType<Product>().ToArray();


        var anyDuplicates =

           duplicatesOnServer.Union(duplicatesOnClient).

              Distinct().Except(deleltedOnClient).Any();


        if (anyDuplicates)

        {

          results.AddPropertyError("The product name already exists");


        }


      }

    }
This code checks both the client and server for duplicates. It excludes any deletions that have been made on the client. If any duplicates are found, a property error is raised.
Compare Validation
We've chosen the term compare validation for this section because it matches the name of a control that is used in ASP.NET. In essence, this type of validation works by checking the value of a property against that of another property. The following example illustrates a holiday request system. The holiday end date entered by the user cannot be earlier than the start date. Listing 5-4 shows the sample code.
Listing 5-4. Compare Validation
VB:

File : ShipperCentralCommonUserCodeHolidayRequest.vb


Private Sub StartDate_Validate(results As EntityValidationResultsBuilder)

    If Me.StartDate > Me.EndDate Then

        results.AddPropertyError ("Start Date cannot be later than End Date")

    End If

End Sub


C#:

File : ShipperCentralCommonUserCodeHolidayRequest.cs


partial void StartDate_Validate(EntityValidationResultsBuilder results)

{

    if (this.StartDate > this.EndDate) {

      results.AddPropertyError("Start Date cannot be later than End Date");

    }

}
Regular Expression Validation
Regular expressions (regexes) are a powerful and efficient tool for carrying out pattern matching. They can be used in LightSwitch to validate specific characters or patterns. You might use regexes to validate the formats of social security numbers, bank sort codes, postal codes, or domain names.
This technique works by using the Regex class in the System.Text.RegularExpressions namespace. The IsMatch method allows you to pass in an expression and returns a Boolean result indicating whether a match is found.
The most difficult part of using regex validation is working out the correct expression to use. Fortunately, an internet search will reveal many web sites which show prebuilt expressions. Listing 5-5 shows the code that you would use to validate the format of a credit card number. Of course, the code checks only that the formatting is correct and cannot check that the card number is actually valid for the purpose of taking a payment.
Listing 5-5. Regex Validation to Check the Format of a Credit Card
VB:

File: ShipperCentralCommonUserCodePaymentType.vb


Imports System.Text.RegularExpressions


Private Sub CreditCardNum_Validate(results As EntityValidationResultsBuilder)

    Dim pattern As String =

        "(^(4|5)d{3}-?d{4}-?d{4}-?d{4}|(4|5)d{15})|(^(6011)-?d{4}-?d{4}-?

        d{4}|(6011)-?d{12})|(^((3d{3}))-d{6}-d{5}|^((3d{14})))"


    If Not Regex.IsMatch(Me.CreditCardNum, pattern) Then

        results.AddPropertyError("Credit Card Number is not valid")

    End If
End Sub


C#:

File: ShipperCentralCommonUserCodePaymentType.cs


using System.Text.RegularExpressions;


partial void CreditCardNum_Validate(EntityValidationResultsBuilder results)

{

    string pattern =

       @"(^(4|5)d{3}-?d{4}-?d{4}-?d{4}|(4|5)d{15})|(^(6011)-?d{4}-?
?
       d{4}-?d{4}|(6011)-?d{12})|(^((3d{3}))-d{6}-d{5}|^((3d{14})))";


    if( !Regex.IsMatch(this.CreditCardNum, pattern) )

    {

        results.AddPropertyError( "Credit Card Number is not valid" );

    }

}
Validating File Sizes
When working with image or binary data, you might want to restrict the size of the files that are uploaded into your application. You can restrict file size by writing code that checks size of the image or file that's uploaded by the user.
Listing 5-6 shows an example. The Product table contains a field called ProductPhoto that is used to store an image of the product. The listing contains code to ensure that uploaded images cannot be larger than 512KB.
Listing 5-6. Validating File Sizes
VB:

File: ShipperCentralCommonUserCodeProduct.vb


Private Partial Sub ProductPhoto_Validate(results As EntityValidationResultsBuilder)

    If Me.ProductPhoto IsNot Nothing Then

        Dim sizeInKB = Me.ProductPhoto.Length / 1024

        If sizeInKB > 512 Then

            results.AddPropertyError("File Size cannot be > 512kb")

        End If

    End If

End Sub


C#:

File: ShipperCentralCommonUserCodeProduct.cs

partial void ProductPhoto_Validate(EntityValidationResultsBuilder results)

{

    if (this.ProductPhoto!= null)

    {

        var sizeInKB = this.ProductPhoto.Length / 1024;

        if (sizeInKB > 512)

        {
          results.AddPropertyError("File Size cannot be > 512kb");

      }

    }

}
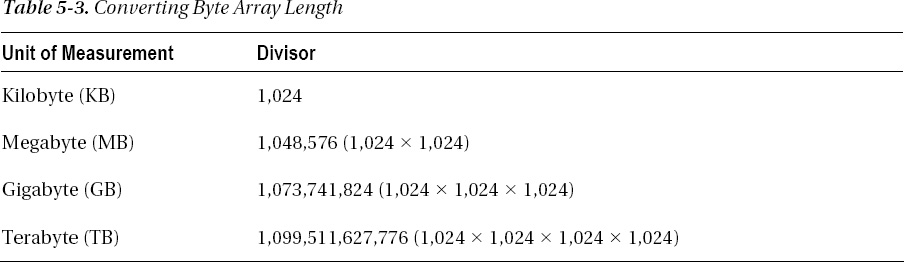
Binary and Image data types are exposed in code as byte arrays. In the preceding code, the file size in kilobytes is calculated by dividing the byte array length by 1,024. If you want to calculate the size in megabytes, you divide by 1,048,576. If you want to calculate in gigabytes, you divide by 1,073,741,824. Table 5-3 indicates these conversions.
Checking Against Child Collections
When using custom validation, you can write code to access child collections and records. For example, the ShipperCentral system stores the order details in an Order table. Each order can contain many order items, and the order items are stored in an OrderItem table.
You can write validation to ensure that each order contains a maximum of ten items, for example. This validation is carried out by counting the number of related child items for an order. Listing 5-7 shows the code that you can use to do this.
The earlier custom validation examples used the Validate method on the property being validated. You can't use the same method to validate child items because navigation properties do not have a validate method that you can use. Instead, you need to apply the validation at the entity level or data-service level. To do this, open your screen, click the Write Code button, and select the EntitySet_Validate option from the General Methods group, as shown in Figure 5-6. In this example, the name of the method is Orders_Validate.
Listing 5-7. Validating the Counts of Child Items
VB:

File: ShipperCentralServerUserCodeApplicationDataService.vb


Private Sub Orders_Validate(entity As Order,

   results As EntitySetValidationResultsBuilder)

    If entity.OrderItems.Count() > 10 Then

      results.AddEntityError("Orders can only contain a maximum of 10 items")

    End If

End Sub
C#:


File: ShipperCentralServerUserCodeApplicationDataService.cs

partial void Orders_Validate(Order entity,

   EntitySetValidationResultsBuilder results)

{

    if (entity.OrderItems.Count() > 10)

    {

        results.AddEntityError("Orders can only contain a maximum of 10 items");

    }

}

Figure 5-6. Creating entity or data-service validation
The code in Listing 5-7 shows how an aggregate function can be applied to a child collection. A point to bear in mind is that calling the Count function retrieves all related order records in order to produce the count.
As another example using child items, imagine that each product in an order could be a product on special offer. Each customer is allowed to purchase only one item on special offer per order. The product table contains a Boolean field called SpecialOffer that stores whether the item is on special offer. Listing 5-8 illustrates how a Where condition can be applied to a child collection.
Listing 5-8. Searching Related Child Items
VB:

File: ShipperCentralServerUserCodeApplicationDataService.vb


Private Sub Orders_Validate(entity As Order,

    results As EntitySetValidationResultsBuilder)
    If entity.OrderItems.Where(

     Function(orderItem) orderItem.Product.SpecialOffer = True).Count() > 1 Then

         results.AddEntityError("Orders can only contain 1 item on special offer")

    End If

End Sub


C#:


File: ShipperCentralServerUserCodeApplicationDataService.cs

partial void Orders_Validate(Order entity,

   EntitySetValidationResultsBuilder results)

{

    if (entity.OrderItems.Where (

     orderItem => orderItem.Product.SpecialOffer == true).Count () > 1){

         results.AddEntityError("Orders can only contain 1 item on special offer");

    }

}
Performing Screen Validation
When applying validation on a property, entity, or data-service level, the rules apply whenever the entity is modified. This means that validation rules need to be written only once and are automatically applied (on both the client and the server) to every screen in your application.
However, you may want to perform validation that applies to only a single screen. In this scenario, using screen validation is the correct approach. To write custom screen validation, open a screen, click the Write Code button, and select the validate method from the Screen Property Methods group, as shown in Figure 5-7.
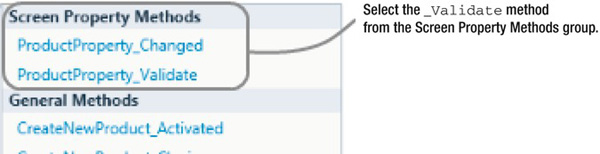
Figure 5-7. Creating screen validation
Listing 5-9 shows some sample code to make the RRP (Recommended Retail Price) field mandatory on a product screen. One of the differences here, compared to some of the earlier examples, is that the results object is of type ScreenValidationResultsBuilder. This object has two methods called AddScreenError and AddScreenMessage. Similar to the AddEntityError and AddEntityMessage methods that were described earlier, these methods accept a parameter that allows you to specify the property related to the error.
Listing 5-9. Performing Screen-Level Validation
VB:

File: ShipperCentralClientUserCodeCreateNewProduct.vb


Private Sub ProductProperty_Validate(results As ScreenValidationResultsBuilder)

    If Not Me.ProductProperty.RRP.HasValue Then

        results.AddPropertyError("RRP must be entered")

    End If

End Sub


C#:

File: ShipperCentralClientUserCodeCreateNewProduct.cs


partial void ProductProperty_Validate(ScreenValidationResultsBuilder results)

{

    if (!this.ProductProperty.RRP.HasValue) {

        results.AddPropertyError("RRP must be entered");

    }

}
Validating Deletions
The previous examples have focused mainly on carrying out validation while inserting or updating records. You may also want to apply validation before a record is deleted. In the ShipperCentral system, a validation rule is required to prevent business customers from being deleted. The customer table includes a Boolean property called IsBusinessCust. If this is set to true, it indicates that the customer is a business or corporate customer, rather than a consumer.
One way to validate deletions in LightSwitch is to use screen-level validation. Listing 5-10 illustrates the screen code that you would use to enforce this validation rule.
Listing 5-10. Validating Deletions
VB:

File : ShipperCentralClientUserCodeCustomerDetail.vb


Private Sub Customers_Validate (results As ScreenValidationResultsBuilder)

    If Me.DataWorkspace.ApplicationData.Details.HasChanges Then

      Dim changeSet As EntityChangeSet = _

          Me.DataWorkspace.ApplicationData.Details.GetChanges()

      For Each cust In changeSet.DeletedEntities.OfType(Of Customer)()


          If cust.IsBusinessCust = True Then

              cust.Details.DiscardChanges()

              results.AddScreenResult("Unable to remove this customer.", & _

                   ValidationSeverity.Informational)

          End If


      Next

    End If
End Sub


C#:

File : ShipperCentralClientUserCodeCustomerDetail.cs

partial void Customers_Validate(ScreenValidationResultsBuilder results)

{

    if (this.DataWorkspace.ApplicationData.Details.HasChanges)

    {

      EntityChangeSet changeSet =

      this.DataWorkspace.ApplicationData.Details.GetChanges();

      foreach (Customer cust in changeSet.DeletedEntities.OfType<Customer>())

      {

          if (cust.IsBusinessCust == true)

          {

              cust.Details.DiscardChanges();

              results.AddScreenResult("Unable to remove this customer. ", +

              ValidationSeverity.Informational);

          }

      }

    }

}
![]() Note Chapter 4 introduced the save pipeline and explained how save operations are performed inside a transaction. If a Cascade Delete rule is set up on the customer table and the deletion of a related order record fails because of validation, the entire transaction will be rolled back and your data will remain in a consistent state.
Note Chapter 4 introduced the save pipeline and explained how save operations are performed inside a transaction. If a Cascade Delete rule is set up on the customer table and the deletion of a related order record fails because of validation, the entire transaction will be rolled back and your data will remain in a consistent state.
Validating Deletions on the Server
Validating deletions by using screen validation is relatively simple. The previous screen validation code was shown for its simplicity, but it's far from ideal. Relying on the client to perform validation isn't good practice. If you wanted to apply validation rules throughout your application, the code would have to be added to every single place where you could delete a customer. If you want to validate deletions on the server, the process can be quite complex.
This complexity arises because LightSwitch ignores validation errors on deleted entities during the save pipeline process. It does this for a good reason. If LightSwitch didn't behave like this, imagine how your users would react if they were forced to fill in all mandatory fields before deleting a record.
Because of this behavior, validating deletions on the server becomes a three-stage process:
- In the entity set
Validatemethod, check whether theEntityStateisDeleted. If so, apply the validation rules that you want to enforce. If the entity fails validation, add the error by calling theAddEntityErrormethod on the results object. - Any errors that you've added in step 1 can be detected in the entity set
Deletingmethod. If any errors exist, throw an exception and prevent the deletion from being carried out. - In the client
SaveErrormethod, you can optionally undelete the deleted records that have failed validation.
If you want to perform validation against child records during a delete, another important point is to turn off Cascade Delete (that is, set it to Restricted). If not, any related child records are deleted prior to the validate method being called. You therefore won't be able to access related child records in the validate method of your parent entity. If you want to carry out Cascade Delete behavior, you can do this manually by deleting the child records in the validate method.
Listing 5-11 shows the code that you would use to prevent customers from being deleted if they still hold an active subscription. Each customer can have multiple subscriptions. These are stored in a table called Subscription, and active subscriptions are marked by using a Boolean property called IsActive.
Listing 5-11. Validating Deletions on the Server
VB:

File : ShipperCentralServerUserCodeApplicationDataService.vb


Public Class ApplicationDataService


    Private Sub Customers_Validate(entity As Customer,

       results As Microsoft.LightSwitch.EntitySetValidationResultsBuilder)


      ' Check for validation errors for deletions

      If entity.Details.EntityState = EntityState.Deleted Then

          If entity.Subscriptions.Where(

             Function(s) s.IsActive.GetValueOrDefault()).Any() Then

                results.AddEntityError("Cannot delete customers with active subscriptions.")

          End If

      End If


    End Sub


    Private Sub Customers_Deleting(entity As Customer)


      ' Check for validation errors for deletions

      If entity.Details.ValidationResults.Errors.Any Then

          Throw New ValidationException(Nothing,

              Nothing, entity.Details.ValidationResults)

      End If


      ' Cascade delete children because delete rule is Restricted

      For Each s In entity.Subscriptions

          s.Delete()

      Next


    End Sub


End Class
File: ShipperCentralClientUserCodeCustomersGrid.vb

' This is the screen code

Private Sub CustomersGrid_SaveError(exception As System.Exception,

    ByRef handled As Boolean)


    ' Un-delete deleted records that had server-side validation errors

    Dim validationExc =  TryCast(exception, ValidationException)


If validationExc IsNot Nothing Then

          Dim entities = From v In validationExc.ValidationResults

                  Let e = TryCast(v.Target, IEntityObject)

                  Where e IsNot Nothing AndAlso

                      e.Details.EntityState = EntityState.Deleted

                         Select e

       For Each e In entities

           e.Details.DiscardChanges()

       Next

End If


End Sub


C#:


File : ShipperCentralServerUserCodeShipperCentralDataService.cs


public class ApplicationDataService

{

    partial void Customers_Validate(Customer entity,

          Microsoft.LightSwitch.EntitySetValidationResultsBuilder results)

    {

      // Check for validation errors for deletions

      if (entity.Details.EntityState == EntityState.Deleted) {

          if (entity.Subscriptions.Where(s => s.IsActive).Any()) {

              results.AddEntityError(

                 "Cannot delete customers with active subscriptions.");

          }

      }

    }


    partial void Customers_Deleting(Customer entity)

    {

      // Check for validation errors for deletions

      if (entity.Details.ValidationResults.Errors.Any())

      {

          throw new ValidationException(null, null, entity.Details.ValidationResults);

      }


      // Cascade delete children because delete rule is Restricted

      foreach (var childSub in entity.Subscriptions)
      {

          childSub.Delete();

      }

    }

}


File: ShipperCentralClientUserCodeCustomersGrid.cs

' This is the screen code

partial void EditableCustomersGrid_SaveError(Exception exception, ref bool handled)

{

    ValidationException validationExc = (exception as ValidationException);

    if (validationExc != null)

    {


      var entities = from v in validationExc.ValidationResults

                      let e = (v.Target as IEntityObject)

                      where (e != null &&

                         e.Details.EntityState == EntityState.Deleted)

                      select e;


      foreach (IEntityObject e in entities)

      {

          e.Details.DiscardChanges();

      }

    }

}
Database Validation
You can create your own validation rules at the database when working with an external SQL Server database. For example, you could create SQL Server check constraints to validate the data against a T-SQL expression. If a user attempts to enter data that conflicts with the database rules that you have defined, LightSwitch will return the error to the user in the validation result summary.
Earlier in this chapter, we showed you how to prevent users from entering duplicate records. If you were using an attached SQL Server database, you could apply this validation using a SQL Server unique constraint. To create a unique constraint, open your table in SQL Server Management Studio. On the toolbar, click the Index button, and the Indexes/Keys dialog box opens, as shown in Figure 5-8.
In the General section of the dialog box, choose the column that you want to apply the index on, set the Is Unique option to Yes, and select the type Unique Key.
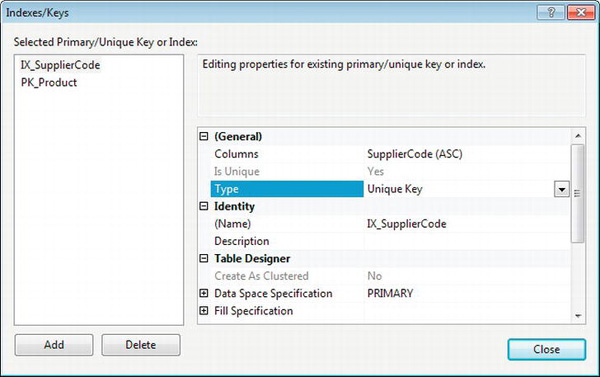
Figure 5-8. Creating a unique index
Figure 5-8 illustrates a unique constraint on the SupplierCode column in the product table. If you attempt to enter a product containing a duplicate supplier code, an error is returned after you attempt to save, as shown in Figure 5-9. This error message indicates the error that is returned from the server. Other server validation errors are grouped into the same block.

Figure 5-9. Unique constraint violation error
Summary
In this chapter, you have learned how to perform data validation in LightSwitch. The main topics that have been covered are as follows:
- Creating predefined validation rules
- Writing custom validation code
- Code examples of typical validation scenarios
Validation can be applied through entities, properties, and screens, and at the data-storage level. The actual validation itself is performed both on the client and on the server.
LightSwitch performs validation based on the predefined rules that are specified in properties. This enables data type, data length, and range validation to be carried out automatically.
For more-complex scenarios, custom validation can be performed at a property or entity level by using the validate method. To use this method, you would write your own conditional logic to check for any errors and then use the EntityValidationResultsBuilder object to specify the exact error message. If the AddPropertyError or AddEntityError methods of this object are called, the user cannot save their changes until the validation problems have been resolved. However, if the AddPropertyMessage or AddEntityMessage methods are used instead, the user will be warned of the validation issues and can save the changes afterward.
In this chapter, you have also seen various code samples that you can use. These include methods for preventing duplicates, comparing values against other properties, checking child collections, and using regular expressions.
Finally, you have seen how LightSwitch handles errors that are generated at the data-storage level.