C H A P T E R 14
Authorization
Whereas authentication is all about users proving who they are, authorization is all about what they are allowed to do, within the context of your application. Of course, this whole chapter is applicable only if you're using Windows Authentication or Forms Authentication.
Understanding Authorization
Security can be extremely important in a business application. If you've chosen the Do Not Enable Authentication option, LightSwitch won't use any mechanism to authenticate your user, and you can skip this chapter. In other words, your application won't know who's using it, and you won't be able to restrict what the users of your application can do.
Here are just a few of the reasons that you might want to use authorization:
- Control access (for example, whether a user is allowed to run your application)
- Hide screens (to show users only certain screens, based on their job definition)
- Restrict data access (because maybe not everyone should be able to see all data)
- Prevent data changes (for example, allowing a user to view data but not change it)
Fortunately, LightSwitch has a number of “hooks” built into it—in entities, screens, and queries—where you can write code that represents your unique business requirements. This allows you to easily check that your users have the required permissions to do whatever it is that they're trying to do. LightSwitch implements authorization by allowing you to create permissions, roles, and users.
Setting Permissions
Permissions determine what your users can do in your application. As the developer, you define these permissions while you're developing your application. In your code, you then check that the current user has the required permission, either in your own code, or by using one of the various security points that LightSwitch provides out of the box.
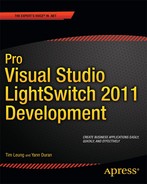
Later in this chapter, you'll learn how permissions are assigned to roles, and then how those roles are assigned to users (see Figure 14-1).
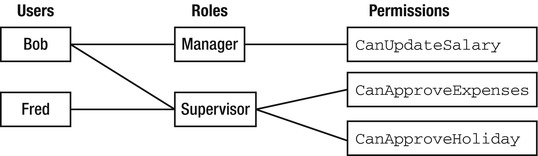
Figure 14-1. Permissions get assigned to roles, and roles get assigned to users.
In terms of the underlying implementation, permissions are claims that are defined by the application. Permissions are defined by your application in the same way that screens and entities are defined by your application. In fact, a permission definition is stored in the LSML file.
Roles and users are defined external to your application, so that an application administrator can manage them. LightSwitch lets the application administrator associate permissions with roles. But the application administrator cannot define permissions. Figure 14-2 illustrates where permissions, roles, and users are defined.
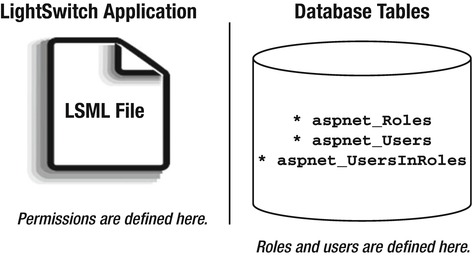
Figure 14-2. This is where permissions, roles, and users are defined.
Defining Permissions
Permissions are defined by adding them into the permissions grid in the Access Control tab of the LightSwitch project's properties (see Figure 14-3). You can add permissions to indicate, for example, whether a user can view a certain screen, to restrict access to individual controls on a screen, to determine whether an entity's properties are editable or read-only, and so on. You can be as general, or as granular, as your application requires.
For example, if you had an entity called Product, you might care only that a user is given a permission to edit a product, and not distinguish between the various ways that you can edit a product. You might call that permission EditProduct.
Or you might want to be able to provide a way that users can be given different permissions to add, edit, and delete that entity instead. In this case, you'd create individual AddProduct, EditProduct, and DeleteProduct permissions. It's a good idea to match your permission to the types of actions that your application's users are likely to need to perform, giving the administrative user the ability to assign the permissions required to perform those actions as they see fit.
More-granular permissions provide a much greater level of control, but it's also a bit of extra work for the administrative user who's setting up the roles and users. Adding a permission for every single possible action might be overkill. You really need to find the right balance between granularity and convenience.
Figure 14-3. Adding permissions in the Access Control tab
You test whether the current user has a given permission within the code that you add for tables, screens, and queries. When you select a permission method name from the Write Code drop-down list, LightSwitch will create a method stub for you, where you can then write the code that provides the logic for the permission.
After you become more experienced, you can add these methods to the appropriate classes manually, without having to use the drop-down. If you decide not to use the drop-down, it's worth noting that the Partial modifier is optional in VB, but must be specified in your C# code (if that's the language you're using in your project). In fact, this is common to all partial methods including validation, and computed properties.
LightSwitch will also generate a Permissions class for you that contains a string constant for each of the permissions that you've defined in the grid, so you can refer to the permissions in a consistent way. The class is automatically kept up to date, when the project is built (or rebuilt), so you don't have to take any extra action if you add, change, or delete permissions in the grid.
The string constants have the following format:
"ApplicationName:PermissionName"

 LightSwitchApplication:AddProduct
In your code, you refer to them like this:
"Permissions.PermissionName"

 Permissions.AddProduct
![]() Note Either Windows Authentication or Forms Authentication must be selected. Otherwise, the Define Permissions grid will be disabled.
Note Either Windows Authentication or Forms Authentication must be selected. Otherwise, the Define Permissions grid will be disabled.
Setting the Security Administration Permission
Every LightSwitch application has a built-in permission called SecurityAdministration. Only users who have been granted this permission, through any of the roles that have been assigned to them, will be able to manage security for the application, through the Roles screen and the Users screen.
These two screens are visible only if the user has this permission, and will appear in a navigation menu group called Administration (although you can change the name of the navigation group if you prefer, just as with any other navigation group). Any other screens that you've added to the group will still be visible (if the user has permission to view them, of course), whether the user has the administration permission or not.
Debugging Permissions
When debugging a LightSwitch application, there's no mechanism to allow you to choose which user you're running the program as. But you'll want to be able to test your permissions, to make sure that they work as you expect. Each permission row in the grid has a column called Granted for Debug, which appears as a check box.
If you tick the check box, you'll be granted that permission while you're debugging (meaning the Current.User.HasPermission function will return true for that permission), so that any code that relies on it can be tested.
When debugging, actual users and roles don't matter. You're not tied to, nor do you have access to, any specific roles, so you can set any combination of permissions that you want to test, and you can change them for each debugging session.
![]() Note If you enable the
Note If you enable the SecurityAdministration permission for use during debugging, you'll be able to add, view, and edit roles and users. However, any roles or users that you add while debugging won't be deployed with your application, and they have absolutely no effect on your debugging session permissions.
Setting Entity Set (Table) Permissions
The first area where you can set permissions is at the table/entity set level. These types of permissions apply to the whole entity set. You can control actions such as whether a user can add, view, edit, or delete any entity from the entire entity set. These permissions will be enforced by LightSwitch, whether the action is being performed in a screen on the client tier, or programmatically on the server tier (via any code that you've written to be executed there).
Checking permissions at the entity set level ensures that your data is protected, even if, for example, you forget to check for the appropriate permissions in a screen (on the client tier). The code that you write for a table runs on the server, so your application will check these permissions before it performs any action on your data, preventing anything unauthorized.
Although these permission checks are run and enforced on the server, the client queries and caches these values. In this way, the LightSwitch client can modify the screen functionality in accordance with the user's permissions.
The easiest way to access the code where you set the actual true/false value for these permission methods is to use the Write Code drop-down (see Figure 14-4), which is available when you're in the table designer. LightSwitch then adds a code stub for the chosen method for you, putting it in the data service class. You'll find this class in the ServerUserCodeApplicationDataService.vb (or ApplicationDataService.cs) file when writing permissions for a table in the intrinsic database. You then provide the code that represents the logic for the method.
We'll use the Employee entity/table to illustrate the various methods and how you'd use them.
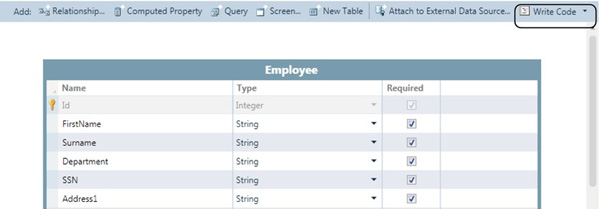
Figure 14-4. The Write Code drop-down menu
Entity Set Access Control Methods
These methods, as their names suggest, control the various levels of access that a user has to the entire entity set or table (see Figure 14-5). If you restrict an operation by using these methods, LightSwitch will make that operation unavailable to users who do not have unrestricted permissions. These methods run on the server. The results of these methods are enforced both on the server and on the client.
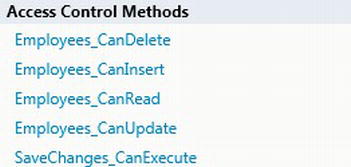
Figure 14-5. Access control methodss
CanDelete Method
You can prevent a user from making any deletions from the entity set by setting the result of the CanDelete method to false (see Listing 14-1). Any built-in Delete buttons on any screen will automatically be disabled. If you create your own Delete buttons, or override the existing buttons, you'll need to write code in their CanExecute methods to manually check for any delete permission you may have defined in the permissions grid.
We've chosen to call the permission that we're using to determine whether a user can delete an employee DeleteEmployee. In this case, the name of the permission that we've created (DeleteEmployee) matches the name of the method's action (delete), but that won't always be the case, as you'll see next.
CanInsert Method
You can restrict a user from being able to insert any entity to the entity set by setting the result of the CanInsert method to false (see Listing 14-1). As with the built-in Delete buttons, built-in Add buttons will automatically be disabled, and any that you create yourself will also need to have its CanExecute method overridden as well.
This time, we chose to call the permission AddEmployee (rather than InsertEmployee), as that more correctly reflects the actual function that the user is performing, even though technically the record is being inserted into the table.
CanRead Method
This method is run before LightSwitch reads a record. This includes any queries that are based on the table (either the default queries, or any custom queries that you add). If you set the result of the CanRead method to false (see Listing 14-1), a user will not be able to read or load any entities from the table.
If you base a search screen, or an editable grid screen, on a table with CanRead set to false, the grid will not be able to display the records (you'll get a red X in the grid instead). Your end user won't find this behavior very attractive, so it'll be a good idea to also use the screen's CanRun method to restrict access to the actual screen.
Using the CanRead method is still very valuable, particularly if you have sensitive data in a table. If you deny access to a table by using the CanRead method, those records are also hidden in the server pipelines. This means that data cannot leak out in any way.
However, you could still use the elevate permissions technique to override the current user's restrictions, if your server-side business logic requires access. This technique grants permissions to the user by using the method Application.Current.User.AddPermissions.
CanUpdate Method
Similarly, by setting the result of the CanUpdate method to false (see Listing 14-1), you can prevent users from being able to update any entity in the entity set. The UI (on the client tier) will respond by automatically setting the controls displaying the entity's properties to be read-only. If a change is attempted outside of a screen, the check will still be run on the server tier to prevent any back-door type of data changes.
SaveChanges_CanExecute Method
SaveChanges_CanExecute determines whether the save operation can be executed in the current context.
This method is executed on the server, after a user attempts to save data. If the method returns false, the user won't be allowed to carry out the save. This extends to all tables in the data source. If SaveChanges_CanExecute returns false, the user won't be able to save any data in any table at all.
The logic that you write in SaveChanges_CanExecute can be based on permissions, and can also be based on other reasons for denying save operations. For example, you might want to prevent changes during certain business hours.
The code in Listing 14-1 shows how you can use this method to restrict access to your application between the hours of midnight and 3 a.m.
Listing 14-1. Setting Access Control Permissionss
VB:


File : OfficeCentralServerUserCodeApplicationDataService.vb


Namespace LightSwitchApplication


    Public Class ApplicationDataService


        Private Sub Employee_CanDelete(ByRef result As Boolean)

            result = Application.User.HasPermission(

               Permissions.DeleteEmployee)

        End Sub


        Private Sub Employee_CanInsert(ByRef result As Boolean)

            result = Application.User.HasPermission(

                Permissions.AddEmployee)

        End Sub


        Private Sub Employee_CanRead(ByRef result As Boolean)

            result = Application.User.HasPermission(

                Permissions.ReadEmployee)

        End Sub


        Private Sub Employee_CanUpdate(ByRef result As Boolean)

            result = Application.User.HasPermission(

                Permissions.EditEmployee)

        End Sub


        Private Sub SaveChanges_CanExecute(ByRef result As Boolean)

            'System is down for daily maintenance from midnight to 3am

            If Now.TimeOfDay.Hours >= 0 AndAlso

              Now.TimeOfDay.Hours <= 3 Then

                result = False

            Else

                result = True

            End If

        End Sub


    End Class


End Namespace


C#:


File : OfficeCentralServerUserCodeApplicationDataService.cs


namespace LightSwitchApplication

{

    public class ApplicationDataService
    {

        private void Employee_CanDelete(ref bool result)

        {

            result = Application.User.HasPermission(

                Permissions.DeleteEmployee);

        }


        private void Employee_CanInsert(ref bool result)

        {

            result = Application.User.HasPermission(

                Permissions.AddEmployee);

        }


        private void Employee_CanRead(ref bool result)

        {

            result = Application.User.HasPermission(

                Permissions.ReadEmployee);

        }


        private void Employee_CanUpdate(ref bool result)

        {

            result = Application.User.HasPermission(

                Permissions.EditEmployee);

        }


        private void SaveChanges_CanExecute (ref bool result)

        {

             //System is down for daily maintenance from midnight to 3am

                if (Now.TimeOfDay.Hours >= 0 &&

                   Now.TimeOfDay.Hours <= 3) {

                   result = false;

                } else {

                   result = true;

                }

        }

    }

}
Property Permissions
In addition to being able to define table-wide permissions, you can have slightly more granular control over the ability to edit an entity by using a property-level IsReadOnly method (see Figure 14-6).
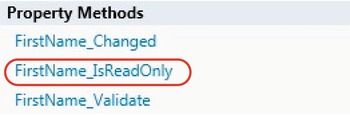
Figure 14-6. IsReadOnly method
LightSwitch uses the IsReadOnly method only to manage the UI editable state. This method doesn't control read access from the entity set/table, so it can't be used for row-level security. This is in contrast to EntitySet_CanRead, which does prevent read access from the entity set.
To give an example, let's say that you've created an employee table that contains a salary property. You'd like to secure the salary property so that only managers are allowed to view and edit this property. It isn't possible to apply permissions at a property level. As a workaround, you'd need to create separate screens for managers and nonmanagers, and apply the permissions at a screen level.
Each property in an entity has its own IsReadOnly method (see Listing 14-2), so you can use custom (or shared) business logic to set individual properties to be read-only. For example, you might want a property's value to be able to be entered only if a value hasn't previously been entered, unless the current user has an override permission (which has been defined in the permissions grid, and assigned by the administrative user).
We've called our permission OverrideNames. By setting the result of a property's IsReadOnly method to false, any screen control that's bound to that property will automatically be displayed as a read-only value.
Listing 14-2. Setting a Property's IsReadOnly Method
VB:


File: OfficeCentralCommonUserCodeEmployee.vb


Namespace LightSwitchApplication


    Public Class Employee


        Private Sub FirstName_IsReadOnly(ByRef result As Boolean)

            result = (Not String.IsNullOrEmpty(Me.FirstName))

                OrElse?

                (Current.User.HasPermission(Permissions.OverrideNames) = True)

        End Sub


    End Class


End Namespace


C#:


File: OfficeCentralCommonUserCodeEmployee.cs


namespace LightSwitchApplication

{

    partial void FirstName_IsReadOnly(ref bool result)

    {

        result = (!string.IsNullOrEmpty(this.FirstName))

            || (Current.User.HasPermission(Permissions.OverrideNames) == true);

    }

}
Setting Screen Permissions
Setting permissions in your screens for buttons, tabs, grids, and other controls is an effective way of restricting what your users can do. It's much better to visually inform your users (by way of a disabled button or a read-only control) that they can't perform a certain action, rather than rely on just the table permissions.
Imagine a user's frustration if he fills out a lengthy screen of information, only to be informed when he clicks the Save button that he's not allowed to save the data. Your application won't impress its users if you allow that to happen.
Screen Access Control Methods
There's only one permission-related method for a screen itself (see Figure 14-7). Setting the result of this method to false will prevent the user from being able to open the screen.

Figure 14-7. Access control methods
CanRun Method
If you want to prevent a user from being able to open a particular screen, you can check that the user has a permission that you've specifically defined for that purpose.
For example, in the ProductList screen, we're checking that the user has the EditProducts permission. If the user doesn't have the required permission, the result is simply set to false (see Listing 14-3), and the screen will not be allowed to run.
This method gets added to LightSwitch's Application class.
Listing 14-3. Setting a Screen's CanRun Method
VB:


File : OfficeCentralClientUserCodeApplication.vb


Namespace LightSwitchApplication


    Public Class Application


        Private Sub ProductList_CanRun(ByRef result As Boolean)

            result = (Current.User.HasPermission(Permissions .EditProducts))

        End Sub
    End Class


End Namespace


C#:


File : OfficeCentralClientUserCodeApplication.cs


namespace LightSwitchApplication

{


    public class Application

    {

        partial void ProductList_CanRun(ref bool result)

        {

            result = (Current.User.HasPermission(Permissions .EditProducts));

        }

    }


}
![]() Note If you've added a screen to a navigation menu group, but in its
Note If you've added a screen to a navigation menu group, but in its CanRun method your business logic sets the result to False, that screen won't be visible in the navigation menu. Using this method, you can hide screens that a user doesn't need (or doesn't have permission) to see.
Execute Methods
In Chapter 8, you saw how to add methods (or screen commands) to your screen by using the Add Data Item dialog box. You can then create buttons on your screen that are bound to the screen command. Screen commands provide two methods that allow you to write custom code: the CanExecute method and the Execute method (see Figure 14-8).
Because this chapter covers authorization, only the CanExecute method concerns us here.
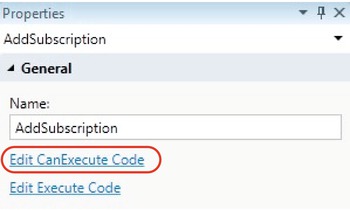
Figure 14-8. Execute methods
CanExecute Method
Each screen command has its own CanExecute method (see Listing 14-4), where you can define the business logic that determines whether its associated control is enabled or disabled. In this example, the Add Product button (or associated control) is enabled only if the user has the AddProduct permission.
Listing 14-4. Editing a Command's CanExecute Method
VB:


File : OfficeCentralClientUserCodeProductList.vb


Namespace LightSwitchApplication


    Public Class ProductList


        Private Sub AddProduct_CanExecute(ByRef result As Boolean)

            result = Me.User.HasPermission(Permissions.AddProduct)

        End Sub


    End Class


End Namespace


C#:


File : OfficeCentralClientUserCodeProductList.cs


namespace LightSwitchApplication

{

    public class ProductList

    {

        partial void AddProduct_CanExecute (ref bool result)

        {

            result = this.User.HasPermission(Permissions.AddProduct);

        }

    }

}
![]() Tip Although we've used the
Tip Although we've used the CanRun method to enforce permissions, you can also use this method to guard screen commands based on other conditions. Let's suppose you've created a method that generates Microsoft Word documents by using COM automation. If your application runs as a browser application (rather than a desktop application), you can hide the button that carries out the Word automation by writing code in the CanRun method that checks AutomationFactory.IsAvailable.
Setting Query Permissions
There's only one method that we need to concern ourselves with for queries related to access control: the CanExecute method (see Figure 14-9). This method is called prior to actually executing the query, so that the current user's permissions can be checked. It runs on the server.
Query Access Control Methods

Figure 14-9. A query's CanExecute method
Let's imagine that you've created a query in the OfficeCentral system that returns holiday requests that are filtered by an employee parameter. Only managers should be able to run this query.
If you've created a permission called ViewHolidayRequests, the code shown in Listing 14-5 guards the query so that only those with this permission will be able to execute it.
Listing 14-5. Editing a Query's CanExecute Method
VB:


File : OfficeCentralServerUserCodeApplicationDataService.vb


Namespace LightSwitchApplication


    Public Class ApplicationDataService


        Private Sub HolidayRequests_ByPersonID_CanExecute(

          ByRef result As Boolean)

             result = Application.User.HasPermission(

               Permissions.ViewHolidayRequests)

        End Sub


    End Class


End Namespace


C#:


File : OfficeCentralServerUserCodeApplicationDataService.cs


namespace LightSwitchApplication

{

    public class ApplicationDataService

    {

        partial void HolidayRequests_ByPersonID_CanExecute(

           ref bool result)

        {

            result = Application.User.HasPermission(
                Permissions.ViewHolidayRequests);

        }

    }

}
Specifying the Application Administrator
When you publish an application for the first time (see Chapter 16 for more details), you have to specify the details of a user who will be the administrator of the program. The administrator needs to run the application before anyone else does, because the administrator needs to add roles, and decide which permissions need to be added to those roles, and which roles are assigned to which users.
![]() Note If you've chosen Forms Authentication as your authentication method, the very first user that logs on needs to use the username and password that you entered into the publishing wizard when you published the application. If you didn't specify a username and password, you'll need to create these by using the Security Admin command line utility.
Note If you've chosen Forms Authentication as your authentication method, the very first user that logs on needs to use the username and password that you entered into the publishing wizard when you published the application. If you didn't specify a username and password, you'll need to create these by using the Security Admin command line utility.
Creating Roles
Roles are a key part of the LightSwitch security model. Let's suppose you want to restrict the users who can delete employees. To do this, you've created a permission called DeleteEmployee. In LightSwitch, you wouldn't assign the DeleteEmployee permission directly to a user. Instead, you'd add the permission to a role. So to grant a user the DeleteEmployee permission, you'd assign the user to a role that contains this permission. Therefore, think of roles of as containers for users and permissions.
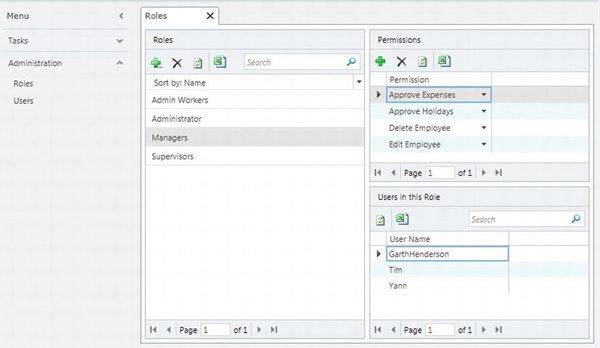
Permissions are created by you (the developer), and are defined in your application inside the LSML file. Roles are created by the application administrator, and it's also the application administrator who adds the permissions that you've defined into roles. This is done in the Roles screen (see Figure 14-10), in the Administration section of the navigation menu, after the application has been deployed.
In your code, you shouldn't be testing whether a user belongs to a particular role. You can't guarantee that the role that you're checking for will even exist. Stick with checking whether the user has the appropriate permission to perform a particular task or to access certain data, and leave the assigning of permissions to roles, and the assigning of roles to users, to the application's administrative user.
![]() Note A role can have any number of permissions assigned to it, and any number of users assigned to it.
Note A role can have any number of permissions assigned to it, and any number of users assigned to it.
Adding Users
As with roles, users are also added by the application administrator, in the Users screen (see Figure 14-11), after the application has been deployed.
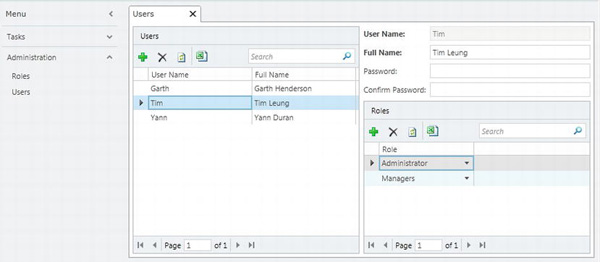
![]() Note A user's effective permissions are made up of the combination of permissions they have from each of the roles that they've been assigned.
Note A user's effective permissions are made up of the combination of permissions they have from each of the roles that they've been assigned.
Filtering Data Based on User
It's a common requirement to display only the data that is relevant to a particular user. You might want a data entry person to be able to view only his own entries, and not be able to see other people's entries, for example. In this section, we'll show you how to filter the data in a table based on the user. We'll demonstrate this functionality by showing you a holiday request system that is part of the OfficeCentral application.
The holiday requests are stored in a table. We'll show you how to create a query that returns holiday request records filtered by user. We'll then show you how to create a query that returns holiday requests automatically filtered by the currently logged-on user. You can then build a screen based on this query to display the records that relate to the user.
In this example, we'll show you the following techniques:
- We'll show you how to create a helper method that strips out the domain portion of the username (if you're using Windows Authentication).
- When a user creates a record, we'll show you how to store the username of the logged-on user into a field in the table. This allows you to mark the owner of a record.
- We'll show you how to query your table so that it returns records for only the currently logged-on user.
Helper Methods
We'll start off by describing some helper methods. If you're using Windows Authentication, you might prefer to store and work with only the username portion of a user's login name.
It's useful to have some methods to separate out the domain name, and username, from a user's logon name. We've created a couple of helper methods in our Security helper class to help you do this.
GetDomainName
The GetDomainName function (see Listing 14-6) will extract the domain out of the logon name that we pass to it.
Listing 14-6. GetDomainName Method
VB:


Namespace Security


    Public Function GetDomainName(logonName As String) As String

        Dim result = ""


        Try

            Dim parts() As String = Split(logonName, "")


            result = parts(0)


        Catch ex As Exception

            result = ""

        End Try


        Return result

    End Function


End Namespace


C#:


Namespace Security

{

    public string GetDomainName(string logonName)

    {

        var result = "";


        try

        {

            string[] parts = logonName.Split(''),


            result = parts[0];


        }
        catch (Exception ex)

        {

            result = "";

        }


        return result;

    }

}
GetUserName
The GetUserName function (see Listing 14-7) will return the username portion of the logon name that gets passed to it.
Listing 14-7. GetUserName Method
VB:


Namespace Security


    Public Function GetUserName(logonName As String) As String

        Dim result = ""


        Try


            If logonName.Contains("") Then

                Dim parts() As String = Split(logonName, "")

                result = parts(1)

            Else

                result = logonName

            End If


        Catch ex As Exception

            result = ""

        End Try


        Return result

    End Function


End Namespace


C#:


Namespace Security

{

{

    public string GetUserName(string logonName)

    {

        var result = "";
        try

        {

            if(logonName.Contains("\")){

               string[] parts = logonName.Split(''),

               result = parts[1];

            }

            else

            {

                result = logonName;

            }

        }

        catch (Exception ex)

        {

            result = "";

        }


        return result;

    }

}
The Table
To enable this type of filtering of data, the table that you're displaying must have a property that either stores the username of the person who it will be filtered by (which is the easiest to do but has disadvantages) or an Employee (which is a bit more work but is also more reliable).
In the HolidayRequest table, we've added a relationship to the Employee table (see Figure 14-12) so that when a HolidayRequest is submitted, we can track which employee submitted it. Another advantage of doing it this way, rather than just storing a username is that each Employee now has a collection of HolidayRequests associated with it. We can display them in a grid in the EmployeeDetail screen, with no extra work required.
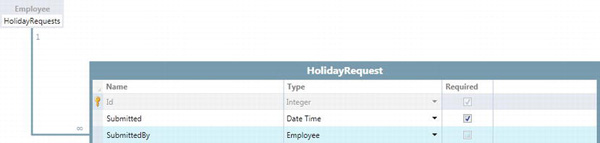
Figure 14-12. SubmittedBy property
The value that will be used to filter the records can be automatically stored when the entity is created, by adding a couple of lines of code to the HolidayRequest's Created method (see Listing 14-8).
Storing a username is fairly straightforward, so we'll show you how to store a related employee when creating a HolidayRequest, which is a slightly more advanced technique.
Listing 14-8. Saving the Current User
VB:


File : OfficeCentralCommonUserCodeHolidayRequest.vb


Namespace LightSwitchApplication


    Public Class HolidayRequest


        Private Sub HolidayRequest_Created()

            Dim userName = GetUserName(Me.Application.User.Name)

            Dim submittedBy =

                Me.DataWorkspace.ApplicationData.Employees.Where(?

                   Function(x) x.UserName = userName).FirstOrDefault


            Me.SubmittedBy = submittedBy

        End Sub


    End Class


End Namespace


C#:


File : OfficeCentralCommonUserCodeHolidayRequest.cs


namespace LightSwitchApplication

{

    public class HolidayRequest

    {

        partial void HolidayRequest_Created()

        {

            var userName = GetUserName(this.Application.User.Name);

            var submittedBy =

                this.DataWorkspace.ApplicationData.Employees.Where(

                   (x) => x.UserName == userName).FirstOrDefault();


            this.SubmittedBy = submittedBy;

        }

    }

}
The Query
Now that you've set up your table and have written the code that automatically populates the SubmittedBy property with the name of the user who created the record, we'll describe a couple of techniques that allow you to filter the records based on the SubmittedBy property.
First, we'll show you how to how to filter the holiday request table by user, using a parameterized query. Second, we'll show you how to automatically filter the table by the logged-on user.
Filtering Records by User
This first query example filters the holiday requests by employee. This would be ideal for someone in a manager role, who needs to be able to select any employee and to view that person's holiday requests.
To do this, you'd simply add a query with an Integer parameter, and pass the Id value of the current user to the query via the parameter (see Figure 14-13).
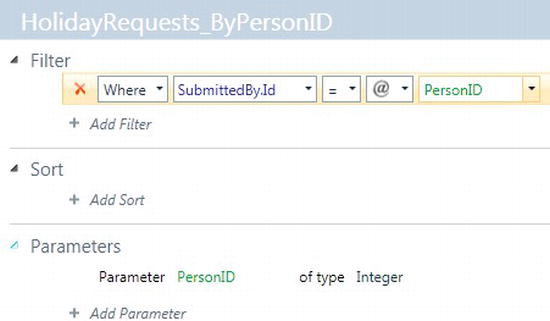
Figure 14-13. Query with a filter based on a parameter
After creating your query, you can create an editable grid screen based on this query. You can then add an AutoCompleteBox that shows a list of employees. The PersonID parameter would be bound to the value of the AutoCompleteBox. Whenever you change the selected employee by using the AutoCompleteBox, the holiday request data grid will refresh itself to show only those records that relate to the selected employee.
More details on building the UI to do this can be found in Chapter 8.
Filtering Records by Logged-on User
Let's say that a nonmanager logs into your application. You might want to provide nonmanagers with a screen that shows only that user's own holiday requests, and no one else's. To create a query that filters the results based on the logged-in user, you'll need to write some code in the PreProcessQuery method of your query.
In the example that follows, we've created a query called HolidayRequestsByUser. After creating the query, you'll need to add the code that's shown in Listing 14-9 to do the filtering. After you've created the HolidayRequestsByUser query, you can simply create a screen that's based on this query.
Listing 14-9. PreProcessQuery Method
VB:


File : OfficeCentralServerUserCodeApplicationDataService.vb


Namespace LightSwitchApplication
    Public Class HolidayRequest


        Private Sub HolidayRequestsByUser_PreProcessQuery(

            ByRef query As IQueryable(Of

                LightSwitchApplication.HolidayRequest))

            Dim name = GetUserName(Me.Application.User.Name)


            query = From hr In query

                    Where (hr.SubmittedBy.UserName = name)

        End Sub


    End Class


End Namespace


C#:


File : OfficeCentralServerUserCodeApplicationDataService.cs


namespace LightSwitchApplication

{

    public class HolidayRequest

    {

        partial void HolidayRequestsByUser_PreProcessQuery(?

            ref IQueryable<LightSwitchApplication.HolidayRequest>)

        {

            var name = GetUserName(this.Application.User.Name);


            query = from hr in query

                    where (hr.SubmittedBy.UserName == name)

                    select hr;

        }

    }

}
If you want the holiday request data to be filtered by the logged-on user throughout your entire application, you could write code in the PreProcessQuery method of the All query that LightSwitch automatically creates. If you've named your table HolidayRequests, this default query would be called HolidayRequests_All.
However, this technique isn't guaranteed to always show holiday request data that's filtered by the logged-on user. Although any queries applied to the HolidayRequests entity set will be filtered correctly, the filter won't be applied if the user browses holiday requests through navigation properties (or related records). You therefore need to apply some caution if you're thinking about modifying the default All query.
![]() Caution If you use the user's Windows logon (
Caution If you use the user's Windows logon (DOMAINuser) to filter by, keep in mind that over time, either the domain name or the user's username could change and therefore affect which records are displayed. An organization's server hardware could be replaced or upgraded, and in the process could be given a new domain name. A spelling mistake in a user's name might be discovered and corrected, forcing a change in the username. A user could also get married or legally change her name for some other reason. So, wherever possible, use a numeric Id value (or a related property) to store identities that will be used for filtering.
Creating a Log Out Option
If you're using Forms Authentication in a LightSwitch browser application, you might like to add a Log Out button, so that the current user can log out, allowing another user to log in instead. In a desktop application, you'd simply close it, using the Windows-provided Close button. But even if you close a LightSwitch browser application, the session cookie for your application (also known as the authentication cookie) will still remain. When you open the application again, it won't prompt the user for a username and password, unless enough time has passed for the cookie to have expired.
To force the application to ask for new user credentials, we'll use a technique based on an article that was created by the LightSwitch team. This creates a special ASPX file that logs out the user and redirects the browser back to the default htm page. When the application reloads, the LightSwitch login screen will be displayed to the user.
Adding an ASPX Page
To add the LogOff.aspx page, follow these steps:
- Switch your LightSwitch project to File view.
- Click the Show All Files option.
- Right-click the
Server Generatedproject. - Choose Add ? New Item.
- Select Web Form (to add an ASPX file), and call it
LogOff.aspx. - Right-click the newly added
Logoff.aspxfile. - Select the View Code option.
- Add the code (shown in bold) from Listing 14-10, and save the file.
Listing 14-10. Logoff.aspx Code-Behind
VB:


Imports System.Web.Security


Public Class LogOff

    Inherits System.Web.UI.Page


    Protected Sub Page_Load(ByVal sender As Object,

       ByVal e As System.EventArgs) Handles Me.Load


              FormsAuthentication.SignOut()

              Response.Redirect("default.htm")


   End Sub


End Class


C#:


using System.Web.Security;


public class LogOff : System.Web.UI.Page

{

    protected void Page_Load(object sender, System.EventArgs e)

    {

            FormsAuthentication.SignOut();

            Response.Redirect("default.htm");

    }

}
Including the ASPX Page in the Project's Build Output
By default, our added ASPX file won't be included in the project's build output, so to make sure it's included, we'll need to manually edit the project's lsproj file (be sure to make a backup of the file first):
- Right-click the LightSwitch project.
- Select the Unload Project option.
- Right-click the project again.
- Select the Edit Lsml option.
- Use Visual Studio's search function to find
_BuildFile Include="default.htm". - Immediately underneath the
_BuildFilesection fordefault.htm, add the XML fragment (shown in bold) that appears in Listing 14-11.
![]() Tip If you have the PowerCommands for Visual Studio 2010 extension installed (which you can download and install via Visual Studio's Extension Manager), you can combine the unload/edit project steps into one with the Edit Project command.
Tip If you have the PowerCommands for Visual Studio 2010 extension installed (which you can download and install via Visual Studio's Extension Manager), you can combine the unload/edit project steps into one with the Edit Project command.
Listing 14-11. Including LogOff.aspx in Build Output
XML:


<_BuildFile Include="default.htm">

  <SubFolder>

  </SubFolder>

  <PublishType>

  </PublishType>

</_BuildFile>

<_BuildFile Include="ServerGeneratedLogOff.aspx">

  <SubFolder>

  </SubFolder>

  <PublishType>

  </PublishType>

</_BuildFile>
Exposing the LogOut Functionality
Now that you have a method to trigger the logoff page, how you choose to expose that functionality to your application's users is really up to you. We'll show you two options. You can choose one of those, or you might come up with something entirely different.
Using a Screen Command
First, we'll show you how to add a button to your home page that logs out the user. In the screen designer, add a new screen command, as shown in Figure 14-14.
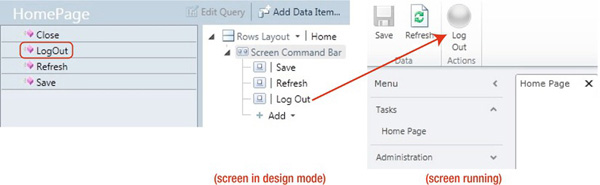
Figure 14-14. Home page
You'll now need to do the following:
- Add a reference to the
System.Windows.Browserassembly to yourClientproject (forHtmlPage). - Add an
Imports/Usingstatement to theMicrosoft.LightSwitch.Threadingnamespace (forDispatchers). - Add an
Imports/Usingstatement to theMicrosoft.LightSwitch.Securitynamespace (forAuthenticationType).
Listing 14-12. Execution Code for the Log Out Button
VB:


File : OfficeCentralClientUserCodeHomeScreen.vb


Imports System.Windows.Browser

Imports System.Runtime.InteropServices.Automation

Imports Microsoft.LightSwitch.Threading

Imports Microsoft.LightSwitch.Security


Namespace LightSwitchApplication


    Public Class HomeScreen


        Private Sub LogOut_CanExecute(ByRef result As Boolean)

            result = (System.Windows.Application.Current.IsRunningOutOfBrowser = False)

                AndAlso

                (Application.Current.User.AuthenticationType =

                AuthenticationType.Forms)

        End Sub


        Private Sub LogOut_Execute()

            Dispatchers.Main.Invoke(

                Sub()

                    HtmlPage.Window.Navigate(

                        New Uri("LogOff.aspx", UriKind.Relative))

                End Sub)

        End Sub


    End Class


End Namespace


C#:


File : OfficeCentralClientUserCodeHomeScreen.cs


using System.Windows.Browser;

using System.Runtime.InteropServices.Automation;

using Microsoft.LightSwitch.Threading;
using Microsoft.LightSwitch.Security;


namespace LightSwitchApplication

{

    public class Home

    {

        private void LogOut_CanExecute(ref bool result)

        {

            result = (System.Windows.Application.Current.IsRunningOutOfBrowser == false)

                && (Application.Current.User.AuthenticationType =

                AuthenticationType.Forms);

        }


    partial void LogOut_Execute()

        {

        Dispatchers.Main.Invoke(() =>

            {

                HtmlPage.Window.Navigate(

                    new Uri("LogOff.aspx", UriKind.Relative));

            });

        }

    }

}
Using a Navigation Menu Item
If you'd prefer to have a Log Out entry appear in the navigation menu, you can do this by adding a New Data Screen (see Figure 14-15), calling it LogOut, but leaving the Screen Data option set to (None).

Figure 14-15. Adding a new data screen
When you've added the LogOut screen, it'll appear in the navigation menu (see Figure 14-16).
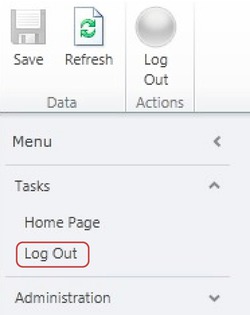
Figure 14-16. Log Out navigation menu item
All that's left now is to do the following:
- Add some code to check whether the application is running in a browser, and also that Forms Authentication is being used.
- Add a reference to
System.Windows.Browser(forHtmlPage). - Add an
Imports/Usingstatementto theMicrosoft.LightSwitch.Threadingnamespace(forDispatchers). - Add an
Imports/Usingstatement to theMicrosoft.LightSwitch.Securitynamespace (forAuthenticationType). - Set the result of the
LogOutscreen'sCanRunmethod (see Listing 14-13), which will then show or hide the screen in the navigation menu. (There's no point having it visible in a nonbrowser application, or if Forms Authentication isn't being used.) - Cancel the opening of the screen when the navigation item is clicked (by setting
handled = truein the screen'sRunmethod). - Make the code to log the user out run instead.
Listing 14-13. Navigation Menu Logout Code
VB:


File : OfficeCentralClientUserCodeApplication.vb


Imports System.Windows.Browser

Imports System.Runtime.InteropServices.Automation

Imports Microsoft.LightSwitch.Threading

Imports Microsoft.LightSwitch.Security


Namespace LightSwitchApplication
    Public Class Application


        Private Sub LogOut_CanRun(ByRef result As Boolean)

            result = (System.Windows.Application.Current.IsRunningOutOfBrowser = False)

                AndAlso (Application.AuthenticationService.AuthenticationType

                 = AuthenticationType.Forms)

        End Sub


        Private Sub LogOut_Run(ByRef handled as Boolean)

            Dispatchers.Main.Invoke( _

                Sub()

                    HtmlPage.Window.Navigate(

                       New Uri("LogOff.aspx", UriKind.Relative))

                End Sub)


            handled = true

        End Sub

    End Class


End Namespace


C#:


File : OfficeCentralClientUserCodeApplication.cs


using System.Windows.Browser;

using System.Runtime.InteropServices.Automation;

using Microsoft.LightSwitch.Threading;

using Microsoft.LightSwitch.Security;


namespace LightSwitchApplication

{

    public class Application

    {

        private void LogOut_CanRun(ref bool result)

        {

            result = (System.Windows.Application.Current.IsRunningOutOfBrowser

                           == false)

                &&(Application.AuthenticationService.AuthenticationType ==

                AuthenticationType.Forms);

        }


        partial void LogOut_Run(ref bool handled)

        {

            Dispatchers.Main.Invoke(() =>

                {

                    HtmlPage.Window.Navigate(

                       new Uri("LogOff.aspx", UriKind.Relative));

                });
            handled = true;

        }

    }

}
![]() Note The
Note The LogOut screen's CanRun method and Run method are both located in the project's ClientUserCodeApplication class, not in the ClientUserCodeLogOut class as you might expect.
Summary
In this chapter, you've learned what authorization is (as opposed to authentication), as well as when and how you'd use it in your LightSwitch application. Authorization is a pretty important part of your LightSwitch application.
We've shown you how, as a developer, you have several ways of controlling what a user can and can't do while using your program. This includes the following:
- Checking permissions at a table/entity set level
- Checking permissions at the entity property level
You also learned the following:
- How to secure various parts of your application by defining permissions
- That after deployment, an administrative user assigns permissions to roles
- That after deployment, an administrative user assign users to those roles
- That a user's effective permissions is the combination of permissions from each of the roles assigned to that user
- A handy technique (for developers of browser applications) to create a Log Out button, enabling the current user to log out of the application, and allowing a different user to log in