Chapter 3
Player Controllers, Pawns, and Weapons
This chapter will cover player controllers, the player’s pawn, and weapons. A pawn in the UDK represents the physical presence of a player or a computer controlled game character. Think of this as the player’s body in the game. The player controller controls the pawn and translates player input into pawn movement and other actions. Information regarding these topics is presented followed by tutorials. You will find out how to:
- Use the PlayerController and Pawn classes
- Make a pawn visible using a skeletal mesh
- Use camera views
- Set and change your pawns’ views
- Use the Weapon and related classes
- Add weapons to pawns from different views
Player Controller and Pawn Overview
The player input system within the UDK is divided between the player controller and the pawn. The pawn represents the player’s physical presence in the game. When you need to find the player’s location, or rotation you will need to find the location or rotation of the player’s pawn. The player controller takes input from the player, processes this input and translates them into movement for the pawn it controls.
All player controllers must derive from the PlayerController class and all pawns must derive from the Pawn class. For programming on the iOS platform the SimplePC class can be used for the base for custom player controllers and SimplePawn can be used as the base for custom pawns. The advantage of using the SimplePC class as the base of your custom player controller is that this class already has set up joystick and touch input zones as well as some other features like footstep sounds and simulated player breathing through camera motion. The advantage of using the SimplePawn is that it features “head bobbing” which makes the camera move up and down as the player walks around. This makes the player’s view more realistic. Head bobbing is done by setting the bScriptTickSpecial=true which is the default value in SimplePawn. The actual head bobbing is done in the TickSpecial() function in the SimplePawn class. To turn head bobbing off, set bScriptTickSpecial=false in a derived pawn class. The main update function for the PlayerController class is PlayerTick(), which is called at regular intervals, or “ticked” once per frame update of the game.
Here you can add in custom code to handle items unique to your particular game. For example, if a goal in your game is to retrieve a certain item then you can check for the player’s possessions for this item in PlayerTick(). The way you would do this is override the PlayerTick() function in your custom player controller, execute the normal PlayerTick() function through the Super prefix and then execute your custom code afterwards. See Listing 3–1.
Listing 3–1. Customizing the PlayerTick() function
function PlayerTick(float DeltaTime)

{

    Super.PlayerTick(DeltaTime);

    // Add in additional code here for your custom player controller

    If (Jazz3Pawn(Pawn).Lives <= 0)

    {

        Gameover = true;

    }

}
The modified PlayerTick() function checks if the player’s has more lives and if not then sets the Gameover variable to true.
The PlayerMove() function is called every time PlayerTick() is called and calculates new acceleration and rotation values for the player. This function then calls ProcessMove() which then executes the actual move. It is in the ProcessMove() function that we can change how the player’s pawn responds to the player’s movement input. For example, in your custom controller class if you declared a function ProcessMove() that is defined in the PlayerWalking state then this new function will override the default ProcessMove() function.
state PlayerWalking

{

    ignores SeePlayer, HearNoise, Bump;

    function ProcessMove(float DeltaTime,

                          vector NewAccel,

                          eDoubleClickDir DoubleClickMove,

                          rotator DeltaRot)

    {

         // Place custom code for player movement here to override the default

    }

}
The UpdateRotation() function is responsible for updating the controller’s rotation and the pawn’s rotation.
Hands-on Example: Making your pawn visible with a 3D skeletal mesh character
This tutorial will show you how to add in a skeletal mesh to your pawn to make it visible. We start off by creating a new game type and a new custom player controller. This game type will use the first-person viewpoint. Next, we configure the new custom game to run on the UDK mobile previewer and show you how to run it. Finally, we add a skeletal mesh to the player’s pawn to make the pawn visible.
Creating the Default First-Person View
In this section you will create a new game type that uses the default first-person viewpoint. This section introduces the basic framework from which we will build on for future examples.
- The first thing you need to do is create a directory for our next example. In your UDK installation directory create the following folder,
DevelopmentSrcExampleCh31Classes. As before you will put your code into this new Classes directory. (Note that the general numbering scheme for these examples is “ExampleCh” followed by the chapter number and then an example number if there is more than one.) - The first class you need to create is the
ExampleCh31Gameclass that defines the type of game to be played. See Listing 3–2.Listing 3–2. Defining the Game Type
class ExampleCh31Game extends FrameworkGame;


event OnEngineHasLoaded()

{

    WorldInfo.Game.Broadcast(self,"ExampleCh31Game Type Active - Engine Has Loaded

!!!!");

}

function bool PreventDeath(Pawn KilledPawn, Controller Killer, class<DamageType>

DamageType, vector HitLocation)

{

    return true;

}

static event class<GameInfo> SetGameType(string MapName, string Options, string Portal)

{

    return super.SetGameType(MapName, Options, Portal);

}

defaultproperties

{

    PlayerControllerClass=class'ExampleCh31.ExampleCh31PC'

    DefaultPawnClass=class'SimplePawn'

    HUDType=class'UDKBase.UDKHUD'


    bRestartLevel=false
bWaitingToStartMatch=true
bDelayedStart=false
} - The next class is the custom player controller class
ExampleCh31PC. This player controller is stripped to the bare essentials. See Listing 3–3.Listing 3–3. Creating a basic player controller
class ExampleCh31PC extends SimplePC;
function bool SwipeZoneCallback(MobileInputZone Zone,
float DeltaTime,
int Handle,
EZoneTouchEvent EventType,
Vector2D TouchLocation)
{
local bool retval = true;
if (EventType == ZoneEvent_Touch)
{
WorldInfo.Game.Broadcast(self,"You touched the screen at = "
@ TouchLocation.x @ " , "
@ TouchLocation.y @ ", Zone Touched = "
@ Zone);
}
else if(EventType == ZoneEvent_Update)
{
}
else if (EventType == ZoneEvent_UnTouch)
{
}
return retval;
}
function SetupZones()
{
Super.SetupZones();
// If we have a game class, configure the zones
if (MPI != None && WorldInfo.GRI.GameClass != none)
{
LocalPlayer(Player).ViewportClient.GetViewportSize(ViewportSize);
if (FreeLookZone != none)
{
FreeLookZone.OnProcessInputDelegate = SwipeZoneCallback;
}
}
}
defaultproperties
{} - Next you need to set up the game and compiler for our new example. Edit the Mobile-UDKGame.ini and UDKEngine.ini files in your UDKGameConfig directory.
Mobile-UDKGame.ini
[ExampleCh31.ExampleCh31Game]
RequiredMobileInputConfigs=(GroupName="UberGroup",RequireZoneNames=("UberStickMoveZone",
"UberStickLookZone","UberLookZone"))
UDKEngine.ini
[UnrealEd.EditorEngine]
ModEditPackages=ExampleCh31 - Now compile the code using the Unreal Frontend.
- Start up the Unreal Editor and change the Default Game Type to ExampleCh31Game. Do this by selecting View
 World Properties to bring up the World Properties window and setting the Default Game Type property under the Game Type category.
 - Run the game on the Mobile Previewer by selecting Play On Mobile Previewer from the main menu and you should see something like the following in Figure 3–1.

Figure 3–1. Default First-Person View
You should note that by default the player’s pawn is invisible. The reason for this is that there is no mesh associated with the pawn. You will add that next.
Adding a Skeletal Mesh to represent your pawn
In order to make the player’s pawn visible we can add in a skeletal mesh that would move around with the player’s pawn and be animated to represent the player’s walking. You need to create a new class called Jazz1Pawn and the associated file Jazz1Pawn.uc. See Listing 3–4.
Listing 3–4. Creating a visible pawn
class Jazz1Pawn extends SimplePawn;
defaultproperties
{
Begin Object Class=SkeletalMeshComponent Name=JazzMesh
SkeletalMesh=SkeletalMesh'KismetGame_Assets.Anims.SK_Jazz'
AnimSets(0)=AnimSet'KismetGame_Assets.Anims.SK_Jazz_Anims'
AnimTreeTemplate=AnimTree'KismetGame_Assets.Anims.Jazz_AnimTree'
BlockRigidBody=true
CollideActors=true
End Object
Mesh = JazzMesh; // Set The mesh for this object
Components.Add(JazzMesh); // Attach this mesh to this Actor
}
In the default properties a new SkeletalMeshComponent is defined and named JazzMesh. This is added to the object’s Components array which attaches this mesh to the object’s position and rotation. The pawn’s Mesh variable is also set to the new SkeletalMeshComponent.
JazzMesh is defined by setting the key variables of SkeletalMesh, AnimSets, and AnimTreeTemplate to point to assets in the UDK system. These assets are visible from within the Content Browser.
NOTE: To find the skeletal mesh used here search for a Skeletal Mesh called “sk_jazz” in the Content Browser under the UDKGame package. You should see a skeletal mesh character called “SK_JAZZ”. You can double-click on this asset to bring it up in the AnimSet Editor if you desire. You can also right-click on this asset and select Copy Full Name to ClipBoard to copy this asset’s name for use in your script code. Do this now and bring up a plain text editor like NotePad and paste the text. You should see the following text:
SkeletalMesh'KismetGame_Assets.Anims.SK_Jazz
In the defaultproperties block of the ExampleCh31Game class change the DefaultPawnClass to point to our new pawn class Jazz1Pawn as shown below.
//DefaultPawnClass=class'SimplePawn'
DefaultPawnClass=class'Jazz1Pawn'
Recompile the code and run the game using the ExampleCh31Game game type. You should see a skeletal mesh however at the same time it blocks your view like in Figure 3–2.
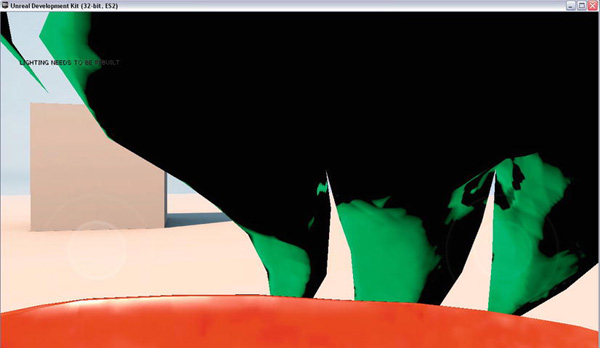
Figure 3–2. Player’s default view with a skeletal mesh attached to the player’s pawn
Obviously, this is not acceptable. By default the position of the camera that represents the player’s view is set directly at the pawn’s location. The skeletal mesh is also set at the pawn location. This overlapping explains this blocked view.
The solution is to move the player’s view backward so that the full skeletal mesh can be viewed and so that the player’s view of the game is not obstructed. In order to do this we must move the camera further away from the pawn.
UDK Camera Overview
The camera system in the UDK involves the camera, the player controller, and the pawn that is controlled by the player controller. These three elements interact to move and rotate the player’s pawn and the player’s view of the world. The way this works is that there are functions in these classes that can be overridden by the programmer to change things like the camera position, camera rotation, or the way the player moves. Changing the camera view from a first-person view to a third-person view where your pawn is visible is easily done. You just need to override a function in the Pawn class.
The player controller takes in user input and then translates this into movement and rotation for its pawn. As discussed in the section on player controllers the functions ProcessMove() and UpdateRotation() can be overridden in a custom player controller class derived from PlayerController to provide custom movements and rotations needed for a specific camera view. Most importantly, the pawn has a function to set the camera’s location and rotation called CalcCamera(). In the following tutorials we will use this function to change the camera views of our pawn.
In our player’s pawn class we would override the CalcCamera() function with our own custom function where we can set the camera location and rotation based on our pawn’s location, rotation, and the kind of camera view we desire. You can set the actual camera location through the out_CamLoc variable and the camera rotation through the out_CamRot variable. Both parameters are declared with the specifier out, which means that setting the value of the variable in the function sets the value of the variable in the caller function.
simulated function bool CalcCamera( float fDeltaTime,
out vector out_CamLoc,
out rotator out_CamRot,
out float out_FOV )
{
// Put in custom code here to control the camera.
}
Hands-on Example: Changing the view of your pawn.
In this tutorial we will show how you can change the view of your pawn so you are able to see it. What we are going to do is override the CalcCamera() function in your custom pawn class to position and rotate the camera to get our desired view.
What you need to do is add some code to your Jazz1Pawn class from ExampleCh31. See Listing 3–5.
NOTE: The Jazz1Pawn class is located in the file Jazz1Pawn.uc. Remember that all UnrealScript classes must have filenames that match the class and have a .uc extension.
Listing 3–5. Modifying the Jazz1Pawn for a third-person view
class Jazz1Pawn extends SimplePawn;
var float CamOffsetDistance;
var int CamAngle;
// Third Person
simulated function bool CalcCamera( float fDeltaTime, out vector out_CamLoc, out rotator
out_CamRot, out float out_FOV )
{
local vector BackVector;
local vector UpVector;
local float CamDistanceHorizontal;
local float CamDistanceVertical;
// Set Camera Location
CamDistanceHorizontal = CamOffsetDistance * cos(CamAngle * UnrRotToRad);
CamDistanceVertical = CamOffsetDistance * sin(CamAngle * UnrRotToRad);
BackVector = -Normal(Vector(Rotation)) * CamDistanceHorizontal;
UpVector = vect(0,0,1) * CamDistanceVertical;
out_CamLoc = Location + BackVector + UpVector;
// Set Camera Rotation
out_CamRot.pitch = -CamAngle;
out_CamRot.yaw = Rotation.yaw;
out_CamRot.roll = Rotation.roll;
return true;
}
defaultproperties
{
Begin Object Class=SkeletalMeshComponent Name=JazzMesh
SkeletalMesh=SkeletalMesh'KismetGame_Assets.Anims.SK_Jazz'
AnimSets(0)=AnimSet'KismetGame_Assets.Anims.SK_Jazz_Anims'
AnimTreeTemplate=AnimTree'KismetGame_Assets.Anims.Jazz_AnimTree'
BlockRigidBody=true
CollideActors=true
End Object
Mesh = JazzMesh; // Set The mesh for this object
Components.Add(JazzMesh); // Attach this mesh to this Actor
CamAngle=3000;
CamOffsetDistance= 484.0
}
The main addition is the function CalcCamera() which actually sets the camera location and rotation. The function does this through the function parameters out_CamLoc, and out_CamRot. These parameters are declared as out which means that when you set the values of out_CamLoc or out_CamRot these values are set in the variables that are used to call this function. By doing this a function can return many values at once to the caller.
The variable CamOffsetDistance holds the distance from the pawn to the camera. The variable CamAngle holds the angle the camera will make with the pawn. The angle is measured in Unreal Rotation units. In Unreal Rotation units PI which is 180 degrees or half a circle is approximately 32000. See Chapter 8 on 3D Math for more information.
The variable CamDistanceHorizontal determines the horizontal distance to the camera from the pawn. The variable CamDistanceVertical determines the vertical distance to the camera from the pawn.
The variable BackVector calculates the vector behind the pawn that is horizontally CamDistanceHorizontal distance away. The variable UpVector calculates the vector that is vertically CamDistanceVertical distance upward. Vectors are discussed in more detail later in this book in Chapter 8.
The variable out_CamRot.pitch controls the up and down tilt of the camera which is set to the CamAngle.
Recompile the code and run the program using the ExampleCh31Game game type and you should see something like Figure 3–3.
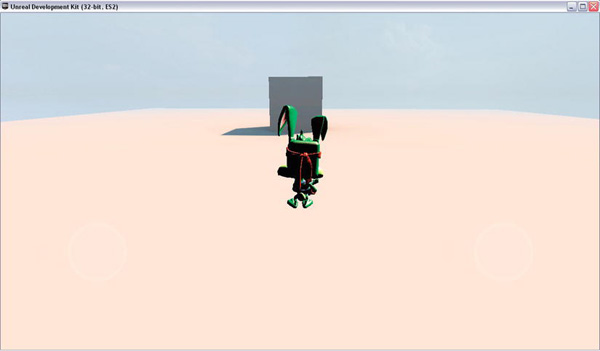
Figure 3–3. Third-Person View Behind Pawn
By playing around with the camera settings in the CalcCamera() function you can easily create other custom camera views such as a top down camera view. For a top down camera view just fix the camera location to a point above the pawn and fix the camera rotation to point downward toward the pawn.
For example, the code in Listing 3–6 sets the camera to a top-down view of the pawn.
Listing 3–6. CalcCamera function for a top-down view
simulated function bool CalcCamera( float fDeltaTime,
out vector out_CamLoc,
out rotator out_CamRot,
out float out_FOV )
{
out_CamLoc = Location;
out_CamLoc.Z += CamOffsetDistance;
if(!bFollowPlayerRotation)
{
out_CamRot.Pitch = -16384;
out_CamRot.Yaw = 0;
out_CamRot.Roll = 0;
}
else
{
out_CamRot.Pitch = -16384;
out_CamRot.Yaw = Rotation.Yaw;
out_CamRot.Roll = 0;
}
return true;
}
The out_CamLoc.Z value sets the height of the camera. The out_CamRot.Yaw value sets the rotation of the camera to follow or not follow the rotation of the camera depending on the value of bFollowPlayerRotation.
UDK Weapons Overview
Using weapons in the UDK system involves the InventoryManager class, Inventory class, and the Weapon class. Weapons are actually inventory items derived from the Inventory class and held as inventory items within a player’s pawn.
Inventory Manager
Each pawn has its own inventory manager that contains links to that pawn’s particular inventory. In the pawn class you have the InvManager variable that holds the inventory manager.
var class<InventoryManager> InventoryManagerClass;
var repnotify InventoryManager InvManager;
The InventoryManagerClass holds the exact class to be used for the InvManager and is set in the defaultproperties block. Thus, you can create your own custom inventory manager classes and set them in your custom pawn in the pawn’s defaultproperties block.
InventoryManagerClass=class'InventoryManager'
Weapon Types
In terms of weapon types the Weapon class supports three different types of weapons defined by the enumeration EweaponFireType. The three different types are:
EWFT_InstantHit: This weapon type causes immediate damage to the object that is in the weapon’s gun sights.EWFT_Projectile: The weapon type spawns a projectile and launches it.EWFT_Custom: This weapon type requires custom code to handle the firing sequence.
enum EWeaponFireType
{
EWFT_InstantHit,
EWFT_Projectile,
EWFT_Custom,
EWFT_None
};
In terms of actually firing weapons, the FireAmmunition() function in the Weapon class can be called on the weapon in order to get it to fire. This function can be used for all types of weapons including instant hit, projectile, and custom weapons. This function also processes ammo consumption. See Listing 3–7.
Listing 3–7. Firing your weapon’s ammunition
simulated function FireAmmunition()
{
// Use ammunition to fire
ConsumeAmmo( CurrentFireMode );
// Handle the different fire types
switch( WeaponFireTypes[CurrentFireMode] )
{
case EWFT_InstantHit:
InstantFire();
break;
case EWFT_Projectile:
ProjectileFire();
break;
case EWFT_Custom:
CustomFire();
break;
}
NotifyWeaponFired( CurrentFireMode );
}
For weapons that fire projectiles you are able to fully customize the actual projectile. The class Projectile is used to define the basic projectile. You can create custom projectiles by subclassing this and creating your own class that derives from Projectile.
Weapon States
The Weapon class defines several different states. UnrealScript has built in support for the concept of states. A state is defined by the state keyword and its basic structure is similar to the following. An example of a state is the Active state in the Weapon class. See Listing 3–8.
Listing 3–8. The Weapon class’s Active state
simulated state Active
{
/** Initialize the weapon as being active and ready to go. */
simulated event BeginState(Name PreviousStateName)
{
local int i;
// Cache a reference to the AI controller
if (Role == ROLE_Authority)
{
CacheAIController();
}
// Check to see if we need to go down
if( bWeaponPutDown )
{
`LogInv("Weapon put down requested during transition, put it down now");
PutDownWeapon();
}
else if ( !HasAnyAmmo() )
{
WeaponEmpty();
}
else
{
// if either of the fire modes are pending, perform them
for( i=0; i<GetPendingFireLength(); i++ )
{
if( PendingFire(i) )
{
BeginFire(i);
break;
}
}
}
}
/** Override BeginFire so that it will enter the firing state right away. */
simulated function BeginFire(byte FireModeNum)
{
if( !bDeleteMe && Instigator != None )
{
Global.BeginFire(FireModeNum);
// in the active state, fire right away if we have the ammunition
if( PendingFire(FireModeNum) && HasAmmo(FireModeNum) )
{
SendToFiringState(FireModeNum);
}
}
}
/**
ReadyToFire() called by NPC firing weapon. bFinished should only be true if called from
the Finished() function
*/
simulated function bool ReadyToFire(bool bFinished)
{
return true;
}
/** Activate() ignored since already active
*/
simulated function Activate()
{
}
/**
* Put the weapon down
*/
simulated function bool TryPutDown()
{
PutDownWeapon();
return TRUE;
}
}
For example, when the weapon is in the Active state it has access to a certain set of functions unique to the Active state such as a custom BeginFire() function. The Weapon class can switch from one state to another through the GotoState('StateName') command. It also has built in functions BeginState() that is executed when the state is first entered and EndState() that is executed just before leaving the state. States are covered more in depth later in this book. Specifically, more coverage and examples of how to use states are given in Chapters 5, 7, 8, 10, 11, and 12.
Some important states in the Weapon class are as follows:
Inactive: Weapon can not be fired and is not in use.Active: Weapon is being held by the pawn and is in use and can be fired.WeaponFiring: Weapon is being held by the pawn and is being fired.WeaponEquipping: Weapon is in this state when moving from theInactivestate to theActivestate. Weapon selection animations should be done in this state. Weapon can not be fired when in this state.WeaponPuttingDown: Weapon is in the state where it is being put down and is moving to theInactivestate. Any weapon deactivation animations should be played in this state.
Weapon Selection
To activate a weapon from your inventory call the SetCurrentWeapon(Weapon DesiredWeapon) function on your inventory manger with the desired weapon. If you have a weapon active and it is different from the new weapon then the pawn will try to put the current weapon down by calling the weapon’s TryPutdown() function. The weapon is then put into the WeaponPuttingDown state and then moved into the Inactive state. Then from there the inventory manager’s ChangedWeapon() function is called.
If the pawn has no weapon currently active then the pawn will switch to the target weapon and activate it for use by calling ChangedWeapon(). This function will then call the weapon’s Activate() function. The Activate() function puts the weapon into the WeaponEquipping state which leads to the Active state where the weapon is fully operational and ready to fire.
For example, to set MainGun as the current weapon you would use the following line of code in your pawn class.
InvManager.SetCurrentWeapon(Weapon(MainGun));
Weapon Firing
The weapon firing sequence for a player starts in the PlayerController class’s StartFire() function. The StartFire() function associated with the controller’s pawn is then called. In the Pawn class the StartFire() function associated with the pawn’s current weapon is called. The weapon’s StartFire() function calls the BeginFire() function which calls the SetPendingFire() function which sets the PendingFire variable array in the InventoryManager class to indicate that the weapon needs to fire. If the weapon is in the Active state then the SendToFiringState() function is also called. If the FiringStatesArray contains a valid weapon state for the requested FireMode then this state will be transitioned to using the command:
GotoState ( FiringStatesArray[FireModeNum] )
The default state for handling the actual firing of the weapon is the WeaponFiring state.
The WeaponFiring state then calls the FireAmmunition() function where the weapon is actually fired based on the type of weapon such instant hit, projectile or custom. To stop the weapon from firing you must call the StopFire() function.
On the iOS platform you can put the weapon firing code in the SwipezoneCallback() function in the player controller as shown in Listing 3–9.
Listing 3–9. Firing a Weapon from the player controller on iOS
function bool SwipeZoneCallback(MobileInputZone Zone,
float DeltaTime,
int Handle,
EZoneTouchEvent EventType,
Vector2D TouchLocation)
{
local bool retval;
retval = true;
if (EventType == ZoneEvent_Touch)
{
// Start Firing pawn's weapon
StartFire(0);
}
else
if(EventType == ZoneEvent_Update)
{
}
else
if (EventType == ZoneEvent_UnTouch)
{
// Stop Firing Pawn's weapon
StopFire(0);
}
return retval;
}
In the above example the player’s pawn starts firing when the user touches the screen and stops firing when the user lifts his finger.
Hands-on Example: Adding a weapon to your pawn
In this tutorial we will be adding a weapon to the pawn from the last tutorial. The weapon will be a custom class derived from the Weapon class and fire a custom projectile that is derived from the Projectile class. We will also be creating a new InventoryManager class to manage this new weapon. Finally, in order to use this weapon we will need to modify the player controller and add code that will actually fire the weapon.
Creating the Weapon
Create a new file called “JazzWeapon1.uc” with the following code. The new class JazzWeapon1 is our custom weapon.
We are going to add to the code from the previous example so all code for this example will go to the Classes directory at:
C:UDKUDK-2011-06DevelopmentSrcExampleCh31
See Listing 3–10 for the JazzWeapon1 code.
Listing 3–10. Creating a Weapon
class JazzWeapon1 extends Weapon;
defaultproperties
{
Begin Object Class=SkeletalMeshComponent Name=FirstPersonMesh
SkeletalMesh=SkeletalMesh'KismetGame_Assets.Anims.SK_JazzGun'
End Object
Mesh=FirstPersonMesh
Components.Add(FirstPersonMesh);
Begin Object Class=SkeletalMeshComponent Name=PickupMesh
SkeletalMesh=SkeletalMesh'KismetGame_Assets.Anims.SK_JazzGun'
End Object
DroppedPickupMesh=PickupMesh
PickupFactoryMesh=PickupMesh
WeaponFireTypes(0)=EWFT_Projectile
WeaponFireTypes(1)=EWFT_NONE
WeaponProjectiles(0)=class'JazzBullet1'
WeaponProjectiles(1)=class'JazzBullet1'
FiringStatesArray(0)=WeaponFiring
FireInterval(0)=0.25
Spread(0)=0
}
The actual gun mesh is created as a SkeletalMeshComponent and assigned to the Weapon’s Mesh variable and added to this object’s location and rotation through the Components array.
Next a pickup mesh is defined which is the mesh that is placed into the world when the weapon is dropped by the holder.
Weapon fire types are defined by the WeaponFireTypes array in the Weapon class. For fire mode 0 we define the type of weapon that is to be fired as a projectile weapon.
WeaponFireTypes(0)=EWFT_Projectile
If the type of weapon to be used is a Projectile weapon then we need to specify the specific sub class of Projectile to use. For firemode 0 we choose the JazzBullet1 class.
WeaponProjectiles(0)=class'JazzBullet1'
The FiringStatesArray holds the state the weapon transitions to when actually firing. The weapon that uses firing mode 0 is set to the default firing state of WeaponFiring.
FiringStatesArray(0)=WeaponFiring
The FireInterval array holds the how long a shot takes for a specific fire mode. The length that a shot takes for firemode 0 is 0.25 seconds.
FireInterval(0)=0.25
The Spread refers to how much of a distance there is between shots.
Spread(0)=0
The following Figure 3–4 is a preview of our final working weapon JazzWeapon1.

Figure 3–4. Preview of your pawn holding our custom weapon
Creating the Bullets for the Weapon
Next we need to create a new file “JazzBullet1.uc” for our custom projectile (shown in Listing 3–11). Create this file and enter the following code into it and save it like you did before with our custom weapon class. The directory to save this new source file under would be:
C:UDKUDK-2011-06DevelopmentSrcExampleCh31Classes
Listing 3–11. JazzBullet1 weapon projectile
class JazzBullet1 extends Projectile;
simulated function Explode(vector HitLocation, vector HitNormal)
{
}
function Init( Vector Direction )
{
local vectorNewDir;
NewDir = Normal(Vector(InstigatorController.Pawn.Rotation));
Velocity = Speed * NewDir;
}
defaultproperties
{
Begin Object Class=StaticMeshComponent Name=Bullet
StaticMesh=StaticMesh'EngineMeshes.Sphere'
Scale3D=(X=0.050000,Y=0.050000,Z=0.05000)
End Object
Components.Add(Bullet)
Begin Object Class=ParticleSystemComponent Name=BulletTrail
Template=ParticleSystem'Castle_Assets.FX.P_FX_Fire_SubUV_01'
End Object
Components.Add(BulletTrail)
MaxSpeed=+05000.000000
Speed=+05000.000000
}
The Explode() function is overridden because we want the projectile to stay around for awhile and demonstrate how we can attach a particle emitter to a projectile for special effects.
The Init() function is called after the projectile is created and sets its starting direction and speed. Here we need to override it to set the direction it is firing to point in the direction the pawn is facing.
The actual mesh for the bullet is a StaticMeshComponent named Bullet. Here we set the Scale3D variable to shrink the mesh in size before it is placed into the world.
We also attach a particle emitter which is a ParticleSystemComponent named BulletTrail to this projectile. The actual name of the particle emitter is assigned to the Template variable. Particle emitters can be viewed in the Content Browser and viewed in Unreal Cascade.
The MaxSpeed variable is set to a new maximum speed from the default value. The Speed variable is also set to a new value from the default.
Creating the Custom Inventory Manager
Next we need to create a custom inventory manager. See Listing 3–12.
Listing 3–12. WeaponsIM1 class
class WeaponsIM1 extends InventoryManager;
defaultproperties
{
PendingFire(0)=0
PendingFire(1)=0
}
The reason we need to do this is because we need to create entries for the PendingFire array that holds the fire status of your weapon. By default this array is empty. You need to create these entries so that they can be set when the weapon is ready to fire.
Modifying the Player’s PawnNow you need to make some changes to your custom Pawn from the last example Jazz1Pawn. See Listing 3–13.
class Jazz1Pawn extends SimplePawn;
var float CamOffsetDistance;
var int CamAngle;
var Inventory MainGun;
simulated singular event Rotator GetBaseAimRotation()
{
local rotator TempRot;
TempRot = Rotation;
TempRot.Pitch = 0;
SetRotation(TempRot);
return TempRot;
}
function AddGunToSocket(Name SocketName)
{
local Vector SocketLocation;
local Rotator SocketRotation;
if (Mesh != None)
{
if (Mesh.GetSocketByName(SocketName) != None)
{
Mesh.GetSocketWorldLocationAndRotation(SocketName, SocketLocation,
SocketRotation);
MainGun.SetRotation(SocketRotation);
MainGun.SetBase(Self,, Mesh, SocketName);
}
else
{
WorldInfo.Game.Broadcast(self,"!!!!!!SOCKET NAME NOT FOUND!!!!!");
}
}
else
{
WorldInfo.Game.Broadcast(self,"!!!!!!MESH NOT FOUND!!!!!");
}
}
function AddDefaultInventory()
{
MainGun = InvManager.CreateInventory(class'JazzWeapon1'),
MainGun.SetHidden(false);
AddGunToSocket('Weapon_R'),
Weapon(MainGun).FireOffset = vect(0,0,-70);
}
/////////////////////////////// Third Person View ////////////////////////////////////
simulated function bool CalcCamera( float fDeltaTime, out vector out_CamLoc,
out rotator out_CamRot, out float out_FOV )
{
local vector BackVector;
local vector UpVector;
local float CamDistanceHorizontal;
local float CamDistanceVertical;
// Set Camera Location
CamDistanceHorizontal = CamOffsetDistance * cos(CamAngle * UnrRotToRad);
CamDistanceVertical = CamOffsetDistance * sin(CamAngle * UnrRotToRad);
BackVector = -Normal(Vector(Rotation)) * CamDistanceHorizontal;
UpVector = vect(0,0,1) * CamDistanceVertical;
out_CamLoc = Location + BackVector + UpVector;
// Set Camera Rotation
out_CamRot.pitch = -CamAngle;
out_CamRot.yaw = Rotation.yaw;
out_CamRot.roll = Rotation.roll;
return true;
}
defaultproperties
{
Begin Object Class=SkeletalMeshComponent Name=JazzMesh
SkeletalMesh=SkeletalMesh'KismetGame_Assets.Anims.SK_Jazz'
AnimSets(0)=AnimSet'KismetGame_Assets.Anims.SK_Jazz_Anims'
AnimTreeTemplate=AnimTree'KismetGame_Assets.Anims.Jazz_AnimTree'
BlockRigidBody=true
CollideActors=true
End Object
Mesh = JazzMesh; // Set The mesh for this object
Components.Add(JazzMesh); // Attach this mesh to this Actor
CamAngle=3000;
CamOffsetDistance= 484.0
InventoryManagerClass=class'WeaponsIM1'
}
First we added in an Inventory item called MainGun which holds a reference to the custom weapon.
The function GetBaseAimRotation() will change the pawn’s aiming to reflect our third-person viewpoint where the player’s viewpoint does not move up and down.
The AddGunToSocket() function adds the custom weapon to a socket which is a dummy attachment point on the character mesh which when used with a weapon makes it appear that the character is holding the weapon. Sockets are created within the AnimSet Editor.
The AddDefaultInventory() function is automatically called when the game begins and adds in our custom weapon to the pawn’s inventory.
The InventoryManagerClass variable is set to the custom InventoryManager class.
Adding to the Player Controller
In our player controller class ExampleCh31PC in the SwipeZoneCallback() function we need to add in the commands StartFire(0) for a touch event to begin firing the player’s weapon and StopFire(0) for an untouch event to stop firing the player’s weapon. See Listing 3–14.
Listing 3–14. Adding to the Player Controller
function bool SwipeZoneCallback(MobileInputZone Zone,
float DeltaTime,
int Handle,
EZoneTouchEvent EventType,
Vector2D TouchLocation)
{
local bool retval = true;
if (EventType == ZoneEvent_Touch)
{
WorldInfo.Game.Broadcast(self,"You touched the screen at = "
@ TouchLocation.x @ " , "
@ TouchLocation.y @ ", Zone Touched = "
@ Zone);
// Start Firing pawn's weapon
StartFire(0);
}
else if(EventType == ZoneEvent_Update)
{
}
else if (EventType == ZoneEvent_UnTouch)
{
// Stop Firing Pawn's weapon
StopFire(0);
}
return retval;
}
Recompile and run the game on the Unreal Editor using our custom game type. You should now be able to touch anywhere on the screen except for the joysticks and fire your weapon. See Figure 3–5.
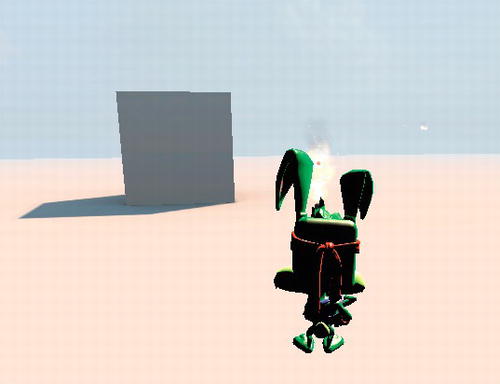
Figure 3–5. Demonstration of your new weapon
Also note how your bullets emit a fire from the particle emitter (see Figure 3–6).
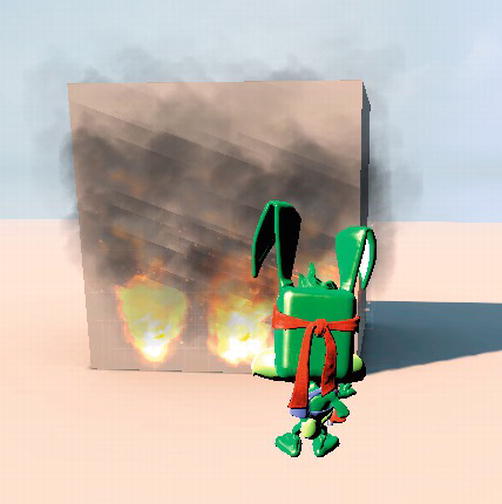
Figure 3–6. Flames come from your bullets via the fire particle emitter
Hands-On Example: Adding a weapon to your first-person view.
In this tutorial we will be creating another custom weapon and putting it into a first-person view. First, create a new directory called ExampleCh32 under our source directory which by default is:
C:UDKUDK-2011-06DevelopmentSrc
This is for the June 2011 UDK. If you are using a different version of the UDK then your directory may be different. Under this new directory create another directory called Classes. As in the previous examples you will put all the source code for this example in this Classes directory.
Creating the Weapon
Our custom weapon class is JazzWeapon2. The only difference is that this weapon will be firing a different kind of bullet as defined in the JazzBullet2 class. See Listing 3–15.
Listing 3–15. JazzWeapon2 class
class JazzWeapon2 extends Weapon;
defaultproperties
{
Begin Object Class=SkeletalMeshComponent Name=FirstPersonMesh
SkeletalMesh=SkeletalMesh'KismetGame_Assets.Anims.SK_JazzGun'
End Object
Mesh=FirstPersonMesh
Components.Add(FirstPersonMesh);
Begin Object Class=SkeletalMeshComponent Name=PickupMesh
SkeletalMesh=SkeletalMesh'KismetGame_Assets.Anims.SK_JazzGun'
End Object
DroppedPickupMesh=PickupMesh
PickupFactoryMesh=PickupMesh
WeaponFireTypes(0)=EWFT_Projectile
WeaponFireTypes(1)=EWFT_NONE
WeaponProjectiles(0)=class'JazzBullet2'
WeaponProjectiles(1)=class'JazzBullet2'
FiringStatesArray(0)=WeaponFiring
FireInterval(0)=0.25
Spread(0)=0
}
Creating the Projectile for the Weapon
The code for the JazzBullet2 class is as follows. See Listing 3–16.
Listing 3–16. JazzBullet2 class
class JazzBullet2 extends Projectile;
simulated function Explode(vector HitLocation, vector HitNormal)
{
SetPhysics(Phys_Falling);
}
function Init( Vector Direction )
{
super.Init(Direction);
RandSpin(90000);
}
defaultproperties
{
Begin Object Class=StaticMeshComponent Name=Bullet
StaticMesh=StaticMesh'Castle_Assets.Meshes.SM_RiverRock_01'
Scale3D=(X=0.300000,Y=0.30000,Z=0.3000)
End Object
Components.Add(Bullet)
Begin Object Class=ParticleSystemComponent Name=BulletTrail
Template=ParticleSystem'Castle_Assets.FX.P_FX_Fire_SubUV_01'
End Object
Components.Add(BulletTrail)
MaxSpeed=+05000.000000
Speed=+05000.000000
}
The Explode() will now change the physics model for the projectile so that when it hits another object it will fall to the ground. The Init() will now set a random spin to the object being thrown which is now a rock.
Creating the Pawn
The new pawn class is Jazz2Pawn. This pawn uses a different weapon JazzWeapon2 in the AddDefaultInventory() function. However, we don’t need to change the InventoryManager class. See Listing 3–17.
Listing 3–17. Jazz2Pawn class
class Jazz2Pawn extends SimplePawn;
var Inventory MainGun;
function AddDefaultInventory()
{
MainGun = InvManager.CreateInventory(class'JazzWeapon2'),
MainGun.SetHidden(false);
Weapon(MainGun).FireOffset = vect(0,0,-70);
}
defaultproperties
{
InventoryManagerClass=class'WeaponsIM1'
}
Creating the Player Controller
We need a new player controller class which is called ExampleCh32PC. See Listing 3–18. A lot of the code is the same as ExampleCh31PC except for the PlaceWeapon() function and the PlayerTick() function.
- The
PlaceWeapon()function actually does the work of putting the weapon mesh into the first-person view. Depending on exactly how your weapon mesh is oriented your weapon rotation offsets may be different than this example. - The
PlayerTick()function is overridden and thePlaceWeapon()function is called from here to constantly update the position and rotation of our first-person weapon.
Listing 3–18. Player Controller class
class ExampleCh32PC extends SimplePC;
function bool SwipeZoneCallback(MobileInputZone Zone,
float DeltaTime,
int Handle,
EZoneTouchEvent EventType,
Vector2D TouchLocation)
{
local bool retval = true;
if (EventType == ZoneEvent_Touch)
{
// Start Firing pawn's weapon
StartFire(0);
}
else if(EventType == ZoneEvent_Update)
{
}
else if (EventType == ZoneEvent_UnTouch)
{
// Stop Firing Pawn's weapon
StopFire(0);
}
return retval;
}
function SetupZones()
{
Super.SetupZones();
// If we have a game class, configure the zones
if (MPI != None && WorldInfo.GRI.GameClass != none)
{
LocalPlayer(Player).ViewportClient.GetViewportSize(ViewportSize);
if (FreeLookZone != none)
{
FreeLookZone.OnProcessInputDelegate = SwipeZoneCallback;
}
}
}
function PlaceWeapon()
{
// First Person
local vector WeaponLocation;
local Rotator WeaponRotation,TempRot;
local Weapon TestW;
local vector WeaponAimVect;
WeaponRotation.yaw = -16000; // 90 Degrees turn = OFFSET
TempRot = Pawn.GetBaseAimRotation();
WeaponRotation.pitch = TempRot.roll;
WeaponRotation.yaw += TempRot.yaw;
WeaponRotation.roll -= TempRot.pitch; // Swith due to weapon local axes orientation
WeaponAimVect = Normal(Vector(TempRot));
WeaponLocation = Pawn.Location + (40 * WeaponAimVect) + vect(0,0,30);
TestW = Pawn.Weapon;
if (TestW != None)
{
TestW.SetLocation(WeaponLocation);
TestW.SetRotation(WeaponRotation);
}
else
{
WorldInfo.Game.Broadcast(self,"Player has no weapon!!!!!");
}
}
function PlayerTick(float DeltaTime)
{
Super.PlayerTick(DeltaTime);
PlaceWeapon();
}
defaultproperties
{
}
Creating a New Game Type
Finally, create a new class for our new game type. See Listing 3–19.
Here, the key changes are that we set the PlayerControllerClass to point to the new ExampleCh32PC player controller class and set the DefaultPawnClass to Jazz2Pawn which will be the player’s pawn.
Listing 3–19. Game Type class
class ExampleCh32Game extends FrameworkGame;
event OnEngineHasLoaded()
{
WorldInfo.Game.Broadcast(self," ExampleCh32Game Type Active - Engine Has Loaded
!!!!");
}
function bool PreventDeath(Pawn KilledPawn, Controller Killer, class<DamageType>
DamageType, vector HitLocation)
{
return true;
}
static event class<GameInfo> SetGameType(string MapName, string Options, string Portal)
{
return super.SetGameType(MapName, Options, Portal);
}
defaultproperties
{
PlayerControllerClass=class' ExampleCh32.ExampleCh32PC'
DefaultPawnClass=class'Jazz2Pawn'
HUDType=class'UDKBase.UDKHUD'
bRestartLevel=false
    bWaitingToStartMatch=true

    bDelayedStart=false

}
Setting up your new Game Type
Next you need to set up the game and compiler for our new example. Edit the Mobile-UDKGame.ini and UDKEngine.ini files in your UDKGameConfig directory.
Mobile-UDKGame.ini

[ExampleCh32.ExampleCh32Game]

RequiredMobileInputConfigs=(GroupName="UberGroup",RequireZoneNames=("UberStickMoveZone",

"UberStickLookZone","UberLookZone"))

UDKEngine.ini

[UnrealEd.EditorEngine]

ModEditPackages=ExampleCh32
Running the new Game Type
Compile and run our new game using the Unreal Editor. Make sure to set your game type to ExampleCh32Game under the Default Game Type property. You should be able to move your view up and down and left and right. The weapon should be visible and you should be able to fire flaming rocks into the air (see Figure 3–7).
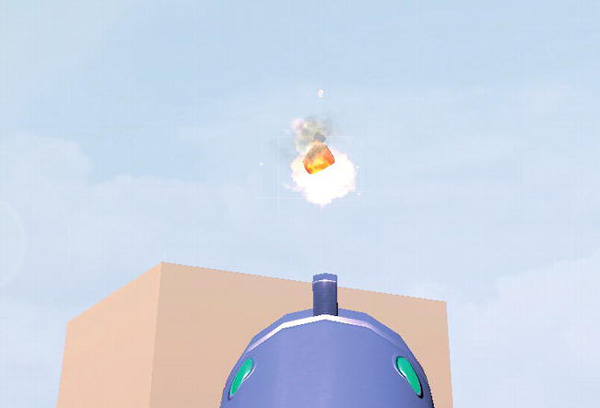
Figure 3–7. Shooting flaming rocks into the air with your new weapon in a first-person view.
Also, you should see your new projectiles bounce off of an object when it is hit. For example try to hit a static mesh object to see the rocks bounce off it and hit the ground, as shown in Figure 3–8.
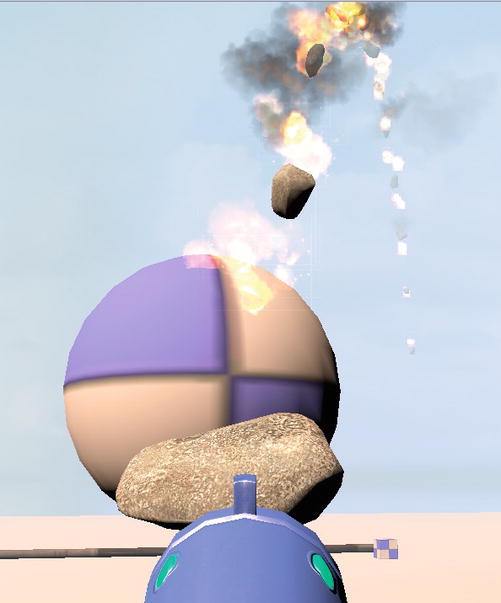
Figure 3–8. Weapon’s projectiles bouncing off a sphere l
Summary
In this chapter we have shown you how to make the player’s pawn visible by adding a skeletal mesh. Then we demonstrated how to change the camera angle so you can view your pawn from the third-person perspective. Next, we added a weapon to our pawn and showed you how to set it up and fire it. Finally, we changed the view to a first-person view and demonstrated how we could place a weapon within this view and have it rotate up/down and left/right and move correctly with the player’s view. In the following chapters we will build on the knowledge gained here to eventually build entire games using the UDK.
Specifically, in the next chapter which covers UDK collisions we take a look at how to create realistic complex collisions using the UDK physics engine. We also examine such topics as physics constraints that the UDK uses to bind objects together and have them behave realistically when interacting with each other and the environment.