Chapter 10
First-Person Shooter Game Framework
This chapter provides a framework for a first-person shooter based on a one-on-one deathmatch type combat game. The gameplay consists of a one player vs. one computer-controlled bot taking place in a level full of crates that serve as cover for the bot. Both the player and bot are respawned upon death.
This framework provides for a:
- First-person perspective weapon view and operation
- Custom bot controller that moves from cover to cover and attacks the player
- Spawning a bot on a spawnpad determined at random
- Custom HUD
- Health Power Up
- Mechanism to respawn dead bots and players
First the overall game framework will be discussed in both general and specific terms. This is followed by the actual hands-on example which will present the actual game framework.
Game Framework Overview
In this section we will cover a general overview and a specific overview for this chapter's game framework. The general overview will give you an idea of the key features of the game framework and the specific overview discusses features of the game framework in code-specific terms and tells you how you might be able to modify the framework for your own custom needs.
General Overview
This framework provides for a first-person player world viewpoint with a weapon that is visible within this view. The weapon is placed so that the player appears to be holding it. This framework can be modified to add in a different weapon and to place this new weapon in a different position within the player's view if needed.
A basic framework for a computer controlled bot that can use the cover nodes feature of the UDK is presented. The bot framework also features the ability to attack the player and to retrieve health powerups when its health is below a certain level. You can change the bot's behavior by adding in new states or modifying the states that already exist.
A method to randomly select a spawnpad from a set of spawnpads is presented. Code for respawning the enemy bot on one of these spawnpads is also given.
A custom Heads Up Display or HUD is presented. You can extend this HUD by adding or eliminating items to display using the existing HUD items in the framework as a guide.
A method to process health powerups is given in this game framework. This method could be expanded to include other types of powerups such as weapon powerups.
Specific Overview
In terms of generating a first-person perspective for weapons, the PlaceWeapon() function located in the player controller ExampleCh10PC actually does the work of placing the weapon 3d mesh in the 3d world in front of the player. In the JazzCh10Pawn class which is the player's pawn the function AddDefaultInventory() initialized the player's weapon which is the JazzWeaponCh10 class and adds it into the player's inventory. The WeaponsIM1 class is set as the inventory manager for the player's pawn.
You can expand on this basic framework through creating a new weapon and replacing it with the one now used by changing the JazzWeaponCh10 weapon to your custom weapon in the CreateInventory() function in the AddDefaultInventory() function. For example, the code
InvManager.CreateInventory(class'YourCustomWeaponClass'),
would place your new custom weapon in the player's inventory.
The bot controller is BotAttackCoverController and consists of three states:
TakeCover—Bot moves to the cover node specified in theCurrentGoalvariable. When the target cover node is reached, thenBotInCoveris set to true.GettingHealthPickup—Bot moves to the location of the Bonus specified in theCurrentGoalvariable. When the Bonus has been reached thenbGotHealthPickupis set to true.AttackingEnemy—Bot moves toward the enemy specified by theBotThreatvariable and stopsAttackOffsetDistdistance from the threat if there is a clear path to the threat and then setsbAttackDoneto true. Bot fires its weapon during this state.
When the bot is spawned it goes into the TakeCover state and the bot takes cover from the player. Once in cover, if the bot has health that is lower than the HealthPickupTrigger variable and a health powerup is available, it goes into the GettingHealthPickup state, picks up the bonus health, and then returns to the TakeCover state. If the bot is in cover and has been in the TakeCover state greater than the AttackTimeInterval time, then the bot goes into the AttackEnemy state and attacks the player. Once the attack is finished then the bot goes back into the TakeCover state and takes cover from the player.
You can extend this bot behavior by adding new states to the bot controller or changing the way the current states interact with one another.
In the BotPawnCh10 class, which is the enemy bot's pawn class, the function GetRandomSpawnPosition() chooses a random pad from those in the game level and returns the position of that pad so that a new enemy bot can be respawned there.
You can expand this feature by increasing the number of pads available to the bot or how the bot selects a new pad to respawn on.
The game's custom HUD is defined in the class FPSHUD, and you can easily extend this class to provide for modifications of the key statistics displayed in the game.
The health powerup is implemented in the class Bonus1 and can be used as a starting point template for other powerups you may have in mind.
Hands-On Example: First-Person Shooter Game Framework
In this hands-on example we build a first-person shooter deathmatch style game that involves one enemy computer controlled bot and one player. The bot will move from cover to cover and attack the player, retrieving health bonus powerups as needed. This section covers creating code for the game type, player related classes, enemy bot related classes, the HUD, and the health bonus powerup. Then a new game level is created and the game is configured to run on the mobile previewer.
Creating the Game Type
The first thing we need to do is create a new directory for the code for this project. Create the ExampleCh10 directory under your default UDK installation directory at C:UDKUDK-2011-06DevelopmentSrc. (This is for the June 2011 UDK. If you are using a different version of the UDK then this directory will be different.) Create a directory called Classes under the new directory you just created and put all your source code files in this directory.
Create the following class (see Listing 10–1) and save it under the filename “ExampleCh10Game.uc”. Again as with all previous examples in this book the filenames must match the classnames and the file extension must be “.uc”. The code in bold is specific to this example. (See the hands-on example in Chapter 2 for an example of the base game type class.)
In the listing, note the following variables:
- The variable
Scoreholds the player's score. - The variable
MaxSpawnPadsholds the maximum number of bot spawn pads in the level. - The variable
bGameOverindicates whether the current game is over.
Also, notice the following classes:
- The
PlayerControllerClassis set to the custom player controller class for this framework. - The
DefaultPawnClassis set to the custom player pawn for this framework. - The
HUDTypeis set to the custom HUD class for this framework.
Listing 10–1. Game Type
class ExampleCh10Game extends FrameworkGame;

var int Score;

var int MaxSpawnPads;

var bool bGameOver;

event OnEngineHasLoaded()

{

    WorldInfo.Game.Broadcast(self,"ExampleCh10Game Type Active - Engine Has Loaded !!!!");

}

function bool PreventDeath(Pawn KilledPawn, Controller Killer, class<DamageType> DamageType, vector HitLocation)

{

    return true;

}

static event class<GameInfo> SetGameType(string MapName, string Options, string Portal)

{

    return super.SetGameType(MapName, Options, Portal);

}

defaultproperties

{

    PlayerControllerClass=class'ExampleCh10.ExampleCh10PC'

    DefaultPawnClass=class'JazzCh10Pawn'

    HUDType=class'FPSHUD'

    bRestartLevel=false

    bWaitingToStartMatch=true

    bDelayedStart=false

    Score = 0
    MaxSpawnPads = 4

    bGameOver = false;

}
FRAMEWORK NOTE: You can expand the number of bot spawnpads in the level by increasing the MaxSpawnPads variable and placing additional number of spawnpads in your level using the Unreal Editor and setting the PadNumber in each additional pad.
Creating the Player-Related Classes
Next, we need to create the player related classes. These classes include the player controller, the player's pawn, the player's weapon, and the player's projectile that is fired from the weapon.
Creating the Player Controller
In this section we will discuss the player controller class. For a full version of this code without the explanations, please download the source code for this book.
The first part of the code, shown in Listing 10–2, covers the class variables and the function that resets the player:
- The variable
EnemyBotholds a reference to the enemy bot's controller and theEnemyPawnvariable holds a reference to the enemy bot's pawn. These variables are used in creating the enemy bot controller and enemy bot pawn when the player controller is first initialized. - The
SpawnPadLocationsarray holds the locations of the enemy bot's spawn pads for this level. - The
ResetGame()function resets key game variables such as player's score and player's health after the player dies and is respawned.
Listing 10–2. Resetting the Game
class ExampleCh10PC extends SimplePC;


var Controller EnemyBot;

Var Pawn EnemyPawn;

var bool BotSpawned;

var Actor BotTarget;

var bool bGameOver;

var array<vector> SpawnPadLocations;

function ResetGame()

{

    ExampleCh10Game(WorldInfo.Game).bGameOver = false;

    ExampleCh10Game(WorldInfo.Game).Score = 0;

    Pawn.Health = 100;
    Pawn.SetHidden(false);

    Pawn.Weapon.SetHidden(false);

    Pawn.SetLocation(JazzCh10Pawn(Pawn).InitialLocation);

}
The next piece of code, shown in Listing 10–3, covers the creation or spawning of the enemy bot. These are the important elements:
- The
FindSpawnPad()function finds the spawnpad in the level that has aPadNumberequal to the input parameter and returns a reference to it orNoneif no pad is found. - The
SpawnBot()function spawns the enemy bot at a location in the 3d world with a bot controllerBotAttackCoverControllerand bot pawnBotPawnCh10and initializes it. - The function
SpawnBotOnRandomPad()randomly chooses a bot spawn pad in the level. It then finds a reference to the pad using theFindSpawnPad()function and creates this bot at that location using theSpawnBot()function.
Listing 10–3. Spawning Bots
function Actor FindSpawnPad(int PadNumber)

{

    local BotSpawnPad TempSpawnPad;

    local Actor ReturnSpawnPad;


    ReturnSpawnPad = None;

    foreach AllActors(class'BotSpawnPad', TempSpawnPad)

    {

        SpawnPadLocations.Additem(TempSpawnPad.Location);

        if(TempSpawnPad.PadNumber == PadNumber)

        {

            ReturnSpawnPad = TempSpawnPad;

        }

    }

    return ReturnSpawnPad;

}

function SpawnBot(Vector SpawnLocation, optional Vector Offset)

{

    SpawnLocation = SpawnLocation + Offset;

    EnemyBot = Spawn(class'BotAttackCoverController',,,SpawnLocation;

    EnemyPawn = Spawn(class'BotPawnCh10',,,SpawnLocation);

    EnemyBot.Possess(EnemyPawn,false);

    BotAttackCoverController(EnemyBot).BotThreat = Pawn;

    BotPawnCh10(EnemyPawn).AddDefaultInventory();

    BotPawnCh10(EnemyPawn).InitialLocation = SpawnLocation;

    BotPawnCh10(EnemyPawn).SpawnPadLocations = SpawnPadLocations;

    EnemyPawn.SetPhysics(PHYS_Falling);

}

function SpawnBotOnRandomPad(vector AlternateLocation, vector offset)

{

    local int RandomPadNumber;

    local Actor SpawnPad;

    local int MaxPads;
    MaxPads = ExampleCh10Game(WorldInfo.Game).MaxSpawnPads;

    RandomPadNumber = Rand(MaxPads);// Number from 0 to Max-1.

    WorldInfo.Game.Broadcast(self,"RANDOMPADNUMBER = " @ RandomPadNumber);

    SpawnPad = FindSpawnPad(RandomPadNumber);

    if (SpawnPad != None)

    {

        SpawnBot(SpawnPad.Location, offset);

    }

    else

    {

        SpawnBot(AlternateLocation, Offset);

    }

}
The next piece of code, which is in Listing 10–4, deals with player touch input. Again, the bold code is specific to this example, and the base code for the functions in this listing can be found in the hands-on example in Chapter 2.
In the SwipeZoneCallback() function code has been added to reset our game and to fire our weapon.
Listing 10–4. Player Input
function bool SwipeZoneCallback(MobileInputZone Zone,

                                 float DeltaTime,

                                 int Handle,

                                 EZoneTouchEvent EventType,

                                 Vector2D TouchLocation)

{

    local bool retval;

    retval = true;

    if (EventType == ZoneEvent_Touch)

    {

        // Reset Game

        if (ExampleCh10Game(WorldInfo.Game).bGameOver)

        {

            ResetGame();

        }

        else

        {

            // Start Firing pawn's weapon

        StartFire(0);

        }

    }

    else

    if(EventType == ZoneEvent_Update)

    {

    }

    else

    if (EventType == ZoneEvent_UnTouch)

    {

        // Stop Firing Pawn's weapon

        StopFire(0);

    }

    return retval;
}


function SetupZones()

{

    Super.SetupZones();

    // If we have a game class, configure the zones

    if (MPI != None && WorldInfo.GRI.GameClass != none)

    {

        LocalPlayer(Player).ViewportClient.GetViewportSize(ViewportSize);

        if (FreeLookZone != none)

        {

            FreeLookZone.OnProcessInputDelegate = SwipeZoneCallback;

        }

    }

}
The code segment in Listing 10–5 deals with placing the player's weapon in the first-person view. This PlaceWeapon() function is exactly the same as the one in Listing 3-18, which created the player controller class in Chapter 3.
Listing 10–5. Placing the Weapon
function PlaceWeapon()

{

    // First Person

    local vector WeaponLocation;

    local Rotator WeaponRotation,TempRot;

    local Weapon TestW;

    local vector WeaponAimVect;


    WeaponRotation.yaw = -16000; // 90 Degrees turn = OFFSET

    TempRot = Pawn.GetBaseAimRotation();

    WeaponRotation.pitch = TempRot.roll;

    WeaponRotation.yaw   += TempRot.yaw;

    WeaponRotation.roll  -= TempRot.pitch; // Switch due to weapon local axes orientation

    WeaponAimVect = Normal(Vector(TempRot));

    WeaponLocation = Pawn.Location + (40 * WeaponAimVect) + vect(0,0,30);


    TestW = Pawn.Weapon; //Pawn.InvManager.GetBestWeapon();

    if (TestW != None)

    {

        TestW.SetLocation(WeaponLocation);

        TestW.SetRotation(WeaponRotation);

    }

    else

    {

        WorldInfo.Game.Broadcast(self,"Player has no weapon!!!!!");

    }

}
The code segment in Listing 10–6 is the PlayerTick() function, which is called continuously or “ticked”. The PlayerTick() function adds in code for testing for the game over status and implementing code for a game over status. In terms of the game over status, if bGameOver is true, then the game is over because the player has died. If the player is still alive, bGameOver is false.
Listing 10–6. PlayerTick Function
function PlayerTick(float DeltaTime)

{

    Super.PlayerTick(DeltaTime);

    PlaceWeapon();

    if (!BotSpawned)

    {

        SpawnBotOnRandomPad(Pawn.Location, vect(0,0,500));

        BotSpawned = true;

        JazzCh10Pawn(Pawn).InitialLocation = Pawn.Location;

    }

    if (Pawn.Health <= 0)

    {

        ExampleCh10Game(WorldInfo.Game).bGameOver = true;

    }

    if (ExampleCh10Game(WorldInfo.Game).bGameOver)

    {

        Pawn.Health = 0;

        StopFire(0);

        Pawn.SetHidden(true);

        Pawn.Weapon.SetHidden(true);

        Pawn.Velocity = vect(0,0,0);

    }

}

defaultproperties

{

    BotSpawned = false;

}
FRAMEWORK NOTE: When adding a new weapon you may also have to modify the PlaceWeapon() function which places the weapon mesh into the player's first-person view.
Creating the Player's Pawn
Next, the code for the player's pawn must be created (see Listing 10–7).
Several key elements from this listing:
- The key new function is the
AddHealthBonus()function which processes the health powerup bonus. (Listing 3–17 in Chapter 3 is the base class for a player's pawn using the default first-person view.) - The function
TakeDamage()plays a sound when this pawn is hit and calculates damage to health. - The
AddDefaultInventory()function adds in our new custom weapon for this framework.
class JazzCh10Pawn extends SimplePawn;


var Inventory MainGun;

var vector InitialLocation;

var SoundCue PawnHitSound;


function AddHealthBonus(int Value)

{

    Health = Health + value;

}


event TakeDamage(int Damage, Controller InstigatedBy, vector HitLocation, vector Momentum, class<DamageType> DamageType, optional TraceHitInfo HitInfo, optional Actor DamageCauser)

{

    PlaySound(PawnHitSound);

    Health = Health - Damage;

}


function AddDefaultInventory()

{

    MainGun = InvManager.CreateInventory(class'JazzWeaponCh10'),

    MainGun.SetHidden(false);

    Weapon(MainGun).FireOffset = vect(0,0,-70);

}


defaultproperties

{

    InventoryManagerClass=class'WeaponsIM1'

    PawnHitSound = SoundCue'A_Character_CorruptEnigma_Cue.Mean_Efforts.A_Effort_EnigmaMean_Death_Cue'

}
Creating the Player's Weapon
Next, we need to create the player's weapon, as shown in Listing 10–8. The key new code here is the setting of the WeaponProjectiles array to the new JazzBulletCh10 class.
Listing 10–8. Player's Weapon
class JazzWeaponCh10 extends Weapon;


defaultproperties

{

    Begin Object Class=SkeletalMeshComponent Name=FirstPersonMesh

        SkeletalMesh=SkeletalMesh'KismetGame_Assets.Anims.SK_JazzGun'

    End Object

    Mesh=FirstPersonMesh

    Components.Add(FirstPersonMesh);


    Begin Object Class=SkeletalMeshComponent Name=PickupMesh

        SkeletalMesh=SkeletalMesh'KismetGame_Assets.Anims.SK_JazzGun'

    End Object
    DroppedPickupMesh=PickupMesh

    PickupFactoryMesh=PickupMesh


    WeaponFireTypes(0)=EWFT_Projectile

    WeaponFireTypes(1)=EWFT_NONE


    WeaponProjectiles(0)=class'JazzBulletCh10'

    WeaponProjectiles(1)=class'JazzBulletCh10'


    FiringStatesArray(0)=WeaponFiring

    FireInterval(0)=0.25

    Spread(0)=0

}
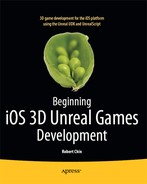
The player's weapon in the first-person view should look like that shown in Figure 10–1.
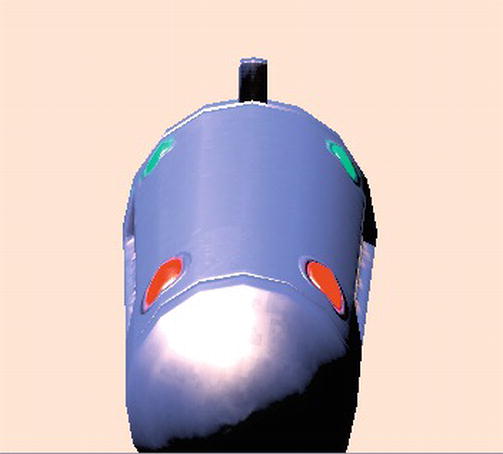
Figure 10–1. Player's Weapon
FRAMEWORK NOTE: You can expand on this class by using a new custom class for the projectile or changing other weapon variables such as FireInterval which determines the time between shots.
Creating the Player's Projectile
Next, we need to create the projectile for the player's weapon (see Listing 10–9). The key changes from past versions of our custom projectile class here are new sound cues defined in variables ImpactSound and SpawnSound.
Listing 10–9. Player weapon's bullet
class JazzBulletCh10 extends Projectile;


var SoundCue FireSound;

var bool ImpactSoundPlayed;


simulated singular event Touch(Actor Other, PrimitiveComponent OtherComp, vector HitLocation, vector HitNormal)

{

    Other.TakeDamage(33, InstigatorController, HitLocation, -HitNormal, None);

}

simulated function Explode(vector HitLocation, vector HitNormal)

{

    if (!ImpactSoundPlayed)

    {

        PlaySound(ImpactSound);

        ImpactSoundPlayed = true;

    }

    SetPhysics(Phys_Falling);

}

function Init( Vector Direction )

{

    super.Init(Direction);

    RandSpin(90000);

    PlaySound(SpawnSound);

    PlaySound(FireSound, , , true,,);

}

defaultproperties

{

    Begin Object Class=StaticMeshComponent Name=Bullet

        StaticMesh=StaticMesh'Castle_Assets.Meshes.SM_RiverRock_01'

        Scale3D=(X=0.300000,Y=0.30000,Z=0.3000)

    End Object

    Components.Add(Bullet)


    Begin Object Class=ParticleSystemComponent  Name=BulletTrail

        Template=ParticleSystem'Castle_Assets.FX.P_FX_Fire_SubUV_01'

    End Object

    Components.Add(BulletTrail)


    MaxSpeed=+05000.000000

    Speed=+05000.000000


    FireSound = SoundCue'A_Vehicle_Generic.Vehicle.Vehicle_Damage_FireLoop_Cue'

    ImpactSound = SoundCue'A_Character_BodyImpacts.BodyImpacts.A_Character_RobotImpact_HeadshotRoll_Cue'

    SpawnSound = SoundCue'KismetGame_Assets.Sounds.S_WeaponRespawn_01_Cue'

    ImpactSoundPlayed = false

}
The player's projectile is shown in Figure 10–2.
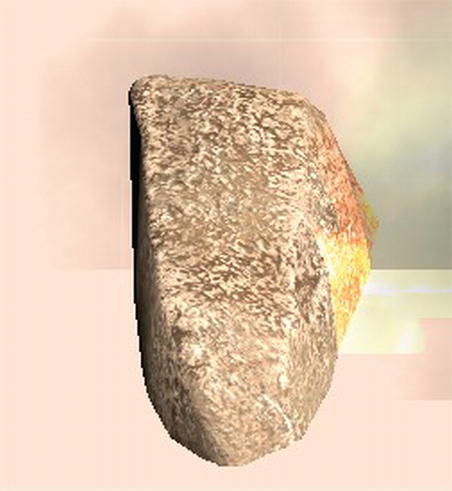
Figure 10–2. Player's Projectile
Creating the Enemy Bot Related Classes
In this section we will create classes for our enemy bot. These classes will include those for the bot's pawn, controller, weapon, projectile, and spawnpad.
Creating the Bot Pawn
The first thing we need to do is create the enemy bot's pawn, as shown in Listing 10–10.
Key elements from the listing:
- New in this class are separate sounds that are played when an enemy bot dies which is
DeathSoundand when an enemy bot is injured which isHurtSound. - The function
GetRandomSpawnPosition()chooses a random pad from those stored in the arraySpawnPadLocationsand returns the location of that pad. - The function
AddHealthBonus()is used to process the bot's pickup of the bonus powerup and adds this bonus to the enemy bot's health.
Listing 10–10. Enemy bot's pawn
class BotPawnCh10 extends BotPawn2;


var array<vector> SpawnPadLocations;

var SoundCue DeathSound;

var SoundCue HurtSound;


function vector GetRandomSpawnPosition()

{

    local int RandPad;

    local int MaxPads;

    local vector returnvec;


    MaxPads = ExampleCh10Game(WorldInfo.Game).MaxSpawnPads;

    Randpad = Rand(MaxPads);

    WorldInfo.Game.Broadcast(self,"*************** " @ self @ " RESPAWNED at pad number " @ RandPad);

    if (RandPad >= SpawnPadLocations.length)

    {

        // error

        return InitialLocation;

    }

    else

    {

        returnvec = SpawnPadLocations[RandPad];

    }

    return returnvec;

}

function AddHealthBonus(int Value)

{

    Health = Health + value;

}

event TakeDamage(int Damage, Controller InstigatedBy, vector HitLocation, vector Momentum, class<DamageType> DamageType, optional TraceHitInfo HitInfo, optional Actor DamageCauser)

{

    PlaySound(HurtSound);

    Health = Health - Damage;

    if (Health <= 0)

    {

        PlaySound(DeathSound);

        SetLocation(GetRandomSpawnPosition());

        SetPhysics(PHYS_Falling);

        Health = 100;

        BotAttackCoverController(Controller).ResetAfterSpawn();

        // Process Kill

        if (PlayerController(InstigatedBy) != None)

        {

            // Add kill to Player's Score

            ExampleCh10Game(WorldInfo.Game).Score += KillValue;

        }

    }

}

function AddDefaultInventory()

{
    MainGun = InvManager.CreateInventory(class'BotWeaponCh10'),

    MainGun.SetHidden(false);

    AddGunToSocket('Weapon_R'),

    Weapon(MainGun).FireOffset = vect(0,50,-70);

}

defaultproperties

{

    DeathSound = SoundCue'KismetGame_Assets.Sounds.Jazz_Death_Cue'

    HurtSound = SoundCue'KismetGame_Assets.Sounds.Jazz_SpinStop_Cue'

}
Creating the Bot Controller
Next, we need to create the bot's controller class. For a full version of this code without explanations, please download the source code for this book.
This new class builds upon the code presented in Chapter 8 where the bot moves from cover to cover and considers the player to be the threat. Important new code is highlighted in bold.
The first segment of code, shown in Listing 10–11, involves the variables that will be used in this class and cover node related functions:
- The
bGotHealthPickupis true when the enemy bot has just taken the health bonus. If the enemy bot's health is less than the value ofHealthPickupTriggerthen the bot will retrieve a health powerup if one is available. - The variable
bJustRespawnedis set to true just after the enemy bot is respawned and placed on a random spawn pad. - When the bot is in the
TakeCoverstate and anAttackTimeIntervalhas passed thenbStartAttackEnemyis set to true and bot starts its attack on the player andbAttackDoneis set to false. When the bot has a clear path to the player and is withinAttackOffsetDistfrom the player then bAttackDone is set to true and the bot stops its attack.
Listing 10–11. Class Variables and Cover Node Related Functions
class BotAttackCoverController extends UDKBot;


// Navigation

var Actor CurrentGoal;

var Vector TempDest;

var Actor TempGoal;


// Cover Link

var CoverLink CurrentCover;

var bool BotInCover;


// Bot's Enemy

var Pawn BotThreat;

// Health Pickups

var bool bGotHealthPickup;
var int HealthPickupTrigger;

// Respawn

var bool bJustRespawned;

// Attack State

var int AttackOffsetDist;

var bool bAttackDone;

var int AttackTimeInterval;

var bool bStartAttackEnemy;


function UnclaimAllSlots()

{

    local CoverLink CoverNodePointer;

    local CoverLink TempNodePointer;

    local bool done;


    CoverNodePointer = WorldInfo.Coverlist;

    done = false;

    while (!done)

    {

        CoverNodePointer.Unclaim(Pawn, 0, true);

        if (CoverNodePointer.NextCoverLink != None)

        {

            TempNodePointer = CoverNodePointer.NextCoverLink;

            CoverNodePointer = TempNodePointer;

        }

        else

        {

            done = true;

        }

    }

    Pawn.ShouldCrouch(false);

    BotInCover = false;

}

function FindEnemyLocation(out vector EnemyLocation)

{

    EnemyLocation = BotThreat.Location;

}

function CoverLink FindClosestEmptyCoverNodeWithinRange(Vector ThreatLocation, vector Position, float Radius)

{

    local CoverLink CoverNodePointer;

    local CoverLink TempNodePointer;

    local bool done;


    local CoverLink ValidCoverNode;

    local bool SlotValid;

    local bool SlotAvailable;

    local bool NodeFound;

    local int DefaultSlot;


    local float Dist2Cover;

    local float ClosestCoverNode;


    CoverNodePointer = WorldInfo.Coverlist;

    DefaultSlot = 0;  // Assume only 1 slot per cover node.

    ClosestCoverNode = 999999999;
    ValidCoverNode = None;

    NodeFound = false;


    done = false;

    while (!done)

    {

        SlotValid = CoverLinkEx(CoverNodePointer).IsCoverSlotValid(0,ThreatLocation);

        SlotAvailable = CoverLinkEx(CoverNodePointer).IsCoverSlotAvailable(0);

        Dist2Cover =  VSize(CoverNodePointer.GetSlotLocation(DefaultSlot) - Position);

        if (SlotValid && SlotAvailable && (Dist2Cover < ClosestCoverNode))

        {

            ValidCoverNode = CoverNodePointer;

            ClosestCoverNode = Dist2Cover;

            NodeFound = true;

        }


        // Goto Next CoverNode

        if (CoverNodePointer.NextCoverLink != None)

        {

            TempNodePointer = CoverNodePointer.NextCoverLink;

            CoverNodePointer = TempNodePointer;

        }

        else

        {

            // No more Cover Nodes

            done = true;

        }

    }

    if (!NodeFound)

    {

        WorldInfo.Game.Broadcast(self,"!!! Can Not Find Valid CoverNode");

    }

    return ValidCoverNode;

}

function bool IsCurrentCoverValid()

{

    local bool RetVal;

    local vector ThreatLoc;


    RetVal = false;

    if (CurrentCover != None)

    {

        FindEnemyLocation(ThreatLoc);

        RetVal = CoverLinkEx(CurrentCover).IsCoverSlotValid(0, ThreatLoc);

    }

    return Retval;

}

function PrepMoveToCover()

{

    local vector ThreatLoc;

    local CoverLink NextCover;


    FindEnemyLocation(ThreatLoc);

    NextCover = FindClosestEmptyCoverNodeWithinRange(ThreatLoc, Pawn.Location, 9999999);

    if (NextCover != None)

    {

        WorldInfo.Game.Broadcast(self, self @ " moving to Next Cover " @ NextCover);
        CurrentCover = NextCover;

        CurrentGoal = CurrentCover;

        BotInCover = false;

        UnclaimAllSlots();

        CurrentCover.Claim(Pawn, 0);

    }

}
Listing 10–12 contains the next piece of code that contains the GeneratePathTo() function that actually generates the navigation path that the computer controlled bot will use. This is the exact same function that was used in Chapter 5 on bots.
Listing 10–12. GeneratePathTo
event bool GeneratePathTo(Actor Goal, optional float WithinDistance, optional bool bAllowPartialPath)

{

    if( NavigationHandle == None )

    return FALSE;


    // Clear cache and constraints (ignore recycling for the moment)

    NavigationHandle.PathConstraintList = none;

    NavigationHandle.PathGoalList = none;

    class'NavMeshPath_Toward'.static.TowardGoal( NavigationHandle, Goal );

    class'NavMeshGoal_At'.static.AtActor( NavigationHandle, Goal, WithinDistance, bAllowPartialPath );

    return NavigationHandle.FindPath();

}
The next code segment, in Listing 10–13, involves the TakeCover state in which the enemy bot uses the UDK cover node system to shield itself from incoming fire.
The AttackEnemyTimer() function is called after the AttackTimeInterval amount of time when the bot is in the TakeCover state to flag that the bot's attack on the player should start.
NOTE: In the BeginState and EndState functions, the “Put Code Here” comments in the code refer to new code you can add to extend this framework for you own customized game.
Listing 10–13. TakeCover State
function AttackEnemyTimer()

{

    bStartAttackEnemy = true;

}

state TakeCover

{

    event BeginState( Name PreviousStateName )

    {
        // Put code here that is to only be executed when the state is first entered

        bStartAttackEnemy = false;

        SetTimer(AttackTimeInterval, false, 'AttackEnemyTimer'),

    }

    event EndState( Name NextStateName )

    {

        // Put code here that is to be executed only when exiting this state

    }


    Begin:

    WorldInfo.Game.Broadcast(self,"*********** In State TAKECOVER");

    if (CurrentGoal != None)

    {

        if(GeneratePathTo(CurrentGoal))

        {

            NavigationHandle.SetFinalDestination(CurrentGoal.Location);


            if( NavigationHandle.ActorReachable(CurrentGoal) )

            {

                // then move directly to the actor

                MoveTo(CurrentGoal.Location, BotThreat);

                BotInCover = true;

            }

            else

            {

                // move to the first node on the path

                if( NavigationHandle.GetNextMoveLocation(TempDest, Pawn.GetCollisionRadius()) )

                {

                    if (!NavigationHandle.SuggestMovePreparation(TempDest,self))

                    {

                        MoveTo(TempDest, BotThreat);

                    }

                }

            }

        }

        else

        {

            WorldInfo.Game.Broadcast(self,"FindNavMeshPath failed to find a path!, CurrentGoal = " @ CurrentGoal);

            MoveTo(Pawn.Location);

        }

    }

    LatentWhatToDoNext();

}
The next piece of code, shown in Listing 10–14, involves code related to the enemy bot retrieving the health powerup. These are the key components:
- The
NeedHealthPickup()returns true if the enemy bot's health is less than theHealthPickupTriggervalue. TheHealthPickupAvailable()function returns a reference to the Health Bonus powerup closest to the enemy bot if one exists orNoneif no health powerups exist. - The
PrepGettingHealthPickup()function releases the ownership of any cover node that the bot may be occupying, sets the goal of the bot to point to the health bonus, and does other initializations in preparation for the bot transitioning to theGettingHealthPickupstate. - The
GettingHealthPickupstate moves the enemy bot toward the health powerup and setsbGotHealthPickupto true when the bot moves over it.
Listing 10–14. Getting the Health Pickup
function bool NeedHealthPickup()

{

    local bool bresult;

    if (Pawn.Health < HealthPickupTrigger)

    {

        bresult = true;

    }

    else

    {

        bresult = false;

    }

    return bresult;

}

function Actor HealthPickupAvailable()

{

    local Bonus1 TempBonus;

    local Actor ReturnActor;

    local float ClosestDist;

    local float TempDist;


    ReturnActor = None;

    ClosestDist = 999999;


    foreach AllActors(class'Bonus1', TempBonus)

    {

        TempDist = VSize(Pawn.Location - TempBonus.Location);

        If (TempDist < ClosestDist)

        {

            ReturnActor = TempBonus;

            ClosestDist = TempDist;

        }

    }

    return ReturnActor;

}

function PrepGettingHealthPickup(Actor Pickup)

{

    UnclaimAllSlots();

    CurrentGoal = Pickup;

    CurrentCover = None;

    bGotHealthPickup = false;

}

state GettingHealthPickup

{

    event BeginState( Name PreviousStateName )

    {

        // Put code here that is to only be executed when the state is first entered

    }

    event EndState( Name NextStateName )

    {

        // Put code here that is to be executed only when exiting this state

    }

    Begin:
    WorldInfo.Game.Broadcast(self,"-----------> In state GettingHealthPickup");

    if (CurrentGoal != None)

    {

        if(GeneratePathTo(CurrentGoal))

        {

            NavigationHandle.SetFinalDestination(CurrentGoal.Location);

            if( NavigationHandle.ActorReachable(CurrentGoal) )

            {

                // then move directly to the actor

                MoveTo(CurrentGoal.Location);

                bGotHealthPickup = true;

            }

            else

            {

                // move to the first node on the path

                if( NavigationHandle.GetNextMoveLocation(TempDest, Pawn.GetCollisionRadius()) )

                {

                    if (!NavigationHandle.SuggestMovePreparation(TempDest,self))

                    {

                        MoveTo(TempDest, BotThreat);

                    }

                }

            }

        }

        else

        {

            MoveTo(Pawn.Location);

        }

    }

    LatentWhatToDoNext();

}
The code in Listing 10–15 deals with the enemy bot attacking the player:
- The
PrepAttackingEnemy()function initializes the enemy bot for coming out of cover and entering theAttackingEnemystate by releasing any cover nodes that the bot currently occupies. The bot is ordered to start firing its weapon and other initializations take place. - The
AttackingEnemystate moves the enemy bot toward the player and when the player is directly reachable by the bot (has a clear line of sight without obstacles) withinAttackOffsetDistdistancebAttackDoneis set to true and the attack is finished.
Listing 10–15. Attacking the Player
function PrepAttackingEnemy()

{

    bAttackDone = false;

    UnclaimAllSlots();

    CurrentGoal = BotThreat;

    CurrentCover = None;
    Pawn.StartFire(0);

}

state AttackingEnemy

{

    event BeginState( Name PreviousStateName )

    {

        // Put code here that is to only be executed when the state is first entered

        PrepAttackingEnemy();

    }

    event EndState( Name NextStateName )

    {

        // Put code here that is to be executed only when exiting this state

        Pawn.StopFire(0);

    }

    Begin:

    WorldInfo.Game.Broadcast(self,"############# In State AttackingEnemy");

    if (CurrentGoal != None)

    {

        if(GeneratePathTo(CurrentGoal))

        {

            NavigationHandle.SetFinalDestination(CurrentGoal.Location);


            if( NavigationHandle.ActorReachable(CurrentGoal) )

            {

                // then move directly to the actor

                MoveTo(CurrentGoal.Location, BotThreat, AttackOffsetDist);

                bAttackDone = true;

            }

            else

            {

                // move to the first node on the path

                if( NavigationHandle.GetNextMoveLocation(TempDest, Pawn.GetCollisionRadius()) )

                {

                    if (!NavigationHandle.SuggestMovePreparation(TempDest,self))

                    {

                        MoveTo(TempDest, BotThreat);

                    }

                }

            }

        }

        else

        {

            MoveTo(Pawn.Location);

        }

    }

    LatentWhatToDoNext();

}
The next code piece is shown in Listing 10–16. It involves resetting the enemy bot after it dies:
- The function
ResetAfterSpawn()is called from theBotPawnCh10class in theTakeDamage()function if the enemy bot dies. - The function
ExecuteResetAfterSpawn()actually executes the reset/respawn of the enemy bot whenbJustRespawnedis true. In addition this function unclaims any cover nodes owned by the enemy bot and sets up the move to theTakeCoverstate.
Listing 10–16. Resetting the Bot
function ResetAfterSpawn()

{

    bJustRespawned = true;

}

function ExecuteResetAfterSpawn()

{

    UnclaimAllSlots();

    CurrentCover = None;

    CurrentGoal = None;

    bGotHealthPickup = false;

    BotInCover = false;

    PrepMoveToCover();

}
Listing 10–17 shows the supporting code related to the enemy bot's Artificial Intelligence. This was originally presented in Chapter 5.
Listing 10–17. AI-related code
auto state Initial

{

    Begin:

    LatentWhatToDoNext();

}

event WhatToDoNext()

{

    DecisionComponent.bTriggered = true;

}
The piece of code in Listing 10–18 is related to the enemy bot's AI. A simplified state diagram of the enemy bot's AI is shown in Figure 10–3.
Figure 10–3. Simplified state diagram for enemy bot
In Listing 10–18, the ExecuteWhatToDoNext() function is the main decision-making function for the enemy bot. Here the bot makes the decision of which state to transition to based on certain conditions such as its health, whether it's time to attack the player or not.
Listing 10–18. ExecuteWhatToDoNext
protected event ExecuteWhatToDoNext()

{

    local Actor TempActor;


    if (bJustRespawned)

    {

        bJustRespawned = false;

        ExecuteResetAfterSpawn();

        GotoState('TakeCover', 'Begin'),

    }

    else
    if (IsInState('Initial'))

    {

        PrepMoveToCover();

        GotoState('TakeCover', 'Begin'),

    }

    else

    if (IsInState('TakeCover'))

    {

        if (BotInCover)

        {

            TempActor = HealthPickupAvailable();

            if (NeedHealthPickup() && (TempActor != None))

            {

                // Health Pickup available and needed

                PrepGettingHealthPickup(TempActor);

                GotoState('GettingHealthPickup','Begin'),

            }

            else

            if (IsCurrentCoverValid())

            {

               if (bStartAttackEnemy)

               {

                   GotoState('AttackingEnemy', 'Begin'),
               }

               else

               {

                   GotoState('TakeCover', 'Begin'),

               }

            }

            else

            {

                PrepMoveToCover();

                GotoState('TakeCover', 'Begin'),

            }

        }

        else

        {

            GotoState('TakeCover', 'Begin'),

        }

    }

    else

    if (IsInState('GettingHealthPickup'))

    {

        if (!bGotHealthPickup)

        {

            GotoState('GettingHealthPickup','Begin'),

        }

        else

        {

            // Got Pickup Now Take Cover

            PrepMoveToCover();

            GotoState('TakeCover', 'Begin'),

        }

    }

    else

    if (IsInState('AttackingEnemy'))

    {

        if (!bAttackDone)

        {

            GotoState('AttackingEnemy', 'Begin'),

        }

        else

        {

            PrepMoveToCover();

            GotoState('TakeCover', 'Begin'),

        }

    }

}
Listing 10–19 contains the next piece of code for this class, which sets the default values for the variables in this class.
Here in the defaultproperties block, you can set key variables such as AttackTimeInterval which controls the time the bot waits in cover before attacking and AttackOffsetDist which controls how close the enemy bot will get to the player when attacking.
Listing 10–19. Default Properties
defaultproperties

{

    CurrentGoal = None

    CurrentCover = None

    BotInCover = false


    bGotHealthPickup = false

    HealthPickupTrigger = 49

    bJustRespawned = false


    AttackOffsetDist = 700

    bAttackDone = false

    AttackTimeInterval = 3

    bStartAttackEnemy = false

}
Creating the Bot Weapon
Next, we need to create the code for the enemy bot's weapon, shown in Listing 10–20. The key new code here is which class of projectiles the weapon will fire and is now set to the BotBulletCh10 class.
Listing 10–20. Enemy bots's weapon
class BotWeaponCh10 extends Weapon;

defaultproperties

{

    Begin Object Class=SkeletalMeshComponent Name=FirstPersonMesh

        SkeletalMesh=SkeletalMesh'KismetGame_Assets.Anims.SK_JazzGun'

    End Object

    Mesh=FirstPersonMesh

    Components.Add(FirstPersonMesh);


    Begin Object Class=SkeletalMeshComponent Name=PickupMesh

        SkeletalMesh=SkeletalMesh'KismetGame_Assets.Anims.SK_JazzGun'

    End Object
    DroppedPickupMesh=PickupMesh

    PickupFactoryMesh=PickupMesh


    WeaponFireTypes(0)=EWFT_Projectile

    WeaponFireTypes(1)=EWFT_NONE


    WeaponProjectiles(0)=class'BotBulletCh10'

    WeaponProjectiles(1)=class'BotBulletCh10'


    FiringStatesArray(0)=WeaponFiring

    FireInterval(0)=0.25

    Spread(0)=0

}
Creating the Bot Projectile
Next, we need to create the projectile class for the enemy bot's weapon. Listing 10–21 contains the code.
The key change here is the lowering of the amount of health damage this projectile does to the pawn that it hits from 33 in the JazzBulletSound class to 2 in this derived class. This makes it easier to play around with this framework and not get killed so often.
Listing 10–21. Enemy bot's weapon's projectile
class BotBulletCh10 extends JazzBulletSound;

simulated singular event Touch(Actor Other, PrimitiveComponent OtherComp, vector HitLocation, vector HitNormal)

{

    Other.TakeDamage(2, InstigatorController, HitLocation, -HitNormal, None);

}
Creating the Bot Spawn Pad
Next, we need to create the enemy bot's spawn pad. The one created in Listing 10–22 is similar to the one we created for the sample game in Chapter 7. However, with this pad, we add a new 3d mesh graphic to represent our pad and we add a user editable variable called PadNumber. You can place an object of this class in a level using the Unreal Editor and edit its PadNumber in the properties window.
Listing 10–22. Bot spawn pad
class BotSpawnPad extends Actor

placeable;


var() int PadNumber;


defaultproperties

{
    Begin Object Class=StaticMeshComponent Name=StaticMeshComponent0

        StaticMesh=StaticMesh'Pickups.jump_pad.S_Pickups_Jump_Pad'

    End Object

    Components.Add(StaticMeshComponent0)


    Begin Object Class=CylinderComponent NAME=CollisionCylinder

        CollideActors=true

        CollisionRadius=+0040.000000

        CollisionHeight=+0040.000000

    End Object

    CollisionComponent=CollisionCylinder

    Components.Add(CollisionCylinder)


    bCollideActors=true

    PadNumber = 0

}
Creating the HUD
Next, we need to create a custom HUD class. Most of the code will be the same as other HUD code from Chapter 6. The custom HUD code is in Listing 10–23, and the difference are set in bold print. Notably in this listing,
- The variable
HUDEnemyHealthdisplays the health of the enemy bot. - The
HUDEnemyHealthvariable is initialized in thePostBeginPlay()function. - Modifications have been made to the
DrawHUD()function to draw the enemy bot's health on the HUD as well as changes needed due to the new game type which isExampleCh10Game.
Listing 10–23. The Custom HUD
class FPSHUD extends UDKHud;


struct HUDInfo

{

    var string Label;

    var Vector2D TextLocation;

    var Color TextColor;

    var Vector2D Scale;

};


// HUD

var HUDInfo HUDHealth;


var HUDInfo HUDEnemyHealth;

var HUDInfo HUDGameOver;

var HUDInfo HUDScore;


simulated function PostBeginPlay()

{

    Super.PostBeginPlay();


    HUDHealth.Label = "Health:";

    HUDHealth.TextLocation.x = 1100;

    HUDHealth.TextLocation.y = 0;

    HUDHealth.TextColor.R = 255;

    HUDHealth.TextColor.G = 0;

    HUDHealth.TextColor.B = 0;
    HUDHealth.Scale.X = 2;

    HUDHealth.Scale.Y = 4;


    HUDEnemyHealth.Label = "Enemy Health:";

    HUDEnemyHealth.TextLocation.x = 500;

    HUDEnemyHealth.TextLocation.y = 0;

    HUDEnemyHealth.TextColor.R = 255;

    HUDEnemyHealth.TextColor.G = 0;

    HUDEnemyHealth.TextColor.B = 0;

    HUDEnemyHealth.Scale.X = 2;

    HUDEnemyHealth.Scale.Y = 4;


    HUDGameOver.Label = "GAME OVER";

    HUDGameOver.TextLocation.x = 400;

    HUDGameOver.TextLocation.y = 300;

    HUDGameOver.TextColor.R = 255;

    HUDGameOver.TextColor.G = 0;

    HUDGameOver.TextColor.B = 255;

    HUDGameOver.Scale.X = 7;

    HUDGameOver.Scale.Y = 7;


    HUDScore.Label = "Score:";

    HUDScore.TextLocation.x = 0;

    HUDScore.TextLocation.y = 0;

    HUDScore.TextColor.R = 255;

    HUDScore.TextColor.G = 0;

    HUDScore.TextColor.B = 0;

    HUDScore.Scale.X = 2;

    HUDScore.Scale.Y = 4;

}


function DrawHUDItem(HUDInfo Info, coerce string Value)

{

    local Vector2D TextSize;


    Canvas.SetDrawColor(Info.TextColor.R, Info.TextColor.G, Info.TextColor.B);

    Canvas.SetPos(Info.TextLocation.X, Info.TextLocation.Y);

    Canvas.DrawText(Info.Label, ,Info.Scale.X,Info.Scale.Y);

    Canvas.TextSize(Info.Label, TextSize.X, TextSize.Y);

    Canvas.SetPos(Info.TextLocation.X + (TextSize.X * Info.Scale.X), Info.TextLocation.Y);

    Canvas.DrawText(Value, , Info.Scale.X, Info.Scale.Y);

}

function DrawHUD()

{

    super.DrawHUD();

    Canvas.Font = class'Engine'.static.GetLargeFont();

    // Score

    DrawHUDItem(HUDScore,ExampleCh10Game(WorldInfo.Game).Score);

    // Enemy Health

    DrawHUDItem(HUDEnemyHealth, ExampleCh10PC(PlayerOwner).EnemyPawn.Health);

    // Health

    DrawHUDItem(HUDHealth,PlayerOwner.Pawn.Health);

    // Game Over

    if (ExampleCh10Game(WorldInfo.Game).bGameOver)

    {
        DrawHUDItem(HUDGameOver, "");

    }

}

defaultProperties

{

}
Creating the Bonus
The next class we need to create is the class that represents the Health Bonus power-up class. This class is shown in Listing 10–24.
The key functions in this class are the Touch() and Tick() functions. The Touch() function is called when this object touches another object. If the object touched is a player then the player's health powerup function is called. If the object is an enemy bot then the enemy bot's health powerup function is called. The Tick() function is called continuously and is used to update the rotation of the health bonus 3d mesh in the game world.
The Value variable is the amount of health to add to the player or an enemy bot.
Listing 10–24. Health Bonus power-up class
class Bonus1 extends Actor

placeable;


var() float Value;

var SoundCue PickupSound;

var int SoundCueLength;


event Touch(Actor Other, PrimitiveComponent OtherComp, vector HitLocation, vector HitNormal)

{

    WorldInfo.Game.Broadcast(self,"Health Bonus1 Has Been Touched by " @ Other @ ", Bonus Value = " @ Value);

    if (Other.IsA('JazzCh10Pawn'))

    {

        JazzCh10Pawn(Other).AddHealthBonus(Value);

        PlaySound(PickUpSound);

        destroy();

    }

    else

    if (Other.IsA('BotPawnCh10'))

    {

        BotPawnCh10(Other).AddHealthBonus(Value);

        PlaySound(PickUpSound);

        destroy();

    }

}


function Tick(FLOAT DeltaTime)

{

    local Rotator TempRot;


    TempRot = Rotation;
    TempRot.yaw = Rotation.yaw + (15000 * DeltaTime);

    SetRotation(TempRot);

}


defaultproperties

{

    Begin Object Class=StaticMeshComponent Name=HealthMesh

        StaticMesh=StaticMesh'Pickups.Health_Large.Mesh.S_Pickups_Health_Large_Keg'

    End Object

    Components.Add(HealthMesh)


    Begin Object Class=CylinderComponent NAME=CollisionCylinder

        CollideActors=true

        CollisionRadius=+0040.000000

        CollisionHeight=+0040.000000

    End Object

    CollisionComponent=CollisionCylinder

    Components.Add(CollisionCylinder)


    bCollideActors=true

    bEdShouldSnap=True


    value = 25

    PickupSound = SoundCue'A_Pickups.Health.Cue.A_Pickups_Health_Super_Cue'

    SoundCueLength = 3

}
Configuring the Game Type
Next, we need to set up this new example for compilation and for playing on the mobile previewer. In the configuration directory located at
C:UDKUDK-2011-06UDKGameConfig
change the UDKEngine.ini and Mobile-UDKGame.ini configuration files to the following. (This path is for the June 2011 version of the UDK. If you are using a different UDK version, then this default directory will be different.)
UDKEngine.ini

[UnrealEd.EditorEngine]

ModEditPackages=ExampleCh10

Mobile-UDKGame.ini

[ExampleCh10.ExampleCh10Game]

RequiredMobileInputConfigs=(GroupName="UberGroup",RequireZoneNames=("UberStickMoveZone","UberStickLookZone","UberLookZone"))
Save the configuration files. You may need to write protect them to preserve the contents since the UDK sometimes overwrites them (see the section “Configuring the Game Type" in Chapter 9).
Bring up the Unreal Frontend and compile the scripts.
Creating the Level
The next thing we need to do is create the level. Perform the following steps:
- Bring up the Unreal Editor.
- Load in the level that you created in Chapter 8 that involves the bot moving from cover to cover and hiding from the player. (You also can find the level—ExampleCh8Map.zip—with the source code for this book.)
- Save the level as a new level by selecting File
 Save As from the main menu and entering a new filename for the map. Choose whatever filename you wish.
 - The level should consist of a group of crates with cover nodes placed on each side of the box with cover slots facing each side of the box. See Figure 10–4.
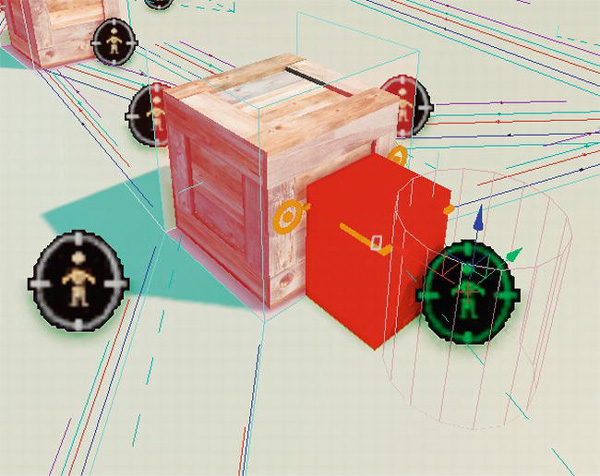
Figure 10–4. Crate with cover nodes
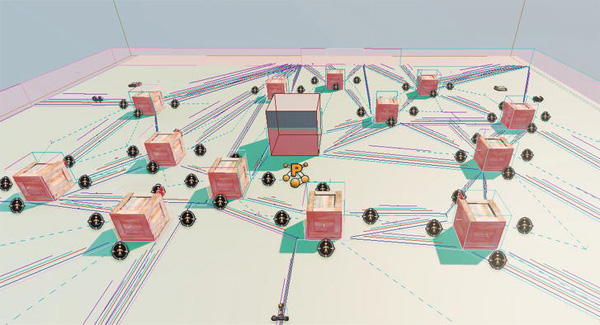
- Select the crate and cover nodes by holding down the Ctrl key and clicking on the crate and all the cover nodes around it. Then make copies of these objects until they are spread across the level. Hold down the Alt key and move the transformation widget to create a new copy and move it to an open area. See Figure 10–5.
- Now we need to create and place the enemy bot spawn pad. Go to the Actor Classes tab in the generic browser and type in BotSpawnPad into the search box to bring up the new BotSpawnPad class. Click on the class and drag and drop it into an empty corner of the level.
- Type in Bonus1 into the search box in the Actor Classes tab to bring up the
Bonus1class. Click on this class and drag and drop it near the spawn pad you just placed in the level (see Figure 10–6).

Figure 10–6. Putting a bot spawn pad and bonus in a corner of the level
- Put spawn pads and Bonus power-ups in each of the four corners of the level. For the first bot spawn pad, set the number to 0 and number each one consecutively higher.
- Rebuild the AI paths by selecting
Build(AI Pathsfrom the Unreal Editor menu. - Save the level by selecting
File(Save Current Level.
Running the Game
Now, we are ready to run our game. Follow these steps:
- Select View World Properties from the Unreal Editor main menu. This brings up the World Properties window.
- In the World Properties window set the Default Game Type under the Game Type category to ExampleCh10Game.
- Select the Play On Mobile Previewer option to run the game on the mobile previewer form the Editor.
Figure 10–7 shows the player being attacked by the enemy bot. Figure 10–8 shows the enemy bot taking cover from the player. Figure 10–9 shows the bot getting a health power-up.
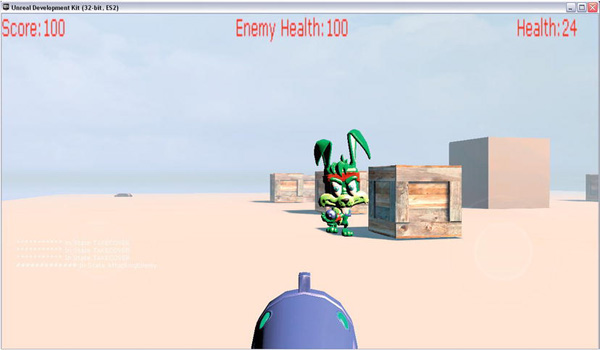
Figure 10–7. Enemy bot attacking the player
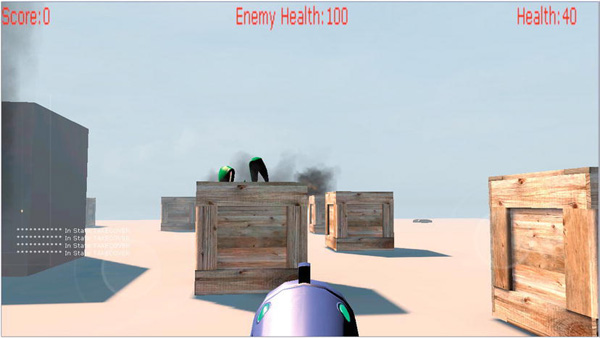
Figure 10–8. Enemy bot taking cover from player

Figure 10–9. Enemy bot retrieving a health power up
Summary
In this chapter we created a game framework for a first-person deathmatch style combat game. We first gave a general overview of the game and a specific overview including code-specific ways on how this game framework could be extended. Next we created the actual game framework. We then built the level and ran the game on the mobile previewer from the Unreal Editor. In conclusion, the game framework presented in this chapter would be a good starting point for your own first-person shooter style game that involves enemy bots moving into and out of cover and attacking the player.