
In this chapter you’ll build your first complete game. It won’t win any awards, but you’ll learn how to get the essential elements of cocos2d to work together, and the game can be easily adapted. In fact, several variations of this game were released to the App Store by readers of earlier editions of this book.
The game is the inversion of the famous Doodle Jump game, aptly named DoodleDrop. The player’s goal is to avoid falling obstacles for as long as possible by rotating the device to move the player sprite. Take a look at the final version in Figure 4-1 to get an idea of what you’ll be creating in this chapter.
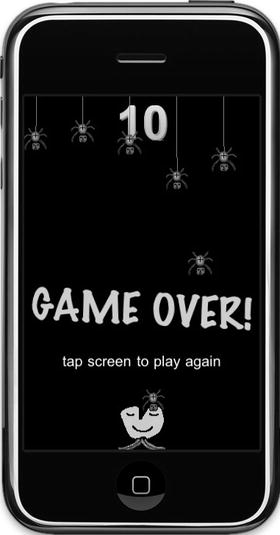
Figure 4-1 . The final version of the DoodleDrop game
In Chapter 2 you learned how to create a Kobold2D and a cocos2d project with ARC enabled.
Kobold2D users should run the Kobold2D Project Starter app and choose the Empty-Project template (see Figure 2-2 in Chapter 2) to start from scratch. Use DoodleDrop as the name for the project and you’re all set. The only thing left to do is to select the app’s target and select the portrait mode icons under Supported Device Orientation, as shown in Figure 3-17 in Chapter 3. The landscape icons should be deselected because DoodleDrop is designed to be played in Portrait mode.
The next section is for cocos2d users only—Kobold2D users may want to skip it.
Start with an ARC-enabled cocos2d Project
Cocos2d users should follow the instructions in Chapter 2 to create an ARC-enabled cocos2d project. If you've already done so then just make a copy of the project you’ve created. Here's an important time-saver: keep an unmodified version of such an original cocos2d project template converted to ARC enabled around, so you can create new projects easily and quickly.
Tip In the book’s source code you’ll find ARC-enabled cocos2d template projects in the Cocos2D_ARC_Template_Projects folder.
After following the instructions in Chapter 2, you’ll have an ARC-enabled cocos2d project. Mine is named cocos2d-2.x-ARC-iOS. Simply make a copy of the folder that contains the .xcodeproj file before opening it in Xcode. Don't rename the .xcodeproj file itself, though, because doing so would render it unusable.
Now you can rename the project from within Xcode, which will also rename the .xcodeproj file. In the Project Navigator select the cocos2d-2.x-ARC-iOS project (the first entry, see Figure 2-5 in Chapter 2) and edit it with a delayed double-click. That means click it once to select it, wait a second or two, then click it again, and the project’s name will become editable. Enter DoodleDrop as the name for the project.
After you press Enter to confirm the change, Xcode will ask you to confirm renaming several items, as seen in Figure 4-2. You should confirm by clicking Rename. If you click Don’t Rename, Xcode will still have renamed the project but all other items are not. So even if you recognize a typo or don’t like the name, click Rename anyway. You may also see a warning, “New name for file can not be the same,” regarding the Prefix.pch file after renaming. You can safely ignore that warning.
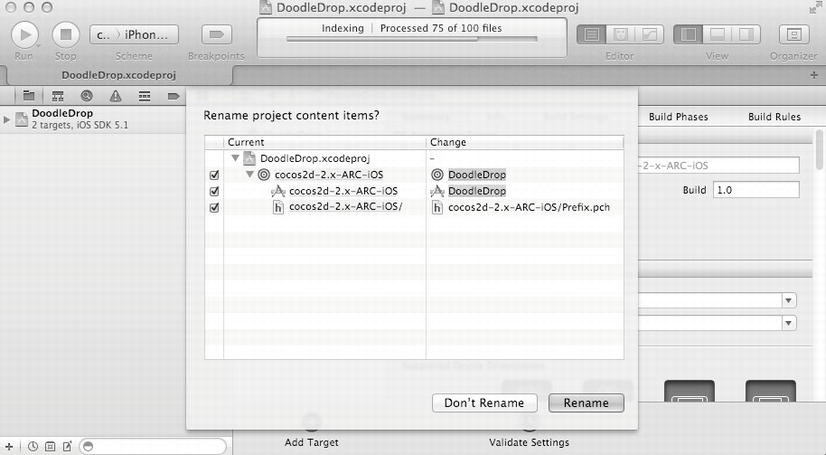
Figure 4-2 . Confirm renaming the project and related files
There’s one last item you need to rename manually: the app’s scheme. It will still be named cocos2d-2.x-ARC-iOS, or whichever name you gave your ARC-enabled cocos2d project. Select Product ![]() Manage Schemes… to view the list of schemes. Select and edit the scheme’s name by delay-clicking it to make its name editable and then renaming it to DoodleDrop. Once done, close the scheme list.
Manage Schemes… to view the list of schemes. Select and edit the scheme’s name by delay-clicking it to make its name editable and then renaming it to DoodleDrop. Once done, close the scheme list.
Because DoodleDrop is going to be a Portrait mode application, you must edit the AppDelegate.m file and change the shouldAutorotateToInterfaceOrientation method to return YES only for portrait modes:
return UIInterfaceOrientationIsPortrait(interfaceOrientation);
Now select the DoodleDrop scheme from the drop-down menu to the right of the Run and Stop buttons and run it to verify that everything is in working order.
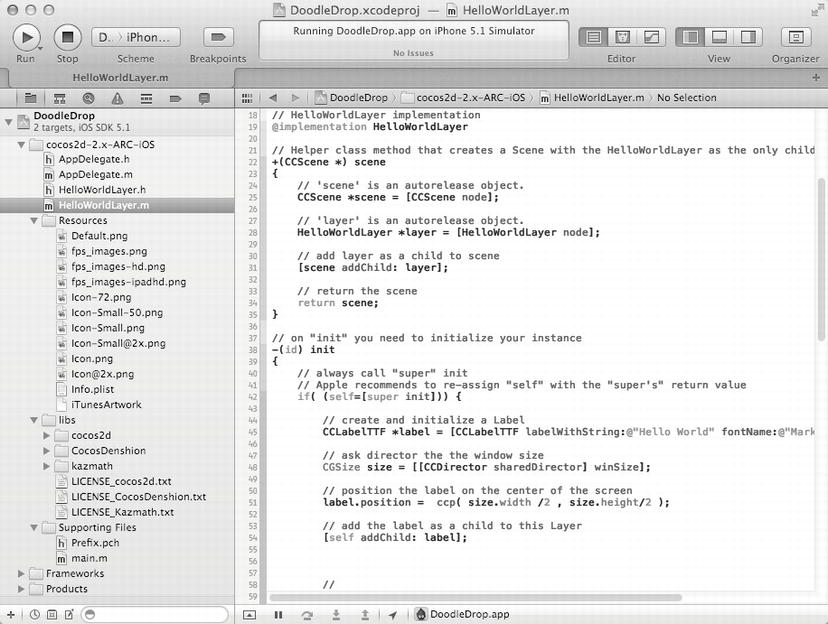
Figure 4-3 . Let the games begin! The DoodleDrop project here is based on the cocos2d ARC project from Chapter 2, but the Kobold2D Empty-Project template isn’t much different
Create the DoodleDrop Scene
The next step you’re faced with is a decision: do you start working with the existing HelloWorldLayer because it’s there already, possibly renaming it later? Or do you go through the extra steps to create your own scene to replace the HelloWorldLayer? I chose the latter because eventually you’ll have to add new scenes anyway, so it’s a good idea to learn the ropes here and now and start with a clean slate.
Make sure the group where you want to add the new scene class is selected and then select File ![]() New
New ![]() New File… or right-click in the appropriate location in the Project Navigator tree and select New File… to open the New File dialog shown in Figure 4-4.
New File… or right-click in the appropriate location in the Project Navigator tree and select New File… to open the New File dialog shown in Figure 4-4.

Figure 4-4 . Adding new CCNode-derived classes is best done using the class templates provided by cocos2d or Kobold2D. In this case, you want the CCNode class to be a subclass of CCLayer because you’re setting up a new scene and layer
Because Cocos2d and Kobold2D provide class templates for the most important nodes and classes, it'd be a shame not to use them. On the other hand, Xcode’s own Objective-C class template is also a very good template for new classes—you only need to change the base class from NSObject to CCLayer manually. From the cocos2d v2.x templates section, select the CCNode class, click Next, and make sure it’s set to Subclass of CCLayer before clicking Next again to bring up the Save File dialog in Figure 4-5.
I’m going to name the new file GameLayer.m. It’s going to be the class where all of the DoodleDrop game play logic takes place, so that name seems appropriate. Be sure that the DoodleDrop target check box is checked (see Figure 4-5).
Note Not reviewing the target check boxes may incorrectly assign the newly added file to the wrong target. This can lead to all kinds of issues—compile or “file not found” errors are the typical result. Sometimes the game may crash during game play when a file hasn’t been added to the app’s target. Or you might simply waste space by adding files to targets that don’t need them at all.
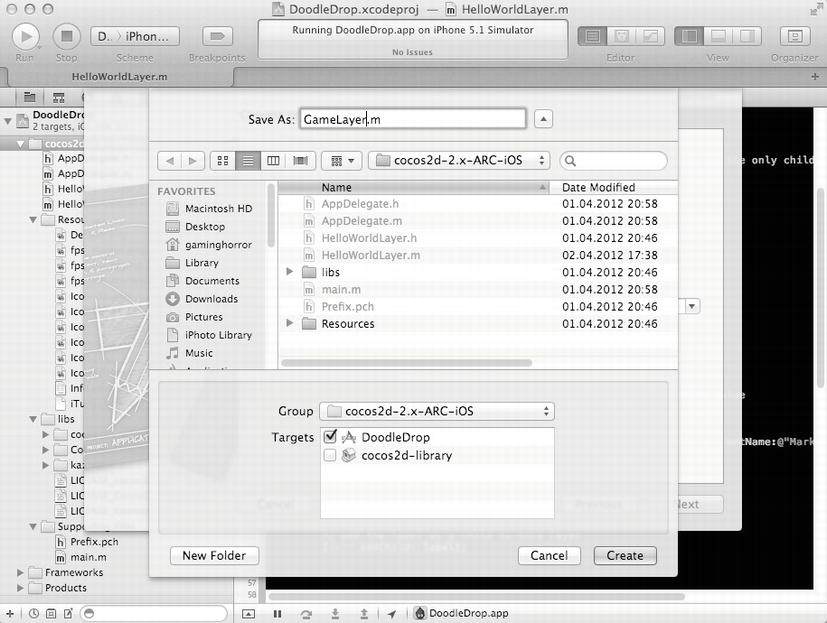
Figure 4-5 . Naming the new scene and making sure it’s added to the appropriate group and targets
At this point, the GameLayer class is empty, and the first thing you need to do, to set it up as a scene, is to add the + (id) scene method to it. The code to plug in is essentially the same as in Chapter 3, with only the layer’s class name changed. What you’ll almost always need in any class is the –(id) init method. Adding the –(void) dealloc method also can’t hurt, if only to be able to log that an object has been properly disposed of. Monitoring the dealloc method can be an effective early warning system for detecting memory leaks.
I’m also a very cautious programmer and decided to add the logging statements introduced in Chapter 3. The resulting GameLayer.h is shown in Listing 4-1, and GameLayer.m is in Listing 4-2.
Listing 4-1. GameLayer.h with the Scene Method
#import < Foundation/Foundation.h>
#import "cocos2d.h"

@interface GameLayer : CCLayer
{
}

+(id) scene;

@end
Listing 4-2. GameLayer.m with the Scene Method and Standard Methods Added, Including Logging
#import "GameLayer.h"

@implementation GameLayer

+(id) scene
{
  CCScene *scene = [CCScene node];
  CCLayer* layer = [GameLayer node];
  [scene addChild:layer];
  return scene;
}

-(id) init
{
  if ((self = [super init]))
  {
  CCLOG(@"%@: %@", NSStringFromSelector(_cmd), self);
  }

  return self;
}

-(void) dealloc
{
  CCLOG(@"%@: %@", NSStringFromSelector(_cmd), self);
}

@end
Now you can safely delete the HelloWorldLayer class. When asked, select the Move to Trash option to remove the file from the hard drive as well, not just from the Xcode project. Select both HelloWorldLayer files and choose Edit ![]() Delete, or right-click the files and choose Delete from the context menu.
Delete, or right-click the files and choose Delete from the context menu.
Kobold2D users now only need to open the config.lua file in the Resources group and change the FirstSceneClassName entry to read:
FirstSceneClassName = "GameLayer",
That’s all. But in a purely cocos2d app, you have to modify AppDelegate.m and replace any references to HelloWorldLayer with GameLayer. Listing 4-3 highlights the necessary changes to the #import and pushScene statements if you’re not using Kobold2D.
Listing 4-3. Changing the AppDelegate.m Fil to Use the GameLayer Class Instead of HelloWorldLayer
// replace the line #import "HelloWorldLayer.h" with this one:
#import "GameLayer.h"

- (BOOL)application:(UIApplication *)application ← didFinishLaunchingWithOptions:(NSDictionary *)launchOptions
{
  . . .

  // replace HelloWorldLayer with GameLayer
  [director_ pushScene:[GameLayer scene]];
}
Compile and run, and you should end up with…a blank scene. Success! If you run into any problems, compare your project with the DoodleDrop01 project that accompanies this book.
Tip The app builds successfully but it won’t run? Remember that there can be multiple targets in an Xcode project, and even multiple schemes for a single target. Check the scheme selection / deployment target drop-down menu located in the Xcode toolbar right next to the Run and Stop buttons (see Figure 2-6). The left half of the drop-down menu allows you to choose the active scheme. Make sure it’s the one with the name DoodleDrop in it. Most other schemes like cocos2d-library will be static libraries. You can only build static libraries, but you can’t run them. Unfortunately deleting, hiding or selecting schemes is a per-user setting and must be done by each user individually. If not for that I would have cleaned up the projects for you.
Adding the Player Sprite
Next you’ll add the player sprite and use the accelerometer to control the player’s actions. To add the player image, select the Resources group in Xcode and select File ![]() Add Files to “DoodleDrop”… or, alternatively, right-click and from the context menu pick Add Files to “DoodleDrop”… to open the File Picker dialog. If you accidentally add files to the wrong group, you can also drag the file in the Project Navigator. There’s also nothing special about the Resources group—it's merely by definition supposed to contain the files that are not source code.
Add Files to “DoodleDrop”… or, alternatively, right-click and from the context menu pick Add Files to “DoodleDrop”… to open the File Picker dialog. If you accidentally add files to the wrong group, you can also drag the file in the Project Navigator. There’s also nothing special about the Resources group—it's merely by definition supposed to contain the files that are not source code.
The player images alien.png and alien-hd.png are located in the Resources folder of the DoodleDrop project supplied with the book. You can also choose your own image, as long as it’s 64 × 64 pixels in size and 128 × 128 pixels in the high-resolution (HD) format, the file with the -hd suffix. The HD files are used automatically by cocos2d on iPhone and iPod touch devices with Retina display; the regular standard-definition (SD) files are used only on the iPhone 3GS. Cocos2d recognizes two other file suffixes: -ipad for iPad and iPad 2 and –ipadhd for 3rd-generation iPads (and newer) with Retina displays.
The –hd, -ipad, and -ipadhd extensions are the default file extensions used by cocos2d for Retina and iPad-specific assets. These file extensions aren't used by regular iOS apps. Such apps have to use Apple’s @2x file extension for high-resolution images. Although the @2x extension does work with cocos2d apps as well, the cocos2d documentation warns users not to use the @2x file extension.
Tip A very frequently asked question is whether it wouldn’t be appropriate to simply downscale HD images on non-Retina devices. It’s not, and there’s two reasons for that. One is memory constraints. The non-Retina devices have only half the memory (or even less) than what’s available even on the earliest Retina devices. Requiring a non-Retina device to load an HD image will use up four times as much memory compared to an already downscaled and bundled SD image. Second, it takes noticably longer to load a Retina image, more so on older and slower devices like those without Retina displays.
Xcode asks you details about how and where to add the files, as in Figure 4-6. Make sure the Add To Targets check boxes are set for each target that will use the files, which in the figure is only the DoodleDrop target, but in Kobold2D you may want to add the file to the Mac OS X target as well. The check box "Copy items into destination group’s folder (if needed)" should be checked if the file isn’t already located in the project’s folder. If in doubt make sure it’s checked, at worst you will have duplicate versions of the same file. If you don’t check it, at worst files may be missing if you add the project to source control or if you zip and share the project.
Tip The preferred image format for iOS games is PNG (Portable Network Graphics). It’s a compressed file format, but unlike JPG’s, its compression is lossless, retaining all pixels of the original image unchanged. Although you can also save JPEG files without compression, the same image in PNG format is typically smaller than an uncompressed JPEG file. This affects only the app size, not the memory (RAM) usage of the textures. Another reason not to use JPEG files is that they’re particularly slow to load with cocos2d on iOS devices—about a factor of 8 times slower than PNGs, the last time I measured. In Chapter 6 you’ll also learn about TexturePacker, a tool that manages images for you. It allows you to convert images into various compressed formats or reduce the color depth while retaining the best possible image quality through dithering and other techniques.
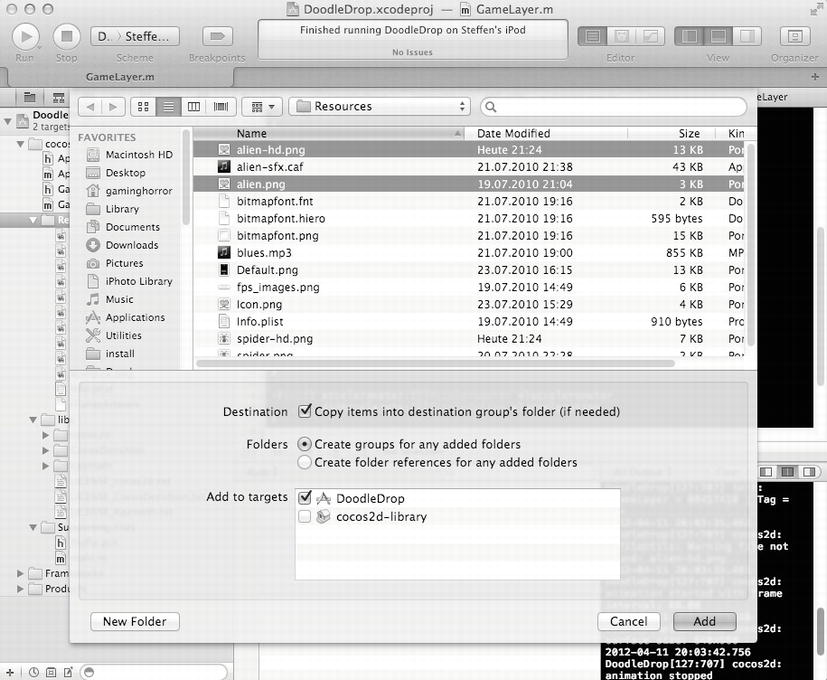
Figure 4-6 . You’ll see this dialog whenever you add resource files. In most cases you should use these default settings
Now add the player sprite to the game scene. I decided to add it as a CCSprite* member variable to the GameLayer class That's easier for now, and the game is simple enough for everything to go into the same class. Generally, that’s not the recommended approach, so the projects in later chapters will create separate classes for individual game components as a matter of good code design.
Listing 4-4 shows the addition of the CCSprite* member to the GameLayer header file.
Listing 4-4. The CCSprite* Player Is Added as a Member Variable to the GameLayer Class
#import < Foundation/Foundation.h>
#import "cocos2d.h"

@interface GameLayer : CCLayer
{
  CCSprite* player;
}

+(id) scene;

@end
Listing 4-5 contains the code I’ve added to the init method to initialize the sprite, assign it to the member variable, and position it at the bottom center of the screen. I’ve also enabled accelerometer input
Listing 4-5. Enabling Accelerometer Input and Creating and Positioning the Player Sprite
-(id) init
{
  if ((self = [super init]))
  {
  CCLOG(@"%@: %@", NSStringFromSelector(_cmd), self);

  self.isAccelerometerEnabled = YES;

  player = [CCSprite spriteWithFile:@"alien.png"];
  [self addChild:player z:0 tag:1];

  CGSize screenSize = [CCDirector sharedDirector].winSize;
  float imageHeight = player.texture.contentSize.height;
  player.position = CGPointMake(screenSize.width / 2, imageHeight / 2);
  }

  return self;
}
The player sprite is added as a child with a tag of 1, which will later be used to idenjpgy and separate the player sprite from all other sprites. For the filename, the standard resolution image filename is used, in this case alien.png. Cocos2d will automatically load the alien-hd.png on Retina devices. If there’s no accompanying –hd file, cocos2d will simply load the standard-resolution image instead. In that case the image will appear smaller on Retina devices than it will be on non-Retina devices. It’s good practice to provide –hd variants of all image assets.
Caution Filenames on iOS devices are case-sensitive. If you try to load Alien.png or ALIEN.PNG, it will work in the simulator but not on any iOS device because the real name is alien.png in all lowercase. That’s why it’s a good idea to stick to a naming convention like consistently keeping all filenames in all lowercase. Why lowercase? Because filenames in all uppercase are typically harder to read, and they speak to you quite loudly.
You set the initial position of the player sprite by centering the x position at half the screen width, which puts the sprite in the center horizontally. Vertically you want the bottom of the player sprite’s texture to align with the bottom of the screen. If you remember from Chapter 3, you know that the sprite texture is centered on the node’s position. Positioning the sprite vertically at 0 would cause the bottom half of the sprite texture to be below the screen. That’s not what you want—you want to move it up by half the texture height.
You do that with the call to player.texture.contentSize.height, which returns the sprite texture’s content size. What exactly is the content size? In Chapter 3, I mentioned that the texture dimensions of iOS devices can only be powers of two. But the actual image size may be less than the texture size—for example, the case of the image being 100 × 100 pixels while the texture has to be 128×128 pixels. The contentSize property of the texture returns the original image’s size of 100×100 pixels. In most cases, you’ll want to work with the content size, not the texture size. Even if your image is a power of two, you should use contentSize because the texture might be a texture atlas containing multiple images. Texture atlases are covered in Chapter 6.
By taking half the image height and setting this as the position on the y-axis, the sprite image will align neatly with the bottom of the screen.
Tip Avoiding using fixed positions wherever you can is good practice. If you simply set the player position to 160,32, you’re making two assumptions you should avoid. First, you’re assuming the screen width will be 320 pixels, but that will not hold true for every iOS device. Second, you’re assuming that the image height is 64 pixels, but that might change too. Once you start to make assumptions like these, your code will be less flexible, and it takes more time to make changes.
One last step, and then you're done tilting the player sprite around. As I demonstrated in Chapter 3, you have to add the accelerometer method to the layer that receives accelerometer input. Here I use the acceleration.x parameter and add it to the player’s position; multiplying by 10 is to speed up the player’s movement.
-(void) accelerometer:(UIAccelerometer *)accelerometer
  didAccelerate:(UIAcceleration *)acceleration
{
  CGPoint pos = player.position;
  pos.x + = acceleration.x * 10;
  player.position = pos;
}
Notice something odd? I wrote three lines where one might seem to suffice:
// ERROR: lvalue required as left operand of assignment
player.position.x +
= acceleration.x * 10;
Unlike other programming languages such as Java, C++, and C#, writing something like player.position.x + = value won’t work with Objective-C properties. The position property is a CGPoint, which is a regular C struct data type. Objective-C properties simply can’t assign a value to a field in a struct directly. The problem lies in how properties work in Objective-C and also how assignment works in the C language, on which Objective-C is based.
The statement player.position.x is actually a call to the position getter method [player position], which means you’re actually retrieving a temporary position and then trying to change the x member of the temporary CGPoint. But the temporary CGPoint would then get thrown away. The position setter [player setPosition] simply will not be called automagically. You can only assign to the player.position property directly—in this case, a new CGPoint. In Objective-C you have to live with this unfortunate issue—and possibly change programming habits if you come from a Java, C++, or C# background.
This is why the previous code has to create a temporary CGPoint object, change the point’s x field, and then assign the temporary CGPoint to player.position. Unfortunately, this is how you have to do it in Objective-C.
Your project should now be at the same level as the one in the DoodleDrop02 folder of the code provided with this chapter. Give it a try now. Make sure you choose to run the app on the device, because you won’t get accelerometer input from the simulator. Test how the accelerometer input behaves in this version.
If you haven’t installed your development provisioning profiles in Xcode for this particular project yet, you’ll get a "code sign" error. Code signing is required to run an app on an iOS device. Refer to Apple’s documentation to learn how to create and install the necessary development provisioning profiles (http://developer.apple.com/ios/manage/provisioningprofiles/howto.action).
Notice how the accelerometer input isn’t quite right? It’s reacting slowly, and the motion isn’t fluid. That’s because the player sprite doesn’t experience true acceleration and deceleration. Let’s fix that now. You'll find the accompanying code changes in the DoodleDrop03 project.
The concept for implementing acceleration and deceleration is not to change the player’s position directly but to use a separate CGPoint variable as a velocity vector. Every time an accelerometer event is received, the velocity variable accumulates input from the accelerometer. Of course, that means you also have to limit the velocity to an arbitrary maximum; otherwise, it’ll take too long to decelerate. The velocity is then added to the player position every frame, regardless of whether accelerometer input was received.
Note Why not use actions to move the player sprite? Well, move actions are a bad choice whenever you want to change an object’s speed or direction very often—say, multiple times per second. Actions are designed to be relatively long-lived, one-shot objects; creating new ones frequently creates additional overhead in terms of allocating and releasing memory. This can quickly drain a game’s performance.
Worse yet, actions don’t work at all if you don’t give them any time to do their work. That’s why adding a new action to replace the previous one every frame won’t show any effect whatsoever. Many cocos2d developers have stumbled across this seemingly odd behavior.
For example, stopping all actions and then adding a new MoveBy action to an object every frame won’t make it move at all! The MoveBy action will change the object’s position only in the next frame. But that’s when you’re already stopping all actions again and adding another new MoveBy action. Repeat ad infinitum, but the object will simply not move at all. It’s like the clichéd donkey: push it too hard, and it’ll become a stubborn, immobile object.
Let’s go through the code changes. Add the playerVelocity variable to the header:
@interface GameLayer : CCLayer
{
  CCSprite* player;
  CGPoint playerVelocity;
}
If you wonder why I’m using a CGPoint instead of float, who’s to say you’ll never want to accelerate up or down a little? So, it doesn’t hurt to be prepared for future expansions.
Listing 4-6 shows the accelerometer code, which I changed to use the velocity instead of updating the player position directly. It introduces three new design parameters for the amount of deceleration, the accelerometer sensitivity, and the maximum velocity. Those are values that don’t have an optimum; you need to tweak them and find the right settings that work best with your game’s design (which is why they’re called design parameters).
Deceleration works by reducing the current velocity before adding the new accelerometer value multiplied by the sensitivity. The lower the deceleration, the quicker the player can change the alien’s direction. The higher the sensitivity, the more responsive the player will react to accelerometer input. These values interact with each other because they modify the same value, so be sure to tweak only one value at a time.
Listing 4-6. GameLayer Implementation Gets playerVelocity
-(void) accelerometer:(UIAccelerometer *)accelerometer
  didAccelerate:(UIAcceleration *)acceleration
{
  // controls how quickly velocity decelerates (lower = quicker to change direction)
  float deceleration = 0.4f;
  // determines how sensitive the accelerometer reacts (higher = more sensitive)
  float sensitivity = 6.0f;
  // how fast the velocity can be at most
  float maxVelocity = 100;

  // adjust velocity based on current accelerometer acceleration
  playerVelocity.x = playerVelocity.x * deceleration + acceleration.x * sensitivity;

  // we must limit the maximum velocity of the player sprite, in both directions
  if (playerVelocity.x > maxVelocity)
  {
  playerVelocity.x = maxVelocity;
  }
  else if (playerVelocity.x <- maxVelocity)
  {
  playerVelocity.x = - maxVelocity;
  }
}
Now playerVelocity will be changed, but how do you add the velocity to the player’s position? By scheduling the update method in the GameLayer init method, adding this line:
// schedules the –(void) update:(ccTime)delta method to be called every frame
[self scheduleUpdate];
You also need to add the –(void) update:(ccTime)delta method as shown in Listing 4-7. The scheduled update method is called every frame, and that’s where you add the velocity to the player position. This way, you get a smooth constant movement in either direction regardless of the frequency of accelerometer input.
Listing 4-7. Updating the Player’s Position with the Current Velocity
-(void) update:(ccTime)delta
{
  // Keep adding up the playerVelocity to the player's position
  CGPoint pos = player.position;
  pos.x + = playerVelocity.x;

  // The Player should also be stopped from going outside the screen
  CGSize screenSize = [CCDirector sharedDirector].winSize;
  float imageWidthHalved = player.texture.contentSize.width * 0.5f;
  float leftBorderLimit = imageWidthHalved;
  float rightBorderLimit = screenSize.width - imageWidthHalved;

  // preventing the player sprite from moving outside the screen
  if (pos.x < leftBorderLimit)
  {
  pos.x = leftBorderLimit;
  playerVelocity = CGPointZero;
  }
  else if (pos.x > rightBorderLimit)
  {
  pos.x = rightBorderLimit;
  playerVelocity = CGPointZero;
  }

  // assigning the modified position back
  player.position = pos;
}
A boundary check prevents the player sprite from leaving the screen. Once again, you have to take the player texture’s contentSize into account, because the player position is at the center of the sprite image, but you don’t want either side of the image to be off the screen. For this, you calculate imageWidthHalved and then use it to check whether the newly updated player position is within the left and right border limits. The code may be a bit verbose at this point, but that makes it easier to understand. Build and run the project now to see how controlling the player feels like.
Tip You’ll notice that this straightforward implementation of accelerometer control doesn’t give you the same dynamic feeling that you may be used to from games like Tilt to Live. The reason is that smooth, dynamic accelerometer controls require accelerometer filtering. The KKInput class in Kobold2D allows you to obtain high-pass (instantaneous) and low-pass (smooth) filtered accelerometer values as properties, for example:
This game isn’t any good until we add something for the player to avoid. Let’s introduce an abomination of nature: a six-legged man-spider. Who wouldn’t want to avoid that?
As with the player sprite, you should add the spider.png and spider-hd.png files to the Resources group. Then the GameLayer.h file gets three new member variables added to its interface: a spiders NSMutableArray, whose class reference is shown in Listing 4-9, and the spiderMoveDuration and numSpidersMoved, which are used in Listing 4-12:
@interface GameLayer : CCLayer
{
  CCSprite* player;
  CGPoint playerVelocity;

  NSMutableArray* spiders;
  float spiderMoveDuration;
  int numSpidersMoved;
}
Caution Avoid using CCArray in your own code. CCArray is a faster replacement for NSArray and NSMutableArray. But it’s only marginally faster and using it will hardly affect framerate in almost all cases. Some methods like insertAtIndex or removeObjects are significantly slower than the same methods of NSMutableArray. The biggest problem with CCArray is that it’s been shown to have critical bugs in the past, including ARC-compatibility issues. It also doesn’t support all the features of NSArray/NSMutableArray. For example, you can’t enumerate a CCArray with blocks, which makes it unsuitable for concurrent processing (via Grand Central Dispatch, for example). Overall, CCArray is simply not as reliable, compatible, or defect-free as NSMutableArray is. I would trade performance any time for reliability. Cocos2d uses CCArray internally, and for internal uses CCArray has been proven and well tested. I would leave it at that.
And in the GameLayer init method, add the call to the initSpiders method discussed next, right after scheduleUpdate:
-(id) init
{
  if ((self = [super init]))
  {
  ...

  [self scheduleUpdate];
  [self initSpiders];
  }
  return self;
}
After that you add a fair bit of code to the GameLayer class, beginning with the initSpiders method in Listing 4-8, which is creating the spider sprites.
Listing 4-8. For Easier Access, Spider Sprites Are Initialized and Added to a CCArray
-(void) initSpiders
{
  CGSize screenSize = [CCDirector sharedDirector].winSize;

  // using a temporary spider sprite is the easiest way to get the image's size
  CCSprite* tempSpider = [CCSprite spriteWithFile:@"spider.png"];

  float imageWidth = tempSpider.texture.contentSize.width;

  // Use as many spiders as can fit next to each other over the whole screen width.
  int numSpiders = screenSize.width / imageWidth;

  // Initialize the spiders array using alloc.
  spiders = [NSMutableArray arrayWithCapacity:numSpiders];

  for (int i = 0; i < numSpiders; i++)
  {
  CCSprite* spider = [CCSprite spriteWithFile:@"spider.png"];
  [self addChild:spider z:0 tag:2];

  // Also add the spider to the spiders array.
  [spiders addObject:spider];
  }

  // call the method to reposition all spiders
  [self resetSpiders];
}
There are a few things to note. You create a tempSpider CCSprite only to find out the sprite’s image width, which you then use to decide how many spider sprites can fit next to each other. The easiest way to get an image’s dimensions is by simply creating a temporary CCSprite. Note that you didn't add the tempSpider as child to any other node, nor assign it to an instance variable. This means that once execution leaves the initSpiders method, ARC will recognize that the tempSpider object is no longer in use and will automatically release its memory.
This is in contrast to the spiders array you're using to hold references to the spider sprites. The array is assigned to the instance variable spiders; therefore, ARC won't release the object until the GameLayer object itself is released. Under ARC, you don't have to release the spiders array in any way or form.
At the end of Listing 4-8, the method [self resetSpiders] is called; this method is shown in Listing 4-9. The reason for separating the initialization of the sprites and positioning them is that eventually there will be a game over, after which the game will need to be reset. The most efficient way to do so is to simply move all game objects to their initial positions. However, that may stop being feasible once your game scene gets to a certain complexity. Eventually, it may be easier to simply reload the whole scene, at the cost of having the player wait for the scene to reload.
Caution Speaking of reloading a scene, you may be tempted to write [[CCDirector sharedDirector] replaceScene:self];, to reload the same scene. This will cause a crash because self is the currently running scene, and trying to replace a running scene with itself is something cocos2d doesn’t like and causes the app to crash. Instead, you must create a new instance of the GameLayer class: [[CCDirector sharedDirector] replaceScene:[GameLayer scene]];.
Listing 4-9. Resetting Spider Sprite Positions
-(void) resetSpiders
{
  CGSize screenSize = [CCDirector sharedDirector].winSize;

  // Get any spider to get its image width
  CCSprite* tempSpider = [spiders lastObject];
  CGSize size = tempSpider.texture.contentSize;

  int numSpiders = [spiders count];
  for (int i = 0; i < numSpiders; i++)
  {
  // Put each spider at its designated position outside the screen
  CCSprite* spider = [spiders objectAtIndex:i];
  spider.position = CGPointMake(size.width * i + size.width * 0.5f,←
  screenSize.height + size.height);

  [spider stopAllActions];
  }

  // Schedule the spider update logic to run at the given interval.
  [self schedule:@selector(spidersUpdate:) interval:0.7f];

  // reset the moved spiders counter and spider move duration (affects speed)
  numSpidersMoved = 0;
  spiderMoveDuration = 4.0f;
}
Once again you obtain a reference to one of the existing spiders temporarily to get its image size via the texture’s contentSize property. You don’t create a new sprite here because there are already existing sprites of the same kind, and because all spiders use the same image with the same size, you shouldn't even care which sprite you're getting. So, simply get the last spider from the array.
You then modify each spider’s position so that together they span the entire width of the screen. You add half the image size’s width—once again, this is because of the sprite’s texture being centered on the node’s position. As for the height, also set each sprite to be one image size above the upper screen border. This is an arbitrary distance, as long as the image isn’t visible, which is all you want to achieve. Because the spider might still be moving when the reset occurs, you also stop all of its actions at this point.
Tip To save a few CPU cycles, it’s good practice not to use method calls in the conditional block of for or other loops if it’s not strictly necessary. In this case, I created a variable numSpiders to hold the result of [spiders count] and I use that in the conditional check of the for loop. The count of the array remains the same during the for loop’s iterations because the array itself isn’t modified in the loop. That’s why I can cache this value and save the repeated calls to [spiders count] during each iteration of the for loop.
I’m also scheduling the spidersUpdate : selector to run every 0.7 seconds, which is how often another spider will drop down from the top of the screen. If the selector is already scheduled, then cocos2d will acknowledge that with a log message you can ignore. Cocos2d doesn't schedule the selector a second time, but merely updates the scheduled selector’s interval. The spidersUpdate : method, shown in Listing 4-10, randomly picks one of the existing spiders, checks whether it's idle, and lets it fall down the screen by using a sequence of actions.
Listing 4-10. The spidersUpdate: Method Frequently Lets a Spider Fall
-(void) spidersUpdate:(ccTime)delta
{
  // Try to find a spider which isn't currently moving.
  for (int i = 0; i < 10; i++)
  {
  int randomSpiderIndex = CCRANDOM_0_1() * spiders.count;
  CCSprite* spider = [spiders objectAtIndex:randomSpiderIndex];

  // If the spider isn't moving it won't have any running actions.
  if (spider.numberOfRunningActions == 0)
  {
  // This is the sequence which controls the spiders' movement
  [self runSpiderMoveSequence:spider];

  // Only one spider should start moving at a time.
  break;
  }
  }
}
I don’t let any listing pass without some curiosity, do I? In this case, you might wonder why you're iterating exactly ten times to get a random spider. The reason is that you don’t know if the randomly generated index will get you a spider that isn’t moving already, so you want to be reasonably sure it eventually picks a spider that's currently idle. If after ten tries—and this number is arbitrary—you didn't have the luck to get an idle spider chosen randomly, simply skip this update and wait for the next.
You could brute-force your way and just keep trying to find an idle spider using a do/while loop. However, it’s possible that all spiders could be moving at the same time, because this depends on design parameters such as the frequency with which new spiders are being dropped. In that case, the game would simply lock up, looping endlessly trying to find an idle spider. Moreover, I’m not so keen on trying too hard; it really doesn’t matter much for this game if you're unable to send another spider falling down for a few seconds. That said, if you check out the DoodleDrop03 project, you’ll see I added a logging statement that will print out how many retries it took to find an idle spider.
Because the movement sequence is the only action the spiders perform, you simply check whether the spider is running any actions at all, and if not, assume it's idle. And that brings us to the runSpiderMoveSequence in Listing 4-11.
Listing 4-11. Spider Movement Is Handled by an Action Sequence
-(void) runSpiderMoveSequence:(CCSprite*)spider
{
  // Slowly increase the spider speed over time.
  numSpidersMoved++;
  if (numSpidersMoved % 8 == 0 && spiderMoveDuration > 2.0f)
  {
  spiderMoveDuration - = 0.1f;
  }

  // This is the sequence which controls the spiders' movement.
  CGPoint belowScreenPosition = CGPointMake(spider.position.x,←
  -spider.texture.contentSize.height);
  CCMoveTo* move = [CCMoveTo actionWithDuration:spiderMoveDuration
  position:belowScreenPosition];

  CCCallBlock* callDidDrop = [CCCallBlock actionWithBlock:^void(){
  // move the droppedSpider back up outside the top of the screen
  CGPoint pos = spider.position;
  CGSize screenSize = [CCDirector sharedDirector].winSize;
  pos.y = screenSize.height + spider.texture.contentSize.height;
  spider.position = pos;
  }];

  CCSequence* sequence = [CCSequence actions:move, callDidDrop, nil];
  [spider runAction:sequence];
}
The runSpiderMoveSequence method keeps track of the number of dropped spiders. Every eighth spider, the spiderMoveDuration decreases, and thus any spider’s speed increases. In case you're wondering about the % operator, it’s called the modulo operator. The result is the remainder of the division operation, meaning that if numSpidersMoved is divisible by 8, the result of the modulo operation will be 0.
The action sequence consists only of a CCMoveTo action and a CCCallBlock action. You could improve it to let spiders drop down a bit, wait, and then drop all the way, as evil six-legged man-spiders would normally do. I leave this improvement to you, and you can find an example implementation in the final DoodleDrop project.
For now it’s only important to know that I chose to reset the spider’s position in a block function passed to the CCCallBlock action. The block function can simply use the same spider variable passed to the runSpiderMoveSequence method. The block is called after the spider’s movement is done, meaning it dropped past the player character. Thanks to the block you don’t have to jump through hoops to find the right spider. The spider’s position is then reset to just above the top of the screen. Listing 4-12 shows the same block from Listing 4-11 again, in isolation.
Listing 4-12. Resetting the Spider Position So It Can Fall Back Down Again is done in a CCCallBlock block
CCCallBlock* callDidDrop = [CCCallBlock actionWithBlock:^void(){
  // move the droppedSpider back up outside the top of the screen
  CGPoint pos = spider.position;
  CGSize screenSize = [CCDirector sharedDirector].winSize;
  pos.y = screenSize.height + spider.texture.contentSize.height;
  spider.position = pos;
}];
So far, so good. You may want to build and run the game now and play it a little. I think you’ll quickly notice what’s still missing. Hint: read the next headline.
You may be surprised to see that collision detection can be as simple as Listing 4-13. Admittedly, this only checks the distance between the player and all spiders, which makes this type of collision detection a radial check. For this type of game, it’s sufficient. Add the call to [self checkForCollision] to the end of the –(void) update:(ccTime)delta method, along with the resetGame method, which resets the spiders.
Listing 4-13. A Simple Range-Check or Radial Collision-Check Suffices
-(void) checkForCollision
{
  // Assumption: both player and spider images are squares.
  float playerImageSize = player.texture.contentSize.width;
  CCSprite* spider = [spiders lastObject];
  float spiderImageSize = spider.texture.contentSize.width;
  float playerCollisionRadius = playerImageSize * 0.4f;
  float spiderCollisionRadius = spiderImageSize * 0.4f;

  // This collision distance will roughly equal the image shapes.
  float maxCollisionDistance = playerCollisionRadius + spiderCollisionRadius;


  int numSpiders = spiders.count;
  for (int i = 0; i < numSpiders; i++)
  {
     spider = [spiders objectAtIndex:i];

     if (spider.numberOfRunningActions == 0)
      {
      // This spider isn't even moving so we can skip checking it.
      continue;
      }

      // Get the distance between player and spider.
      float actualDistance =     ccpDistance(player.position, spider.position);

      // Are the two objects closer than allowed?
      if (actualDistance <     maxCollisionDistance)
      {
      // Game Over (just restart the game for now)
  [self resetGame];
      break;
    }
  }
}

-(void) resetGame
{
  [self resetSpiders];
}
The image sizes of the player and spider are used as hints for the collision radii (or radiuses, if you prefer). The approximation is good enough for this game. If you check the DoodleDrop03 project, you’ll also notice that I’ve added a debug drawing method (see Listing 4-14) that renders the collision radii for each sprite.
You're iterating over all the spiders but ignoring those that aren’t moving at the moment because they’ll definitely be out of range. The ccpDistance method calculates the distance between the current spider and the player. This is another undocumented but fully supported cocos2d method. You can find these and other useful math functions in the CGPointExtension filesin the cocos2d/Support group in the Xcode project and in the amended cocos2d API reference hosted on the Learn Cocos2D web site: www.learn-cocos2d.com/api-ref.
The resulting distance is then compared to the sum of the player’s and spider’s collision radius. If the actual distance is smaller than that, a collision has occurred. Because you've not implemented a game-over, you can just reset all the spiders to restart the game.
Listing 4-14. Drawing Collision Radii in Debug Builds
#if DEBUG
-(void) draw
{
    [super draw];

    // Iterate through all nodes of the layer.
    for (CCNode* node in [self children])
    {
       // Make sure the node is a CCSprite and has the right tags.
       if ([node isKindOfClass:[CCSprite class]] && (node.tag == 1 || node.tag == 2))
       {
       // The sprite's collision radius is a percentage of its image width.
       // The same factor is used in the checkForCollision method.
       CCSprite* sprite =    (CCSprite*)node;
       float radius = sprite.texture.contentSize.width * 0.4f;
       float angle =    0;
       int numSegments = 10;
       bool drawLineToCenter = NO;
       ccDrawCircle(sprite.position, radius, angle, numSegments, drawLineToCenter);
      }
    }
}
#endif
Labels are the second-most important graphical element of cocos2d games, right after sprites. The easiest and most flexible solution seems to be the CCLabelTTF class, but its performance is terrible if you need to change the displayed text frequently. The alternative is the CCLabelBMFont class, which renders bitmap fonts instead of TrueType fonts. Along with that I’ll introduce you to Glyph Designer, an elegant tool for converting TrueType fonts into bitmap fonts and enhancing them along the way with effects like shadows, color gradients, and so on.
The game needs some kind of scoring mechanism. Let's add a simple time-lapse counter as the score. Start by adding the score’s Label in the init method of the GameLayer class:
scoreLabel = [CCLabelTTF labelWithString:@"0" fontName:@"Arial" fontSize:48];
scoreLabel.position = CGPointMake(screenSize.width / 2, screenSize.height);

// Adjust the label's anchorPoint's y position to make it align with the top.
scoreLabel.anchorPoint = CGPointMake(0.5f, 1.0f);

// Add the score label with z value of -1 so it's drawn below everything else
[self addChild:scoreLabel z:-1];
You also need to declare the score and scoreLabel instance variables in the GameLayer.h file. Instead of adding a CCLabelTTF object, however, use a CCNode object that implements the CCLabelProtocol. That way, later you can change the implementation from CCLabelTTF to CCLabelBMFont without having to change the instance variable’s declaration. Using the protocol instead of a concrete class is an example of interface-based programming, which makes programs easier to modify and maintain. The scoreLabel is now oblivious to whether it's a CCLabelTTF or CCLabelBMFont object.
@interface GameLayer : CCLayer
{
    CCSprite* player;
    CGPoint playerVelocity;

    NSMutableArray* spiders;
    float spiderMoveDuration;
    int numSpidersMoved;
int score;
CCNode < CCLabelProtocol > * scoreLabel;
}
I consciously chose a CCLabelTTF object for now because it would likely be the first choice for most beginning cocos2d programmers. And that’s where things might get ugly pretty fast. In Chapter 3, I mentioned that updating a CCLabelTTF’s text is slow. The whole texture is re-created using iOS font-rendering methods, and they take their time, besides allocating a new texture and releasing the old one. On current-generation devices and with a single label, you probably won’t notice it. But use several frequently updating devices and run the game on an iPhone 3GS and perhaps you’ll notice a severe drop in framerate.
But keep in mind that CCLabelTTF is slow only when changing its string frequently. If you create the CCLabelTTF once when the scene begins and never or rarely change it, it’s just as fast as any other CCSprite of the same dimensions.
You should also update the resetGame method so that it resets the score and scoreLabel variables:
-(void) resetGame
{
    [self resetSpiders];
score = 0;
[scoreLabel setString:@"0"];
}
To frequently change the label for testing, you can add the following line to the update method. It simply prints the number of total frames rendered so far:
score = [CCDirector sharedDirector].totalFrames;
[scoreLabel setString:[NSString stringWithFormat:@"%i", score]];
Labels that update fast at the expense of more memory usage, like any other CCSprite, are the specialty of the CCLabelBMFont class. I’ve replaced the CCLabelTTF with a CCLabelBMFont in DoodleDrop04. The code change is relatively straightforward; you have to change the line in the init method, as shown here:
scoreLabel = [CCLabelBMFont labelWithString:@"0" fntFile:@"bitmapfont.fnt"];
Note Bitmap fonts are a great choice for games because they’re fast, but they do have one disadvantage: the size of any bitmap font is fixed. If you need the same font but larger or smaller in size, you can scale the CCLabelBMFont—but you lose image quality scaling up, and you’re wasting memory when scaling down. The other option is to create a separate font file with the new size, but this uses up more memory because each variation of a bitmap font uses its own texture.
You also need to add the bitmapfont.fnt and bitmapfont-hd.fnt files as well as the accompanying bitmapfont.png and bitmapfont-hd.png, which are all in the DoodleDrop04 project’s Resources folder. Don't add the .GlyphProject files, though—those files are used by, and useful only to, Glyph Designer.
The tool to create bitmap fonts used to be Hiero, but by now Hiero is only the tool of choice if you really don’t want to spend any money. Written by Kevin James Glass, Hiero is a free Java Web application, available from http://slick.cokeandcode.com/demos/hiero.jnlp.
The downside is, it’s a free Java web application. It asks you to trust the application because of a missing security cerjpgicate. On the other hand, many developers use the tool, and so far there's been no evidence that the application is untrustworthy. Hiero also “features” several odd and downright annoying bugs, including an obnoxious one that has the resulting image file flipped upside-down. If you see only garbage instead of a bitmap font text in your app, you may have to flip the bitmap font PNG image upside down with an image-editing program. I've documented these issues and how to fix them in my Hiero tutorial: www.learn-cocos2d.com/knowledge-base/tutorial-bitmap-fonts-hiero.
Some developers also swear by BMFont. But as a Windows program, it requires a Windows computer or Windows installed in a virtual machine on your Mac. That’s why it’s not more widely used in the Mac developer community. You can download BMFont from www.angelcode.com/products/bmfont.
For everyone else, there’s Glyph Designer.
Creating Bitmap Fonts with Glyph Designer
The guys at www.71squared.com released the Hiero replacement tool called Glyph Designer. Although it’s not free, it’s definitely worth every cent.
You can download a trial version at http://glyphdesigner.71squared.com, and if you’re already familiar with Hiero, you’ll notice a striking similarity in features, although the user interface is a lot easier to use and encourages experimentation. Mike Daley also mentioned in an episode of the Cocos2D Podcast (available at http://cocos2dpodcast.wordpress.com) that Glyph Designer will get a new feature that allows you to share font designs with other users of the tool.
Figure 4-7 shows Glypgh Designer in action. The process of creating a bitmap font is relatively playful, and it doesn’t hurt to change the various knobs, buttons, and colors as you please. I outline just the basic editing areas for you.
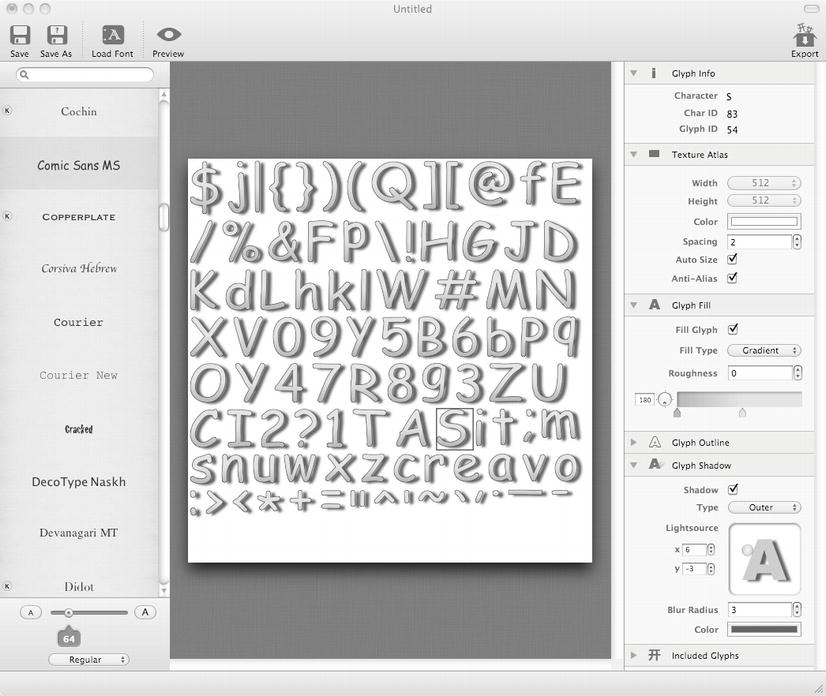
Figure 4-7 . Glyph Designer lets you create bitmap fonts from any TrueType font and can export FNT and PNG files compatible with the CCLabelBMFont class of cocos2d
On the left-hand side you have the list of TrueType fonts, and if those aren’t enough, you can use the Load Font icon to load any TTF file. Below the list you can change the size of the font with the slider and also switch to bold, italic, and other font styles.
Tip Creating Retina-enabled bitmap fonts is easy. Create your font as usual and export it. This will be your non-Retina or SD font. Then simply change the size of the font in Glyph Designer to twice its normal size; for example, move the slider from a font size of 30 to a font size of 60. Then reexport the font using the same name but adding the -hd suffix. Now you have the same font in regular/SD and Retina/HD sizes.
In the center of the screen, you see the resulting texture atlas used for your current font settings. Notice that the texture atlas size and the order of the glyphs frequently change as you modify the font settings. You can also select a glyph and see its info on the right-hand pane under Glyph Info.
Further down on the right-hand pane you can change the texture atlas settings, although in most cases you don’t have to. Glyph Designer makes sure the texture atlas size is always large enough to contain all the glyphs in a single texture.
With the Glyph Fill settings, you can change the color and the way glyphs are filled, including a gradient setting. Alongside that you have the option to change the Glyph Outline, which is a black thin line around each glyph, and the Glyph Shadow, which allows you to create a 3D-ish look of the font.
At the very bottom of the right-hand pane you find the Included Glyphs section. With that you can choose from a predefined selection of glyphs to include in the atlas. If you absolutely know for sure that you won’t be needing certain characters, you can also enter your own list of characters to reduce the size of the texture. This is especially helpful for score strings, where you may only need digits plus very few extra characters. For example, the bitmap font used in the DoodleDrop project only contains letters to minimize the font’s memory usage.
Once you’re satisfied with your bitmap font, you can save the entire project so that you can restore previous settings. To save the font in a format usable by cocos2d, you have to save it via File ![]() Export in the .fnt (Cocos2d Text) format. You can then add the FNT and PNG files created by Glyph Designer to your Xcode project and use the FNT file with the CCLabelBMFont class.
Export in the .fnt (Cocos2d Text) format. You can then add the FNT and PNG files created by Glyph Designer to your Xcode project and use the FNT file with the CCLabelBMFont class.
Caution If you try to display characters using a CCLabelBMFont, which aren’t available in the .fnt file, they’ll simply be skipped and not displayed. For example, if you do [label setString:@"Hello, World!"], but your bitmap font contains only lowercase letters and no punctuation characters, you’ll see the string “ello orld” displayed instead.
I’ve added some audio files to complete this game. In the Resources folder of the DoodleDrop04 project, you’ll find the audio files named blues.mp3 and alien-sfx.caf that you can add to your project. The first choice and the easiest way to play audio files in cocos2d is by using the SimpleAudioEngine. Audio support is not an integral part of cocos2d; this is the domain of CocosDenshion, a third-party addition to cocos2d and fortunately distributed with cocos2d.
Tip If you’re looking for an alternative sound engine, I recommend ObjectAL, available from http://kstenerud.github.com/ObjectAL-for-iPhone, which is readily available in Kobold2D (see Chapter 16). ObjectAL has a cleanly written API and excellent documentation but is only compatible with iOS.
Because CocosDenshion is treated as separate code from cocos2d, you have to add the corresponding header files whenever you use the CocosDenshion audio functionality, like so:
#import "GameLayer.h"
#import "SimpleAudioEngine.h"
You’ll find playing music and audio using the SimpleAudioEngine is straightforward, as shown here:
[[SimpleAudioEngine sharedEngine] playBackgroundMusic:@"blues.mp3" loop:YES];
[[SimpleAudioEngine sharedEngine] playEffect:@"alien-sfx.caf"];
You may want to preload sound effects especially when the game starts, to avoid a small delay when each sound effect is first played. This is also easily accomplished:
[[SimpleAudioEngine sharedEngine] preloadEffect:@"alien-sfx.caf"];
For music and longer speech files, playing MP3 files is the preferred choice. Note that you can play only one MP3 file in the background at a time. Technically, it’s possible to play two or more MP3 files, but only one can be decoded in hardware. The extra strain on the CPU is undesirable for games, so playing multiple MP3 files at the same time, or merely crossfading two music tracks, is something you might want to avoid unless your app’s design calls for it.
This also means that short-lived sound effects should not be in MP3 format. For those audio effects, I’ve had good experiences with 16-bit PCM (uncompressed) audio in either the WAV or CAF file format. The sampling rate can be 22.5 kHz for most game sound effects, unless you need or want crystal-clear audio quality, in which case use 44.1 kHz.
A good and complete audio-editing tool for Mac OS X is Audacity, which you can download for free from http://audacity.sourceforge.net. If you need only to quickly convert audio files from one format to another, possibly changing some basic settings such as sampling rate, I recommend SoundConverter, which was developed by Steve Dekorte. The tool is free to use for files up to 500KB in size, and the license to use SoundConverter without restrictions is just $15. You can download SoundConverter from http://dekorte.com/projects/ shareware/SoundConverter/.
A free alternative to SoundConverter is the command-line tool afconvert. Familiarity with Terminal is recommended. You can do a lot with afconvert, but being a command-line tool, you’ll also have to type a lot. To get help for afconvert, open the Terminal app and type the following:
afconvert -h
The preferred audio format for iOS devices is 16-bit, little endian, linear PCM packaged as CAF file (Apple CAF audio format code: LEI16), according to Apple’s Audio Coding How To, which contains generally helpful advice for audio programming: http://developer.apple.com/library/ios/#codinghowtos/AudioAndVideo/_index.html.
To convert any audio file that afconvert supports to the preferred iOS audio format, run the afconvert command like this:
afconvert -f caff -d LEI16 myInputFile.mp3 myOutputFile.caf
The -f (or -file) switch denotes the file format, which is caff for CAF files. With the -d switch, you specify the audio data format, here LEI16. You can get a list of the audio data formats supported by afconvert by running afconvert with the -hf switch.
Note If you’re ever in the situation where an audio file just won’t play or results in a garbled mess of noise, there’s probably nothing wrong with your code or your device. There are countless audio applications and numerous audio codecs, and they all create their own variations of the respective formats. Some can’t play on iOS devices but play fine otherwise. Particularly, WAV files seem to be affected, which is why I prefer to use Apple’s more native audio container format CAF. Typically, the way you can fix broken audio files is to open the audio file in an audio-editing program that you know is capable of saving iOS-compatible audio files and then save it again. You can do this with the aptly named SoundConverter or the audio application of your choice. Usually, after this resave, the file will play just fine on the iOS device. Also sound issues are common in the iOS Simulator. If the issue only occurs in the Simulator, you can ignore it and maybe fix it by rebooting your computer.
iPad Considerations
With all coordinates taking the screen’s size into account, the game should simply scale up without any problems when running it on the iPad’s bigger screen. And it does. Just like that. In contrast, if you had been using fixed coordinates, you’d be facing a serious rework of your game.
You can try this out by deploying the DoodleDrop project to an iPad device or by selecting the iPad Simulator from the scheme drop-down menu.
The 3rd-generation iPad features a Retina display with four times as many pixels as its predecessors. But if you run the DoodleDrop project as is, you may notice that the images are too small on a Retina iPad.
When running your app on an iPad, cocos2d will try to load assets with the suffix –ipad and –ipadhd. If they don’t exist, cocos2d reverts back to loading the standard-resolution asset with no suffix. In this case the Retina iPad won't find the –ipadhd versions of any assets and displays the smaller SD assets.
You can either provide both –ipad and –ipadhd variants of all your assets or you can change which type of suffix cocos2d should look for. For the DoodleDrop project it's sufficient to use the regular Retina assets on a Retina iPad. Do that by changing the iPad and iPad Retina suffixes to the empty string and –hd respectively:
[CCFileUtils setiPadSuffix:@""];
[CCFileUtils setiPadRetinaDisplaySuffix:@"-hd"];
Run this code as early as possible—for example, in the init method of the first scene or directly in the AppDelegate class. From then on, the 1st- and 2nd-generation iPads will load the assets without suffixes, whereas the Retina iPads will load the –hd assets.
One Universal App or Two Separate Apps?
When porting your app to iPad, you generally have to decide whether your app will be treated as a single (Universal) app on the App Store or whether it should be treated as two separate apps. Both options have their pros and cons, and generally you could say that Universal apps are better and fairer for customers, whereas separate apps may be better for developers.
Universal apps include code and assets for both iPhone/iPod touch and iPad devices. This has the drawback that all assets are added to the same Xcode target, increasing the app’s size—possibly beyond the over-the-air download limit of (currently) 50 MB. That’s the technical drawback; there are no performance penalties.
With a Universal app, you can't set different prices for iPhone/iPod touch and iPad versions. That’s probably the biggest bummer, knowing that iPad users tend to be more willing to pay more for an app. Moreover, you won’t know which percentage of your download’s respective purchases were made by iPad users. You’d have to have the app “call home” to determine that.
Regardless of that, Universal apps will still be ranked separately by device in the App Store charts. If the user downloads or purchases the app on an iPhone or iPod touch device, it's accounted for in the iPhone charts. The same goes for downloads/purchases on the iPad, which add to your app’s ranking in the iPad charts. That leaves the question of how iTunes downloads/purchases are accounted for. They're simply accounted for in the iPhone rankings. That makes it impossible to even estimate how many of your users are iPad users, unless you add analytics tracking code to your app.
Splitting your app into two separate apps for iPhone/iPod touch and iPad allows you to keep the game assets separate. But the biggest drawback is if iOS users want both the iPhone and iPad versions, they'll have to buy both. That's good for you, but bad for the customer. And some won’t hesitate to give your app a bad rating just because of that.
Because your app will be treated as two entirely separate apps in the App Store, at least the customer reviews and comments will be specific to the particular app version. You’ll also be able to optimize each app’s description and screenshots for the target platform and update each version separately. Splitting your app is also a good choice if your app has been on the App Store for a while, because adding support for new devices in a Universal app won't have your app appear in the What’s New section of the App Store.
By default all cocos2d projects are set to be Universal apps that run natively on iPhone, iPod touch, and iPad devices. But you can change your app to work only on iPhone and iPod touch or iPads.
First, select the project DoodleDrop in the Project Navigator. This brings up the list of targets where you select the DoodleDrop target and then choose the Summary tab. Under the iOS Application Target section, there’s a pop-up control labeled Devices that gives you three choices: iPhone, iPad, and Universal.
In Figure 4-8 the target is set to build a Universal app. Changing this setting to either iPhone or iPad will restrict your app to users of that device. Of course, iPad users can still buy and download iPhone apps, but they're displayed on the iPad as an iPhone screen-sized app that iPad users can optionally zoom up with the 2x button.

Figure 4-8 . Changing the application target to build either a Universal app or one that’s limited to either iPhone and iPod touch or iPads
Now you may be wondering, what if I want two separate targets for iPhone and iPad? This can be useful to charge different prices for iPhone and iPad versions or simply to reduce the download size of either version.
In that case, all you have to do is to select the target—DoodleDrop in this case—and choose Edit ![]() Duplicate. Or just right-click the target and select Duplicate. This creates a duplicate of the target, which allows you to set one target’s Devices setting to iPhone and the other target’s Devices setting to iPad. Now you have a separate target for each device type, and you might want to rename both targets and their schemes accordingly to avoid confusion.
Duplicate. Or just right-click the target and select Duplicate. This creates a duplicate of the target, which allows you to set one target’s Devices setting to iPhone and the other target’s Devices setting to iPad. Now you have a separate target for each device type, and you might want to rename both targets and their schemes accordingly to avoid confusion.
Summary
I hope you had fun building this first game. It was surely a lot to take in, but I’d rather err on the side of too much information than too little.
At this point, you’ve learned how to create your own game-layer class and how to work with sprites. You’ve used the accelerometer to control the player and added velocity to allow the player sprite to accelerate and decelerate, giving it a more dynamic feel.
Simple radial collision detection using the distance check method from the likewise undocumented CGPointExtensions was also on the menu. And for dessert you had a potpourri of labels, bitmap fonts, and the Glyph Designer tool, garnished with some audio programming.
What’s left? Maybe going through the source code for this chapter. I’ve added a finalized version of this game that includes some game-play improvements, a startup menu, and a game-over message.
There’s just one thing about the DoodleDrop project I haven’t mentioned yet: it’s all in one class. For a small project, this may suffice, but it’ll quickly get messy as you move on to implement more features. You need to add some structure to your code design. The next chapter will arm you with cocos2d programming best practices, show you how to lay out your code, and discuss the various ways you can pass information between objects if they're no longer in the same class.
In the meantime, you may want to check out the DoodleDrop05 game, which I improved with a game-over screen and additional visual effects.