
![]()
Java Web Services
Java Web Services can play a vital role in enterprise application development. A web service can be described as a client and server application that communicates over HTTP, which provides a standard means for communication and interoperability between different applications. There are many different web service implementations available across each of the different programming platforms. A web service is made accessible via an endpoint implementation. Clients and servers transmit messages to exchange information between various web services. Entire applications can be implemented using web services that transmit messages and data to and from each other. The two main web service implementations that are part of Java EE 7 are the Java API for XML Web Services (JAX-WS) and the Java API for RESTful Web Services (JAX-RS).
JAX-WSutilizes XML messages following the Simple Object Access Protocol (SOAP) standard. SOAP is an XML language that defines messages. JAX-WS utilizes a Web Services Description Language (WSDL) file to describe each of the various operations of a particular web service, and clients can use the WSDL file to obtain a proxy to the service. Recipes in this chapter will demonstrate how to make use of JAX-WS to serve content via web services.
JAX-RS is the Java API for Representational State Transfer (REST) web services. REST services are useful for performing operations via HTTP without the need for a WSDL or XML messages. REST services do not follow the SOAP standard. REST service implementations are stateless, and they provide a smaller footprint for bandwidth than SOAP services, making them ideal for HTTP on mobile devices.
Services written in JAX-WS are helpful in enterprises where security is a necessity. Although both SOAP and REST support SSL, JAX-WS provides WS-Security, which provides enterprise-related security. JAX-WS provides a very formal transaction process over a service, whereas REST is limited by HTTP. In most cases, it is recommended to use REST services over JAX-WS when possible. However, the use of JAX-WS has its merits, especially in secure enterprises and for use with applications requiring transaction security, such as banking services.
Over the next several recipes, you will be shown how to develop both JAX-WS and JAX-RS web services. You’ll learn how to configure your environment to work with each type of service, and how to code a client to make use of the services.
SETTING UP A REST ENVIRONMENT
There are a couple of options that can be utilized for creating and utilizing REST services. In this chapter, we focus on making use of the JAX-RS reference implementation for REST services, based upon Jersey. If you are using GlassFish v3 or greater (Java EE 6 and up), the JAX-RS jars are provided with the distribution, so you do not need to download any additional libraries in order to add REST functionality to your applications. However, if you are utilizing another application server, such as Tomcat, you will need to download Jersey from the homepage at https://jersey.dev.java.net/ and add the JAR files to your application server installation or application WEB-INF/lib directory.
The tact you decide to take depends on the application you are developing. If you need to make use of the Java standard for RESTful web services, then choose JAX-RS, but if you wish to work with the latest and greatest features in REST, choose Jersey. The material covered in the REST recipes for this chapter will work with either JAX-RS or Jersey.
15-1. Creating a JAX-WS Web Service Endpoint
Problem
You would like to develop a JAX-WS web service that can be called upon from a desktop or web-based client application.
Solution #1
To develop a web service endpoint solution, create an endpoint interface that exposes any public methods of the service that will be implemented. In the interface, annotate method definitions that will be exposed as web service endpoints with the javax.jws.WebMethod annotation. Create a class that implements the interface, and annotate it with the javax.jws.WebService annotation. In the following example, we develop a web service endpoint solution that exposes a single method to a client application.
The following interface is a web service endpoint interface, which declares one method, named obtainContactList, that will be implemented by the web service implementation class.
package org.javaeerecipes.chapter15.recipe15_01.endpointinterface;

import java.util.List;
import javax.jws.WebMethod;
import javax.jws.WebService;
import javax.jws.soap.SOAPBinding;
import javax.jws.soap.SOAPBinding.Style;

/**
 * Bookstore Web Service Endpoint Interface
 * @author juneau
 */
@WebService
@SOAPBinding(style=Style.DOCUMENT)
public interface BookstoreEndpoint {
    @WebMethod String obtainCompleteContactList();
}
Next, let’s take a look at the web service implementation class, which implements the web service endpoint interface. The following class, org.javaeerecipes.chapter15.recipe15_01.endpoint.BookstoreService, defines a web service method that calls an EJB that will return the list of Contacts that are stored in the Acme Bookstore database.
/*
 * JAX-WS web service endpoint class
 */
package org.javaeerecipes.chapter15.recipe15_01.endpoint;

import java.util.List;
import javax.ejb.EJB;
import javax.jws.WebMethod;
import javax.jws.WebService;
import org.javaeerecipes.chapter15.recipe15_01.endpointinterface.BookstoreEndpoint;
import org.javaeerecipes.jpa.entity.Contact;
import org.javaeerecipes.jpa.session.ContactFacade;

@WebService(serviceName="BookstoreService",

endpointInterface="org.javaeerecipes.chapter15.recipe15_01.endpointinterface.BookstoreEndpoint")
public class BookstoreService implements BookstoreEndpoint {

    @EJB
    ContactFacade contactFacade;

    public void BookstoreService(){

    }

    @Override
    public String obtainCompleteContactList(){
        StringBuilder sb = new StringBuilder();
        sb.append("Here is the new JAX-WS Web Service
");
        List<Contact> contacts = contactFacade.findAll();
        for(Contact contact: contacts){
            sb.append(contact.getEmail() + "
");
        }
        return sb.toString();
    }
}
Now that the web service endpoint interface and service implementation has been created, it is time to deploy so that clients can consume the service. Please refer to Recipe 15-2 for more details on deployment.
Solution #2
Use an IDE, such as NetBeans, to develop a web service endpoint class. The following steps walk you through the process of developing a web service endpoint using NetBeans 7.x IDE.
- Create a new Java EE Application that will be used to host the web service, or add a web service to an existing application. Once the new Java EE application has been created, or you’ve chosen which of your existing Java EE applications to add the web service into, create the web service by right-clicking the NetBeans project and choosing New
 Web Services Web Service (see Figure 15-1). Click Next after completing the form.
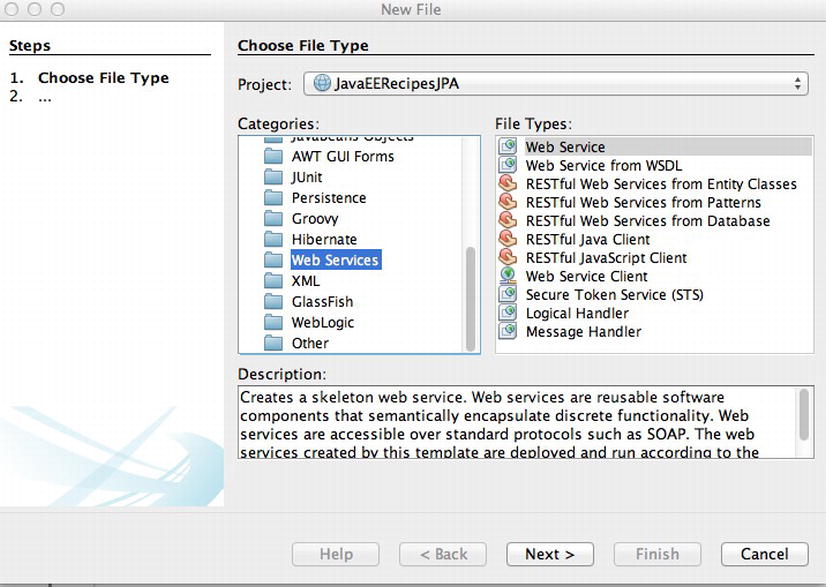
Figure 15-1. Creating a new web service within NetBeans
- Complete the New Web Service form by entering a service name, location, and package in which to create the service class. For this example, leave the location as Source Packages and leave the Create Web Service from Scratch option selected (see Figure 15-2). Click Finish to create the service.
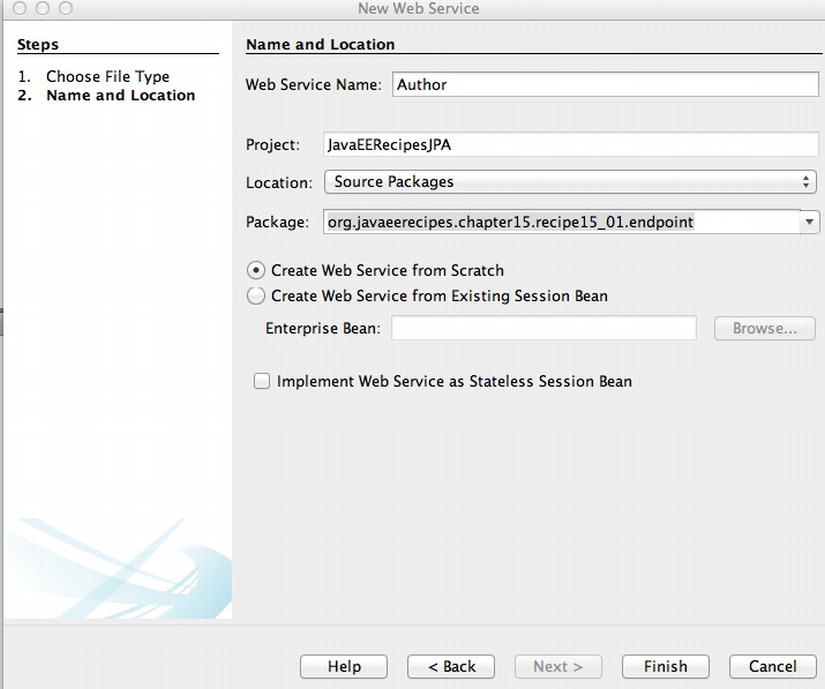
Figure 15-2. NetBeans New Web Service form
The resulting web service class will look similar to the following:
package org.javaeerecipes.chapter15.recipe15_01.endpoint;

import javax.jws.WebService;
import javax.jws.WebMethod;
import javax.jws.WebParam;

/**
 * JAX-WS service implementation class, generated by NetBeans
 * @author juneau
 */
@WebService(serviceName = "Author")
public class Author {

    /**
     * This is a sample web service operation
     */
    @WebMethod(operationName = "hello")
    public String hello(@WebParam(name = "name") String txt) {
        return "Hello " + txt + " !";
    }
}
![]() Note Notice that NetBeans does not generate a service endpoint interface. This is because when annotating a class with @WebService, an interface is optional.
Note Notice that NetBeans does not generate a service endpoint interface. This is because when annotating a class with @WebService, an interface is optional.
How It Works
There are a few different ways to produce a JAX-WS web service, either by coding directly or by using an IDE. Perhaps the easiest way to develop a web service is using an IDE, such as NetBeans. However, it is important to understand the web service that you are developing before making use of automated tools to produce a solution. Therefore, Solution #1 shows how to develop a complete web service, which makes use of a web service endpoint interface. In many situations, an interface is no longer required for the development of a web service implementation class. However, some clients still necessitate coding against an interface (see Recipe 15-3 for details). Solution #2 covers the easier technique for generating web services, that is, utilizing an IDE.
When writing a service endpoint interface, which is optional with newer releases of Java EE, create a standard Java interface that contains signatures for any public methods that will be exposed. A service interface differs from a standard interface because it is annotated with @WebService. It may also contain an optional @SOAPBinding interface to specify the style of the service that is to be created. By default, the @SOAPBinding style attribute is set to Style.DOCUMENT, but Style.RPC can also be specified to create an RPC-style service. Any methods that are declared within the interface should be annotated with @WebMethod.
The service implementation class should implement the service endpoint interface if there is one. In the example for Solution #1, the class does implement the service endpoint interface, and therefore, it is annotated with @WebService, and the endpointInterface attribute of the annotation contains the fully qualified name of the endpoint interface in String format. Being that the service implementation class in this example implements the interface, it needs to implement the method(s) contained within the interface. Since the endpoint interface designates the obtainCompleteContactList method with a @WebMethod annotation, it will be exposed via the service. After the service implementation class and its endpoint interface are deployed, the service will be identified by the specified serviceName attribute of the @WebService annotation. If this attribute is not specified, the application server will append the word Service to the end of every web service class name to create a default identifier for the service.
It is possible to construct the same web service without the need for a service endpoint interface. However, some clients require the use of an interface to work properly. If developing a web service implementation class without the service endpoint interface, omit the endpointInterface attribute of the @WebService annotation and mark any methods that will be exposed with the @WebMethod annotation. The following source listing is the same BookstoreService class shown in Solution #2, but it does not make use of a service endpoint interface.
@WebService
public class BookstoreService implements BookstoreEndpoint {

    @EJB
    ContactFacade contactFacade;

    public void BookstoreService(){
    }

    @WebMethod
    public String obtainCompleteContactList(){
        StringBuilder sb = new StringBuilder();
        sb.append("Here is the new JAX-WS Web Service
");
        List<Contact> contacts = contactFacade.findAll();
        for(Contact contact: contacts){
            sb.append(contact.getEmail() + "
");
        }
        return sb.toString();
    }
}
Table 15-1 lists the different optional elements of the @WebService annotation.
Table 15-1. @WebService Elements
| Element | Description |
|---|---|
| endpointInterface | The complete name of the service endpoint interface. |
| name | The name of the web service. |
| portName | The port name of the web service. |
| serviceName | The service name of the web service. |
| targetNamespace | Used for the namespace for the wsdl:portType |
| wsdlLocation | The location of a pre-defined WSDL describing the service. |
Table 15-2 lists the different optional elements of the @WebMethod annotation.
Table 15-2. @WebMethod Elements
| Element | Description |
|---|---|
| action | The action for this operation. |
| exclude | Marks a method to NOT be exposed as a web method. |
| operationName | Name of the wsdl:operation matching this method. |
When using an IDE to develop a web service, there is usually very little coding involved. Most IDEs, such as NetBeans, include a wizard to help developers create web services. Solution #2 walks you through the process of creating a JAX-WS web service using the NetBeans IDE. By default, the wizard does not create a service endpoint interface, so the entire web service solution is contained within a single class.
WHAT IS A WSDL DOCUMENT?
When a web service is deployed, it produces what is known as a WSDL document. A WSDL document is constructed of XML elements that describe the web service so that it can be consumed. A WSDL file uses the following elements to describe web services:
- <binding>: Specifies data protocol and binding for each particular port type.
- <message>: Contains <part> subelements that define the data elements for the service.
- <portType>: Defines a web service, the operations it can perform, and the messages it contains.
- <types>: Defines the data-types that are used by the web service.
15-2. Deploying a JAX-WS Web Service
You have implemented a JAX-WS web service endpoint and you wish to deploy it to a Java EE application server so that clients can begin to consume it.
Solution #1
A JAX-WS web service can be deployed in a number of ways. First, be sure that the Java EE Application to which the web service belongs has been fully developed, including all necessary configuration, and is ready for deployment. Once an application is ready to be deployed, it can be compiled into a WAR file, and then deployed to the application server container. The WAR file can be deployed to an application server container, such as GlassFish, via the standard means of deploying any type of Java web application. To that end, deploy the project via the GlassFish administrative console, or manually copy the WAR into the GlassFish autodeploy directory. Please refer to Recipe 11-4 for more details on deploying an application to GlassFish application server.
Solution #2
If using an IDE to develop your web service, it is easy to deploy the service from directly within the development environment. In this case, we will assume that NetBeans is the IDE of choice. To deploy a fully developed Java EE project that contains a web service, perform the following steps:
- Ensure that your NetBeans project appears in the left-hand Projects menu.
- Right-click your NetBeans project, and choose Deploy from the contextual menu.
![]() Note In order to deploy an application from within NetBeans, your project must be associated with an application server. To learn more about setting up an application server for use via NetBeans, please refer to Appendix A.
Note In order to deploy an application from within NetBeans, your project must be associated with an application server. To learn more about setting up an application server for use via NetBeans, please refer to Appendix A.
Solution #3
Create an endpoint publisher, which is a stand-alone application that will publish the service to a specified URL. To create a publisher, develop a stand-alone application that contains a main method and invoke the javax.xml.ws.Endpoint object’s publish method from within the main method. Pass the URL to which you would like to publish the web service, along with an instance of the web service implementation class to the publish method. The following stand-alone application demonstrates the use of an Endpoint publisher. The sources for this publisher can be found at org.javaeerecipes.chapter15.recipe15_02.endpoint.publisher.BookstorePublisher.
package org.javaeerecipes.chapter15.recipe15_02.endpoint.publisher;

import javax.xml.ws.Endpoint;
import org.javaeerecipes.chapter15.recipe15_01.endpoint.BookstoreService;

//Endpoint publisher
public class BookstorePublisher{

    public static void main(String[] args) {
           Endpoint.publish("http://localhost:8085/JavaEERecipes/BookstoreServicePub", new BookstoreService());
    }
}
When the publisher class is started, the web service will become available at the specified URL.
How It Works
To deploy an application that contains a web service, use the same procedures that would be used to deploy any Java EE Application or NetBeans project. Both Solution #1 and Solution #2 to this recipe show how to deploy an application or NetBeans project to the GlassFish application server.
Once the service is deployed using one of the techniques mentioned, the WSDL for the service can be viewed by using the following URL within your browser: http://your-hostname.local:8080/JavaEERecipes/BookstoreService?wsdl.
The third solution to this recipe demonstrates the use of a publisher class to deploy a web service. The publisher class is a stand-alone application that can be executed in order to make the web service available for use.
15-3. Consuming a JAX-WS Web Service via WSDL
Solution
In order for a client to gain reference to a web service implementation class, the artifacts must be generated via the Java compiler by using the wsimport utility. To generate the artifacts for clients to use, run the wsimport utility, passing the URL to the web service WSDL file. The following lines from the terminal or command line demonstrate how to make use of the wsimport tool to produce the artifacts for the JAX-WS web service that was created in Recipe 15-1.
wsimport -keep -verbosehttp://localhost:8080/JavaEERecipes/BookstoreService?wsdl
parsing WSDL...

Generating code...

org/javaeerecipes/chapter15/recipe15_01/endpoint/BookstoreEndpoint.java
org/javaeerecipes/chapter15/recipe15_01/endpoint/BookstoreServiceService.java
Once the artifacts have been generated, they can be copied into the correct Java packages (if the wsimport tool was not run within the correct package already), and a client application can be coded to make use of the web service implementation classes.
How It Works
When a Java web service is created and deployed, the Java environment creates service implementation artifacts on the fly, which enable service discovery by the client applications. A client application can use wsimport to generate the client-side artifacts/classes that can be used to access the web service. The wsimport tool ships with the JDK, and therefore, resides within the <JDK_Home>/bin directory. To utilize the tool, open a command prompt or terminal window, and then traverse into the directory in which the resulting classes should be written. Optionally, you can specify the directory into which the files should be generated by passing the –d flag. The wsimport tool accepts the URL to the WSDL file of the web service for which you wish to create the artifacts. In the example to this solution, there are a couple of optional flags specified as well. Table 15-3 lists the different flags that can be used along with the wsimport tool.
Table 15-3. wsimport Command Flags
| Flag | Description |
|---|---|
| -d <directory> | Specifies where to place the generated output files. |
| -b <path> | Specifies an external JAX-WS or JAXB binding file. |
| -B <jaxbOption> | Pass this option to the JAXB schema compiler. |
| -catalog | Specifies a catalog file to use for resolving external entity references. |
| -extension | Allow vendor extensions to be utilized. |
| -help | Display the help for wsimport. |
| -httpproxy:<host>:<port> | Specifies an HTTP proxy server. |
| -keep | Tells the tool to keep the generated files. |
| -p | Specifying a target package via this command-line option overrides any wsdl and schema binding. |
| -s <directory> | Specifies where to place the generated source files. |
| -verbose | Causes output messages explaining the steps taken by the compiler. |
| -version | Prints information regarding the tool version. |
| -wsdllocation <location> | Specifies the location to the WSDL file. |
| -target | Generates code as per the given JAX-WS specification version. |
| -quiet | Suppresses any output. |
15-4. Consuming a JAX-WS Web Service via a Stand-Alone Application Client
Problem
You have written a JAX-WS web service and you would like to consume it using a stand-alone Java client application.
Solution
Develop a stand-alone application that will reference the WSDL of the web service that it will consume, then generate a service based upon the WSDL and qualified name of the web service implementation. The following Java source is a stand-alone client application that consumes the JAX-WS web service that was developed in Recipe 15-1.
package org.javaeerecipes.chapter15.recipe15_01.endpoint.appclient;

import java.net.URL;
import java.util.List;
import javax.xml.namespace.QName;
import javax.xml.ws.Service;
import org.javaeerecipes.chapter15.recipe15_01.endpoint.BookstoreService;
import org.javaeerecipes.chapter15.recipe15_01.endpointinterface.BookstoreEndpoint;
import org.javaeerecipes.jpa.entity.Contact;

/**
 *
 * @author juneau
 */
public class BookstoreClient {

    public static void main(String[] args) {
        List<Contact> contacts = obtainList();
    }

    public static List<Contact> obtainList() {
        try {
            URL url = new URL("http://localhost:8080/JavaEERecipes/BookstoreService?wsdl");

            QName qname = new QName("http://endpoint.recipe15_01.chapter15.javaeerecipes.org/", "BookstoreServiceService");
            Service service = Service.create(url, qname);
            BookstoreEndpoint bookstore = service.getPort(BookstoreEndpoint.class);
            System.out.println(bookstore.obtainCompleteContactList());
        } catch (Exception e) {
            System.out.println("Exception: "+ e);
        }
        return null;
    }
}
Running this application will invoke the BookstoreService and display the entire list of contacts that are stored within the Acme Bookstore’s CONTACT database table.
How It Works
A client that is going to consume a JAX-WS web service must have the ability to obtain information regarding the web service. This information can be obtained from the web service WSDL document. There are a couple of different ways that a client can obtain a reference to and parse a WSDL in order to obtain a proxy to a web service. In the solution to this example, we assume that a web service endpoint interface has been coded, and therefore, the code makes use of the interface to call upon the exposed methods.
In the solution to this example, the client application creates a URL object that points to the web service WSDL file and uses it to invoke the service methods that have been exposed to clients. The next step the client application needs to take is to construct the qualified name of the web service in the form of a QName object. Once the client has both the URL to the WSDL and the QName, those can be passed to the javax.xml.ws.Service class create method to create a Service instance, which is the client view of the service. The service proxy can then be used to obtain a proxy to the service by calling the getPort method of the Service instance. The proxy returns the service endpoint interface, which can then be used to call upon the methods of the service.
As mentioned previously, it is possible to obtain a reference to the WSDL document and obtain a service proxy in different ways as well. If a web service does not contain a service endpoint interface (@WebService and @WebMethod annotations exist within service implementation class), then the need to create URL and QName objects are not needed. In fact, a client application can simply call upon the Service getPort method to obtain a proxy to the service, and return the service endpoint interface that is automatically generated by the container. The WSDL reference can also be injected into a client class to alleviate the need for URL and QName objects via the @WebServiceRef annotation. The following example client demonstrates these techniques to call the BookstoreService method.
import javax.xml.ws.WebServiceRef;

public class BookstoreClient {
    @WebServiceRef(wsdlLocation =
      "META-INF/wsdl/localhost_8080/JavaEERecipes/BookstoreServiceService.wsdl")
    private static BookstoreService service;

    /**
     * @param args the command line arguments
     */
    public static void main(String[] args) {
       System.out.println(sayHello("world"));
    }

    private static String obtainContacts() {
        org.javaeerecipes.chapter15.recipe15_1.BookstoreService port = service.getBookstoreServicePort();
        return port.obtainCompleteContactList();
    }
}
The @WebServiceRef annotation is used to define a reference to a web service and optionally an injection target for it. Table 15-4 lists the different (optional) elements of the @WebServiceRef annotation.
Table 15-4. @WebServiceRef Elements
| Attribute | Description |
|---|---|
| lookup | A portable JNDI lookup name that resolves to the target web service reference. |
| mappedName | A product-specific name that this resource should be mapped to. |
| name | A JNDI name of the resource. |
| type | The Java type of the resource. |
| value | The service class, always a type extending javax.xml.ws.Service. |
| wsdlLocation | A URL pointing to the WSDL document for the web service. |
15-5. Integrating Web Services into a Java EE Project
Problem
You wish to expose methods within an Enterprise JavaBean as web services to be consumed via JSF views on an enterprise application.
Solution
Designate an EJB as a web service using the @WebService annotation and specify methods of the EJB to be exposed via the web service using the @WebMethod annotation. Once the EJB has been made into a web service, deploy it, and use the wsimport tool to create artifacts from the resulting WSDL. Finally, reference the web service from a managed bean controller to make use of it.
EJB as a Web Service
The following excerpt, taken from org.javaeerecipes.jpa.session.ChapterFacade, demonstrates how to expose an EJB as a web service using only a couple of annotations.
package org.javaeerecipes.jpa.session;

import java.math.BigDecimal;
import java.util.List;
import javax.ejb.Stateless;
import javax.jws.WebMethod;
import javax.jws.WebService;
import javax.persistence.EntityManager;
import javax.persistence.PersistenceContext;
import org.javaeerecipes.jpa.entity.Book;
import org.javaeerecipes.jpa.entity.Chapter;

@WebService
@Stateless
public class ChapterFacade extends AbstractFacade<Chapter> {
      @PersistenceContext(unitName = "JavaEERecipesPU")
    private EntityManager em;

    @Override
    protected EntityManager getEntityManager() {
        return em;
    }

    public ChapterFacade() {
        super(Chapter.class);
    }

    @WebMethod
    public List<Book> findBookByChapterTitle(Chapter chapter){
        return em.createQuery("select b from Book b INNER JOIN b.chapters c " +
                "where c.title = :title")
                .setParameter("title", chapter.getTitle())
                .getResultList();
    }

    public List<Book> findAllBooksByChapterNumber(BigDecimal chapterNumber){
        return em.createQuery("select b from Book b LEFT OUTER JOIN b.chapters c " +
                "where c.chapterNumber = :num")
                .setParameter("num", chapterNumber)
                .getResultList();
    }

}
When the application that contains the annotated EJB (JavaEERecipes) is deployed, the ChapterFacadeService/ChapterFacade web service will be deployed and made available for use to client applications, including JSF-managed bean controllers.
Coding the Managed Bean Client
A JSF-managed bean can be a web service client, just as a servlet or stand-alone Java application can be. Before writing the managed bean client, the wsimport tool (covered in Recipe 15-3) must be used to create the artifacts from the resulting WSDL file that was generated when the web service was deployed. Once the wsimport tool has been run, the web service can be referenced via utilization of the @WebServiceRef annotation, and its methods can be invoked.
The ChapterController JSF-managed bean class of the Acme Bookstore application, found within the JavaEERecipes project at org.javaeerecipes.jpa.jsf.ChapterController, has been modified to make use of the ChapterFacadeService. The following excerpt, taken from the class, demonstrates how to reference a web service implementation class and call the service methods from within a managed bean controller.
...
@ManagedBean(name = "chapterController")
@SessionScoped
public class ChapterController implements Serializable {

    @EJB
    ChapterFacade ejbFacade;

    // Uncomment after running wsimport utility and placing the compiled ChapterFacadeService class
    // into the CLASSPATH

@WebServiceRef(wsdlLocation="http://localhost:8080/ChapterFacadeService/ChapterFacade?wsdl")
    ChapterFacadeService chapterService;

    private List<Book> booksByChapterTitle;
    private List<Chapter> completeChapterList;
    private List<Book> booksByChapterNumber;

    /**
     * Creates a new instance of ChapterController
     */
    public ChapterController() {
    }

    /* Uncomment after running wsimport utiltity and placing the compiled ChapterFacadeService class
     * into the CLASSPATH
     */
    public List<Book> loadAllChapters(){
        return chapterService.findAll();
    }
    ...
How It Works
Many enterprise applications utilize EJBs to retrieve data from an underlying database. In most cases, the data provided by these same queries residing within the EJB are necessary for use via remote clients. In such cases, it makes sense to make the entire EJB into a fully functional web service. Doing so is easy by decorating an EJB class and methods with the @WebService and @WebMethod annotations. By creating web services from EJB classes, enterprise applications can reduce the amount of redundant code that is required by coding separate web services, and also increase performance since fewer resources are required when fewer classes are querying the underlying data store.
The @WebService annotation can be used to decorate an EJB class to denote it as a web service. The @WebService annotation accepts the (optional) elements that are listed in Table 15-1. If a class is designated as a web service, then all public methods will be made available to clients. The @WebMethod annotation can be placed before any public method within an EJB to expose it via the web service. In the solution to this example, the @WebMethod annotation is placed before the first method as a demonstration only. Since the class has been designated as a web service using the @WebService annotation, all public methods will be exposed, even if they are not decorated with @WebMethod. To deploy the web service, simply deploy the Java EE application that contains the annotated EJB to a compliant Java EE application server container, such as GlassFish.
In the end, JAX-WS web services can be easy to generate from existing entity classes. Once generated, JSF-managed bean controllers can make use of the web service to provide data and or content from the web service to JSF views within the application.
15-6. Developing a RESTful Web Service
Problem
You would like to create a JAX-RS web service that will be exposed over the Internet to handle operations on data.
![]() Note Prior to performing the solutions to this recipe, you must be sure that your environment is configured for using REST services. For more information, please see the introduction to this chapter.
Note Prior to performing the solutions to this recipe, you must be sure that your environment is configured for using REST services. For more information, please see the introduction to this chapter.
Solution #1
Create a RESTful (Representational State Transfer) web service by creating a root resource class (POJO) and adding resource methods to the class. To designate a class as a root resource class, annotate it with @Path or create at least one method within the class that is annotated with @Path or a request method designator (@GET, @PUT, @POST, or @DELETE). The following example demonstrates how to create a RESTful web service that simply displays a String or HTML to a client. The sources for this code can be found in the JavaEERecipes project within the org.javaeerecipes.chapter15.recipe15_06.SimpleRest.java file.
package org.javaeerecipes.chapter15.rest;

import javax.ws.rs.GET;
import javax.ws.rs.Produces;
import javax.ws.rs.Path;

// Set the PATH tohttp://host:port/application/rest/simplerest/
@Path("/simplerest")
public class SimpleRest {

    @GET
    // Produces plain text message
    @Produces("text/plain")
    public String getPlainMessage() {
        return "Hello from a simple rest service";
    }

    @GET
    // Produces plain text message
    @Produces("text/html")
    public String getHTMLMessage() {
        return "<P>Hello from a <b>simple</b> rest service</P>";
    }
}
Assuming that you have configured your environment to work with Jersey, you can deploy the JavaEERecipes application and then visit the following URL to see the results produced from the REST service: http://localhost:8080/JavaEERecipes/rest/simplerest.
Solution #2
Utilize an IDE, such as NetBeans, to create a RESTful web service. The NetBeans IDE includes wizards for developing web services of different types. By right-clicking a project and choosing New ![]() Other ... option from the contextual menu, the New File dialog will open, and Web Services can be chosen from the selection list, as seen in Figure 15-1. Proceed with the following directions to generate a REST web service from an entity class.
Other ... option from the contextual menu, the New File dialog will open, and Web Services can be chosen from the selection list, as seen in Figure 15-1. Proceed with the following directions to generate a REST web service from an entity class.
- Choose the RESTful Web Service from Entity Classes option from the New File menu.
- Select one or more classes from the Available Entity Classes list and click the Add button. In this example, we’ll choose the org.javaeerecipes.jpa.entity.Book entity, as shown in Figure 15-3. Choose Next.
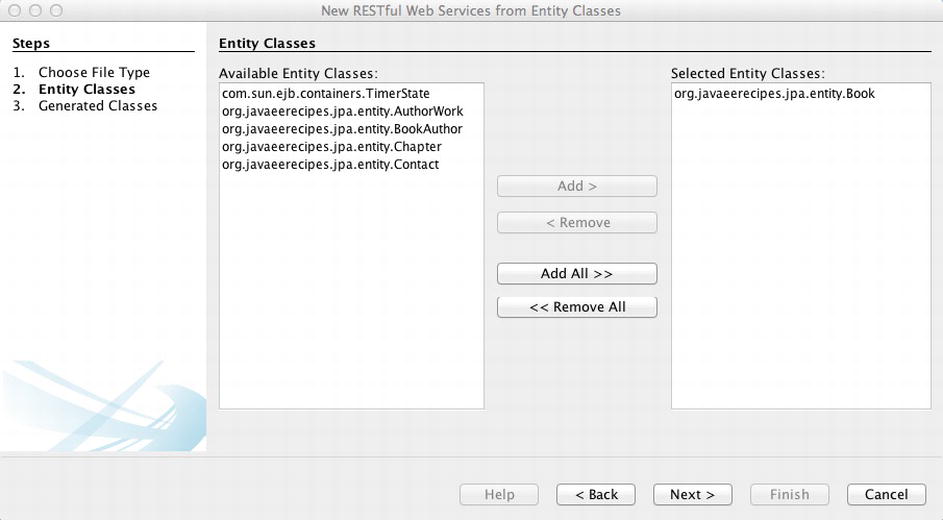
Figure 15-3. Select entity classes for RESTful web services within NetBeans
- List the package into which the REST service class will be generated, along with a package location and name for the REST application configuration class (see Figure 15-4). Click Finish.
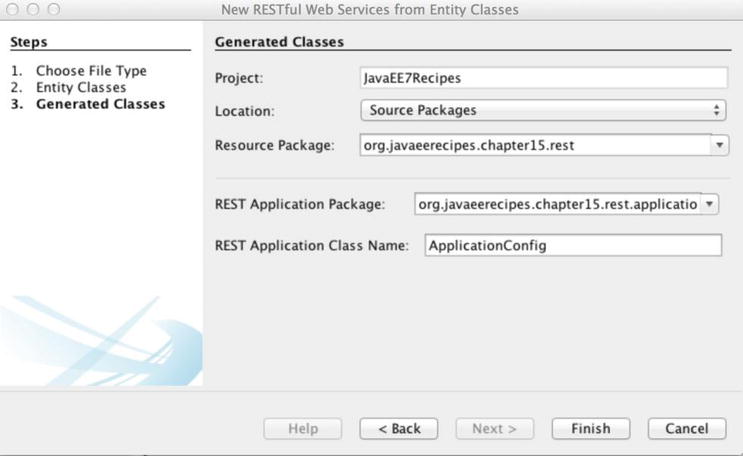
Figure 15-4. Choose a resource package for REST service class within NetBeans
A REST service class that is similar to the following class would be generated after performing these steps.
@Stateless
@Path("org.javaeerecipes.jpa.entity.book")
public class BookFacadeREST extends AbstractFacade<Book> {
    @PersistenceContext(unitName = "JavaEERecipesPU")
    private EntityManager em;

    public BookFacadeREST() {
        super(Book.class);
    }

    @POST
    @Override
    @Consumes({"application/xml", "application/json"})
    public void create(Book entity) {
        super.create(entity);
    }

    @PUT
    @Override
    @Consumes({"application/xml", "application/json"})
    public void edit(Book entity) {
        super.edit(entity);
    }

    @DELETE
    @Path("{id}")
    public void remove(@PathParam("id") BigDecimal id) {
        super.remove(super.find(id));
    }

    @GET
    @Path("{id}")
    @Produces({"application/xml", "application/json"})
    public Book find(@PathParam("id") BigDecimal id) {
        return super.find(id);
    }

    @GET
    @Override
    @Produces({"application/xml", "application/json"})
    public List<Book> findAll() {
        return super.findAll();
    }

    @GET
    @Path("{from}/{to}")
    @Produces({"application/xml", "application/json"})
    public List<Book> findRange(@PathParam("from") Integer from, @PathParam("to") Integer to) {
        return super.findRange(new int[]{from, to});
    }

    @GET
    @Path("count")
    @Produces("text/plain")
    public String countREST() {
        return String.valueOf(super.count());
    }

    @Override
    protected EntityManager getEntityManager() {
        return em;
    }

}
How It Works
RESTful web services are easy to develop, and they have the ability to produce and consume many different types of media. In most cases, REST web services are encouraged for services that will be sending and receiving information over the Internet. Before an application can support REST services, it must be properly configured to do so. In this book, the JAX-RS REST implementation is utilized, which is based upon Jersey, the standard REST implementation for the industry. Please see the introduction to this chapter for more information on configuring Jersey within your application.
A Java class that is a REST service implementation contains a myriad of annotations. Table 15-5 lists the possible annotations that may be used to create a REST service.
Table 15-5. REST Service Annotations
| Annotation | Description |
|---|---|
| @POST | Request method designator that processes HTTP POST requests. |
| @GET | Request method designator that processes HTTP GET requests. |
| @PUT | Request method designator that processes HTTP PUT requests. |
| @DELETE | Request method designator that processes HTTP DELETE requests. |
| @HEAD | Request method designator that corresponds to the HTTP HEAD method. Processes HTTP HEAD requests. |
| @Path | The value of this annotation should correlate to the relative URI path that indicates where the Java class will be hosted. Variables can be embedded in the URIs to make a URI path template. |
| @PathParam | A type of parameter that can be extracted for use in the resource class. URI path parameters are extracted from the request URI, and the parameter names correspond to the URI path template variable names specified in the @Path class-level annotation. |
| @QueryParam | A type of parameter that can be extracted for use in the resource class. Query parameters are extracted from the request. |
| @Consumes | Used to specify the MIME media types of representations that a resource can consume. |
| @Produces | Used to specify the MIME media types of representations that a resource can produce. |
| @Provider | Used for anything that is of interest to the JAX-RS runtime, such as a MessageBodyHeader and MessageBodyWriter. |
To designate a class as a REST service, the @Path annotation must be placed prior to the class, or before at least one of the class method signatures. The @Path annotation is used to indicate the URI that should correspond to the service. The full URI includes the host name, port number, application name, and REST servlet name, followed by the path designated with the @Path annotation. In the example, the @Path annotation specifies "/simplerest" as the service path, so the URL http://localhost:8080/JavaEERecipes/rest/simplerest will invoke the web service. It is possible to include variables within a URL by enclosing them within brackets using the syntax: {var}. For example, if each user had his or her own profile for a particular site, the @Path designation could be as follows:
...
@Path("/simplerest/{user}")
...
In such a case, the URL could look like the following: http://localhost:8080/JavaEERecipes/rest/simplerest/Juneau.
The @Path annotation can also be specified before any methods that are marked with @GET, @POST, @PUT, or @DELETE in order to specify a URI for invoking the denoted method. Moreover, variables can be placed within the path in order to accept a more dynamic URL. For instance, suppose a method was added to the class in Solution #1 that would return a greeting for the user that is specified as a parameter within the URL. You may do something like the following in order to make the URL unique:
@Path("{user}")
@GET
@Produces("text/html")
public String getUserMessage(@PathParam("user") String user){
    return "Greetings " + "<b>" + user + "</b>";
}
In this case, the getUserMessage method would be invoked if a URL like the following were placed into the browser: http://localhost:8080/JavaEERecipes/rest/simplerest/josh. If this URL were specified, then the method would be invoked, passing “josh” as the user variable value, and the message would be displayed as:
Hello josh
![]() Note It is very important to create URIs that are readable and also provide intuitive information about your web service. URIs that are based upon these standards help to reduce errors within client applications and make the web service more functional.
Note It is very important to create URIs that are readable and also provide intuitive information about your web service. URIs that are based upon these standards help to reduce errors within client applications and make the web service more functional.
Designate methods with the @GET, @POST, @PUT, or @DELETE designator to process the type of web service request that is desired. Doing so will generate web service functionality. If more than one method exists within a REST web service implementation and @Path is only specified at the class level and not at the method level, then the method that returns the mime type the client requires will be invoked. If you wish your method to display content, designate a method with @GET. If you wish to create a method for adding or inserting an object, designate the method as @POST. If you are creating a method for inserting new objects only, then designate it with @PUT. Finally, if you are creating a method for removing objects, then designate it with @DELETE.
REST services can become fairly complex if they constitute many different methods and paths. Entire applications exist based upon REST services, where all CRUD (Create, Retrieve, Update, Delete) manipulations are invoked via web service calls. This recipe provides only the foundation for developing with JAX-RS, as the topic is far too involved for a handful of recipes or a chapter in itself.
15-7. Consuming and Producing with REST
Problem
You would like to produce different types of content with a RESTful web service. Moreover, you would like the web service to consume content as well.
Solution
Create methods within the web service implementation class that are annotated with @GET for generating output, and optionally along with @Produces for specifying the type of output. Annotate methods with @POST or @PUT for updating or inserting data. The following sections provide examples utilizing these solutions.
Producing Output
Make use of the @Produces annotation to specify the type of content you wish to produce from a decorated method. The following excerpt, taken from the JavaEERecipes project source at org.javaeerecipes.chapter15.recipe15_07.RestExample, demonstrates the use of @Produces.
@GET
// Produces an XML message
@Produces("application/xml")
public MessageWrapper getXMLMessage() {
    // Pass string to MessageWrapper class, which marshals the String as XML
    return new MessageWrapper("Hello from a simple rest service");
}
Accepting Input
Annotate methods within a web service class with @PUT to indicate that some content is being passed to the method. To specify the type of content being passed, annotate the same method with @Consumes(content-type). The following excerpt, taken from the JavaEERecipes project source at org.javaeerecipes.chapter15.rest.SimpleRest.java, demonstrates the use of @Consumes.
@PUT
@Path("add")
@Consumes("text/plain")
public String add(@QueryParam("text") String text){
    this.message = text;
    return message;
}
To input a new message stating JavaEERecipes, you would visit the following URL in your browser, which passes the new message to the text variable: http://localhost:8080/JavaEERecipes/rest/simplerest/add?text=JavaEERecipes.
How It Works
Create a web service class by following the procedures outlined in Recipe 15-7, and then designate methods within the web service as producers or consumers by annotating them appropriately. Methods that will be generating some type of output should be annotated with @Produces, which should subsequently specify the type of output generated. Moreover, the methods that are generating output should also be annotated with @GET, which indicates that the method is a reading resource. Methods that will be accepting input should be annotated with @PUT or @POST. The @PUT annotation indicates that a new resource will be created, and the @POST annotation indicates that an existing resource will be updated or a new resource will be created. Incidentally, the methods that accept input should also be annotated with @Consumes, which should subsequently specify the type of content that is being consumed. Overall, @Produces annotations should coincide with the @GET annotated methods. That is, a method that is decorated with @GET will return some content to the client. @Consumes annotations should coincide with either @PUT or @POST annotated methods.
In the solution to this recipe, two types of methods are demonstrated. The first example demonstrates a REST method that produces XML content, and the @Produces("application/xml" annotation indicates it as such. Within the method, a String is passed to a class named MessageWrapper. The MessageWrapper class is responsible for marshaling the String as XML using JAXB. For more information, please refer to the sources located at org.javaeerecipes.chapter15.recipe15_07.MessageWrapper.java, and see the JAXB documentation online at http://docs.oracle.com/javaee/6/tutorial/doc/gkknj.html. The beauty of JAX-RS is that just about any content type can be produced. A client application can visit the URL that corresponds to a web service’s @GET method, and content will be returned in a format that will work for that client. For instance, if a client is a web browser, it will look for a method that produces "text/html" content within the web service, and then invoke that method.
The second example in the solution to this recipe demonstrates a REST method that consumes String content. The @PUT annotation indicates that either a new object will be generated, or an existing object will be updated with the request. In this case, the String-based message field is updated to the content that is passed into the web service via the text variable. The @Path annotation has been placed above the method signature to indicate a path following the format /add should be used to access this method. Lastly, the @Consumes annotation indicates that the method will consume plain text.
The REST service in this example is very brief, and in real-world scenarios, many methods producing and consuming different types of content are utilized within REST service implementations.
Solution
Make use of the new JAX-RS Client API to build a client application. The following example demonstrates how to create a very basic client using the JAX-RS Client API.
import java.util.concurrent.ExecutionException;
import java.util.logging.Level;
import java.util.logging.Logger;
import javax.ws.rs.client.Client;
import javax.ws.rs.client.ClientBuilder;
import javax.xml.ws.Response;

/**
 *
 * @author Juneau
 */
public class RestClient {

    public static void main(String[] args){
        // Obtain an instance of the client
        Client client = ClientBuilder.newClient();

        Response res = (Response) client.target("http://localhost:8080/JavaEERecipes/rest/simplerest")
                .request("text/plain").get();
        try {
            System.out.println((String) res.get());
        } catch (InterruptedException ex) {
            Logger.getLogger(RestClient.class.getName()).log(Level.SEVERE, null, ex);
        } catch (ExecutionException ex) {
            Logger.getLogger(RestClient.class.getName()).log(Level.SEVERE, null, ex);
        }
    }
}
To test the client, first deploy and run the JavaEERecipes application so that the simplerest REST web service is available. Once deployed, run the RestClient class to see the result in the server log.
How It Works
Historically, it has always been a small task to test web services. That is because in order to test a web service, a separate web application either had to make a call to the web service, or custom client tests would have to be built to accommodate the testing. In the JAX-RS 2.0 release, a client API has been included, allowing developers to follow a standard API for developing test clients and so forth.
To make use of the client API, obtain an instance of the javax.ws.rs.client.Client by either injecting the resource, or calling the javax.ws.rs.client.ClientBuilder newClient method. Once a Client instance is obtained, it can be configured by setting properties, or registering Provider and/or Feature classes. Properties are simply name/value pairs that can be passed to the client via the setProperty method. Features are Providers that implement the Feature interface. A Feature can be used for grouping-related properties and Providers into a single unit, making configuration even easier.
In the solution to this recipe, the client has been built to access the simplerest web service. After a client instance is obtained, properties can be set against it by calling the Client setProperty method, passing the property/value pair.
client.setProperty("property", "value");
The first step toward invoking a web resource is to make a call to a target. This can be done in a couple of different ways. The previous example demonstrated the use of the Client target method, which accepts a URI and returns a WebTarget.
WebTarget myTarget = client.target("http://somehost.com/service");
Once the target has been obtained, a number of things can be done with it. A request can be made against it, as in the RestClientOne example, by invoking the target’s request method. A target can also be further qualified by calling its path method and passing the next sequence in a URI path.
WebTarget myTarget =
    client.target("http://somehost.com/service").path(SPI_AMPquot;one");
A path can also contain dynamic content in the form of URI template parameters. To include a template parameter, wrap the dynamic portion of the path in curly brackets { }, and then chain a call to the pathParam method, passing the name/value pair of the parameter.
WebTarget myTarget =
  client.target("http://somehost.com/service").path(SPI_AMPquot;one").path("{code}")
  .pathParam("code","100375");
WebTarget objects are immutable, in that methods for altering WebTargets, such as path, return new instances of WebTarget. WebTargets can also be configured by registering features or providers via a call to the target’s register method, passing either type of class.
client.register(Feature.class)
client.register(Provider.class)
Obtaining a Response
The example at the beginning of this section demonstrated a simple client that returns a plain-text response. However, it is possible to return different response types by passing different Strings or MediaType fields to the Client target request method. Table 15-6 lists the different MediaType fields that can be used. All fields listed within the table that contain a _TYPE suffix are of type MediaType, whereas the others are static String types.
Table 15-6. MediaType Fields
| Field | String |
|---|---|
| APPLICATION_ATOM_XML APPLICATION_ATOM_XML_TYPE | "application/atom+xml" |
| APPLICATION_FORM_URLENCODED APPLICATION_FORM_URLENCODED_TYPE | "application/x-www-form-urlencoded" |
| APPLICATION_JSON APPLICATION_JSON_TYPE | "application/json" |
| APPLICATION_OCTET_STREAM APPLICATION_OCTET_STREAM_TYPE | "application/octet-stream" |
| APPLICATION_SVG_XML APPLICATION_SVG_XML_TYPE | "application/svg+xml" |
| APPLICATION_XHTML_XML APPLICATION_XHTML_XML_TYPE | "application/xhtml+xml" |
| APPLICATION_XML APPLICATION_XML_TYPE | "application/xml" |
| MEDIA_TYPE_WILDCARD | "*" |
| MULTIPART_FORM_DATA MULTIPART_FORM_DATA_TYPE | "multipart/form-data" |
| TEXT_HTML TEXT_HTML_TYPE | "text/html" |
| TEXT_PLAIN TEXT_PLAIN_TYPE | "text/plain" |
| TEXT_XML TEXT_XML_TYPE | "text/xml" |
| WILDCARD WILDCARD_TYPE | "*/*" |
To obtain a requested resource, call the get method, which will return a javax.ws.rs.core.Response object. The returned Response can be used to process the results accordingly, depending upon what you are trying to do within the client. In the example, the Response object’s readEntity method is called, which simply returns the results in the requested format. In the example, a String.class is passed to the readEntity method, implying that a response should be returned in String format. To see a complete list of methods that can be called against a Response object, please refer to the online documentation (http://jax-rs-spec.java.net/nonav/2.0-SNAPSHOT/apidocs/javax/ws/rs/core/Response.html), as the list is quite lengthy.
It is possible to filter a response by chaining methods, as needed, to specify headers, cookies, and so forth, off of the request method. Each of these chained method calls returns a Builder object, which can be further built upon. The following methods can be chained to further build the request:
- cookie(Cookie)
- cookie(String, String)
- header(String, Object)
- headers(MultivaluedMap<String, Object>)
- register
Returning Entities
Sometimes there is a requirement to return a type other than Response from a web resource. In these cases, it is possible to obtain an entity type by passing the entity class to the get call. The following lines of code demonstrate how to return an Employee entity, rather than a standard Response object.
Response res = client.target("http://localhost:8080/JavaEERecipes/rest/employeeSearch")
                .request("application/xml").get(Employee.class);
In cases where entities are being returned, the request type is required to be "application/xml" or APPLICATION_XML_TYPE.
Invoking at a Later Time
There are cases when it makes sense to obtain a request and prepare it for execution, but not invoke that request until a later time. In such cases, one can prepare an Invocation that can be executed at a later time. In the following lines of code, an Invocation is created by making a request to a WebTarget, and then calling the buildGet method.
Invocation inv1 = client.target("http://localhost:8080/JavaEERecipes/rest/simplerest")
                .request("text/plain").buildGet();
// Sometime later...
Response res = inv1.invoke();
If we were posting a response, the buildPost method could be called against the WebTarget instead, as follows:
Invocation inv1 = client.target("http://localhost:8080/JavaEERecipes/rest/makeithappen")
                .request("text/plain").buildPost(order);
 Response res = inv1.invoke();
![]() Note To asynchronously execute an Invocation, call the invocation submit method, rather than the invoke method.
Note To asynchronously execute an Invocation, call the invocation submit method, rather than the invoke method.
Invocation objects can be configured similarly to WebTarget and Client objects. Filters, interceptors, properties, features, and providers can be configured on an Invocation by calling the register method and passing the appropriate configuration instance, as demonstrated in the following.
// Assume that inv1 is an Invocation instance
String result = inv1.register(MyInterceptor.class).invoke(String.class);
![]() Note To learn more about filters and interceptors, read Recipe 15-9, which follows in this chapter.
Note To learn more about filters and interceptors, read Recipe 15-9, which follows in this chapter.
WebTarget Injection
A WebTarget can be injected into any JAX-RS managed resource by specifying the @Uri annotation, and passing the WebTarget URI. In following example, a WebTarget resource is injected into a JAX-RS resource to demonstrate this concept.
@Path("/orderservice")
public class OrderService {
    @Uri("order/{id}")
    WebTarget orderId;

    //...
}
15-9. Filtering Requests and Responses
Problem
You wish to perform some activity against a web service request before it has been delivered to the network, or to a web service response before it has been sent back to the client.
Solution
Apply a filter or interceptor to the web service request or response to perform the desired activity. The following example filter is used to write alerts to the system log before an incoming request has been processed and before a response is sent back to the client.
import java.io.BufferedReader;
import java.io.IOException;
import java.io.InputStream;
import java.io.InputStreamReader;
import javax.annotation.Priority;
import javax.ws.rs.Priorities;
import javax.ws.rs.container.ContainerRequestContext;
import javax.ws.rs.container.ContainerRequestFilter;
import javax.ws.rs.container.ContainerResponseContext;
import javax.ws.rs.container.ContainerResponseFilter;
import javax.ws.rs.ext.Provider;
import org.javaeerecipes.chapter15.rest.interfaces.Alerter;

@Provider
@Alerter
public class AlertFilter implements ContainerRequestFilter,
        ContainerResponseFilter {

    @Override
    public void filter(ContainerRequestContext requestContext)
            throws IOException {
        alert(requestContext);
    }

    @Override
    public void filter(ContainerRequestContext crc, ContainerResponseContext crc1) throws IOException {
        alert(crc);
    }

    public void alert(ContainerRequestContext context) {

        try(InputStream in = context.getEntityStream();) {
            if (in != null) {
                InputStreamReader inreader = new InputStreamReader(in);
                BufferedReader reader = new BufferedReader(inreader);
                String text = "";

                while ((text = reader.readLine()) != null) {
                    System.out.println(text);

                }

            }
        } catch (IOException ex) {
            // Error handling
        }
    }
}
How It Works
The concept of filters and interceptors is analogous to the post office processing your mail before it comes to your address. Rather than a message being delivered directly from point A to point B, it is first routed to one or more postal offices, where it is further processed before reaching point B. Web resource filters and interceptors apply that same concept to requests or responses that are being processed via a web service. If a filter or interceptor is bound to a web resource, then it will be invoked at some point in the life cycle of a request or response to that web resource. The type of filter or interceptor determines at what point in the life cycle it is applied. Interceptors (otherwise known as entity interceptors) wrap around a method invocation at a specified extension point. Filters, on the other hand, execute code at a specified extension point, but they are not wrapped around methods. In the next few sections, you will take a closer look at each and how they are used.
An extension point is an interface that includes a method, which is responsible for filtering or intercepting the request or response. Filters have four such extension point interfaces, those being: ClientRequestFilter, ClientResponseFilter, ContainerRequestFilter, and ContainerResponseFilter. The name of the extension point helps to describe to what a filter is applied and at what point. ClientRequestFilter and ClientResponseFilter are for use with the JAX-RS Client API. ClientRequestFilter is applied before an HTTP request is delivered to the network. A ClientResponseFilter is applied when a server response is received and before control is returned to the application. ContainerRequestFilter and ContainerResponseFilter classes are for use with the JAX-RS Server API. Similar to the client-side filters, a ContainerRequestFilter is applied upon receiving a request from a client, and a ContainerResponseFilter is applied before the HTTP response is delivered.
As mentioned in the previous section, an extension point is an interface that includes a method, which is responsible for filtering or intercepting the request or response. Entity interceptors have two such extension points, those being ReaderInterceptor and WriterInterceptor. An entity interceptor class must implement one or both of these extension points. Also mentioned previously, entity interceptors wrap calls to methods. More specifically, MessageBodyWriter implementations wrap calls to the writeTo method, whereas MessageBodyReader implementations wrap calls to the readFrom method.
Binding Filters and Interceptors
Filters and interceptors must be associated to application classes or methods, and this process is also known as binding. The default type of binding is global binding, and any filter or interceptor that does not include annotations is bound globally. Global binding associates the filter or interceptor with all resource methods in an application. That said, any time a resource method is invoked, all globally bound filters and interceptors are processed as well.
Filters and interceptors can be registered manually via Application or Configuration, or they can be registered dynamically. To indicate that a filter or interceptor should be registered dynamically, it can be annotated with @Provider. If a filter or interceptor is not annotated as such, it must be registered manually.
To manually bind a filter or interceptor to a resource method, the filter or interceptor class must be denoted with a @NameBinding annotation. A @NameBinding annotation can be coded just as a standard annotation would, but it should also include the @NameBinding annotation in its interface. The following annotation code could be used to create an @NameBinding annotation that might be placed on a filter that is responsible for firing alerts.
@NameBinding
@Target({ ElementType.TYPE, ElementType.METHOD })
@Retention(value = RetentionPolicy.RUNTIME)
public @interface Alerter { }
To associate the @NameBinding with a filter or interceptor, simply annotate the filter or interceptor class with it. The following AlertFilter class is a filter implementation that is denoted with the @Alerter annotation.
@Provider
@Alerter
class AlertFilter implements ContainerRequestFilter,
        ContainerResponseFilter {

...

}
That filter can now be bound to a resource method by annotating the resource method with the same @NameBinding as the filter class, as demonstrated in the following.
@GET
@Produces("text/html")
@Alerter
public String  getJobs(){
    ...
}
![]() Note This same concept can be applied to Application subclasses in order to globally bind the filter or interceptor.
Note This same concept can be applied to Application subclasses in order to globally bind the filter or interceptor.
Setting Priorities
As mentioned in previous sections, filters and interceptors can be chained. Chains of filters or interceptors invoke individual filters or interceptors based upon a given priority. To assign priority to a filter or interceptor, denote the implementation class with the @BindingPriority annotation. Integer numbers are used to associate priorities.
15-10. Processing Long-Running Operations Asynchronously
Problem
Your server-side JAX-RS method contains a long-running operation, and you would like to avoid blocking while waiting for the event to complete.
Solution
Perform asynchronous processing so that the resource method containing the long-running operation can inform JAX-RS that a response is not yet readily available, but will be produced at some point in the future. In the following example, a JAX-RS service named AsyncResource contains a resource method named asyncOperation. The asyncOperation method contains a long-running task, which is handed off to a ManagedExecutorService for processing.
import javax.annotation.Resource;
import javax.enterprise.concurrent.ManagedExecutorService;
import javax.ws.rs.GET;
import javax.ws.rs.Path;
import javax.ws.rs.container.AsyncResponse;
import javax.ws.rs.container.Suspended;

/**
 * Recipe 15-10:  Asynchronous Processing
 * @author Juneau
 */
@Path("/asynchronous/asyncResource")
public class AsyncResource {

    @Resource(name = "concurrent/__defaultManagedExecutorService")
    ManagedExecutorService mes;

    @GET
    public void asyncOperation(@Suspended final AsyncResponse ar){
        mes.submit(
                new Runnable() {
                    public void run(){
                        // Perform long running operation
                        longRunningOperation();
                        ar.resume("Performing asynchronous operation");
                    }
                });
    }

    public void longRunningOperation(){
        // This is a method that contains a long-running operation
        System.out.println( "Performing long running task...");
    }

}
![]() Note To learn more about ManagedExecutorService, please see Chapter 19.
Note To learn more about ManagedExecutorService, please see Chapter 19.
How It Works
The JAX-RS 2.0 API provides the ability to hand off long-running tasks to a ManagedExecutorService for processing. This allows a server-side resource to return control to a client and avoid problematic blocks. To begin, the server-side asynchronous implementation will be described..
To perform asynchronous processing within a JAX-RS resource, the resource method that contains long-running operations must accept an instance of AsyncResponse via the utilization of the @Suspended annotation. The AsyncResponse class provides the means for resuming operations and returning control to the client. A ManagedExecutorService (see Chapter 19 for more information) must be made available within the class. The ManagedExecutorService must be called upon to submit a new Runnable containing the long-running operation. along with a call to AsyncResponse.resume() to return control back to the client once the long-running process is completed. When the ManagedExecutorService submit method is called, the Runnable is passed to the server for further processing, forking a thread to execute the task, and returning immediately. When the long-running task has completed, control will be passed back to the application, invoking the AsyncResponse resume method.
In order to avoid long-running operations that never return and cause a suspended connection to wait indefinitely, it is possible to specify a timeout value. The timeout value can be specified by setting a timeout handler via the AsyncResponse.setTimeoutHandler() method, passing a new instance of the TimeoutHandler. After the setTimeoutHandler has been invoked, the timeout can be set by calling the AsyncResponse.setTimeout() method, passing any unit of type java.util.concurrent.TimeUnit. For instance, the following lines demonstrate how to set a timeout of 30 seconds for the long-running operation contained in the resource shown in the solution to this recipe:
...
@GET
    public void asyncOperation(@Suspended final AsyncResponse ar){
        ar.setTimeoutHandler(new TimeoutHandler() {
            public void handleTimeout(AsyncResponse ar){
                ar.resume("Timed out");
            }
        });
        ar.setTimeout(30, SECONDS);
        mes.submit(
                new Runnable() {
                    public void run(){
                        // Perform long running operation
                        longRunningOperation();
                        ar.resume("Performing asynchronous operation");
                    }
                });
    }
...
![]() Note JAX-RS implementations will generate a ServiceUnavailableException with a status of 503 when a timeout value is reached and no timeout handler is present.
Note JAX-RS implementations will generate a ServiceUnavailableException with a status of 503 when a timeout value is reached and no timeout handler is present.
JAX-RS 2.0 also introduces asynchronous processing support to the client-side.. By default, invocations from a client to a target are executed in a synchronous fashion, but they can be changed to asynchronous by calling the async method and optionally registering an instance of InvocationCallback. For example, the following lines of code demonstrate an asynchronous client call to the web service resource that was presented in the solution to this recipe:
Client client = ClientBuilder.newClient();
Target target = client.target("http://localhost:8080/JavaEERecipes/rest/asynchronous/asyncResource");
Target.request().async().get();
For more information regarding the client API and asynchronous operations, please refer to the JAX-RS 2.0 documentation online.