![]()
One of the biggest advantages of the Raspberry Pi is that it is tiny and can fit in just about any small nook or cranny you care to think of. This is why it is constantly touted as a great choice for people to use when designing—it can be placed just about anywhere and, with the right peripherals, can do almost any task. Additionally, its low power consumption means that there is less of a barrier to its usage in these situations as it doesn’t need a large amount of electrical plumbing to “just work.” Which is to say that Raspberry Pi is a super tiny machine that provides a monumental bang for your buck!
However, this is not without some strings attached (see Figure 9-1)! All that power is for naught without a small supply of external electricity. While 5 volts isn’t much, it does need to somehow magically enter your Raspberry Pi to turn the lights on. In addition to requiring power, the Pi is almost useless on its own as there is little you can do with the Pi on 5 volts alone beyond making the power LED go on and off. You need to attach devices to make the Pi useful. To use the Pi as a simple home computer you need the following (at a minimum):
- HDMI or composite cable for video
- Ethernet cable for Internet and network access
- A keyboard to enter data with
- An SD card to provide storage

Figure 9-1. Constrained Pi
Suddenly, you see what I’m getting at; the Raspberry Pi, the tiny unattached super machine is actually quite tied down. Tied down with the needs of human usability and interactiveness, these constraints mean running a large number of cables to your Pi just to get some of the basic functionality out of it. As you can probably guess, all is not lost! There are a number of ways you can detach your Pi and make it a lot more mobile and give yourself a lot more flexibility in what you can do with it. That’s the purpose of this chapter: to provide you with the tools and some background to remove the wires constraining your Raspberry Pi.
Preparing for WiPi
In addition to having your SD card loaded with a copy of Raspbian, you will want to ensure that your version of Raspbian has been upgraded because the September release included significant improvements in how WiFi access is managed. To get this system up, you first need to run a few quick commands:
$ sudo apt-get update
$ sudo apt-get upgrade
These two commands will first tell your apt-get instance to update to know which versions of the software are available to you for usage. The second will tell apt-get to compare and then install every upgraded version of all software currently installed on the system. As you can imagine, running these commands on a regular basis is a very good idea because it allows you to keep your system running the latest version of the software.
Before you begin chopping off cables willy-nilly, you need to understand what you want to achieve with your Pi. This will automatically place a number of constraints on what you want to do with it. I can’t presuppose what you want to do with your Pi because there are genuinely so many options. So given this, what I will try and provide here are individual ways that you can cut the cord (not literally) and unconstrain your Pi. You may well be able to make use of your newfound cable-cutting skills with some of the content in later chapters to improve on the designs or to make them better suit your purpose.
Start with the easiest and lowest hanging of fruits: the monitor, keyboard, and audio cables. I know it sounds funny to say that cutting out three peripherals at once is easiest, but you really are cutting something much different out of the equation: you. By far, the easiest set of connections to cut is that of the human interaction devices. Much of this book is, in fact, geared toward giving you the skills to work with your Pi without the aid of a monitor, a keyboard, or speakers. This is not to say you can’t ever go without; you can always plug them back in as needed to diagnose any really critical issues, but you can start by removing them and managing your Pi remotely. The use of SSH is key here because you can use SSH to remotely connect to your Pi over your network connection. Once you have connected to your Pi, you have full command-line access to perform whatever tasks you need. There is also the added benefit that you can go and change the memory distribution within your Pi using sudo raspi-config and set the memory_split value to 240/16, which puts most of the memory into free RAM for your system to use and as little as possible into the Graphics display, which you won’t normally be using.
Before you assume that this means no use of monitor and keyboard ever, stop. All the things you want to do with your Pi should be tested and configured in a working environment with keyboard, monitor, mouse, and so on, all available for usage. Once you have your system to a state where it works without your interference, you can power on and off without needing to jump back in and manage each time you know you should be able to remove all the human interface devices. This is a great start for anyone: being able to remove all the cables and interface with your system remotely. This is also means you can do other things such as manage your Raspberry Pi via your phone or from a system at work across the Internet. Once you get the feeling for jumping across the Internet to manage your machine, I guarantee you will ask yourself how you did without it before.
Alright, while I will readily admit that there are some true benefits from working within a console–only remote environment there are some people who just cannot get their head around it. And there are a number of cases where it is impractical for whatever reason. In these situations, it’s best to use a tool called Virtual Network Computing (VNC) to give you the ability to interact with your Pi’s desktop from another machine.
To do this, you will need to install a VNC server on your Pi and you will need a client on your machine. There are numerous different VNC solutions out there, and as long as they obey the VNC protocol, they should all be compatible. For your Pi, you will be using tightvnc because it aims to be efficient and “tight.” You can download the clients for both Windows and Linux systems at www.tightvnc.com. But before you go jumping into clients, start by installing the server on your Pi. Run the following command:
$ sudo apt-get install tightvncserver
This command will install tightvnc with the package management tool; your output should be similar to the following:
Reading package lists... Done
Building dependency tree
Reading state information... Done
The following extra packages will be installed:
  x11-xserver-utils xfonts-base xfonts-encodings xfonts-utils
Suggested packages:
  tightvnc-java nickle cairo-5c xorg-docs-core
The following NEW packages will be installed:
  tightvncserver x11-xserver-utils xfonts-base xfonts-encodings xfonts-utils
0 upgraded, 5 newly installed, 0 to remove and 91 not upgraded.
Need to get 7,824 kB of archives.
After this operation, 11.7 MB of additional disk space will be used.
Do you want to continue [Y/n]?
Once you have Tight VNC Server installed, you need to power it up and start it running so you can connect. So go ahead and execute this command:
$ tightvncserver
You will then be prompted for a pair of passwords: one is the actual VNC password that allows you to use the mouse and keyboard to manipulate the screen; the second is the optional “View Only” password that allows you to view what’s on the screen but not interact. This is what you should expect to see after executing:
You will require a password to access your desktops.
Password:
Warning: password truncated to the length of 8.
Verify:
Would you like to enter a view-only password (y/n)? n
New 'X' desktop is raspberrypi:1
Creating default startup script /home/pi/.vnc/xstartup
Starting applications specified in /home/pi/.vnc/xstartup
Log file is /home/pi/.vnc/raspberrypi:1.log
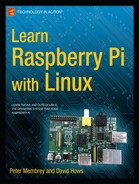
Now all you need to do is go ahead and connect with the tightvnc client on the machine you wish to browse from. Go ahead and fire up the client. I am working from a Windows environment, and you should see a screen like in Figure 9-2.
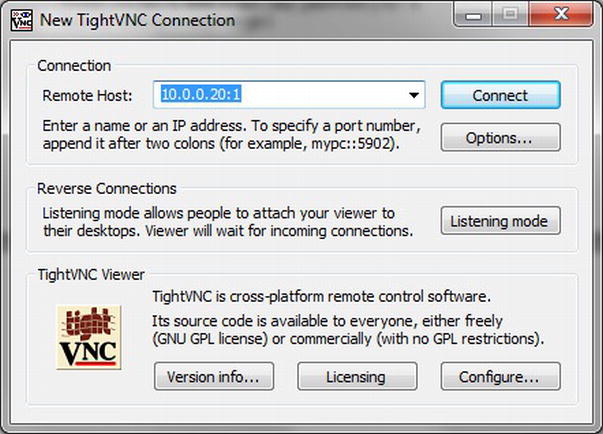
Figure 9-2. TightVNC Client
In Figure 9-2, you can see that I have entered my Raspberry Pi’s IP address and :1. Normally a single colon after an IP address designates a port number, but in this case it designates a screen number. If you go back over the output from the tight VNC startup, you can see that it says it created a new desktop of raspberrypi:1, which is what I have connected to. Now press Connect and boom, there is the lovely pink raspberry displayed on your screen and you are able to move around in the Raspberry Pi environment.
If you were to restart, however, you would be without a VNC server again, and running tightvncserver will ask you for credentials again. This is not the optimal way to do this, so instead you will run the following command if you wish to restart the server:
$ vncserver :1 -geometry 1920x1080 -depth 24
This command says to run a vncserver on screen :1 with the dimensions 1920 x 1080, which is the maximum resolution of your Pi (full 1080p high definition) and set the color depth to 24 bits. You can lower these values if need be to fit the dimensions of your client screen or to lower the number of resources used by your Pi in hosting a VNC connection. In addition to this, you may wish to run your VNC server on boot so you don’t need to SSH in to set up a video connection. After all, that’s just redundant! The simple way is to add the vncserver command to /etc/rc.local as everything in this file gets executed during the boot process.
By default, your rc.local file will look like this:
#!/bin/sh -e
#
# rc.local
#
# This script is executed at the end of each multiuser runlevel.
# Make sure that the script will "exit 0" on success or any other
# value on error.
#
# In order to enable or disable this script just change the execution
# bits.
#
# By default this script does nothing.

# Print the IP address
_IP=$(hostname -I) || true
if [ "$_IP" ]; then
  printf "My IP address is %s
" "$_IP"
fi

exit 0
You can then add the following line to start tightvnc just before the exit 0:
vncserver :1 -geometry 1920x1080 -depth 24
If you want a proper start process, you can use something like the following script as the file /etc/init.d/tightvnc:
### BEGIN INIT INFO
# Provides: tightvnc
# Required-Start: $remote_fs $syslog
# Required-Stop: $remote_fs $syslog
# Default-Start: 2 3 4 5
# Default-Stop: 0 1 6
# Short-Description: Start Tight VNC Server at boot time
# Description: Start Tight VNC Server at boot time.
### END INIT INFO
#! /bin/sh
# /etc/init.d/tightvnc

USER=pi
HOME=/home/pi
export USER HOME

case "$1" in
 start)
   echo "Starting Tight VNC Server"
   /usr/bin/vncserver :1 -geometry 1920x1080 -depth 24
;;

 stop)
   echo "Stopping Tight VNC Server"
   /usr/bin/vncserver -kill :1
   ;;

 *)
   echo "Usage: /etc/init.d/tightvnc {start|stop}"
   exit 1
   ;;
esac

exit 0
Once you have created this file, you need to execute the following command to allow the script to be executed:
$ sudo chmod +x /etc/init.d/tightvnc
Then you can start and stop the script with /etc/init.d/tightvnc . Be aware that the first time you run this script you will have to enter a VNC password again as this script is being run as root, rather than the Pi user. Finally, you can set the script to automatically boot with this:
$ sudo update-rc.d tightvnc defaults:
update-rc.d: using dependency based boot sequencing
Now that you have installed and configured VNC on your Pi and been able to remove the dependency on human input devices for working with the Pi, you can move into the next area.
True WiPi with WiFi
From your earlier work with VNC and SSH, you will have come to realize that in removing human input devices, you have increased the dependency on your network connection. This dependency comes in the form of management because you can’t interact directly via keyboard and monitor anymore; you need to have another access method: the Ethernet network connection. Of course, this is still a wire, so you may as well keep the input devices, right? There is a very obvious solution here—WiFi—but to the chagrin of many people the Raspberry Pi doesn’t come with WiFi on the board itself. You will need to go out and purchase a wireless adapter for your Pi if you wish to use one.
Okay, simple enough, you say, and off you pop down to the local computer hardware store to pick up a wireless adapter. You look around and urgh. There are so many wireless adapters available! So which of the dozens available is best for the Pi? Will all of them even work with the Pi? While most people would intuitively go and pick up the cheapest that will fit in with their WiFi setup at home, this is not the correct thing to do here as there are other factors at play.
First, all USB devices require power, and, as you are well aware, the Raspberry Pi runs on 5 volts of power. This means that you will need to get a wireless device that runs on a lower amount of power (if you place too much draw on your Pi’s USB you can crash it), or you will need to invest in a powered USB device that connects to an external power source (not good for your purposes, but I will cover this later because there are other uses for them). So you need to be mindful of power; you also need to be mindful of compatibility as some of the stranger wireless adapters may not have support within Linux systems. I have included some data from the Raspberry Pi community on their experiences with various wireless adapters to supplement my own.
As you can see in Figure 9-3, I chose to use a D-Link DWA-131 wireless adapter purchased from my local tech store. The rest of this example will cover some of the basics of getting your Pi to communicate with your local wireless network using the DWA-131.

Figure 9-3. D-Link DWA-131 802.11n wireless N nano adapter
![]() Note Your Pi may restart when you connect the wireless adapter, so save any work beforehand.
Note Your Pi may restart when you connect the wireless adapter, so save any work beforehand.
This doesn’t mean you need to use this particular adapter alone; the setup of most wireless adapters to work with your Pi should be the same process once you have managed to get it to register correctly. So without further ado, start and plug in the wireless adapter and get to work. The current state of the board is shown in Figure 9-4.

Figure 9-4. Three down, two to go!
As you can see, I have still got my Ethernet cable attached for now. I will show you how to configure wireless on your Pi from both the command line and the GUI. Before you jump straight into configuration, you need to know exactly what you are working with, so jump into the shell and run the lsusb command, which is just like the ls command, but for USB devices.
$ lsusb
Bus 001 Device 001: ID 1d6b:0002 Linux Foundation 2.0 root hub
Bus 001 Device 002: ID 0424:9512 Standard Microsystems Corp.
Bus 001 Device 003: ID 0424:ec00 Standard Microsystems Corp.
Bus 001 Device 004: ID 07d1:3303 D-Link System DWA-131 802.11n Wireless N Nano Adapter(rev.A1) [Realtek RTL8192SU]
Perfect! You can see from this command that my wireless adapter has been recognized by the system and should be able to function—fantastic. If not, don’t fear; you will simply need to install the driver for your particular network card. A small amount of Google research and you should be able to find the chipset of the WiFi card. The chipset refers to the small silicon chip inside the wireless adapter that “runs” the wireless adapter. The chipset is often manufactured by an entirely different company from the one whose badge appears on the device, and it is the chipset with which you need to interface and is thus what determines which drivers you need to find. Once you have found the chipset, a quick search on this should point out what driver packages you will need to install. Once you have installed your driver packages and you can see your wireless adapter in lsusb, you can move to the next step.
Since you have the device installed and registered, you should check that the device has registered correctly as a network device. When working with Linux, the most common tool for network management is ifconfig. So go ahead and run ifconfig and examine the output:
$ ifconfig
eth0      Link encap:Ethernet  HWaddr b8:27:eb:8a:46:ba
          inet addr:10.0.0.20  Bcast:10.0.0.255  Mask:255.255.255.0
          UP BROADCAST RUNNING MULTICAST  MTU:1500  Metric:1
          RX packets:6558 errors:0 dropped:0 overruns:0 frame:0
          TX packets:268 errors:0 dropped:0 overruns:0 carrier:0
          collisions:0 txqueuelen:1000
          RX bytes:374403 (365.6 KiB)  TX bytes:28129 (27.4 KiB)

lo        Link encap:Local Loopback
          inet addr:127.0.0.1  Mask:255.0.0.0
          UP LOOPBACK RUNNING  MTU:16436  Metric:1
          RX packets:0 errors:0 dropped:0 overruns:0 frame:0
          TX packets:0 errors:0 dropped:0 overruns:0 carrier:0
          collisions:0 txqueuelen:0
          RX bytes:0 (0.0 B)  TX bytes:0 (0.0 B)

wlan0     Link encap:Ethernet  HWaddr 90:94:e4:51:81:7a
          UP BROADCAST RUNNING MULTICAST  MTU:1500  Metric:1
          RX packets:0 errors:0 dropped:0 overruns:0 frame:0
          TX packets:0 errors:0 dropped:0 overruns:0 carrier:0
          collisions:0 txqueuelen:1000
          RX bytes:0 (0.0 B)  TX bytes:0 (0.0 B)
The previous configuration actually shows information for three devices rather than just the wireless adapter (two of which you saw in Chapter 3):
- It shows first the eth0 device that is the physical Ethernet device.
- Next is the lo adapter; recall that this is the system’s internal self-reference device that is used when you want to address traffic to within the Pi (or any system) from itself.
- Finally you have wlan0, which is the wireless device. You should be able to notice a few differences between the eth0 and lo devices and the wlan device—it doesn’t have an IP address (denoted by inet addr) or a mask. These are things you will need to configure to get it talking with your wireless network—along with the details of your wireless networks SSID and security arrangements. So that will be your next step.
If your adapter didn’t show up, but did register in the lsusb, reboot and perform the same troubleshooting steps. The system may be able to recognize your device, but be unable to interface with it correctly. Installing a driver package for your system will likely be the solution here.
To begin with, make this easy and do the configuration via the GUI, which ironically involves installing something via the command line. Go ahead and fire up apt-get to install wpa-gui. WPA GUI is an application that has recently been added to Raspbian to make the installation and configuration of wireless devices much, much simpler. It is so recent, in fact, that this chapter needed to be rewritten to include it because the version of Raspbian that was used during the first round of the writing did not include it! If you’re unsure about whether you have the correct version, you should run this command because there is no harm in doing so. The command to install this application is the following:
$ sudo apt-get install wpagui
If you have the latest version of Raspbian, which includes wpagui, you will see the following output stating that the package is already installed:
Reading package lists... Done
Building dependency tree
Reading state information... Done
wpagui is already the newest version.
0 upgraded, 0 newly installed, 0 to remove and 0 not upgraded.
If you have not installed the package, your installation will look something like this:
Reading package lists... Done
Building dependency tree
Reading state information... Done
The following extra packages will be installed:
  libaudio2 liblcms1 libmng1 libqt4-svg libqtcore4 libqtgui4 menu
Suggested packages:
  nas liblcms-utils qt4-qtconfig menu-l10n
The following NEW packages will be installed:
  libaudio2 liblcms1 libmng1 libqt4-svg libqtcore4 libqtgui4 menu wpagui
0 upgraded, 8 newly installed, 0 to remove and 96 not upgraded.
Need to get 8,921 kB of archives.
After this operation, 22.6 MB of additional disk space will be used.
Do you want to continue [Y/n]?
Fantastic! Now that you have installed wpagui, you should be able to make good use of it via the user interface. But before you jump in, go ahead and reboot your Pi because you have made a major change to how the Pi manages your network connections and you want to make sure it’s bombproof before continuing. Booted okay? You can run ifconfig and the output looks the same, great.
Now you can begin configuring your wireless adapter. You’ll start with the GUI and then see how to do it over the command line.
![]() Note If you notice your Pi slowing or failing to connect to WiFi, it may be your keyboard drawing too much power. Try removing it and using VNC or SSH to configure your wireless.
Note If you notice your Pi slowing or failing to connect to WiFi, it may be your keyboard drawing too much power. Try removing it and using VNC or SSH to configure your wireless.
GUI WiFi Configuration
Log in to the GUI and there should be a new icon called WiFi Config, as shown in Figure 9-5.

Figure 9-5. WiFi Config icon
Double-click this icon to open the application and you should be presented with the wpagui window, as shown in Figure 9-6.

Figure 9-6. wpa_gui window
From within the wpagui window, press the Scan button. It will take a few moments, but another window will pop up, as shown in Figure 9-7.
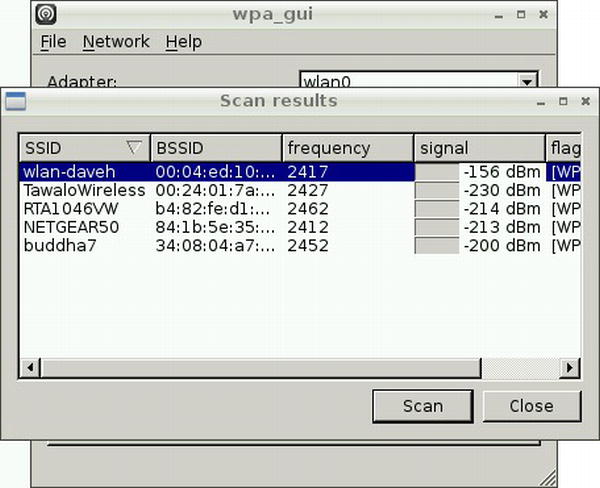
Figure 9-7. Scan results window
This window should look familiar to everyone. This is the window for selecting your wireless network. Find your particular network and then double-click it to open the configuration window (see Figure 9-8).
Figure 9-8. Network details
I am assuming that you should have your details available to set up your configuration. Most of this is intuitive, but there are a few things you need to be aware of:
- SSID is the “name” given to your wireless network, so you need to type this name.
- Next is Authentication, which specifies the type of authentication that you are using: WEP, WPA, WPA2, and so on.
- Next is Encryption, which selects the encryption mode that you will be using.
- The last is PSK, which stands for preshared key. This is your WiFi password.
Now change to the Wireless Security tab and set up whichever authentication method, encryption method, and password you are using for your WiFi. This information is normally inside your router’s configuration system, but can also be written on the router itself or within the router manual. Now click Add. Your wireless settings should be saved into the system and it will pick these up and begin attempting to connect to your adapter; after a few moments, you should expect to see something like Figure 9-9.
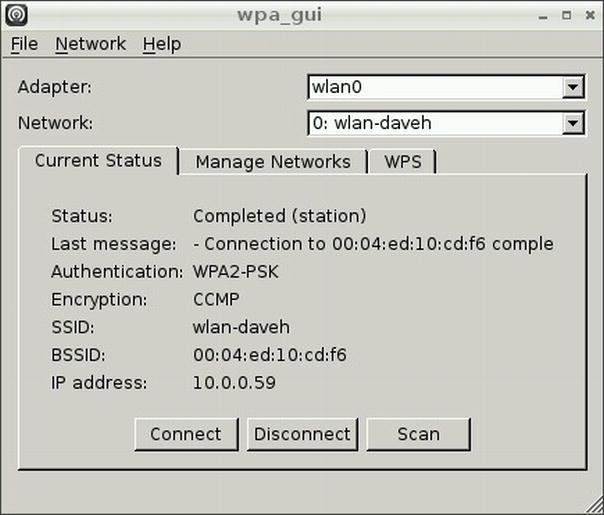
Figure 9-9. WiFi connected!
If you didn’t see this, have a look at the mouse-over message it should give you an idea of what is going wrong with your connection. Check that your settings are correct and that you have picked the right security method. If in doubt, open your router configuration to double-check. Finally, you can go back into the console and issue ifconfig again to check out your wireless adapter settings!
wlan0     Link encap:Ethernet  HWaddr 90:94:e4:51:81:7a
          inet addr:10.0.0.59  Bcast:10.0.0.255  Mask:255.255.255.0
          UP BROADCAST RUNNING MULTICAST  MTU:1500  Metric:1
          RX packets:772 errors:0 dropped:10 overruns:0 frame:0
          TX packets:35 errors:0 dropped:0 overruns:0 carrier:0
          collisions:0 txqueuelen:1000
          RX bytes:100749 (98.3 KiB)  TX bytes:4254 (4.1 KiB)
That looks much more like what you expect; it has an IP address, mask, and so on. It also shows that it has been sending and receiving packets (those are the RX and TX packet numbers) without error. The final test is to ping that IP address from a second machine, and that’s it. You can now go ahead and remove that Ethernet cable. As a final test, go ahead and reboot; you should be able to ping your system on the wlan0 IP address after the reboot, showing that you have successfully kept the wireless adapter details stored across a reboot. Now you can go ahead and remove that next cable and reboot as you want to ensure your system is using the wireless adapter by default.
Managing WiFi from the Command Line
For those of you who don’t really want to use the GUI or who consider themselves purists to the true Linux tradition of using only the command line to manage your systems, this is the bit for you! To do this, you will be modifying the NetworkManager configuration. The basic way the NetworkManager system decides how it should manage your Ethernet devices is twofold:
- It checks to see whether the managed flag in /etc/NetworkManager/NetworkManager.conf is set.
- It takes over management of anything configured within /etc/network/interfaces; these settings say how this device should be managed.
You don’t want the NetworkManager system to jump in and take over your settings from above, so you need to ensure that it’s not going to. This will be an issue only if you installed the GUI earlier, or if NetworkManager came bundled with your Raspbian image, but it is best to be thorough. So go ahead and check /etc/NetworkManager/NetworkManager.conf and ensure that the managed flag is set to false. The file should look like:
[main]
plugins=ifupdown,keyfile

[ifupdown]
managed=false
Once this is done, go ahead and reboot your Pi; you want to ensure that the Pi comes up correctly and all existing Ethernet connections are working after this first reboot. Now you need to add the configuration into /etc/network/interfaces so that it knows how to manage the device and connect to your WiFi. So go ahead and open up /etc/network/interfaces . You will see that the file is already partially populated with the following lines:
auto lo

iface lo inet loopback
iface eth0 inet dhcp
You may also see the following lines in your file, depending on whether your system has already done some wireless configuration or not.
allow-hotplug wlan0
iface wlan0 inet manual
wpa-roam /etc/wpa_supplicant/wpa_supplicant.conf
iface default inet dhcp
These lines correspond to the loopback and eth0 devices, respectively, and provide some simple details about their management; is in this case, the loopback is an automatically managed loopback device, and the eth0 device is given an IP address via DHCP. There may also be some existing configuration for your wlan0 device; if they exist, you should comment them out by adding a # to the front of them or delete them from the file. You now need to add a new configuration for the wlan0 wireless device, so go ahead and add the following to your config below the existing content:
auto wlan0
iface wlan0 inet dhcp
    wpa-ssid <Your WiFi SSID>
    wpa-psk <Your WiFi password>
This block says that you will have an automatically managed wlan0 device, which gets its connection information via DHCP. You also pass it the SSID and PSK. This configuration will work for both WPA and WPA2 network security implementations. Once you’ve finished, it’s time to test your new device, so go ahead and run the following, which will start the interface. It may take a few moments, but your output should resemble mine:
$ sudo ifdown wlan0
$ sudo ifup wlan0
Internet Systems Consortium DHCP Client 4.2.2
Copyright 2004–2011 Internet Systems Consortium.
All rights reserved.
For info, please visit https://www.isc.org/software/dhcp/

Listening on LPF/wlan0/90:94:e4:51:81:7a
Sending on   LPF/wlan0/90:94:e4:51:81:7a
Sending on   Socket/fallback
DHCPDISCOVER on wlan0 to 255.255.255.255 port 67 interval 8
DHCPDISCOVER on wlan0 to 255.255.255.255 port 67 interval 15
DHCPDISCOVER on wlan0 to 255.255.255.255 port 67 interval 9
DHCPREQUEST on wlan0 to 255.255.255.255 port 67
DHCPOFFER from 10.0.0.1
DHCPACK from 10.0.0.1
bound to 10.0.0.59 -- renewal in 444671 seconds.
All this shows that the device has connected to my wireless network and has been given an IP address via DHCP, which is exactly what you told it to do! Now suppose that you don’t want to use DHCP, but would rather give your WiFi adapter a static IP address. You simply need to change the iface line to read static rather than dhcp and then add details for your IP address, subnetmask and gateway. Your config will look like this instead:
auto wlan0
iface wlan0 inet static
    address 10.0.0.57
    netmask 255.255.255.0
    gateway 10.0.0.1
    wpa-ssid <Your WiFi SSID>
    wpa-psk <Your WiFi password>
Now that you have successfully configured wireless on your system, you can go ahead and reboot your Pi to check that the wireless adapter automatically comes up. If not, go back and ensure that you set auto wlan0 and that you enabled the managed=false flag in the NetworkManager config file.
If that doesn’t work, go over your configuration settings for SSID and WiFi password. You can confirm whether or not you can start your wireless adapter with ifup wlan0; if there are problems connecting and getting an IP address your system should show them here giving you a chance to work out what’s going wrong. Finally, if you just can’t get it to run, try removing any other attached USB devices; they can draw valuable power away from your WiFi adapter.
One last thing on the command line that may help you is the iw series of commands:
- You can run iwlist with the scan option to get a scan of information about nearby wireless hotspots.
- Or you can use iwconfig to get configuration details about your wireless adapter.
Down to One
Congratulations, you are on your way to a fully wireless Raspberry Pi! You have successfully removed the need for an Ethernet cable and you can now access your Pi wirelessly. It should now be down to just one cable! (See Figure 9-10.)

Figure 9-10. Last cable standing
Removing the Need for Power
There is very little you can do to shortcut the need to provide your Raspberry Pi with power; it needs it, and there are only a finite number of solutions to this problem. By far the most easy and convenient is to get a large USB battery. These are available just about everywhere these days for charging any of the many devices people commonly carry on the go. The simple solution here is to attach your Pi to one of these batteries for use because this kind of battery should guarantee the correct level of power output to your Pi—as they are designed to power USB devices. The important thing when looking at batteries to power your Pi is to be certain they can provide the full 1 amp of power, as some USB batteries are okay for charging but don’t pack quite enough juice to power a Pi. Figure 9-11 shows the final WiPi.

Figure 9-11. WiPi at long last!
There are a few hacks out there with a combination of rechargeable batteries and solar panels, which will go much further for you, but those are well beyond the scope of this book.
I made mention earlier that if you place too much draw on your Pi’s USB, you can crash it as it has only got a limited power supply of its own. The solution is to get your hands on a powered USB hub. These powered hubs normally have one connection out and a number of connections in and will also have a mains connection with which to supply power. The principle with these is that people rarely use the full data transmission volume of a USB but will often run out of power, so having a way to supplement the power of a USB device with a mains power source is a good way to give people more flexibility with their devices. If you find that when you attach your device your Pi switches itself off, it’s a fair bet that you will need something like one of these to help spread out the power load (see Figure 9-12).

Figure 9-12. Powered USB hub in action
Summary
After all that work, you should have seen a large payoff. You should now know how to configure your Pi to make it wireless. You should be able to set up and connect to your Pi via a VNC client in addition to the normal SSH connections. You have learned how to configure your Raspberry Pi to take a wireless adapter and can attach it to your existing wireless network. Finally, you should be aware of some of the limitations of your Pi with regard to power consumption and how you can resolve these issues.