![]()
Surveying the Landscape
Although the majority of this book focuses on getting you comfortable on the command line and really getting your hands dirty with Linux, we would be completely remiss if we didn’t first show you how to use the graphical interface that comes with your Pi. It’s not quite as flashy as what you might find on a Windows PC, a Mac, or even some Linux distributions, but it’s fast, easy to use, and will let you do all the things you’re used to doing. And, of course, it’s all on a device that fits in your pocket and draws less power than the monitor or TV it’s connected to.
We start off this chapter by looking around the desktop and seeing what interesting things we have to play with. Some are obviously useful applications in their own right and some are probably less useful at this stage (for example the Python development environment won’t be of much interest to you unless you’re programming in Python). We’ll then trundle through the various menus and have a look at what we find.
Welcome to LXDE
Unlike Windows, Linux isn’t integrated with a particular GUI; it uses a separate application (a client and a server, in this case) to provide one. This application is known as the X-server and it used to be by far the most complicated thing in the Linux universe to set up. Although it has gotten a lot better, not too long ago, great time and effort needed to be spent if you wanted to use the scroll wheel in that newfangled mouse of yours. Needless to say, the fun of that wears out pretty quickly. These days, the X-server is almost a black box and very rarely do you need to actually touch it. For that reason, we won’t go into any more depth on that subject in this book, but if you are a bit curious to find out more, check out http://en.wikipedia.org/wiki/X_Window_System.
The X-server provides the framework for using a GUI, but it doesn’t actually provide the pretty desktops that we’re used to seeing. They are provided by desktop environments. Again, we won’t cover how these all work, but suffice it to say, like everything else in the Linux world, you have a choice about which one you prefer. For most people, it comes down to which one comes with their Linux distribution of choice, although most distributions offer a selection. The more advanced ones have all sorts of features and special effects, and understandably consume a fair amount of resources while they’re at it. On the latest and greatest desktop or laptop, this is hardly a problem, and most people jump at the chance to make their expensive machine actually do some work. However, it does become something of a problem when you’re running a less-than-high-spec machine such as the Pi.
It’s not just the Pi that can struggle—computers of just a few years ago could easily run Linux, but struggled with the new highly graphical interfaces. When you consider even older machines that would often get thrown out, a suitable display manager could easily manifest as a perfectly useful PC. There’s still more to it, though; modern netbooks are low-powered by design, with the aim of high efficiency for battery consumption as well as cost. They also benefit from a minimalist design when it comes to the desktop.
When you need to stretch your processing budget, the best place to cut corners is in the feature set of the graphical interface. Do you really need all those fancy features? Are transparent windows essential to what you’re doing? Do you really need that 3D-rendered clock? If not, and you want to cut some fat, a desktop environment such as LXDE will be right up your street.
LXDE (short for Lightweight X11 Desktop Environment) was designed for machines in which energy efficiency and the need to run on hardware at the lower end of the performance spectrum was of critical importance. It aims to be efficient in terms of CPU cycles and memory usage, and although some window managers eschew all unnecessary features, LXDE tries to remain full of features at the same time.
Although we now know that the GUI is made up of a lot of moving parts, LXDE is mostly transparent when used. Really there is no harm in thinking of LXDE as the main environment for your Pi and if you plan to spend most of your time using the GUI, we feel there’s no harm in considering it a core part of the operating system. You can simply just use it and accept it as being available. With that in mind, let’s move on to exploring what we actually have when we are using LXDE.
What Do We Have Here?
Once you’ve installed and set up your Pi, and you’ve powered it up for the first time, you should be left with a screen that looks like Figure 2-1

Figure 2-1. First boot of your Pi
How the icons are laid out really depends on the screen you connected to your Pi. It should look pretty similar; the only real difference is how the desktop icons are laid out. And because Raspbian is constantly being improved by the developers, it’s possible that you will see new icons or perhaps some replacements.
There are some key areas here that are hard to see in one large screenshot, so we’re going to break each part down individually. For simplicity (not to mention the fact that they have become common idioms) we’ll refer to various GUI elements by the name most people are familiar with. Thus we will discuss the start menu and taskbar. Let’s start with the bottom left of the screen.
The Start Menu and Bottom Left of the Task Bar
The first button on the bottom left (the one that looks like an alien spider—see Figure 2-2) is actually the LXDE logo and acts as the start button. The second button (which is indistinct even on a high-quality monitor) will start up PCManFM, the LXDE file manager. This is the tool you reach for when you need to move some files around or do some general tidying up. The next button (a globe) starts the default web browser that happens to be Midori in this case. Like the other apps, you’ll find that most of these applications are designed to be lightweight and efficient.

Figure 2-2. Start button and friends
So far, so good. None of these applications is really that different from what you’re probably used to doing on your main computer. The next two, however, are a bit different: they control the environment rather than start individual programs. The first button (the two overlapping windows) acts like a “minimize all” button when clicked: all the windows currently being displayed will be immediately minimized. Clicking the button again doesn’t restore the windows, though, so if you do have a lot of windows open, don’t expect to be able to click this button again to get them back. This button has a second feature: if you click with the middle button (most scroll wheels can also be used as a button), all the windows will be “shaded.” When you shade a window, it rolls up inside its title. We don’t really use this feature (in all honesty, we never saw the point, but to each his own), but if it’s something you like, feel free to use it.
Next up are the desktop buttons. Microsoft Windows by default has a single desktop, and most people are unaware that it can actually have more than one. This feature was added in recent versions of Windows, but Linux has had it from day one, mostly because other UNIX-based operating systems have had it for considerably longer.
The feature is quite powerful in that it lets you have multiple desktops, each with its own applications. This allows you to keep all your work applications on one desktop while keeping your chat and browser windows in another. By default, LXDE provides two desktops, but you can have more if you want.
The rest of this part of the bar is taken up with the various applications that you’ve opened. Like Windows, all running applications (at least those that provide a graphical interface) will show up here and you can use the bar to select which application you want to interact with.
And on the Right Side…
After the taskbar, there are more icons, as seen in Figure 2-3. The first one appears to be just a black box, but it actually acts as a CPU monitor. The more work you give your Pi, the greener this box will become. It acts like a chart, showing you how your CPU is being used over time. You can actually amuse yourself (at least for a few minutes) by rapidly moving your mouse pointer. The faster you move it, the more CPU is used, and the box becomes greener. Fun and games aside, though, this monitor is quite useful because if your Pi starts acting a bit sluggishly, a quick look at the monitor can tell you whether you are maxing out your CPU.
![]()
Figure 2-3. The right side of the task bar
Next to the CPU monitor is the clock, which doesn’t really need much in the way of explanation. The monitor with the padlock in the middle is used to lock your screen (although we have heard that this doesn’t work for everyone). This is very useful if you’re stepping away from your computer and you have some friends around who think it might be funny if you made some “amusing” posts on Facebook. By locking your screen, their efforts will be thwarted–assuming you remember to change your password to something other than the default, of course!
Last up is the power button that gives you numerous options for shutting down or rebooting your machine, as shown in Figure 2-4 (although if you started manually with startx, then you will only see logout and cancel).
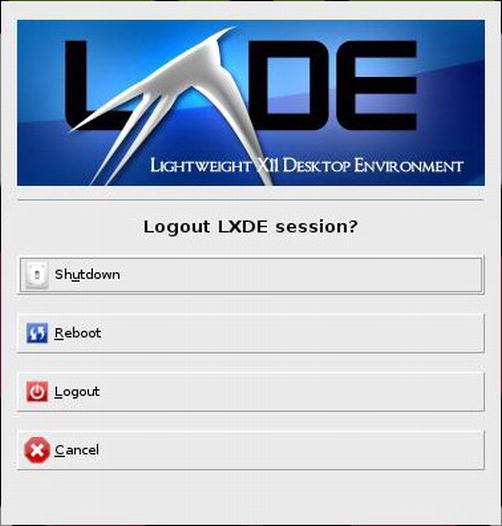
Figure 2-4. Clicking the shut down button
Clicking Shutdown will do pretty much what you expect, as will Reboot and Logout. There is one thing that is worth remembering, though: the Pi runs Linux, which is a multiuser operating system. That means that things might be happening in the background that you’re not aware of. For example, someone might be streaming a video from your Pi. If you shut down or reboot, you will disconnect anyone else who is connected to the Pi. This might not be an issue for you right now, but it is something that you probably should be aware of.
And that’s pretty much it for what you have on your screen. We’ll cover the apps on your desktop after the next section, in which we look at the mysteries of the start menu.
The Start Menu
The start menu concept has become almost ubiquitous across most operating systems (notably not the Mac) since its introduction with Windows 95. Although various people might scoff at that and point to places where it might have been seen before or insist that the start menus in Linux are nothing like those found in Windows, we try to move beyond that. The fact is, the start menu concept works very well regardless who thought of it, and there is a reason why it’s been adopted so far and wide.
Enough of the soap box; let’s see what our start menu has to offer (see Figure 2-5).
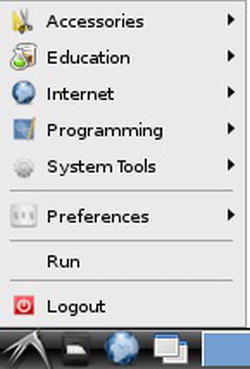
Figure 2-5. The start menu
As before, there’s nothing really groundbreaking here. The first section lists all the applications that are available, all neatly grouped together: in this case, Accessories, Education, Internet, Programming, and System Tools. Apart from System Tools (and Accessories doesn’t look that inspiring), it’s hard to decide which of these options we should delve into first. Before we can begin, though, we need to wrap up the rest of the items.
Preferences and Logout are fairly straightforward. We’ll look at some of the settings in Preferences that you can tweak later on; if you press the Logout button, you will, well, log out. No surprises there. The final item is the Run command, which lets us execute specific commands without the need to pick them from a menu, click an icon, or open a terminal. Just as with Windows, this option can be a useful convenience. It also has autocomplete functionality, as shown in Figure 2-6.

Figure 2-6. The run command and autocomplete
Here you can see we typed in gno, and it autocompleted to the app that matches the pattern. This can save you a lot of time as you will get to know how many characters you need to type before the autocomplete kicks in with the right answer. Quite often, command names (especially for GUI apps) can be pretty long and this can be real time saver!
Accessories
Now let’s take a look at what we have under Accessories. Like all the other menus, the items here can change as you install more software, and on newer versions of Raspbian it might look a little different. On our Pi, the Accessories menu looks like Figure 2-7.

Figure 2-7. The Accessories menu
Debian Reference
First up is Debian Reference. As its name suggests, it’s a guide to all things Debian and because Raspbian is based on Debian, it gets taken along for the ride. The manual is nicely structured and well written, and has had the additional benefit of evolving over an extended period of time. The manual is a set of HTML pages, and when you click the link it will open in the Midori browser. Simply click the first link as shown in Figure 2-8.

Figure 2-8. You want the HTML version on the left
The second link contains the same content in plain text, but it is stored as a compressed archive and so it’s not something you’d use for online viewing. As the manual is taken from the Web, this is a holdover from the days when you might have wanted to download a copy for browsing offline. All being well, you should end up with the page shown in Figure 2-9.
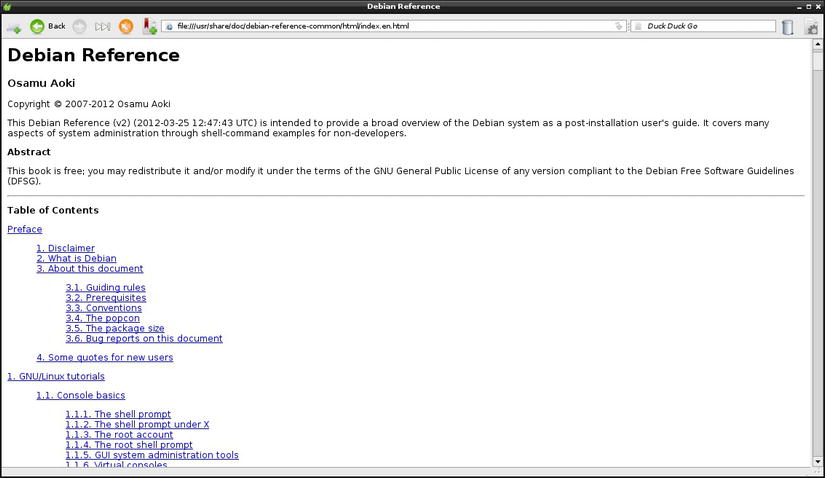
Figure 2-9. The Debian reference manual in all its glory
You can navigate the manual just like a web page. Although having a local copy is very useful, it’s not as easy to search as asking Google, which will usually take you straight to what you want. That said, if you’re trying to figure out why you can’t get online, you’ll be happy for a local copy.
File Manager
As touched on earlier, LXDE ships with the PCManFM file manager. Of course you can also access it from the task bar, as shown earlier. Taking its lead from the minimalist design movement, this file manager is lightweight, simple, and easy to use, but still has all the features you’re going to need. It works in a very similar way to Microsoft’s Windows Explorer, so if you’re coming from a Windows background you’ll feel right at home with PCManFM (see Figure 2-10). If not, you’ll be able to pick it up easily with just a few moments of clicking about.

Figure 2-10. The PCManFM file manager
When it initially opens, PCManFM will drop you into your home area. It will show you how much space you have available on the bottom right (always useful in devices with relatively limited storage such as the Pi) and lists the most common places on the top left. For browsing, you can simply click your way through the folders and you can use the navigation icons on the toolbar to help you move quickly through your files. If you’re looking to get a bit more hands on, we cover how to manipulate files in Chapter 4.
Image Viewer
Image Viewer is one of those applications that you’ll probably never open directly; you’ll almost always open it by double-clicking an image file that by default will then open Image Viewer for you. Simple though it may be, Image Viewer is not lacking in features and has all the basic tools you’ve come to expect, as shown in Figure 2-11.
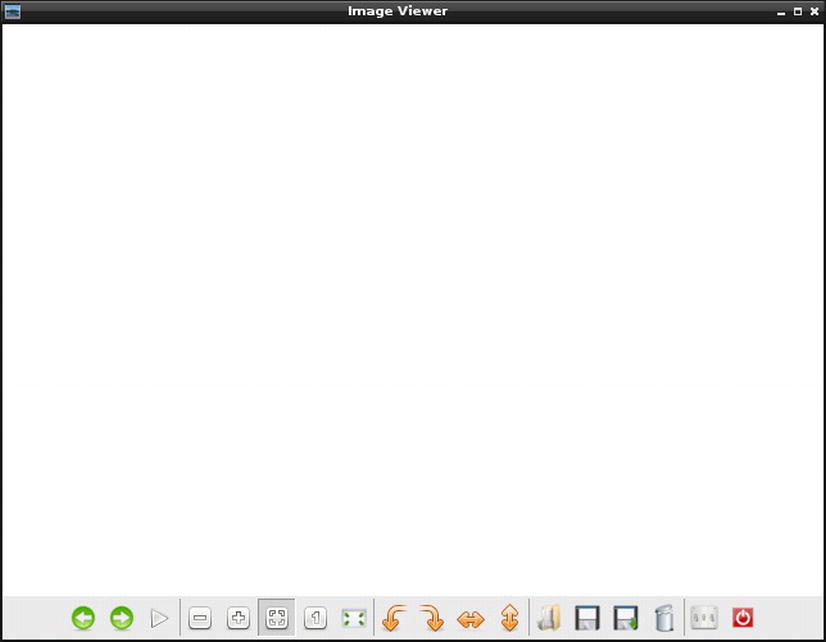
Figure 2-11. Image Viewer’s main interface
The first two buttons let you move back and forth through a collection of images. This is actually surprisingly useful because people are now accessing albums rather than specific photos. To help with exactly that, there is also a slideshow feature that you can access by pressing on the play button.
The next section has controls for how you want to actually view the image.
- The first two are the traditional zoom controls
- The third icon is for “fit to screen”
- The fourth is show at full size (which, if it is a photo from a digital camera, means you’ll have to scroll)
- Last, the full-screen option to really take advantage of that 60-inch flat screen you just got your hands on
In the third section are the controls for altering the image. The first two are rotate controls (rotate left and right, respectively), and the second pair of controls allows you to flip the image horizontally and vertically. This is especially handy when you took the photo at an odd angle and don’t fancy tilting your head 90 degrees in order to see your picture the right way up.
The next set contains file controls. They let you open, save, save as, and delete the file, respectively. The last two icons provide access to the preferences panel (nothing too interesting in there) and allow you to exit the program.
Leafpad
In keeping with the minimalist theme, the Leafpad text editor does the basics and that’s about all. It’s very similar to later versions of Microsoft’s Notepad and it is similarly easy to use (see Figure 2-12). It’s not much good for writing letters to Aunt Maude or to the council to complain about the next door neighbor’s dog, but it’s perfect for when you need to do some light text editing.
Despite its simplicity, Leafpad still provides some of the most useful tools, namely being able to do a find-and-replace, and enable and disable word wrap. Armed with those tools, you can accomplish pretty much anything.
![]() Note If you feel that Leafpad is a little underpowered for your tastes, you might want to flip ahead to Chapter 6, in which we show you some of the more powerful native text editors that you can get your hands on.
Note If you feel that Leafpad is a little underpowered for your tastes, you might want to flip ahead to Chapter 6, in which we show you some of the more powerful native text editors that you can get your hands on.
For the most part, Leafpad does exactly what it says on the box: it edits text, and if that’s all you need to do, Leafpad is an excellent choice.

Figure 2-12. Leafpad has a similar look and feel to Microsoft’s Notepad
LXTerminal
LXTerminal is a terminal emulator for Linux that gives you access to a virtual console. We won’t go into any depth on how to actually use this particular application because we’ll discuss the details in the next chapter. Suffice it to say, this tool is used to give you direct command-line access to the operating system. For many people, this is a place where angels fear to tread, yet for seasoned administrators, it is somewhere they call home. To find out whether the command line is for you, though, you’ll have to wait until Chapter 3.
LXTerminal is a simple emulator (see Figure 2-13), but it gets the job done. It doesn’t have all the bells and whistles that some emulators provide, but it is perfectly fine for the majority of people.
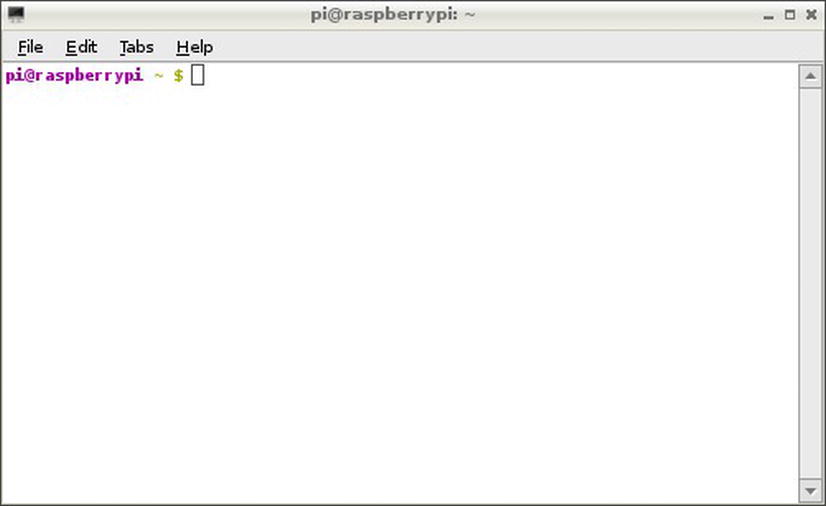
Figure 2-13. LXTerminal up and running
One thing we will mention here is the prompt. When the font color is green, and the end of the prompt is a dollar symbol, you know you’re running as a normal user and you don’t have root privileges (you can’t execute any commands that can really hurt the system). Again, we’ll cover this topic in more depth in the next chapter; we mention this distinction here so that the next program makes sense.
Root Terminal
This is all but identical to LXTerminal, except that instead of running as the normal pi user, it runs as the root (system administrator) user. When you first run this application, you’ll get a popup message, as shown in Figure 2-14.

Figure 2-14. Not a warning; you’re running admin-level commands without needing a password
Although it looks like an error message, it just lets you know that the system is configured to let you run an administrative-level command (in this case, running LXTerminal with root privileges) without having to provide authentication. For the Pi, this is almost certainly what you want, but on a machine that’s connected to sensitive resources and in which other people could feasibly access the machine, you might want to have it password-protected.
A root terminal is very similar to a standard LXTerminal, but (as you can see in Figure 2-15) the prompt looks a little different.

Figure 2-15. LXTerminal running as root
Here you can see that that prompt is now in gray text, and the end of the prompt is the pound or hash symbol. This means you are operating with elevated privileges and you could indeed run commands to effectively destroy the operating system. Linux doesn’t try to second-guess you; if you tell it you want to erase everything on the disk, it will obey that command and do so precisely. There is no safety net when running as root, which is why most people recommend that you stay in your own user account as much as possible. We’ll come back to this theme many times in this book.
XArchiver
XArchiver is less likely to be called directly than Image Viewer, but nonetheless is probably an application that will get a fair bit of use on the average system. This tool allows you to create and decompress archives of various formats, which is essential when you’re downloading content from the Internet. XArchiver looks like Figure 2-16.
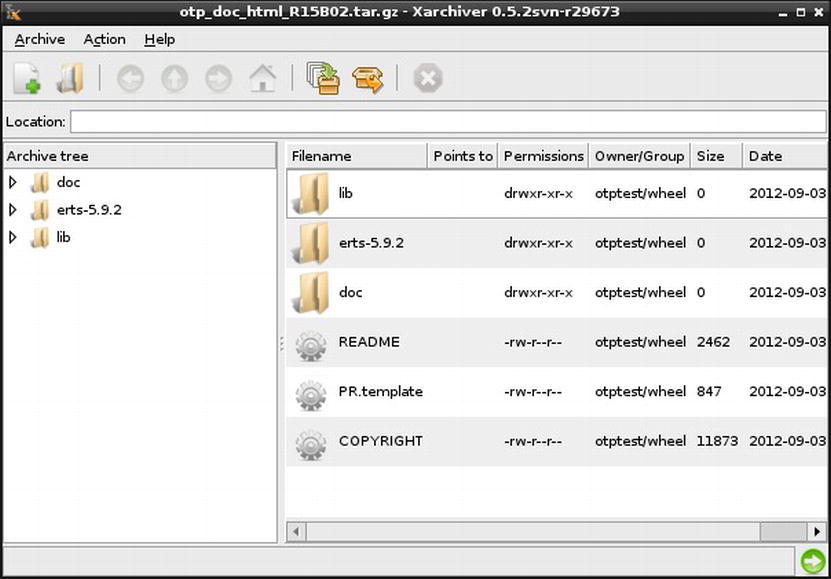
Figure 2-16. XArchiver when it’s opened by hand
Here we downloaded the documentation to the Erlang platform (it was the first thing that popped into our heads when we needed something to demonstrate XArchiver). After double-clicking the file, XArchiver was opened automatically. The only button we have used so far is the extract all button, which is the second one from the right. Clicking this will extract all the contents of the archive, which is usually what you actually want to do.
The Education menu has only two items, but as they comprise some of the more interesting applications on the Pi, it’s worth checking them out. The menu on our Pi looks like Figure 2-17.

Figure 2-17. Education menu
Scratch
Scratch was developed at the MIT media labs by the Lifelong Kindergarten group led by Mitchel Resnik. The goal was to create a way to teach people how to program without having to teach all the fiddly bits first. This made the tactile approach in Scratch (in which you can drag and drop blocks of logic) much easier to pick up.
We can’t claim to be experts in Scratch (in fact, we first came across it when we were playing with the Pi) but we are convinced that these sorts of applications will have a huge impact as the Pi spreads out across the waters. Getting people hands-on with technology and providing them with a powerful system that lets them get started without having to master all the underpinnings first is definitely a winner in our book.
If you’re not convinced, check out Figure 2-18; it certainly made us take a second look.

Figure 2-18. Scratch programming environment
Squeak
Squeakis a programming language that is preinstalled on your Pi. For licensing reasons, however, the install is not quite complete, so you won’t actually be able to use it out of the box. We are not sure if this is a temporary issue and one that might be resolved in future versions of Raspbian. At the moment, if you open Squeak you’ll see a window that looks something like Figure 2-19.

Figure 2-19. Starting up Squeak for the first time
After doing a bit of digging, we discovered the reason and also a post on the Raspberry Pi forums by jstout that provided a handy shell script that would install the missing components for you. Thanks to jstout, we can help you get Squeak up and running. You’ll need to open up LXTerminal and enter these commands (you could also come back to this section once you’ve read Chapter 3 and are comfortable on the command line):
$ wget -r -O SqueakV41.sources.gz http://ftp.squeak.org/4.1/SqueakV41.sources.gz
$ gunzip -f SqueakV41.sources.gz
$ wget -r -O Squeak-4.3-All-in-One.zip http://ftp.squeak.org/4.3/Squeak-4.3-All-in-One.zip
$ unzip -j -o Squeak-4.3-All-in-One.zip "Squeak-4.3-All-in-One.app/Contents/Resources/Squeak4.3.*"
$ sudo mv  SqueakV41.sources /usr/share/squeak
$ sudo mv  Squeak4.3.image /usr/share/squeak
$ sudo mv  Squeak4.3.changes /usr/share/squeak
This isn’t the time or place to discuss what those commands actually do, but the short version is this: they download the missing components and place them in the right location for Squeak to find them. Once you’ve entered these commands, you’ll be able to run Squeak without seeing that popup box. Instead you should see Figure 2-20.

Figure 2-20. Squeak is fully operational
Squeak is a dialect of Smalltalk, which is an object-oriented, reflective language. This makes it a very powerful and expressive language (you can do more with less code) that has earned it quite a following over the years. It has inspired various new programming languages (including Ruby) and was also used to implement Scratch, which we discussed just a few pages ago.
We’re not Smalltalk experts either, but we do know that it is a very interesting and powerful language, and it might make an interesting place for you to start your exploration of programming languages if you feel so inclined.
Internet
The Internet menu unsurprisingly contains applications that are specific for accessing the Internet. On our Pi, the Internet menu looks like Figure 2-21.
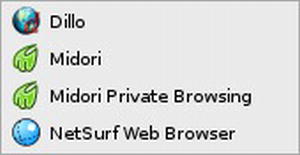
Figure 2-21. The Internet menu
Raspbian ships with three different browsers out of the box. They are all designed to be minimalistic and your choice will come down to personal preference. For us at least, the preferred browser has to be Midori, which is the one we’ll cover in this section. At the end of the day, if you know how to browse the Web on any computer, nothing in these browsers will be new to you, and we’re covering it here more for completeness than out of real necessity.
So rather than going through all the browsers, we’re just going to touch on Midori because it offers both a standard browsing experience and a private option. Most browsers on other platforms look very distinct when they’re in private mode (usually a different color scheme or icon set), which ensures that you don’t accidentally type the wrong thing into the wrong window. Midori, on the other hand, simply changes the name of the title bar that isn’t really all that distinctive. Take a look at Figure 2-22.
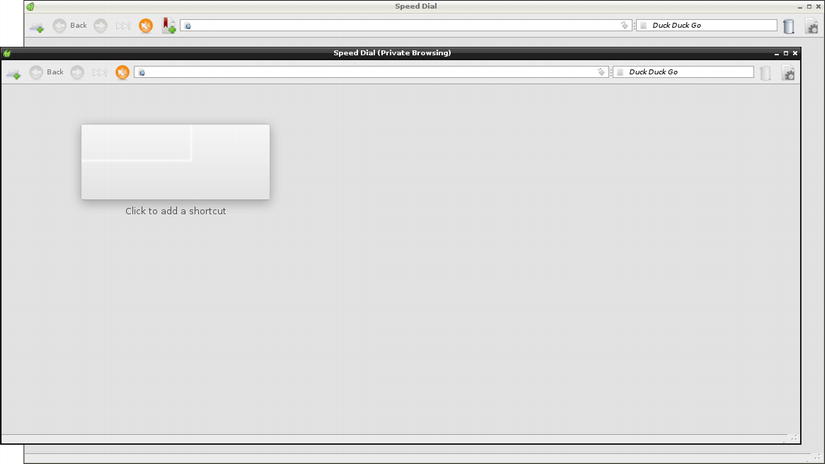
Figure 2-22. Midori in standard and private mode
As you can see, there’s not a lot of difference here. The private browser doesn’t allow you to add bookmarks, and the ability to open previously closed tabs is not available. Other than that, they look pretty much identical. If you do decide to take advantage of this feature, you should always double-check before you hit the Enter key.
Programming
The Programming menu consists of four items (see Figure 2-23), two of which we covered when we came across them under the Education menu.

Figure 2-23. The Programming menu
Because we’ve already covered Scratch and Squeak, all we have left is IDLE and IDLE 3. Actually, these two are pretty similar in that they are both integrated development environments (IDEs)for the Python programming language. IDEs provide a rich development environment in which all the tools you need are close at hand. They usually include tools to run and test code as well as nicely formatting your source code so it’s easier to read. The reason why there are two different versions is because there are two current versions of Python that for various reasons aren’t mutually compatible. In many ways, scripts that you might write for version 2.x of Python will work just fine in 3.x, but there are quite a few gotchas and changes in the language that make guaranteeing compatibility impossible. This is why you’ll often see two versions of Python installed on any given machine.
![]() Note At the time of writing, Python 2.x is still where most people are at, and many projects are still actively developed using it. In fact, when we write new Python scripts we also use 2.x because it has the most libraries, a history of documentation and blog and forum posts, and generally a large community. On the other hand, Python 3.x has had a lot of tweaks and language improvements that will never make it to Python 2.x, and all the new ideas and development are focused on the new series. Ultimately, Python 3.x is the way to go, and if you’re just starting out in your programming career, we recommend you start out on Python 3.x. It certainly can’t hurt, and you can always look at Python 2.x if for some reason you need to use it, and in reality going from one to the other is really not a big problem.
Note At the time of writing, Python 2.x is still where most people are at, and many projects are still actively developed using it. In fact, when we write new Python scripts we also use 2.x because it has the most libraries, a history of documentation and blog and forum posts, and generally a large community. On the other hand, Python 3.x has had a lot of tweaks and language improvements that will never make it to Python 2.x, and all the new ideas and development are focused on the new series. Ultimately, Python 3.x is the way to go, and if you’re just starting out in your programming career, we recommend you start out on Python 3.x. It certainly can’t hurt, and you can always look at Python 2.x if for some reason you need to use it, and in reality going from one to the other is really not a big problem.
Because the two versions of IDLE are effectively identical in terms of how they’re used, we’re going to show you IDLE from the 2.x branch (rather than IDLE 3), as shown in Figure 2-24.
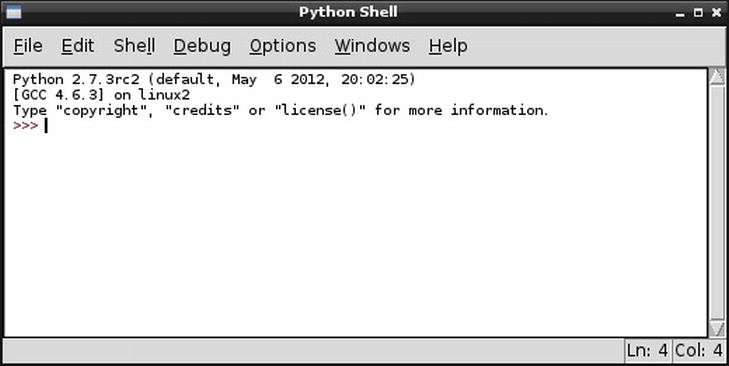
Figure 2-24. Firing up IDLE
When you first start up IDLE, you’ll be dropped into a Python shell. There’s nothing special about this prompt; in fact, you can get the same prompt by running Python at the command line. IDLE really shines because it provides an editor that supports syntax highlighting. If you’re new to programming, syntax highlighting is where the text that you enter (the source code) is color-coded to make it easier to read the program. Keywords and structures are highlighted, so it’s much easier to scan through a program (and check that you haven’t made any obvious typos) than if you simply had black text on a white background. If you’re not convinced, try it sometime; you might be surprised.
Figure 2-25 shows a very simple program that prints “Hello world!” 20 times and exits.

Figure 2-25. Using the IDE component of IDLE
As you can see, the structure is a lot easier to read when you add a splash of color (or if you’re reading this in the black-and-white printed version, you might have to use your imagination). You can open an editing window by clicking File and selecting New Window.
Python is a very powerful language and is used in a huge range of places for all sorts of things. If you’re interested in learning Python, check out www.python.org for more information on how to get started.
This section won’t even need a subheading as there’s only one tool in this menu group, as shown in Figure 2-26.

Figure 2-26. The somewhat lonely System Tools menu
The Task Manager lists all the processes currently running on your machine along with how much of your system resources are being used. Figure 2-27 is a snapshot of what Task Manager reported on our Pi (of course, yours will likely be quite different).

Figure 2-27. I spy on my little Pi: Task Manager shows what your Pi is up to
As you can see, the CPU is practically idle at the moment. Considering that it is running a full operating system (and an advanced one at that), it might be surprising to see that the CPU isn’t doing any heavy lifting. Although when compared with high-end Intel processors, the ARM chip in the Pi is far from impressive, this truly demonstrates that you can get a perfectly good desktop machine running with surprisingly few resources if you are careful.
Our RAM usage tells a similar story. Admittedly, we don’t have much open at the moment (although you can see from the process list that we have a VNC remote desktop session running), but we are still well under 50% usage and with the new Model B’s packing 512 MB of RAM, this will allow even more applications to run at the same time.
The process list gives you a good indication of what’s running on the machine and how many resources are being consumed on an individual basis. This is mostly useful when your Pi is acting a little bit funky, and you need to see whether an application has suddenly decided to eat all your RAM or set your CPU on fire. If you do find an application that is getting a bit too greedy, you can right-click its name and then select Kill, which will forcibly shut it down and thus hopefully restore our Pi to full health.
Now it’s time for a whistle-stop tour of some of the things you can tweak to make your desktop a little more personalized. Because the tools in Raspbian are pretty much self-describing (not to mention fairly obvious), we’re going to cover just the two main topics and let you explore the rest of the preferences for yourself. Because you really can’t do much in the way of damage, feel free to explore to your heart’s content.
Desktop Preferences
To get to the desktop preferences, right-click your desktop and click Desktop Preferences. You should see a window like Figure 2-28.
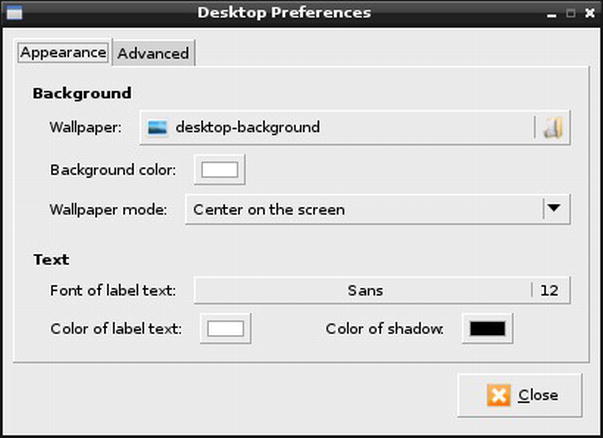
Figure 2-28. Desktop Preferences
We’re not going to cover the Advanced tab (it only has one option, and it isn’t one that most people will be interested in) and so we won’t show a screenshot of it. Everything on the Appearance tab is fairly straightforward, and there are no unusual options or special tweaks that you need to do to get anything to work.
Customizing the Look and Feel
If you want to customize the look and feel of your entire desktop experience, you can tweak themes, icons, fonts, and more from the Customize Look and Feel tool. You can access it from the Preferences menu, as shown in Figure 2-29.
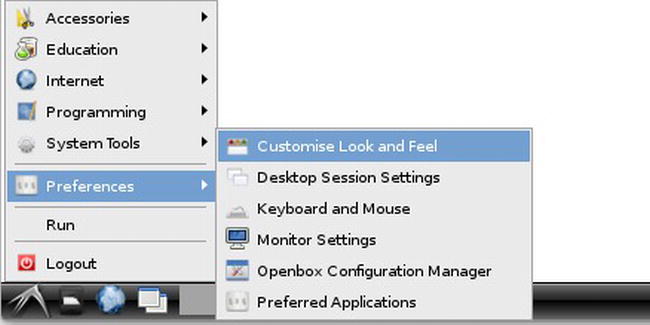
Figure 2-29. Finding Customize Look and Feel
This will open the Customize Look and Feel app, as shown in Figure 2-30.

Figure 2-30. The Customize Look and Feel tool
Because the tool is fairly straightforward, we’ll cover only the first screen, which allows you to change the color scheme for the entire environment in a single mouse click. The default scheme is Mist, which we actually prefer, but there are a number of other predefined schemes that you can choose from. The sample window will immediately reflect your new choice, and so gives you a preview as to what your environment will look like once you hit the Apply button.
Summary
And that’s pretty much it for the whirlwind tour of the desktop! We’ve really only scratched the surface, and the aim is just to get you comfortable enough with what’s available to start exploring by yourself. Remember that Pi exists to allow people to experiment and learn more about computing, so getting your hands dirty (even if you break your Pi now and then) is really nothing to worry about.
This chapter covered the applications installed by default and accessible via the start menu, and we skimmed over some of the interface features that are somewhat unique to the Linux world. We then finished off by looking at the two most common configuration changes that people want to make.
In the next chapter we start to get really serious (sort of) and take you back in time to the command line, where we introduce you to an interface that once you’ve gotten used to, you’ll wonder how you ever managed to live without it.