
![]()
The beautiful things about a Raspberry Pi are that it is so flexible a device and its potential uses are nearly limitless. You can do just about anything with Pi, and it has an array of peripheral input ports that can be used to great effect.
You should also be aware that while your Pi can display through a standard HDMI, the power of the device doesn’t end there. It can display at a full 1920 x 1080 resolution, commonly called 1080P, which is the benchmark level for high definition. Your tiny little Raspberry Pi is capable of displaying video at full high-definition resolution, and thanks to the sound interleave of HDMI it can also play back audio on the same channel as video. That is the goal of this chapter; we are going to take advantage of the Pi’s media playback capabilities to create two different varieties of Pi media center. One is a video playback center that you can use to play videos over your network. It can sit attached to your TV and allow you to tap into the Internet for video. The second is a wireless playback device that enables you to remotely stream your music collection and play back across a network.
Video with XBMC
As mentioned earlier, one big advantage of Raspberry Pi is that it can play back in full high definition, but we need a way to take advantage of this, which is where XBMC comes in.
XBMC (which is short for XBox Media Center) was originally designed as a media center for the original (Fat) XBox. People liked the project so much that it has subsequently been ported to just about every operating system under the sun, including but not limited to Windows, Android, OS X, and iOS. There is even a full-blown, stand-alone version called XMBCbuntu that is a port of Ubuntu that has XBMC installed, preconfigured, and ready to go out of the box. Given its wide use, open source nature, and easy-to-work-with nature, it has been ported and forked many times with its progeny, including MediaPortal, Plex, Voddlern, and Boxee. This goes to show how popular media center systems are; as a further example, Boxee makes a small device called the Boxee Box that costs upward of $200. What we are creating is a tool that is just as powerful and only costs $35—the price of the Pi. So now that you’re all excited about the bright and shiny media center future, it’s time to take advantage of it.
You’ve reached the end of the book, so it’s time to crack out the big guns and do a proper Linux install from the application source. While most applications come prepackaged via apt-get, there are some that do not and they need to be compiled. Installing XBMC from source is a somewhat involved process and is very time-consuming. We have chosen to compile it from source because not only does it help you through one of the more complex ways of getting an application running in Linux but it also means that our installation of XBMC is optimized for our system because we have built it on our own system. Historically, compiling from source was considered to be an arduous process, but as the number of people using Linux has grown so has the need for simple-to-use installation tools and the rise of precompiled binary installation systems such as apt-get. But as with everything, there are still times when using a prebuild is never as good as doing it from scratch, and as time as gone on, tools for compilation have grown and become much more approachable. It’s also easier to do when someone steps you through the process—which is what this book is all about.
So let’s get started. First, I have stepped away from the primary build of Raspbian to use one of the slightly cut-down versions of Raspbian called Pisces that is available from Raspbian at www.raspbian.org/PiscesImages. I am using Pisces because it has been cut down and doesn’t include as much overhead, which means more power for doing what we want: playing movies! Download and install this image on an SD card (you will need one with 4 GB of space) and then boot up and get the OS attached to the Internet so you can work with it. The default user is raspbian and the password is also raspbian, which is also the root password.
RASPMC
There is a much more simple way to get XBMC working on your Pi: using a prebuilt version of Raspbian called RaspMC. You can download a RaspMC installer and push the image onto an SD card just as you did with Raspbian. You can download this image from http://www.raspbmc.com/download/. This installation is very simple and will take between 15–25 minutes. You simply attach your Pi to your network, turn it on, and off the installer goes. It will download everything it needs from the Internet and then set itself up. This is by far the easiest way to get XBMC running on your Pi. For those of you who take the path of using RaspMC, you can skip to the “Starting and Using XBMC” section of this chapter.
![]() Note If ifconfig is missing, install the net-tools package using apt-get. See Chapter 3 for more on apt-get.
Note If ifconfig is missing, install the net-tools package using apt-get. See Chapter 3 for more on apt-get.
Once you are inside the operating system, it’s time to issue some commands and start getting XBMC installed. This is a very long process: the compiler is much slower than using apt-get because all the software installed by apt-get is precompiled, thus cutting out some steps. The compile in this case takes about 12 hours—yes hours, half a day. I find it best to leave the final compile to run overnight so I won’t be tempted to sit there for hours on end and watch it.
The process takes such a long time because of the nature of the ARM processor and the speed at which it can work. This means that compiling takes longer, but we can do as much work on a lower level of power.
Let’s start with the build. The first step is to ensure that we can divert as much power and memory to the compile as possible. In the core Raspbian we did this with the rapsi-config command, but Pisces doesn’t have that control script, so you have to change this manually by replacing the start.elf file with a different one that will change how the system’s resources are allocated. Run this command:
$ sudo cp /boot/arm224_start.elf /boot/start.elf
This will copy the version that allocates 224 MB to system RAM and 32 MB to graphics into the system to be used. Now we need to make this configuration change registered within the system and then reboot so that the changes can take effect by issuing the following two commands:
$ sudo rpi-update
$ sudo reboot
Once your system has rebooted, and you are back up and running, it is best if you upgrade the OS to ensure it is running the latest versions of software. To do this, we will leverage apt-get by telling it to update itself with the latest version of its configuration from the Internet and then upgrade all available packages on your system. To do this, issue the following commands:
$ sudo apt-get update
$ sudo apt-get upgrade
This execution will take a little bit of time because it needs to download, unpack, and replace a large number of system components. So get this up and running and then go have a coffee; it should be done when you return, and you can move on to the next step.
![]() Note Some of these packages might already be installed on your system. We include them as they might not be installed for everyone.
Note Some of these packages might already be installed on your system. We include them as they might not be installed for everyone.
The next step is to install packages to give us the ability to compile; they include the essential build tools, automatic configuration tools, zip and unzip tools, and so on. To install these tools, run the following command:
$ sudo apt-get install build-essential autoconf ccache gawk gperf mesa-utils zip unzip
Reading package lists... Done
Building dependency tree
Reading state information... Done
build-essential is already the newest version.
The following packages were automatically installed and are no longer required:
  libcdio-cdda0 libcdio-paranoia0 libcdio10 libcelt0-0 libdb4.8 librpmio2
Use 'apt-get autoremove' to remove them.
The following extra packages will be installed:
  automake autotools-dev libglew1.7 libsigsegv2
Suggested packages:
  autoconf2.13 autoconf-archive gnu-standards autoconf-doc libtool gettext distcc gawk-doc glew-utils
The following NEW packages will be installed:
  autoconf automake autotools-dev ccache gawk gperf libglew1.7 libsigsegv2 mesa-utils
The following packages will be upgraded:
  unzip zip
2 upgraded, 9 newly installed, 0 to remove and 187 not upgraded.
Need to get 2,647 kB/3,174 kB of archives.
After this operation, 7,143 kB of additional disk space will be used.
Do you want to continue [Y/n]?
Once you have installed these basic packages, move on to the far bigger install job. We now need to install a number of packages that will install video and decoder libraries and specialized graphics libraries. In addition to all these, you will need to install a few other packages to enable you to connect remotely to the XBMC. This command is very long, so I recommend you download the source code from the Apress website. There is a script within that package that will execute these commands for you. The command to install this giant number of packages is as follows:
$ sudo apt-get install autotools-dev comerr-dev dpkg-dev libalsaplayer-dev
libapt-pkg-dev libasound2-dev libass-dev libatk1.0-dev
libavahi-client-dev libavahi-common-dev libavcodec-dev libavformat-dev
libavutil-dev libbison-dev libbluray-dev libboost1.49-dev
libbz2-dev libc-dev-bin libc6-dev libcaca-dev libcairo2-dev
libcdio-dev libclalsadrv-dev libcrypto++−dev libcups2-dev libcurl3-gnutls-dev
libdbus-1-dev libdbus-glib-1-dev libdirectfb-dev libdrm-dev libegl1-mesa-dev
libelf-dev libenca-dev libept-dev libevent-dev libexpat1-dev libflac-dev
libfontconfig1-dev libfreetype6-dev libfribidi-dev libgconf2-dev
libgcrypt11-dev libgdk-pixbuf2.0-dev libgl1-mesa-dev libgles2-mesa-dev
libglew-dev libglewmx-dev libglib2.0-dev libglu1-mesa-dev
libgnome-keyring-dev libgnutls-dev libgpg-error-dev libgtk2.0-dev libhal-dev
libhunspell-dev libice-dev libicu-dev libidn11-dev libiso9660-dev
libjasper-dev libjbig-dev libjconv-dev libjpeg8-dev libkrb5-dev
libldap2-dev libltdl-dev liblzo2-dev libmad0-dev libmicrohttpd-dev
libmodplug-dev libmp3lame-dev libmpeg2-4-dev libmysqlclient-dev
libncurses5-dev libnspr4-dev libnss3-dev libogg-dev libopenal-dev
libp11-kit-dev libpam0g-dev libpango1.0-dev libpcre++−dev libpcre3-dev
libpixman-1-dev libpng12-dev libprotobuf-dev libpthread-stubs0-dev
libpulse-dev librtmp-dev libsamplerate0-dev
libsdl-image1.2-dev libsdl1.2-dev libslang2-dev
libsm-dev libsmbclient-dev libspeex-dev
libsqlite3-dev libssh-dev libssh2-1-dev libssl-dev libstdc++6-4.6-dev
libtagcoll2-dev libtasn1-3-dev libtiff4-dev libtinfo-dev libtinyxml-dev
libts-dev libudev-dev libv8-dev libva-dev libvdpau-dev
libvorbis-dev libvpx-dev libwebp-dev libwibble-dev
libx11-dev libx11-xcb-dev libxapian-dev libxau-dev
libxcb-glx0-dev libxcb-render0-dev libxcb-shm0-dev
libxcb1-dev libxcomposite-dev libxcursor-dev libxdamage-dev
libxdmcp-dev libxext-dev libxfixes-dev libxft-dev libxi-dev
libxinerama-dev libxml2-dev libxmu-dev libxrandr-dev
libxrender-dev libxslt1-dev libxss-dev libxt-dev
libxtst-dev libxxf86vm-dev libyajl-dev libzip-dev linux-libc-dev
lzma-dev mesa-common-dev python-dev python2.7-dev x11proto-composite-dev
x11proto-core-dev x11proto-damage-dev x11proto-dri2-dev x11proto-fixes-dev
x11proto-gl-dev x11proto-input-dev x11proto-kb-dev x11proto-randr-dev
x11proto-record-dev x11proto-render-dev x11proto-scrnsaver-dev
x11proto-xext-dev x11proto-xf86vidmode-dev x11proto-xinerama-dev xtrans-dev
zlib1g-dev
This list of packages has a number of slashes on the end; they are line breaks that say that the current command should be executed and that there will be another line of command following. Line breaks are very useful when you need to break up long commands over a large number of lines, as I have done here. This command will take a while to run because there are is a large number of packages to be downloaded and installed. So execute this command, go cook dinner, and then come back.
Once you have installed all these packages, you need to copy some special files into place and create other ones that are linked into the correct location so they can be used. Again, they will be included within the script that we have created to help ease the execution of these commands.
The first of these is to copy the VideCoreIV include files from the Raspberry Pi firmware into /usr/include. This directory is a special directory from which the compiler will search for libraries and files that are to be included within a build. To copy all these files into the correct place, execute the following commands:
$ sudo cp -R /opt/vc/include/* /usr/include
$ sudo cp /opt/vc/include/interface/vcos/pthreads/* /usr/include/interface/vcos
Now in addition to copying these files into place, there are a number we need to link correctly into the right location so they can be read. While in the last step we copied include files that are predominantly source code, this time we need to link in precompiled portions of the firmware into the correct spot to be read by the compiler at compile time. Instead of copying, we are linking because we are happy to use the files in their current location and save on some space. Run the following:
$ sudo ln -fs /opt/vc/lib/libEGL.so /usr/lib/libEGL.so
$ sudo ln -fs /opt/vc/lib/libEGL.so /usr/lib/arm-linux-gnueabihf/libEGL.so
$ sudo ln -fs /opt/vc/lib/libEGL.so /usr/lib/arm-linux-gnueabihf/libEGL.so.1
$ sudo ln -fs /opt/vc/lib/libEGL_static.a /usr/lib/libEGL_static.a
$ sudo ln -fs /opt/vc/lib/libEGL_static.a /usr/lib/arm-linux-gnueabihf/libEGL_static.a
$ sudo ln -fs /opt/vc/lib/libGLESv2.so /usr/lib/libGLESv2.so
$ sudo ln -fs /opt/vc/lib/libGLESv2.so /usr/lib/arm-linux-gnueabihf/libGLESv2.so
$ sudo ln -fs /opt/vc/lib/libGLESv2.so /usr/lib/arm-linux-gnueabihf/libGLESv2.so.2
$ sudo ln -fs /opt/vc/lib/libGLESv2_static.a /usr/lib/libGLESv2_static.a
$ sudo ln -fs /opt/vc/lib/libGLESv2_static.a /usr/lib/arm-linux-gnueabihf/libGLESv2_static.a
$ sudo ln -fs /opt/vc/lib/libbcm_host.so /usr/lib/libbcm_host.so
$ sudo ln -fs /opt/vc/lib/libbcm_host.so /usr/lib/arm-linux-gnueabihf/libbcm_host.so
$ sudo ln -fs /opt/vc/lib/libvchiq_arm.a /usr/lib/libvchiq_arm.a
$ sudo ln -fs /opt/vc/lib/libvchiq_arm.a /usr/lib/arm-linux-gnueabihf/libvchiq_arm.a
$ sudo ln -fs /opt/vc/lib/libvchiq_arm.so /usr/lib/libvchiq_arm.so
$ sudo ln -fs /opt/vc/lib/libvchiq_arm.so /usr/lib/arm-linux-gnueabihf/libvchiq_arm.so
$ sudo ln -fs /opt/vc/lib/libvcos.a /usr/lib/libvcos.a
$ sudo ln -fs /opt/vc/lib/libvcos.a /usr/lib/arm-linux-gnueabihf/libvcos.a
$ sudo ln -fs /opt/vc/lib/libvcos.so /usr/lib/libvcos.so
$ sudo ln -fs /opt/vc/lib/libvcos.so /usr/lib/arm-linux-gnueabihf/libvcos.so
![]() Note We found that these links can be removed by other processes and sometimes by rebooting; if they do, you need to re-create them.
Note We found that these links can be removed by other processes and sometimes by rebooting; if they do, you need to re-create them.
Now that you have linked all the files into the correct place, go ahead and get the source code. Change the directory into your home directory with this:
$ cd ∼
If you can’t type a tilde (∼), you can try reconfiguring the Pi keyboard layout with dpkg-reconfigure keyboard-configuration and then rebooting the Pi. You can also just use cd with no arguments because it will also take you to your home directory. The tilde is just a symbol to reference the current user’s home directory.
Now that you have changed into your home directory, it is time to download the source code so you can work with it and correctly compile everything. Thankfully, a modern tool has appeared that makes doing source code downloads much easier: Git, which is named for Linus Torvalds of Linux Kernel fame. Git is used for source code management and version control; all users can download the current source version of a set of source code and submit modifications back to the central repository.
![]() Note This means that we always download the latest version, but we might get a less stable build if something is wrong with the current version in Git. Most developers strive to keep their Git repositories in good working order, but it is something to be aware of.
Note This means that we always download the latest version, but we might get a less stable build if something is wrong with the current version in Git. Most developers strive to keep their Git repositories in good working order, but it is something to be aware of.
All we want to do at this point is download the source code into our home directory to work with it. To do this, use the git command and tell it to clone the repository of source code onto the system. We have also added the –-depth 1 to the command to say that we only want to clone the most recent 1 revision of the source code (the absolute latest version of the code) and avoid getting a lot of extra and unwanted historical code.
Start your clone by running the following:
$ git clone --depth 1 git://github.com/xbmc/xbmc-rbp.git
Cloning into 'xbmc-rbp'...
remote: Counting objects: 35172, done.
remote: Compressing objects: 100% (22895/22895), done.
remote: Total 35172 (delta 15265), reused 27885 (delta 10698)
Receiving objects: 100% (35172/35172), 158.26 MiB | 385 KiB/s, done.
Resolving deltas: 100% (15265/15265), done.
Now that we have cloned the source code of XBMC, we need to start building the application. This is the part that will take the longest by far. Change the directory into the newly created xbmc-rbp directory because there are a few last steps we need to take.
Changing Files with Sed and Regular Expressions
Before we go ahead and kick off the build of our XBMC application, we need to make a few minor adjustments to the source code so that it compiles in the exact manner we want it to. Instead of making these changes by hand, we will use a tool called Sed (short for Stream Editor). It does just as its name implies: it takes a stream of text and then performs edits on that text. The tricky part of Sed is that it makes use of a highly specialized language called regular expressions, which are used to perform the equivalent of a find-and-replace function.
Regular expressions evolved out of the need to validate a given set of data to see if it conforms to a given standard and to edit when the given example is found. While a simple find and replace is enough for most people when editing text, how do you perform a find-and-replace when you want to edit only words that start with T as the third letter in a given sentence? Probably one of the easiest cases for a regular expression is e-mail. You want to confirm that a given string is a valid e-mail: an e-mail will contain a username (who it’s from), a domain (where it’s from, e.g., Hotmail or Gmail), and there will be an at (@) symbol in between. Okay, we can do that with just a wildcard like *. So something that looks like *@* will be an e-mail, right? Well the * that we use to denote anything will pick up anything. Even spaces, numbers, strange symbols, and so on. So we need a way to pick up something that is made up of a string of valid e-mail characters (letters, numbers, period, underscores) and then @, and finally a valid domain. This will be a collection of letters, followed by a period and then perhaps another set (or a few sets) of letters. Describing this is exhausting, which is why we have a specialized language for performing them.
Now that you understand what we are trying to achieve, run the following two commands to alter the file tools/rbp/setup-sdk.sh. These sed commands make use of the –i option, which says to edit the given file:
$ sed -i 's/USE_BUILDROOT=1/USE_BUILDROOT=0/' tools/rbp/setup-sdk.sh
$ sed -i 's/TOOLCHAIN=/usr/local/bcm-gcc/TOOLCHAIN=/usr/' tools/rbp/setup-sdk.sh
These commands change the USE_BUILDROOT variable from a value of 1 to a value of 0 wherever it is found within that file and to replace any instance of the phrase TOOLCHAIN=/usr/local/bcm-gcc with TOOLCHAIN=/usr. Once you have edited the tools/rbp/setup-sdk.sh file, you should execute it with the following command:
$ sudo sh tools/rbp/setup-sdk.sh
The command will generate a makefile, but won’t display anything onscreen. Once it is finished it’s time to edit the newly created tools/rbp/depends/xbmc/Makefile. All you need to do then is run one last sed on the file to add a # to the start of any instance of cd $(SOURCE); $(CONFIGURE):
$ sed -i 's/cd $(SOURCE); $(CONFIGURE)/#cd $(SOURCE); $(CONFIGURE)/' tools/rbp/depends/xbmc/Makefile
What we did is change the way our system will compile the XBMC software and make it use some of our system libraries rather than use the ones that can be found within the XBMC source code.
Now that the Makefile is created, it is time to compile!
Compiling Source Code
Most compilations use a very simple logic: you run the command ./configure to generate a configuration file that knows about the makeup of your system. This generates a file that is called a makefile. This file is in a slightly specialized language that describes the way in which a compile for a collection should be performed. It is not a script that executes code in and of itself; it is a collection of directions that will be used by the make application.
Unfortunately, this compile is slightly more advanced. We need to make our configuration tools to match the setup we are trying to do before we run the configuration and the compile. This will take a little while to execute, so kick off and go have another cuppa.
The command to execute is this:
$ make -C tools/rbp/depends/xbmc/
This command will run the make within the directory tools/rbp/depends/xbmc/, which will generate the config file. The output for this is very long, but when it’s done successfully, you should see something like this on your console window:
examples/Makefile.am: installing './depcomp'
Makefile.am: installing './INSTALL'
autoreconf: Leaving directory 'lib/libdvd/libdvdnav'
Please (re)run configure...
#cd ../../../../; ./configure --prefix=/opt/xbmc-bcm/xbmc-bin --build=i686-linux --host=arm-bcm2708-linux-gnueabi --enable-gles --disable-sdl --disable-x11 --disable-xrandr --disable-openmax --disable-optical-drive --disable-dvdcss --disable-joystick --disable-debug --disable-crystalhd --disable-vtbdecoder --disable-vaapi --disable-vdpau --disable-pulse --disable-projectm --with-platform=raspberry-pi --disable-optimizations --enable-rpi-cec-api
#cd ../../../../; make -j 1
#cd ../../../../; make install
make: Leaving directory '/home/raspbian/xbmc-rbp/tools/rbp/depends/xbmc'
Now that the compile of the configuration utility has gone through its time to perform the configure. This configure command is very long and again, you will find code that will perform this for you in the Apress source code repository, the configure command is this:
$ ./configure --prefix=/usr --build=arm-linux-gnueabihf --host=arm-linux-gnueabihf
--localstatedir=/var/lib --with-platform=raspberry-pi --disable-gl --enable-gles
--disable-x11 --disable-sdl --enable-ccache --enable-optimizations
--enable-external-libraries --disable-goom --disable-hal --disable-pulse
--disable-vaapi --disable-vdpau --disable-xrandr --disable-airplay
--disable-alsa --enable-avahi --disable-libbluray --disable-dvdcss
--disable-debug --disable-joystick --enable-mid --disable-nfs --disable-profiling
--disable-projectm --enable-rsxs --enable-rtmp --disable-vaapi
--disable-vdadecoder --disable-external-ffmpeg  --disable-optical-drive
Specify a number of arguments to the configure command that specifies where this installation should go (−−prefix=/usr), which architecture to build (−−build=arm-linux-gnueabihf), where to keep its running files (−−localstatedir=/var/lib), and which platform (−−with-platform=raspberry-pi), along with a whole host of disable and e-mail options to remove features such as CD drives and joysticks and enable things such as optimizations and Avahi automated detection of peripherals. Ultimately, when the command has finished executing, the output on your screen should look like this:
XBMC Configuration:
  Debugging:    No
  Profiling:    No
  Optimization: Yes
  Crosscomp.:   No
  target ARCH:  arm
  target CPU:   arm1176jzf-s
  OpenGLES:     Yes
  ALSA:         No
  DBUS:         Yes
  VDPAU:        No
  VAAPI:        No
  CrystalHD:    No
  VDADecoder:   No
  VTBDecoder:   No
  OpenMax:      No
  Joystick:     No
  XRandR:       No
  GOOM:         No
  RSXS:         Yes
  ProjectM:     No
  Skin Touched: No
  X11:          No
  Bluray:       No
  TexturePacker:Yes
  MID Support:  Yes
  ccache:       Yes
  ALSA Support: No
  PulseAudio:   No
  HAL Support:  No
  DVDCSS:       No
  Avahi:        Yes
  Non-free:     Yes
  ASAP Codec:   No
  MySQL:        Yes
  Webserver:    Yes
  libRTMP support:      Yes
  libsmbclient support: Yes
  libnfs client support:No
  libafpclient support: No
  AirPLay support:      No
  AirTunes support:     No
  Optical drive:        No
  libudev support:      Yes
  libusb support:       No
  libcec support:       No
  libmp3lame support:   Yes
  libvorbisenc support: Yes
  libcap support:       No
  External FFmpeg:      No
  prefix:       /usr
This configuration specifies all the flags we asked for in our installation, which is designed to get the best from the Raspberry Pi. So, now we have done our configure onto the actual compilation. The command itself highly anticlimactic for what it will do: tell the system to spend the next 12 hours generating code for our system. All these other jobs taking a little time is nothing compared to how long this compile will run for. So saddle up, and execute this simple four-letter command m a k e:
$ make
Don’t be alarmed if you see lines such as the following:
/tmp/ccGvUe1g.s:507: Warning: swp{b} use is deprecated for this architecture
The only thing that will stop the compile is a critical error or success. These warnings are related to some of the functions being used within the XBMC compile being a bit old for our Pi. When the compile has succeeded, you should expect to see this:
XBMC built successfully
This shows that we have successfully build XBMC and can do the last step in this process, which is to install our newly compiled software. The make system will actually take care of installation, too. To install, you simply run make install, which copies all the freshly compiled binaries into the correct spot in your OS. You will need to prefix this with sudo because the location we are copying too (/usr) is a system location, and only root is given write access. Your output should look like this:
$ sudo make install
Copying XBMC binary to /usr/lib/xbmc/xbmc.bin
You can run XBMC with the command 'xbmc'
Copying support and legal files...
Done!
Copying system files to /usr/share/xbmc
And we are done! While it was long and required a little bit of work to begin with, the actual process of compiling is relatively pain-free, you know, beyond the pain of waiting. So now that the XBMC is installed, how do we use it?
Troubleshooting
Before we jump ahead and run XBMC, we should have a look at some of the issues you could have run into. Most of these steps should take care of themselves because this setup is generic and meant to work on any Pi because they all share the same hardware. If you are ever in doubt, remove the xbmc-rbp directory and start over. Ensure that you execute the copies and the linking in full. I found that when doing the git clone, things could sometimes get stuck and not move.
When this is the case, it is best to stop the current job with Ctrl + C, remove the directory, reboot, and start again. It was also better to remove peripherals from the system during the compile and install stages because having too many peripheral devices caused load issues on my system. Additionally, you should ensure that your output for commands such as configure match the ones given as these flags can play a much bigger role when compiling and save you a nasty headache and another 12–hour compile job. Finally, ensure that all your apt-gets run and complete successfully because these packages are required to provide the libraries that your Pi will use when building XBMC.
Starting and Using XBMC
Now that we have gone through that mega compile process, it is time to start up XBMC and get going! First, though, we need to reset the options we set earlier, directing a larger amount of memory into system RAM. We will need to go to the graphics device because we want to do some serious display work with XBMC. Execute the following command to change over the Pi boot system:
$ sudo cp /boot/arm128_start.elf /boot/start.elf
Go back and check that the linked files mentioned earlier are correct. Now we can also make some changes to the /boot/config.txt file because it governs how the Pi’s low-level hardware runs. The most simple change to make is to add the line disable_overscan=1 as it will remove the need to do overscan processing because overscan processing will make the amount of video we play back larger, thus consuming more resources. Once you have made these changes, issue the following commands to reconfigure and reboot your Pi one last time:
$ sudo rpi-update
$ sudo reboot
Now that you have changed the settings back to 50/50 resource allocation, start XBMC by logging in as root and issuing the following command:
$ /usr/lib/xbmc/xbmc.bin
Your screen will freeze for a moment, and Figure 11-1 will greet you.

Figure 11-1. XBMC boot screen
You should get to the XBMC menu, which looks like Figure 11-2.

Figure 11-2. XBMC main menu
From within the main menu, there are options to select different types of playback, and XBMC is a fully graphical system that will present you with options and locations for getting files from when you are within it. As long as your media are accessible on a network, XBMC should be able to access it and play it back! Now on the topic of playback, you will probably be sitting there thinking, “Will I be stuck with this keyboard for all my playback?” The answer is a resounding no! There are two solutions:
- Purchase a USB remote and attach it to your Pi.
- The second is much sneakier: use your smartphone!
Most smartphones have the capability to download an XBMC remote control application that simply needs to be paired with your XBMC system to function. To do this, we need to enable two options within XBMC to allow it to receive remote control. Go into the settings menu and then into services, and change the remote control settings to “Allow programs on other systems to control XBMC.” Once you have allowed remote control, you need to go into Webserver and set “Allow control of XBMC via HTTP”; you should also go ahead and set a username and password so that only people with the password can control your XMBC instance, not just anyone on your network with an XBMC app!
Once you have enabled these remote control options, it is simply a matter of downloading the application from your favorite app store and then setting the options within the application. You should only need to give the application the local address of your Pi, which you can see via the System ➤ System info menu, set the port to 8080, and furnish an instance name for the XBMC and the username/password, as shown in Figure 11-3.
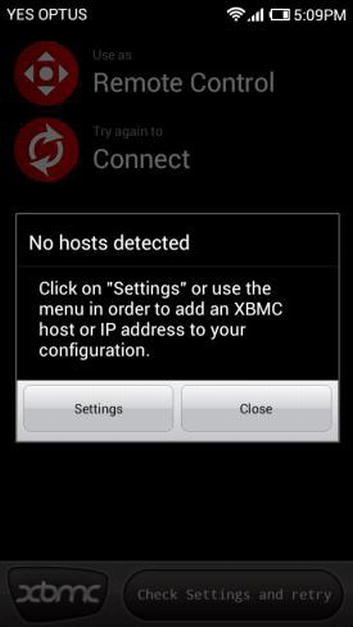
Figure 11-3. XBMC remote application
Once you have given all the details, your phone should turn into a remote for your XBMC instance! Complete with a whole host of directional buttons and playback controls, as shown in Figure 11-4.

Figure 11-4. XBMC remote in action!
Although we have started XBMC by hand thus far, most people will want it to occur automatically because what is the point of a media center that you need to plug a keyboard into each time you want to start it up?
The following is a simple start script that will allow you to execute XBMC using a start script. Create this in the file /etc/init.d/xbmc (like all other long files, it can be found in the Apress repository for this book):
#! /bin/sh
### BEGIN INIT INFO
# Provides:          xbmc
# Required-Start:    $all
# Required-Stop:     $all
# Default-Start:     2 3 4 5
# Default-Stop:      0 1 6
# Short-Description: Start XBMC
# Description:       Start XBMC
### END INIT INFO
DAEMON=/usr/bin/xinit
DAEMON_OPTS="/usr/lib/xbmc/xbmc.bin"
NAME=xbmc
DESC=XBMC
RUN_AS=root
PID_FILE=/var/run/xbmc.pid
test -x $DAEMON || exit 0
set -e
case "$1" in
  start)
        echo "Starting $DESC"
        start-stop-daemon --start -c $RUN_AS --background --pidfile $PID_FILE  --make-pidfile --exec $DAEMON -- $DAEMON_OPTS
        ;;
  stop)
        echo "Stopping $DESC"
        start-stop-daemon --stop --pidfile $PID_FILE
        ;;
  restart|force-reload)
        echo "Restarting $DESC"
        start-stop-daemon --stop --pidfile $PID_FILE
        sleep 5
        start-stop-daemon --start -c $RUN_AS --background --pidfile $PID_FILE  --make-pidfile --exec $DAEMON -- $DAEMON_OPTS
        ;;
  *)
        echo "Usage: /etc/init.d/$NAME{start|stop|restart|force-reload}" >&2
        exit 1
        ;;
esac
exit 0
Once this file is created, run the following commands to make it executable and have it loaded into the Pi’s boot process:
$ sudo chmod +x /etc/init.d/xbmc
$ sudo update-rc.d xbmc defaults
Now go ahead and reboot your system; it will bring you automatically into XBMC! Congratulations; at this point, you should have a fully functional XBMC instance complete with working smartphone remote!
Because you compiled from source successfully, there shouldn’t be any issues with getting your XBMC instance up and going. The first thing to check is that the compile did indeed complete fully and so did the install. They are the two most likely culprits. If you start your XBMC instance, you might see warnings like the following:
libEGL warning: DRI2: xcb_connect failed
If you do, you have to re-run the previous copy and linking commands. This issue relates to being unable to load those library files.
People often want to use the Raspberry Pi as a streaming music system, which means that it is connected to a set of speakers and can be remotely controlled and has music streamed to it from a central controlling system. There are already a large number of systems out there for doing this kind of playback, but for us the plan is to take advantage of the Apple AirPlay protocol. You can continue working in this on Pisces or you can revert to the original Raspbian. This install will work the same way on both devices.
This setup is much easier to do than the video update; we still need to do some compiling to get things to work, but we won’t need to run a ./configure because there are far fewer moving parts. Additionally, we want to have the ability to play audio out to a given device, so you need to ensure you have speakers attached.
The first thing to do is to install the following precursor packages:
$ sudo apt-get install build-essential libssl-dev libcrypt-openssl-rsa-perl libao-dev libio-socket-inet6-perl libwww-perl avahi-utils pkg-config alsa-utils
Reading package lists... Done
Building dependency tree
Reading state information... Done
build-essential is already the newest version.
libio-socket-inet6-perl is already the newest version.
libio-socket-inet6-perl set to manually installed.
libssl-dev is already the newest version.
libwww-perl is already the newest version.
libwww-perl set to manually installed.
pkg-config is already the newest version.
pkg-config set to manually installed.
The following packages were automatically installed and are no longer required:
  libcdio-cdda0 libcdio-paranoia0 libcdio10 libcelt0-0 libdb4.8 librpmio2
Use 'apt-get autoremove' to remove them.
The following extra packages will be installed:
  alsa-base avahi-daemon libao-common libao4 libavahi-core7 libcrypt-openssl-bignum-perl libdaemon0 libnss-mdns
Suggested packages:
  alsa-oss oss-compat avahi-autoipd libaudio2 libesd0 libesd-alsa0
The following NEW packages will be installed:
  alsa-base alsa-utils avahi-daemon avahi-utils libao-common libao-dev libao4 libavahi-core7 libcrypt-openssl-bignum-perl libcrypt-openssl-rsa-perl libdaemon0
  libnss-mdns
0 upgraded, 12 newly installed, 0 to remove and 139 not upgraded.
Need to get 1,699 kB of archives.
After this operation, 3,702 kB of additional disk space will be used.
Do you want to continue [Y/n]?
Once you have installed all these packages, load the sound module into the system to take advantage of it. To load a module, use the modprobe command. In this instance, load the snd_bcm2835 module, which is the Broadcom sound adapter in the Pi. Issue this command:
$ sudo modprobe snd_bcm2835
The command will run, but it doesn’t generate any output to tell us the status of the execution or just about anything else. We need to check and see whether the module has been loaded. Just like the ls command for directories and lsusb for listing USB devices, there is an lsmod command for listing the modules that are currently installed within your system. Issue the lsmod command and check that you can see the snd_bcm2835 module loaded within your system (like mine):
$ lsmod
Module                  Size  Used by
snd_bcm2835            21485  0
snd_pcm                82208  1 snd_bcm2835
snd_page_alloc          5383  1 snd_pcm
snd_seq                59808  0
snd_seq_device          6920  1 snd_seq
snd_timer              21905  2 snd_seq,snd_pcm
snd                    57668  5 snd_timer,snd_seq_device,snd_seq,snd_pcm,snd_bcm2835
ipv6                  290227  34
r8712u                182646  0
spi_bcm2708             4815  0
i2c_bcm2708             3818  0
Because you are loading the sound module for the first time, you also need to select which audio device is being used (because none was used before). To change the device, use the amixer command as follows:
$ sudo amixer cset numid=3 1
numid=3,iface=MIXER,name='PCM Playback Route'
  ; type=INTEGER,access=rw------,values=1,min=0,max=3,step=0
  : values=1
We changed the numid=3 value, which is the PCM Playback Route, to be equal to 1, which is the value of the 3.5 jack. You can change the 1 on the end to a 2, which signifies that you should use the HDMI’s inbuilt audio channel to send the sound.
Now that the hardware is sorted out, it is time to take care of the software by downloading the shairport software from its repository on the Internet. By far the easiest way to do this is by using the wget (short for Web GET) command to download all the available contents on a given URL. In this manner, we can download a whole software package from the Internet with a simple URL. Execute the following:
$ wget https://github.com/albertz/shairport/zipball/master
--2012-09-30 18:13:36--  https://github.com/albertz/shairport/zipball/master
Resolving github.com (github.com)... 207.97.227.239
Connecting to github.com (github.com)|207.97.227.239|:443... connected.
HTTP request sent, awaiting response... 302 Found
Location:https://nodeload.github.com/albertz/shairport/zipball/master[following]
--2012-09-30 18:13:42--  https://nodeload.github.com/albertz/shairport/zipball/master
Resolving nodeload.github.com (nodeload.github.com)... 207.97.227.252
Connecting to nodeload.github.com (nodeload.github.com)|207.97.227.252|:443... connected.
HTTP request sent, awaiting response... 200 OK
Length: 46413 (45K) [application/zip]
Saving to: 'master'
100%[==================================================>] 46,413      60.1K/s   in 0.8s
2012-09-30 18:13:50 (60.1 KB/s) - 'master' saved [46413/46413]
Now that we have downloaded the shairport software we need to work with it. The file is called master, so let’s neaten it up and name it correctly. Just use the move command to change the filename. Once you have moved the file, unzip it with the unzip command and cd into the newly created albertz-shairport-b58f156 directory:
$ mv master albertz-shairport-b58f156.zip
$ unzip albertz-shairport-b58f156.zip
$ cd albertz-shairport-b58f156
Now you need to build the application, so run the make command. Thankfully this application is far simpler than the XBMC one and thus doesn’t need to be preconfigured.
$ make
cc -O2 -Wall   -c alac.c -o alac.o
cc -O2 -Wall   -DHAIRTUNES_STANDALONE hairtunes.c alac.o -o hairtunes -lm -lpthread -lssl -lcrypto -lao
cc -O2 -Wall   -c socketlib.c -o socketlib.o
cc -O2 -Wall   -c shairport.c -o shairport.o
cc -O2 -Wall   -c hairtunes.c -o hairtunes.o
cc -O2 -Wall   socketlib.o shairport.o alac.o hairtunes.o -o shairport -lm -lpthread -lssl -lcrypto -lao
Once the compile is finished, it is time to test; shairport is run by executing the shairport.pl file. So execute it as such:
$ ./shairport.pl
Can't locate Net/SDP.pm in @INC (@INC contains: /usr/lib/perl5/site_perl /usr/share/perl5/site_perl /usr/lib/perl5/vendor_perl /usr/share/perl5/vendor_perl /usr/lib/perl5/core_perl /usr/share/perl5/core_perl .) at ./shairport.pl line 45.
Whoops! There’s an error related to a particular module of code not being available to the Perl system that it needs to perform the install. In this case, it is the Net/SDP module that we need to install.
Unfortunately, apt-get cannot fix this one, so you have to get it working by downloading the module from the Perl CPAN library (which is much like a giant apt-get repository for Perl software that developers can borrow and use) and then install it. You will again use wget to download the file from the Internet. Issue the following command:
$ wget http://search.cpan.org/CPAN/authors/id/N/NJ/NJH/Net-SDP-0.07.tar.gz
--2012-09-30 19:01:11--  http://search.cpan.org/CPAN/authors/id/N/NJ/NJH/Net-SDP-0.07.tar.gz
Resolving search.cpan.org (search.cpan.org)... 199.15.176.161
Connecting to search.cpan.org (search.cpan.org)|199.15.176.161|:80... connected.
HTTP request sent, awaiting response... 302 Found
Location: http://mirror.westfield.com.au/cpan/authors/id/N/NJ/NJH/Net-SDP-0.07.tar.gz [following]
--2012-09-30 19:01:11--  http://mirror.westfield.com.au/cpan/authors/id/N/NJ/NJH/Net-SDP-0.07.tar.gz
Resolving mirror.westfield.com.au (mirror.westfield.com.au)... 203.42.62.21
Connecting to mirror.westfield.com.au (mirror.westfield.com.au)|203.42.62.21|:80... connected.
HTTP request sent, awaiting response... 200 OK
Length: 20679 (20K) [application/x-gzip]
Saving to: 'Net-SDP-0.07.tar.gz'
100%[===========================================================================>] 20,679      --.-K/s   in 0.05s
2012-09-30 19:01:12 (382 KB/s) - 'Net-SDP-0.07.tar.gz' saved [20679/20679]
Once the file is downloaded, you need to extract it with the tar command. Issue a tar command to unpack the file with the arguments –zxvf to unzip and extract this tarball. Then change into the newly created Net-SDP-0.07 directory:
$ tar –zxvf Net-SDP-0.07.tar.gz
$ cd Net-SDP-0.07
Now that the package is here, you just need to issue commands to the Perl build system here. The first is to execute the Build.PL script to generate the build file:
$ perl Build.PL
Created MYMETA.yml and MYMETA.json
Creating new 'Build' script for 'Net-SDP' version '0.07'
Once the build file is created, you need to run it with this:
$ ./Build
Building Net-SDP
And once the build is finished, run the inbuilt tests to ensure there are no problems by issuing the test command to the build script:
$ ./Build test
t/00use.t ....... ok
t/10generate.t .. ok
t/10parse.t ..... ok
t/20repeat.t .... ok
t/30asstring.t .. ok
All tests successful.
Files=5, Tests=69,  5 wallclock secs ( 0.97 usr  0.05 sys +  3.40 cusr  0.29 csys =  4.71 CPU)
Result: PASS
Finally, you need to install the modules, so issue the install command to the build script (you might need to press Enter after the command to get the install to finish and display):
$ sudo ./Build install
[sudo] password for raspbian:
Building Net-SDP
Installing /usr/local/man/man1/sdp2rat.1p
Installing /usr/local/share/perl/5.14.2/Net/SDP.pm
Installing /usr/local/share/perl/5.14.2/Net/SDP/Time.pm
Installing /usr/local/share/perl/5.14.2/Net/SDP/Media.pm
Installing /usr/local/man/man3/Net::SDP::Media.3pm
Installing /usr/local/man/man3/Net::SDP::Time.3pm
Installing /usr/local/man/man3/Net::SDP.3pm
Installing /usr/local/bin/sdp2rat
Once the build is done, it is a simple matter to run the shairport.pl script again, and this time it should work! The output should look like this:
$ cd..
$ ./shairport.pl
Established under name '891BEA3BF8A1@ShairPort 2113 on pisces'
Now you need to establish connectivity with the application and test that you can send music to it. Open up iTunes and then change the output destination in the bottom-right corner of iTunes (see Figure 11-5). You should see a shairport name there. Select it and press Play on your favorite song and presto: streaming music!
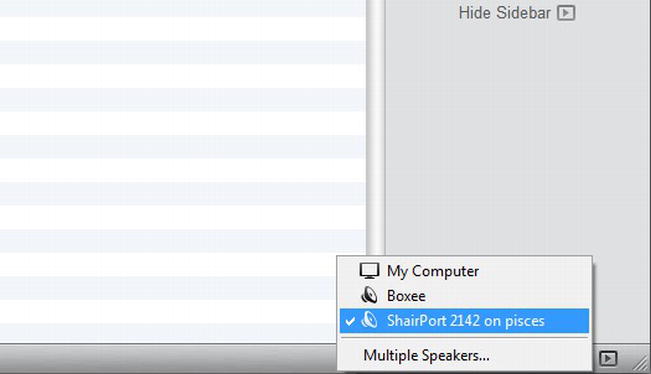
Figure 11-5. ShairPort enabled
As with XBMC, this process is fairly painless because the Raspberry Pi has a fixed hardware platform, and without all these variables there is not as much to worry about—things should just work.
If you find that no sound is coming out of your speakers when they are attached, check that you correctly issued both the modprobe and the amixer commands because both are needed to make the audio function.
Other than this issue, most of the commands should work. If not, you should delete any downloaded content and start over.
As with using the XBMC instance, most people won’t want to have shairport started with their system without needing to manually log in to your Pi and start the application. This is easy for us because the shairport install has all the files needed to do this bundled with it! To perform this, first install the shairport system: run sudo make install, and your output should look like this:
$ sudo make install
install -D -m 0755 hairtunes /usr/local/bin/hairtunes
install -D -m 0755 shairport.pl /usr/local/bin/shairport.pl
install -D -m 0755 shairport /usr/local/bin/shairport
Once the install is finished, you can copy the provided init script into the correct location:
$ sudo cp shairport.init.sample /etc/init.d/shairport
Now that the file is copied, you need to make one small modification: add the modprobe command from earlier—modprobe snd_bcm2835 —into the /etc/init.d/shairport file just before you start the shairport application. The start section should look like this:
start() {
    echo -n "Starting shairport: "
    modprobe snd_bcm2835
    start-stop-daemon --start --quiet --pidfile "$PIDFILE"
                      --exec "$DAEMON" -b --oknodo -- $DAEMON_ARGS
    log_end_msg $?
}
The last commands we need to run are these:
$ sudo chmod +x /etc./init.d/shairport
$ sudo update-rc.d shairport defaults
These commands make the new start script writeable and update the boot sequence to include the new shairport scripts! Reboot your Pi, and shairport should be up and running for you on boot! Congratulations.
Summary
In this comprehensive chapter, you installed a whole course of precursor applications and learned how to download source code, configure it, and compile from it. This is quite a lot of work and the XBMC compile took in excess of 12 hours!
You also created and installed start scripts to get these new media playback systems to run on the Pi at boot, avoiding the need to manually intervene.
Finally, you connected the XBMC instance to the remote control application for smartphones. This has been an incredible amount of work for one chapter, so well done!