
![]()
Editing Files on the Command Line
Believe it or not, one of the things you’ll end up spending most of your time doing on Linux is editing text files. They get absolutely everywhere, and you’ll find them used for content, source code for applications, configuration files, and startup scripts. The reason is that despite their somewhat basic and boring nature, they are very useful for storing human readable information. When you combine this with ease of use, you know you’re on to a winner. Linux doesn’t have a registry like Windows, and it’s extremely rare for applications not to use text files for their configuration. Even Sendmail, which has a historically evil config file (so evil in fact you need to write a config file for yet another application that will then create the Sendmail config file for you), stores its config file as plain old text.
This chapter gives you a brief overview of text files and how they’re used today. We’ll then introduce the two editors that we’ll cover in this chapter (nano and vim) and then we’ll get into the real meat of the chapter and show you how to actually get things done.
What is a Text File?
When a computer stores data on disk, it can store data in one of two formats: as a text file or as a binary file. So because computers store everything as binary data (those good old 1s and 0s), what exactly makes a text file different from a binary file? After all, surely the text file must also be stored in a binary format. If you were thinking along those lines, you’re quite correct. It’s not so much how the data itself is stored, but more to do with how that data can be read.
The best way to appreciate the difference is to think about the page you’re reading right now. The reason why you can understand what I’m writing is because we have implicitly agreed to use English to communicate. The content of this page has structure that we both understand. We start sentences with capital letters; we use punctuation to show when sentences end or when to stop for a breath. In short, we have quite a complicated protocol here, but it works because we are both capable of reading and writing English. We can understand both the structure (how the data is to be read and written) as well as the semantics (what the words actually mean). So, what about the following sentence?
- Goedemorgen. Hoe gaat het?
Straight away we can tell that it’s not English; after all, if it were, we would be able to understand it. Unless you happen to speak Dutch (we don’t, but our good friend does), you probably wouldn’t know which language it was written in. Even though the content doesn’t make sense, the structure itself does. We can see we have two sentences: one is a statement and the other is a question. In this particular case, we can guess what the first word means. If we pronounce it as we would English, it sounds very similar to good morning (which is actually what the word translates to). From that, we can probably guess that the question is “How are you?”
The reason we can do that is because although we don’t understand the content, Dutch and English share a common structure or format. We share an alphabet (although Dutch does have some characters not present in English) and punctuation (full stops, commas, and question marks). Now you might not get the pronunciation right (it is, after all, a foreign language) but because we share a common structure, we can at least handle the content, even if we can’t understand it.
Let’s take this one step further with Figure 6-1.
![]()
Figure 6-1. Some Chinese text
At least for the average reader of this book, Figure 6-1 will be unintelligible. It’s actually the same two sentences that appeared in our Dutch example, but this time written in Chinese using simplified characters. To the uninitiated, there is no way to tell from this collection of characters how they should be pronounced. In fact, depending on the dialect spoken, these characters could be pronounced in many different ways. This is because each character represents an idea rather than a sound, and once you recognize the idea, you know which word to say. This is why in China it is possible for two people who cannot speak the same language to communicate perfectly well by reading and writing characters.
So why did we sidetrack into foreign languages? Well, text files are like reading and writing English or Dutch. Whether the content makes sense or not depends on whether the reader can speak English or Dutch. This is similar to two applications and their config files. If you give an Apache web server configuration file to the Sendmail e-mail server, it will spit it back in your face (Sendmail doesn’t speak Apache), but it can open and read in the file.
Chinese, on the other hand, is our example of a binary format. It is very alien for most Western speakers (although arguably it is far more efficient, elegant, and sophisticated than phonetic writing used in Western European languages). Unless you know Chinese, you can’t understand the content or the implied structure. In computing terms, what you have is a blob of raw data that only makes sense to the application that wrote it.
Now you might be thinking that storing data in an arbitrary format is no big deal. After all, the application that wrote it is the application that will read it, and as long as it understands the file, surely that’s enough. Well yes and no. What happens if the program breaks? What if you need to read the file on another machine? Perhaps the vendor has provided some special tools to do just that, but therein lies the problem: you need special tools.
Not so for text files; they can be opened in any text editor, and no special tools are required. Because the vast majority of Linux applications all use text files (we can’t think of any off the top of our heads that don’t), all you need to read or make changes to a configuration file is your favorite text editor, and Linux has a stunning variety of editors to choose from. Thus you can become familiar with a single tool and then use that tool to reconfigure all your applications, write source code when you’re doing scripting, and even use it for writing books (which is precisely what we’re doing right now).
So the text editor is your Linux Swiss army knife and something you never want to leave home without. Of course, just like Swiss army knives, there are many different text editors to choose from, and some have more features than others. Sometimes you want a basic text editor that just lets you open files, edit some text, and then save the results. Other times you might want to do a complex search and replace or delete to the end of the line. Of course, you can quite easily use one of the more feature-full editors for all your tasks; after all, you don’t have to use the features if you don’t need them. That said, it’s been our experience that people are generally familiar with at least two text editors: one basic and one fully featured. In this book, that means nano and vim, respectively.
The first text editor that we’ll cover is nano. It’s a lightweight and easy-to-use text editor and it tends to be installed on most systems. Some later versions of nano have more features (such as syntax highlighting when writing source code), but all effectively look and work the same way. If you can use nano on your Pi, you’ll be able to use it equally well on any platform.
The nano editor was actually written to be a drop in replacement for the pico text editor that used to ship with Pine, a text-based e-mail client. Pico can still be found on older systems (usually much older), and chances are if you can’t find nano, you might still be able to find pico. Because it’s a drop in replacement, the same commands and basic features used in nano will also be available in pico. Combined, this gives you coverage of most other UNIX platforms as well as Linux.
Nano’s key selling point is its ease of use, but it does have a number of useful features. These features are accessed from menus, and while nano has more than enough features for simply editing a config file, sometimes you need something with a little more power. This is where the vim editor comes in. It can do all the things that nano can do, but it can do so much more so that’s pretty much where the comparison ends. Vim enables the following: syntax highlighting, different color schemes, cut and paste, delete blocks of text, indent chunks of text, open multiple files and show both at the same time, and much more.
Now you might be thinking that if vim is this great, you might save yourself a lot of headaches by simply just learning how to use that text editor rather than any others. Like nano, vim is available almost everywhere in some form or another, and has the same basic features and accepts the same commands. The reason we’re covering nano is that you can be up and running quite literally in just a few seconds. Its features are easy to explain, and getting it to do what you want is really easy. Although vim users may disagree, in our experience, vim doesn’t exactly hold any ease-of-use awards. That said, if you really don’t want to learn two editors and feel that you’d rather just learn vim, that’s fine, you won’t really be missing out on anything; it just might take you a bit longer to get productive.
Starting out with nano
We’re starting out with nano for the simple reason that it’s really easy to use and doesn’t take much explaining. You can quite literally do everything you need to in nano, and while you might be able to do it faster in another editor, nano will help you get the job done just fine.
Nano can be run by using the nano command. Okay, no surprises there, but running nano by itself isn’t all that useful. After all, you’ve got a text editor now and you want to do some editing. Unless making a few notes, no one ever just writes text without wanting to save it afterward. When you open nano, you probably want to open a particular file for editing. That file may or may not exist, but you probably know what it is you want to call it when it comes to pressing the save button. For the sake of this introduction, we’re going to open nano and tell it that we want to edit test.txt. We can do that with this:
$ nano test.txt
All being well, you should get something like Figure 6-2.
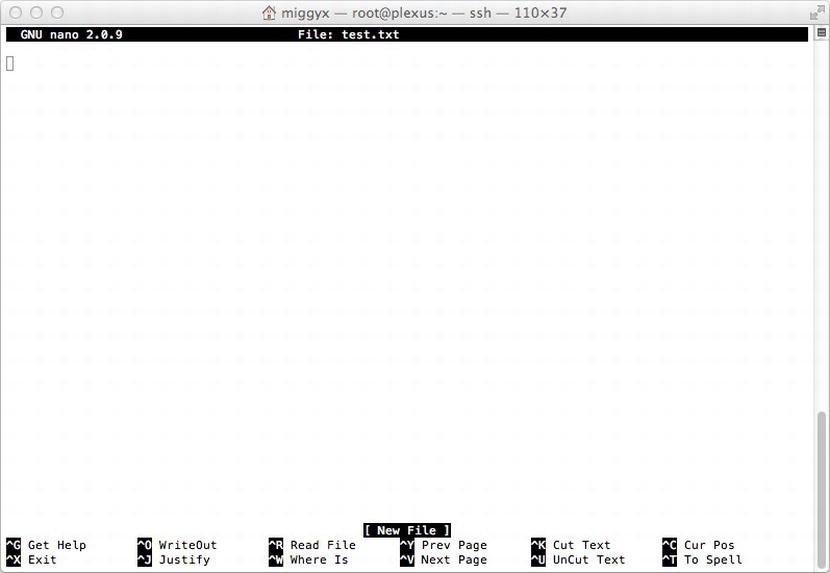
Figure 6-2. Freshly opened nano with a new file
We’ve connected to our Pi using SSH but because nano is a terminal based application, it will look the same regardless of how you run it. One interesting thing about these sorts of terminal applications is that they are sensitive to how big your terminal is. A fixed terminal (such as the physical console) has a set screen size. When you connect via SSH or use a virtual terminal, you can adjust the size of the screen and this will cause nano to resize along with it. This makes it very flexible and can fit in with your needs regardless of the shape or size of your screen.
So What Does This All Mean?
Nano’s screen can be a bit confusing at first (especially the bit at the bottom), but most of the time you won’t actually be paying attention to anything other than your text. In fact, all the other stuff melts away in the background. For example, on the top left of your screen you can see that we’re running “GNU nano 2.0.9.” Until we came to write this book, we had no idea what version of nano we were running and quite honestly until we had to describe it here, if someone had asked us to draw the nano layout from memory, we’d have had a pretty hard time doing it. Actually, we wouldn’t have been able to do it at all!
There are two other pieces of information that you can glean from nano’s title bar. Smack bang in the middle is the name of the current file that you’re editing. In our case, it’s test.txt. Not exactly earth-shattering, but it’s quite common to be working on multiple windows at once, and being able to quickly get your bearings can come in handy.
The third piece of useful information is whether the file has been modified; that is, are there any unsaved changes? This can be very handy when you want to check whether you’ve saved your latest work. It’s also useful for simply jogging your memory and reminding you to save your work. To see what this looks like, just press the spacebar to make a change, and you’ll see that “Modified” appears in the top right of the screen (see Figure 6-3).

Figure 6-3. Modified file in nano
That’s pretty much it for the title bar. At the bottom of the screen there are actually two sections. The first one is the status line, which shows you important information (right now, it’s telling you that it’s a new file), and the second one is the shortcut or menu bar. We’re not going to say much more about the status line because it’s pretty much self-explanatory. Anything of importance that you need to know, nano will put it there. Of much greater interest (and in fact the key to using nano) is the shortcut bar. Let’s take a closer look at it in Figure 6-4.
![]()
Figure 6-4. The shortcut bar
When you’ve been working in Windows or on the Mac, you’ve probably reached the point where rather than using the mouse to copy and paste things you instead use the keyboard combinations. On Windows, you would use the Ctrl and C keys, and on the Mac it would be the Command key and C. When you use more than one key in concert with another, you end up with a key combination. Nano works in a very similar way, but rather than just copy and paste, all its important functions are driven with key combinations. Because it would be somewhat difficult to remember all the possible options available (although the ones you’ll use on a frequent basis will soon be committed to your long-term memory), nano displays them in the shortcut bar. Actually, it only shows the most common commands, but we have never needed to stray away from them.
To make use of any command, you need to use the correct key combination. You can find which combo you need by looking at the shortcut bar. A shorthand way of writing control key is to use the carat (^) symbol. Looking at the shortcut bar, you can see that if you want to get help, you need to use ^G; in other words, hold down the Control key and press the G key.
Saving Your File
Saving a blank text file is pretty boring, and it’s hard to tell if it saved correctly if all you have is a space character. We’re going to go for an old favorite here and punch in “Mary had a little lamb.”
Unlike some editors (most notably vim, which you’ll come across later), nano doesn’t have the concept of different modes. That is, when you type into nano, it will be interpreted as text to put into the file. Vim, on the other hand, stands in command mode, and if you just start typing, you will get some interesting results. As you might expect, pressing Enter after each line will take you to the beginning of the next line. After typing in the nursery rhyme, you should get something like Figure 6-5.
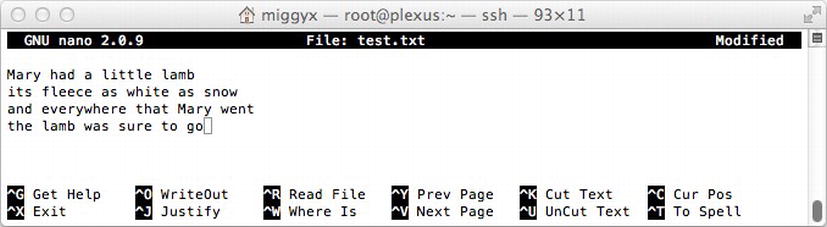
Figure 6-5. Mary had a little lamb, nano style
We shrank the nano window down a bit so that we don’t take up vast quantities of paper with blank whitespace. It also acts as a pretty good example of why you might want to resize a window and how it looks when you actually do. In this case, everything looks just fine, although admittedly for writing anything of a reasonable length, you’d need something a bit bigger than this.
You may have noticed that the status line seems to have disappeared. This is because the file stops being a new file once any content has been added to it. Our modified warning is still up in the top right hand corner though. It’s time to get rid of that and get Mary safely on to disk.
Looking at the shortcut bar you can see the options we have available to use. The most common ones you’ll use are WriteOut (which really just means Save File) and Exit. Exit actually doubles as WriteOut because if you try to exit nano with unsaved changes, it will ask you if you want to save your changes.
Let’s start with the WriteOut command. Hold down the Control key and press the O key. Nano should now look something like Figure 6-6.

Figure 6-6. Using the WriteOut command
- The status line has made a comeback. This time it’s asking for information, or at least it wants us to confirm it. Now that it’s time to save the file, nano is asking us to confirm what the name should be. Because we passed it a name when we originally started nano, this is the name that nano will provide by default. If we press the Enter key now, it will save the file; but before we do that, let’s take a look at the shortcut bar.
- The shortcut bar has changed to a whole new set of options because the shortcut bar is actually contextual; that is, it will show you the most relevant things based on what it is you’re doing at the time. These options are only useful (or even available) when saving a file, so this is when you get to see them. We’ve never actually had to use any of these options apart from Cancel (when you suddenly decide that saving is not what you want to do at all).
Okay, back to saving the file. If you like, you can change the name that the file will be saved as, and nano will not only save it under your new name but will also continue using that name when you go back to editing, which is the same file and you should get a message like the one shown in Figure 6-7.
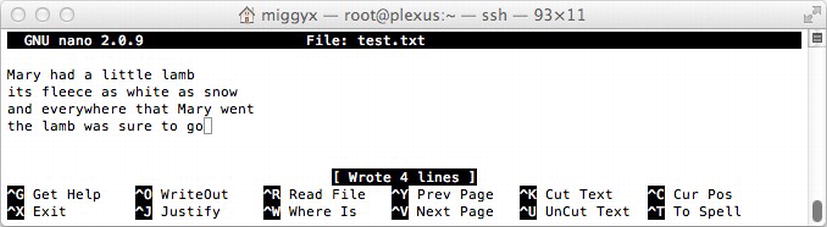
Figure 6-7. File has been written to disk
You can see that the shortcut bar has gone back to its usual look and we have a new message in our status line. You’ll also have spotted that the Modified status has vanished. So far so good.
Let’s quickly look at what happens if you try to exit nano while you have an edited file (see Figure 6-8):

Figure 6-8. Exiting before saving
All we did here was add a signature to the file (although admittedly it probably wasn’t Mary who wrote it) and then tried to exit nano by using Control and X. This time the status line gives us a scary warning, and the shortcut bar gives us a somewhat reduced number of choices. We can say yes, in which case nano will save the changes before it exits; or we can say no, in which case nano will still exit, but we will lose all the changes we made since the last time we saved the file. We can also think better of exiting and change our minds. In this case, we can use Control plus C to cancel our exit request, which will just take us back to nano.
Moving Around in nano
You can move around your text just by using the cursor keys because you’re probably used to from your word processor of choice. In fact the only reason we mention this here is because some editors don’t use those keys at all because they take your hands too far off the home row (that is, they’re slow to use because you have to move your hands a long distance to reach them). So rather than explaining cursor keys, we’ll show you the two features we use most in nano, which are both coincidentally related to finding things.
The first thing you will probably want to use is the search feature that is somewhat oddly named “Where Is” under nano. We can issue that command by pressing the Control and W keys to get to the next step, as shown in Figure 6-9.
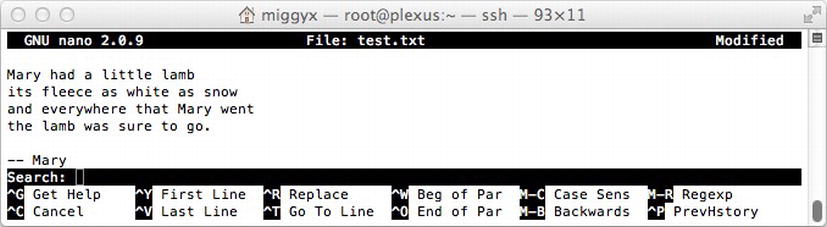
Figure 6-9. Searching for some text
Once again we have some new options available to us. The most common task, though, is to simply find a word. So let’s search for Mary and see what happens (see Figure 6-10).
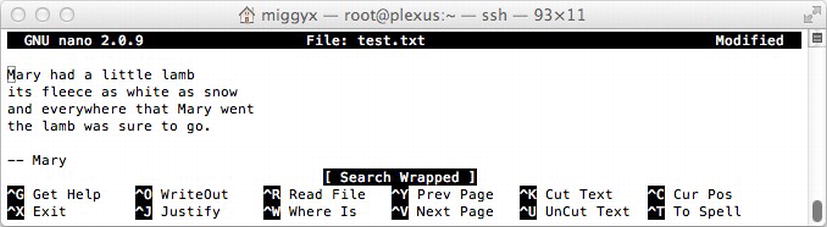
Figure 6-10. Nano found Mary
After pressing the Enter key, nano will try to find the text you searched for. In our example, we were already at the end of the file; that’s why you can see “Search Wrapped” in the status bar—nano reached the end of the file and wrapped around to continue the search from the beginning. This is a really handy feature!
There will often be more than one occurrence of the word that you’re looking for. If you want the second Mary, you repeat your search. You can do this by just pressing Control and W and then immediately pressing the Enter key. Nano remembers what you searched for last time, and if you don’t supply a new word, it will simply search again with the old word. This means you can easily cycle through the document to find the specific entry that you’re looking for.
The last feature that we’ll cover is a slightly more specific form of search. Suppose that rather than searching for a word, you want to go to a specific line number. In day-to-day text editing this is not something that you’ll actually do all that often. However, when you start writing scripts and they generate errors, you will generally be told which line that error occurred on. For short programs it often doesn’t matter, but if you’re building something fairly epic, you’ll want to be able to get to the line quickly. This is true even in medium-length programs because if you have a particularly tricky problem, you’ll have to keep revisiting a specific piece of code and you certainly don’t want to have to use the cursor keys to find it each time.
To go to a specific line number, you need to start the search as you did before by using Control plus W; but rather than typing any text, you should then do Control plus T. This will change the status line as shown in Figure 6-11.
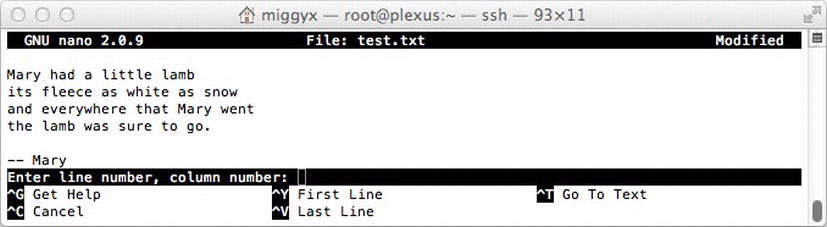
Figure 6-11. Go to a specific line number
All you have to do here is enter the line number that you want to go to and press Enter. You can also see that there are some other useful options here that allow you to go to the start of the file and the end of the file, respectively. You can also press command and T to go back to searching for text, or you can press command and C and cancel the search.
That’s all we’re going to cover for nano but as you can see, even the limited amount of functionality we’ve covered has already given you the ability to edit configuration files or even compose your own book. Nano is great for these kinds of tasks where you don’t want distractions and you just want to get the job done. As it happens, a good deal of this book was written in nano, so it just goes to show that this tool is certainly not just a toy! That being said, let’s move on now to look at what the vim editor can offer you instead.
Getting Started with vim
Vim is a bit more advanced than nano. Whereas nano was specifically designed to be simple, vim is designed to be a fully featured environment for doing all sorts of tasks. You can even integrate other applications (such as the shell and source code control) directly with vim, so you can do huge amounts of work without ever leaving your text editor.
The downside to this raw power is that you have to learn how to use it. Unlike nano, which is basically ready to use right away, vim has the concept of modes. Generally speaking you’re either in the normal or insert modes, and they are the ones that we’ll focus on in this section.
However, we do want to point out that even though we use vim on a regular basis, we’re not what you would call vim experts. We know how to use the functionality that helps us with our work, but there are many features that we don’t use or even know about. Because this is just a primer on vim, we don’t feel that this is an issue, but if you think vim is the tool for you, there is a wealth of books dedicated solely to vim as well as numerous video tutorials on some of its more advanced and powerful features.
Rather than having to type in yet another poem, let’s give Mary an encore and bring her back to the stage with vim. First though, we need to install it:
$ sudo apt-get install vim
Now that we have vim, let’s see about that encore:
$ vim test.txt
Needless to say, starting vim is as straightforward as starting nano, but it does look a little different once it has started (see Figure 6-12).
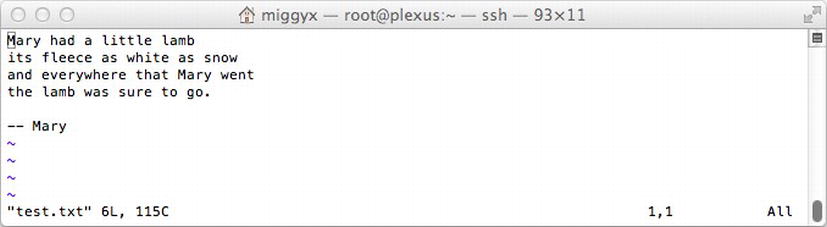
Figure 6-12. Starting up vim
Gone are the nice headers, status lines, and shortcut bars. In the land of vim, like Linux itself, we’re expected to know what we’re doing. In the bottom left of the screen, you can see the name of the file that we’re editing. Next to that is 6L, which tells us how many lines are in the file, followed by 115C which tells us the number of characters. On the other side of the screen we have another useful piece of information: 1,1, which tells us the line that we’re currently on and the column that we’re in. At present it is telling us that we’re on line 1 and in the first column. That makes sense because we only just opened the file; if you look at the cursor, sure enough we’ve sitting on top of the first M.
![]() Note Depending on the version of vim and how it is configured, it will usually take you to the location you were at when you last stopped editing that file. This is really useful when programming because it gets you immediately to where the action is.
Note Depending on the version of vim and how it is configured, it will usually take you to the location you were at when you last stopped editing that file. This is really useful when programming because it gets you immediately to where the action is.
You can also see several lines of tildes (∼) beneath the last line in the file. They are here to remind us that although the screen is a certain size there is no content below Mary. This is especially useful when doing certain types of programming and you want to make sure there’s no additional whitespace. It’s really just a visual clue and won’t get in your way.
The vim Modes
Vim comes across as being a bit quirky because (unlike word processors and more basic text editors) with vim you can’t start typing right away because vim has different modes or personalities. When you first start vim, it is in command mode. Unlike nano, in which you give commands by using key combos, vim has a wide range of commands that are single or double letters. You might think that this would be hellishly confusing and, well, you’d be right. Once you know the magic key presses to make vim do your bidding, you’ll love this way of controlling your text editor. Until then, however, it’s likely to drive you to distraction.
So let’s get out of command mode and slip into something more comfortable. We can replicate a nano-esque environment in vim by pressing the i key. This will take us out of command mode and place us in insert mode. You can tell when you’re in this mode because you see --INSERT-- in the bottom-left corner, as shown in Figure 6-13.

Figure 6-13. Vim in insert mode
At this point you can move around your text file just as you did with nano. The cursor keys work as expected and you can add and delete text as you did under nano. The differences start when you want to do something other than writing text, though. How do you save your changes?
Saving Your Changes
To save your changes in vim the first thing you need to do is exit from insert mode by pressing the escape (ESC) key. This takes you back to normal mode, in which you can issue commands and consequently save your document. First, though, let’s change the signatory to say John instead. This will give us the much-needed change for the document. To actually save the document we use this command:
:w
The command really is a colon followed by a lowercase w. Vim is case-sensitive, so if you tried to do: W, you would get an error message that it isn’t a valid command, as shown in Figure 6-14.

Figure 6-14. Whoops, W isn’t a command
There’s no need to panic; just try the command again and you’ll be fine, as shown in Figure 6-15.

Figure 6-15. :w works like a charm
If you want to change the file name while you were saving, you can simply type in the filename you want to use after the command like so:
:w test2.txt
This will then save the changes to the new filename and will then continue to edit the new file.
This leaves us with just one more feature to bring you to the same basic level that you had with nano (we’ll cover searching in just a moment). Once you’ve done all your editing and you’ve saved your files, you’ll want to exit. The command for this is as follows:
:q
As long as you haven’t made any changes, vim will immediately exit, and you’ll be back at the command line. However, if you had made some changes and you try to do this, you’ll once again catch the wrath of vim, as shown in Figure 6-16.

Figure 6-16. To quit without saving you’ll need an override
Fortunately, vim has already told us how to fix the problem, but basically if you want to quit without having your changes saved, you’ll need to explicitly tell vim that’s what you want to do:
:q!
And that’s all there is to leaving vim!
In this section we’ll cover only the basics and show you how to do the same sorts of searches that you did in nano. In actual fact, vim has very advanced search capabilities (you can use regular expressions for a start; see the following sidebar) but although you might come to depend on these features as you become more advanced in your usage, you’ll still probably find that you spend most of your time doing the simple things.
To search for a word in vim, all you need to do is prefix it with a forward slash. To give this a try, while in command mode (tap the Escape key twice to ensure that you’re in the right mode) type:
/Mary
This should then find all instances of Mary and highlight them for you, as shown in Figure 6-17.
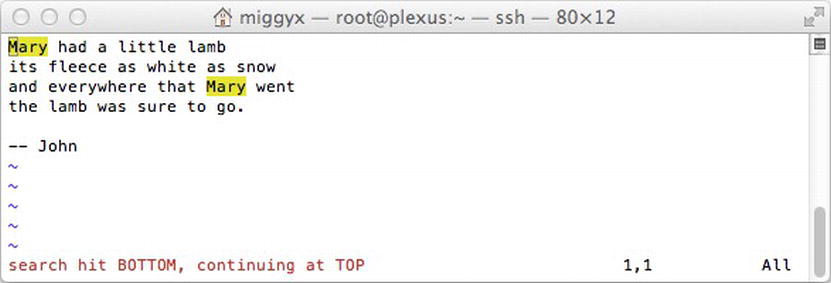
Figure 6-17. Vim found Mary
You can see the “search hit BOTTOM, continuing at TOP” message, which is equivalent to the nano “Search Wrapped” message. One thing to watch out for with vim is that because it uses regular expressions for searching, it’s also case sensitive by default. That means if you search for mary rather than Mary, expect to receive a complaint as shown in Figure 6-18.
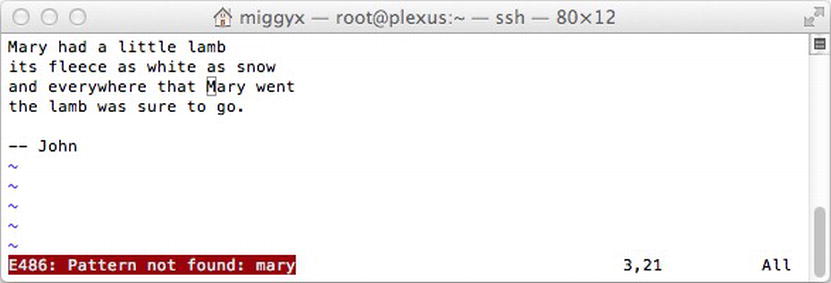
Figure 6-18. Vim can’t find mary
One advantage that vim has over nano is repeated searches. To move to the next search result, all you need to do is press the n key. In our preceding example text, if you search for Mary with /Mary and then keep pressing the n key, you will see vim will cycle through the search results for you. We can’t really demonstrate that effect in print, but it’s a nice distraction for a few seconds if you’d rather not be doing something else. If you’d like to search in the opposite direction (i.e., toward the top of the file rather than the bottom), simply use a capital N instead.
REGULAR EXPRESSIONS
Regular expressions in the right hands are like magic. They slice through complex text-processing tasks like a hot chainsaw through warm butter. They are also frequently used to give system administrators bed-wetting nightmares and to scare small children. Regular expressions are very powerful once you know how to use them, but boy does that power come with a cost! Be that as it may, a basic knowledge of regular expressions will be very useful to you, and you can use them directly in vim for searching, replacing, and otherwise manipulating your text.
We don’t have enough space to go into regular expressions here (often referred to as regex), but there are some fantastic resources available on the Internet to get you started, not to mention complete books on the topic. A great starting place is Jan Goyvaerts’ website: www.regular-expressions.info/. Not only is this site full of useful and helpful information (it is very often our first port of call) but Jan has also written some very powerful software. We bought RegexBuddy many years ago and it’s still our first port of call when we’re trying to debug some complicated regex. If you want a simpler tool for testing out your regular expressions, check out http://rubular.com/, which does real time regex parsing in Ruby.
Moving to a Specific Line Number
The last thing we covered in nano was moving to a specific line number. This is actually much easier in vim, probably because it’s something that programmers have to do all the time. To jump to a specific line number, all you need to do is place the line number after the colon. For example to jump to the 5th line all you’d need to do is this:
:5
Once you hit the Enter key, you’ll be taken directly to the fifth line. As before, this feature isn’t particularly useful for normal editing, but it comes in handy when you’re fiddling about with a program that simply refuses to work the way you know it should!
Moving About in vim
Although we’ve already shown you how to move around your text file, we haven’t been leveraging the power of vim. Vim provides additional commands that can allow us to navigate through text more quickly.
In command mode, you can still move around your text using the cursor keys, which is convenient. In effect, you can do the same thing using two other commands: the h and l keys. The h key will move the cursor back one character, and the l key will move the cursor forward one character. Admittedly that’s not very exciting, but we can now introduce the b and w commands. They work just like the previous commands, but instead of stepping back just one character, they jump to the beginning of words. Suddenly that’s more useful because now if you have a long line of text, rather than pressing and holding down the cursor key for extended periods of time (tempting, though, isn’t it?), you can greatly speed up the process by hopping a word at a time.
We can take this one step farther, though. If you want to jump to the beginning of a line you can press the 0 (zero) key. To get to the end of the line, you simply use $ (in our case, that means holding down the Shift key and pressing the 4 key). This is surprisingly useful because there will be lots of times when you want to get to either the beginning or the end of the line, and now you can do so with a single key press.
Table 6-1 makes it a bit clearer.
Table 6-1. Common Navigation Shortcuts in vim
| Movement | Key press |
|---|---|
| Start of line | 0 |
| Back one word | b |
| Back one letter | H |
| Forward one letter | l |
| Forward one word | w |
| End of line | $ |
So what we have now is a progressive way to move our cursor from one end of the line to the other. No longer do we have to fiddle about with the Enter or backspace keys, or fall asleep waiting for the cursor to trundle across the screen. That’s just the beginning, though, because these keys can be used for a lot more than just moving around your file; they can also be used to specify the scope of the commands you feed to vim.
Deleting in vim
In command mode, to delete a single character all you need to do is press the x key. This will remove whichever letter happened to be under the cursor at the time. This is sometimes useful in its own right (usually when tweaking a typo), but it doesn’t really offer you any great advantages over dropping into insert mode. The d key, however, provides a very powerful delete command that you can now combine with your newly acquired knowledge of moving the cursor to do some pretty impressive things.
The first delete command we’re going to try is dd. Let’s start out by deleting the first line in our file. To make sure we’re all in the right place, use the following command to get back to the first line:
:1
Now we’re going to delete the current line by typing the following:
dd
Your poem should now be somewhat shorter and look like Figure 6-19.
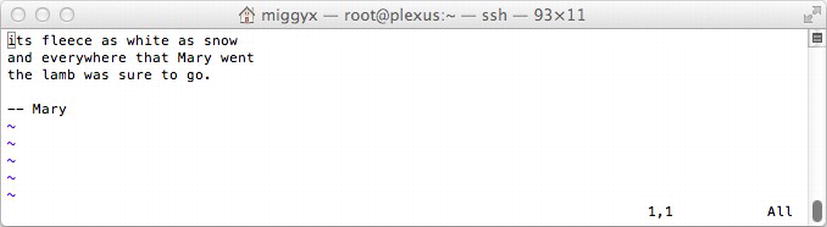
Figure 6-19. Deleting the first line
Now that we’ve ruined our poem, now would be a great time to introduce another very useful feature in vim: the “undo” command. To undo the change we just made, simply press the u key, and Mary will be restored to her former glory. This not only prevents panic attacks when accidentally deleting the wrong line but it also means we can delete parts of this line in numerous fascinating ways.
If you have more than one line that you want to remove, you can tell vim how many times you want it to execute a particular command by prefixing the command with a number. For example, if we want to remove three lines from our poem, we could do this:
3dd
This is equivalent to pressing the d key six times and gives you the happy result shown in Figure 6-20.

Figure 6-20. Deleting three lines in one go
You can see in the bottom-left corner that there are now “3 fewer lines” just as you hoped. Let’s restore Mary with the u key and try something else. With our cursor at the beginning of the first line, try executing this command:
dw
This command combines the delete command with movement commands that you saw earlier. In this case, we combined it with w. which means “one word to the right.” You can see the effect of that command in Figure 6-21.

Figure 6-21. Deleting a single word
Rather than moving the cursor, we have effectively selected text that we wanted to delete. In this case, d will start deleting from the cursor’s current location, up to the first letter of the next word. We could have achieved this effect easily enough simply by pressing the x key multiple times, but using dw is clearly faster and more precise. Let’s take this to the next level and combine what we know. We know that we can make vim execute a command multiple times by prefixing the command with a number. We also know that we can combine the d command with w to delete a complete word. Let’s revive Mary (another press of the u key) and try this new improved command (the results of which are shown in Figure 6-22):
2dw
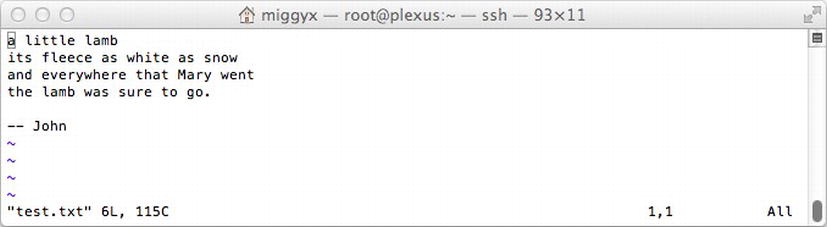
Figure 6-22. Deleting two words at once
Well isn’t that interesting? We’ve been able to combine a serious of commands to express some reasonably complicated tasks. You can, of course, combine them in any way. For example, if you want to delete everything to the end of the line, you can use d$. If you want to delete everything from the start of the line, you can use d0. It’s being able to combine commands in this way that makes vim such a powerful tool for working with text. Although these features are of fairly limited used when working with English prose, when you start working with programming languages, they become very useful indeed.
Before we move on to look at some of the features of Vim’s visual mode, we’re going to provide a very quick overview of some other simple commands that will come in handy. The i enters into insert mode, but sometimes you want to write immediately above or below the current line. You can get this effect by using O and o respectively. These will both insert a new line and then switch to insert mode. Sometimes you don’t need to actually edit the content of a file; you just need to change a single letter. This could be because of a typo or maybe you just want to increment a number. You can do this with the r key. This key allows you to replace the character under the cursor with any other character. Simply press r and then type the character you want to replace it with. Simple but very effective!
Visual Mode
Visual mode is not something we use very often, but it can save us a huge amount of time and effort. This mode enables you to select or highlight blocks of text for further processing. This is akin to highlighting text with your mouse in a word processor. There are two ways you can enter visual mode from command mode: by pressing either the V key or the v key. If you use the uppercase V, you will be able to select a block of text based on lines. With the lowercase v, you gain extra precision as you can select based on single letters rather than entire lines. The overall result is the same, and the option you choose depends only on which one would be most convenient to you.
So what exactly can you do with visual mode? Well it really doesn’t do anything in and of itself; it just provides an easy way for you to tell vim what text the following command should be applied to. In keeping with our previous examples, let’s select a chunk of Mary’s poem, as shown in Figure 6-23. (You don’t need to highlight the exact text that we have, but try to get a fairly random chunk.)
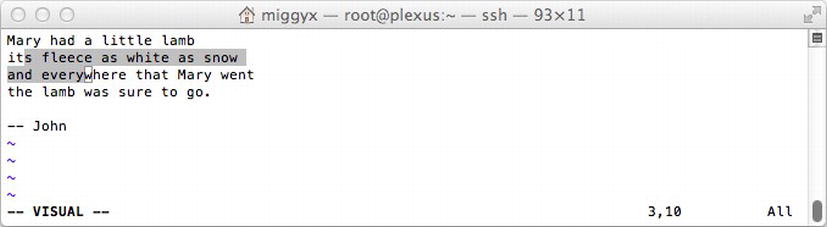
Figure 6-23. Highlighting text in visual mode
As you can see from the highlight, we used the lowercase v option as we wanted to highlight within a particular word. There’s no real reason for that apart from a sense of the dramatic, so it could easily have been a bunch of lines selected with V. Now let’s apply our favorite command: the delete command. By pressing d, you will find that the highlight text magically disappears. In this case, you don’t need to provide additional information to vim to tell it what to delete because in effect you’ve already told it by highlighting the text in the first place.
Of course, you can do other interesting things apart from deleting text (though deleting text is fun). For example, if you want to indent the first two lines of the poem, you can highlight the first two lines with V and then use the greater-than and less-than signs (> and <, respectively) as appropriate. We can’t show you how that would look in print (honestly moving huge chunks of text back and forth is surprisingly therapeutic), but we can show you the end result of this command, as shown in Figure 6-24.
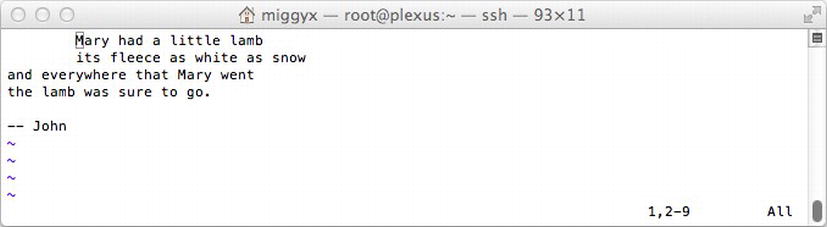
Figure 6-24. Indenting highlighted text
There is one more terribly useful feature that we haven’t covered yet that works very nicely with visual mode: copy and paste.
Copy and paste in a terminal is something of an iffy proposition. The reason for that is an application running in the terminal effectively lives in its own little world. If you copy text from the terminal on your laptop, for example, that text is copied into your laptop’s clipboard. The remote application (in this case, vim) has no idea that you did that. Likewise, if you paste content in to vim from your laptop, vim will simply receive it as a set of key strokes, it won’t have a clue that it came from a clipboard. Generally speaking, this is okay. If you just want to move a bit of text about, using the clipboard in this way is probably fine.
There are times when this doesn’t do what you want. For example, if you have a split screen and you have two files side by side and you want to select the first paragraph on the left, you’re now a bit stuck. The terminal just shows you a representation of what’s on the server; it’s just a display and as such the terminal has no real understanding of what it’s displaying. If you try to copy and paste the left side, you’ll find the right side comes along for the ride. That’s far from ideal (not to mention highly irritating).
You might want vim to do something with the text. If you just want to paste it once, no big deal, but what if you want to paste exactly 10,004 times? Vim can’t help you there because it has no concept of your local clipboard. You’ll find that when these issues do crop up, they’ll be fairly niche and you can work around them. However it is likely to really irritate you because you will think “if only I could just copy this text!” while you sit there trying to work around the problem.
What we need then is a remote clipboard—somewhere for the remote application to store data for processing. There’s no standard for this, but many terminal-based applications offer a solution; for vim, it’s the yank and paste feature. To yank some content, you need to use the y key, which takes the same modifiers that the d command uses, so you can quite happily copy an entire line with yy (remember that the letter just doubles up) and a single word with yw. Also like the delete command, we can also use this with the visual mode.
First, simply highlight the text that you want to copy. For simplicity, let’s go for the top two lines again. Once you’ve highlighted that with the V key, press the y key to yank it into the clipboard. Phase one is complete; now all we have to do is paste it back into our file. There are two ways you can use the paste command: with either P or p. As with the V and v commands, the upper- and lowercase versions are usually related in some way. In this case, the P key inserts the content before the current line, whereas the p key inserts it after. Feel free to move your cursor to any location in the file before hitting one of those keys. The effect is really what you’d expect, and vim will just paste content in. You can, of course, combine these commands with the numeric prefixes to repeat the number of times something is inserted. Figure 6-25 shows what happens if you end 40p.

Figure 6-25. Mass pasting
Although you don’t know it yet, you actually learned to cut as well as copy text. Whenever you use the d key, you delete the text from the file, but a copy is placed in the clipboard. If you select a line and delete it with dd, you can restore it with P. Bear in mind that if you use the p key instead, you’ll actually be inserting the original line after the line you’re currently on because you’ve removed the line. If you want to restore it to its original location, you must use the P key to paste before the current line.
Summary
This chapter looked at what separates a text file from a binary file and why text files are the lingua franca when it comes to configuring software. We covered two of the key text editors that you are likely to come across in your travels, and we’ve given you a good grounding in both of them. Certainly we have not been able to show you everything that is possible, but now you should be in a good position to explore and try new things yourself.
In the next chapter, we’ll cover the BASH shell and show you some of the more important things that a system administrator needs to know.