
![]()
In the last chapter we introduced touch events and discussed the basics of using them. In this chapter we will dive deeper with a few more complicated examples and techniques for managing the differences between the browser touch models. There are screenshots of what we are building in this chapter; but screenshots cannot express the activity in a touch-based sample very well, so I encourage you to try them on the live sample site discussed in the introduction.
Being able to handle the plain touch/mouse/pointer events is very handy, but soon most will want to be able to use gestures. Gestures are higher-level combinations of events and other factors like swiping, tapping, double-tapping, pinching, and zooming. Thinking and programming in these abstractions is a great way to express actions. But to do this really well, it would be nice to be able to create custom events so we can attach gestures as we do other events. Let’s turn to that now.
Ideally, when attaching a gesture to an element, it would be nice to use code like this:
var swipeable = document.getElementById('swipeable'),

swipeable.addEventListener('swipeleft', left);
swipeable.addEventListener('swiperight', right);
Unfortunately you are not going to be able to do that. Elements don’t know about “swipeleft” and “swiperight” gestures. However, I can show you how you can get something like this:
var swipeable = document.getElementById('swipeable'),

var gesture = new CustomSwipeGesture(swipeable); //Custom functionality attached here
swipeable.addEventListener('swipeleft', left);
swipeable.addEventListener('swiperight', right);
In this case the CustomSwipe object encapsulates the logic around collecting touch/mouse/pointer events. Let’s walk through how to create this.
Custom events are relatively easy to create in JavaScript. The problem is that different browsers do so in different ways. Let’s start with the event model of Webkit-based browsers and Firefox. The syntax is fairly straightforward. Let’s create a custom event and fire it when the touchend event fires on an element.
var element = document.getElementById('theThing'),
var myCustomEvent = new CustomEvent('stoppedtouching'),

element.addEventListener('mouseup', function (evt) {
  //Normally more will be involved here since we’re just mimicking the mouseup event. That will come in a bit.
  evt.target.dispatchEvent(myCustomEvent, evt);
});

element.addEventListener('stoppedtouching', function (evt) {
  //Your new event is firing. Cool.
});
Now imagine if the “stoppedtouching” event became “tap”, “swipeleft”, or “pinch” and you get the idea. Unfortunately, this code doesn’t work for Android 2.x or for IE 10, so if we want to support as many devices as we can, we should use something that works across them all. Fortunately for us, this functionality can be added to the browsers that don’t have it. This is called a polyfilling. We are adding behavior to the browsers that they don’t natively have so that we can code as if they did. Here is a polyfill that adds the level of custom event support that we need.
//This is based on the polyfill on MDN:https://developer.mozilla.org/en-US/docs/Web/API/CustomEvent
//  It was originally meant just for IE. This now covers older Androids.
(function () {

  //IE10 has the custom event object but it doesn't work like the other browsers :(
  var isIE = window.navigator.userAgent.indexOf('MSIE') > -1;
  if (window.CustomEvent && !isIE) {
    //Firefox for Android, Chrome for Android, Android 4.x default browser, Opera, Firefox OS, iOS
    return;
  }

  function CustomEvent(eventName, params) {
    params = params || { bubbles: false, cancelable: false, detail: undefined };

      var evt = document.createEvent('Event'),
      evt.initEvent(eventName, true, true)
    return evt;
  };

  //Older Androids don't have the CustomEvent object, so we only want the prototype for IE.
  if (window.CustomEvent) {
    CustomEvent.prototype = window.CustomEvent.prototype;
  }

  window.CustomEvent = CustomEvent;
})();
With this in place we can now create our custom gesture using custom events.
A gesture is usually going to be based on activity related to at least one event and have logic around screen positioning and time. In our example, we are going to implement a gesture for swiping left or right on an element. Doing this well requires taking into account multiple events, position on screen and time, so it’s a good example.
We can consistently get the information from the browser across devices to infer gestures; but the gestures themselves do not come built into the browser, at least not in a cross-browser-friendly way. You may recall from our last chapter that touch events give us rotation and scale. We can also get rotation and scale from gesture events in Internet Explorer 10, but it also supplies tap, hold, and intertia start gestures, but these only work in IE 10 at the moment. So to get cross-platform gestures, we have to create them.
I will call this “LazySwipe” because it waits until after the swipe is complete to fire the event. I am going to create this as a function that I can instantiate that will take the element to add the custom gesture to. The shell of it all would look like this. You can see that I’ve already created my custom events.
window.LazySwipe = (function () {
  function swipe(element) {

    this.element = element; //This is the element all of the gestures will be attached to.
    this.swipeLeftEvent = new CustomEvent('swipeleft'),
    this.swipeRightEvent = new CustomEvent('swiperight'),
  };
  return swipe;
})();
The first thing I want to do is attach all the event handlers I want to pay attention to. Since we’ll create this to work on desktop and mobile, we’ll handle touch, mouse, and pointer events. Here is my new constructor.
function swipe(element) {

  this.element = element;
  var self = this;

  //These events for firefox and webkit-based browsers
  element.addEventListener('touchstart', function (evt) { self.start.call(self, evt); });
  element.addEventListener('touchmove', function (evt) { self.move.call(self, evt); });
  element.addEventListener('touchend', function (evt) { self.end.call(self, evt); });

  //If we want to support pointer events, we need to make sure mouse events are disabled. See
  //  Chapter 10 on why this is required.
  if (window.navigator.msPointerEnabled) {
    element.addEventListener('MSPointerDown', function (evt) { self.start.call(self, evt); });
    element.addEventListener('MSPointerMove', function (evt) { self.move.call(self, evt); });
    element.addEventListener('MSPointerUp', function (evt) { self.end.call(self, evt); });
  }
  else {
    //These events for all browsers that support mouse events
    element.addEventListener('mousedown', function (evt) { self.start.call(self, evt); });
    element.addEventListener('mousemove', function (evt) { self.move.call(self, evt); });
    element.addEventListener('mouseup', function (evt) { self.end.call(self, evt); });
  }

  this.swipeLeftEvent = new CustomEvent('swipeleft'),
  this.swipeRightEvent = new CustomEvent('swiperight'),
};
There are a few things to note about this. First, I’m mapping all of the various “start” events (touchstart, mousedown, and MSPointerDown) to a generic start method so I can treat them in a unified manner. I’m doing the same for both the move and end events as well. Second, because of context switching in JavaScript caused by event handlers, I’m forcing the context to always be that of the function instance by using the JavaScript call method on the functions to force the context. If you are used to using jQuery, this is something you would use the proxy method for. For more information about the call method and its kin, apply, see this excellent blog post by K. Scott Allen: http://odetocode.com/blogs/scott/archive/2007/07/05/function-apply-and-function-call-in-javascript.aspx. Next we need to create our start, move and end functions.
swipe.prototype.start = function (evt) {
  evt.preventDefault();
  //We need to know where we started from later to make decisions on the nature of the event.
  this.initialLocation = this.getPositionFromTarget(evt)
}

swipe.prototype.move = function (evt) {
  //Do nothing yet
}

swipe.prototype.end = function (evt) {
  var currentLocation = this.getPosition(evt, this.element);

  //If you end to the right of where you started, you swipe right.
  if (currentLocation.x > this.initialLocation.x) {
    this.element.dispatchEvent(this.swipeRightEvent, evt);
  } //If you end to the left of where you started, you swipe left.
  else if (currentLocation.x < this.initialLocation.x) {
    this.element.dispatchEvent(this.swipeLeftEvent, evt);
  }
}

swipe.prototype.getPosition = function(evt) {

  var pageX, pageY;
  if (evt.touches) { //If this is a touch event
    pageX = evt.changedTouches[0].pageX;
    pageY = evt.changedTouches[0].pageY;
  }
  else { //If this is a mouse or pointer event
    pageX = evt.pageX;
    pageY = evt.pageY;
  }

  return {
    y: pageY,
    x: pageX
  };
}
For a swipe gesture, we need to know where we started, because it’s from that point that we’ll determine if we are moving left or right, so we capture that when the start event occurs. At the end we need to check the final location to see if we’ve gone left or right. If we went left, we dispatch the swipeleft event. If we went right, we dispatch the swiperight event. I also provided a function for determining location. How you determine location is different depending on whether it is a touch, mouse, or pointer event, so we abstract that into this getPosition method.
We now have a basic swipe gesture in less than 80 lines of JavaScript, but it’s far from perfect. Let’s fix a few of the flaws. Right now it would detect a swipe left if the user ended one pixel to the left of his or her start location. This is hardly a swipe. So we’ll add a minimum required distance. Here is our new end method.
swipe.prototype.end = function (evt) {
  evt.target.innerHTML = 'end';

  var currentLocation = this.getPosition(evt, this.element);
  var delta = Math.abs(currentLocation.x - this.initialLocation.x);
  if (delta < 80)
    return;

  //If you end to the right of where you started, you swipe right.
  if (currentLocation.x > this.initialLocation.x) {
    this.element.dispatchEvent(this.swipeRightEvent, evt);
  } //If you end to the left of where you started, you swipe left.
  else if (currentLocation.x < this.initialLocation.x) {
    this.element.dispatchEvent(this.swipeLeftEvent, evt);
  }
}
Now we only fire the event if the user moved their finger over 80 pixels. Of course the minimum delta could be tweaked. Another thing to watch is their vertical movement. A swipe would only be triggered if a minimal amount of vertical space was traversed. How would we do that? Here is one way.
swipe.prototype.start = function (evt) {
  evt.preventDefault();
  //We need to know where we started from later to make decisions on the nature of the event.
  this.initialLocation = this.getPosition(evt)
  this.inProgress = true;
}

swipe.prototype.move = function (evt) {
  var currentLocation = this.getPosition(evt, this.element);
  var verticalDelta = Math.abs(currentLocation.y - this.initialLocation.y);
  if (verticalDelta > 50) {
    this.inProgress = false;
  }
}

swipe.prototype.end = function (evt) {
  if (!this.inProgress)
    return;

  //...the rest of the method
}
Before we mentioned that you will often have to handle multiple events (we are doing that already) as well as pay attention to position (we are also doing that). We are not paying any attention to time. Let’s say we only want our swipe gesture to fire if the user is moving his or her finger quick enough. We could do this:
swipe.prototype.start = function (evt) {
  evt.preventDefault();
  //We need to know where we started from later to make decisions on the nature of the event.
  this.initialLocation = this.getPosition(evt)
  this.inProgress = true;
  this.startTime = new Date();
}

swipe.prototype.end = function (evt) {
  evt.target.innerHTML = 'end';

  var timeDelta = new Date() - this.startTime;
  if (timeDelta > 700) //milliseconds
    return;

  if (!this.inProgress)
    return;

  //...the rest of the method
}
We now have a pretty reasonable swipe gesture that we can attach like this.
<style>
#swipeable {
  -ms-touch-action: none;
}
</style>

<div id="swipeable">
  Swipe This
</div>

<script>
window.addEventListener('load', load);

var swipeable;

function load() {
  swipeable = document.getElementById('swipeable'),

  new LazySwipe(swipeable);

  swipeable.addEventListener('swipeleft', left);
  swipeable.addEventListener('swiperight', right);
}

function left() {
  swipeable.innerHTML = 'left you have swiped';
}

function right() {
  swipeable.innerHTML = 'right you have swiped';
}
</script>
Now we need to put it to good use.
Making a Swipeable Image Widget
Let’s make a swipeable image widget. We want it to look like Figure 11-1 left image when the page loads and the right image after the user swipes.
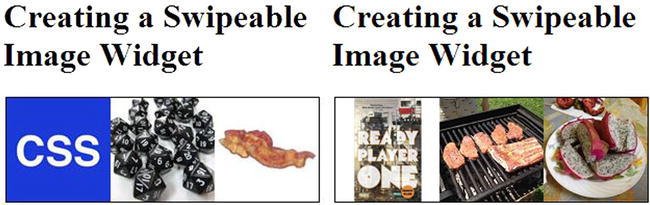
Figure 11-1. An image widget that you can swipe!
Let’s say we start with this bit of markup:
<div id="carousel">
  <div id="image-container">
    <img class="carousel-item" src="/content/images/css_100.jpg" />
    <img class="carousel-item" src="/content/images/dice_100.jpg" />
    <img class="carousel-item" src="/content/images/bacon_100.jpg" />
    <img class="carousel-item" src="/content/images/ready_100.jpg" />
    <img class="carousel-item" src="/content/images/meat_100.jpg" />
    <img class="carousel-item" src="/content/images/dragonfruit_100.jpg" />
  </div>
</div>
The styling we need to get this right looks like the following:
/* This is the outer container of the widget. Note especially overflow and width values. */
#carousel {
  border: solid 1px #000;
  height: 100px;
  margin: 0 auto;
  overflow: hidden;
  width: 300px;
  -ms-touch-action: none;
}

/* This container is the full width of the images and moves left and right to give us the sliding affect.
    The images are each 100 pixels in width a piece for a total of 600 pixels. Note the transition here. */
#image-container {
  width: 600px;

  -moz-transition: all .4s;
  -webkit-transition: all .4s;
  -o-transition: all .4s;
  transition: all .4s;
}

/* This makes the images stack up to the right of each other */
#carousel img {
  display: block;
  float: left;
}
To shift the images to the left when we swipe, all we need to do is apply the following CSS class to the image container. And since we have a transition set on the container, the browser will animate the movement.
.left {
  -moz-transform: translate3d(-300px, 0, 0);
  -ms-transform: translate3d(-300px, 0, 0);
  -o-transform: translate3d(-300px, 0, 0);
  -webkit-transform: translate3d(-300px, 0, 0);
  transform: translate3d(-300px, 0, 0);
}
Back in Chapter 9 (“Native APIs, HTML5 and CSS 3 on Mobile Today”) I discussed a few CSS transformations, including the CSS transform: translate property. The transform: translate3d is the 3d version of this same CSS property, allowing you to translate an element along the z-axis along with the x and y axis. It may seem like an odd choice here but translate3d is definitely the right CSS to use in this case. Though you could use absolute positioning to move the image container or CSS transform: translateX to do so, neither are likely to use the GPU. But in most cases transform3d will involve the GPU and give you faster animations, even if you aren’t using the z-axis.
Now comes the JavaScript. It looks almost exactly like the script we were using to test the initial swipe implementation. The differences are highlighted.
<script>
window.addEventListener('load', load);

var carousel, imageContainer;

function load() {
  carousel= document.getElementById('carousel');
  imageContainer = document.getElementById('image-container'),

  var gesture = new LazySwipe(carousel);

  carousel.addEventListener('swipeleft', left);
  carousel.addEventListener('swiperight', right);
}

function left() {
  imageContainer.className = 'left';
}

function right() {
  imageContainer.className = '';
}
</script>
And that’s all that’s required to create a swipeable image widget. Once you abstract the swiping into a reusable bit of JavaScript, the implementation is fairly trivial. In a real-world scenario this might be a bit more complicated. Perhaps you want potentially unlimited groups of three pictures to show. In those cases you may find it easier to dynamically generate the CSS. But the difficult touch problems are solved.
Scaling, Rotating and Moving Things
The last sample of this chapter will show us how to do a number of things, including implementing scaling, rotation, and movement of an element on the page. For a visual, we’re going to build what you see in Figure 11-2. The image on the left is the image unchanged, on the right the image has been moved, rotated and zoomed.
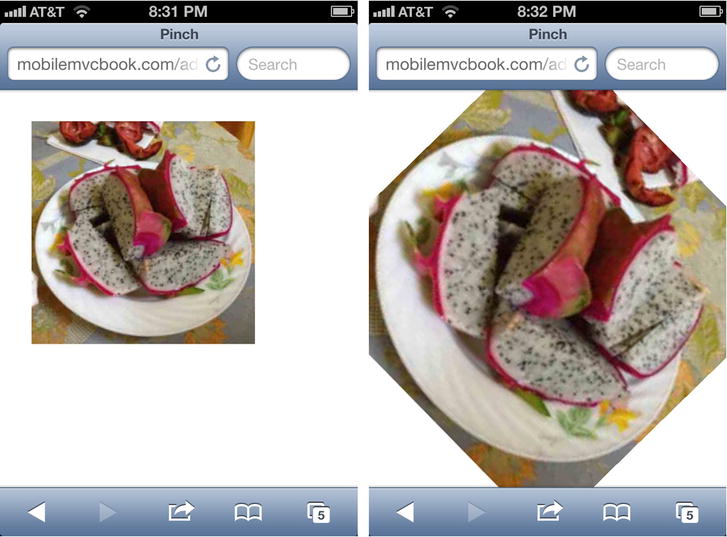
Figure 11-2. A picture we can move, pinch, zoom or rotate
The need to do these things is a very practical need for some appplications; but just as important, this is going to require us to face some of the trickier issues in touch programming. First, we’re going to have to normalize the various touch-event models. iOS’s touch events mostly work like those in Firefox, Opera, and Chrome but with subtle but important differences. On top of that is the very different model of touch programming that Internet Explorer 10 gives us. Making these work together elegantly can be a challenge. Second, we are now dealing with multi-touch. Our examples so far have been single-touch only. This will use single-touch for moving a photo, but two touches will be required to scale or rotate. All this will be difficult; but if you break it down right and take it a piece at a time, you should have a better understanding of how to create more advanced touch experiences.
Because this requires multi-touch capabilities, the browsers you can target with this is more limited than before. First of all, all desktop browsers that aren’t multi-touch capable and/or aren’t being used on a touch-capable monitor are crippled and can’t do any of the pinching, zooming, or rotating without making serious accommodations that won’t be made here. Second, phones that only support single-touches in their browsers are also out. This means Android 2.x will not run this sample. As for what we can target, note the following: Android 4.x (default browser, Chrome, Firefox, Opera), iOS 4+, Firefox OS, Blackberry 10, Windows Phone 8 and Internet Explorer 10 on a Surface device, or similar touch-capable hardware.
Let’s start by creating the basic shell. We will use a lot of the same patterns as we did in the last sample, so you will recognize some of this. We will call this function “Pincher”.
window.Pincher = (function () {

  var pincher = function (element) {
    this.element = element;

    //This is where we will store info about all of the active touches
    this.touchInfo = {
      touchLookup: {},
      touchArray: []
    };

    this.mode = 'none'; //move, resize are other modes
    var self = this;

    this.element.addEventListener('touchstart', function (evt) { self.start.call(self, evt) });
    this.element.addEventListener('touchmove', function (evt) { self.change.call(self, evt) });
    this.element.addEventListener('touchend', function (evt) { self.end.call(self, evt) });

    this.element.addEventListener('MSPointerDown', function (evt) { self.start.call(self, evt) });
    this.element.addEventListener('MSPointerMove', function (evt) { self.change.call(self, evt) });
    this.element.addEventListener('MSPointerUp', function (evt) { self.end.call(self, evt) });
  }

  return pincher;
})();
Here we have a function that takes the element that we will attach the behavior to. We wire up our event listeners as well (though no mouse this time). This is very similar to the previous sample. The differences include the mode and the touchInfo object. The mode signifies the mode of action the code is in, which is either “none” (no touches are ”active”), “move” (one finger is touching) or “resize” (more than one finger is touching, and encompasses rotate as well as resizing). The touchInfo object is explained in the next section.
The DOM for the page and for hooking this all up is fairly concise. Also, given how we are going to construct this, you can have multiple elements on the page that you can manipulate: all you have to do is instantiate new instances of Pincher.
<head>
  <meta name="viewport" content="width=device-width, initial-scale=1.0, maximum-scale=1.0, user-scalable=0" />
  <title>Pinch</title>

  <style>
    #the-picture {
      height: 200px;
      margin: 20px 0 0 20px;
      width: 200px;
      position: absolute;
      -ms-touch-action: none;
    }
  </style>
</head>
<body>
  <img src="∼/content/images/dragonfruit_500.jpg" id="the-picture" />

  <script src="/content/advancedtouchprogramming/pincher.js"></script>
  <script>
    window.addEventListener('load', load);

    function load() {
      var picture = document.getElementById('the-picture'),

      var pincher = new window.Pincher(picture);
    }
  </script>
</body>
The touchInfo object is for holding our touch information. Since we have different touch models working in the same code, we could either have code for handling the different models scattered throughout the file, as we had to handle the differences. Or we can normalize the behavior and have all the interesting code (that around scaling, moving, and rotating) all working off a single model. The latter approach makes it all so much easier, so that’s what we’ll do.
Our approach is to take that bit of code and create a custom model of the touches. Let’s look at it again.
this.touchInfo = {
  touchLookup: {},
  touchArray: []
};
We will be managing either one or two touches but no more. In a sample where you are rotating or scaling an image, more than two touches makes no sense. To manage these touches, I’m putting them into both into an object for key-based lookups (all the touch implementations have identifiers for touches we can use) and into the array to remember the order the events happened (the first touch happened first, the second happened second).
We have three points at which we need to normalize the behavior, at the start of a touch, when the touch changes and when the touch ends. You saw above how we hooked up the code. Let’s look at these methods in turn.
pincher.prototype.start = function (evt) {
  evt.preventDefault(); //prevent scrolling
  this.registerTouch(evt);
  this.setMode();
}
This is the method that fires on touchstart and MSPointerDown. We call preventDefault as we normally do to prevent page scrolling. We will examine the setMode function in the next section. The registerTouch method is very important at this point and looks like this.
pincher.prototype.registerTouch = function (evt) {
  //It is in this method that we normalize the touch model between the different implementations

  if (evt.touches) { //touch events
    //find all the touches in the touch array that haven't been registered and do so.
    for (var i = 0; i < evt.touches.length; i++) {
      var evtTouch = evt.touches[i];

      if (!this.touchInfo.touchLookup[evtTouch.identifier]) {
        //Instead of storing the actual touch object, we just store what we need. The actual object
        //  isn't persisted in non-iOS webkit so this normalizes more with that pattern.
        var touch = {
          identifier: evtTouch.identifier,
          pageX: evtTouch.pageX,
          pageY: evtTouch.pageY
        };

        this.addTouchToLookup(touch);      }
    }
  }
  else { //pointer events
    //pointer events are normally collected in a group but we need to do that so we know how many touches
    //  there are.
    var touch = {
      pageX: evt.pageX,
      pageY: evt.pageY,
      identifier: evt.pointerId
    };
    this.addTouchToLookup(touch);  }
}

pincher.prototype.addTouchToLookup = function (touch) {
  this.touchInfo.touchArray.push(touch);
  this.touchInfo.touchLookup[touch.identifier] = touch;
  touch.indexInArray = this.touchInfo.touchArray.length - 1;
}
The first half of the method normalizes touch events into our custom touch model. As we discussed in the last chapter, touch objects are stored in arrays on the event object. The two arrays we’ll use are the touches array and the changedTouches array. When a touch first appears it will be in the touches array, so we use that one in this method. The normalization process takes the touches out of the array; and if the touch doesn’t yet exist, we create our custom object and add it to our touch model. In a multi-touch scenario, the first touch will fire and we’ll add that to our touch model. When the second touch fires the touch start event, both touches will be in the array, and we need to find only the new one and create a custom touch model for that particular one. This is why we loop through the touches collection looking to see if any touches are not yet registered, which we do on line 8 of the sample above.
Before we move on to the next section, I should point out how you can avoid one other problem you could potentially run into when creating something like this. When a touch event fires, that touch object in the array is given an identifier, which implies that it’s more than just a bundle of data. It’s an object representing that touch. Question: once you move that touch and the move event fires, is the touch object you used in the touch start the same object? Answer: it depends. On iOS, it’s the same object. So for iOS, we could have just put the touch object in our touchInfo object and used it later because it’s properties (like pageX and pageY) would get changed as the touch moved. But on Android it isn’t the same object. It’s a new object with the same pointer ID as the object in the touch start event. So if you need to know where this point is as it moves, you need to handle this difference. We do that by looking up the custom touch event object and updating it. More on that just below.
The second half normalizes the pointer event model that Internet Explorer 10 uses. In that model each touch is entirely independent. So we will be gathering up the touches to coordinate them, normalizing the pointer event model more toward the touchevent model. Because the touch model for touch events doesn’t distinguish in the event object which of the touches in the touches array is actually the one started with that event, it’s actually easier to normalize the pointer event model to our new structure than the touch event model.
So that was normalizing at the point of touchstart and MSPointerDown. Now we normalize at the point of touchmove and MSPointerMove. This is the function called:
pincher.prototype.change = function (evt) {
  this.updateTouchEvent(evt);

  if (this.mode === 'move') {
    this.move(evt);
  }
  else if (this.mode === 'resize') {
    this.resize(evt);
  }
}
Right now all we are concerned with is the call to the updateTouchEvent method. The others we will deal with in the next section. The updateTouchEvent function finds the custom touch object we need and updates the position.
pincher.prototype.updateTouchEvent = function (evt) {
  var touch, i = 0;

  if (evt.touches) {
    for (i; i < evt.changedTouches.length; i++) {
      touch = evt.changedTouches[i];
      this.touchInfo.touchLookup[touch.identifier].pageX = touch.pageX;
      this.touchInfo.touchLookup[touch.identifier].pageY = touch.pageY;
    }
  }
  else {
    touch = this.touchInfo.touchLookup[evt.pointerId];
    touch.pageX = evt.pageX;
    touch.pageY = evt.pageY;
  }
}
Once again, you have to handle both event models. The identifier for pointer events is “pointerId”, so you can use that to find the pointer event. The identifier for touch events is “identifier”, so you use that one to look up the custom touch object needed. Because we are dealing only with changed touches, you can look in the changedTouches array for touch events and just update for those.
When a touch ends, we have to do our final normalization. The touch end function looks like so:
pincher.prototype.end = function (evt) {
  this.removeDeadTouches(evt);

  this.setMode();

  //If one of the two touches has ended, need to prep for the next time two touch and can resize and rotate.
  if (this.touchInfo.touchArray.length < 2) {
    this.originalDistanceBetweenTouchPoints = null;
    this.currentTransformValue = this.activeTransformValue;
  }
}
The bit we are most concerned with at this point is the call to removeDeadTouches, which is where we normalize these ended touches.
pincher.prototype.removeDeadTouches = function (evt) {

  if (evt.touches) { //touch events
    //for touch events it's hard to tell which touch ended, so we'll just remove ones from our state that
    //  are no longer in the touches array.
    var ids = '', i = 0;
    for (i; i < evt.touches.length; i++) {
      var touch = evt.touches[i];
      if (ids.length > 0)
        ids += '|';
      ids += touch.identifier;
    }

    for (var key in this.touchInfo.touchLookup) {
      if (ids.indexOf(key) === -1) { //need to remove the touch
        this.touchInfo.touchArray.splice(this.touchInfo.touchLookup[key].indexInArray);
        delete this.touchInfo.touchLookup[key];
      }
    }
  }
  else { //mouse and pointer events
    var touch = this.touchInfo.touchLookup[evt.pointerId];
    this.touchInfo.touchArray.splice(touch.indexInArray);
    delete this.touchInfo.touchLookup[touch.identifier];
  }
}
Once again, the function has two parts. The first part removes the completed touch event objects from the custom touch model. Since there is no obvious way to tell which touch actually ended with the firing of the event, we look through all of them and remove all that are no longer present.
The pointer events are a little easier to deal with yet once again. Because the touch that ended is passed with the event object, we can easily find the one to remove and do so.
At this point all the normalization logic is done. Now all touch work can be done in a browser-independent way. It wasn’t simple but it will make the rest of the code much more straightforward.
Now to the actual business of manipulating the image. We will start with moving because it is the easiest action to understand. The DOM manipulation is always in one of two modes, move or resize. Move mode involves one touch point, resize involves two. The setMode method, which is called any time a touchstart/MSPointerDown event fires or a touchend/MSPointerUp event fires, sets the mode. The method looks at our normalized touch model to determine how many touches are active.
pincher.prototype.setMode = function () {
  // we need to reset this so on the the next move can have an starting offset.
  this.startingOffset = null;

  if (this.touchInfo.touchArray.length === 1)
    this.mode = 'move';
  else if (this.touchInfo.touchArray.length === 2)
    this.mode = 'resize';
  else
    this.mode = 'none';
}
When a change event (touchmove or MSPointerMove) fires, we look at the mode and decide what to do.
pincher.prototype.change = function (evt) {
  this.updateTouchEvent(evt);

  if (this.mode === 'move') {
    this.move(evt);
  }
  else if (this.mode === 'resize') {
    this.resize(evt);
  }
}
Of course in this case we want to move.
pincher.prototype.move = function (evt) {
  if (!this.startingOffset)
    this.startingOffset = this.getPosition(evt);

  //move already assumes a single touch, so the zero-based indexing works.
  this.element.style.left = (this.touchInfo.touchArray[0].pageX - this.startingOffset.x) + 'px';
  this.element.style.top = (this.touchInfo.touchArray[0].pageY - this.startingOffset.y) + 'px';
}
The first thing we need to do is determine where in the element we are touching so we can subtract that offset from the final. Otherwise the element will visually jump the distance of that offset on the page. We get our position with this function.
pincher.prototype.getPosition = function (evt) {
  var pageX = this.touchInfo.touchArray[0].pageX;
  var pageY = this.touchInfo.touchArray[0].pageY;

  //This will get us the x/y position within the element.
  return {
    y: pageY - this.element.offsetTop,
    x: pageX - this.element.offsetLeft
  };
}
As the touch moves, the pageX and pageY values change, moving the element with the touch point. Move is now complete.
When we are in resize mode, we need to start either resizing or rotating (or both). Let’s start with resizing. It starts with the change method.
pincher.prototype.change = function (evt) {
  this.updateTouchEvent(evt);

  if (this.mode === 'move') {
    this.move(evt);
  }
  else if (this.mode === 'resize') {
    this.resize(evt);
  }
}
Both resizing and rotation have to set a starting state before performing their respective actions. The actions are cumulative, so the starting place is necessary. This means the resizing method is broken into two pieces, which call two different methods.
pincher.prototype.resize = function (evt) {
  if (!this.startingPointSet) {
    this.beginTransform(); //set our beginning state so we can begin
  }
  else {
    this.continueTransform(); //apply next change
  }
}
Resizing requires that we collect the distance between the initial touch points. As the distance increases, we make the image larger. As the distance decreases, we shrink it. But it starts with determining the original value.
pincher.prototype.beginTransform = function () {

  //setup initial values for resize
  var firstLength = Math.abs(this.touchInfo.touchArray[0].pageX - this.touchInfo.touchArray[1].pageX);
  var secondLength = Math.abs(this.touchInfo.touchArray[0].pageY - this.touchInfo.touchArray[1].pageY);

  this.originalDistanceBetweenTouchPoints = Math.sqrt((firstLength * firstLength) + (secondLength * secondLength));

  //setup initial values for rotation
  //...

  this.startingPointSet = true;
}
Now that we have the original value, on subsequent moves we can use that to determine the new size. Here is that code.
pincher.prototype.continueTransform = function () {
  //calc rotation change
  //...

  //calc size transform
  var firstLength = Math.abs(this.touchInfo.touchArray[0].pageX - this.touchInfo.touchArray[1].pageX);
  var secondLength = Math.abs(this.touchInfo.touchArray[0].pageY - this.touchInfo.touchArray[1].pageY);

  var newDistance = Math.sqrt((firstLength * firstLength) + (secondLength * secondLength));
  this.activeTransformValue = newDistance / this.originalDistanceBetweenTouchPoints;

  //A new currentTransformValue will be set when the transform ends.
  if (this.currentTransformValue) {
    this.activeTransformValue = this.currentTransformValue * this.activeTransformValue;
  }

  //apply to element style
  this.element.style.webkitTransform = 'scale(' + this.activeTransformValue + ')';
  this.element.style.transform = 'scale(' + this.activeTransformValue + ')';
}
The size calculations should be relatively straightforward; but there are two things to note. First, we are using CSS transforms to change the size of the element. We could just change the height and width of the element, but we can’t do that with rotating, so I’ll use the transform for both to keep it consistent.
Second, once you resize, the next time you resize you need to start with the original size. We save that in the currentTransformValue variable. You won’t know to save that value until the touch event ends. This happens in the end function, which you’ve already seen.
pincher.prototype.end = function (evt) {
  this.removeDeadTouches(evt);

  this.setMode();

  //If one of the two touches has ended, need to prep for the next time two touch and can resize and rotate.
  if (this.touchInfo.touchArray.length < 2) {
    this.startingPointSet = false;
    this.originalDistanceBetweenTouchPoints = null;
    this.currentTransformValue = this.activeTransformValue;
  }
}
And at this point our resizing code is complete.
Now on to rotation. We need to return to our beginTransform method but focus on the rotation aspect. We need to get our initial angle, because we’ll use that when we execute our next move.
pincher.prototype.beginTransform = function () {

  //setup initial values for resize
  //...

  //setup initial values for rotation
  this.startPoint0 = { x: this.touchInfo.touchArray[0].pageX, y: this.touchInfo.touchArray[0].pageY };
  this.startPoint1 = { x: this.touchInfo.touchArray[1].pageX, y: this.touchInfo.touchArray[1].pageY };

  var xDelta = this.startPoint1.x - this.startPoint0.x;
  var yDelta = this.startPoint1.y - this.startPoint0.y;

  this.initialAngle = Math.atan2(xDelta, yDelta);

  this.startingPointSet = true;
}
So on each move re-calculate the angle and rotate the element accordingly.
pincher.prototype.continueTransform = function () {
  //calc rotation change
  var touch0 = this.touchInfo.touchArray[0];
  var touch1 = this.touchInfo.touchArray[1];

  var xDelta = touch1.pageX - touch0.pageX;
  var yDelta = touch1.pageY - touch0.pageY;

  var newAngle = Math.atan2(xDelta, yDelta);

  var rotationAmount = this.initialAngle - newAngle;

  //calc size transform
  //...

  //apply to element style
  this.element.style.webkitTransform = 'scale(' + this.activeTransformValue + ')';
  this.element.style.transform = 'scale(' + this.activeTransformValue + ')';

  this.element.style.webkitTransform += ' rotate(' + rotationAmount + 'rad)';
  this.element.style.transform += ' rotate(' + rotationAmount + 'rad)';
}
For those unfamiliar with the Math.atan2 method, it calculates the angle between the x-axis and the given coordinate. For more information, I recommend the excellent article on the function on Wikipedia [http://en.wikipedia.org/wiki/Atan2].
To accomplish the rotation, we are once again using transforms. The transform CSS property takes multiple transforms, so we are always applying scale and rotation styles, even if nothing changed.
Summary
If you follow the right techniques, you can create some nice, re-usable code for gestures and touch manipulations, despite the very different browser touch implementations. Doing complex touch interactions can get, well, complex, but if you work at it you can come up with some easy abstractions. Some of you might be thinking this is too complex and that you should use a library to make this easier. In some cases I agree; and in the next chapter I will discuss a couple of touch libraries I have found to be very useful. But this chapter and the previous one were about teaching the core principles, the things you need to know if the libraries don’t give you what you need or if they have a bug you need to fix. Hopefully, these chapters will inspire you to put a little touch code in your next mobile project.