
![]()
Querying Your Data
Along with tables and screens, queries play an important role in LightSwitch application design. They allow you filter records, display a subset of records, build search screens, and to show other significant pieces of information.
In this chapter, you’ll learn how to
- Filter and sort data by using the graphical designer
- Write server-side and client-side queries using .NET and LINQ code
- Create global filter values that you can reuse in multiple queries
LightSwitch provides a designer that allows you to build a query graphically. If the graphical designer isn’t able to produce your desired output, you can apply filters in code. This allows you to use LINQ and the many methods in the .NET Framework to customize your query output.
The four main query types are default queries, user-defined data service queries (queries that you define in the graphical designer), screen queries, and code-based queries. This chapter covers all of these query types.
The HelpDesk application includes an Engineer Dashboard screen, and you’ll find out how to write code queries to support the retrieval of statistical information. This includes whether the engineer has outstanding high-priority issues, and whether or not all issues that have been open more than seven days are closed.
You’ll learn how to apply filter operations that are not supported by the graphical designer. For example, you’ll find out how to create a query that returns all issue records that don’t have related issue-response records. (This is an example of a Not Exists type of query.) You’ll also learn how to filter issues by the month and year they were created (an example of filtering by date parts).
Introduction to Data Retrieval
I’ll begin by reminding you how the data-retrieval process works. Every data source in your application has a corresponding data service that runs on the server. When you define a query by using the graphical designer, LightSwitch creates a query operation on the data service. It exposes this query operation as an OData service endpoint.
When a user wants to retrieve some data, your LightSwitch client calls the query operation method via an OData call. If you’ve defined parameters on your query, the client will supply the necessary arguments. When the server completes the query, the query operation will return either a single entity or multiple entities to the client.
LightSwitch Queries Always Return Entities
Because query operations return entities from an entity set, the shape of the query results cannot be modified. For example, a query could return a single engineer or a collection of engineers. Alternatively, it could return a single issue or a collection of issues. However, a query can’t return just the first name from a set of engineers, nor can it return some sort of combined object that’s created by joining engineers and issues. Equally, you can’t perform a union on data from two different tables and return a combined data set. LightSwitch’s data service isn’t capable of returning non-entity data from a query. And even if it could, you wouldn’t be able to consume this data from a screen, anyway. You’ll remember that the ‘Add New Screen’ dialog only allows you to set the underlying data source of a screen to entities that you’ve defined in the table designer.
This behavior might seem strange, particularly for Access or SQL developers who are accustomed to selecting just the columns they need or returning results that are joined to other tables.
At this point, you may wonder how to retrieve additional data that isn’t part of the underlying data set. Provided that you’ve set up correct relationships between entities, you can retrieve related data by using the navigation properties that you’ve defined.
Once you start thinking in the LightSwitch way, you’ll soon realize that it isn’t necessary to return joined data from queries.
Understanding the Query Pipeline
When you call a query in LightSwitch, the server-side execution passes through the query pipeline. Just like the save pipeline (which was discussed in Chapter 4), the query pipeline consists of phases that include points where you can inject your own custom server-side code.
Figure 6-1 shows the phases in the query pipeline, and highlights the points where you can add custom code.
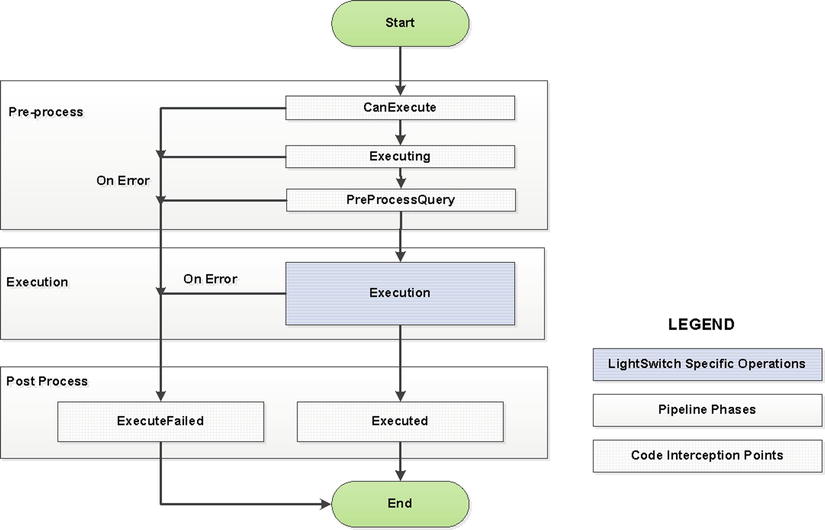
Figure 6-1. The query pipeline
At the start of the query pipeline, the CanExecute method allows you to carry out security checks and apply access control rules. You can find more details on writing authorization code in Chapter 17.
You’ll most likely spend much of your time writing code in the PreProcessQuery method. This area allows you to customize your query by writing LINQ code, and you’ll see plenty of examples toward the end of this chapter.
During the Execution phase, LightSwitch transforms the query into one that the data provider understands. (Examples of data providers are the ADO.NET Entity Framework provider for SQL Server and the OData data provider for SharePoint.) During the Execution phase, LightSwitch also translates business types between their underlying storage type and business type representation.
If the query succeeds, the query pipeline executes the code in the Executed method. For example, you could write custom code here to audit the users who have read some data.
If the query fails, you can perform additional error handling by writing code in the ExecuteFailed method.
![]() Tip If your query fails to return data, handle the ExecuteFailed event and place a breakpoint in this method. This allows you see the details of the full exception by examining the queryDescriptor object.
Tip If your query fails to return data, handle the ExecuteFailed event and place a breakpoint in this method. This allows you see the details of the full exception by examining the queryDescriptor object.
Using LightSwitch’s Default Queries
LightSwitch automatically generates two queries, called All and Single, for each entity set in your application. Taking the engineers example, LightSwitch generates a query called Engineers_All that returns all engineers, and a query called Engineers_Single that returns a single engineer by ID value.
You can use these queries in several ways. If you create an editable grid screen and select Engineers from the Add New Screen dialog’s screen data drop-down list, LightSwitch uses the Engineers_All query as the data source. If you create a details screen for an engineer, LightSwitch uses the Engineers_Single query as the data source.
Another place where you’ll see default queries is if you add additional data items to a screen by opening the screen designer and clicking the Add Data Item button, as shown in Figure 6-2.
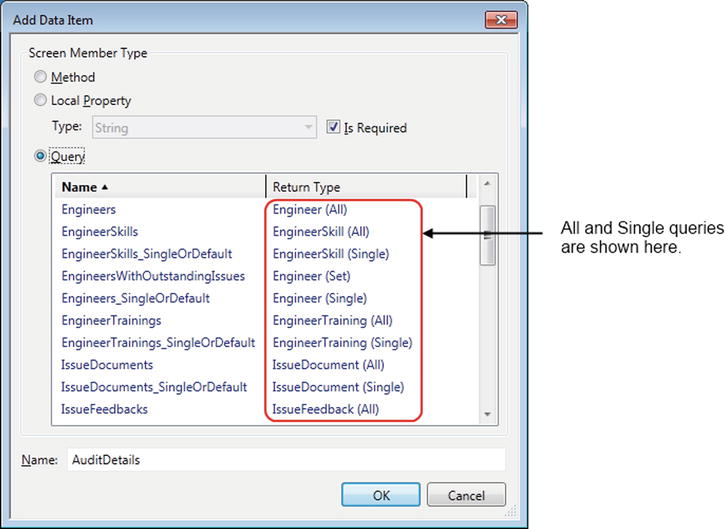
Figure 6-2. Adding default queries to your screen
An important concept is that queries that return collections are composable. This means that you can create queries based on other queries. Once you’ve created a query, you can right-click your query in Solution Explorer and create a query that’s based on the one that you’ve selected.
Another important point is that the _ALL query will always be the base query for any user query that you define. For example, if you create a query by right-clicking your Engineer table in Solution Explorer and choosing the Add Query menu item, LightSwitch bases your query on the Engineers_All query.
Filtering and Sorting Data
The graphical query designer allows you to sort and filter data in several different ways. For example, you can filter by hard coded values, other property values, or by global values. This section describes all of these options in further detail.
Creating Queries Based on Entities
To create a user-defined query, right-click a table in Solution Explorer and choose the Add Query menu option. Because queries are composable, you can extend existing queries by right-clicking and selecting the Add Query item for the query.
When you add a query, the properties sheet allows you to set various attributes. (See Figure 6-3.) Let’s take a look at some of these settings in more detail.
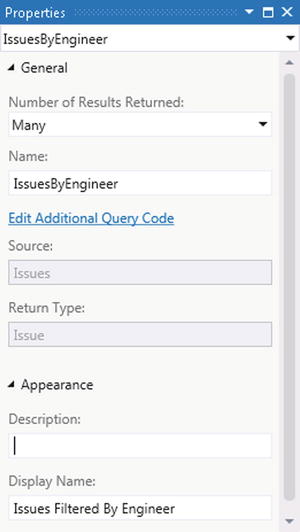
Figure 6-3. Query properties
- Name: The name uniquely identifies your query in Solution Explorer and appears in the screen data drop-down box in the Add New Screen dialog.
- Number Of Results Returned: This displays a drop-down box with the options One and Many.
- Description: You can use the Description text box to add a comment about your query at design time. The description text isn’t exposed elsewhere in LightSwitch during design time or runtime.
- Display Name: This allows you to specify a friendly name, which appears in the query source drop-down list in the screen designer (as shown in Figure 6-4).
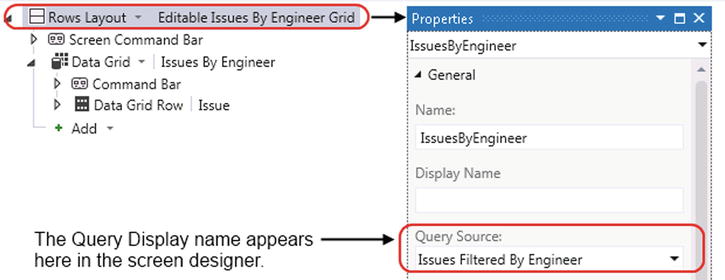
Figure 6-4. Query display name shown on a screen
By default, any new query that you create returns multiple records. This is controlled by the Number Of Results option.
Selecting the one option from this drop-down list defines the query as a singleton query. This is a query that returns a single record or is null. Singleton queries are not composable and can’t be further modified. If you designate a query as a singleton query and define a query that returns more than one record, LightSwitch will not generate a compile-time error. Instead, it throws an exception at run time when it executes the query.
The Number Of Results Returned option also specifies where LightSwitch shows your query in the Add New Screen dialog. You can use singleton queries to create New Data and Details screens. Queries that return multiple records allow you to create Editable Grid, List And Details, and Search Data screens.
Applying Filters
Once you create your query, you can use the graphical designer to filter your data. Figure 6-5 illustrates the controls that you can use to set up filters. LightSwitch applies the filters that you define here on the server, as part of the query pipeline.
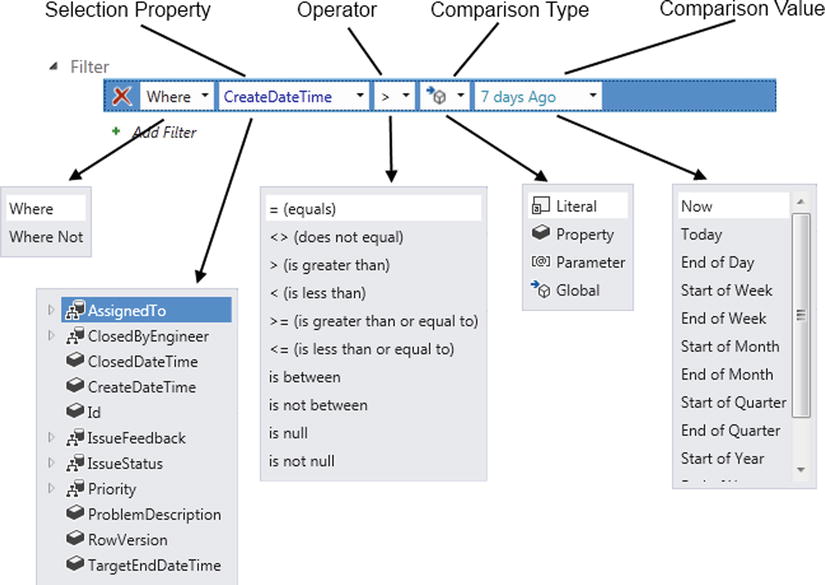
Figure 6-5. The parts that make up a filter
The operator drop down allows you to choose the operator that you want to apply. Some of these operators will depend on the data type of the selection property and whether the property is defined as a required property.
The comparison type drop down allows you to select from the options literal, property, parameter, or global.
The literal option allows you create a filter that uses a hard-coded value. For example, Figure 6-6 shows you how to create a query that returns issues with a status of Open. Because the status description is held in a separate table, this query shows how you can use the IssueStatus navigation property to filter by related parent records.
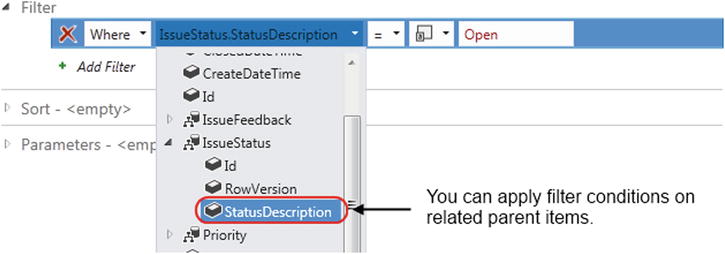
Figure 6-6. Filtering by parent items using literal values
Comparing Against Other Fields/Properties
The comparison type drop-down allows you create a filter that compares by property. This lets you compare two fields from the same record. After you choose the Property option, LightSwitch displays a second drop-down box that allows you to specify the comparison property.
Figure 6-7 shows a query that allows you to find issues that have overrun by returning issues where the close date exceeds the target end date.

Figure 6-7. Comparing against another property
Passing Arguments into a Query
Rather than using a hard-coded literal value, you can make queries more reusable by creating parameters. To create a parameter, choose the Parameter option from the comparison type drop-down list. After you select the parameter option, a second drop-down box appears that allows you to either create a new parameter or select an existing parameter (if one exists).
If you choose to create a new parameter, the parameter appears in the Parameter section in the lower part of the query designer.
You can make parameters optional by checking the Is Optional check box. If the user doesn’t set the value of an optional parameter at run time, LightSwitch won’t apply the filters that use the parameter. Optional parameters are ideal for creating search queries that filter on multiple fields. If the user doesn’t supply search criteria for any given field, LightSwitch simply omits the filter clause during execution.
![]() Note Refer to Chapter 7 to find out how to set parameter values on a screen, and how to display the data that the query returns.
Note Refer to Chapter 7 to find out how to set parameter values on a screen, and how to display the data that the query returns.
Filtering by Global Values
If you filter by the Date or DateTime property, you can choose to filter by a set of global values that LightSwitch provides. These include Today, Start Of Week, End Of Week, and several others. (See Figure 6-8.)
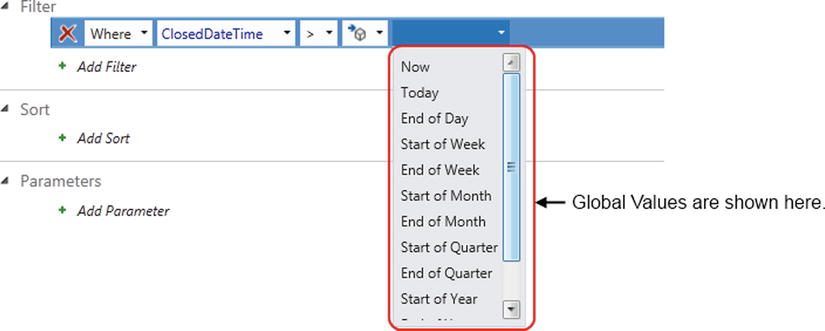
Figure 6-8. Global value options when filtering by Date/DateTime
If you filter on a DateTime property, take care when applying the equals operator with the Today global value. For example, the Issue table contains a field called ClosedDateTime. If you want to create a query that returns all queries that are closed today, the filter ClosedDateTime=Today won’t work.
This is because Today returns today’s date with a time of 12:00:00am. To apply the correct filter, you have to use the is between operator and filter the ClosedDateTime property between Today and End Of Day.
Therefore, the Start Of Day option is perhaps a better description for the value that’s returned by the Today global value.
EXERCISE 6.1 – CREATING QUERIES
To familiarize yourself with the query designer, create a query that’s based on the Issue table and name it IssueSearchAll. You’ll use this query in Chapter 7 to build a custom search screen.
Create a filter that matches the Issue Engineer’s Id against a new parameter called EngineerId. Select your EngineerId parameter, and use the Properties sheet to select the Is Optional check box.
Return to the Selection Property drop-down list, select the Engineer property, and take a look at the other properties that you can filter by. Does LightSwitch allow you to filter by computed properties, such as the Engineer Age property that you created in Chapter 2? Does LightSwitch allow you to filter against properties in the IssueResponse table? (There’s a one-to-many relationship between the Issue and IssueResponse table.) To complete your query, add additional parameters to optionally filter your results by IssueStatus.Id, Priority.Id, and ProblemDescription.
The graphical query designer allows you sort the output of your query by multiple properties. (See Figure 6-9.)
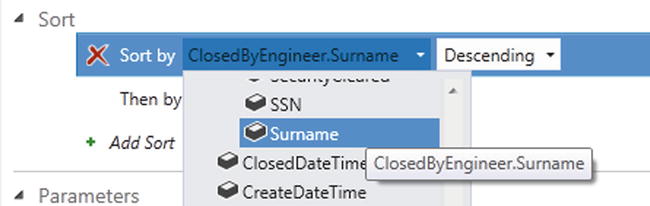
Figure 6-9. Sorting a query
The first drop-down list allows you to select a property. The second drop-down list allows you choose from the sort orders Ascending and Descending. After you specify a sort order, you can sort on additional properties by clicking on the Add Sort button.
A new feature in LightSwitch 2012 is the ability to sort queries by related parent properties. In Figure 6-9, notice how you can sort issues by the related engineer’s surname.
It isn’t possible to sort queries by related child records. For example, users and engineers can add multiple issue-response records to each issue. It isn’t possible to create a query on the issue table that sorts the output using the response date that’s held in the issue-response table. (This would allow you to return issues in the order that they’ve been most recently been worked on.) To perform this type of sort, you’ll need to extend your query by writing code in the PreprocessQuery method. You’ll see an example of how to do this later in this chapter.
Sorting Data Grids
When you display data on a grid, users can toggle the sort order by clicking on the column headings. The column header includes an arrow that indicates the sort order that’s currently in use (as shown in Figure 6-10).
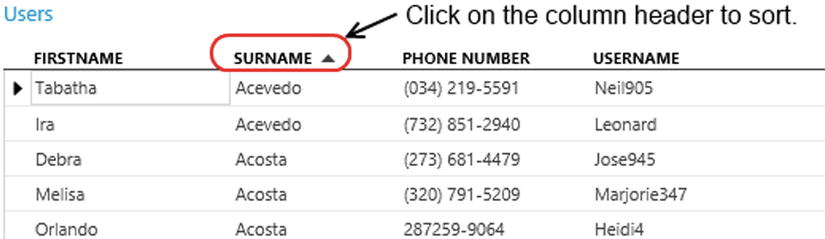
Figure 6-10. Sorting a query
LightSwitch retains the column header sort sequence between sessions, and it even restores the sort sequence after the user closes and reopens your application.
The problem with this behavior is that a user can’t clear the grid sort order and return to the initial sort sequence that you intended.
To give an example, let’s say you’ve created an Editable Engineer Grid screen that uses a query that sorts the data by surname followed by first name. If the user opens this screen and sorts the data by priority, there isn’t any way for the user to return to the initial sort sequence of surname followed by first name.
Therefore, if you create grid screens that use queries that are sorted by multiple properties, it makes sense to disable sorting to prevent this problem from occurring. To do this, uncheck the Support Sorting check box for your query in the screen designer.
Examining User Setting Files
To explain the grid sort behavior, LightSwitch retains the user settings for your application in the following path, which appears below your Documents folder (or My Documents on a Windows XP machine): MicrosoftLightSwitchSettings
In this folder, there’ll be a subfolder for every LightSwitch application that you’ve run on your computer. Inside each application folder, you’ll find a .SortSettings file for each screen in your application. (See Figure 6-11.) This is an XML file that contains the user sort orders for the screen. Users could manually clear their sort settings by deleting this file.
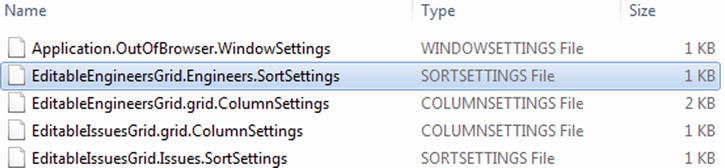
Figure 6-11. File listing of C:UsersTimDocumentsMicrosoftLightSwitchSettingsHelpDesk.1.0.0.0
In this folder, you’ll find various other files. If a user resizes the widths of the columns on a data grid, LightSwitch persists these settings between sessions in the .ColumnSettings file. LightSwitch uses the remaining files to retain the state of the application, navigation, and ribbon settings. To illustrate one of these XML files, Listing 6-1 shows you the contents of the Application.OutOfBrowser.WindowSettings file. LightSwitch uses the data in this file to reopen your application in the same screen position as your last session.
Listing 6-1. Contents of Application.OutOfBrowser.WindowSettings
<?xml version="1.0" encoding="utf-8"?>
<OutOfBrowserWindowSettings
  xmlns:xsi="http://www.w3.org/2001/XMLSchema-instance"
  xmlns:xsd="http://www.w3.org/2001/XMLSchema">
  <Top>10</Top>
  <Left>360</Left>
  <Width>1077</Width>
  <Height>604</Height>
  <WindowState>Normal</WindowState>
</OutOfBrowserWindowSettings>
Modifying Screen Queries
When you create a screen that’s based upon a collection of data (an editable grid screen or search screen, for example), you can define additional parameters, filtering, and ordering at the screen level.
To do this, click on the Edit Query link that appears next to your data collection. (See Figure 6-12.) This opens the graphical query designer and allows you to apply filter and sort conditions.
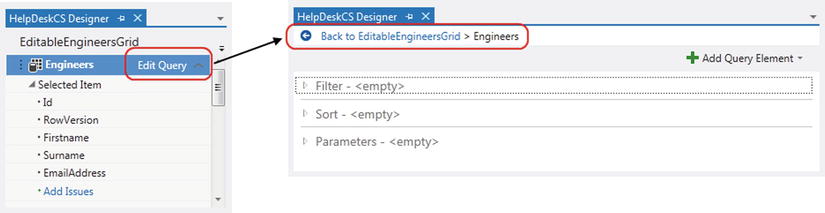
Figure 6-12. Editing a screen query
A disadvantage of this approach is that you can’t reuse your filter conditions on other screens. Also, you can’t further customize your query by writing code. However, the advantage of modifying the screen query is that it’s simple. It’s the perfect way to apply a different sort order for a collection of data that you want to show on a screen. By now, you’ll know that you can’t organize the queries and objects that LightSwitch shows in Solution Explorer into subfolders. So screen queries save you from cluttering up your view of Solution Explorer with lots of one-off queries.
You’re not just limited to modifying the main underlying query for a screen. In fact, if you add other collections of data to your screen by using the dialog that’s shown in Figure 6-2, LightSwitch gives you the option to edit the query for the data collection that you’ve added.
Writing Queries in Code
Although you can easily create queries in the graphical designer, LightSwitch allows you to create more powerful queries by writing custom code.
There are a couple of places where you can write custom query code. First, you can extend the queries that you’ve created in the graphical designer by applying extra filtering in code.
Second, you can query data entirely in code by using the data APIs that you saw in Chapter 4. To give you an illustration of what you can do, Figure 6-13 shows an Engineer Dashboard screen.
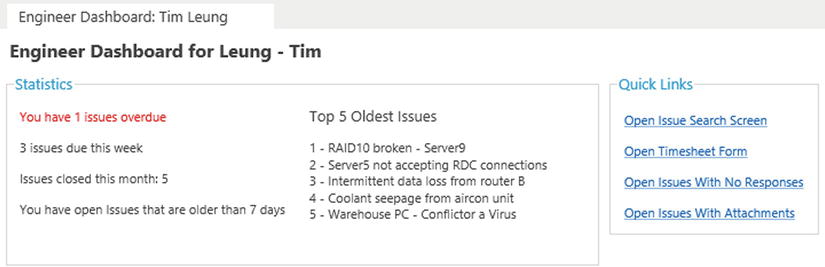
Figure 6-13. Engineer Dashboard page
The examples in this section will show you how to retrieve the statistical details that are shown on this screen. But before moving on further, let’s take a closer look at how LINQ works.
Understanding LINQ Syntax
LINQ is used throughout LightSwitch, so it’s important to understand how to construct a query with LINQ. Once you start learning LINQ, you’ll soon discover that you can express queries using two different types of syntax: Query Syntax and Method (or Lambda) Syntax.
You’ll commonly find Query Syntax in documentation, and it’s generally more readable. (It looks a bit like SQL.) You’ve already seen some examples of Query Syntax in this book. The screen code that undeletes records in Listing 5-10 is one example.
Figure 6-14 shows a snippet of Query Syntax code and highlights the parts that make up the query. The query belongs in an engineer details screen and is designed to return a collection of open issues sorted in date descending order.
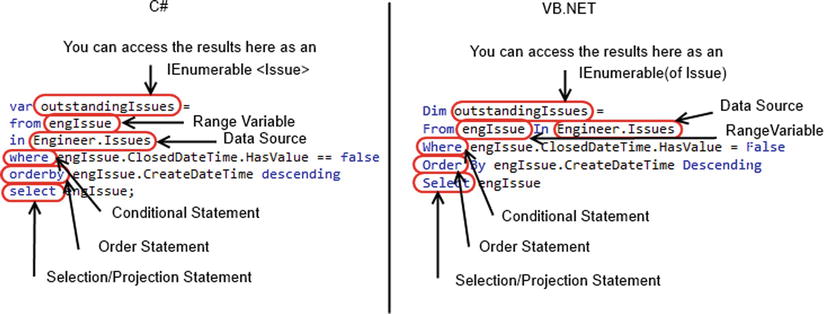
Figure 6-14. Parts that make up a query expressed using Query Syntax
Every query needs a data source, and in this sample, the Engineer.Issues navigation property is the data source. Because the code belongs in a details screen, Engineer refers to the Engineer query that’s created by the details screen template.
The engIssue variable is called the range variable. This behaves just like the iteration variable in a for-each loop, although no actual iteration takes place in a LINQ query. This variable allows you to reference each element in the data source and conditionally filter the results by using a where clause.
The compiler infers the data type of engIssue. Therefore, there’s no need for you to explicitly declare this as an Issue object.
The select clause at the end of the statement specifies the type of each returned element. This allows you to return only a subset of properties from the Issue entity, if required.
An important point about LINQ is that queries are executed when the code first tries to work with the query, and not on the line that contains the select clause. This characteristic is called deferred execution.
In this example, the query’s data source is the Issues navigation property on a local property. Therefore, LightSwitch will carry out the filtering locally on the client.
Understanding Method (Lambda) Syntax Code
Although Query Syntax is generally easier to read and write, there are certain operations that you can perform only with Method Syntax. Retrieving the element with the maximum value in a source sequence is an example.
Method Syntax queries are characterized by lambda expressions, and you’ve already seen a few examples in this book.
Figure 6-15 illustrates the same query as before, but expressed using Method Syntax rather than Query Syntax.
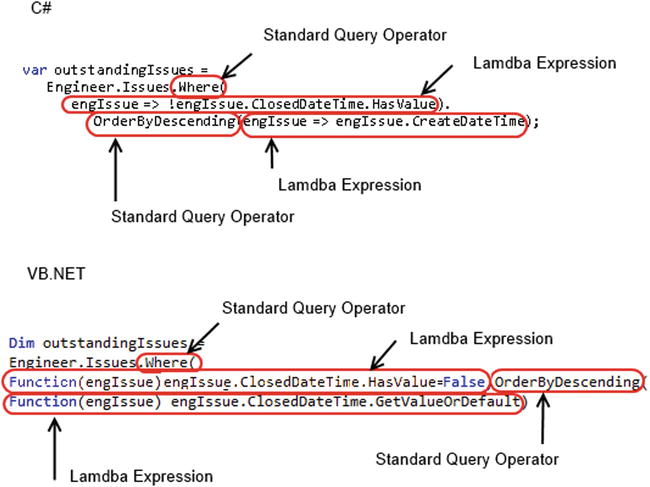
Figure 6-15. Parts that make up a query expressed using Method Syntax
Standard Query operators define the operations you want to perform, such as filtering or ordering. You can control the way that many of these operators work by supplying a lambda expression.
Using Standard Query Operators
Standard Query operators are extension methods on top of the objects that implement the IEnumerable or IDataServiceQueryable interface. The operators you can use depend on the data source that you’ve chosen.
There are over 50 Standard Query operators you can apply when you’re working with navigation properties. As well as the where and orderby operators, there are many other useful operators that you can use. For example, you can apply various aggregate operators, such as count, min, max, and average.
Filtering Data with Lambda Expressions
Let’s take a closer look at the where operator and lambda expression from Figure 6-15:
C#  Where(engIssue => !engIssue.ClosedDateTime.HasValue)
VB  Where(Function(engIssue) engIssue.ClosedDateTime.HasValue= false)
The where operator expects you to pass in a Func delegate that returns a Boolean. The return value indicates whether the supplied value (engIssue) meets the criteria for inclusion in the where clause.
engIssue is called the lambda parameter. This represents a single issue in the collection of issue responses that you’re working against. This code uses .NET’s implicit data-typing feature, which saves you from having to define the data type of engIssue. You could equally write the expression like this:
C#  Where((Issue engIssue )=> !engIssue.ClosedDateTime.HasValue)
VB  Where(Function(engIssue As Issue) engIssue.ClosedDateTime.HasValue= false)
If you want to construct more complex query expressions, you can do so by using the navigation properties that your lambda parameter exposes.
In the C# version, the lambda parameter must be enclosed in brackets if you’re not using implicit typing. Brackets must also be used if you want to specify more than one lambda parameter.
In C#, the => operator is called the lambda or goes to operator. This separates the lambda parameter or parameters from the actual expression.
In Visual Basic, the Function keyword specifies the lambda expression and the lambda parameters are defined inside brackets following the Function keyword. Visual Basic developers might find it strange to see the Function keyword used without a function name being specified. For example, a typical function in Visual Basic looks like this:
Public Function GetIssue (issueId As Integer) As Issue
As you can see, the function name here is called GetIssue. In the lambda expression code, you can omit the function name because the syntax uses a feature of .NET 3.5 called anonymous methods. Before .NET 3.5, methods had to be explicitly named, which would have resulted in you having to write more code.
The final part of the lambda expression tests to see if the ClosedDateTime value is null. If true, the query returns the record in the results.
Using the Any and All Operators
Two useful Standard Query operators that you can use are the Any and All methods. The All method returns a Boolean that indicates whether or not all elements of a sequence match a condition, whereas the Any method returns whether or not any element satisfies a condition.
The code in Listing 6-2 finds whether or not there is at least one issue in the database with a priority set to high. Because the data source is the outstandingIssues query (shown in Figure 6-15), the query searches only open issues.
If you want to run the code that's shown in this section, the first part of Chapter 7 will give you more detail. In Chapter 7, you'll find out how to display your query results on your screen by adding local screen properties.
Listing 6-2. Using the Any Standard Query Operator
VB:
File:HelpDeskVBClientUserCodeEngineerDashboard.vb

Dim highPriorityExists As Boolean =
    outstandingIssues.Any(
        Function(engIssue) engIssue.Priority.PriorityDesc = "High")
C#:
File:HelpDeskCSClientUserCodeEngineerDashboard.cs

bool highPriorityExists =
   outstandingIssues.Any(
         engIssue => engIssue.Priority.PriorityDesc == "High");
The code in Listing 6-3 returns whether or not all issues that have been open for more than seven days are closed, and it demonstrates the use of the All query operator.
Listing 6-3. Using the All Standard Query Operator
VB:
File:HelpDeskVBClientUserCodeEngineerDashboard.vb

Dim oldIssueExists As Boolean =
    Engineer.Issues.Where(
        Function(engIssue) engIssue.CreateDateTime < DateTime.Now.AddDays(-7)).All(
            Function(engIssue) engIssue.ClosedDateTime.HasValue)
C#:
File:HelpDeskCSClientUserCodeEngineerDashboard.cs

bool oldIssueExists =
   Engineer.Issues.Where(engIssue =>
      engIssue.CreateDateTime < DateTime.Now.AddDays(-7)).All(
         engIssue => engIssue.ClosedDateTime.HasValue);
Performing For Each Logic
A neat little method that you can use is the ForEach extension method. This allows you to supply an Action delegate that defines some logic that you want to carry out against each element in a sequence.
Listing 6-4 shows you how to build a string that shows the top-5 oldest issues.
Listing 6-4. Using the ForEach Operator
VB:
File:HelpDeskVBClientUserCodeEngineerDashboard.vb

Imports System.Text

Dim sb As StringBuilder = new StringBuilder()

outstandingIssues.OrderByDescending(
    Function(engItem) engItem.CreateDateTime).Take(5).ToList().ForEach(
        Function(engItem) sb.AppendLine(engItem.ProblemDescription))
C#:
File:HelpDeskCSClientUserCodeEngineerDashboard.cs

using System.Text;

StringBuilder sb = new StringBuilder();

outstandingIssues.OrderByDescending(
    engItem => engItem.CreateDateTime).Take(5).ToList().ForEach(
       engItem => sb.AppendLine(engItem.ProblemDescription));
The first part of the code retrieves the top-five oldest records by ordering the issues in date descending order and calling the Take method to retrieve the first five records in the sequence.
The ForEach extension method belongs to the type List<T>, so you need to call the ToList method to return a list of issues.
The code inside the ForEach method then builds a list of the issue descriptions by using a StringBuilder object. At the end of this process, the code would display the contents of the StringBuilder object on the Engineer Dashboard screen.
Querying Data Remotely
When you’re writing queries, it’s important to consider where the query executes. Take a look at the code that’s shown in Listing 6-5.
Listing 6-5. Querying Data Collections
VB:
File:HelpDeskVBClientUserCodeEngineerDetail.vb

Dim startOfYear = New DateTime(DateTime.Now.Year, 1, 1)

'Query 1
Dim issuesLastMonth =
    Engineer.Issues.Where(
        Function(issueItem) issueItem.CreateDateTime > startYear).
            Count()

'Query 2
Dim issuesLastMonth2 =
    Engineer.IssuesQuery.Where(
        Function(issueItem) issueItem.CreateDateTime > startYear).
            Execute().Count()


C#:
File:HelpDeskCSClientUserCodeEngineerDetail.cs

DateTime startOfYear = new DateTime(DateTime.Now.Year, 1, 1);

//Query 1
var issuesLastMonth =
    Engineer.Issues.Where(
        issueItem => issueItem.CreateDateTime > startOfYear).Count();

//Query 2
var issuesLastMonth2 =
    Engineer.IssuesQuery.Where(
        issueItem => issueItem.CreateDateTime > startOfYear).
            Execute().Count();
This code exists on an Engineer details screen, and both queries are designed to return engineer issues that have been created since the start of the year. Although query 1 looks very similar to query 2, there’s a big difference between the two code samples.
The data source for query 1 is a navigation property. Navigation properties are of type EntityCollection<T>, and any queries that you perform on a navigation property are executed by LightSwitch locally.
The code in query 2 calls the <CollectionName>Query method. This returns an IDataServiceQueryable, and LightSwitch remotely executes any filtering that you define against this object.
Considering that each engineer could be associated with hundreds or even thousands of issues, it’s much more efficient to perform this specific query remotely. However, a common pitfall with remote queries is that they won’t include any entities that have been added locally. Therefore, you’ll need to consider this behavior when you’re writing remote queries.
Figure 6-16 shows you the actual SQL that’s executed by SQL Server by highlighting the output from SQL Server Profiler. This output proves that when you use <CollectionName>Query as a data source, SQL Server carries out the filtering, not LightSwitch.
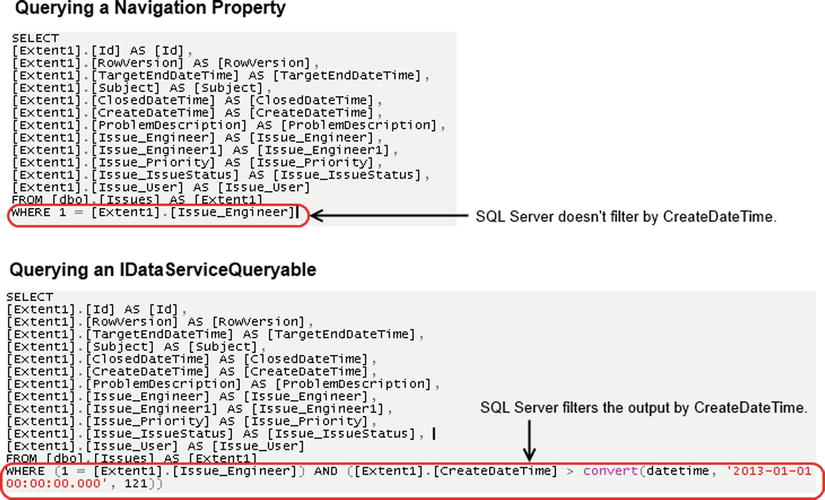
Figure 6-16. The SQL Profiler result of querying navigation properties and IDataServiceQueryables
Querying Data Locally
Although it might seem more efficient to perform your querying remotely, there are good reasons to query your data locally. If the data that you want to use is already loaded on the client, it’s quicker to query the data that’s already loaded.
Also, not all standard query operators support remote execution, or there might be application features that you want to create that can be achieved only with a local query.
To demonstrate such a feature, here’s a screen that allows engineers to enter the time that they’ve spent on issues. This screen includes a button that merges time entries that refer to the same issue. Figure 6-17 illustrates how the screen functions.
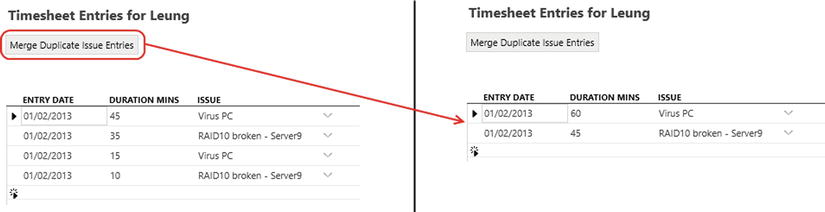
Figure 6-17. Merging duplicate issues
To create this example, carry out the following steps:
- Add the TimeTracking table to your project. You’ll find the schema of this table in Appendix E.
- Create a detail screen, and base it on the Engineer table. In the Add New Screen dialog, make sure to include the TimeTracking data collection.
- When the screen designer opens, add a new button and bind it to a new method called MergeDuplicateIssues. Add the code that’s shown in Listing 6-6 to this method.
Listing 6-6. Querying an EntityCollection
VB:
File:HelpDeskVBClientUserCodeEngineerTimeTracking.vb

Dim duplicates =
    From timeEntry In Engineer.TimeTracking
    Group timeEntry By timeEntry.Issue Into issueGroup = Group, Count()
    Where issueGroup.Count() > 1
    Select issueGroup

For Each dup In duplicates
   Dim totalDuration = dup.Sum(Function(timeEntry) timeEntry.DurationMins)
   Dim firstLine = dup.First
   firstLine.DurationMins = totalDuration
   dup.Except(New TimeTracking() {firstLine}).ToList().ForEach(
      Sub(timeEntry) timeEntry.Delete())
Next


C#:
File:HelpDeskCSClientUserCodeEngineerTimeTracking.cs


var duplicates =
    from TimeTracking timeEntry in this.Engineer.TimeTracking
    group timeEntry by timeEntry.Issue into issueGroup
    where issueGroup.Count() > 1
    select issueGroup;

foreach (var dup in duplicates)
{
    var totalDuration =
        dup.Sum(timeEntry => timeEntry.DurationMins);
    var firstEntry = dup.First();
    firstEntry.DurationMins = totalDuration;
    dup.Except(
        new TimeTracking[] { firstEntry }).ToList().ForEach(
        timeEntry => timeEntry.Delete());
}
This code uses several of the features that you’ve covered in this section. The TimeTracking table stores the amount of time that an engineer has spent on an issue. The first part of the code groups the TimeTracking records by issue and selects groups that contain more than one time-tracking record ![]() .
.
The second part of the code loops through the collection of grouped records, sums the total duration into the first record ![]() , and deletes the remaining records in the group
, and deletes the remaining records in the group ![]() .
.
Notice how the code uses the Except operator, along with the ForEach operator that you saw earlier.
Performing Advanced Filtering
In this section, you’ll find out how to apply filter operations that are not supported by the graphical designer. This allows you to carry out more complex filtering by adding LINQ code to your query’s PreprocessQuery method. All the queries in this section are server based and are executed by LightSwitch through the query pipeline. You can run the queries in the section by adding new screens that are based on the query.
Filtering by Related Child Items
If you create a query that uses the issue table, the graphical designer allows you to filter the results by engineer. In other words, the graphical designer allows you to filter by parent records. Working in the other direction, however, a query that’s based on the engineer table can’t be filtered by a property in the issue table. Figure 6-18 illustrates how the drop-down box in an Engineer query doesn’t contain an entry for Issue.
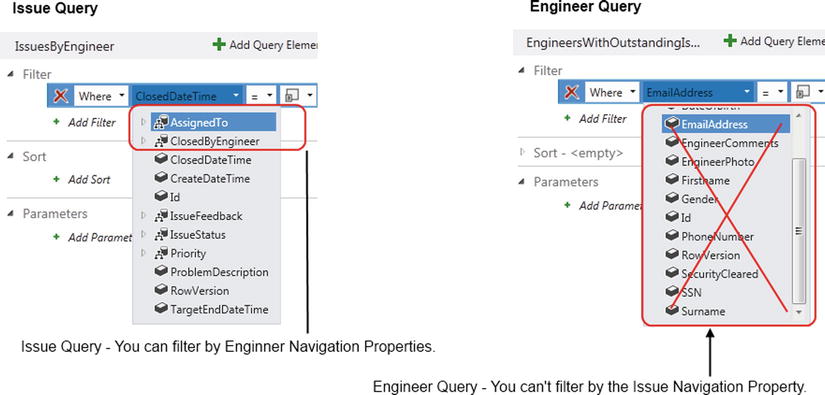
Figure 6-18. You cannot filter by child items in the graphical designer
To filter by child items, you’ll need to write some custom code. To demonstrate this, here’s how to create a query that returns engineers with outstanding issues.
Right-click on the Engineer table in Solution Explorer, and create a query called EngineersWithOutstandingIssues. Click on the Write Code button, and select the PreprocessQuery method. When the code editor opens, enter the code that’s shown in Listing 6-7.
Listing 6-7. Filtering by Child Items
VB:
File: HelpDeskVBServerUserCodeApplicationDataService.vb

Private Sub EngineersWithOutstandingIssues_PreprocessQuery(
   ByRef query As IQueryable(Of Engineer))

     query = query.Where(Function(engItem) engItem.Issues.Where(
       Function(issueItem) issueItem.IssueStatus.StatusDescription = "Open").Any())
End Sub


C#:
File: HelpDeskCSServerUserCodeApplicationDataService.cs

partial void EngineersWithOutstandingIssues_PreprocessQuery(
    ref IQueryable<Engineer> query)
{
    query = query.Where
        (engItem => engItem.Issues.Where(
            issueItem => issueItem.IssueStatus.StatusDescription == "Open").
            Any());
}
The PreprocessQuery method includes a parameter called query that allows you to reference the query’s output. So to further customize your query, you would append your additional query operators to this parameter. Notice how this example uses the Any operator that was covered in Listing 6-2.
Exists, In
This example demonstrates how to perform an exists or in type query. This type of query returns records where related child records exist. For example, you can use this type of query to find issues that are associated with one or more records in the issue document table. If you’re more conversant with SQL, Listing 6-8 provides the SQL equivalent to illustrate what this example strives to achieve.
Listing 6-8. SQL Equivalent of the Exists Query
SELECT  *
 FROM Issues
WHERE IssueID IN (
    SELECT IssueID FROM IssueDocuments)
To create this example, create a query called IssuesWithAttachments. Click on the Write Code button, select the PreprocessQuery method, and enter the code that’s shown in Listing 6-9.
Listing 6-9. Returning All Issues with Related Issue Document Records
VB:
File: HelpDeskVBServerUserCodeApplicationDataService.vb

Private Sub IssuesWithAttachments_PreprocessQuery(
   ByRef query As IQueryable(Of Issue))
    query = query.Where(Function(issueItem) issueItem.IssueDocuments.Any())
End Sub

C#:
File: HelpDeskCSServerUserCodeApplicationDataService.cs

partial void IssuesWithAttachments_PreprocessQuery(
    ref IQueryable<Issue> query)
{
    query = query.Where (issueItem => issueItem.IssueDocuments.Any());
}
Not Exists, Not In
As a natural progression of the previous example, this example shows you how to perform a not exists or not in type query. This type of query returns records where no related child records exist.
This example demonstrates a query that returns all issues without any issue-response records. Just like before, Listing 6-10 shows the equivalent SQL that you would use to perform this query.
Listing 6-10. SQL Equivalent of a Not In Query
SELECT  *
 FROM Issues
WHERE IssueID NOT IN (
    SELECT IssueID FROM IssueResponses)
To carry out this example, create a query called IssuesWithNoResponse and add the code shown in Listing 6-11 to the PreprocessQuery method of your query.
Listing 6-11. Returning Issue Records Without Any Issue Responses
VB:
File: HelpDeskVBServerUserCodeApplicationDataService.vb

Private Sub IssuesWithNoResponse_PreprocessQuery(
   ByRef query As System.Linq.IQueryable(Of LightSwitchApplication.Issue))
      query = query.Where(Function(issueItem) Not issueItem.IssueResponses.Any())
End Sub


C#:
File: HelpDeskCSServerUserCodeApplicationDataService.cs


partial void IssuesWithNoResponse_PreprocessQuery(ref IQueryable<Issue> query)
{
    query = query.Where(issueItem => !issueItem.IssueResponses.Any());
}
Filtering by Date Elements
The ability to filter by date elements is a common scenario. Finding people who were born on a given day and month is a typical example.
This example shows you how to create a query that allows users to find all issues that were raised during a specified month and year.
To allow your user to specify the month and year, create a query on the Issue table called IssuesByMonthAndYear and create two integer parameters, called IssueMonth and IssueYear. (See Figure 6-19.) Set the Is Optional property of both of these parameters to true.

Figure 6-19. IssueMonth and IssueYear parameters
Now add the code that’s shown in Listing 6-12 to the PreprocessQuery method of your query.
Listing 6-12. Filtering by Month and Year Parameter Values
VB:
File: HelpDeskVBServerUserCodeApplicationDataService.vb

Private Sub IssuesByMonthAndYear_PreprocessQuery(
    IssueMonth As System.Nullable(Of Integer),
    IssueYear As System.Nullable(Of Integer),
    ByRef query As System.Linq.IQueryable(Of LightSwitchApplication.Issue))


    If (IssueMonth.HasValue And IssueYear.HasValue) Then
        query = query.Where(
            Function(item) item.CreateDateTime.Month = IssueMonth.Value AndAlso
                item.CreateDateTime.Year = IssueYear.Value)

    End If

End Sub

C#:
File: HelpDeskCSServerUserCodeApplicationDataService.cs

partial void IssuesByMonthAndYear_PreprocessQuery(
    int? IssueMonth, int? IssueYear, ref IQueryable<Issue> query)
{
    if (IssueMonth.HasValue && IssueYear.HasValue)
    {
        query = query.Where(
            item => item.CreateDateTime.Month == IssueMonth.Value &&
            item.CreateDateTime.Year == IssueYear.Value);
    }
}
To create a screen that uses this query, you can simply create an editable grid screen that’s based on this query. As with all other parameterized queries, LightSwitch automatically creates text boxes that allow the user to supply the required values.
Top N Records
This final example shows you how to create a query that returns the top n records from an entity set. To demonstrate this technique, this example shows you how to create a query that returns the top five issues with the highest feedback rating.
If you’ve not done so, create a (zero-or-1)-to-many relationship between the Issue and IssueFeedback tables. (You’ll find the schema for the IssueFeedback table in Appendix E.) Create a query based on the Issue table called IssuesWithHighestFeedback. Now add the code that’s shown in Listing 6-13 to the query’s PreprocessQuery method.
Listing 6-13. Query to Return Issues with the Highest Feedback
VB:
File: HelpDeskVBServerUserCodeApplicationDataService.vb


Private Sub IssuesWithHighestFeedback_PreprocessQuery(
   ByRef query As System.Linq.IQueryable(Of LightSwitchApplication.Issue))

    query = query.OrderByDescending(
        Function(issueItem) issueItem.IssueFeedback.Average(
            Function(feedback) feedback.OverallRating)).Take(5)
End Sub


C#:
File: HelpDeskCSServerUserCodeApplicationDataService.cs

partial void IssuesWithHighestFeedback_PreprocessQuery(
   ref IQueryable<Issue> query)
{
    query = query.OrderByDescending(
    issueItem => issueItem.IssueFeedback.Average(
        feedback => feedback.OverallRating)).Take(5);
}
Each issue item can have multiple issue-feedback records. So to calculate a value that the query can use to sort the issues, the code works out the average feedback that’s assigned to each issue. The important part of this code is the take method—this is a method that allows you to retrieve the top five records.
To improve this code further, you could add a parameter to allow the user to choose the number of records to return, rather than use a hard-coded value of 5.
Let’s imagine that you want find all issues that were raised within the last seven days. To do this, you could create a query and write some code in the pre-process query method. However, this is more difficult than it should be because it involves having to write code.
A much neater approach is to create a global value that you can reuse in multiple queries. This example shows you exactly how to do this by creating a global value called 7 Days Ago. At the end of this section, you’ll have a global value that you can reuse in the query designer, as shown in Figure 6-20.
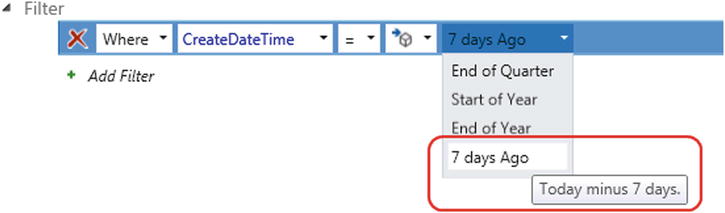
Figure 6-20. Using global parameters
The task of creating a global value involves two things:
- Editing your project’s LSML file
- Creating a class and writing the code that performs the calculation
Note that if you’re working on an HTML client application, or a project that’s been upgraded after installing Visual Studio 2012 Update 2, you need to follow the modified instructions that are shown at the end of this section.
![]() Caution Make sure to back up your project before manually editing your LSML file. You can easily corrupt and damage your project if you make mistakes during this process.
Caution Make sure to back up your project before manually editing your LSML file. You can easily corrupt and damage your project if you make mistakes during this process.
Adding Your Global Value to Your LSML File
First, you need to append the global value definition to your Common project’s LSML file. Switch to File View, and open the file Common ![]() Properties
Properties ![]() Common.lsml.
Common.lsml.
Add the code in Listing 6-14 to the end of your file, just before the </ModelFragment> tag.
Listing 6-14. Global Value Definition to Add to the LSML file
<GlobalValueContainerDefinition
  Name="GlobalDates">
  <GlobalValueDefinition
    Name="SevenDaysAgo"
    ReturnType=":DateTime">
    <GlobalValueDefinition.Attributes>
      <DisplayName Value="7 days Ago" />
      <Description Value="Today minus 7 days." />
    </GlobalValueDefinition.Attributes>
  </GlobalValueDefinition>
</GlobalValueContainerDefinition>
The name of the GlobalValueContainerDefinition needs to match the name of the class that you’re about to create. In this example, it’s been named GlobalDates.
Each global value is defined within a GlobalValueDefinition element. The ReturnType attribute specifies the data type for your global value. The acceptable values that you can use include :String, :Int32, :Decimal, and :Boolean. Appendix B shows a full list.
Note that these values are case sensitive. Visual Studio will not load your project if you get the casing wrong.
Creating the Global Value Class
The next thing to do is to write the code that does the computation. Switch to File View, and create a new class in your Common project. An ideal place to create this class is in the User Code folder (if it exists). LightSwitch creates this folder if you’ve written any entity code.
The name of your class needs to match the name that’s defined in your GlobalValueContainerDefinition element (GlobalDates in this example). Enter the code that’s shown in Listing 6-15.
Listing 6-15. Code to Return Date
VB:
File: HelpDeskVBCommonUserCodeGlobalDates.vb

Imports System

Namespace LightSwitchCommonModule

    Public Class GlobalDates

        Public Shared Function SevenDaysAgo() As DateTime
            Return DateTime.Now.AddDays(-7)
        End Function

    End Class

End Namespace

C#:
File: HelpDeskCSCommonUserCodeGlobalDates.cs


using System;

namespace LightSwitchCommonModule
{
    public class GlobalDates
    {
        // The name of the GlobalValueDefinition
        public static DateTime SevenDaysAgo()
        {
            return DateTime.Now.AddDays(-7);
        }
    }
}
The new class contains Visual Basic shared or C# static methods for each GlobalValueDefinition element that you defined in your LSML. The method name needs to match the name that you’ve defined in the GlobalValueDefinition element, and the namespace of your class must be set to LightSwitchCommonModule.
Your new global value is now ready for use. Whenever you filter a query on a date-time property, you’ll be able to select 7 Days Ago as a global value.
![]() Note If you’re curious as to how the default DateTime global values work, the equivalent logic for the built-in global values can be found in the Microsoft.LightSwitch.RelativeDates namespace.
Note If you’re curious as to how the default DateTime global values work, the equivalent logic for the built-in global values can be found in the Microsoft.LightSwitch.RelativeDates namespace.
Using Global Values in Upgraded Projects
If you’ve added an HTML client application (as discussed in Chapter 8) or have upgraded your project after installing Visual Studio 2012 Update 2, the instructions that you’ll need to follow are slightly different. Upgraded projects no longer include a Common project. Therefore, the LSML file that you’ll need to modify will exist in the following locations, depending on your project’s language:
- VB Projects: YourApp.serverMy Projectservice.lsml
- C# Projects: YourApp.ServerPropertiesservice.lsml
Locate your service.lsml file, and add the GlobalValueContainerDefinition block from Listing 6-14 to the end of your file, just before the </ModelFragment> tag. After you do this, create a folder called UserCodeShared in your server project, and add your GlobalDate class file to this folder. When you create your GlobalDate class, you need to modify the code in Listing 6-14 by changing the namespace of your class from LightSwitchCommonModule to LightSwitchApplication.
Summary
Queries allow you to find records by applying filters. They allow you to display a subset of records, build search screens, or show other significant pieces of information. LightSwitch queries can return a single entity or multiple entities. Because LightSwitch queries always returns entities, you can’t add or remove properties (for example, table columns) from the output of a query. If you’ve developed applications using systems other than LightSwitch, you’ll notice that this chapter doesn’t show you how to join data. This is because LightSwitch allows you to access related data through navigation properties, so if you’ve properly designed your application, there’s no need for you to create joins.
You can easily create data service queries that run on the server by using LightSwitch’s graphical designer. This allows you to filter a query by hard-coded values, parameters, and other fields in the same table. You can filter date fields by global values. These include Today, Start Of Week, Start Of Month, and many more. It’s possible to create your own global values, and you’ve seen an example of how to create a 7 Days Ago global value.
By default, LightSwitch creates two queries that return all entities or a single entity by ID value. Queries that return multiple entities are composable, meaning that you can build queries upon other queries.
At a screen level, you can customize the sort and filter criteria that the screen applies by clicking on the Edit Query link that appears against the relevant collection in the screen designer. However, you can’t reuse any filter settings that you’ve defined like this in other queries, and you can’t extend these queries using code.
When the server executes a query, the process passes through the query pipeline. This pipeline includes phases that allow you to attach custom code. It allows you to apply filter operations that are not supported by the graphical designer by writing code in a query’s PreprocessQuery method. You’ve learned how to write LINQ code in the PreprocessQuery method to filter a query by child records and date parts, and how to carry out Exists and Not Exists type queries. Another useful query pipeline method is the CanExecute method. This allows you to carry out security checks to prevent certain users from running a query.
You can express a LINQ query syntactically in one of two ways: Method Syntax or Query Syntax. Query Syntax looks a bit like SQL and is simple to read. When .NET compiles your code, it converts your Query Syntax into the Method Syntax equivalent. Although Query Syntax is easy to read, there are certain operations that you can perform only by using Method Syntax. Method Syntax LINQ is characterized by Standard Query operators (the Where and OrderBy operators are examples) and lambda expressions. A lambda expression is an anonymous function that you can supply as an argument to a standard query operator.
This chapter has showed you how to define LINQ queries on a Silverlight client screen. The output of these queries allows you to show statistical details to your users. Every LINQ query requires a data source. If the data source for your query is a collection or navigation property, LightSwitch performs your query locally. If the data source for your query uses your screen collection’s <CollectionName>Query method, LightSwitch applies any query conditions that you define remotely on the server.