
![]()
Creating and Using RIA Services
LightSwitch allows you to connect to a wide range of data sources. But if you can’t natively connect to the data source of your choice, you can still consume your data by writing a WCF RIA (Windows Communication Foundation Rich Internet Application) service.
In this chapter, you’ll learn how to
- Consume an RIA service from your LightSwitch application
- Create an RIA service to retrieve and update data
- Call SQL Server stored procedures
Creating a custom RIA service enables you to connect to data sources that are not well supported. This could include nonrelational data or data sources that don’t have an Entity Framework data provider. For example, you could create an RIA service that allows you to view XML files, Windows event logs, or even the Internet Information Services (IIS) log files on the server.
RIA services also allow you to create aggregated views of data or views that join multiple database tables. An aggregate view can provide counts, sums, averages, or totals of a group of data. RIA services can help you create views of your data for statistical or reporting purposes.
In this chapter, you’ll find out how to create an RIA service to improve the performance of the HelpDesk application. You’ll learn how to perform data operations, and also how to call a SQL Server stored procedure to delete engineer records.
Creating an RIA Services Project
Creating an RIA Service consists of the following four steps. We’ll cover each of these in this chapter:
- Create a class library project.
- Write a class that represents your entity.
- Add a domain service.
- Write the data-access code.
In addition to helping you connect to nonstandard data sources, RIA services are an ideal way to improve your application’s performance.
Let’s take the Engineer table as an example. This table stores engineer details and includes a Photo field. Let’s suppose you add a screen that includes a list of first names and surnames for engineers. Although you don’t show the Photo field, the LightSwitch client still retrieves the photo data from the server. This is because the server can return only entity sets to the client, and entity sets can’t exclude fields. If your average photo size is 500 KBs and you retained the default page size of 45 records, you could incur an additional 20 MBs of data-transfer between the client and server every time the page loads. By creating an RIA service that excludes the photo data, you’ll end up with a screen that performs much better.
![]() Note An RIA service is only one way to solve this problem. In practice, you’ll find that it’s quicker to split the employee photo data into a separate table.
Note An RIA service is only one way to solve this problem. In practice, you’ll find that it’s quicker to split the employee photo data into a separate table.
Staying on the performance theme, this chapter shows how you can create an RIA service that improves the performance of a computed column. The HelpDesk application includes an engineers management screen that shows a count of issues for each engineer. (See Figure 9-1.)
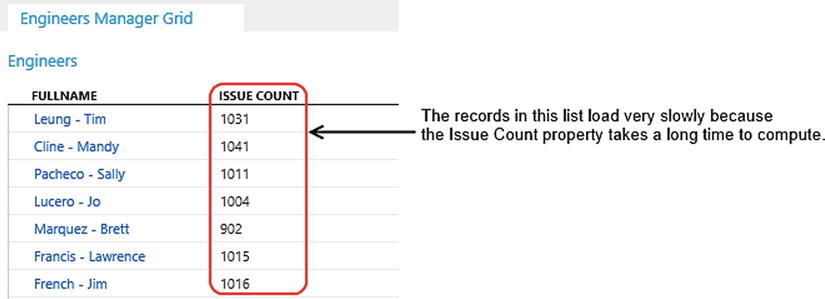
Figure 9-1. The Engineers management screen
Due to the high number of records in the system, this screen performs poorly because LightSwitch needs to retrieve every issue for each engineer to calculate the count. (You’ll find the computed column code in Chapter 2, Listing 2-3.)
To get started, create a new RIA service project by opening Visual Studio and creating a new project using the Class Library template. Name your project HelpDeskDataService.
Creating an Entity Class
Your RIA service project needs a class that represents an engineer entity. The class doesn’t need to contain every column in the Engineer table. As I mentioned earlier, returning a subset of columns is an ideal way to optimize performance.
In your project, create an EngineerRecord class and add the code shown in Listing 9-1.
Listing 9-1. Entity Class for Engineers
VB:
File:HelpDeskDataServiceVBEngineerRecord.vb

Imports System.ComponentModel.DataAnnotations

Public Class EngineerRecord
    <Key(), Editable(False)>
    Public Property Id As Integer

    <Required(ErrorMessage:="Surname required"),
        StringLength(50)>
    Public Property Surname As String

    <Required(ErrorMessage:="Firstname required"),
            StringLength(50)>
    Public Property Firstname As String

    <Required(ErrorMessage:="DateOfBirth required")>
    Public Property DateOfBirth As DateTime

    <Required(ErrorMessage:="SecurityVetted required")>
    Public Property SecurityVetted As Boolean

    <Editable(False)>
    Public Property IssueCount As Integer

End Class

C#:
File:HelpDeskDataServiceCSEngineerRecord.cs

using System;
using System.ComponentModel.DataAnnotations;

namespace HelpDeskDataServiceCS
{
    public class EngineerRecord
    {
        [Key(), Editable(false)]
        public int Id { get; set; }

        [Required(ErrorMessage = "Surname required"),
           StringLength(50)]
        public string Surname { get; set; }

        [Required(ErrorMessage = "Firstname required"), StringLength(50)]
        public string Firstname { get; set; }

        [Required(ErrorMessage = "DateOfBirth required")]
        public DateTime DateOfBirth { get; set; }

        [Required(ErrorMessage = "SecurityVetted required")]
        public bool SecurityVetted { get; set; }

        [Editable(false)]
        public int IssueCount { get; set; }

    }
}
You’ll need to add a reference to the System.ComponentModel.DataAnnotations DLL. The easiest way to do this is to add a Domain Service class (covered next). This automatically adds all the references that you’ll need.
Your primary-key property (Id) must be decorated with the key attribute, and the Editable attribute needs to be set to false ![]() . LightSwitch uses these attributes to prevent users from editing your engineer’s Id property.
. LightSwitch uses these attributes to prevent users from editing your engineer’s Id property.
The Required attribute ![]() indicates that the property can’t be null or empty. If a user fails to enter any of the required properties, LightSwitch triggers its built-in validation and prevents the user from saving the record.
indicates that the property can’t be null or empty. If a user fails to enter any of the required properties, LightSwitch triggers its built-in validation and prevents the user from saving the record.
The StringLength attribute ![]() allows you to specify the maximum length of a property. LightSwitch’s built-in validation uses this value to prevent users from entering text that exceeds the maximum length that you specify.
allows you to specify the maximum length of a property. LightSwitch’s built-in validation uses this value to prevent users from entering text that exceeds the maximum length that you specify.
It’s important to apply the StringLength and Required attributes to stop users from entering invalid data.
In addition to the attributes that you’ve seen, you can also define relationships and navigation properties by using similar attributes. LightSwitch recognizes the relationships and navigation properties that you’ve specified when you attach to your RIA service.
![]() Tip The code that allows you to create a custom data source extension is very similar to the code that’s shown in this section. Take a look at Chapter 13 if you want to see an example of how to create an entity class that includes navigation properties.
Tip The code that allows you to create a custom data source extension is very similar to the code that’s shown in this section. Take a look at Chapter 13 if you want to see an example of how to create an entity class that includes navigation properties.
Creating a Domain Service Class
The next step is to create a new domain service class. To do this, right-click your project and choose the option to add a new Domain Service Class. (See Figure 9-2.) Name your class EngineerDataService.
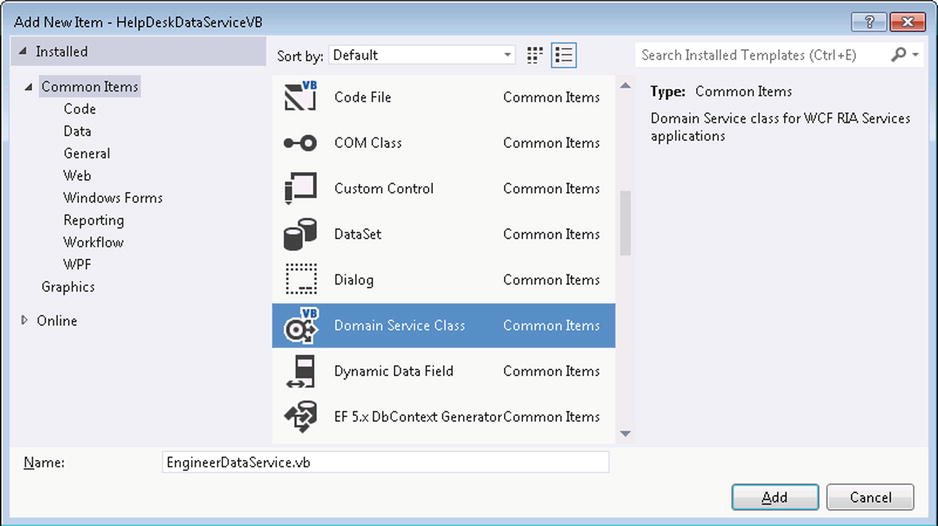
Figure 9-2. Creating a domain service class
In the next dialog that appears (shown in Figure 9-3), uncheck the Enable Client Access check box. Leaving this enabled can pose a security risk because it allows other external clients to call your service. If you disable client access, users can access your RIA service only through LightSwitch’s service end point. This gives you the extra protection of any logic or security code that you might have added to the LightSwitch save and query pipelines.
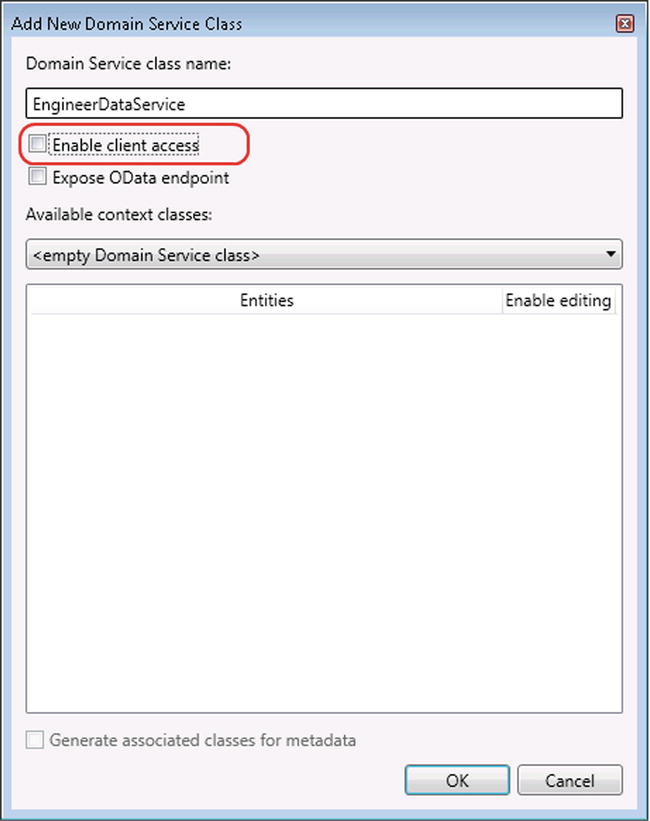
Figure 9-3. Uncheck the Enable Client Access check box
Now that you’ve added your domain service class, the next step is to write the code that performs the data access. The previous step created a class file called EngineerDataService. Modify this file by adding the code that’s shown in Listing 9-2. Because this listing contains code that retrieves the database connection string, you’ll need to add a reference to the System.Configuration namespace.
Listing 9-2. Domain Service Code for Retrieving Records
VB:
File:HelpDeskDataServiceVBEngineerDataService.vb

Option Compare Binary
Option Infer On
Option Strict On
Option Explicit On

Imports System
Imports System.Collections.Generic
Imports System.ComponentModel
Imports System.ComponentModel.DataAnnotations
Imports System.Linq
Imports System.ServiceModel.DomainServices.Hosting
Imports System.ServiceModel.DomainServices.Server
Imports System.Configuration
Imports System.Data.SqlClient

<Description("Enter the connection string to the HelpDesk Database")>
Public Class EngineerDataService
    Inherits DomainService

    Private ReadOnly _EngineerRecordList As List(Of EngineerRecord)

    Public Sub New()
        _EngineerRecordList = New List(Of EngineerRecord)()
    End Sub

    Private _connectionString As String

    Public Overrides Sub Initialize(
        context As System.ServiceModel.DomainServices.Server.DomainServiceContext)

        _connectionString =
            ConfigurationManager.ConnectionStrings(
                Me.[GetType]().FullName).ConnectionString
        MyBase.Initialize(context)
    End Sub

    <Query(IsDefault:=True)>
    Public Function GetEngineerData() As IQueryable(
       Of EngineerRecord)
        _EngineerRecordList.Clear()

        Using cnn As New SqlConnection(_connectionString)
            Using cmd As SqlCommand = cnn.CreateCommand()

                cmd.CommandText =
                   "SELECT Id, Surname, Firstname, DateOfBirth,
                   SecurityVetted, IssueCount
                   FROM dbo.Engineers eng
                   JOIN  ( SELECT Issue_Engineer,
                           COUNT(Issue_Engineer) IssueCount
                           FROM  dbo.Issues GROUP BY Issue_Engineer)
                   AS iss ON eng.Id = iss.Issue_Engineer"

                cnn.Open()

                Using dr As SqlDataReader = cmd.ExecuteReader()
                    While dr.Read()
                        Dim Engineer As New EngineerRecord()
                        Engineer.Id = CInt(dr("Id"))
                        Engineer.Surname = dr("Surname").ToString()
                        Engineer.Firstname = dr("Firstname").ToString()
                        Engineer.DateOfBirth = CDate(dr("DateOfBirth"))
                        Engineer.SecurityVetted = CBool(dr("SecurityVetted"))
                        Engineer.IssueCount = CInt(dr("IssueCount"))

                        _EngineerRecordList.Add(Engineer)
                    End While
                End Using
                cnn.Close()
            End Using
        End Using

        Return _EngineerRecordList.AsQueryable()

    End Function

End Class

C#:
File:HelpDeskDataServiceCSEngineerDataService.cs

namespace HelpDeskDataServiceCS
{
    using System;
    using System.Collections.Generic;
    using System.ComponentModel;
    using System.ComponentModel.DataAnnotations;
    using System.Configuration;
    using System.Data.SqlClient;
    using System.Linq;
    using System.ServiceModel.DomainServices.Hosting;
    using System.ServiceModel.DomainServices.Server;

    [Description("Enter the connection string to the HelpDesk DB")]
    public class EngineerDataService : DomainService
    {
        private readonly List<EngineerRecord> _EngineerRecordList;

        public EngineerDataService()
        {
            _EngineerRecordList = new List<EngineerRecord>();
        }

        string _connectionString;
        public override void Initialize
           (System.ServiceModel.DomainServices.Server.DomainServiceContext
              context)
        {
            _connectionString = ConfigurationManager.ConnectionStrings
              [this.GetType().FullName].ConnectionString;
            base.Initialize(context);
        }

        [Query(IsDefault = true)]
        public IQueryable<EngineerRecord> GetEngineerData()
        {
            _EngineerRecordList.Clear();

            using (SqlConnection cnn = new SqlConnection(_connectionString))
            {
                using (SqlCommand cmd = cnn.CreateCommand())
                {
                     cmd.CommandText  =
                       "SELECT Id , Surname , Firstname , DateOfBirth ,
                       SecurityVetted , IssueCount
                       FROM dbo.Engineers eng
                       JOIN  ( SELECT Issue_Engineer,
                           COUNT(Issue_Engineer) IssueCount
                           FROM  dbo.Issues GROUP BY Issue_Engineer)
                       AS iss ON eng.Id = iss.Issue_Engineer";
                    cnn.Open();

                    using (SqlDataReader dr = cmd.ExecuteReader())
                    {
                        while (dr.Read())
                        {
                            EngineerRecord Engineer = new EngineerRecord();
                            Engineer.Id = (int)dr["Id"];
                            Engineer.Surname = dr["Surname"].ToString();
                            Engineer.Firstname = dr["Firstname"].ToString();
                            Engineer.DateOfBirth = (DateTime)dr["DateOfBirth"];
                            Engineer.SecurityVetted = (bool)dr["SecurityVetted"];
                            Engineer.IssueCount = (int)dr["IssueCount"];
                            _EngineerRecordList.Add(Engineer);
                        }
                    }
                    cnn.Close();
                }
            }

            return _EngineerRecordList.AsQueryable();
        }

    }

}
The GetEngineerData method ![]() returns the engineer data. This method is decorated with the Query(IsDefault=true) attribute
returns the engineer data. This method is decorated with the Query(IsDefault=true) attribute ![]() , which tells LightSwitch to use it as the default method for returning a collection.
, which tells LightSwitch to use it as the default method for returning a collection.
If you don’t decorate a method with this attribute and don’t decorate any properties with the Key attribute, LightSwitch won’t allow you to import the entity or entity set.
The code uses ADO.NET to connect to your SQL data source. If you were writing an RIA service to connect to an unsupported data source, you would need to adapt the code in this method to use a different data-access mechanism.
The pattern that’s used here is to create a SqlConnection object ![]() and specify the SQL command that you want to execute by using a SqlCommand object. The SQL that’s specified in this method
and specify the SQL command that you want to execute by using a SqlCommand object. The SQL that’s specified in this method ![]() produces the issue count much more efficiently than the native LightSwitch computed column code.
produces the issue count much more efficiently than the native LightSwitch computed column code.
Retrieving a Connection String from web.config
The ADO.NET connection string your RIA service uses to connect to your database should be stored in the web.config file of your LightSwitch application. By doing this, you can easily modify your connection string after you deploy your application.
When you connect to an RIA service at design time, LightSwitch displays an automatic prompt that requests you to enter a connection string. (You’ll see this dialog later in the “Consuming Your RIA Service” section.)
LightSwitch saves your connection string in the ConnectionStrings section of your web.config file, and keys the entry using the fully qualified name of your class.
You can obtain the connection string value in your RIA service code by using the methods in the ConfigurationManager namespace, as shown here:
VB:
ConfigurationManager.ConnectionStrings(Me.[GetType]().FullName) →
.ConnectionString

C#:
ConfigurationManager.ConnectionStrings[this.GetType().FullName]→
.ConnectionString;
In practice, you might also want to write some additional error-checking code to make sure the connection string setting exists, and that it isn’t null or empty.
Also note how the name of the domain service class is decorated with the description attribute. (See Listing 9-2.) LightSwitch shows this description when you attach to the RIA service from the Add Data Source Wizard.
Updating Data
So far, your RIA service only retrieves the engineer data but doesn’t yet allow data to be updated. To allow users to update your engineer data from LightSwitch, add the code that’s shown in Listing 9-3.
Listing 9-3. Updating and Inserting Data
VB:
File:HelpDeskDataServiceVBEngineerDataService.vb

Public Sub UpdateEngineerData(Engineer As EngineerRecord)

    Using cnn As New SqlConnection(_connectionString)
        Using cmd As SqlCommand = cnn.CreateCommand()

            cmd.CommandText =
                "UPDATE Engineers SET [Surname] = @Surname,
                                      [Firstname] = @Firstname,
                                      [DateOfBirth] = @DateOfBirth,
                                      [SecurityVetted] = @SecurityVetted
                WHERE Id=@Id"
            cmd.Parameters.AddWithValue("Surname", Engineer.Surname)
            cmd.Parameters.AddWithValue("Firstname", Engineer.Firstname)
            cmd.Parameters.AddWithValue("DateOfBirth", Engineer.DateOfBirth)
            cmd.Parameters.AddWithValue("SecurityVetted", Engineer.SecurityVetted)
            cmd.Parameters.AddWithValue("Id", Engineer.Id)

            cnn.Open()
            cmd.ExecuteNonQuery()
            cnn.Close()
        End Using
    End Using

End Sub

Public Sub InsertEngineerData(Engineer As EngineerRecord)

    Using cnn As New SqlConnection(_connectionString)
        Using cmd As SqlCommand = cnn.CreateCommand()

            cmd.CommandText =
                 "INSERT INTO Engineers
                  (Surname, Firstname, DateOfBirth, SecurityVetted)
                    VALUES
                  (@Surname, @Firstname, @DateOfBirth, @SecurityVetted);
                  SELECT @@Identity "

            cmd.Parameters.AddWithValue("Surname", Engineer.Surname)
            cmd.Parameters.AddWithValue("Firstname", Engineer.Firstname)
            cmd.Parameters.AddWithValue("DateOfBirth", Engineer.DateOfBirth)
            cmd.Parameters.AddWithValue("SecurityVetted", Engineer.SecurityVetted)

            cnn.Open()
            Engineer.Id = CInt(cmd.ExecuteScalar())
            cnn.Close()
        End Using
    End Using

End Sub

C#:
File:HelpDeskDataServiceCSEngineerDataService.cs

public void UpdateEngineerData(EngineerRecord Engineer)
{

    using (SqlConnection cnn = new SqlConnection(_connectionString))
    {
        using (SqlCommand cmd = cnn.CreateCommand())
        {
            cmd.CommandText  =
                "UPDATE Engineers SET [Surname] = @Surname,
                                      [Firstname] = @Firstname,
                                      [DateOfBirth] = @DateOfBirth,
                                      [SecurityVetted] = @SecurityVetted
                WHERE Id=@Id";


            cmd.Parameters.AddWithValue("Surname", Engineer.Surname);
            cmd.Parameters.AddWithValue("Firstname", Engineer.Firstname);
            cmd.Parameters.AddWithValue("DateOfBirth", Engineer.DateOfBirth);
            cmd.Parameters.AddWithValue("SecurityVetted", Engineer.SecurityVetted);
            cmd.Parameters.AddWithValue("Id", Engineer.Id);
            cnn.Open();
            cmd.ExecuteNonQuery();
            cnn.Close();
        }
    }


}

public void InsertEngineerData(EngineerRecord Engineer)
{

    using (SqlConnection cnn = new SqlConnection(_connectionString))
    {
        using (SqlCommand cmd = cnn.CreateCommand())
        {
            cmd.CommandText =
                 "INSERT INTO Engineers
                  (Surname, Firstname, DateOfBirth, SecurityVetted)
                    VALUES
                  (@Surname, @Firstname, @DateOfBirth, @SecurityVetted);
                  SELECT @@Identity";

            cmd.Parameters.AddWithValue("Surname", Engineer.Surname);
            cmd.Parameters.AddWithValue("Firstname", Engineer.Firstname);
            cmd.Parameters.AddWithValue("DateOfBirth", Engineer.DateOfBirth);
            cmd.Parameters.AddWithValue("SecurityVetted", Engineer.SecurityVetted);
            cnn.Open();
            Engineer.Id = (int)cmd.ExecuteScalar();
            cnn.Close();
        }
    }
}
The RIA service uses the UpdateEngineerData ![]() and InsertEngineerData
and InsertEngineerData ![]() methods to insert and update data. LightSwitch understands that these methods are responsible for inserting and updating through the presence of the Insert and Update prefixes in the method names. There isn’t any more that you need to do to indicate that these methods are responsible for inserting or updating data.
methods to insert and update data. LightSwitch understands that these methods are responsible for inserting and updating through the presence of the Insert and Update prefixes in the method names. There isn’t any more that you need to do to indicate that these methods are responsible for inserting or updating data.
The insert and update methods use ADO.NET code to update the database. The code uses named parameters to prevent rogue users from carrying out SQL injection attacks.
The SQL command that’s used in the InsertEngineerData method includes an additional command that selects @@Identity ![]() . This command retrieves the autogenerated identity value that SQL Server assigns to the newly added record. The code then executes the command by calling the command’s ExecuteScalar method. This allows it to retrieve the ID value of the newly added engineer entity, which it then assigns to the engineer’s Id property (
. This command retrieves the autogenerated identity value that SQL Server assigns to the newly added record. The code then executes the command by calling the command’s ExecuteScalar method. This allows it to retrieve the ID value of the newly added engineer entity, which it then assigns to the engineer’s Id property (![]() ). This allows your user to see the ID number of the record onscreen immediately after a save.
). This allows your user to see the ID number of the record onscreen immediately after a save.
If you’re working with existing SQL Server databases, the ability to call SQL Server stored procedures can be very useful. For security reasons, it’s not uncommon for database administrators to block developers from accessing tables directly. The only way that you can often work with a SQL databases that you don’t own is to retrieve data through views and update data through stored procedures.
Another scenario for using stored procedures is to improve performance. For certain data-intensive tasks, it can be more efficient to perform logic through a stored procedure rather than pull the data that’s needed into the business logic layer.
To demonstrate how to call a stored procedure, this example shows you how to extend your domain service to delete engineers by using a stored procedure. In this scenario, using a stored procedure also helps you to perform an additional piece of functionality—It allows you to cascade-delete all related issue records when a user deletes an engineer.
Although LightSwitch provides this ability, there are some challenges that you need to overcome to make it work with the HelpDesk application. First, the Engineer table includes a self-relationship that allows you to store the manager for each engineer. Self-join navigation properties don’t include the ability to disassociate related records on deletion. So if the engineer that you want to delete is the manager of other engineers, you can’t automatically set the manager field for all subordinate engineers to null.
Second, there are two relationships between the Engineer and Issue tables. For each issue, the engineer can be the engineer assigned to the issue or the engineer who closes the issue. LightSwitch allows you to specify only a single cascade-delete rule on any pair of tables, so you’d need to manually carry out the cascade-deletion manually. Figure 9-4 illustrates these issues.
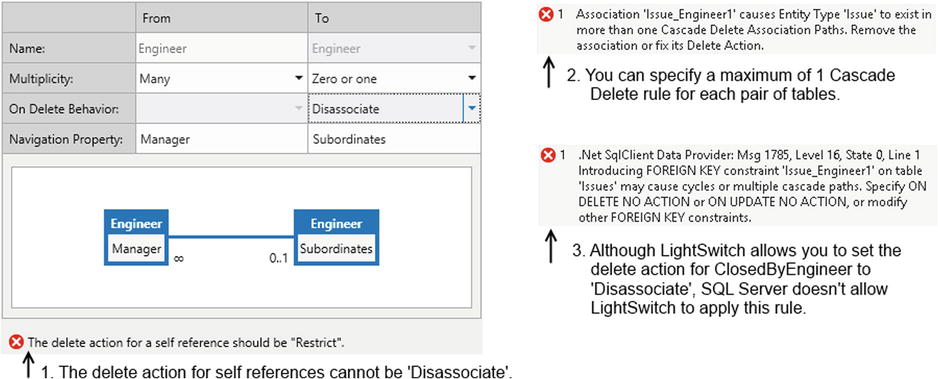
Figure 9-4. Cascade-delete issues
When you set up a relationship to cascade-delete records, it’s also important to consider performance. During this process, the save pipeline loads the records it needs to cascade-delete. In this example, LightSwitch loads all issue records that are related to the engineer before deleting the issues and the engineer.
For each issue record that LightSwitch deletes, it needs to load the issue response and document records to carry out the cascade-delete rules that are defined on the Issue table. And because each issue document record can be large, there’ll be a noticeable delay in performance. In this scenario, a stored procedure provides an efficient alternative because it bypasses the need to load data prior to deletion.
To carry out this example, you’ll need to create a stored procedure in your database. Listing 9-4 shows the stored procedure that carries out the deletion.
Listing 9-4. T-SQL Definition of the DeleteEngineer Stored Procedure
CREATE PROCEDURE DeleteEngineer
   @Id int
AS
BEGIN
   SET NOCOUNT ON;

    --Disassociate records where the engineer is the manager
    UPDATE Issues SET issue_engineer = NULL
    WHERE issue_engineer =@Id

    --Disassociate the issues that are closed by the engineer
    UPDATE Issues set Issue_Engineer1 = NULL
    WHERE issue_engineer=@Id

    --Delete issue document records
    DELETE IssueDocuments FROM IssueDocuments isd join issues iss
    ON iss.id = isd.IssueDocument_Issue
    WHERE iss.Issue_Engineer=@Id

    --Delete issue response records
    DELETE IssueResponses FROM IssueResponses isr join issues iss
    ON iss.id = isr.IssueResponse_Issue
    WHERE iss.Issue_Engineer=@Id

    --Delete Issues that are assigned to the engineer
    DELETE FROM Issues WHERE Issue_Engineer=@Id


    --Delete the engineer record
   DELETE FROM Engineer WHERE ID=@Id

END
GO
After creating your stored procedure, you’ll need to add the delete method to your domain service, as shown in Listing 9-5.
Listing 9-5. Deleting Records
VB:
File:HelpDeskDataServiceVBEngineerDataService.vb

Public Sub DeleteEngineerData(Engineer As EngineerRecord)
    Using cnn As New SqlConnection(_connectionString)
        Using cmd As SqlCommand = cnn.CreateCommand()

            cmd.CommandText = "DeleteEngineer"
            cmd.Parameters.AddWithValue("@Id", Engineer.Id)
            cmd.CommandType = System.Data.CommandType.StoredProcedure

            cnn.Open()
            cmd.ExecuteNonQuery()
            cnn.Close()
        End Using
    End Using
End Sub

C#:
File:HelpDeskDataServiceCSEngineerDataService.cs

public void DeleteEngineerData(EngineerRecord Engineer)
{
    using (SqlConnection cnn = new SqlConnection(_connectionString))
    {
        using (SqlCommand cmd = cnn.CreateCommand())
        {
            cmd.CommandText = "DeleteEngineer";
            cmd.Parameters.AddWithValue("@Id", Engineer.Id);
            cmd.CommandType = System.Data.CommandType.StoredProcedure;
            cnn.Open();
            cmd.ExecuteNonQuery();
            cnn.Close();
        }
    }
}
Just as with the update and insert methods, you’ll need to prefix the delete method with the word delete. This indicates that the method is responsible for deleting the engineer entity.
The ADO.NET code is similar to the code that’s shown earlier. An important difference is that you must set the CommandType property of the SqlCommand object to StoredProcedure ![]() . Your SQL command will not run if don’t do this.
. Your SQL command will not run if don’t do this.
You’ve now completed everything that’s needed for your RIA service to work. Build your project, and make a note of the output DLL that your project produces—you’ll need to refer to this in the next section.
EXERCISE 9.1 – CREATING AN RIA SERVICE
Try creating the RIA Service that’s shown in chapter. You can try extending your project so that it includes tables other than the engineer table. If you need some help, you can refer to the entity class code in chapter 13 to see examples of how to set up navigation properties.
Consuming Your RIA Service
Once you’ve built your RIA Service, you can easily consume it from your LightSwitch application. To do this, open your LightSwitch project, right-click the Data Sources folder, select the Add Data Source Wizard, and choose the WCF RIA Service option.
When the Choose A WCF RIA Service dialog appears (as shown in Figure 9-5), click the Add Reference button. When the Reference Manager dialog appears, click the browse button and select the HelpDeskDataService.dll file that you built in the earlier exercise.
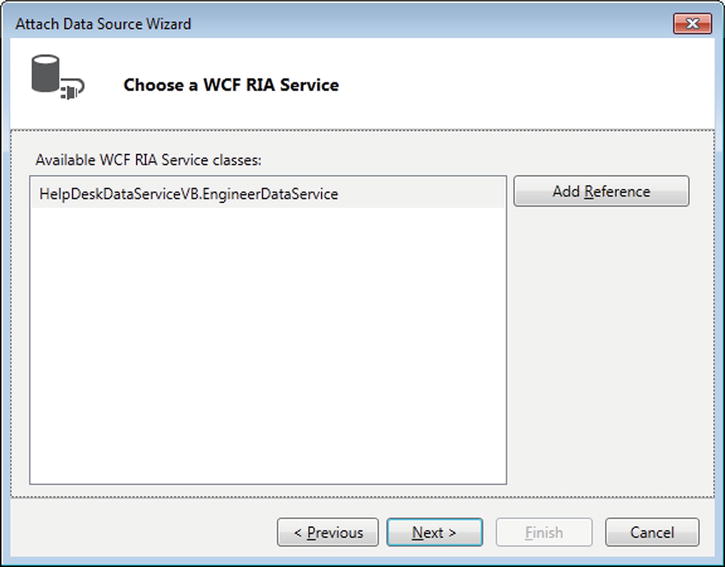
Figure 9-5. Attaching a WCF RIA service
The next step allows you to add entities and properties, just as you would for any other data source. (See Figure 9-6.) The name that you specify in this dialog appears in your list of data sources, so it’s a good idea to keep it consistent with the names of your other data sources. For example, you could name your data source EngineerData to make it look similar to the intrinsic ApplicationData data source.
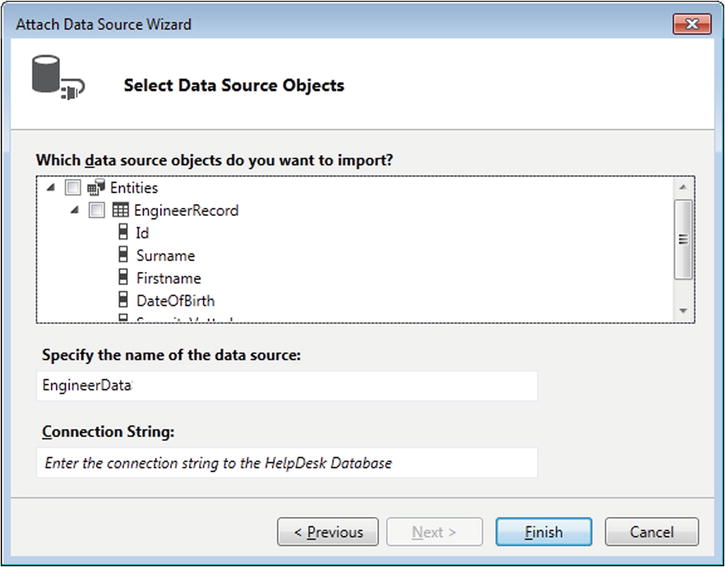
Figure 9-6. Choosing the entities to include
The dialog also contains the Connection String text box, that allows you to enter a connection string (as shown in Figure 9-6). Notice how the text box includes the following default text: “Enter the connection string to the HelpDesk Database.” This help text comes from the Description attribute of the domain service class, which was shown in Listing 9-2.
Clicking the Finish button completes the addition of your RIA Service data source. You can now re-create the engineers management screen using your RIA service. You’ll find that this new screen performs much quicker than the previous screen.
Summary
You can use RIA services to perform data-related operations that are not natively supported by LightSwitch. For instance, you could write an RIA service to allow your LightSwitch application to connect to data that’s held in a Microsoft FoxPro or Access database, or even to connect to nonrelational data source.
You also can use RIA services to create views of your data. These can be aggregated views that contain counts, sums, and averages of your data, or they can even be views that contain joined-up data from multiple tables. Alternatively, you can create a view that returns a subset of columns from a table. This technique can help you optimize the performance of your application, particularly if you have a table that contains large rows (a table that contains images, for example).
Creating an RIA service involves creating a class library project and a domain service class. To do this, you need to create a class that represents your entity. If you want to return an engineer entity, for example, you'll need to create an engineer class and include properties that represent the engineer ID, surname, first name, and so on. The property that acts as the primary key must be decorated with the key attribute. If you don’t specify a key property, LightSwitch won’t allow you to import your entity.
Every RIA service must contain a method that returns a collection of data. This method must return an IQueryable object and has to be decorated with the query attribute. The IsDefault property on the query attribute must be set to true.
To update data, you'll need to create methods that are prefixed with the name Insert, Update, or Delete. These methods must include a parameter that accepts an instance of your entity.
You can store the database connection string that your RIA service uses in your web.config file. This allows you to change the setting after you deploy your application. You can easily set the connection string when you attach your RIA service, and retrieve it in code by using the methods in the ConfigurationManager namespace.
Once you’ve created an RIA service, you can consume it from your LightSwitch application by attaching to it using the Attach Data Source Wizard, just as you would for any other data source.