
![]()
Sharing Data with OData
There are many ways for you to work with external data. You can connect to external data sources by using the Add Data Source dialog, and for nonstandard data sources, you can create your own RIA service. OData (the Open Data protocol) provides you with yet another choice. A big advantage of using OData is that it allows you and other applications to access your LightSwitch data from outside of LightSwitch.
In this chapter, you’ll learn how to
- Connect to third-party data by using OData
- Share your LightSwitch data with other applications
- Update LightSwitch data from outside of LightSwitch
This chapter extends the HelpDesk application by integrating travel advice data from an external data source for each office location. You’ll learn how to allow managers to connect to your LightSwitch issue data from Microsoft Excel and how to allow users to update their issues through a custom ASP.NET web site.
What Is OData?
OData is an open standard that provides a common way to retrieve and update data via the Web, which makes it much easier to share data. It saves you from having to learn a new API each time you want to access a different type of data. For example, SAP (the enterprise resource-planning software product) publishes its data via OData. The great thing is that you can display your SAP data inside of LightSwitch without having to learn any complicated new API.
If you want to connect to your data from outside of LightSwitch, there are many languages and platforms that you can use. The languages that you can use include Java, PHP, Ruby, JavaScript, and many more.
In this first section, you’ll learn to attach to an OData data source. Later in the chapter, you’ll find out how to consume your LightSwitch data from Excel and .NET.
Using External Data Sources
A big benefit of OData is that it allows you consume the silos of data that are held within your organization. Microsoft products that support OData include SharePoint 2010, Microsoft Dynamics CRM 2011, and SQL Server Reporting Services 2012. If your company uses any of these products, you can use LightSwitch to connect to the data that’s held in these applications.
In addition to OData data sources within your organization, there are plenty of third-party and external data sources that you can use. I’ll now show you how to find public data sources that you can incorporate into your LightSwitch applications.
Finding Third-Party Data Sources to Use
A great place to find public data sources is the Ecosystem page on the official OData web site (http://www.odata.org/ecosystem). Here, you’ll find a list of third-party OData providers that includes eBay, Windows Live, and various Government and public bodies.
Another great place is the Azure Data Market (http://datamarket.azure.com/). Here, you’ll find many data sources, some of which are free.
To demonstrate how to consume an OData data source, I’ll show you how to connect to a travel advisory service that’s provided by the UK Foreign and Commonwealth Office. This enables the HelpDesk application to associate travel advice information with the office locations that are stored in your application. You can find this service by visiting http://datamarket.azure.com/dataset/uk.gov/traveladvisoryservice.
To use this service, you’ll need to create an account on the Windows Azure Marketplace. Once you do this, the next step is to click on the Sign Up button that you’ll find on the Travel Advisory Service’s web page. (At the time of writing, it’s free to sign up.) Once you sign up to a Marketplace service, you can use the web site’s Explore This Dataset option to preview the data that’s offered by the service.
Determining Connection Settings
To connect to an OData data source, you’ll need to know the web address that identifies the data source and any authentication details that the service requires. The Travel Advisory Service displays these details on the Details tab of its web page. The OData address you need is labeled Service Root URL, as shown in Figure 10-1.
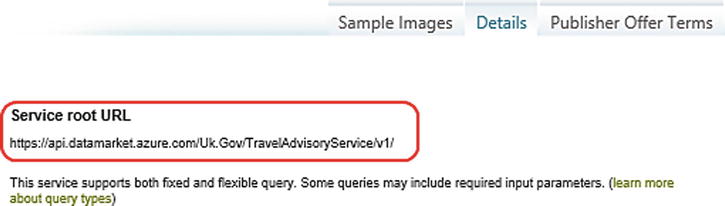
Figure 10-1. Finding the end point of an Azure Marketplace service
All the services from the Azure Marketplace require authentication. To find out your credentials, go to the My Account section of the Windows Azure Marketplace and note the Customer ID and Primary Account Key settings. (See Figure 10-2.) You’ll need these details to authenticate to this service from LightSwitch.
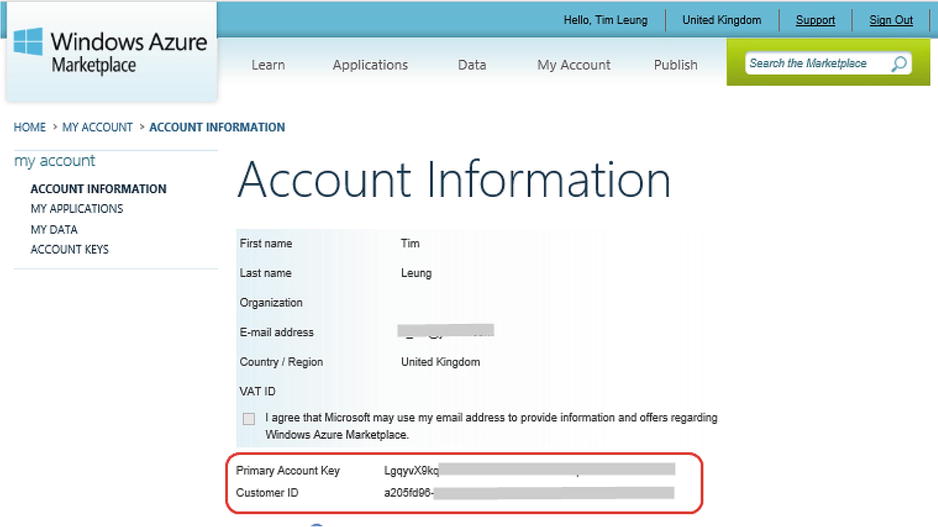
Figure 10-2. Finding your Azure Marketplace credentials
![]() Caution Because certain elements of the Windows Azure Marketplace are chargeable, you should protect your Primary Account Key in the same way as you would protect a credit card number.
Caution Because certain elements of the Windows Azure Marketplace are chargeable, you should protect your Primary Account Key in the same way as you would protect a credit card number.
Connecting to an OData Data Source
To connect to an OData data source from LightSwitch, right-click Solution Explorer, open the Attach Data Source Wizard, and choose the OData option. When the OData settings page appears, enter your OData URL in the Specify The OData Service Endpoint text box. (See Figure 10-3.) In the travel advisory example, the Customer ID is your user name and the Primary Account Key is your password.
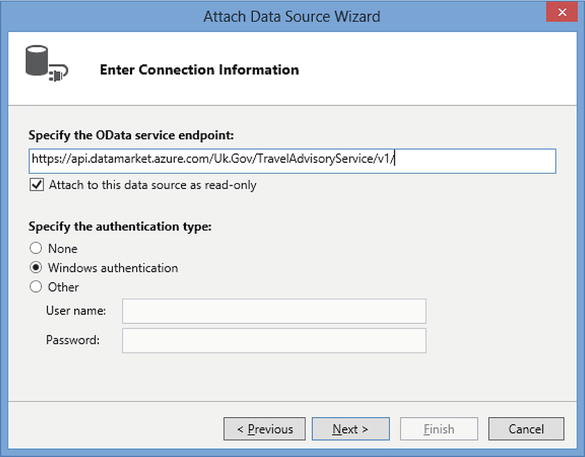
Figure 10-3. Attaching to the Travel Advisory Service
By default, LightSwitch checks the ‘Attach To This Data Source As Read-Only’ check box. This is because OData data sources are more likely to be non-updatable. This option disables the insert, update, and delete commands on screens and also prevents you from updating the data source through code.
Next, the wizard prompts you to select the entities you want to use in your application (as shown in Figure 10-4).
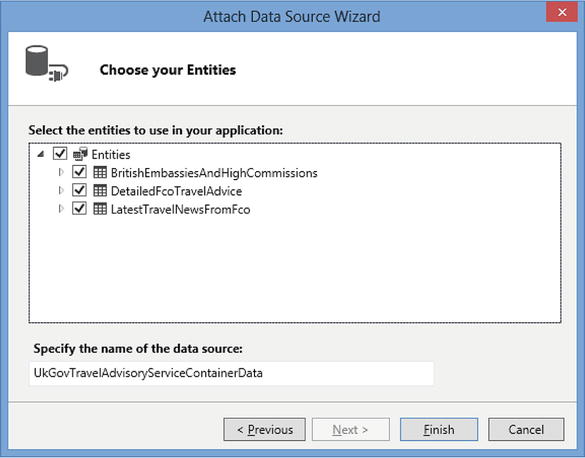
Figure 10-4. Choosing the entities you want to use
Once you complete the wizard, you can use the data source just as you would any other data source. Remember that you can also add relationships between entities in different data sources. Figure 10-5 shows the appearance of this data when you include it on a screen that includes department data.
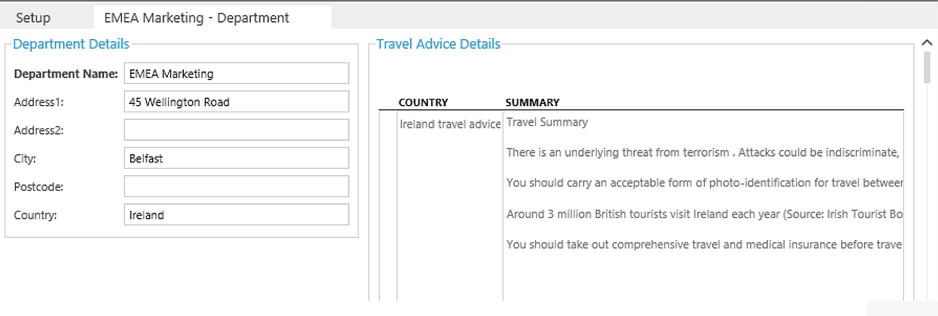
Figure 10-5. A screen that uses the OData data source
EXERCISE 10.1 – FINDING ODATA DATA SOURCES
Visit the OData and Windows Azure Marketplace web sites, and try to find some interesting data sources. Once you find a data source you can use, use the Attach Data Source Wizard to attach it to your application and create an editable grid screen to view your data source.
Understanding Default Data Source Options
OData feeds from different sources behave differently. We used a data source that comes from the Foreign and Commonwealth Office (FCO). But the FCO might not have implemented all of the underlying OData query operators that LightSwitch supports. For example, some OData data sources don’t support paging, sorting, or certain kinds of query filters.
To stop your application from breaking when LightSwitch tries to do something that isn’t supported by your data source, LightSwitch applies application options that are more restrictive than normal. First, it switches off searching by setting the Is Searchable option to false at the entity level. Any collections of datathat you’ve added to a screen will also have their Support Search settings set to false. If you later discover that your OData data source supports searching, you can manually enable the setting in the table designer’s property sheet. However, you should be aware that this can slow down your application.
To further help performance, LightSwitch disables eager loading if your screen contains multiple related tables that come from an OData data source. Finally, LightSwitch also turns off pagination on data grids and data lists if it isn’t able to request an individual page of data or count how many pages of data there are.
Exposing Your LightSwitch Data via OData
Publishing your application’s data is just as easy as consuming an OData data source. In fact, LightSwitch does this automatically for you without you having to carry out any extra work.
Finding Your Application’s End Point URL
When you deploy your application, LightSwitch creates service end points for each data source in your application. You can access these end points in a web browser by entering the root URL for your application followed by the data source name with an .SVC extension, followed by the name of your entity set. Figure 10-6 shows some example URLs.
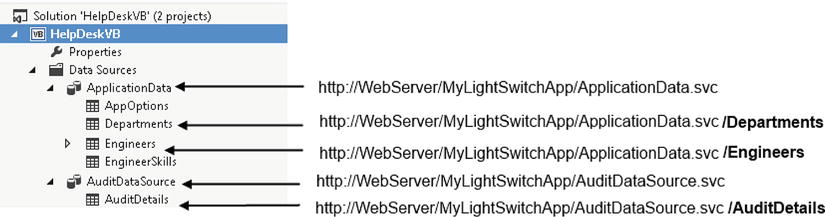
Figure 10-6. OData end-point URLs
To demonstrate the data that’s returned by an OData end point, start up a LightSwitch web application and make a note of the root URL—it’ll look something like this: http://localhost:41155/HelpDesk. Now open a new browser tab and enter http://localhost:41155/HelpDesk/ApplicationData.svc/Engineers into the address bar. This returns the raw data, as shown in Figure 10-7.
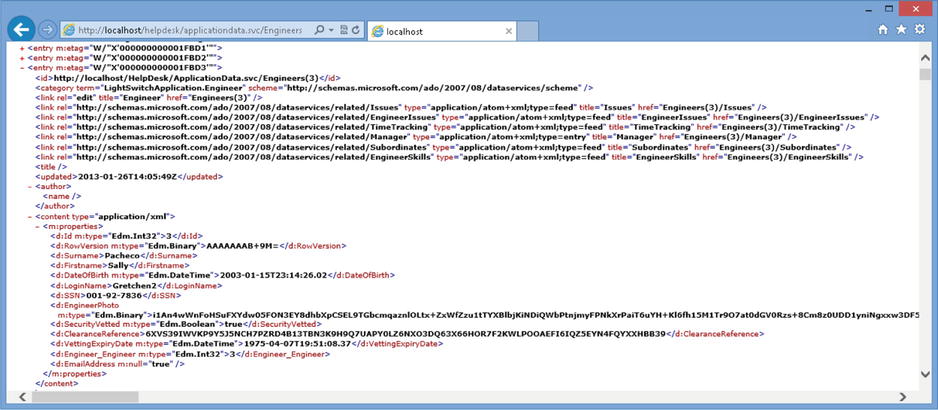
Figure 10-7. Raw OData feed
If you can’t see the raw data as shown in Figure 10-7, you need to adjust your browser settings. In Internet Explorer, you do this by switching off the Turn On Feed Reading View option under Tools ![]() Internet Options
Internet Options ![]() Content
Content ![]() Feeds and Web Sites (Settings).
Feeds and Web Sites (Settings).
![]() Tip If you try this technique on a table with a sizable number of rows, the amount of XML data that LightSwitch returns might be large enough to crash Internet Explorer. If this happens, you can request fewer records by specifying a query in the URL.
Tip If you try this technique on a table with a sizable number of rows, the amount of XML data that LightSwitch returns might be large enough to crash Internet Explorer. If this happens, you can request fewer records by specifying a query in the URL.
Querying OData
OData allows you to perform queries by appending query operators to your URL. To return records for the first engineer, you’d use this URL:
http://localhost:41155/ApplicationData.svc/Engineers(1)
The OData protocol allows you access related records by using similar syntax. So to return all issues that are assigned to the first engineer, you’d use the URL:
http://localhost:41155/ApplicationData.svc/Engineers(1)/Issues
If you want to find all engineers with a surname of Smith, you’d use
http://localhost:41155/ApplicationData.svc/Engineers?$filter=Surname
eq 'Smith'
![]() Note LightSwitch OData queries are case sensitive. In this example, the URL includes the word Engineers rather than engineers. If you’re interested in finding out more about the OData query operators that you can use, the official OData web site includes a full list of operators (http://www.odata.org/documentation/uri-conventions).
Note LightSwitch OData queries are case sensitive. In this example, the URL includes the word Engineers rather than engineers. If you’re interested in finding out more about the OData query operators that you can use, the official OData web site includes a full list of operators (http://www.odata.org/documentation/uri-conventions).
Securing OData Feeds
Following the previous example, seeing all your data exposed through OData might leave you feeling vulnerable. For instance, any user could easily view all your engineer records by typing this address into their browser:
http://localhost:41155/ApplicationData.svc/Engineers
If this concerns you, there sadly isn’t a way to switch off OData end points. However, you can secure your data by using the security features that are built into LightSwitch. The first thing that you should do is to turn on authentication. This prevents someone from accessing the end point without a password or being Windows authenticated. Next, you can limit access to your data by writing code in your entity’s CanRead, CanUpdate, CanDelete, and CanInsert methods. If you want to apply row-level access control, you can write code in your entity’s Entity_Filter method. To find out more about securing your data, refer to Chapters 16 and 17.
![]() Note LightSwitch doesn’t provide access control at a column level. For example, let’s suppose that the Engineer table contains a Salary column. If you want all users to be able to view engineer names but only managers to be able to view the salary details, the salary data must to be split into a separate table. If not, your salary data can be exposed via the OData end point.
Note LightSwitch doesn’t provide access control at a column level. For example, let’s suppose that the Engineer table contains a Salary column. If you want all users to be able to view engineer names but only managers to be able to view the salary details, the salary data must to be split into a separate table. If not, your salary data can be exposed via the OData end point.
Consuming LightSwitch Data
Now that you understand how LightSwitch publishes your data using OData, I’ll show you some examples of how to consume your data from outside of LightSwitch. You’ll find out how to connect to your data from Microsoft Excel and from .NET.
Connecting to LightSwitch Data from Excel
Excel 2013 allows you to connect to your LightSwitch data via OData. The big advantage of using Excel is that it allows users to analyze their data by using custom formulas, charts, or PivotTables. To create a connection, select the OData option that you’ll find in the Get External Data group in the ribbon’s Data section. (See Figure 10-8.)
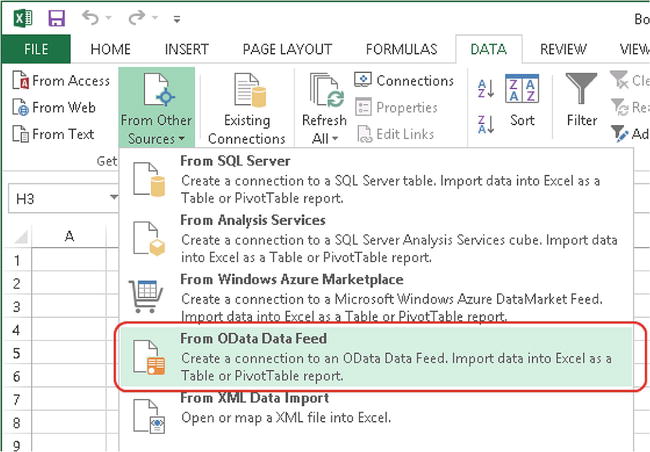
Figure 10-8. Connecting to your LightSwitch application using OData
Connecting to LightSwitch Data from .NET
Any application you create that uses .NET 3.5 or above can access your LightSwitch data through WCF (Windows Communication Foundation) Data Services. In this section, you’ll find out how to extend the HelpDesk system by creating an ASP.NET application that allows users to create and view issues.
To create this application, start Visual Studio, create a new ASP.NET Web Forms application, and call it HelpDeskPortal. Right-click your project, and select the Add Service Reference option from Solution Explorer. This opens the dialog that’s shown in Figure 10-9.
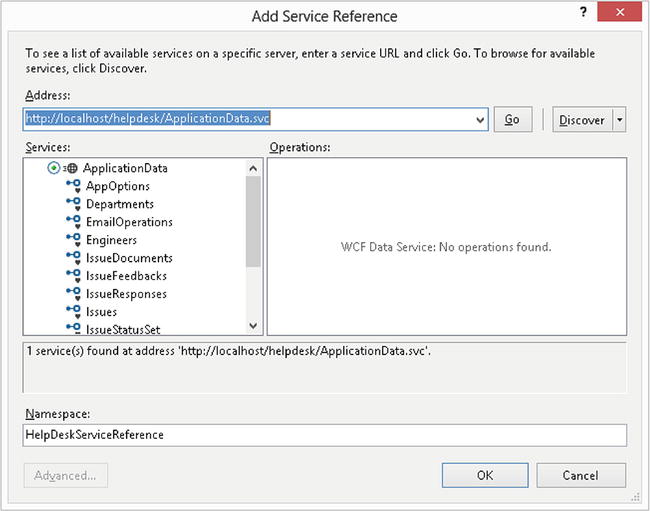
Figure 10-9. Adding a service reference
Enter the URL of your OData end point in the Address field (for example, http://WebServer/YourAppName/ApplicationData.svc), and click the Go button to populate the Services list box. Click the OK button to complete the addition of the service reference. You can use the service reference (also known as the proxy or service client) to access your LightSwitch entities in .NET code.
Adding data from ASP.NET
To add records to the HelpDesk system from outside of LightSwitch, we’ll create a web page that allows users to add new issues. Add a new Web Form to your ASP.NET project, and name it CreateIssue.aspx. Listing 10-1 shows the markup for a page that includes data-entry controls and a button that performs the save.
Listing 10-1. Web Form for Adding a New Issue
File: HelpDeskPortalCreateIssue.aspx

<html xmlns="http://www.w3.org/1999/xhtml">
<head runat="server">
    <title />
</head>
<body>
    <form id="form1" runat="server">
    <div>
        <asp:Label runat="server" Text="Issue Subject"/>
        <asp:TextBox ID="IssueSubject" runat="server"/>
        <asp:Label runat="server" Text="Description"/>
        <asp:TextBox ID="IssueDescription" runat="server"/>
        <asp:Button Text="Add Issue" runat="server" OnClick="AddIssue_Click" />
        <asp:Label ID="ConfirmLabel" runat="server" />
    </div>
    </form>
</body>
</html>
The IssueSubject ![]() and IssueDescription
and IssueDescription ![]() text boxes allow the user to enter a subject and description. The Add Issue button
text boxes allow the user to enter a subject and description. The Add Issue button ![]() calls the code that adds the issue to your LightSwitch database. (See Listing10-2.)
calls the code that adds the issue to your LightSwitch database. (See Listing10-2.)
Listing 10-2. Web Form Code That Adds a New Issue
VB:
File: HelpDeskPortalVBCreateIssue.aspx.vb

Imports HelpDeskPortalVB.HelpDeskServiceReference

Protected Sub AddIssue_Click(sender As Object, e As EventArgs) Handles Button1.Click

    Dim srvRef As ApplicationData =
       New ApplicationData(
          New Uri("http://localhost/HelpDesk/ApplicationData.svc/"))
    'srvRef.Credentials = New Net.NetworkCredential("username", "password")

    Dim issue As HelpDeskServiceReference.Issue =
        New HelpDeskServiceReference.Issue()

    issue.Subject = IssueSubject.Text
    issue.CreateDateTime = DateTime.Now
    issue.TargetEndDateTime = DateTime.Now.AddDays(3)
    issue.ProblemDescription = IssueDescription.Text

    Try
        srvRef.AddToIssues(issue)
        srvRef.SaveChanges()
        ConfirmLabel.Text = "Issue Created"

    Catch ex As Exception
        ConfirmLabel.Text = ex.Message
    End Try

End Sub

C#:
File: HelpDeskPortalCSCreateIssue.aspx.cs

using HelpDeskPortalCS.HelpdeskServiceReference;

protected void AddIssue_Click(object sender, EventArgs e)
{

    ApplicationData srvRef =
       new ApplicationData(
          new Uri("http://localhost/HelpDesk/ApplicationData.svc/"));
    //srvRef.Credentials =
    //     new System.Net.NetworkCredential("username", "password");

    HelpdeskServiceReference.Issue issue =
        new HelpdeskServiceReference.Issue();

    issue.Subject = IssueSubject.Text;
    issue.CreateDateTime = DateTime.Now;
    issue.TargetEndDateTime = DateTime.Now.AddDays(3);
    issue.ProblemDescription = IssueDescription.Text ;

    try
    {
        srvRef.AddToIssues(issue);
        srvRef.SaveChanges();
        ConfirmLabel.Text = "Issue Created";
    }
    catch (Exception ex)
    {
        ConfirmLabel.Text = ex.Message;
    }
}
The first part of the code ![]() creates the service context you use to access your LightSwitch data. The constructor requires you to supply a URL for your OData end point. We hardcoded this URL, but in practice, it’s a good idea to store this value in your application’s web.config file. By doing this, you can change the end-point address after you deploy your application. If you sensibly secured your application by enabling authentication (as discussed in Chapter 16), the commented-out line of code shows you how to supply a user name and password.
creates the service context you use to access your LightSwitch data. The constructor requires you to supply a URL for your OData end point. We hardcoded this URL, but in practice, it’s a good idea to store this value in your application’s web.config file. By doing this, you can change the end-point address after you deploy your application. If you sensibly secured your application by enabling authentication (as discussed in Chapter 16), the commented-out line of code shows you how to supply a user name and password.
The next part of the code creates a new instance of an issue entity ![]() , and it sets several properties
, and it sets several properties ![]() that include the subject, create date, target end date, and description properties. Visual Studio provides you with full IntelliSense—this makes it easy for you to set your entity’s property values because there’s no need for you to remember the exact names.
that include the subject, create date, target end date, and description properties. Visual Studio provides you with full IntelliSense—this makes it easy for you to set your entity’s property values because there’s no need for you to remember the exact names.
An AddTo method exists for each entity in your data source. To add a new record, you’ll need to call the AddTo method that corresponds with your entity and supply the entity that you want to add. In this case, the method is called AddToIssues ![]() . Finally, the SaveChanges method allows you commit your changes. If the data that your user enters fails validation, the SaveChanges method raises an exception, and you can handle this as you wish in the exception handler
. Finally, the SaveChanges method allows you commit your changes. If the data that your user enters fails validation, the SaveChanges method raises an exception, and you can handle this as you wish in the exception handler ![]() .
.
With some extra styling, Figure 10-10 shows how this web page looks. This section highlights how easily you can work with LightSwitch data, and how the API objects that you use are very similar to those described in Chapter 4.
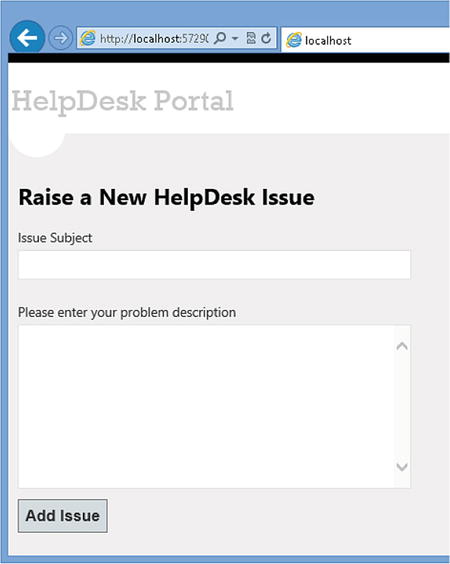
Figure 10-10. Web page that adds issues
Reading data from ASP.NET
To retrieve records from the HelpDesk system, we’ll add a page that displays the issues that have been assigned to a user. Add a new Web Form to your ASP.NET project, and name it ViewIssues.aspx. From the toolbox, drag a GridView control onto your Web Form. Your markup will look like the code that’s shown in Listing 10-3.
Listing 10-3. Web Form That Displays Records
File: HelpDeskPortalViewIssues.aspx

<html xmlns="http://www.w3.org/1999/xhtml">
<head runat="server">
    <title />
</head>
<body>
    <form id="form1" runat="server">
    <div>
        <asp:GridView ID="IssuesGrid" runat="server"/>
    </div>
    </form>
</body>
</html>
Now add the .NET code to the load method of your page, as shown in Listing 10-4.
Listing 10-4. Web Form Code That Populates a Grid View
VB:
File: HelpDeskPortalVBViewIssues.aspx.vb

Imports HelpDeskPortalVB.HelpDeskServiceReference

Protected Sub Page_Load
   (ByVal sender As Object, ByVal e As System.EventArgs) Handles Me.Load

    Dim srvRef As ApplicationData =
       New ApplicationData(
          New Uri("http://localhost/HelpDesk/ApplicationData.svc/"))

    Dim issues = srvRef.Issues.Where(Function(i) i.User.Username = "timl")

    IssuesGrid.DataSource = issues
    IssuesGrid.DataBind()

End Sub

C#:
File: HelpDeskPortalCSViewIssues.aspx.cs

using HelpDeskPortalCS.HelpDeskServiceReference;

protected void Page_Load(object sender, EventArgs e)
{
    ApplicationData srvRef =
        new ApplicationData(
           new Uri("http://localhost/HelpDesk/ApplicationData.svc/"));

    var issues = srvRef.Issues.Where(i => i.User.Username == "timl");

    IssuesGrid.DataSource = issues;
    IssuesGrid.DataBind();
}
Just like the previous example, the first part of the code ![]() creates the service reference context. The next line of code selects the issues that are assigned to the user timl
creates the service reference context. The next line of code selects the issues that are assigned to the user timl ![]() . In practice, you’d replace the hardcoded timl value with logic that determines the currently logged-in user. But the important point of this code is that you can query your data by using the same query syntax from Chapter 4. So if you want to return just a single issue, you can write code that uses the FirstOrDefault method.
. In practice, you’d replace the hardcoded timl value with logic that determines the currently logged-in user. But the important point of this code is that you can query your data by using the same query syntax from Chapter 4. So if you want to return just a single issue, you can write code that uses the FirstOrDefault method.
The final piece of code sets the data source of your GridView control ![]() , and data-binds the issues to the grid. Figure 10-11 shows how your final screen might look with some extra formatting.
, and data-binds the issues to the grid. Figure 10-11 shows how your final screen might look with some extra formatting.
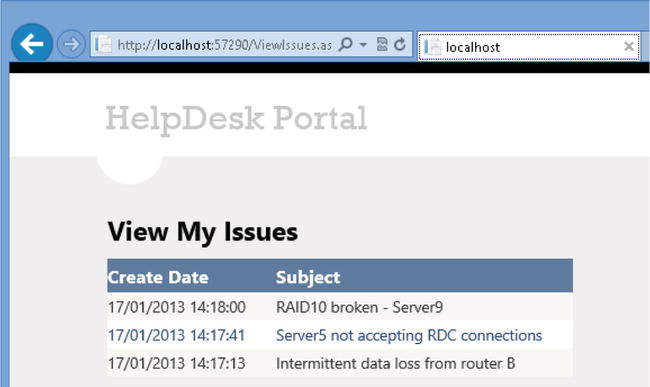
Figure 10-11. Web page that shows issues
Connecting to Use LightSwitch from Other Platforms
So far, you’ve seen how to consume LightSwitch data from a .NET /ASP.NET application. Fortunately, connecting to your LightSwitch data from other platforms or devices isn’t very difficult. The main thing that you’ll need to do is to find an appropriate OData client.
Table 10-1 shows a list of common platforms and links to suitable OData clients for those platforms. When you connect to a LightSwitch application from a different platform or language, the principles that you’ve learned will still remain the same. For example, you’d still use the same OData methods to access entities and to save your changes.
Table 10-1. OData Platforms and Clients
| Platform | OData Client/Web Site |
|---|---|
| JavaScript | Datajs: http://datajs.codeplex.com/ |
| Android/Java | OData4j: http://code.google.com/p/odata4j/ |
| Windows Phone 7 | Windows Phone 7 SDK: http://create.msdn.com/ |
| iOS (Apple) | OData client for Objective-C: http://odataobjc.codeplex.com/ |
| PHP | OData SDK for PHP: http://odataphp.codeplex.com/ |
| Ruby | ruby_odata: http://github.com/visoft/ruby_odata |
Summary
LightSwitch supports OData, a protocol that makes it easy to consume external data sources and share your data with other applications.
You can use OData to connect to data that’s held in systems that you’ll commonly find within businesses. This includes data that’s stored in SharePoint 2010, Microsoft Dynamics CRM 2011, and SQL Server Reporting Services 2012. Externally, there are many other third-party data sources that you can use. This chapter shows you how to connect to a travel advisory service, but you’ll find many other data sources through the official OData web site and the Windows Azure Marketplace.
To connect your application to an OData data source, you would use the Attach Data Source Wizard, just as you would for any other external data source. The connection process requires you to enter an end point—this is the web address that identifies the OData data source that you want to use. Depending on the service that you’re connecting to, you may also need to enter a user name and password.
LightSwitch automatically creates service end points for each data source in your application. These end-point addresses consist of the root URL for your application, followed by the data source name with an .SVC extension, followed by the name of your entity set. For example, http://WebSite/HelpDesk/ApplicationData.svc/Engineers is the address that returns all engineer records. Because users can access your raw data through a web browser, it’s a good idea to apply access control to your application. Chapters 16 and 17 show you how to do this.
OData allows you connect to your LightSwitch data from other applications. You’ve seen examples of how to do this with Excel and ASP.NET. In Excel, you can connect to OData data sources by using the Data Import feature. In .NET, you can add a WCF service reference to your LightSwitch data. This gives you strongly typed access to entities and allows you to query, add, and update records using much of the same syntax that you saw in Chapter 4.