

Define the Problem
Step One
This chapter starts with the most basic element in problem solving: defining the problem.
Some people might not understand the difference between the problem’s definition and the problem’s cause. It’s important to understand this difference before you venture into the realm of problem solving.
The Cause and Why It Is Important
Consider for a minute a plastic part formed in a molding machine. The machine has at least two moveable parts that are joined before the resin is injected into the mold. One of these is the cope (the top) and the other is the drag (the bottom). These two sections must join flawlessly to produce components that don’t have a substantial knit line (mismatch) where they meet. Mismatch is prevented by using mating pins in the drag section and bushings in the cope section. These components keep the pattern sections from shifting in the north, south, east, and westerly directions. As long as the pins and bushings are new, the mating can be almost flawless and imperceptible. However, when there is excessive wear on any of these control components, the pattern can shift significantly. When that happens, a visual knit line with the potential of a sharp fin will be produced.
The problem is the manufacture of a part or process that contains a defect. The problem definition is that the part is unacceptable because it has a visible defect (knit line and a sharp fin). Put another way, the problem definition can be simply stated as, “The part is defective, because it won’t fulfill its intended purpose.” (If an O-ring had to be applied to this component, for example, it would fail because the fin would cut and damage the O-ring during operation.)
An ensuing investigation would seek to identify conditions that could influence the quality of the part under question . The conditions, or clues, are generated by comparing a properly manufactured part with a mismatched part.
The cause of the problem in this case is excessive wear on the pin and bushing components, which allowed the poor positioning of the mating pattern. This poor positioning allowed the mismatch and the unacceptable knit line. To eliminate the cause of the mismatch, it is necessary to change the worn pins and or bushings.
Hopefully, this distinction will become more apparent as you observe the samples and illustrations in the book. In the past, many manufacturers would recognize the mismatch and fin as being detrimental and would have assigned an individual to file down the unsatisfactory components to remove the mismatch and the fin. This is reactive and does not solve the problem or prevent it from happening again. The point of this book is to teach you how to identify a problem, remove the inadequacy, and prevent it from happening again.
So the difference between a problem definition and its cause might be expressed as follows. The problem definition is a description of the conditional state (it fails to meet a requirement) of the part that created or resulted in an inadequate product. You then augment that description by uncovering relevant clues.
The cause of the problem, on the other hand, is that condition to which you apply corrective steps in order to eliminate the observed detrimental characteristics. You focus on pinpointing the specific mechanism, practice, material, process, or environment that made the component characteristics unacceptable.
![]() Note The cause of a problem is the specific mechanism, practice, material, process, or environment that made the component characteristics unacceptable.
Note The cause of a problem is the specific mechanism, practice, material, process, or environment that made the component characteristics unacceptable.
Problems: Inherent in Manufacturing
All manufacturing problems have causes. And all causes are specific conditions that can eventually create customer discontent. Customer discontent is unpredictable, because it relates to users’ expectations and values. In manufacturing, defects are inadequacies in the process that affect the final product quality. These inadequacies can affect aesthetics, smooth product flow, product function, or equipment downtime. They may even cause costly recalls. In service operations, defects may result from customers comparing high expectations to marginal results.
The good news is that what you learn from this book is applicable to simple and complex manufacturing or service problems.
Since each problem is the result of some recognized fault, you can use “cause identification” to focus on a specific flaw present within the problem. The term main cause describes the detrimental condition that prevents a desired outcome. You have identified it and referred to it as the root cause, the source of the problem, the main variable, or another identifier. To reduce ambiguity, it’s called the cause from this point on.
The cause of a problem is not the same as the definition of the problem, as mentioned. It is the factor that aggravates a condition that allows a problem to form. For example, the sharp fin on a plastic part can create an unsafe handling condition. That is a safety problem. The characteristic of the safety problem is the fin. As you’ve seen, the misalignment of two mating mold sections can allow mismatch and cause sharp fins. This improper mating creates a gap for excess plastic to escape, which then forms the sharp fin.
In this case, you can prevent the safety problem only by correcting the attribute that caused it. You would have to improve the mold mating, or sealing surfaces, to prevent the sharp fin from forming. The sharp fin is therefore a characteristic of the safety problem, but it is not the cause of the problem.
The first step in problem solving is therefore to adequately and completely define the problem. It is imperative that you take the time and effort needed to define your problem thoroughly. The extra effort you take to define the problem thoroughly will enable you to identify the cause quickly. This results in untold timesaving dividends.
![]() Note The first step in solving a manufacturing problem is to adequately and completely define it. Don’t jump to a solution before you have defined the problem, or you will probably have to solve it again in the near future.
Note The first step in solving a manufacturing problem is to adequately and completely define it. Don’t jump to a solution before you have defined the problem, or you will probably have to solve it again in the near future.
Another example: An engine assembly line was experiencing a high reject rate due to a leak test. We defined the condition in this manner, “Engines are failing the leak test at the front water seal areas.” We then conducted an evaluation to determine the characteristics responsible for causing the engine leak rejects.
The evaluation revealed that the front seal assemblies had traces of a foreign material (FM) that coated the outside diameter of the seal. The foreign material was trapped between the seal’s outside diameter and the engine-housing wall. We removed and inspected many leaking seals to generate clues.
At this point, some people insisted that a blow-off (a high-compression jet of air directed on a surface to clean or dry it) be applied to each seal to remove the FM. But then we noticed that there was an unusual scratch (wear mark) on the seal’s coating, which proved to be an important clue. Study showed that this scratch was due to seal ram misalignment with the engine assembly, which sheared the coating during installation. The misalignment of the positioning locators proved to be the cause.
The immediate problem was the rejection of engines due to a leak test failure. However, the cause of the problem was not the sheared traces of material that were found on the leaking engines. The cause of the problem was the misalignment of the positioning locators, which allowed the uneven shearing and enabled the particles to be trapped in the assembly. The trace of material found on the rejected units and the unusual installation wear pattern were characteristics of the leaking, and they were valuable clues in identifying the problem.
Conditions: Clues to Solving Problems
Each of the following conditions was a characteristic we found in different studies involving leaking seals in engines or other products:
Misplaced or insufficient grease application
Inadequate dust seal lubrication
Foreign material on the mating surfaces
Mismatch on the molded part
Imperfect rubber coating
Packaging components found in the assembly
Reworked but unacceptable parts found in the assembly
Strings and fibers negatively affecting the assembly
Seals with dimples created during the assembly process
It should be apparent from this list that there are numerous conditions that can allow a seal problem to occur. Each condition contains a plethora of information that is not observable to the untrained eye. Each characteristic can be a valuable clue to identify and solve the puzzle. It is not uncommon to find a major clue when studying a defective part or the results from a troubled process.
![]() Tip Always approach an industrial problem as if it were a crime scene. This enables you to glean as much information as possible and find more clues. Always check the “victims” for valuable clues.
Tip Always approach an industrial problem as if it were a crime scene. This enables you to glean as much information as possible and find more clues. Always check the “victims” for valuable clues.
Key to Gleaning Clues and Solving Problems
One of the tools for generating clues is a problem corrective action worksheet (Figure 1-1). You can use this sheet to verify acceptable and established practices and to assess compliance with current work instructions and procedures. The instructions and procedures are sometimes referred to as consistent work instructions. They specify the detailed manpower, tools, methods, procedures, equipment, and measuring devices used in a particular operation. In addition, environmental and required safety equipment might be specified, although these two concerns are not explained here.
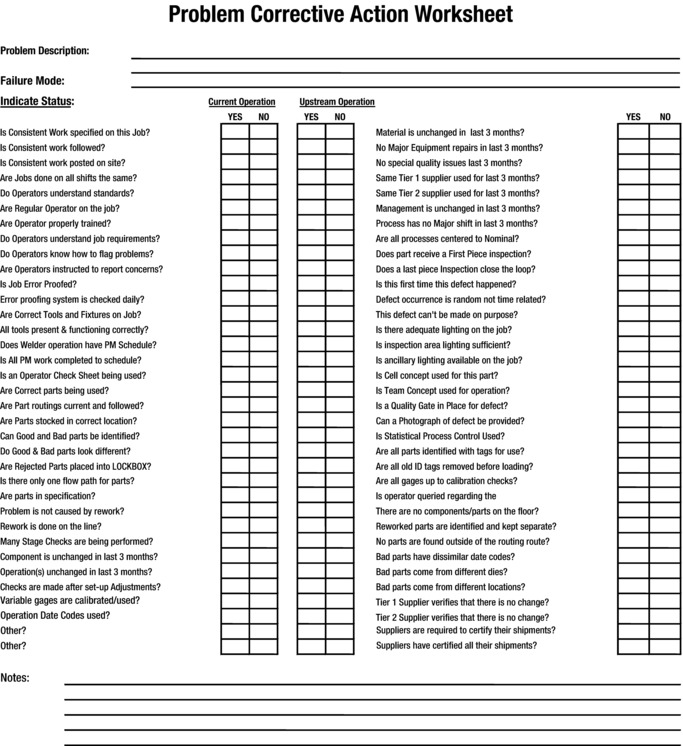
Figure 1-1. The Problem Corrective Action Worksheet
The questions shown in the worksheet are self-explanatory, as they evaluate conditions in the affected and previous operations. Your first step should always be to evaluate these established benchmarks, in order to prevent wasted efforts. Answers that result in a “Yes” are acceptable. You need to study the answers that result in a “No” more fully—they are clues that can help you find the cause of problems.
You can correct the vast majority of industrial problems by using the problem corrective action worksheet. The clues you gather from using this sheet help to pinpoint systemic conditions, which are more easily corrected than more complex, obtuse problems. For more complicated problems, you will need to use all eight steps in the process.
If you don’t find any “No” evaluations, other areas are suspect. You might need to check for missing baskets on a casting overhead in a foundry to prevent hotcrack scrap. Or, you might need to audit a chemical manufacturer’s cooling tower temperatures to control a process. As you find conditions that cause detrimental effects, add them to your own corrective action worksheet.
![]() Tip Keep all worksheets as a starting point for each of your future evaluations.
Tip Keep all worksheets as a starting point for each of your future evaluations.
In any case, it is advisable to request the work sheet information from your tier 1 and tier 2 suppliers1 to ensure that they have not changed materials, components, operations, processes, equipments, or systems that you have certified. As an example, a supplier once changed the component raw material for a part sintering operation (creating objects from powders) from red iron oxide to black iron oxide without permission. This caused the product of the manufacturing process to fail.
Another supplier changed the approved oven temperature for curing foam molds without permission, and it resulted in warped crankshaft castings.
Both suppliers later insisted that they made these “minor” changes in order to save costs. Unfortunately, they denied making these changes until very late in the problem evaluation, which added cost and scheduling problems.
As a sad matter of fact, almost 40% of the problems we experienced with 200 suppliers over a period of one year were caused by unauthorized material changes, process changes, or the lack of consistent work items as identified on the problem solving worksheet. Admittedly, not all problems are so easily solved. Sometimes scrap or defective components require in-depth study in order to identify the characteristics that lead to the discovery and elimination of the cause.
Once you have established consistent work procedures for your internal and external suppliers, you can focus on relevant clues.
Summary
This chapter introduced basic material that will allow you to progress more easily through the remaining chapters. You should now feel more confident about focusing on the problem and evaluating its characteristics. The next chapter deals with defect identification. It contains tables that will help you isolate important separation criteria identifiable within the problem. These tables will become valuable tools for identifying defects.
Since you are now able to create an adequate description of the problem and describe its physical conditions, it is time to move on to the next chapter.
1 A tier 1 supplier supplies goods directly to you, the customer. A tier 2 supplier supplies parts, services, or components to the tier 1 supplier, who then utilizes the materials or service and sends the product to you, the customer.