
![]()
High-Performance JavaScript
For a game to be enjoyable, smoothness is critical. A smooth game can feel lifelike and amazing; without smoothness, a game will be sluggish and annoying, even with the best art.
Smoothness is also important for user retention. Facebook recently revealed the results of an A/B test in which scrolling was slowed from 60FPS to 30FPS (http://youtu.be/3-WYu_p5rdU?t=36m): engagement collapsed.
In this chapter, I will discuss the essential techniques for making a simple, two-dimensional HTML5 game feel and perform like a native one.
The first two techniques are the low-hanging fruit and will give you a lot, while taking only a couple of hours each to implement. It is worth noting that these techniques are useful even if you are using one of the many game frame works available.
You may have heard that premature optimization is the root of all evil, and although this is true, planning for optimizations in advance of your game architecture is a smart move. If you have a game in the planning stages, that is the time to consider how optimizations would fit, and in the event that you decide to apply the following techniques to your game, make sure, using profiling, that it would benefit from their implementation.
Profiling your game with Google Chrome DevTools will help you identify bottlenecks; these tools have improved considerably in last year, especially in the area of profiling. I’d recommend checking the documentation for updated information on the subject: https://developers.google.com/chrome-developer-tools.
About the Demo
I will use the example of a particle system throughout this chapter to illustrate how the aforementioned techniques can be applied. You can find the demo at the book’s home page on the Apress web site (www.apress.com), along with the code this chapter is based on. This particle system wasn’t made to be efficient as a particle system per se, but instead was made to resemble a two-dimensional game, in the sense that the system moves objects around and then renders them every frame.
The demo uses the Web Graphics Library (WebGL) to render two-dimensional sprites; however, you don’t need to know WebGL to understand the techniques I outline.
As Figure 3-1 shows, the coordinate system is the same as that of Canvas 2D, with x: 0, y: 0 at the top-left corner and x: width, y: height at the bottom-right corner, so you should feel at ease, even if you are more comfortable with Canvas 2D.
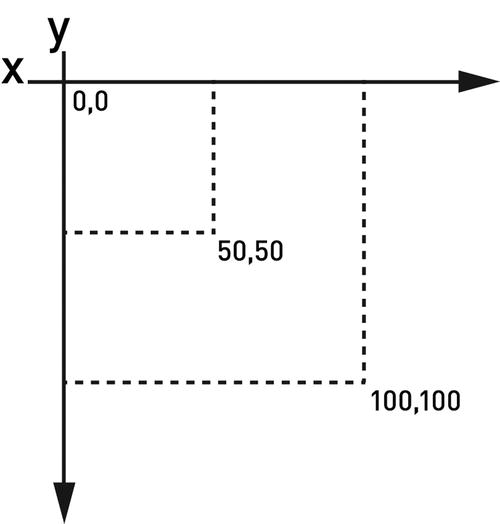
Figure 3-1. Although the demo uses WebGL, its coordinate system is the same as that of Canvas 2D
As discussed in the introduction, steady frame rate is definitely the goal, and you cannot have a steady frame rate if your memory usage looks like what you see in Figure 3-2.

Figure 3-2. Memory spikes in the particle system demo suggest that your games can benefit from an object pool
This illustration, taken from Chrome DevTools, displays the memory usage of the demo when spawning 60,000 objects per second, without turning on object recycling. You can see that the memory usage varies widely, from 30MB to 360MB.
If your game exhibits the same memory behavior, it may greatly benefit from an object pool. Use Chrome DevTools, and check your memory timeline! You may also use the heap profiler, as well as the object allocation tracker, to get a precise view of your memory usage. Refer to the Chrome DevTools documentation for how-tos and up-to-date information.
When a particle reaches the end of its life, you dereference the particle object by removing it from the particles array:
// This is the kind of code you want to avoid!
// not only we are creating garbage from dereferencing particles
// but also by splicing arrays.
for (i = 0; i < particles.length; i++) {

     var particle = particles[i];

     if( particle.life === 0 ){
         // our particle reached the end of its life
         // splicing like pushing should be avoided
         particles.splice(i, 1);
         i--;
     }

     else
         demo.integrate( particle );

     particle.life--;
 }
The memory occupied by all discarded objects isn’t freed as you dereference them, but later, when the garbage collector (GC) decides to do it. That’s when memory usage drops in Figure 3-1.
The bad news is that during the garbage collection, the program is stopped for the time needed to complete the task and only resumes when the GC has done its job. This may take a long time, especially on mobile, which may miss several frames.
The result of leaving memory management to the GC is that the game performs badly for a period of time whenever the garbage is to be collected.
To have a steady frame rate, you need to take care of memory management yourself and recycle dead particles instead of throwing them away; this avoids memory churn and the garbage collection taxes that come with it. Figure 3-3 illustrates what the memory usage looks like when recycling is turned on in the demo:

Figure 3-3. Memory usage climbs to 33.6MB and never goes down
You can see the memory usage climb when the number of particles per second is bumped from 60 to 60,000. But memory usage is stable now that you are using an object pool. By managing the churn of memory objects, you are avoiding the largest contributor to the occurrence of GC events, meaning that your game’s performance is going to be much more consistent; you won’t see performance loss from garbage collection.
How to Make an Object Pool
The goal of a pool is to avoid memory churn by reusing objects instead of allocating and freeing them, thus improving performance.
Object pools maintain a collection of reusable objects and track their usage. As you will see, object pools are easy to build and only require a few modifications to your existing objects’ classes.
As the chapter demo source code demonstrates, using a pool is pretty straightforward and doesn’t call for a lot of changes:
//
// Our step function called on each Request Animation Frame (RAF)
//

// in this step we recycle our particle
demo.recyclingStep = function( particles ) {

    var i;

    for (i = 0; i < demo.settings.rate; i++) {

        var min = -10,
            max = 10,
            velx = min + Math.random() * (max - min),
            vely = min + Math.random() * (max - min),
            w = demo.settings.size,
            h = demo.settings.size,
            life = demo.settings.life;

        particles.getFree()
            .setup( demo.settings.width * 0.5, demo.settings.height * 0.5, w, h, life )
            .setVel( velx, vely );
    }

    for (i = 0; i < particles.elements.length; i++) {

        var particle = particles.elements[i];

        if( particle.allocated === true ){

            if( particle.life === 0 )
                particles.free( particle );

            else if(demo.settings.cull === true && demo.isInBounds(particle) === false)
                particles.free( particle );

            else
                demo.integrate( particle );

            particle.life--;
        }
    }

    if( demo.settings.render === true )
        demo.draw( demo.particles.elements );
};

// in this step we create new particles instead of recycling them
demo.notRecyclingStep = function( particles ) {

    var i;

    for (i = 0; i < demo.settings.rate; i++) {

        var min = -10,
                max = 10,
                velx = min + Math.random() * (max - min),
                vely = min + Math.random() * (max - min),
                x = demo.settings.width * 0.5,
                y = demo.settings.height * 0.5,
                w = demo.settings.size,
                h = demo.settings.size,
                life = demo.settings.life;

        // continuously pushing new objects in an array cause high memory churn and should be avoided
        particles.push( new demo.Particle( x, y, w, h, life ).setVel( velx, vely ) );
    }

    for (i = 0; i < particles.length; i++) {

        var particle = particles[i];

        if( particle.life === 0 ){
            // splicing like pushing should be avoided
            particles.splice(i, 1);
            i--;
        }

        else if(demo.settings.cull === true && demo.isInBounds(particle) === false){
            // splicing like pushing should be avoided
            particles.splice(i, 1);
            i--;
        }

        else
            demo.integrate( particle );

        particle.life--;
    }

    if( demo.settings.render === true )
        demo.draw( demo.particles );
};
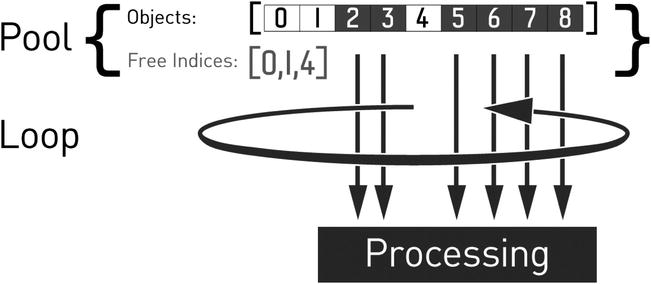
Listing 3-1 displays the pool recipe for the demo: an array of objects and an array that holds the free objects’ indexes.

Listing 3-1. A Simple Object Pool
demo.ParticlePool = function(){
this.elements = [];     // will be filled with particles
this.freeElements = new DoublyLinkedList();//hold free particles indices
      // Fill the pool
      this.grow();
};
As you can see, a linked list holds the free elements’ indexes. Free-object pointers are kept in a dedicated data structure so that the getFree method (see Listing 3-3) will yield a free particle quickly. I prefer using a custom linked-list class to an array in order to avoid the memory churn that would be caused by using the Array.push() and Array.pop() methods repeatedly (see Chapter 1): JavaScript is not the language you think it is. For more on linked lists in JavaScript, visit www.nczonline.net/blog/2009/04/13/computer-science-in-javascript-linked-list.
A recyclable object can look like the one that follows. The important thing to note is that an object can be either alive or dead, so the game ignores the dead ones.
// Recyclable particle
demo.RecyclableParticle = function(poolindex) {
    this._poolindex = poolindex; // used by the pool
    this.allocated = false;      // true means alive, false means dead
}
Right after creating the pool, you initialize it by filling it with objects (see Listing 3-2). The process of increasing the number of allocated objects may also be used later in the life of the pool in the event that you run out of free objects.

Listing 3-2. A Pool Containing Eight Recyclable Objects
demo.ParticlePool.prototype.grow = function( growth ){
    growth = growth || demo.settings.rate * 130;

    var oldsize = this.elements.length, // previous array size
        newsize = oldsize + growth;     // size after growth

    // Resize our elements array
    this.elements.length = newsize;

    for( var i = oldsize; i < newsize; i++ ){

        // Add a new element to our pool
        this.elements[i] = new demo.Particle( i );

        // Add its index to the free elements array
        this.freeElements.push( i );
    }

    console.log( 'Pool grown from ' + oldsize + ' to ' + newsize + ' particles.' );
};
Requesting a Free Object from the Pool
When you need a free object, instead of creating a new object, you ask the pool for one.If no free objects are left, the pool has to be grown.
The object is also reset. As for your particles, you reset their position, velocity, and acceleration; otherwise, the particles will spawn with increasing speed as the simulation runs. If you forget to reset the object properties, you may have unexpected bugs in your game. These bugs can be hard to figure out, so double-check, triple-check, and unit test that your objects are reset properly.
Here’s the particle reset code, straight from the demo:
RecyclableParticle.prototype.reset = function() {
    this.setup( 0, 0, 0, 0, 0 ); // reset size and position
    this.setVel( 0, 0 );         // reset velocity
    this.acc.x  = 0;             // reset acceleration x
    this.acc.y  = 0;             // reset acceleration y
    return this;                 // so our particle API is chainable
}
The pool will quickly find a free object by looking to the free-indexes array. If an array is empty, it will grow itself again. The pool will both remove the index of its internal-indexes array and mark the object as allocated before returning it, as shown in Listing 3-3.

Listing 3-3. Following a Request for a Free Object, Object 8 Has Been Returned and Marked as Allocated, and Its index, Removed from the Free-Indexes Array
demo.ParticlePool.prototype.getFree = function(){
            if( this.freeElements.length === 0 ){
                // no free particles left, grow the pool
                this.grow()
            }
            // get and remove head from freeElements linked-list
            var index = this.freeElements.remove(0);
            // retrieve the particle from the elements array
            var particle = this.elements[index];
            // mark the particle allocated so we use it when iterating on the pool
            particle.allocated = true;

            // reset particle position, velocity etc.
            particle.reset();

            // done
            return particle;
        };
Returning Objects to the Pool
When the game doesn’t need an object anymore (see the section “Updating Only What’s Important”), it can return the object to the pool (see Listing 3-4). To do this, push the object index to the free-indexes array, and mark the object as unallocated so that your loop will skip it.

Listing 3-4. Object 8 Has Been Returned to the Pool and Marked as Free, and Its Index, Added to the Free-Indexes Array
demo.ParticlePool.prototype.free = function( particle ){
    if( particle.allocated === true ){
        // mark the particle as not allocated
        particle.allocated = false

        // add the particle's index to the free elements array
        this.freeElements.push( particle._poolindex )
    }
};
After a while, your pool will look like the one shown in Listing 3-5. You can see here the benefit of both having an array of free indexes and embedding in each object its own index; otherwise, you would have to iterate over the objects array to get objects from the pool as well as to free them.

Listing 3-5. Your Pool after Many Requests and Returns
In the demo, you loop over the pool objects array twice, first to move particles around, in the physics step, then to render them. In the loops the particles are processed only if their allocated flag is set to true, so you ignore unallocated particles instead of discarding them. In this way, you are holding references to the unallocated particles rather than generating garbage, as you would if you were not using a pool (see Listing 3-6).
Listing 3-6. Looping over Only Allocated Objects
for (i = 0; i < particles.elements.length; i++) {

    var particle = particles.elements[i];

    if( particle.allocated === true ){

        if( particle.life === 0 )
            particles.free( particle );

        else
            demo.integrate( particle );

        particle.life--;
    }
}
Using an Object Pool
As in real life, filling a pool takes time and can be expensive. You must avoid having the object pools fill while the player is playing your game by preallocating the necessary number of objects during the initialization of the game, effectively moving the cost of creating objects up front.
You may also prefer not to allow some of your pools to grow. For instance, you may want to have only a fixed number of particles in your game. In this case, when you need to display a particle, and there is no free one left, you can choose not to spawn a particle at all or to remove the oldest one to spawn it in a new place. Do you remember trying to write your name with bullet holes in Half-Life, and the ones you shot first disappeared as you were writing? Well, now you know what was happening.
During the development process, you should monitor your pool usages to determine the levels at which your pools should initially be filled.
For more information on static memory JavaScript and object pools, you may want to consult HTML5Rocks.com (www.html5rocks.com/en/tutorials/speed/static-mem-pools).
Updating Only What’s Important
It may be worth noting that not every item in the world needs to be alive and in memory. For instance, a two-dimensional side-scrolling game doesn’t need to simulate enemies at the end of the level; also, more important, any particles that are offscreen shouldn’t be rendered. If the player only moves forward, you may discard everything behind the player past a certain point to save both memory and central processing unit (CPU) cycles. Just make sure the player cannot walk backward and fall into the void!
Depending on your game, the cost of keeping objects rather than discarding them may be high. For example, not discarding enemies may cause physics-, artificial intelligence– (AI-), and rendering-related functions to be called way more than is necessary.
To get an idea of your game functions’ execution times, you may use the Chrome DevTools CPU Profiler, which will give you a good idea of where your game is spending most of its time. Note that this profiler is a sampling profiler, meaning that it collects data periodically (at 1ms intervals), so you may want to collect samples over a relatively large period of time (for example, a few seconds) to get an accurate picture. There is also a structural profiler in Chrome, which you can find at chrome://tracing. I highly recommend that you check the great Chrome DevTools documentation for more information on those tools as well as this Google Developers Live show about profiling in Chrome: https://developers.google.com/live/shows/7327030-5001.
Also, now that you are using a pool, you can simply return your objects to their respective pools for reuse later on. For instance, if your game is like Sonic Jump (www.sega.com/games/sonic-jump), you may want to return both platforms and enemies to their respective pools when they are below a certain point in order to retrieve them at a later time to place above your hero.
Culling for Simulation
Discarding particles as soon as they are offscreen is the simplest task in the demo. Figure 3-4 shows a drop in CPU usage when culling is turned on.

Figure 3-4. Discarding offscreen particles decreases CPU usage
In your loop, you call the following function and discard the particle if it returns false:
isInBounds = function( particle ){
          var x = particle.pos.x,
                y = particle.pos.y,
                w = particle.size.y,
                h = particle.size.x,
                areaW = demo.settings.width,
                areaH  = demo.settings.height;

           return !(x > areaW || x + w < 0 || y > areaH || y + h < 0);
     }
Not exactly rocket science, and that’s the point. This function must be cheap to be worth it, as it will be used as many times as there are live particles in the pool.
Discarding objects as soon as you can is the easiest way to save performance. It is far more time-consuming to optimize a physics engine so that it becomes 10 percent faster than it is to discard 10 percent of your objects. By not discarding objects, you are not only making the game perform worse than it should, but also wasting user CPU time and battery life.
Culling for Rendering
Chances are that, the demo notwithstanding, you may actually care about offscreen objects. For instance, if your hero were moving freely on a large map, you wouldn’t discard enemies as soon as they were offscreen. In this case, you would use boundaries that are much larger than the viewable area.
If your game boundaries are larger than the viewable area (see Figure 3-5), you should check during the rendering loop that each object is effectively in the viewable area before trying to render it. Otherwise, you will overdraw (draw more than necessary) and end up burning precious graphics processing unit (GPU) power.
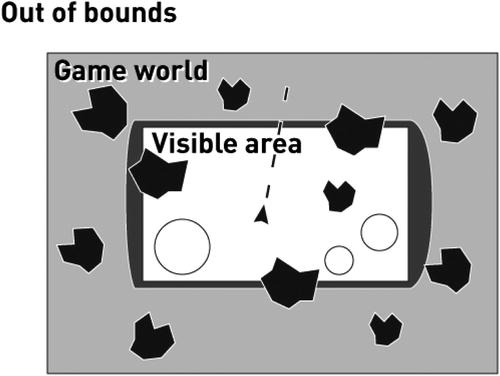
Figure 3-5. The world may be larger than what the player sees
Note that if you use a framework, you should check to see if it does the culling for you.
Warming Up the Virtual Machine
Chances are that your game is far more complex than the demo. And, it’s likely that on mobile, you get a rather choppy frame rate during the first 10s–30s, while your code is being optimized on the fly.
Because those first seconds are crucial to the player experience, it’s important to get a smooth frame rate from the start. Otherwise, your game will be perceived as slow and laggy, and the player may very well quit and never come back.
Your Code Will Be Compiled and Optimized on the Fly
What happens to your JavaScript code is rather fascinating: first it is compiled in machine language in order to run on the CPU, and then it may be compiled again, but in a more optimized way if the browser’s JavaScript engine judges this necessary and possible.
The initial compilation generates slow code, then the following compilations generate fast, optimized code, and whereas on desktop, compilation time is unnoticeable, on mobile, slowdowns are occurring as optimizations are made and tested by the JavaScript engine.
Your code will run fast only when optimized, and only the functions that are called many times will be optimized (the engine marks these as hot and optimizes them).
The consequence of this approach is that the JavaScript engine will make optimizations while your game is running.
Deoptimizations
Optimizations performed by the compiler are speculative; they are made under the assumption that the JavaScript state is stable. If the state changes, then the compiler changes the evaluation of your function, which can cause a deoptimization to occur (called a global deopt).
You can also get deoptimizations if there’s some specific part of your function that invalidates the optimization process, such as a try/catch block (called a local deopt). The engine will continue to attempt to optimize to a specific threshold and then will give up. Until that time, you can get a plethora of optimize/deopt combos every frame as the engine tries to understand itself and find a local minimum of execution.
Finding and fixing all this is madness and varies from engine to engine. I suggest that you check out the literature for each virtual machine (VM) if you see that deopts are causing performance issues (for more information, see the section “Digging Deeper.”)
Rev Up the Engine
To have your game running at a steady 60FPS from the start, your code will have to be optimized before the start. Or, to put it differently, the player shouldn’t be able to play before the JavaScript engine has optimized your game.
The obvious solution is to have a warm-up phase while the game is loading or displaying a menu. During this phase, you would run your game in the background so that its code is optimized before the user starts playing.
If you run only a subset of the game during the warm-up phase, only the JavaScript engine will optimize this subset. Sometimes, it may be enough to call only the most expensive functions, for example, a physics simulation, at a fast rate during the warm-up phase. But, I would say that the best warm-up is to run the entire game at a fast rate; however, it may be impractical to do so.
Figure 3-6 displays how Foxes and Shotguns (www.foxesandshotguns.com) warms up behind the scenes while loading assets.

Figure 3-6. Behind the loading screen a special level is generated
Instead of generating spaced platforms, platforms are lined up, and the hero jumps and shoots randomly. Meanwhile, the loading screen is displayed. None of this is rendered, and the user will see only the loading scene. The result for this particular game is a silky smooth frame rate right from the start, instead of a rate punctuated by random slowdowns caused by JavaScript engine optimizations times.
As you can see, the warm-up phase depends on your game. Creating a special level to be used only for that purpose may be an easy way to move the compilation time up front.
There’s no direct way of knowing when the browser JavaScript engine is done optimizing a function, and although using a warm-up phase is good, warming up longer than necessary makes the user wait longer than is desirable.
The only way to get a hint from your code about what’s going on is to measure the execution time of your loop, like so:
var t = window.performance.now();
function tick() {
        requestAnimationFrame( tick );

      var n = window.performance.now(),
          raf_delta = n - t,
          current_fps = 1000 / raf_delta;
      t = n;

        // read input, move things, render them
        game.step()

       // use step_duration to guess if the game code has been optimized
        var step_duration = window.performance.now() - t;
}
As you can see, the time it takes the loop to execute step_duration decreases and stabilizes after a while. By benchmarking your loop on various devices, you’ll get a good sense of the minimum execution time your loop should target to be to be considered good enough to exit the warm-up phase. However, keep in mind that you cannot assume a fixed number of iterations for your code to be optimized, as the heuristics used are nondeterministic and vary from browser to browser.
Now, it’s up to you to use your benchmark data to decide the best course of action for your game. For instance, you could employ a dynamic solution that uses average execution times on the fly, or a short, special level that runs for a fixed number of frames, and check the elapsed time to determine if your code has been optimized by reaching a target execution time.
To get a glimpse of what’s happening behind the scenes, you can run Chrome or Chromium with flags to print out when functions are optimized, as follows:
chrome.exe --no-sandbox --js-flags="--trace-opt --trace-deopt" -user-data-dir=<empty dir path> http://localhost/awesomegame.html
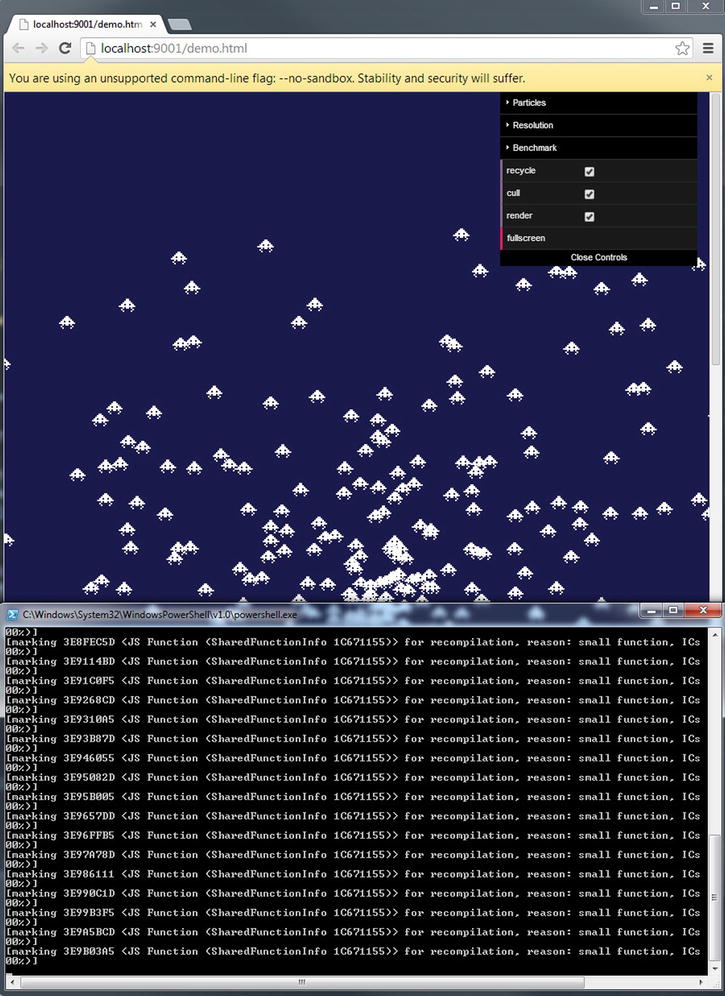
This will output in the console optimizations as they are happening, as pictured in this screenshot. Hopefully, you’ll get a better idea of what the browser is doing to make your code run fast, and maybe you’ll start optimizing your most demanding functions for V8 or find out what prevents some part of your code from being optimized. But, beware that this is a time-consuming process and probably of no value unless you find out that deopt code is a bottleneck.
For more on V8, visit https://docs.google.com/document/d/1hOaE7vbwdLLXWj3C8hTnnkpE0qSa2P--dtDvwXXEeD0/pub.
For more on optimizing for V8, check out: http://floitsch.blogspot.de//search/label/V8-optimizations.
Conclusion
In this chapter, I’ve covered the common pitfalls that cause a game to perform poorly as well as the techniques to address them.
By avoiding garbage collection and unnecessary computations and forcing early optimizations, your game can compete with native ones, in terms of performance. In Chapter 15, I will discuss techniques to make your game look native, while maintaining performance on mobile devices.