
![]()
Faster Map Rendering
Any two-dimensional game is going to, at some point, have a separation between semistatic background content and dynamically animated foreground content. The background content can become a burden to the rendering pipeline, as it can easily consume megabytes of data as well as a hefty chunk of your rendering pipeline. In this chapter, I’m going to discuss a few strategies for overcoming this burden, providing trade-offs where your game may need them.
You generally need somewhere to store your map data once you load them, and you start by declaring a map class that will contain all the information you’re looking for. I’m going to get ahead of myself here and describe a few of the data types you’ll need:
//from TILEDmap.js

function TILEDmap(){
  this.currMapData= null;   //copy of the tile information for this map
  this.tileSets= new Array(); // a list of the tile sets (ie textures) used for this map
  this.viewRect= { //the view-rect defines the part of the map that's currently visible to the user.
    "x": 0,
    "y": 0,
    "w": 1000,
    "h": 1000
  };
  this.numXTiles= 100;  //number of x and y tiles  on the map
  this.numYTiles= 100;
  this.tileSize= {   //the size of a given tile, in pixels
    "x": 64,
    "y": 64
  };
  this.pixelSize= { //size of the entire map, in terms of pixels
    "x": this.numXTiles * this.tileSize.x,
    "y": this.numYTiles * this.tileSize.y
  };

  this.imgLoadCount=0;    //we may be loading many loose images, as such keep a count of how many have been loaded
  this.fullyLoaded=false; //don't start rendering until everything is loaded

//.....important functions go here

}
var gMap = new TILEDmap();
Note that it’s important to create a global gMap object here, as you’ll need to reference it from a few callbacks as well as code inside this file.
Fetch the Data from the Server
Your map data have to come from somewhere, and chances are that you’ll need to save your content in JavaScript Object Notation (JSON) and upload it to your web server to be loaded into your game. If you’re unfamiliar with the process of grabbing blobs of data from a URL, you can use the handy application programming interface (API) XMLHttpRequest (XHR) to do just that. XHR has many uses, features, and settings that are beyond the scope of this chapter; here, you need it simply to fetch your text-based map data file.
One thing worth noting about this load function is that the response function will call a parse operation on the JSON, and this is where the real magic happens:
//from TILEDmap.js

//---------------------------
  this.load= function ()
  {
    var xhr = new XMLHttpRequest();

    //this is a hard-coded URL to where the map file is sitting
    xhr.open("GET", "./data/map.json", true);

    //note that the data is standard text, so you need to set the mime type accordingly
    xhr.overrideMimeType('text/plain; charset=x-user-defined'),

    //here we define what happens when the data-fetch attempts to complete; this callback will be executed
    xhr.onreadystatechange = function()
    {
      //did we successfully get the data?
      if (xhr.readyState != 4 || xhr.responseText =="")
        return;

      //go ahead and pass the fetched content to the parsing system
      gMap.parseMapJSON(xhr.response);

    };

    //execute the XHR
    xhr.send();

  };
I’m going to cover parsing the map data in a moment, but first I’d like to point out that, in this chapter, I will be introducing a couple different ways to render your map. As such, the source code will require a bit of fragmentation in order to show off these principles. For instance, each technique has a separate type of draw function, so you allow the map object simply to call the global override the onDrawMap function to handle the technique-specific details. Note that here, however, you don’t let the map draw until it has been entirely loaded into memory. This is important, because otherwise, you may end up rendering partially loaded information, which may not be visually pleasing to your users:
//from TILEDmap.js

 //---------------------------
  this.draw= function (ctx)
  { //
        if(!this.fullyLoaded) return;

   onDrawMap(ctx); //offload the actual rendering of this map to some external function
  };
Most maps come from a pregenerated artist tool. Usually, some plucky artist gets to sit down (alongside a designer) and map out the visuals for a game. In this case, you’ll find that the Tiled editor is a great tool to use to generate maps, and, lucky for us, it outputs to a JSON format. I’ll skip over how to create a map using the Tiled editor and point you to the relevant documentation on this topic. For the sake of this tutorial, I’m going to work with an existing tiled map from the Girls Raised in Tennessee Science (GRITS) Collaborative Project (see Figure 17-1).
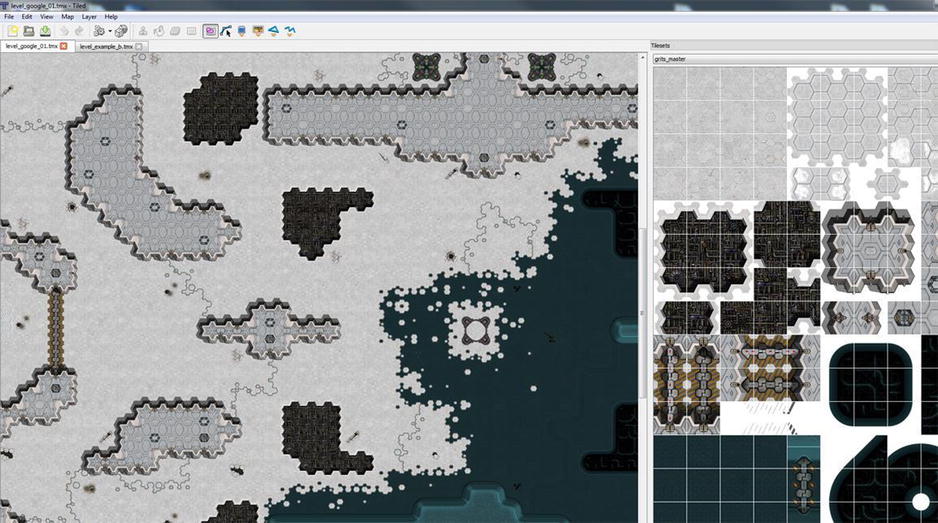
Figure 17-1. The Tiled editor
Before I dive into the “gritty” details, you should know that there’s lots of great content that Tiled dumps out on our behalf. Here’s the overall layout of the file, highlighting the things to care about:
- Height, width, orientation, tile height, tile width, and version
- Properties dictionary (name-value pairs)
- Layers array
- Data (array of integers specifying which tile to draw)
- Layer name
- Width, height, visibility, opacity
- Layer type (tile layer or object layer)
- Tilesets array
- Image (grits_master.png)
- firstgid (this is very important—it lets you know what tile you’re referencing in the data).
- img width, img height, margin, spacing, tile width, tile height
Parsing the Map Data
Parsing the map data is quite simple: once you’ve received the JSON data, you have to convert them to a JavaScript object, using the JSON.parse method. For the sake of ease, you cache some of the values’ directions so that you can fetch them later without an indirection:
//from TILEDmap.js

  this.parseMapJSON=function(mapJSON)
  {
    //go ahead and parse the JSON data using the internal parser
    //this will return an object that we can iterate through.
        this.currMapData = JSON.parse( mapJSON );

    //simply cache all the values from the map for ease-of-use
        var map = this.currMapData;
      this.numXTiles = map.width;
      this.numYTiles = map.height;
      this.tileSize.x = map.tilewidth;
      this.tileSize.y = map.tileheight;
      this.pixelSize.x = this.numXTiles * this.tileSize.x;
      this.pixelSize.y = this.numYTiles * this.tileSize.y;
In Tiled, an artist can drop in a group of images and start placing tiles from any of the images on the map as he or she sees fit. During the loading of your tiled data, you must also load the atlases that were used to create the map, listed inside the .JSON file (see Figure 17-2).
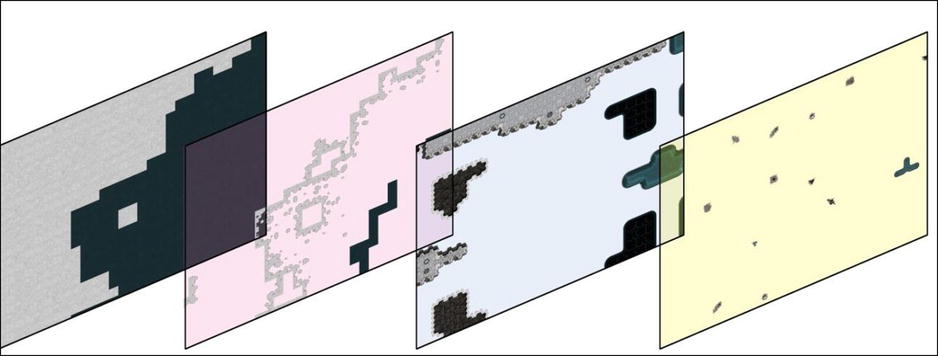
Figure 17-2. An exploded view of the layers of a map (left to right): base layer, accents on the base, walls layer, additional accents
One of the more important aspects of loading these images is that the loading process is asynchronous, meaning that it will occur without blocking the execution flow of your application. As such, you can run into a strange situation, in which your code starts executing the main loop before you have all your content loaded. To address this, you create an imgLoadCount variable for the map object, which is incremented as each image finalizes its load operation:
//from TILEDmap.js

//load our tilesets if we are a client.
    var gMap = this;
    gMap.imgLoadCount = 0; //reset our image loading counter
    for (var i = 0; i < map.tilesets.length; i++)
    {
            //load each image and store a handle to it
       var img = new Image();
       img.onload = new function()
                {gMap.imgLoadCount++;};  //once the image is loaded, increase a global counter

            //NOTE that the TILED data puts some gnarly relative path data into the file
            //let’s get rid of that, since our directory structure in the shipping product is not the same
            //as in the editor layout.
       img.src = "../data/" + map.tilesets[i].image.replace(/^.*[\/]/, ''),

            //store this data in a way that makes it easy to access later:
       var ts = {
          "firstgid": map.tilesets[i].firstgid,
          "image": img,
          "imageheight": map.tilesets[i].imageheight,
          "imagewidth": map.tilesets[i].imagewidth,
          "name": map.tilesets[i].name,
          "numXTiles": Math.floor(map.tilesets[i].imagewidth / this.tileSize.x),
          "numYTiles": Math.floor(map.tilesets[i].imageheight / this.tileSize.y)
        };
        this.tileSets.push(ts);
Because the img.onload function callbacks occur async style, you need to create a method that polls the state of gMap.imgLoadCount to determine if all the images are loaded.
The checkWait function is a nice little helper that will kick off a timer to check for the results of a function periodically. Once the test function returns TRUE, it will call the result function. Again, in your simple example, you allow onMapDataLoaded to be a function defined outside the TILEDMap object. In this way, you can define the postload function for the examples in this chapter and reuse the TILEDMap.js file:
      //images load in an async nature, so kick off a function which will poll
    //to see if they are all loaded
      checkWait(
            function() //this is the condition function that's called every instance
            {
                  return gMap.imgLoadCount == gMap.tileSets.length;
            },
            function () //this is the function called once the above is true
              {
                  onMapDataLoaded();
            });

    }
};//end of map object
For your simple example, once all the images are loaded, you allow yourself to say that the map is “loaded,” and rendering logic can start working:
//0-forward.html

//these functions are specific to this approach
    function onMapDataLoaded()
    {
        gMap.fullyLoaded = true;
    }
Rendering Tiled Data
Once you understand the layout of a Tiled file, you can quickly see how the rendering process occurs. The file consists of a set of layers that are stacked on top of each other. (The first layer in the array is the lowest, or first to be drawn, and subsequent layers replace the pixels drawn by previous layers.) Each layer contains a list of “tiles” that occupy it, in which the tile points to the index of the texture used to render it.
With this in mind, rendering the map is pretty straightforward. You walk through each layer, and each tile in that layer, and draw the specified sprite on the screen. Generally, the most complex piece of logic that you have to deal with here is to determine where the tile should reside in world-space, given that you only have an index to its location in the layer data.
Understanding the Data Format to Render
The Tiled editor expects you to load into it a series of texture atlases to use for adding texture information to your map. In addition, Tiled also expects the tiles for a map to be homogenous in size across atlases, such that you can index a specific tile in a specific atlas simply by having the (x, y) coordinate of the tile in tilespace. To distinguish between two atlases, Tiled will define a range of IDs for the tiles that belong to the atlases. In this way, every tile in your map will have a unique ID that you can quickly reference; even better, you can determine which atlas each tile came from.
Table 17-1. An Example GID-to-Range Table for Textures Used in a Map: the Number of Tiles a Texture Defines Is Related to Its Dimensions, Which Determine what Ranges Are Described
Texture Name |
firstgid |
ID Range |
|---|---|---|
No tile here |
0 |
0 |
base_tiles.jpg |
1 |
1–127 |
ground_accents.png |
128 |
128–255 |
ground_foliage.png |
256 |
256–1023 |
static_objects.png |
1024 |
1024–2047 |
Rendering the entire tiled map becomes somewhat straightforward if you keep the following in mind:
- Walk through each layer.
- Walk through each tile on that layer.
- If the tile value is nonzero, do the following tasks:
- Walk through all the atlases, and find out which atlas the index belongs to.
- Draw the tile on the screen.
Let’s do that again, but in code form. First, let’s talk about how, given an ID from a tile, you can determine what atlas it’s from and what its pixel coordinates are in that atlas:
 //---------------------------
  this.getTilePacket= function (tileIndex) {
    //this is the packet we'll return after fetching
    var pkt = {
      "img": null,
      "px": 0,
      "py": 0
    };

    //walk through the tile-sets and determine what 'bucket' this index is landing in
    //TILED defines this by providing a 'firstgid' object which defines where this tile's indexes start
    var i = 0;
    for (i = this.tileSets.length - 1; i >= 0; i--)
    {
      if (this.tileSets[i].firstgid <= tileIndex)
        break; //FOUND it!
    }

    //copy the information from this tileset
    pkt.img = this.tileSets[i].image;
    //we need to define what the 'local' index is, that is, what the index is in the atlas image for this tile
    //we do this by subtracting the global id for this tileset, which gives us a relative number.
    var localIdx = tileIndex - this.tileSets[i].firstgid;
/    var lTileX = Math.floor(localIdx % this.tileSets[i].numXTiles);
    var lTileY = Math.floor(localIdx / this.tileSets[i].numXTiles);
    pkt.px = (lTileX * this.tileSize.x);
    pkt.py = (lTileY * this.tileSize.y);

    //return!
    return pkt;
  };
For the sake of argument, here is a version of rendering, called forward rendering, which could be considered “brute force.” Effectively, you’re going to walk to each layer and then walk through all the tiles in that layer and draw the tile on its canvas:
function onDrawMap(ctx)
  {
    //we walk through all the layers
    for (var layerIdx = 0; layerIdx < gMap.currMapData.layers.length; layerIdx++)
    {
        //is this a tile layer, or an object layer?
        if (gMap.currMapData.layers[layerIdx].type != "tilelayer") continue;

        var dat = gMap.currMapData.layers[layerIdx].data;

        //find what the tileIndexOffset is for gMap layer
        for (var tileIDX = 0; tileIDX < dat.length; tileIDX++)
        {
          var tID = dat[tileIDX];
          //if the value is 0, then there's no tile defined for this slot, skip it!
          if (tID == 0)
            continue;

          var tPKT = gMap.getTilePacket(tID);

          var worldX = Math.floor(tileIDX % gMap.numXTiles) * gMap.tileSize.x;
          var worldY = Math.floor(tileIDX / gMap.numXTiles) * gMap.tileSize.y;

          // Nine arguments: the element, source (x,y) coordinates, source width and
          // height (for cropping), destination (x,y) coordinates, and destination width
          // and height (resize).
          ctx.drawImage(tPKT.img, tPKT.px, tPKT.py, gMap.tileSize.x, gMap.tileSize.y, worldX, worldY, gMap.tileSize.x, gMap.tileSize.y);

        }
    }
  }
Coordinate Spaces and View-Rect
With the current code, you run into the issue of coordinate spaces. The canvas has coordinates, (0, width) and (0, height). These are not equal to the coordinates of the map, (0, map width) (a.k.a. world-space coordinates). As such, you end up drawing only the part of the map whose coordinates are identical to the canvas coordinates. This, of course, is less than the desired output, as you want the ability to render whatever part of the map your player happens to occupy.
For this, I introduce the concept of a view-rect. The view-rect is a rectangle that defines what part of the map, in world coordinates, is currently visible in canvas coordinates. To put it differently, you use the view-rect to map world-space to view-space:
//.......
            var tPKT = gMap.getTilePacket(tID);

            //test if gMap tile is within our world bounds
            var worldX = Math.floor(tileIDX % gMap.numXTiles) * gMap.tileSize.x;
            var worldY = Math.floor(tileIDX / gMap.numXTiles) * gMap.tileSize.y;
            if ((worldX + gMap.tileSize.x) < gMap.viewRect.x || (worldY + gMap.tileSize.y) < gMap.viewRect.y || worldX > gMap.viewRect.x + gMap.viewRect.w || worldY > gMap.viewRect.y + gMap.viewRect.h) continue;

            //adjust all the visible tiles to draw at canvas origin.
            worldX -= gMap.viewRect.x;
            worldY -= gMap.viewRect.y;

            // Nine arguments: the element, source (x,y) coordinates, source width and
            // height (for cropping), destination (x,y) coordinates, and destination width
            // and height (resize).
            ctx.drawImage(tPKT.img, tPKT.px, tPKT.py, gMap.tileSize.x, gMap.tileSize.y, worldX, worldY, gMap.tileSize.x, gMap.tileSize.y);

  //.......
An added benefit of the view-rect is that it allows you to do visibility culling on your tiles, such that you render only the tiles that are visible to the user rather than drawing every tile in the map, regardless of whether it’s on-screen or not.
To use the view-rect properly, you instruct the update function of your simple example to modify the view-rect, based on the position of the player in the world:
coregame.js
function draw(){
//....other drawing functions here
          //make sure the player is at the center of the screen
          gMap.viewRect.x = (pPos.x - ( canvas_width / 2 ) );
          gMap.viewRect.y = (pPos.y - ( canvas_height / 2 ));
          gMap.viewRect.w = canvas_width;
          gMap.viewRect.h = canvas_height;
Fast Canvas Rendering with Precaching
One of the big problems with the forward rendering method for two-dimensional maps is that it easily becomes a performance bottleneck once the number of layers, tiles, and overlapping tiles increases. Each draw call can have subsequent overhead associated with it, and if you’re not careful, you can end up redrawing massive portions of your screen, thus wasting cycles on pixels that will never be visible to the user.
For instance, if each tile area on the screen had four or five image tiles placed on it, your draw count per frame will, in effect, have quadrupled with the new map (see Figure 17-3).
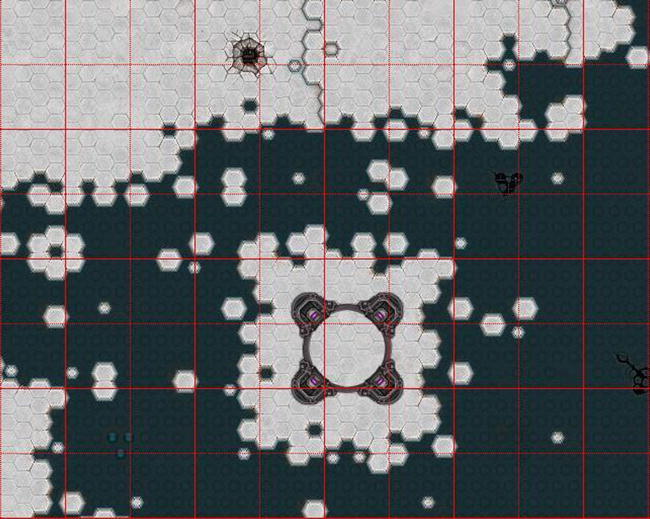
Figure 17-3. Your map with a 64 × 64 tile boundary grid overlaid on it
The obvious solution here is to reduce the number of draws per frame. One of the main ways of fixing this problem involves taking the raw map-rendering data and using the concept of offscreen canvas rendering to reduce the number of draw calls.
This process works by dividing the entire map into 1,024 × 1,024 sections and prerendering each section into a larger texture (see Figure 17-4). At render time, you can draw the pregenerated textures instead of each individual tile. Thus, rather than incurring the overhead of thousands of draw calls per tile, you simply have to do eight or so draws per frame for all the static map data.
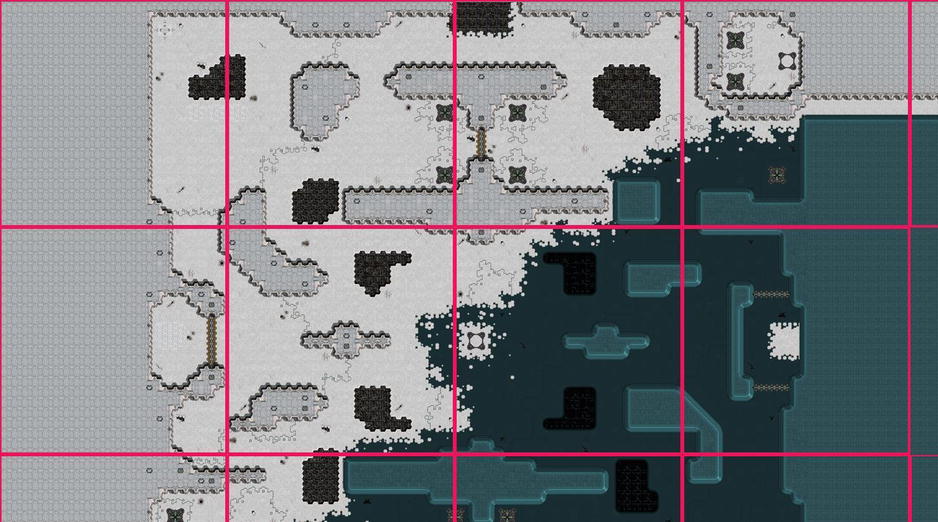
Figure 17-4. Your map with the 1,024 × 1,024 canvas tile boundaries overlaid on it
The result is a trade-off between memory and draw-call performance. Yes, you are churning up more memory for the canvases (each canvas tile is approximately 4MB), but you reduce the draw call to 1–6 per frame (down from approximately 400), which shows a great performance improvement.
To perform offscreen canvas rendering requires use of an offscreen canvas. To help with this process, I have created a new concept, which I’m calling canvasTile. This will represent a canvas object that you render into and use later. In effect, a canvas tile will represent some subsection of the real estate of the map and allow you to prerender the environment into its texture object for later use:
function CanvasTile(){
   this.x=0; //world x,y, width and height of this tile
   this.y=0;
   this.w=100;
   this.h=100;
   this.cvsHdl=null; //a handle to the canvas to draw into
   this.ctx=null; //the 2d context for said canvas

   //-----------------------------
   this.create=function(width,height)
   {

     this.x = -1;
     this.y = -1;
     this.w = width;
     this.h = height;
     //create a brand new canvas object, which is NOT attached to the dop
     //this will make the canvas 'offscreen' in that we can render into it, use it, but it
     //will not be visible to the end user directly
     var can2 = document.createElement('canvas'),
     can2.width = width;
     can2.height = height;
     this.cvsHdl = can2;
     this.ctx = can2.getContext('2d'),

   };
In the forward-rendering model, you needed to add viewport culling to reduce the number of draw calls per frame. Although you now have fewer objects to draw, you must still do viewport culling in order to reduce the number of pixel-processing operations that occur unnecessarily. As such, your canvasTile class contains an isVisible function:
   function CanvasTile(){
//.....................
  //-----------------------------
      this.isVisible=function()
      {
        var r2 = gMap.viewRect;
        var r1 = this;
        return gMap.intersectRect(  {top:r1.y,
                          left:r1.x,
                          bottom:r1.y+r1.h,
                          right:r1.x+r1.w},
                          {top:r2.y,
                          left:r2.x,
                          bottom:r2.y+r2.h,
                          right:r2.x+r2.w});

      };
}
The goal of this technique is to be able to prerender the entire map into separate canvasTiles and then render only the visible ones during the main loop. As such, you have to create a container to hold all the canvasTiles, such that the map can fill and iterate on them:
gMap.canvasTileSize={"x":1024,"y":1024};
gMap.canvasTileArray=[];
Filling the Cache
Once the map data have been parsed, and the images have been loaded, you can continue filling your cache:
function onMapDataLoaded()
    {
        preDrawCache();

    }
Now that you have the basic object, you must create a two-dimensional array of canvasTiles that covers the world-space map correctly. To do this, you divide the size of the map (on each axis) by the size of each canvasTile (which is tunable) to get the number of canvasTiles along that axis. You store these in an array for retrieval later.
Most important, once you create the array, you call fillCanvasTile, which will do all the work of filling in the canvas with the proper tile data:
function preDrawCache()
  {
      //determine the number of canvases across, and down for the given map
      //dividing the overall pixel size of the map by the size of your canvas tiles does this
    var xCanvasCount = 1 + Math.floor(gMap.pixelSize.x / gMap.canvasTileSize.x);
    var yCanvasCount = 1 + Math.floor(gMap.pixelSize.y / gMap.canvasTileSize.y);
    var numSubCanv = xCanvasCount*yCanvasCount;

    //now for each 'cache tile' go through, create it, and fill it with graphics information
    for(var yC = 0; yC <yCanvasCount; yC ++)
    {
      for(var xC = 0; xC <xCanvasCount; xC ++)
      {
        var k = new CanvasTile();
        k.create(gMap.canvasTileSize.x,gMap.canvasTileSize.y);
        k.x = xC * gMap.canvasTileSize.x;
        k.y = yC * gMap.canvasTileSize.y;
        gMap.canvasTileArray.push(k);

        //draw this region of the map into this canvas
        fillCanvasTile(k);
      }
    }

    //once we've filled the cache, we're loaded!
    gMap.fullyLoaded = true;
  };
To fill the canvasTile object, you need to modify your rendering function from the last article. Before, you were taking into account the entire view-rect when rendering. Now, you can extend this concept by culling against the suggested canvasTile bounds rather than the view-rect itself. This lets you easily reuse your existing code to fill your new canvasTiles:
 function fillCanvasTile(ctile)
  {

    var ctx = ctile.ctx;
    //clear the tile itself
    ctx.fillRect(0,0,ctile.w, ctile.h);

    //create a mini-view-rect for this tile, which represents its bounds in world-space
    var vRect={ top:ctile.y,
            left:ctile.x,
            bottom:ctile.y+ctile.h,
            right:ctile.x+ctile.w};

      //most of this logic is the same
      for (var layerIdx = 0; layerIdx < gMap.currMapData.layers.length; layerIdx++)
      {
        if (gMap.currMapData.layers[layerIdx].type != "tilelayer") continue;

        var dat = gMap.currMapData.layers[layerIdx].data;
        //find what the tileIndexOffset is for gMap layer
        for (var tileIDX = 0; tileIDX < dat.length; tileIDX++) {
        var tID = dat[tileIDX];
        if (tID == 0) continue;

        var tPKT = gMap.getTilePacket(tID);

        //test if gMap tile is within our world bounds
        var worldX = Math.floor(tileIDX % gMap.numXTiles) * gMap.tileSize.x;
        var worldY = Math.floor(tileIDX / gMap.numXTiles) * gMap.tileSize.y;

        //figure out if the cache-tile rectangle intersects with the given smaller tile
        var visible= intersectRect(  vRect,
                      {top:worldY,left:worldX,bottom:worldY + gMap.tileSize.y,right:worldX + gMap.tileSize.x});
        if(!visible)
          continue;

        // Nine arguments: the element, source (x,y) coordinates, source width and
        // height (for cropping), destination (x,y) coordinates, and destination width
        // and height (resize).

        ctx.drawImage(tPKT.img,
                tPKT.px, tPKT.py,
                gMap.tileSize.x, gMap.tileSize.y,
                worldX - vRect.left,
                worldY - vRect.top,
                gMap.tileSize.x, gMap.tileSize.y);

        }
      }
Draw!
The creation and filling of canvasTiles occur at initialization time for your app. Later on, in order to render, you simply need to determine if a given canvasTile is visible to the view-rect, using box-box intersection code (see Chapter 16). If it is, draw it as though it were any other tile:
function onDrawMap(ctx)
    {
      //aabb test to see if our view-rect intersects with this canvas.
      for(var q =0; q < gMap.canvasTileArray.length; q++)
      {
        var r1 = gMap.canvasTileArray[q];

        if(r1.isVisible())
          ctx.drawImage(r1.cvsHdl, r1.x-gMap.viewRect.x,r1.y-gMap.viewRect.y);
      }
    }
Results
With caching, the performance improvements can be drastic. Frame rate on lower-end machines can shoot through the roof, although this comes at the cost of large memory overhead.
For a large map, your canvas will incur approximately 4MB per 1,024×1,024 tile. For example, a map of 6,400×6,400 pixels would yield a 7×7 array of tiles, landing you at 196MB of data; 196MB, however, is huge, unyielding, and maybe too uncompromising, especially if the map sizes increase. It would be great to mix the performance of Tiled caching with lower memory restrictions.
Because the preallocation takes up so much memory, it keeps you from being able to distribute specific large map sizes to players with machines that cannot handle the memory requirements. If you’re working with a strong, memory-full device, then, by all means, this technique works great, but for more restricted devices, you may need an alternate solution.
Using a Free List of Canvases
So, let’s review.
The forward-rendering path is great on memory, because it uses only the loaded texture atlases and draws from them each frame. Performance suffers here, however, owing to the recomputation of large portions of the screen with each frame, wasting precious central processing unit (CPU) cycles.
Conversely, the caching path is great on performance, drastically reducing the number of draws per frame. However, this technique is horrible on memory, taking up a large portion of your the available space on your application (app).
This situation requires a middle-of-the-road compromise between memory and performance. The goal is to have some notion of cached tile content, but maybe not the entire map, all the time.
To achieve this, you create a relatively small array of canvasTile objects (the size of the pool is up to the developer or, more specifically, the constraints of the device on which you’re working. You use these canvases as a pool for the visible screen. As a section of the screen becomes visible, you try to cache the map into a tile and use the tile for as many frames as possible.
Once you run out of free tiles to use, you evict the oldest tile (that is, the tile that was filled the longest time ago), replacing it with the new content.
This technique lands midway between the two previous techniques for two reasons:
- The technique will place an upper limit on the amount of memory needed for your canvasTiles; regardless of the map size, you will only ever eat up the same data.
- The technique requires some additional processing overhead, as each canvasTile will need to be filled in as it moves in and out of the view-rect.
As any hard-core computer scientist will tell you, the most important thing about a caching system is how the objects are evicted and retained within it. Simple caching systems, such as Least Recently Used (LRU), will keep a counter on an object, and once the cache is filled, will use the oldest object, repurposing it to be filled with the new information.
AGE AND COST CONSIDERATIONS
You should take into account age and cost when deciding which cache textures to reuse. Cost represents the work value associated with refilling an object with information. In your example some tiles may be more expensive to regenerate than others. As such, evicting the high-cost objects from the cache can represent a worst-performance burden, as opposed to evicting younger textures, which may be faster to repopulate. This trade-off is important for any type of texture-caching system.
Shameless plug: you can read more on this topic in my essay “Efficient Cache Replacement Using Age and Cost Metrics,” in Game Programming Gems 7 (Cengage Learning, 2008).
A New CanvasTile
Because users can run around your map quite randomly (especially in the case of teleporter fights), the oldest canvasTile (that is, the tile that was created the longest time ago) is not a good enough metric. The oldest tile may be the one currently visible on screen, which is a less-than-ideal choice for eviction. As such, you need a way to determine the oldest unseen tile. For our purposes, you allow a canvasTile to chart how old it is, relative to not being visible in the viewport:
function CanvasTile(){
      this.x=0;
      this.y=0;
      this.w=100;
      this.h=100;
      this.cvsHdl=null;
      this.ctx=null;
      this.isFree=true; //is this tile being used currently?
      this.numFramesNoVisible=0; //how many frames has this NOT been visible?
You add an update function to each canvasTile, which will check how long it has been visible to the user. Once a threshold is reached, you consider this tile to be evicted from the cache and available for use in the future:
//-----------------------------
      this.update=function()
      {
        //if this tile is free, then there's no logic to be done here
        if(this.isFree) return;

        //if i'm not visible, age me, and see if we can free me from the cache
        if(!this.isVisible())
        {
          this.numFramesNoVisible++;

          if(this.numFramesNoVisible > 100)   //promote to freed
          {
            this.isFree=true;
            this.x = -1;
            this.y = -1;
          }
        }
      };
Because you’re caching your tiles, you need to generate a pool of them once all the content has been loaded. You can create the objects themselves, but you do not fill them in at load time; you wait until you have validation from the viewport to start the cycles.
You’ll also notice in the code that follows that the size of the tiles has been changed. In the previous example, you used large, 1,024×1,024 textures, as they represented a good compromise between allocation and draws per frame. (Depending on hardware restrictions, ideally you’d precache the entire static background into one large texture, but that may cause additional memory pressure.) In the case of using a free list, you can get away with a smaller tile size, as you’ll be reusing them often:
    gMap.canvasTileSize={"x":256,"y":256};
function onMapDataLoaded()
    {
      //preallocate a small pool of canvases to use
      numCanvases=30;
      for(var i =0; i < gMap.numCanvases; i++)
      {
        var k = new CanvasTile();
        k.create(gMap.canvasTileSize.x,gMap.canvasTileSize.y);
        gMap.canvasTileArray.push(k);
      }

        gMap.fullyLoaded = true;

    }
When the viewport tests visibility against the world, it needs to determine if the targeted section of the map has been cached by the tiling system. If so, you have to use the canvasTile to render. If the section has not been cached, you must find a valid texture from the cache to use. You do this in two steps:
- Cycle the canvases to see if any of them are free for use; these textures are easy to grab and quick to track down.
- If the cache is full (that is, all the textures have been allocated), then you need to go through it and decide which is the oldest and repurpose that texture for your new needs.
 //---------------------------
  fetchFreeCanvas:function()
  {
        //do we have a free canvas?
        for(var i =0; i < this.canvasTileArray.length; i++)
        {
                if(this.canvasTileArray[i].isFree)
                {
                        this.canvasTileArray[i].isFree = false;
                        return this.canvasTileArray[i];
                }
        }

        //no free canvas yet, find one of the used canvases..
        //pick the one with the highest age
        var oldest = 0;
        var winner = null;
        for(var i =0; i < this.canvasTileArray.length; i++)
        {
                if(this.canvasTileArray[i].isFree) continue;
                if(this.canvasTileArray[i].numFramesNoVisible > oldest)
                {
                        oldest = this.canvasTileArray[i].numFramesNoVisible;
                        winner = this.canvasTileArray[i];
                }

        }
        winner.isFree = false;
        return winner;
  },
To draw your map, you first need to update all your canvasTiles in order to make any necessary adjustments to their ages and potentially allow them to free themselves from the cache. It is important to do this step first, because you’re about to start walking the map and reusing tiles where you can get your hands on them:
  function onDrawMap(ctx)
  {
    //do an update of our canvas arrays
for(var i =0; i < gMap.canvasTileArray.length; i++)
  gMap.canvasTileArray[i].update();
The real chaos of this function comes from knowing which tiles have been cached and which haven’t. In effect, you must segment the map and determine which of the larger segmented areas have active residency in your cache. Once you know your canvasTile coordinates, you can walk through the cache and try to find a tile that has already been filled with that data. If you find one, you can continue on and use it during rendering. If you don’t find a canvasTile that contains information, then you need to go through the cache and populate it with the map information:
  //determine what canvasTilings would be visible here, expand our view rect to smooth tiling artifacts..
  var xTileMin = Math.floor((gMap.viewRect.x) / gMap.canvasTileSize.x);
  var xTileMax = Math.floor((gMap.viewRect.x+gMap.viewRect.w) / gMap.canvasTileSize.x);
  var yTileMin = Math.floor((gMap.viewRect.y) / gMap.canvasTileSize.y);
  var yTileMax = Math.floor((gMap.viewRect.y+gMap.viewRect.h) / gMap.canvasTileSize.y);

  if(xTileMin <0) xTileMin=0;
  if(yTileMin <0) yTileMin=0;
  var visibles=[];
  for(var yC = yTileMin; yC <=yTileMax; yC ++)
  {
    for(var xC = xTileMin; xC <=xTileMax; xC ++)
    {
      var rk = {
          x:xC * gMap.canvasTileSize.x,
          y:yC * gMap.canvasTileSize.y,
          w:gMap.canvasTileSize.x,
          h:gMap.canvasTileSize.y
          };

      var found = false;
      for(var i =0; i < gMap.canvasTileArray.length; i++)
      {
        if(gMap.canvasTileArray[i].doesMatchRect(rk.x,rk.y,rk.w,rk.h))
        {
          found = true;
          visibles.push(gMap.canvasTileArray[i]);
        }
      }

      if(found) continue;

      var cv = fetchFreeCanvas();
      cv.x = rk.x;
      cv.y = rk.y;
      fillCanvasTile(cv);
      visibles.push(cv);
    }
  }
At this point, rendering is straightforward; you simply walk through the visible tiles and draw them on the screen. All the heavy lifting has been done already, so you’re mostly good to go:
var r2 = gMap.viewRect;
//aabb test to see if our view-rect intersects with this canvas.
for(var q =0; q < visibles.length; q++)
{
  var r1 = visibles[q];
  var visible= intersectRect(  {top:r1.y,left:r1.x,bottom:r1.y+r1.h,right:r2.x+r2.w},
                    {top:r2.y,left:r2.x,bottom:r2.y+r2.h,right:r2.x+r2.w});

  if(visible)
    ctx.drawImage(r1.cvsHdl, r1.x-gMap.viewRect.x,r1.y-gMap.viewRect.y);
}

}
Results
Caching is an effective bridge between preallocation and memory constraints. In general, though, the technique can create some hitching in your frame rate. Effectively, the cost of caching a tile is mitigated over the number of frames in which it’s reused, so you may get spikes of batches of draw calls when a frame is first visible and has to be filled.
Conclusion
In this chapter, I’ve discussed how to address performance issues that result from the rendering of static map content. Reducing the number of draws per frame is ideal for every situation as a means of keeping frame rate consistent. Nevertheless, one must be mindful of the memory issues involved with precaching too much information. As with most techniques, the best solution is to profile your application across many devices and determine what the right configuration is for your end user’s experience.