
![]()
Introduction to TypeScript: Building a Rogue-like Engine
What Is TypeScript?
TypeScript (http://typescript.org) is a typed superset of JavaScript that compiles to plain JavaScript. TypeScript is cross-platform, runs on any browser, and is open source. Microsoft created it, and it’s hands down one of the best languages for building HTML5 games. One of the great things about TypeScript, apart from adding typing to JavaScript, is that it allows you to start using some of the cool features of ECMAScript 6 (ES6) now, even though it may be years away from being finalized. This means that you can put to good use classes and other higher-level constructs that you find in languages such as C# and Java; moreover, TypeScript is incredibly similar to ActionScript 2 and 3. The final key advantage of TypeScript is that it outputs human readable JavaScript, plus you can use existing JavaScript libraries or inject the code directly into your TypeScript classes and start taking advantage of typing provided by the compiler.
To help you better understand why TypeScript is so great, I have designed a rogue-like engine for you to build in this chapter. Rogue engines are one of my favorite things to tinker with because their simplicity lends itself to some creative ways to manipulate and visualize tile-based levels. In the example, I will walk you through setting up TypeScript, explain some of the more complex concepts of the language, and show off how—with the help of typing—you can achieve polymorphism at scale, which is traditionally difficult to do in JavaScript alone. But first, let’s go through an overview of the language itself.
Language Overview
You will find that, out of the gate, TypeScript is incredibly similar to JavaScript. This is good because, when it comes to picking up TypeScript, the learning curve is rather low. If you have a background in ActionScript, Java, or C#, you will easily understand the more advanced language features quickly. If not, you will learn a lot from this chapter. At its core, TypeScript is all about typing. There are three primitive types that you need to know:
var name: string = "Jesse Freeman";
As you can see, you simply use the string type for any strings.
var age: number = 34;
Here, numbers are typed as numbers. Because this is still JavaScript, at the end of the day, you don’t have int, float, or double, as you would find in other typed languages.
var likesGames: boolean = true;
And, you can see that you can easily type booleans, as you would expect to use the Boolean type.
Another advantage of the compiler is type inference. This allows you to declare variables without having to type them explicitly. So, the previous code could also be done like this:
var name = "Jesse Freeman";
var age = 34;
var likesGames = true;
So long as the compiler can fully qualify what the type will be, it will automatically figure it out for you. Now, arrays and objects can also be typed:
var myArray = any[];
As you can see, the any type is being used to define a generic array. This means that the compiler will ignore mixing and matching of types inside of the array. You could easily type it to something specific, such as string or number, if you knew that the contents of the array would always be the same.
var myArray:string[] = ["Jesse", "Freeman"];
TypeScript also supports classes. This is very important, because, although classes are not a native part of JavaScript, every developer has his or her own way of making them. This could be problematic when you work in larger teams or when you want to keep your code consistent across developers.
Let’s take a look at a simple class:
class Player {
        name: string;
        age: number;
        likesGames:boolean;
        constructor(name: string, age: number, likesGames:boolean) {
                this.name = name;
                this.age = age;
                this.likesGames = likesGames;
        }
}
To create a new player, you would use the new constructor:
var player = new Player("Jesse Freeman", 34, true);
Likewise, the JavaScript that is generated for this class looks like this:
var Player = (function () {
    function Player(name, age, likesGames) {
        this.name = name;
        this.age = age;
        this.likesGames = likesGames;
    }
    return Player;
})();
Clearly, it’s very easy to read. The TypeScript compiler is highly optimized to generate human-readable JavaScript, unlike some other JavaScript compilers you may have seen. This means that, if you decide to stop using TypeScript, you can simply take the generated JavaScript and just use that. That is a huge advantage over similar JavaScript compilers.
There is a lot more to TypeScript than what was covered here. Let’s save that for the rest of the chapter and have you start making a rogue game engine right away.
Setting Up TypeScript
There are two ways to set up TypeScript: the first is through Visual Studio, as a plug-in, and the second is through Node.js. I am going to focus on the latter, as it’s cross-platform, and you can do some really interesting automation with Node and Grunt. If you are unfamiliar with either of these two technologies, I highly recommend your checking out Chapter 23, which covers them.
To get started, you will need to open the command line. On a Mac, use Terminal. For Windows, I use Git Bash, which is part of Git’s installer. You must install Grunt globally on your computer before you begin. You can do that by typing the following code snippet at the command prompt:
>npm install -g grunt-cli
Now, you will want to create a directory and navigate to it. This new directory, which I have called RogueTS, is going to be where you do all your work. You will create a package.json file by typing this at the command prompt:
> npm init
Next, you have to answer a few questions about the project. Figure 19-1 shows you how I configured mine.
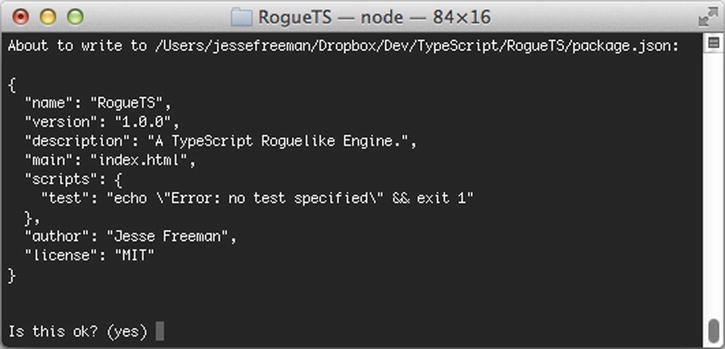
Figure 19-1. Once you have filled out all the questions, npm will generate a package.json file for you
From here, you must install all the modules that are required to run TypeScript as well as to automate your project. (I will go through this quickly, so, again, if you have never used Grunt before, see Chapter 23 for more details.) Type the following code at the command prompt:
npm install typescript --save-dev
This will install the TypeScript compiler into your project directory, as illustrated in Figure 19-2.
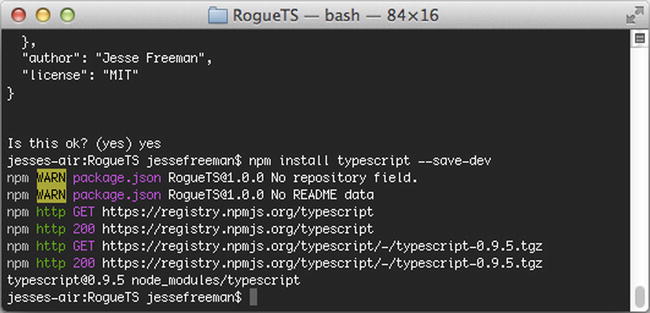
Figure 19-2. Here, you can see that npm was used to install the Typescript compiler, and it has been downloaded and installed correctly
Next, you will want to run through the following commands, one at a time, and let each of them install before moving on to the next plug-in:
npm install grunt-typescript --save-dev
npm install grunt-contrib-watch --save-dev
npm install grunt-contrib-connect --save-dev
npm install grunt-open --save-dev
Now, if you take a look at the package.json file in your project, you should see all your modules installed under the developerDependencies JavaScript Object Notation (JSON) object, as follows:
"devDependencies": {
        "typescript": "∼0.9.1-1",
        "grunt": "∼0.4.1",
        "grunt-typescript": "∼0.2.4",
        "grunt-contrib-watch": "∼0.5.3",
        "grunt-contrib-connect": "∼0.5.0",
        "grunt-open": "∼0.2.2"
}
Note that you may have different version numbers, as npm installs the latest one.
Next, you need to create a GruntFile.js in your project. Open it, and let’s import your modules:
module.exports = function (grunt) {
    grunt.loadNpmTasks('grunt-typescript'),
    grunt.loadNpmTasks('grunt-contrib-watch'),
    grunt.loadNpmTasks('grunt-contrib-connect'),
    grunt.loadNpmTasks('grunt-open'),
}
Now, you can start configuring your Grunt tasks. After the last bit of code with your grunt.loadNpmTask call, add the following code inside the module’s function statement:
grunt.initConfig({
    pkg: grunt.file.readJSON('package.json'),
});
Note that there is a trailing comma after the package.json. You are going to continue adding each task object to this JSON file. Start by putting the next task object after the comma, on a new line:
connect: {
    server: {
        options: {
            port: 8080,
            base: './deploy'
        }
    }
},
Connect is a task that will create a server locally in the directory in which you run it. This will be helpful when it comes to testing your project. Add the next task:
typescript: {
    base: {
        src: ['src/**/*.ts'],
        dest: 'deploy/js/game.js',
        options: {
            module: 'amd',
            target: 'es5'
        }
    }
},
This task will help you run the TypeScript compiler on your code. As you can see, you are setting the source to a src folder, which you will create later on, and the output will be a single game.js file in your deploy directory. Also, as far as options go, you set your module output type to amd. Because you are going to be combining all your TypeScript modules into a single file, you won’t have to worry about loading them via a module manager, as with Require.js. Also, you are going to set your target to ECMAScript 5 (ES5), which allows you to take advantage of TypeScript’s more advanced features, such as getters and setters. HTML5 games require the canvas tag to run, so you don’t really need to worry about supporting ECMAScript 3 (ES3), as canvas doesn’t work on those older browsers. Next, add the final two tasks:
watch: {
    files: 'src/**/*.ts',
    tasks: ['typescript']
},
open: {
    dev: {
        path: 'http://localhost:8080/index.html'
    }
}
Watch lets you have Grunt monitor a directory for changes. Here, you can see that you are setting up Grunt to check for any changes to .ts (TypeScript) files and call the typescript task, which will run the compiler on the files in the src directory. This will allow you to generate your game.js file automatically anytime you click the Save button in a .ts file. The last task simply enables you to open the browser and load your game for testing.
To make all this work, you need to add one final thing to the end of your GruntFile, right after the closing ]); for your task objects:
grunt.registerTask('default', ['typescript', 'connect', 'open', 'watch']);
This will register the default task for Grunt as follows: compile your TypeScript files, start the server, open the http://localhost:8080 URL in your default browser, and then watch the src directory for any changes to your .ts files. Although this may seem like a lot of work, you will quickly get used to this kind of setup for TypeScript, and it’s incredibly similar to how you would automate your normal JavaScript development (instead of having the TypeScript compiler combine JavaScript files, you would use a task called concat) . The last thing you need to do is set up your project directory, as shown in Figure 19-3.
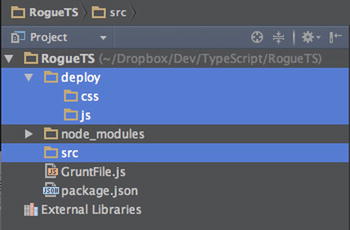
Figure 19-3. Note that I have added a deploy directory with a css and a js folder as well as a src directory to the project
You will want to set up a few files to get started. Create an index.html file in your deploy folder with the following content:
**<!DOCTYPE html>
<html lang="en" xmlns="http://www.w3.org/1999/xhtml">
<head>
    <meta charset="utf-8" />
    <title>RogueTS</title>
    <link rel="stylesheet" href="css/game.css" type="text/css" />
    <script src="js/game.js"></script>
</head>
<body>
        <h1>RogueTS Test</h1>
    <canvas id="display" width="800" height="480" />
</body>
</html>
Now, you will need to make a game.css file in your css folder:
body
{
    margin: 0px;
    padding: 0px;
    background-color: black;
}
Finally, you make your main.ts file, which will go in your src folder. Simply put in it the following content:
console.log("Hello TypeScript");
You should now have a project that looks like Figure 19-4.
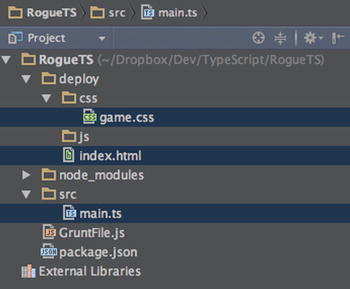
Figure 19-4. You should now have an index.html, a game.css, and a main.js file
If you go back to the command line and run the following code at the root of your game’s project directory, it should start the build script:
> grunt
Assuming that everything worked correctly, you will see your game’s index page in the browser, along with your trace to the console window, as displayed in Figure 19-5.
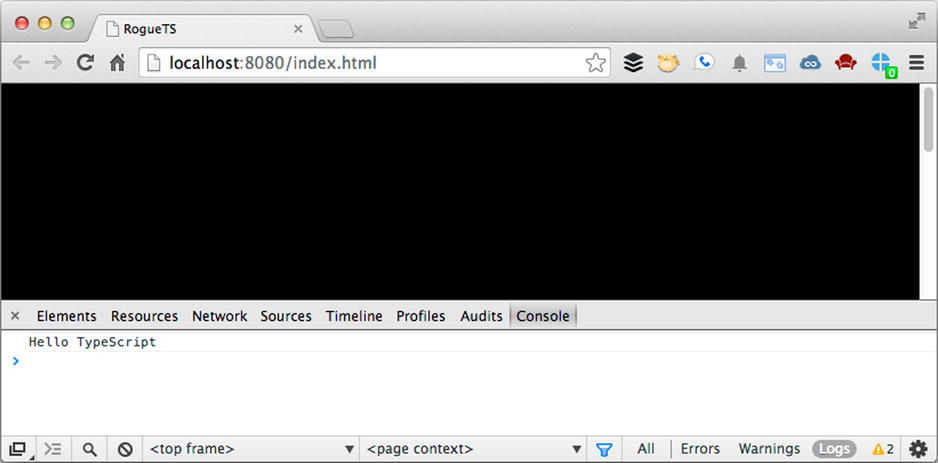
Figure 19-5. The browser should automatically open with your new game’s index page; open your browser’s console to see the log message
And there you have it! TypeScript is fully configured, and you have an automated workflow for compiling and testing your game’s code. Now, let’s dig into the language and build out your game.
In your src folder, you will want to start setting up the location where your rogue game’s code will live. You are going to make all your game code live inside its own module, called rogue. Modules are a great way to help encapsulate the scope of your code so that it doen’t sit in the global scope or conflict with other JavaScript code, which you may have running on the page. To help you better organize this, you will need to create a rogue folder inside src and a game.ts file, as demonstrated in Figure 19-6.
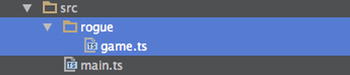
Figure 19-6. You will be keeping all your rogue game .ts files in their own folder inside your src directory
Next, put the following content inside the folder:
module rogue {
        export class Game {
                constructor (public display: HTMLCanvasElement) {
                        console.log("display", display);
                }
        }
}
This is the basic structure for setting up your modules and classes. As you can see, you define the module at the top as rogue and then include your class. You can have several classes in a single module file or break them up over different files. I personally tend to keep classes that are part of the same module in one file. I also take advantage of the keyword “export,” which tells the compiler to make the class publically accessible. Although you can have private and public classes in TypeScript, it doesn’t necessarily translate 100 percent to JavaScript, as everything is public. Using the keyword “export” is a good way to let the compiler validate those classes that allow access to themselves outside their package, and it’s helpful when you are building more complex projects with TypeScript. As you continue to stub out the rest of the game, you will get a better sense of what this means.
Another thing to point out about this class is that you are using a shorthand notation to set up your display property automatically in the constructor. Normally, you would define the public display on the class itself, above the constructor, but in TypeScript, you can save some time by simply defining an argument in your constructor as private or public, which will automatically set it as a property of your class. This is incredibly helpful. Also, note that you are typing the display property to HTMLCanvasElement. TypeScript is well aware of the native HTML element types, and each has its own unique type. This will allow you to have the compiler validate that you are using the correct application programming interfaces (APIs) on the element. You can also define your own constants, but I will not get into that for this project. Simply note that doing so is helpful for avoiding typos when accessing anything; this is one of the great advantages of using a typed language.
If you click the Save button and go back to the command prompt, you should see it compile and give you the okay that the file is done, as shown in Figure 19-7.
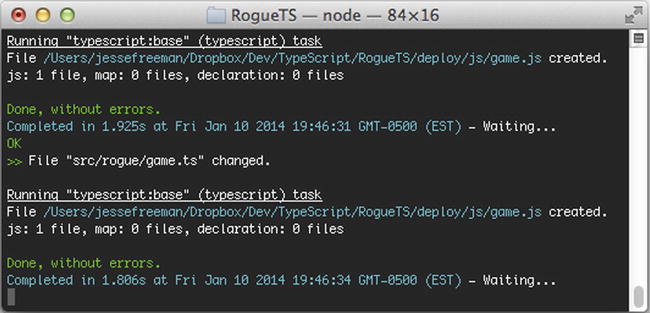
Figure 19-7. As you can see at the bottom of the command prompt, the typescript task has run, and it compiled without any errors
Check the deploy/js folder, and open the game.js file. You should see something like the one displayed in Figure 19-8.
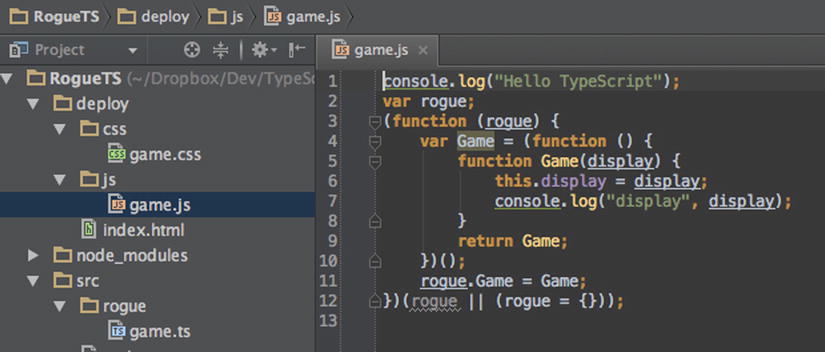
Figure 19-8. Your first generated JavaScript file from TypeScript
You now have your module and class compiled into JavaScript. Note again that this JavaScript is fully readable. If you ever find yourself no longer wanting to use TypeScript, you can simply take all the JavaScript files out and use them without TypeScript or even tell the compiler to generate each TypeScript file separately.
Next, let’s get this connected in your main.ts file. Replace “Hello TypeScript” with the following code:
window.onload = () => {
    var canvas = <HTMLCanvasElement>document.getElementById('display'),
    var rogueTS = new rogue.Game(canvas);
};
You may recognize that you are setting up an onload call to get the canvas and create your RogueTS game. What may look strange is how you actually set up this callback. The arrow notation => is how TypeScript binds a callback to a generic method. The biggest advantage of this in TypeScript, which you will see later in the chapter, when you set up your game loop (see the section “Drawing to Canvas”), is that the compiler will actually fix scoping in this generic function for you. To pass the scope back to a generic method, you may have had, at some point, to do a scope hack similar to this one:
var that = this;
TypeScript alleviates the need for this completely when you take advantage of the arrow notation. You will continue to use this notation as you build out your game, so don’t worry; you will get more hands-on time with it.
Note that you get a reference to the canvas via a normal document.getElementById call. What may look strange is the addition of <HTMLCanvasElement> before it. This is called casting. Basically, because TypeScript sits on top of JavaScript, which is an untyped language, when you make JavaScript calls, you will always get back a generic object. You will have to type cast these objects to allow TypeScript to do its type checking correctly. You may also notice that you don’t set an explicit type to your canvas variable. The compiler is smart enough to infer the type of var by the casting type. This can save you some time by not having to worry too much about adding types to each variable you define locally in a method or function.
You also create a new reference to your game. If you have ever used the new constructor in any language, including JavaScript, this should look very familiar to you. As you can see, you need to include the module name, plus the class, so you call rogue.Game and pass in a reference to the canvas. If you go back to the page in your browser and refresh, you should see the canvas element being traced out to the console, as shown in Figure 19-9.
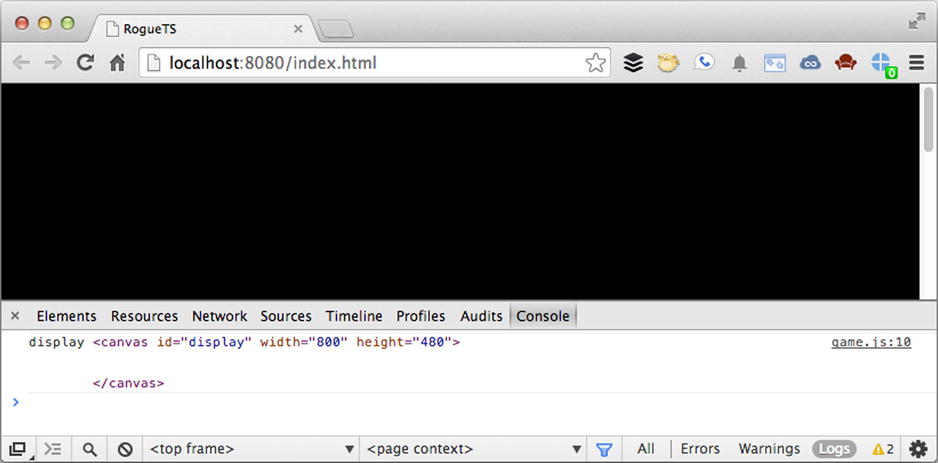
Figure 19-9. By logging the value of the display to the console, you can see that the value has been correctly set
Now, you are ready to move on to something a little more exciting: drawing to the canvas.
If you have ever worked with the canvas, which I assume you have, as you made it this far in the book, you will find that everything is the same in TypeScript. Just think of TypeScript as JavaScript with some extra features, and typing, of course, which you can choose to use or ignore. That is perhaps the best thing about TypeScript: you can revert to writing normal JavaScript at any point, and the compiler will simply ignore TypeScript. If you want the added protection of compiler checking, just add types, and you are good to go.
Before you start rendering to the canvas, you are going to need to set up a basic game loop. In your game.ts file, remove your console log, and add the following code in its place:
// Create and start the game loop
var gameloop = () => {this.update(); requestAnimationFrame(gameloop);}
gameloop();
Here, you are simply setting up an anonymous function, called gameloop. Inside it, you will notice that you are calling an update method (which you will set up next). Then, you use requestAnimationFrame, which requires a callback method to in turn call gameloop. This establishes a continuous loop that you can use to poll for input and render graphics to your canvas. One thing to note is that your game is going to be turn based, so you don’t do much in the way of monitoring frames per second (FPS )or adjusting for slowdown between frames to calculate the time between each loop. Let’s assume that your game runs its render and that everything works fine in a single frame, so in a real game, you may want to make adjustments with a little more logic. Finally, you call the gameloop function, which starts the loop.
Create an update function below the constructor that looks like this:
update():void{
        console.log("update called");
}
Now, you should be able to save the file, make sure that it compiles, and refresh the page. In the console, you will see that update being called in time with the browser’s requestAnimationFrame, as demonstrated in Figure 19-10.
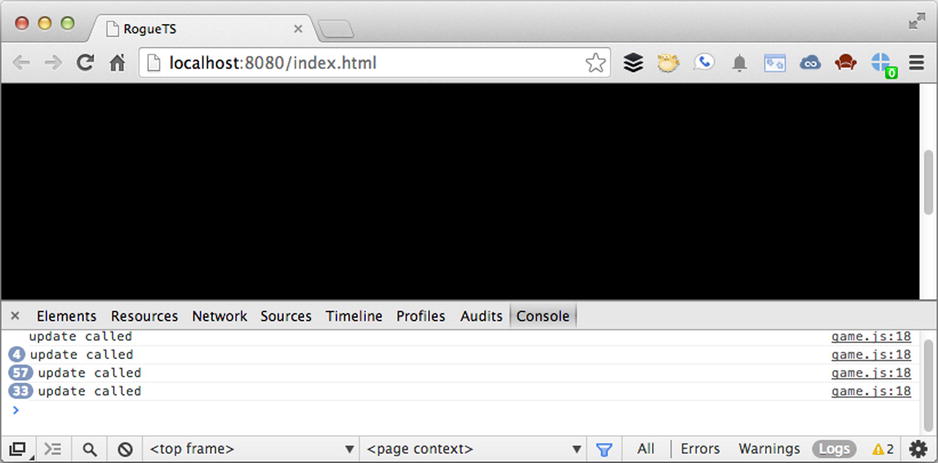
Figure 19-10. As you can see, update is being called a lot, as the loop is going to continue to run without interruption
Let’s also add a draw method call to your update function and to the method itself. Replace “update called” console.log with this:
if (this.invalid) {
        this.draw();
}
Next, create the new method:
draw():void{
        console.log("draw called");
        this.invalid = false;
}
Finally, you have to add a property to your class, right above the constructor called invalid, as follows:
invalid: boolean = true;
This is a neat technique that is common in rendering engines that only need to redraw themselves when changes happen to the display. In this case, you want to render only once and not render when nothing is happening on the screen. Rogue is turn based, so taking advantage of the invalid flag is a great way to control manually when something renders to the screen. Run the example in the browser, and you should see that console.log gets called only once (see Figure 19-11).
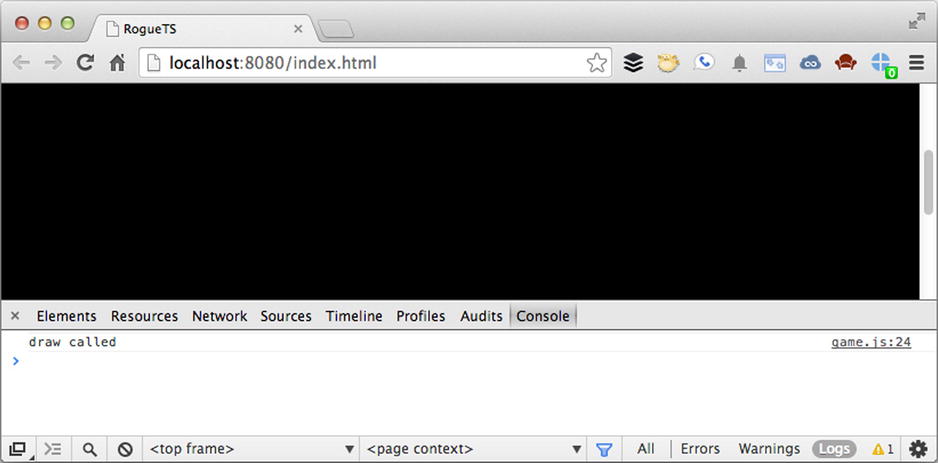
Figure 19-11. Now, your draw call happens only once
Also, make sure to set invalid to true by default so that the first time update gets called, draw does as well. After a draw happens, it sets the invalid flag back to false and turns off the renderer. It’s important to note that update is still being called, but that is okay. You always want to be calculacting what the next frame should be doing, such as accepting user input, calculating artificial intelligence (AI), or performing other processor-intensive tasks, while there is no need to update the display. Now, all you have to do is to create your map and a way to render it.
To start, above the game.ts constructor, add the following property:
tiles: any[];
Then, before the render loop, create the following simple, two-dimensional array:
this.tiles = [["#","#","#","#","#","#","#","#","#"],
             ["#"," "," "," ","#"," "," "," ","#"],
             ["#"," "," "," "," "," "," "," ","#"],
             ["#"," "," "," ","#"," "," "," ","#"],
             ["#","#","#","#","#","#","#","#","#"]
             ]
You can probably discern the structure of the map by looking at the array, but it’s basically two rooms connected by a hallway. In your game, you will use "#" to represent walls and " " to represent the floor, where the player can walk. Now, let’s switch gears and create your basic renderer. To get started, create a new file, called renderer.ts, in the rogue folder within src. From here, you are going to want to set up your basic module structure:
module rogue.renderer {
}
Next, you define a common API for your renderer to use, taking advantage of an interface, which is part of the TypeScript language. Interfaces allow you to define all the public methods on a class, and you can use the interface to type to instead of the class that inherits it. If you have never worked with interfaces before, it should make a little more sense as you get started building it out. Here is your IMapRenderer interface, which should go inside your rogue.renderer module:
export interface IMapRenderer {
    draw(tiles: any[]):void;
    drawTile(column: number, row: number, currentTile: string): void;
    clearMap(): void;
}
As you can see, you have three public-facing APIs: draw, drawTile, and clearMap. These will represent the basic calls that you can make on the map class once you create it. You will also notice that the draw call accepts an array of tiles, but it has been left generic by using the any[] array type. This allows you to extend your map later if you decide to use numbers instead of strings to represent the tile values. This is useful if you want to map each tile to a sprite ID, for example. Now, you are ready to set up the basic code in your game.ts file to render the map. Go back to that file, and add the following property to the top of the class, just below the invalidate property:
renderer: renderer.IMapRenderer;
You are going to create a renderer, and its type is IMapRenderer, which is the interface you just created. This is an important part of object-oriented programming called polymorphism (from the Greek polys, “many,” and morphe, “form”), meaning “the provision of a single interface to entities of different types.” This is what will enable you to grow your application and let each of your classes be completely decoupled from the concrete implementation of the class, instead relying on its interfaces or public methods. As you set up your renderer, the game engine doesn’t have to know anything about the actual class that is in charge of drawing a map; it just requires that whatever you set the renderer to do is able to call draw, drawTile, and clearMap. To help illustrate this, let’s add the following code to your draw method and replace the “draw called” console.log:
this.renderer.draw(this.tiles);
Now, your game is ready to draw the tiles that you defined. If you try to run this, however, it will fail, because an interface doesn’t include the logic to execute anything. To do that, you will need to create a class that implements your new interface.
Before moving on, there is one more important thing I should mention regarding interface type. You may have noticed that you can simply type to it by referring to it as renderer.IMapRenderer instead of by its full module name, rogue.renderer.IMapRenderer. This is because the renderer module is inside the rogue module. Just because they are in different files doesn’t mean that they have their own individual scope. Therefore, when a class is inside a module, the class doesn’t need to use the fully qualified module path name; you can drop the module name to which the class belongs and access the class itself. You will see more of this later on, but in some cases, you will have to use fully qualified module paths. I will do my best to explain these differences.
Next, go back into your renderer.ts file, and add the following class under your interface:
export class CanvasMapRenderer implements IMapRenderer{
}
When you click the Save button, you should see errors similar to those shown in Figure 19-12.

Figure 19-12. As you can see, an error informs you that your class is not implementing your interface
The compiler is telling you that, even though you implemented the interface in your class, you still didn’t add the actual methods defined in it. An interface is like a contract that guarantees the rest of the code that anything implementing it will always have the public methods it defines. Let’s make the compiler happy before moving on and adding the actual render logic. Create these three methods on your CanvasMapRenderer:
public draw(tiles: any[]):void{
}
public drawTile(column: number, row: number, currentTile: string): void {
}
public clearMap(): void {
}
Now, if you go back to your game.ts file, you can assign this new class to the renderer property that you added before. Add the following code to your game’s constructor, just above your game loop:
this.renderer = new renderer.CanvasMapRenderer();
Click the Save button, and look at the console. You should now see that the compiler is satisfied, and you can begin adding logic to your renderer. Go back into the renderer.ts file, and add the following constructor to your CanvasMapRenderer:
constructor (private canvas: HTMLCanvasElement, private tileRect: geom.Rectangle) {
    this.target = this.canvas.getContext("2d");
}
You also must add the following property above it:
target: CanvasRenderingContext2D;
What this means is that your CanvasMapRenderer needs a reference to the canvas in your HTML file as well as the dimensions of the tiles. You now create a new class, called Rectangle, which will be one of two geometry classes required in your game engine. Create a new file, called geom.ts, in your rogue folder inside src, and put in it the following content:
module rogue.geom {

    export class Point{
        constructor(public x:number = 0, public y:number = 0){}
        clone():Point{
            return new Point(this.x, this.y);
        }
    }
As you can see, you have a new package, called geom, and a class called Point. Point is a very simple class: it affords you an easy way to type against an x, y coordinate in your game. Now, whenever you want to represent a position, such as the player’s x, y values, you can create a new point and access its public x, y properties. Next, you need to create your Rectangle. Following your Point class, add this:
export class Rectangle extends Point{
    constructor(x:number, y:number, public width: number = 0, public height:number = 0){
        super(x,y);
    }
}
This may be new to you if you have never worked with inheritance before in a language. Just as the CanvasMapRenderer implemented your IMapRenderer interface, so, too, one class can actually inherit logic from another class. To do this, you use the keyword “extends” when defining the class. From here, you can not only set up your own additional logic, but also pass values up to the parent class from which it extends. In this case, Rectangle needs to store the x, y width and height values for your game. It would be silly just to retype your properties for x and y, so you have Rectangle build onto the Point class, take its constructor’s x, y values, and pass them up to the “super” class, which in this case is Point. Super is what you use to access a parent method. Because your Point class automatically creates an x, y property with its value defaulting to 0, you just pass those up to the super class and add the width and height arguments to the constructor. This allows you to do some very cool things as you get deeper into inheritance. TypeScript also supports method overriding and overloading.
Now that you have your Rectangle class, it’s time to go back into your renderer and add the rest of the logic. Add the following content in the CanvasMapRenderer draw method:
this.clearMap();
var row: number;
var column: number;
var total: number = tiles.length;
var rowWidth: number = tiles[0].length;
var currentTile: string;
Here, you are going to clear the map, which you will add later on, and then set up some local variables to represent the values that you will need as you loop through the tiles in the array to draw them. It’s always good practice, and it helps with performance, to precalculate and predefine variables used in for loops, especially the nested for loop you are about to write. Now, add the following loops to your draw method:
for (row = 0; row < total; row++) {
    for (column = 0; column < rowWidth; column++) {
        currentTile = tiles[row][column];
        this.drawTile(column, row, currentTile);
    }
}
As you can see, you are simply looping through the rows, and, at each row, you loop through the column to get the tile. This will in essence render out each tile in the grid. You can access any tile from your two-dimensional array by calling tiles[row][column]. As you run through the loop, you get a reference to your tile, which is either "#" or " ", to represent walls or floors. Then, you pass the column, row, and tile values over to your drawTile method. Let’s add the following code to that now:
//Change tileRect's x,y position
this.tileRect.x = column * this.tileRect.width;
this.tileRect.y = row * this.tileRect.height;
//Draw tile to the canvas
this.target.fillStyle = this.tileColor(currentTile);
this.target.fillRect(this.tileRect.x, this.tileRect.y, this.tileRect.width, this.tileRect.height);
//Draw outline around tile
this.target.strokeStyle = "black";
this.target.strokeRect(this.tileRect.x, this.tileRect.y, this.tileRect.width, this.tileRect.height);
This should be very standard stuff if you have ever worked with the canvas before. The target is your two-dimensional context, which you defined at the top of the class, and you are simply modifying the tileRect, which represents the size of your map’s tile to update its x, y position according to where you want to render it next. You use fillRect and strokeRect with the x, y width and height values of your tileRect to render your map.
You may have noticed the method in there called tileColor. This will represent your lookup table for determining what color to use on each tile, based on its type. Let’s add the following method to the end of the CanvasMapRenderer:
private tileColor(value: string): string {
    switch (value) {
        case " ":
            return "#ffffff";
            break;
        case "@":
            return "#ff0000";
            break;
        default:
            return "#333333";
    }
}
In this private method, you have a simple switch statement that returns a color value based on the tile type. As you can see, you are adding one special tile type, "@", which is going to be your player. The last thing you need to do is add the code to clear your canvas, so add the following code to your empty clearMap method:
this.canvas.width = this.canvas.width;
This is a neat trick that clears a canvas quickly by simply setting its width to itself. There is no need to mess with adding a method to repaint the canvas with a solid color, unless you want to change the background to something other than black.
At this point, you should have everything that is required to see your map. You just have to make one minor correction to your renderer setup in the game.ts file. Replace
this.renderer = new renderer.CanvasMapRenderer();
with
this.renderer = new renderer.CanvasMapRenderer(this.display, new geom.Rectangle(0, 0, 20, 20));
Save your changes, make sure that everything passes the compiler, and refresh your web page. You should see something similar to the rendering displayed in Figure 19-13.
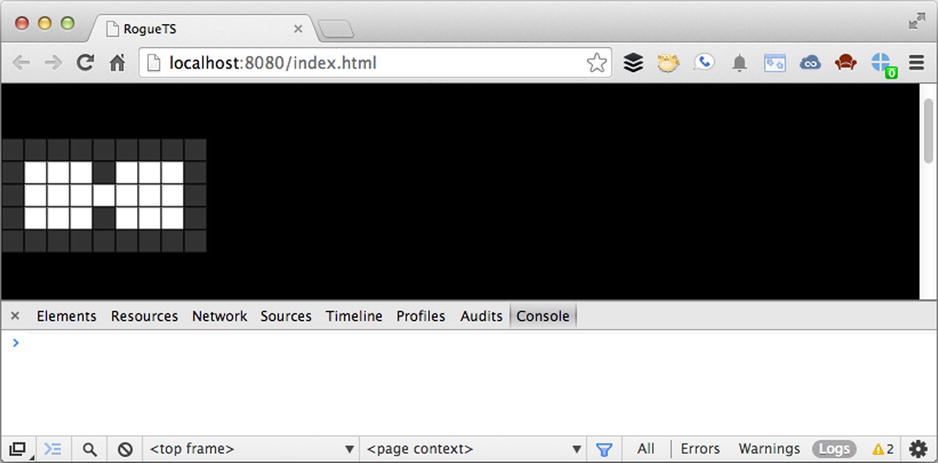
Figure 19-13. You will now see your game’s map being rendered to the screen
And that is how you get your map rendering. Before moving on, let’s talk a little more about extending classes and why it’s important. You may have noticed that your renderer was called CanvasMapRenderer and not just MapRenderer. That was intentional. Rogue is traditionally a text-based game. You could easily have created a text renderer, called TextMapRenderer, that simply modified it to display each tile as its value and not bothered with canvas at all. All you would need to do is implement the IMapRenderer interface and change out your draw, drawTile, and clearMap methods to manipulate text on the page instead. This is where the true power of TypeScript lies. You can take advantage of interfaces to help abstract your code base in ways that encourage extensibility, composition, and inheritance as it grows. This is critical when you are working in larger teams and need to make sure that you have structure and balance in your code base, an inherent problem with JavaScript, as each developer may have his or her own ways of implementing classes or have problems reading other developers’ code.
You now have the basic engine up and running for creating a map and displaying tiles. Let’s add a player to the map and deal with registering input from the user as well as basic collision detection. But, before you do that, you are going to need to abstract your map a little more to make it easier to work with. Right now, it’s simply a multidimensional array. Let’s create a map class and expose some APIs to access the underlying data. You will do this by making a new file, called map.ts, with the following content:
module rogue.map {
    export interface IMap{
        getWidth(): number;
        getHeight(): number;
        getTiles(): any[];
        getTileType(point: geom.Point): string;
    }
}
Again, you will see that you start with a simple interface to define your map’s public properties:getWidth, getHeight, getTiles, and getTileType. Let’s build out the map below your interface:
export class TileMap implements IMap {

    constructor (private tiles: any[]) {}

    public getTileType(point: geom.Point): string {
        return this.tiles[point.y][point.x];
    }

    public getWidth(): number {
        return this.tiles[0].length;
    }

    public getHeight(): number {
        return this.tiles.length;
    }

    public getTileID(row: number, column: number): number {
        return row * this.getWidth() + column;
    }

    public getTiles(): any[] {
        return this.tiles;
    }
}
Nothing here should be too surprising. You accept an array of tiles, and each method lets you access the tile data without directly manipulating it. This is critical when it comes to encapsulation. You always want to make sure that the data are protected when you try to access them. If you remember back to your Point class, you may have noticed that you have a clone method on it. This allows you to get a copy of the data so that they stay protected inside your class, and you don’t accidently corrupt them. Although you don’t have any safeguards here in the map class, you definitely don’t want to be directly accessing the array itself, and this class enables you to safeguard your engine from changes in the map data structure. What if you decide that you need to use a new file format for the map data instead of a two-dimensional array? Perhaps something that is easier to serialize and deserialize, such as JSON, for saving state in your game? You can safely change that, and the rest of your game will never know, so long as you return the expected values in getTileID and getTiles. A JSON map class can simply return the tile data as an array so that your renderer doesn’t break, and you can continue to grow and expand your game’s code base.
Now go back to your game.ts file and implement the map. Add the following property to your class:
map: map.IMap;
And, below the map data, add the following code to instantiate the map class with the tile data:
this.map = new rogue.map.TileMap(this.tiles);
Next, you will modify the draw call to look like this:
this.renderer.draw(this.map.getTiles());
Note how you are asking the map for its tiles instead of passing in the array directly. Again, this is your encapsulation, which lets you extend and modify your map over time to better fit your needs. The renderer doesn’t care so long as it gets a single two-dimensional array to render out. Before adding the player, run the game in the browser, and check that there are no compiler errors. The game should look the same as before (see Figure 19-14).

Figure 19-14. Everything should look the same, with no compiler errors
So, with a cleaned-up map, you are able to create a placeholder position for the player. To do this, add the following property to your game class:
playerPosition: geom.Point;
You will set that up following the map in your constructor:
this.playerPosition = new geom.Point(1,1);
This will put the player in the upper-left corner of your map, in an open tile. To draw the player, simply add the following line of code after rendering the map in your draw call, then reset the invalidate property:
this.renderer.drawTile(this.playerPosition.x, this.playerPosition.y, "@");
If you save, check the compiler, and refresh your browser. You will see that you now have a red square representing your player, as illustrated in Figure 19-15.
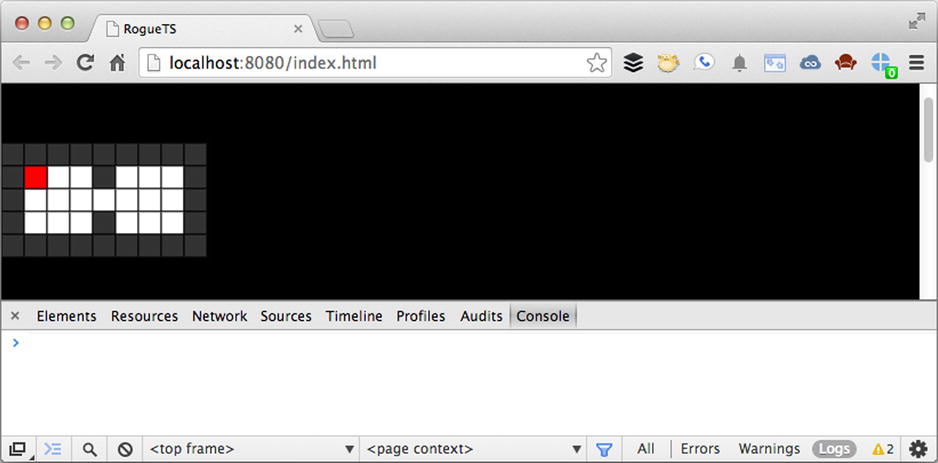
Figure 19-15. You should now see the red square, which is the player
By exposing the internal method of the renderer for drawing a single tile, you can use it to place additional tiles on top of the map. You can render out the entire map and then do another pass to render out the player, monsters, treasure chests, and decoration. You may be thinking, “Why not do this all in a single pass?” The reason is that you want these graphics to sit on top of the map. Right now, you don’t notice the difference, as they are all squares of the same size. However, if your player were a sprite and had transparency, you would want it to appear on top of the floor; through optimization techniques, you could cut down on the additional draw calls by simply rendering out only what’s in the player’s immediate field of vision. Now, let’s make this player move.
You will need to create a new class, called input.ts, in your rogue folder. As before, add to it the following code:
module rogue.input {
}
This time, though, instead of an interface, you are going to create something called an enum (enumerator). Enums allow you to store name-value pairs in easy-to-reference lookup tables. Here is your first enum:
export enum Keyboard {
            LEFT=37,
            UP=38,
            RIGHT=39,
            DOWN=40,
};
If you have ever worked with keyboard events, you know that you must reference their values. As you can see, you store each key value in this enum so that you can reference, for instance, the left key as Keyboard.LEFT. This is a lot better than referencing it directly, by its value of 37. Then, you will need a second lookup table of points that represent the directions in which the player can move. Unfortunately, enums can only contain numbers, and you will want your reference object to have points. Luckily, you can still create something very similar to an enum, but as a generic object, like so:
export var Directions = {
    UP: new geom.Point(0, -1),
    DOWN: new geom.Point(0, 1),
    RIGHT: new geom.Point(1, 0),
    LEFT: new geom.Point(-1, 0)
}
Here, you are setting up points to represent directions in which the player will move. Figure 19-16 provides a handy reference to what this actually looks like on a grid:
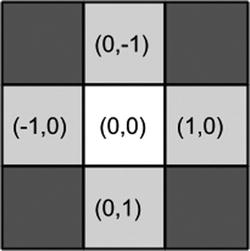
Figure 19-16. As you can see, you simply do math on the x, y position in order to move the player up, down, left, or right
You will use these direction points to help with collision detection later on in this section. For now, you need to start setting up your Input class and working with JavaScript’s input events in TypeScript. Create the following class:
export class Input {
}
From here, you set up the basic constructor and add a listener for the keyboard events within it:
constructor (){
    window.addEventListener("keyup", event => this.keyup(event) , false);
}
Again, you can see that the TypeScript arrow notation is being used to define the event callback. You add the listener and then bind the returned event to your keyup method, which you will create next:
keyup( event: Event ):void {
        event.stopPropagation();
        event.preventDefault();
        var keyCode = event["keyCode"];

        switch (keyCode){
                case Keyboard.UP:
                        this.newDirection = Directions.UP;
                        break;
                case Keyboard.RIGHT:
                        this.newDirection = Directions.RIGHT;
                        break;
                case Keyboard.DOWN:
                         this.newDirection = Directions.DOWN;
                         break;
                case Keyboard.LEFT:
                        this.newDirection = Directions.LEFT;
                        break;
     }
}
There is a lot in this method, but it’s pretty straightforward stuff. You stop the event from propagating and then do a switch on the event keyCode. Because you typed the event to Event, you can attempt to access its properties directly, just like you do in JavaScript. There is one problem, however: TypeScript’s compiler doesn’t recognize keyCode as part of the event type. To get around this, you access the property in array notation, which bypasses the compiler’s type-checking system and lets you still access the property on the object and not get an error. This is a neat trick if you run into type issues and don’t have the time or the know-how to fix them. The rest of the switch statement assigns the direction point to a property called newDirection. Add this to your class, above the constructor:
newDirection: geom.Point;
Finally, you just need to create your clear method, which will allow you to reset the Input class on each frame by adding the following code to the end of the class:
clear():void {
    this.newDirection = null;
}
Before moving on, note that you didn’t add an Input interface to help cut down on the amount of code you have here. This interface could easily be added, allowing you to support a mouse, touch screen, or joystick down the road. You can simply create a common interface for input in your game and classes for each type and then, at runtime, swap them out, based on the user’s device or preferred input. Always think of how to take advantage of TypeScript’s language, such as interfaces and support for typing, which you may not be used to in traditional JavaScript development.
At this point, you can begin to integrate this interface into your game class. Switch back to the game.ts file, and add the following property to your game class:
input: input.Input;
Now, you need to add the following code to your constructor, before the map data:
this.input = new input.Input();
In your update method, you want to check if the newDirection property was set. Add this before you test for the invalid flag and draw call:
if (this.input.newDirection) {
    this.move(this.input.newDirection);
    this.input.clear();
}
As you can see, the Input class is polled for its newDirection. From here, you make a call to a move method and pass in the value. Then, you clear the input for the next frame so that the player needs to press and release the arrow key in order to move. Add the following method to your game class:
move(newDirection:geom.Point): void {

    var tmpPoint: geom.Point = this.playerPosition.clone();
    tmpPoint.x += newDirection.x;
    tmpPoint.y += newDirection.y;

    var tile: string = this.map.getTileType(tmpPoint);
    switch (tile) {
        case " ":
            this.playerPosition = tmpPoint;
            this.invalid = true;
            break;
    }
}
This will represent the core of your collision detection. It’s actually really simple. You clone the player’s current position and then add the newDirection x, y values to it. From here, you can preview the next tile the player is going to enter by getting it from the map via its getTileType method. This is another reason it was important to abstract the tile array data inside the map class and expose an easier way to access individual tiles. Once you have the next tile, you simply see if it’s empty via a switch. If so, you set the current player’s position to the temporary point and invalidate the display. The game loop will automatically update the display on the next frame. Run the game, and you should be able to move around now, as illustrated in Figure 19-17.
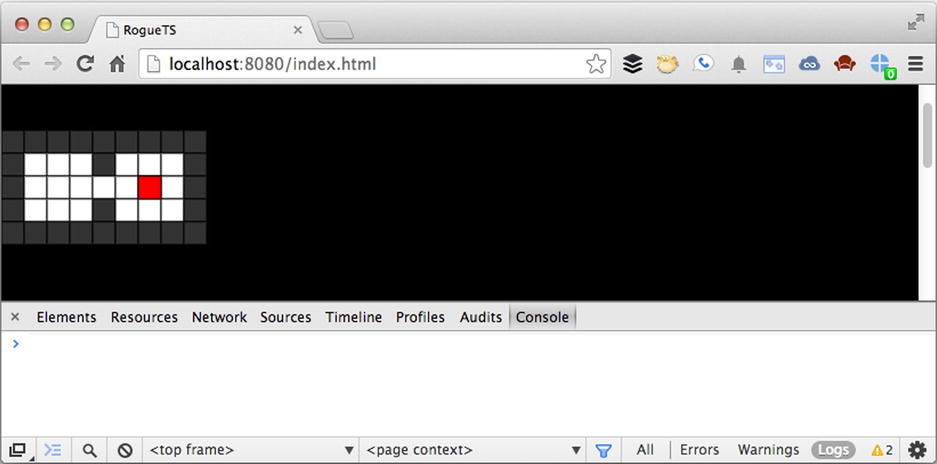
Figure 19-17. Here, you can see that you can now move the player around the map
Extending Your Engine
At this point, you have a fully functional engine for a rogue-like game written in TypeScript. There are several places to which you may want to extend the functionality of this engine. Following are some of the top things you might do next to explore further how TypeScript works.
It’s relatively easy to add additional items to the game. Because the basic foundation is there, you need only follow these steps:
- Add a method to the map class that allows you to find empty tiles easily.
- Build a helper class to populate the dungeon with items and monsters.
- Move the player position into the map populater class, and have it store the ID, tile type, and point for each object in the map.
- Add new colors, based on each item; also, perhaps use an “m” for monster (or “m1,” “m2,” and so on for different types of monsters) and an “x” for treasure chests.
- Modify the render’s tileColor to display each new tile type with its own unique color.
- In your game’s render code, simply loop through the array of game objects stored in the populator manager, and have them draw to the map, just as you did with the player originally.
- In your move code, you can add more values to the switch statement to call methods that handle picking up treasure or attacking monsters.
You can extend the CanvasMapRenderer to use images, or sprites, instead of just drawing colors. Follow these easy steps:
- Create a preloader to handle loading in images before the game runs.
- Extend the CanvasMapRenderer with a new SpriteMapRenderer.
- Override the drawTile method with a way to look up sprites and paint them to the canvas.
- Replace the reference to the old CanvasMapRenderer with the new SpriteMapRenderer; everything should work just the same, but with new images instead of colored boxes.
Right now, the map renderer simply draws every tile you give it. It doesn’t even follow the player around. This could be really bad for performance and gameplay. If you want to have much larger maps, create a MapSelection class that can capture a range of tiles from the map and better manage how you render it. Here is what that would look like:
- Create a MapSelection class that wraps the map class and that can access and manipulate the tile data.
- Add new methods onto the map class to make it easier to select tiles from rows by range, for example, getting five tiles around a center point, which would represent the player.
- Update the selection class’s center point, based on the player’s position as it moves through the levels.
- Use the MapSelection tiles instead of all the tiles from the map when you call the renderer.
As you can see, this engine is easily extensible, and you have set up enough of the foundation to allow you to continue to build on top of it and make the game your own. Rogue games are great engines to build when you are starting out making games in a new language. Hopefully, you now have greater insight into how TypeScript can be a very useful addition to any traditional JavaScript game’s architecture. Even if you write the core of the engine in TypeScript and implement it in JavaScript, you still have the additional help that a compiler offers: checking over your code and making sure that you don’t make easy-to-overlook mistakes.