So far, we have touched on a few applications (apps) in earlier chapters of the book. Apps can be divided into two general categories. The first are the ones that you activate while taking the picture so that you can control things such as digital zoom, stabilization, time to take a shot, and so on. These apps are discussed in this chapter.
The second type of apps includes those that you can use after a picture is taken. These are called post-processing apps. They are discussed in Chapters 8, 9, and 10.
Apps are a wonderful feature of the iPhone camera. Pictures taken or processed with apps have become somewhat of an art form. As you saw in the introduction, thousands of people are using apps and posting their manipulated images on Flickr.
Finally, apps are what makes the iPhone fun. By all means, have a good time when you play with them!
In Chapter 1 you learned how to get free apps or buy apps in the Photography section of the App Store from your computer and move them over to your iPhone. You can also buy apps directly from your iPhone. All you do is tap on the App Store icon and search for the app you want.
Note
If you buy an app from the App Store, the credit card you have on file will be charged automatically.
Updating Apps
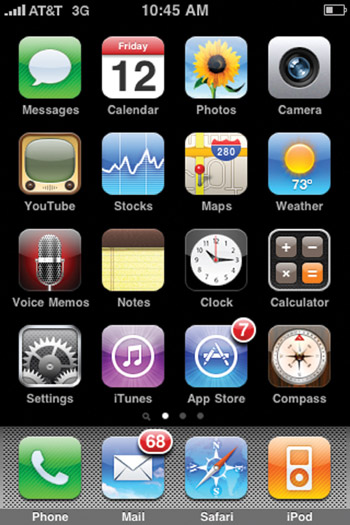
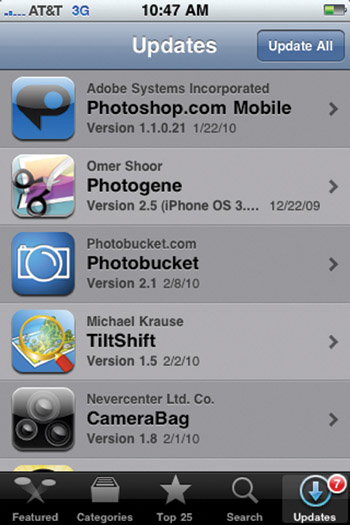
If you see a number in a red circle in the upper-right corner of the App Store icon, it means that the apps you have on your iPhone need updating. Figure 7.1 shows the location of the App Store icon and the number with the red circle around it. At the time this screenshot of the iPhone was taken, there were seven apps that needed updating. (The number indicates how many apps need updating.) When you tap on the App Store icon when it has a number in a red circle on it, you can update your apps. To do this, tap the Updates icon on the bottom-right of the screen. After you tap that icon, a list of the apps that need updating will be displayed. The list contains information about when the last update was made and what version of the app it is called. To make the update, tap the Update All button at the top-right corner of the screen. Figure 7.2 shows the list of apps and information about them, as well as the Updates icon you tap to get to that page and the Update All button in the top-right corner of the screen.
As mentioned in the previous section, you can buy photo apps from your iPhone or from your computer.
It helps to get the lay of the shopping land before you tap the Buy button, which automatically will charge your credit card for the amount of the app.
If you know the name of the app, you can tap the App Store icon and then tap the Search icon at the bottom of the screen.
If you just want a desultory look at what photography apps are available, tap the App Store icon and then tap the Categories icon at the bottom of the screen. Then swipe upward and tap Photography (Categories > Photography), as shown in Figure 7.3. Figure 7.4 shows some of the apps available, their cost, who created them, and their ratings. You can search apps by the top apps you pay for (Top Paid), by the Top Free, and by the date they were released (Release Date).
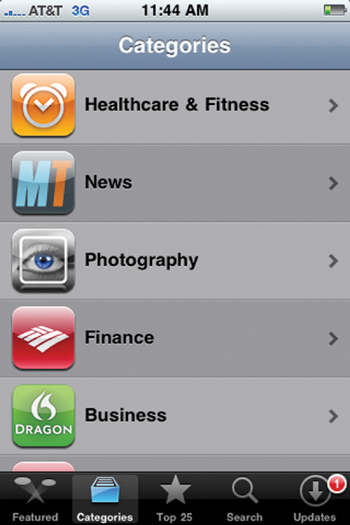
Figure 7.3. The best way to search for photo apps is to look in the Photography section of the App Store.
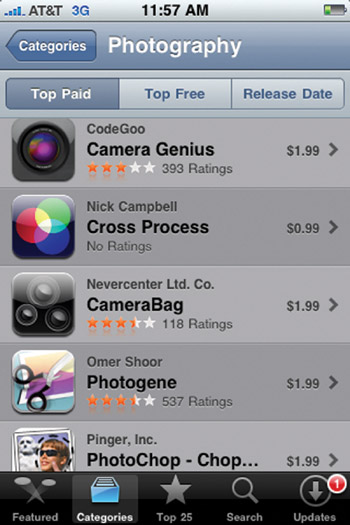
Figure 7.4. You can search apps by using three different parameters listed at the top of the screen, below the Photography heading.
Note
You can’t list both the categories and the apps in alphabetical order, so swipe slowly so you don’t miss the Photography category or the app that you’re looking for.
Two apps—ProCamera and Camera Genius—are remarkable. From using complex voice recognition to using state-of-the-art stabilization, the apps simply help you to take killer pictures. One of the apps can be set to write your location on the photo. The following sections detail every aspect of these two apps to help you make the best use of them.
You can use ProCamera (which sells for $1.99) while you are taking pictures (see Figure 7.5). It has an anti-shake mechanism, 5X digital zoom in full resolution, a timer, and a full-screen trigger. There’s a ProCamera app and a ProCamera Basic app. For the purposes of this book, we’ll cover the Basic app.

Figure 7.5. Images taken with ProCamera’s image stabilization system come out sharp even in low-light situations, as you can see in this picture of a painting by artist Ramiro Ortega.
ProCamera is fairly simple to work with. You just need to know a few things. One of the best things about this app is its steady-shot feature. It can’t be beat for capturing a sharp image with your iPhone.
There are three ways to take a picture using ProCamera:
Tap anywhere on the screen to take the picture immediately. In the settings, you have the option to get a preview and then save (or not) or to automatically save the photo and take another one right away.
Tap the Anti-Shake Camera icon. Tap this and hold the camera in front of your subject/object. Keep steady. When the camera senses that you are steady, it will take the shot.
Tap the Timer Camera icon. The camera will wait a specified amount of time (which you set in the settings) before it takes a picture.
Figure 7.6 shows the Anti-Shake Camera and Timer Camera icons located at the bottom center and bottom right of the screen.

In Figure 7.6, there is also a Gear icon, which takes you to the settings screen; a magnifying glass with a plus sign in it, which digitally zooms in; and a magnifying glass with a minus sign in it, which digitally zooms back out.
Note
Digital zooms don’t work well; you’re better off cropping the part you want to zoom into using a cropping app.
Knowing your options for using ProCamera will improve every image you take. Figure 7.7 shows the options you have when shooting with this app.
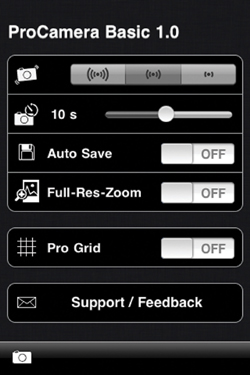
The first setting is the anti-shake setting. You’ll want to tap the last (right) icon of the three. These icons set the sensitivity of the camera. If you choose the last icon, the camera will only take a picture when it’s very still, giving you the sharpest shot. The other two icons are less sensitive and will take your picture when there is some camera shake, not creating the best possible shot.
The second setting is the timer. You can set it from 1 to 20 seconds by swiping the slider to the right to increase the time it takes for the camera to automatically take a shot after you tap the Timer button.
The third setting is Auto Save. You can also consider this as an option to set whether you have a preview of your photo. If it’s off, you’ll be taken to a screen that gives you a preview of your image. There will be two icons at the bottom of the screen, as you can see in Figure 7.8. If you want to keep the photo, you tap the disk icon. If you want to trash it, you tap the disk icon with a line through it. If the Auto Save button is on, you won’t get a preview screen—you can just keep tapping to take one picture after another.
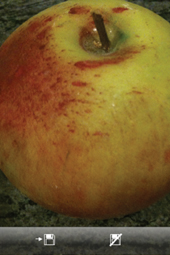
Figure 7.8. You have an option to get a preview of your photo and then to save or trash it when Auto Save is set to off.
Note
The iPhone will vibrate when it has finished saving your photo. The toolbar will change from red to green when saving is complete.
The fourth setting is Full-Res-Zoom. If it’s on, your zoomed pictures will be saved at full resolution.
The fifth setting is the Pro Grid. If you set this to on, you’ll get a grid on your screen to, say, take a picture using the Rule of Thirds (see Chapter 3).
The next app that turns your camera into a mean machine is Camera Genius.
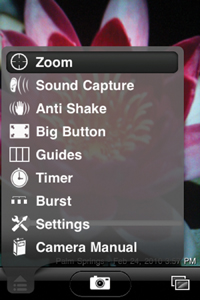
In this app you can turn on one or more options to help you to take a better picture. The options you can turn on by tapping on the arrow/list icon on the bottom-left corner of the screen are shown in the pop-up menu you see in Figure 7.9. You just tap the option you want to activate. To deactivate an option, you tap it again.
Also on the bottom of the screen is a shutter device button (the camera icon) and a double-rectangle icon, which takes you to your Camera Roll so you can preview your picture if you want. To get back to the camera from there, all you do is tap the Cancel button at the top right of the screen.
The following list details what each option does when it’s selected.
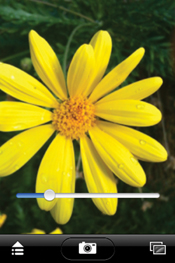
Zoom. This option allows you to zoom into an object by swiping a slider. Figure 7.10 shows the slider that you swipe to zoom in (swipe right) and zoom back out (swipe left).
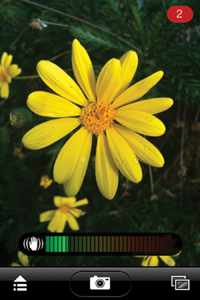
Sound Capture. This option lets you speak to take a picture. All you have to do is say “cheese.” If you talk too much, it will keep taking pictures. Figure 7.11 shows the sound sensor. When it’s green, a picture is taken. The red number in the upper-left corner of the frame shows how many pictures you have taken with your voice. If you tap it, you can clear it to 0. The Saving icon in the left corner means that the iPhone is saving the picture.
Anti Shake. In this mode an anti-shake sensor is activated. Figure 7.12 shows how much shake there is in the camera. When it goes to red, it means you’re trembling. When it dies all the way down, the camera automatically takes a picture.
Big Button. When this is set, you can tap anywhere on the screen to take a picture. If only this option is selected, you won’t see any indicators on the screen.
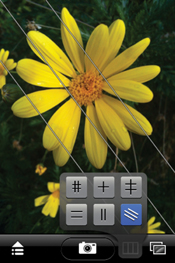
Guides. You have your choice of six grids that you can overlay on your screen, as shown in Figure 7.13. In the figure, the diagonal guides have been selected from a pop-up menu at the bottom of the screen after tapping the Guides icon.
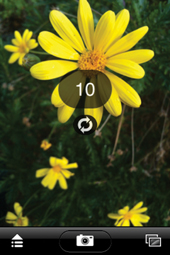
Timer. You can set a loud beeping timer that goes off after you activate the shutter release. Figure 7.14 shows the screen before the shutter release is activated. The numbers count down from 10 after you activate the shutter release.
Burst. Once you set the camera to Burst mode, the screen is free of options. You just tap on the camera (if Big Button isn’t selected) or on the screen (if Big Button is selected), and the camera will automatically take three pictures, one after another.
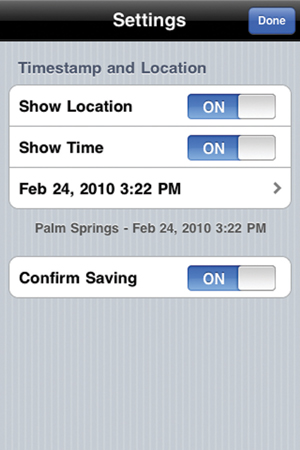
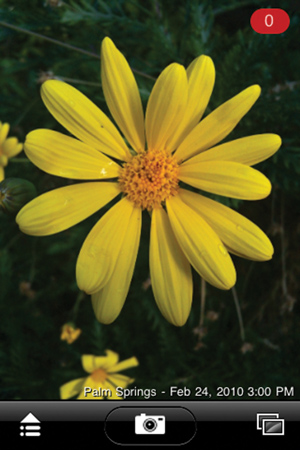
Settings. The settings only do two things. The first is that you can opt to have the location, date, and time on your photo. (Yes, the camera can find out where you are.) Figure 7.15 shows what the buttons look like after they are tapped. Tap to turn them on and off. Figure 7.16 shows where the location, date, and time are printed on the photograph. The last setting is Confirm Saving. When that’s turned on, you’ll get a screen with a preview of your picture and options to delete and save on either side of it. When Confirm Saving is set and the camera is in Burst mode, three previews of your image will appear on the screen, each with an red circle with a minus sign inside and with a blue circle with a check inside. The former option deletes the image; the latter saves it.