The Toolbar and Menus
The toolbar in CsoundQt (see Figure 5.1) is fairly self-explanatory. At the left end is a set of buttons that are found on many computer application toolbars—New, Open, Save, Undo, Redo, Cut, Copy, and Paste. These commands duplicate the standard functions in the File and Edit menus and hardly need explaining. The buttons in the center part of the toolbar—Run, Stop, Run in Term, Record, Render, Ext. Editor, and Ext. Player—invoke commands that cause Csound itself to do things. The buttons on the right end of the Toolbar—Configure, Widgets, Manual, Console, Inspector, Live Events, and Utilities—are commands that open and close panels in the CsoundQt workspace.
If the main window is too narrow to display all of the tool buttons, you’ll see a right-pointing arrow at the right end of the toolbar. Clicking this will display the hidden tool buttons.
Figure 5.1 The CsoundQt menu (in Windows) and toolbar.
The Run button causes the currently active .csd file (the one visible in the multi-tabbed Editor window) to do whatever it does. Most likely, it will produce sound. If it’s set up for real-time MIDI input from an external source such as a keyboard, it may start silently and then wait for you to start sending it MIDI messages. The sound output will be sent to whatever audio device you have selected in the Configuration box (as explained later in this chapter). The Stop button will stop the output immediately.
![]()
Note By default, clicking the Run button saves the currently active .csd file (the one you see in the Editor pane) before compiling and running it. This behavior can be switched off in the Editor pane of the Configuration box.
If the Run button fails to work, it won’t be highlighted. In that case, open up the Output Console window by clicking the Console button in the toolbar, if it isn’t open already. In the Output Console, you’ll see the text output that Csound produces while running or attempting to run. Various useful messages, including error messages, will appear here. If the Run button doesn’t work, it’s probably because your code has one or more bugs. These will be listed in the Console. After fixing the bugs, try clicking the Run button again.
Csound will also fail to run if your MIDI or audio setup has changed. To remedy this situation, open the Configuration box, choose the Run tab, and select inputs and outputs from the drop-down menu.
The Run in Term button bypasses the CsoundQt framework. This button runs Csound in your computer’s Terminal (Mac OS) or Command Prompt (Windows) rather than via the CsoundQt interface. This can be useful for diagnosing problems. If CsoundQt crashes when you try to run a file, for instance, your first stop, after re-launching CsoundQt, should be the Run in Term button. If the .csd file runs as expected in the Terminal/Command Prompt, then it’s possible you’ve uncovered a CsoundQt bug. In that case, you should report it to the Csound mailing list or the CsoundQt mailing list.
Note When you use the Run in Term button, you may need or want to make changes in the command-line arguments in the <CsOptions> area of your .csd file. In addition, Run in Term can fail (in QuteCsound 0.6 for Windows) if the file paths to SSDIR and SFDIR, as set in the Environment tab of the Configuration box, aren’t enclosed in double-quotes and there are spaces in any of the folder or file names. These text strings will be passed directly to Csound as command-line arguments when Csound is run in the terminal, and enclosing them in quotes will ensure that they’re interpreted properly. This bug has been fixed in CsoundQt 0.7.
The Render button will save the output audio from Csound to a file on your hard drive rather than playing it through your audio interface and speakers. If you’ve checked the Ask for Filename Every Time checkbox in the Run tab of the Configuration box, you’ll be prompted for a filename; the default name will be whatever you’ve specified in the Configuration box in the Output Filename field. If you uncheck Ask for Filename Every Time, CsoundQt will simply use whatever filename you’ve provided in that field without asking you to confirm. This could conceivably overwrite an audio file that you want to keep, so leaving Ask for Filename Every Time checked is probably a good idea.
Rendering is a non-real-time process. Unless your orchestra and score are uncommonly dense or your computer is uncommonly slow, rendering will be faster than real time, perhaps much faster. A piece that lasts for several minutes may render in 10 or 15 seconds. You won’t hear any audio output while the rendering is taking place. But this fact raises a question: What if you want to interact with Csound in real time while the music is playing (perhaps by sending it MIDI messages or live audio), but you also want to capture the audio to your hard drive? For that purpose, CsoundQt provides the Record button. This button will both play the file in real time and capture the audio to your hard drive, into the same file folder where the .csd file itself is located.
In version 0.6, the Record button fails to work in the Windows version, though it works in the Mac version. This problem is fixed in 0.7. You won’t be prompted for a filename, but not to worry: CsoundQt won’t overwrite your file if you do several takes. Each file will be given a name that corresponds to the .csd file, with “000.wav”, “001.wav”, and so forth appended. They will be recorded to the same directory where the .csd file itself is located.
The Ext. Editor button will launch whatever external audio editor you’ve specified in the Configuration box under External Programs/Wave Editor. The most recently recorded or rendered audio file should be loaded into the wave editor program, ready to edit. Whatever edits you make won’t be reflected in Csound or CsoundQt, because you’re editing the audio data itself, so this is strictly a convenience feature. You might, for instance, want to normalize the gain of your final rendered file and then export it as an mp3 or .ogg compressed audio file before uploading it to a website.
The Ext. Player button works in a similar way: It should launch whatever external player (such as iTunes) you’ve specific in the Configuration box under External Programs/Wave Player.
Note These features are not quite functional in the 0.6.0 (Win) and 0.6.1 (Mac OS) releases. The Ext. Editor button works in Windows but not in the Mac. Ext. Player works on neither platform. This is no more than a minor inconvenience, as you can still launch your favorite apps in the normal way, such as by dragging and dropping the audio file onto their desktop icons. These buttons seem to be working in version 0.7.0.
The buttons on the right side of the toolbar open windows or boxes within the CsoundQt user interface. They will be alluded to in the sections later in this chapter that deal with these windows and boxes.
Menus
While inspecting the commands in CsoundQt’s menus, take note of the keyboard equivalents. In many cases they’re real time-savers. These shortcuts are not, in every case, identical between the Mac and Windows versions.
Windows users who are vision-impaired may want to be alerted that the standard Windows menu shortcuts, which use the Alt key to open menus, are not implemented in CsoundQt. Once a menu has been opened with the mouse, however, the cursor keys can be used to navigate it. Menu navigation from the cursor keys works both in Mac OS and in Windows.
The File Menu
Most of the items in the File menu will be familiar to anyone who has ever worked with modern computer software, so there’s no need to go into the specifics here. A couple of items are worth special mention, however.
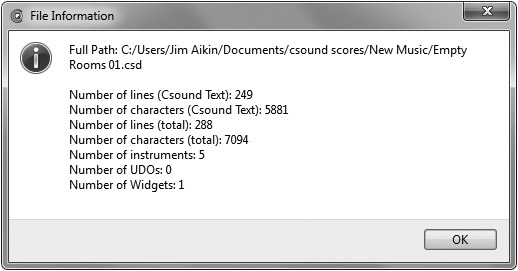
The File Information command opens a little read-only box (see Figure 5.2) that gives some useful information about the current .csd file. The Export without Widgets command allows you to save your .csd file in a “vanilla” form, without the extra code used by CsoundQt to construct graphic controls. This code is normally invisible within CsoundQt itself, but you can view it by opening your .csd file in a text editor program.
Figure 5.2 The File Information box, which is launched from the File menu, provides some statistics as well as a reminder of the full path to the file.
The Edit Menu
The top few items in the Edit menu (Undo, Redo, Cut, Copy, Paste, Find) will, again, be familiar to almost all computer users. Other commands here are more specific to CsoundQt.
To use the Autocomplete command, position your text cursor on an empty line, type the name of a Csound opcode, such as oscil, and then hit the keystroke equivalent of the command (Alt+C on Windows, Option+C in Mac OS). CsoundQt will replace your text with the entire prototype of the opcode, including its output type(s) and input arguments. This feature can save you hours of looking up opcodes in the manual. At first, the meanings of the symbols in the prototype may not be clear—and you’ll need to understand them in order to replace them with actual values suitable for your code. For details, see Chapter 7, “Thirty Opcodes You Must Know.” Some opcodes can be used in two or more forms; with these, Autocomplete will choose the first form it finds in the manual, which may not be what you want.
After selecting one or more lines of your code, or placing the text cursor anywhere within a single line, you can use the Comment or Uncomment command. In Windows, commenting and uncommenting uses Ctrl+/. On the Mac, Cmd+/is used. Commenting out sections of code temporarily is a great way to save time and track down bugs. These commands are very useful.
The Indent and Unindent commands are also handy. Csound code does not require that lines be indented, but indentation (such as of a block of code that begins with an if...then statement and ends with an endif) can make the code easier to read.
The Kill Line (Ctrl+K, Cmd+K) and Kill to End of Line (Ctrl+Shift+K, Cmd+Shift+K) commands are an idea carried over from full-featured text editors. Using these commands is faster than selecting text with the mouse and then hitting the Delete key.
After loading an .orc file and an .sco file (Csound’s original file formats for instrument code and score code), you can use the Join orc/sco command to combine them in a new .csd file. This is a bit easier than copying and pasting all of the code. If you open an .orc file and an .sco file at the same time from the File Open dialog box, CsoundQt can invoke this command automatically if you’ve checked the appropriate checkbox in the Editor pane of the Configuration box. CsoundQt will create a new file that combines the two and invite you to save it. Alternatively, you can invoke the command from the Edit menu after opening only one of the two files. CsoundQt will look for a matching file in the same directory.
The Invalue->chnget and Chnget->invalue commands are complementary. Csound provides two more or less equivalent ways to send and receive external real-time commands—the invalue and chnget opcodes. These two menu commands can be handy if you’ve acquired a file from someone else and need to convert dozens of opcodes at once. The commands also swap outvalue and chnset. (Note, however, that chnset and chnget can be used internally to transmit values between Csound instruments. outvalue and invalue are used to communicate with external objects, such as widgets.)
The Insert/Update CsLadspa Text item adds a new pair of tags (<csLADSPA> and </csLADSPA>) near the top of the current .csd file and places some default text between them. This feature is for developing LADSPA plug-ins in Csound. LADSPA plug-ins run in some Linux audio applications. Developing such plug-ins is beyond the scope of this book; for more information, consult the LADSPA home page (www.ladspa.org) or the Csound Journal article on this topic (www.csounds.com/journal/issue6/csLADSPA.html).
The Widget Edit Mode command (Ctrl+E or Cmd+E) switches the Widgets panel in and out of edit mode. For more information, see the “Widgets” section later in this chapter.
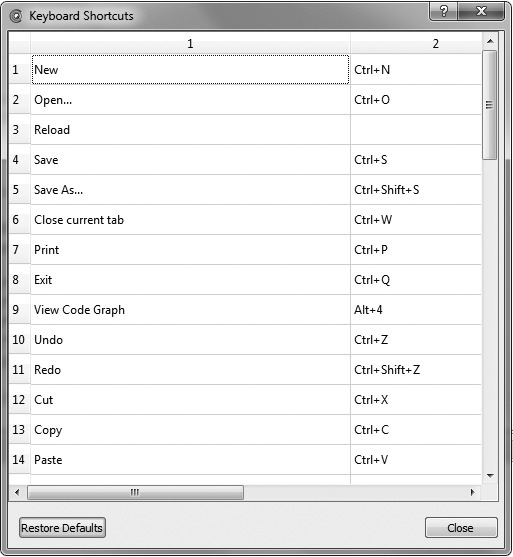
The Set Keyboard Shortcuts command opens a dialog box (see Figure 5.3) in which you can configure some aspects of CsoundQt’s operation to be more to your liking. The list of commands available from this box may be slightly different in the Mac versus Windows versions of the program, but in both, the Restore Defaults button can be used to get rid of the items you don’t like.
To create a new shortcut, click in the right-hand column beside the entry you want to change and then type your desired shortcut. If the shortcut you type is already being used, you won’t be allowed to give it a new meaning. (There seems currently to be no way to delete an existing shortcut.)
Figure 5.3 In the Set Keyboard Shortcuts box, you can set up quick keyboard access to important commands.
The Control and View Menus
The Control and View menus duplicate functions found in the toolbar. To save screen space, you can turn off the toolbar from the Editor tab of the Configuration box by unchecking the Show Toolbars option. Note, however, that if you turn off the toolbar and want to turn it back on, you won’t find the command for opening the Configuration box in the Control or View menu. In Windows, that command is in the Edit menu; on the Mac, it’s in the CsoundQt menu, where it appears as Preferences.
If you activate Split View in the View menu, the main editor area will be split horizontally, with the score portion of the .csd file displayed in the lower pane in spreadsheet form.
The View Code Graph command in the View menu requires the installation of Graphviz (www.graphviz.org). This tool is a way of translating your code into a visual form.
The Examples and Favorites Menus
From the Examples menu, you can load a wide variety of examples of Csound code. A lot can be learned by studying these examples, as they demonstrate many useful techniques. There are far too many to discuss in these pages, however, and more are added from time to time. Most of the examples contain comments that will help you understand what’s going on, but even so, a bit of study and experimentation may be required. If you’ve edited a file, you’ll have to use Save As to save it out to your own Csound Scores directory, because the examples can’t be saved back into their own repository. They’re not stored on the hard drive as separate files; they’re embedded within the CsoundQt program itself.
It’s possible that one or two of the examples may not work perfectly. As with many things in the world of Csound, they were put together by volunteers, and errors are only fixed if they’re reported and if the person who is maintaining the code has time to fix the problem. If you spot an error, please report it.
Especially worth note are the examples in the Floss Manual subdirectory. These are taken directly from the online Floss Manual. If you’re studying this document, you won’t need to do any typing in order to run the examples found therein.
In version 0.6 for Windows, Favorites is a sub-menu under Examples. In version 0.7, however, it’s a top-level menu in both Mac and Windows. In the Environment tab of the Configuration box, you can set a directory for your Favorites. Once you have set this directory, the items in it, including both .csd files and sub-folders, will show up in the Favorites menu.
The Help Menu
The first command in the Help menu, Show Opcode Entry (Shift+F1), is very useful. Park the text cursor on the line with an opcode and use this command, and you’ll see why. It opens the Manual pane and displays the page for that opcode.
The Show Opcode Entry in External Browser command works well in Mac OS with Safari, but not necessarily with other browsers. In my Windows system it doesn’t currently work well with either Firefox or Opera, but I’ve reported the bug, and it should be fixed by the time you read this. In any case, it’s not a big deal, because it’s easy enough to make the Csound manual your home page in your browser and then put a shortcut to the browser on the desktop. Once you’ve done this, looking up an opcode in the external browser (which will have a bigger display than CsoundQt’s own Manual pane) is easy.
The Help Forward and Help Back commands duplicate the functionality of the green triangle buttons at the top of the Manual pane, stepping you forward and backward through multiple pages of the manual.
The next four items in the Help menu open alternate pages in the built-in Manual pane. Below these is the Open Quick Reference Guide command. At this writing, CsoundQt has no manual; this item opens a PDF document that provides a little guidance in how to use CsoundQt, but the PDF covers only version 0.4. To use the menu command, you may need to go to the External Programs tab in the Configuration box and select a PDF viewer program.
Before using the Reset Preferences command, you should be sure to write down all of the settings in the Configurations box, including the directories where CsoundQt is to look for things such as the Csound manual. All of that information will be erased by this command, which is designed to be used only in cases where the Preferences have become corrupted.