1
THE IOS SECURITY MODEL
Let’s give credit where credit is due: Apple has been pretty successful in keeping malicious software out of the App Store (as far as I know). But the application review process can be a frustrating black box for developers. The process used by Apple’s reviewers is not publicly documented, and sometimes it’s simply not clear what functionality is and isn’t permitted. Apple gives some decent guidelines,1 but apps have been rejected based on criteria that apply to accepted applications as well.
Of course, what qualifies as malicious is defined by Apple, not by users. Apple uses the App Store as a way to control what functionality is available on the iOS platform, meaning the only way to obtain certain functionality is to jailbreak the device or subvert the App Store review process. An example of this is the Handy Light application, which masqueraded as a flashlight application but contained a hidden mode to enable device tethering.2
The app review process on its own will never catch all sophisticated (or trivial) malicious applications, so other mechanisms are needed to effectively keep bad applications from affecting the wider OS environment. In this chapter, you’ll learn about the architecture of iOS’s security mechanisms; in later chapters, you’ll dig in to how to take advantage of these mechanisms properly in your own programs.
Let’s take a quick look at the fundamental security components iOS implements to prevent exploits and protect data. I’ll dive deeper into the actual mechanics of most of these in later sections, but I’ll start by giving a broad overview of the impetus behind them and their utility.
Secure Boot
When you power on an iOS device, it reads its initial instructions from the read-only Boot ROM, which bootstraps the system. The Boot ROM, which also contains the public key of Apple’s certificate authority, then verifies that the low-level bootloader (LLB) has been signed by Apple and launches it. The LLB performs a few basic tasks and then verifies the second-stage boot-loader, iBoot. When iBoot launches, the device can either go into recovery mode or boot the kernel. After iBoot verifies the kernel is also signed by Apple, the boot process begins in earnest: drivers are loaded, devices are probed, and system daemons start.
The purpose of this chain of trust is to ensure that all components of the system are written, signed, and distributed by Apple—not by third parties, which could include malicious attackers and authors of software intended to run on jailbroken devices. The chain is also used to bootstrap the signature checking of individual applications; all applications must be directly or indirectly signed by Apple.
Attacking this chain of trust is how jailbreaking works. Jailbreak authors need to find a bug somewhere in this chain to disable the verification of the components further down the chain. Exploits of the Boot ROM are the most desirable because this is the one component Apple can’t change in a software update.
Limiting Access with the App Sandbox
Apple’s sandbox, historically referred to as Seatbelt, is a mandatory access control (MAC) mechanism based on FreeBSD’s TrustedBSD framework, primarily driven by Robert Watson. It uses a Lisp-like configuration language to describe what resources a program can or cannot access, including files, OS services, network and memory resources, and so on.
MAC is different from traditional access control mechanisms such as discretionary access control (DAC) in that it disallows subjects, such as user processes, from manipulating the access controls on objects (files, sockets, and so on). DAC, in its simplest, most common form, is controlled on a UNIX system with user, group, and other permissions, all of which can be granted read, write, or execute permissions.3 In a DAC system, users can change permissions if they have ownership of an object. For example, if you own a file, you can set it to be world-readable or world-writable, which obviously subverts access controls.
While MAC is a broad term, in sandbox-land it means that applications are shunted into a virtual container that consists of detailed rules specifying which system resources a subject is allowed to access, such as network resources, file read and writes, the ability to fork processes, and so on.4 On OS X you can control some of how your application is sandboxed, but on iOS all third-party applications are run with a single restrictive policy.
In terms of file access, processes are generally confined to their own application bundle directory; they can read and write only the files stored there. The standard policy is slightly porous, however. For example, in some versions of iOS, photos in /private/var/mobile/Media/Photos/ can be directly accessed by third-party applications, despite being outside the application’s bundle directory, which allows programs to surreptitiously access photos without asking for user permission. The only protection against applications abusing this type of privilege is Apple’s application review process.
This approach differs from that used by Android, which implements a more traditional DAC model, where applications are given their own user ID and a directory owned by that ID. Permissions are managed strictly via traditional UNIX file permissions. While both approaches are workable, MAC generally provides more flexibility. For instance, in addition to app directory segregation, MAC policies can be used to restrict network access or limit what actions system daemons can take.
Data Protection and Full-Disk Encryption
iOS led the way in offering mobile devices with filesystem encryption, for which some credit is due. iOS offers full-disk encryption and additionally provides developers with the Data Protection API to further protect their files. These two related mechanisms make it possible to wipe remote devices and protect user data in the event of device theft or compromise.
Historically, full-disk encryption is made to solve one problem: data at rest being stolen by an attacker. In the laptop or desktop world, this would involve either removing the hard drive from a machine and mounting it on a separate machine or booting into an OS that could read the files off the drive. Filesystem encryption does not protect against data being stolen off of a running device. If an application is able to read a file from the disk, filesystem encryption provides no benefit because the kernel transparently decrypts files for any process that tries to read them. In other words, filesystem encryption works at a lower level than the calls typically used to read files. An attacker who can authenticate to the system can read any available files unimpeded.
iOS devices are generally designed to be running at all times, and their internal storage is not easily removable. If an attacker wanted to read sensitive data from a device without authenticating, they would have to completely disassemble the device and hook up the flash storage to a custom interface to read storage directly. There are several far easier methods for obtaining data from the device—including code execution exploits, jailbreaking, and so on—so no one would ever actually go to all that trouble.
But that doesn’t mean iOS’s full filesystem encryption is completely useless. It’s necessary to correctly implement two other critical security features: secure file deletion and remote device wipe. Traditional methods of securely erasing files don’t apply to iOS devices, which use solid-state drives (SSDs). The wear-reduction mechanisms used by this hardware remove all guarantees that overwriting a file actually overwrites the previous physical location of the file. The solution to this problem is to ensure that files are encrypted with safely stored keys so that in the event that data destruction is requested, keys can be discarded. The encryption key hierarchy used in iOS is layered. Entire classes of data or even the whole filesystem can be destroyed by throwing away a single encryption key.
The Encryption Key Hierarchy
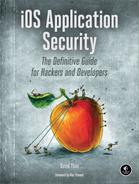
Filesystem encryption keys for stored data on iOS are hierarchical, with keys encrypting other keys, so that Apple has granular control if and when data is available. The basic hierarchy is shown in Figure 1-1.
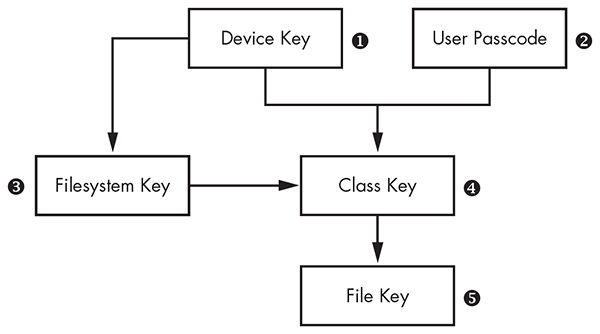
Figure 1-1: The simplified iOS encryption key hierarchy
The File Key ➎ is an individual key generated per file and stored in the file’s metadata. The Class Key ➍ is a dedicated key for a particular Data Protection class so that files classified with different protection levels use separate cryptographic keys. In older versions of iOS, the default protection class was NSFileProtectionNone; from version 5 onward, the default protection class is NSFileProtectionCompleteUntilFirstUserAuthentication, which is further described in Chapter 13. The Filesystem Key ➌ is a global encryption key used to encrypt the file’s security-related metadata after the metadata is encrypted by the Class Key.
The Device Key ➊, also known as the UID key, is unique for each device and accessible only by the hardware AES engine, not by the OS itself. This is the master key of the system, as it were, which encrypts the Filesystem Key and the Class Keys. The User Passcode ➋, if enabled, is combined with the Device Key when encrypting Class Keys.
When a passcode is set, this key hierarchy also allows developers to specify how they want their locally stored data to be protected, including whether it can be accessed while the device is locked, whether data gets backed up to other devices, and so on. You’ll learn more about how to use encryption and file protection features to protect files from device thieves in Chapter 13, where I cover the Data Protection API in greater depth.
The Keychain API
For small pieces of secret information, iOS offers a dedicated Keychain API. This allows developers to store information such as passwords, encryption keys, and sensitive user data in a secure location not accessible to other applications. Calls to the Keychain API are mediated through the securityd daemon, which extracts the data from a SQLite data store. The programmer can specify under what circumstances keys should be readable by applications, similar to the Data Protection API.
The Data Protection API
The Data Protection API leverages filesystem encryption, the Keychain, and the user’s passcode to provide an additional layer of protection to files at the developer’s discretion. This limits the circumstances under which processes on the system can read such files. This API is most commonly used to make data inaccessible when a device is locked.
The degree of data protection in effect depends heavily on the version of iOS the device is running because the default Data Protection classes have changed over time. In newly created iOS application projects, Data Protection is enabled by default for all application data until the user unlocks the device for the first time after boot. Data Protection is enabled in project settings, as shown in Figure 1-2.
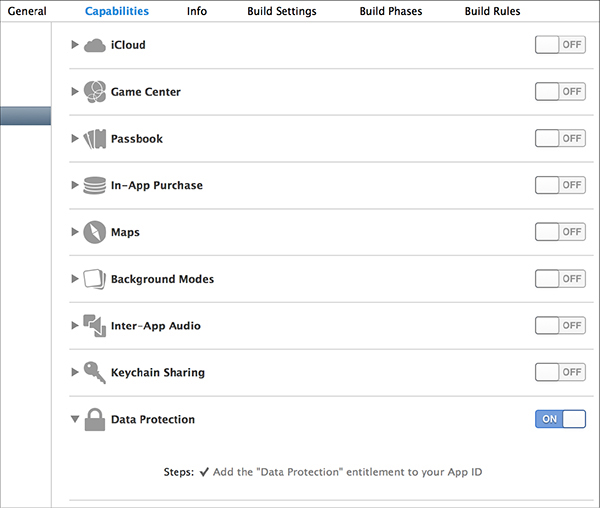
Figure 1-2: Adding a data protection entitlement to a project
Native Code Exploit Mitigations: ASLR, XN, and Friends
iOS implements two standard mechanisms to help prevent code execution attacks: address space layout randomization (ASLR) and the XN bit (which stands for eXecute Never). ASLR randomizes the memory location of the program executable, program data, heap, and stack on every execution of the program; because shared libraries need to stay put to be shared by multiple processes, the addresses of shared libraries are randomized every time the OS boots instead of every program invocation. This makes the specific memory addresses of functions and libraries hard to predict, preventing attacks such as a return-to-libc attack, which relies on knowing the memory addresses of basic libc functions. I’ll talk more about these types of attacks and how they work in Chapter 11.
The XN bit, generally known on non-ARM platforms as the NX (No-eXecute) bit, allows the OS to mark segments of memory as nonexecutable, which is enforced by the CPU. In iOS, this bit is applied to a program’s stack and heap by default. This means in the event that an attacker is able to insert malicious code onto the stack or heap, they won’t be able to redirect the program to execute their attack code. Figure 1-3 shows the segments of process memory and their XN status.
A program can have memory that is both writable and executable only if it’s signed with Apple’s own code-signing entitlement; this is primarily used for the JavaScript just-in-time (JIT) compiler included as part of Mobile Safari. The regular WebViews that you can use in your own programs don’t have access to the same functionality; this is to help prevent code execution attacks. An unfortunate effect of Apple’s policy is that it effectively bans third-party JITs, notably preventing Chrome from performing as well as Safari on iOS. Chrome has to use the built-in WebViews.
Figure 1-3: Basic memory segments of a process
Jailbreak Detection
Fundamentally, jailbreaking is any procedure that disables iOS’s code-signing mechanisms, allowing a device to run applications other than those approved directly by Apple. Jailbreaking allows you to take advantage of some useful development and testing tools, as well as utilities that would never pass App Store muster.5 The ability to jailbreak is critical to testing applications in a black-box fashion; I’ll dig in to black-box testing further in Chapter 6.
Contrary to popular belief, jailbreaking doesn’t necessarily disable the iOS sandbox. It just allows you to install applications outside of the sandbox. Applications installed in the home directory of the mobile user (that is, ones installed via the App Store) are still subject to sandbox restrictions. Third-party iOS applications that need higher levels of privilege on jailbroken devices are installed in the /Applications folder, alongside the stock Apple applications.
The history of jailbreak detection is long and comical. This procedure is intended to detect whether the device is at heightened risk for compromise because of the less trustworthy nature of unsigned third-party programs. To be fair, there isn’t a shortage of malware and misbehaving programs in third-party application repositories, but in general, jailbreak detection isn’t worth your time because it won’t stop a determined attacker.
For a brief period, Apple had an official jailbreak detection API, but this was pulled rather quickly from subsequent releases of iOS. In the absence of this API, developers have implemented a number of tricks to try detect jailbreaking themselves. The most popular techniques for attempting jailbreak detection go along these lines:
• Spawn a new process, such as using fork(), vfork(), popen(), and so on. This is something explicitly prevented by the sandbox. Of course, on jailbroken devices the sandbox is still enabled, making this strategy fairly pointless. It will fail for any App Store application regardless of whether the device is jailbroken.
• Read a file path outside of the sandbox. Developers commonly try to access the binary for ssh, bash, the Cydia.app directory, the path to the apt repository that Cydia uses, and so forth. These checks are painfully easy to get around, and tools such as Xcon6 help end users bypass these checks automatically.
• Ensure that the method name with your jailbreak detection logic is something blatantly obvious, such as isJailbroken, allowing attackers to easily spot and disable your jailbreak checks.
There are some more obscure techniques as well. For example, Apple’s iBooks application attempts to run unsigned code distributed with the app bundle.7 Savvy developers will also attempt to use _dyld_image_count() and _dyld_get_image_name() to check the total number of loaded dynamic libraries (dylibs) and their names,8 and use _dyld_get_image_header() to inspect their locations in memory.9 Getting around these checks generally requires patching an application’s binary directly.
As you may have noticed, I don’t think much of jailbreak detection in general. Like binary obfuscation techniques and DRM, jailbreak detection techniques typically serve only to make you look foolish when they’re bypassed (and believe me, I’ve seen some foolish obfuscation techniques). Proponents often argue that performing cursory jailbreak detection slows down pirates or attackers. But your adversary’s hobby is cracking applications, and they have weeks of time on hand in which to do so—slowing them down by a few hours isn’t really worthwhile. The longest it has taken me to develop a jailbreak detection bypass is about a day with an obfuscated binary and a battery of tests—and I’m an amateur at such things.
How Effective Is App Store Review?
When developing an application or assessing the threats that an app faces, it’s important to evaluate the risk of a rogue application ending up on end users’ devices. Any malicious third-party applications that make it onto devices are able to interact with applications via IPC mechanisms, as well as steal personal information. The primary defense against these applications is Apple’s App Store review process.
Apple doesn’t publicly disclose the techniques it uses to test applications for possible acceptance to the App Store, but it’s clear that both binary analysis and dynamic testing are performed. This process has kept most blatant malware out of the App Store, at the cost of also barring any applications that Apple doesn’t like the look of (including many types of communication apps, pornography, anything fun, and so on).
But despite Apple’s efforts, it has been demonstrated that a moderately sophisticated attacker can get applications through App Store review while retaining the ability to download new code dynamically. There are a few different ways an attacker can approach this.
Bridging from WebKit
There are several approaches to accessing native iOS APIs via JavaScript, such as a user’s location or use of media services, using a WebKit-based bridge. PhoneGap is a prominent example of such a package.10 While these bridges can provide useful functionality and flexibility, using them also means that much application logic ends up in JavaScript and isn’t necessarily shipped with the application to begin with. For example, a developer might implement a generic file-opening function that’s accessible via JavaScript and avoid using it for anything evil during the review process. But later, that developer can alter the JavaScript served to the device and attempt to read data from areas on the device that they shouldn’t be accessing.
I’ll discuss the implementation of and some of the issues with JavaScript/native code bridges in Chapter 9.
Dynamic Patching
Normally, applications are prevented from running any native code that hasn’t been cryptographically signed by Apple-issued keys. If a bug or mis-feature in Apple’s signature-checking logic is found, it can potentially allow for the downloading and execution of native code. A notable example of this in the wild was Charlie Miller’s exploitation of a feature that allowed programs to allocate memory regions without NX protection (that is, memory regions that are readable, writable, and executable) and that do not require code to be signed.11 This mechanism was put in place by Apple to allow Safari’s JIT compiler to function,12 but a bug in the implementation let third-party applications perform the same trick.
This meant that native code could be downloaded and executed without needing to be signed at all. Miller demonstrated this by submitting an application, called InstaStock, to the App Store which purported to be a stock ticker checking program. At the time of app review, the app did nothing malicious or unusual; however, after the review process was complete, Miller was able to instruct the program to download new, unsigned code and execute that code without problem. This issue is now resolved, but it does give you an idea of the things that can slip through the cracks of review.
Intentionally Vulnerable Code
An interesting approach to bypassing App Store review is to intentionally make your app vulnerable to remote exploits. Jekyll13 was a proof-of-concept application developed at Georgia Tech that intentionally introduced a buffer overflow in the core application. Malicious code was included in the app itself so that the code would be signed but was never called by the application. After approval, the researchers were able to use a buffer overflow exploit to change the control flow of the application to include malicious code, allowing it to use private Apple frameworks to interact with Bluetooth, SMS, and more.
Embedded Interpreters
While Apple’s policy on this practice has shifted over the years, many products (primarily games) use an embedded Lua interpreter to perform much of the internal logic. Malicious behavior using an embedded interpreter has not yet been reported in the wild, but a crafty application using a similar interpreter could download code dynamically and execute it from memory, though not during the review process, of course. This would add new and malicious (or helpful, if you’re so inclined) functionality.
Closing Thoughts
Ultimately, what protections does application review provide? Well, it does weed out less sophisticated malware. But you can assume with some certainty that malicious applications will indeed slip through from time to time. Keep that in mind and code your applications defensively; you definitely cannot assume other applications on the OS are benign.