
Chapter 6
Users, Groups, and Permissions
In Chapter 4, the idea of protection and security was introduced. In order to support these operating system requirements, computer accounts are created. Each account comes with certain access rights. These rights can be altered in operating systems such as Windows and Linux such that the owner of a resource can dictate who can use that resource. This chapter examines user accounts, account creation, groups and group creation, passwords, and permissions.
The learning objectives of this chapter are to
- Describe the role of the user account and the group.
- Introduce the mechanisms to create and maintain user and group accounts in Windows and Linux.
- Explain how to change file and directory permissions in both Windows and Linux.
- Discuss password management including the concept of the strong password.
- Introduce the Linux sudo command.
Users
Recall that a computer system is more than a computer; it is a collection of devices, software, and users. If the computer system in question is to be used by more than one user, then the computer system has to offer some degree of protection. Protection ensures that the resources granted to one user do not interfere with other users or their resources. Resources include memory storing user processes, running applications, shared data, and files. Different operating systems offer different approaches to protection. Here, we will look at the most common protection mechanism—the user account. Along with establishing user accounts, we examine the use of permissions so that users can control access to their resources.
Aside from protection, user accounts are useful for a number of other purposes. They provide security in that only authorized users are allowed to use the computer and its available resources. They provide a means by which we can gather statistics on computing usage. For instance, as a system administrator, you can inspect how the number of users is impacting CPU performance, whether there is adequate main memory, and to what extent the users are using the file space. This can, in turn, provide support for asking management to spend money on further resources. Tracking computer usage supports both performance monitoring and accounting.
A user is an agent who uses a computer. Most commonly, we will consider humans to be users. However, in some situations, a user might be a software agent. In most operating systems, a user requires an account to use the computer. A user account is a set of data, directories, and privileges granted to a user, as set up by a system administrator.
Typically, a user account will be coupled with a user name and a user password. These are used to authenticate the user so that the user can be granted access by the operating system. Authentication is most often accomplished using a login whereby the user enters both the user name and password, which are then compared in a database of stored username/passwords. Some more advanced systems may couple this with biometric or keycard access whereby the user must swipe a card through a card reader or use some biometric such as voice print or fingerprint. These are far less common. In some cases, the biometric is used in place of a password.
One key concern with proper protection of a computer system is to ensure that users use strong passwords. It is a fairly simple matter for a hacker to devise a program that will test all dictionary words as passwords in an attempt to break into a user account. Therefore, strong passwords are those that do not appear in a dictionary. Requirements for a strong password are typically that they contain at least one non-alphabetic character or a combination of upper- and lower-case letters and are at least eight characters in length. Additionally, strong passwords might require that the user change the password frequently (every 1 to 3 months) without repeating previous passwords. Other restrictions might include that a password not repeat previous passwords’ characters. For instance, if your password was abcdef12, then changing the password to abcdef13 might not be permissible because it is too similar to the previous password.
Multiuser systems require user accounts so that the operating system knows who the current user is and can match up the user with proper permissions. A single-user system does not require any user accounts because it is assumed that the same user will always use that system. Today, although most people have their own computers, it is still common to create user accounts for a few reasons. First, most operating systems permit remote access and therefore to protect against other agents from attempting to utilize the single user’s resources, establishing a login is essential. Second, all systems need to be administered by a system administrator. Even if there is a single user who uses the system, the need to differentiate between the user acting as an end user and the user acting as system administrator is critical. If the user wants to, for instance, delete a bunch of files and accidentally includes system files in the list, the operating system would deny the request if the current user is the normal user. But if there was no user account, only a system administrator account, then the operating system would not question the deletion leading to perhaps a catastrophic mistake by the user.
There are at least two types of user accounts. The typical user is an end-user, whose account gives them access to their own file space and permission to use shared resources, including application software. Their accounts usually do not give them access to system resources, particularly system administration programs. The other type of user is then the system administrator, known as root in Linux and Unix. Root has access to everything—every program, every file, every resource, no matter who the owner of that resource is. Some operating systems provide intermediate level accounts where a user is given more resources than the minimum while not being at the level of a system administrator. In Linux and Unix, root can permit other users to have some additional access rights. This is done through the program sudo, covered in Miscellaneous User Account Topics. As will be discussed in Setting Up User Accounts, software is also given user accounts. In the case of software accounts, access is actually more restricted than typical end-user accounts, for instance, by not having a home directory and/or not having a login shell.
Setting Up User Accounts
Here, we look at how to create user accounts in both Linux and Windows. Note that only a system administrator will be able to set up user accounts.
Linux
An initial user account is created when you install the Linux OS. This account is a necessity so that the first user of the system will not have to log into the graphical user interface (GUI) as root. Doing so can be dangerous as any window that the user were to open would have root privileges rather than ordinary user privileges. Therefore, by the time you are ready to use Linux, there will be one user account already created. From there, however, you would have to create others.
In Linux, there are two ways to set up user accounts: through the GUI and through the command line. Both approaches require that the person setting up the accounts be the system administrator. The GUI is shown in Figure 6.1.
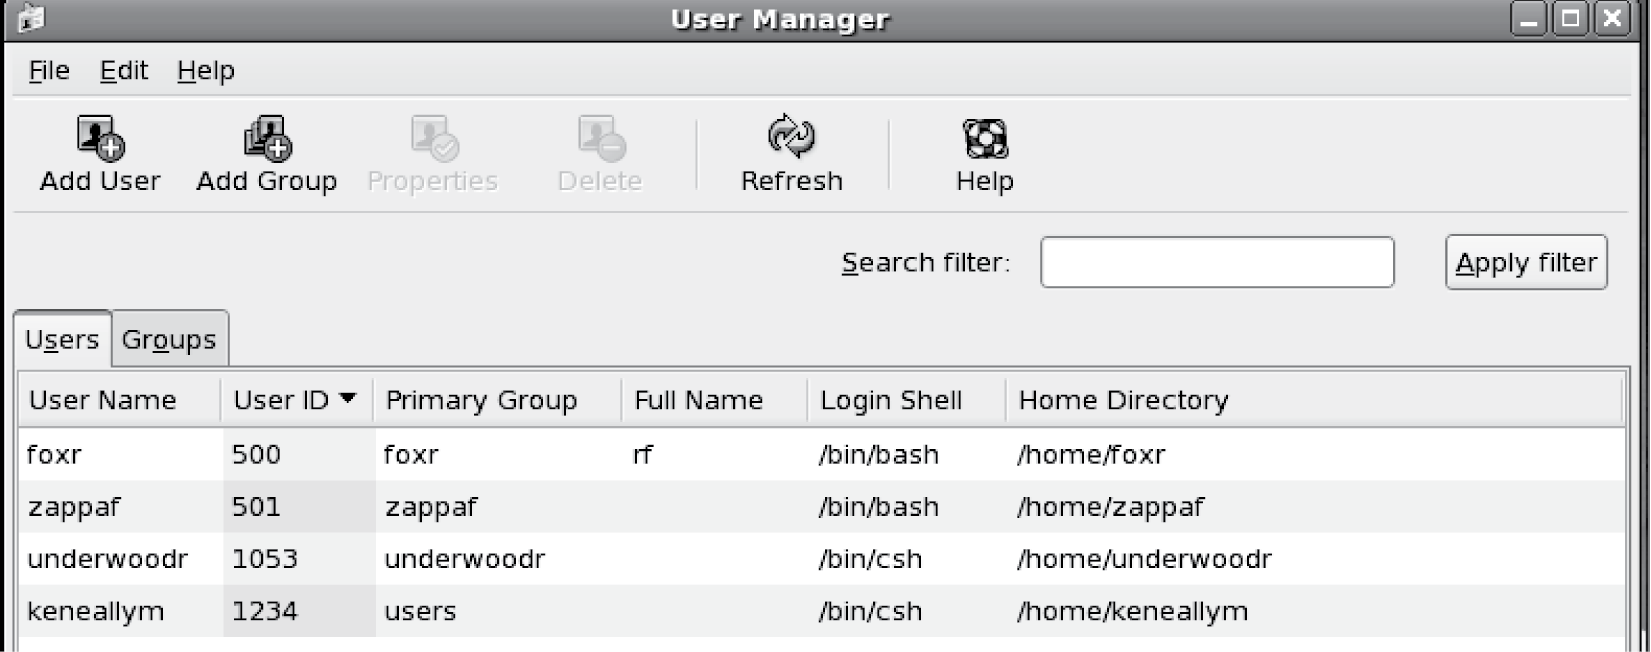
The User Manager is fairly simple to use. You can add or delete users, and alter the properties of users. You can also add, delete, and alter groups (groups are discussed in Role of a Group). Adding a user requires that you specify, at a minimum, the user’s user account name, the user’s name (a string which will typically be the first and last names), and an account number. The account number is used to index the user in the user file, /etc/passwd. This account number will typically be greater than 99 as the first 99 numbers are reserved for software accounts. The default account number is 1 greater than the last user added to the system. However, a system administrator may want to have a numbering scheme whereby numbers do not follow sequentially. For instance, in a university, faculty accounts may be assigned numbers between 100 and 200, graduate students numbers between 201 and 500, and undergraduate students numbers greater than 500. In such a case, the next user you add may not be in the same category as the previously added user and therefore you would not want to just add 1 to the last user’s number to obtain a new number.
In Figure 6.1, you can see that four users have already been created. For instance, the first user has an account name of foxr, a user number (UID) of 500, a login shell of /bin/bash, and a home directory of /home/foxr. As a system administrator, you would create account policies such as the form of account names (a common policy is last name—first initial or last name—first initial and a number if that particular combination has been used, so that for instance Robert Fox might be foxr1). Other policies would include the default locations of directories, default shells, and whether and to what extent to specify the person’s full name. Again, in a university setting, faculty directories may be placed in one location and student directories in another.
Figure 6.2 shows the Add User window. Most of the entries are obvious. Here, the new user is Tommy Mars and is being given the username marst. Notice that you must enter an initial user password and confirm it. This enforces proper security so that accounts are not created without passwords. However, this could be a hassle for a system administrator who has to create dozens or hundreds of accounts. As we will see later, the command-line approach to creating accounts is preferable in such cases. The login shell and home directory default to /bin/bash and /home/username, respectively. A system administrator can alter what appears as defaults. Additionally, upon entering a new user, you can change these as needed. Login shells available also include csh, ksh, sh, and tsch (these are covered in Chapter 9), and you can also select nologin, which means that the user does not have a login shell upon logging in. This is often specified when the user is a piece of software. You can also override the default UID and specify a different number as desired. For instance, if you use one set of numbers for faculty and another for students, you might override the default value for a new student account.
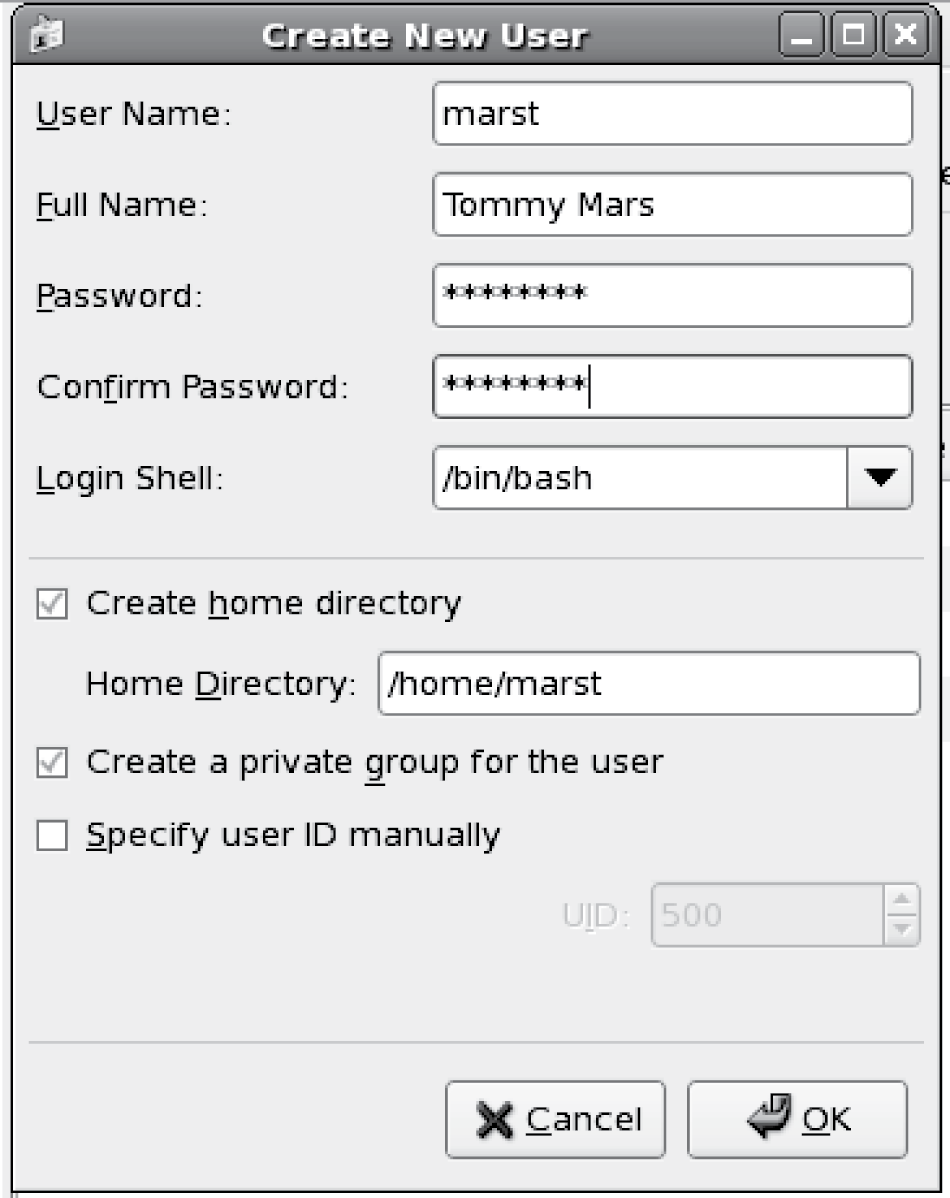
One item in Figure 6.2 requires explanation. Notice the second checkbox, “Create a private group for the user.” When a user account is created, a group that shares the user’s account name is also created. For instance, user foxr will also have a group foxr. The private group will be a group that contains exactly one user. If you turn that checkbox off, the user account is created but a private group is not created. We discuss groups in Role of a Group.
Deleting or changing a user requires selecting the user from the list of users in the User Manager window. Once selected, you can either select Properties to change user properties or Delete User to delete the user. You may change the user’s user name, full name, password, directory, or login shell. You can also specify an expiration date for the account, lock the password (so that the user is not allowed to change it), specify account expiration information (i.e., establish a date by which the user must change their password), and adjust the groups that the user is in. We will talk about password expirations at the end of this section. If you select Delete, to delete a user, you are also asked whether the user’s home directory, mail file, and temporary files should also be deleted or not. One might want to save these directories and files for archival and/or security purposes.
Although the GUI User Manager is easy to use, many system administrators will choose to use the command line useradd instruction instead. The reason is that a shell script can be written to create a number of new user accounts automatically by using a file that lists the new users’ names. In addition, the useradd instruction does not require the specification of an initial password, thus shortening the process. Of course, without an initial password, the user account can easily be broken into and therefore some initial password should be created. However, a separate shell script could take care of that. The password instruction is discussed later.
The useradd instruction is easy to use if you want to specify just a few properties, as with the GUI. The basic form of useradd is:
useradd [-u uid [-o]] [-g group] [-G group, …] [-d home] [-s shell] [-m] username
The notation here requires a little explanation. The items listed inside of [] are optional. Therefore, the only required parameter for useradd is the username. The simplest form of this command would appear like this:
useradd marst
If you do not specify any other parameter aside from username, the UID defaults to being 1 greater than the last user, the directory defaults to /home/username, and the shell defaults to the default shell (typically bash). The –m parameter forces Linux to create a home directory. The reason why this is optional is that some user accounts should not have home directories, particularly those created for software. Software accounts will be explained in more detail later.
To specify a non-default ID, use –u followed by the ID number. The –o parameter is used to permit non-unique ID numbers. There is little reason to permit duplicate IDs, and this could become a problem. However, the option is still available and might be used, for instance, if you want users to share an account without sharing the same login/password, or if you want to give a user multiple account names. Such a command might look like this:
useradd –u 500 –o foxr2
which would create a second account that would use the same UID as foxr (from Figure 6.1).
To override the default private group, –g allows you to specify a different private group whereas –G allows you to insert this user into a number of other groups. You might notice in Figure 6.1 that keneallym has been inserted into the default group users as he was not provided his own private group. The parameters –d and –s are respectively used to specify home directories and shells other than the default. Two other parameters of note are –p, which allows you to specify an initial password, and –c, which allows you to specify the name field. The –c parameter is used to insert a “comment” into the user account file, /etc/passwd, but the comment is primarily used to specify the user’s name.
Figure 6.3 demonstrates the useradd command, using several of the parameters. In this case, we are adding the user Ruth Underwood. Her login shell is csh (c-shell) rather than bash. Her home directory is the default directory. We are giving her a user ID number outside of the ordinary sequence, and assigning her to several groups. The # symbol is not part of the command but instead the prompt for Linux’ system administrator (root). Note that we specify the full path to the instruction because /usr/sbin is probably not in root’s path. Also notice that there is no space placed between the groups (percussionists, music, cit130).

As you add a user, the user’s account information is added to the file /etc/passwd. The information in this file includes for each account, the account name, ID number, group ID number, name (comment field), home directory, and login shell. The group ID number is the ID number of the user’s private account. For actual users (humans), ID and private group numbers are usually the same.
Interestingly, missing from the /etc/passwd file is the user’s password. In the past, this file included all user passwords, stored in an encrypted format. But the /etc/passwd file can be read by anyone. This created a security risk. Even though passwords were encrypted, one could see the length of a password. For instance, if my password were eight characters long and I noticed that someone else’s encrypted password was the same length as my encrypted password, I might infer that their password was also eight characters in length, and that could help me crack their password. Now, the /etc/passwd file stores the character ‘x’ for passwords, and all passwords are stored in the file /etc/shadow. The shadow file is accessible only by root.
Figure 6.4 shows portions of the /etc/passwd file. This listing shows three segments of the password file. The accounts listed in the figure are of operating system accounts, other software accounts, and user accounts. Operating system accounts include root (naturally, the most important account), bin, daemon, adm, and other Linux software accounts such as mail, news, uccp, ftp. Application software accounts include apache, for instance. Each account in the passwd file is on a separate line, and within a line, the individual pieces of information for each user are separated by colons.
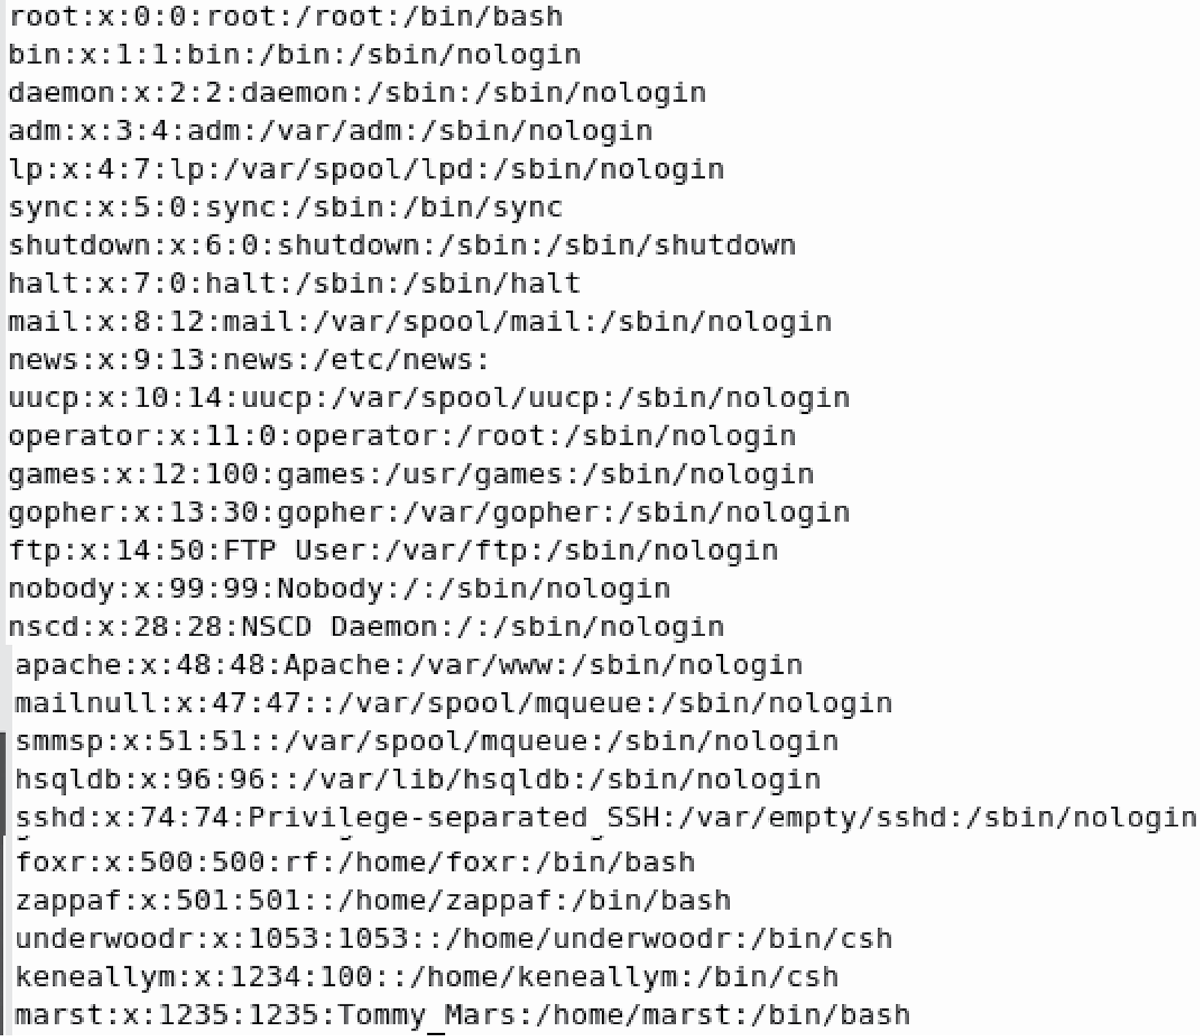
Most of the software accounts specify /sbin/nologin to prevent the software from having a login shell (this is done for security purposes), and have directories other than under /home. For instance, root’s directory is /root; lp, mail, and apache have directories under /var; and news has a directory under /etc. The /var directory is largely used for software storage and log files. Also notice that all of the software accounts have UIDs less than 100 (below 42 in this case), whereas the human users account numbers start at 500. In every case, the password is merely x, indicating that the password now resides in the /etc/shadow file. All entries also have a comment field. In some cases, the comment field merely lists the user name (root, bin, daemon) and in other cases a true name (FTP User for FTP, NSCD Daemon for nscd, X Font Server for xfs, and rf for foxr). Users zappaf, underwoodr, and keneallym have an empty comment field, which appears as ::, that is, nothing occurs between the two colon symbols.
Entries in the /etc/shadow file are somewhat cryptic because they are encrypted. For instance, two of the users in Figure 6.4 (foxr and zappaf) might have entries as follows:
foxr:$1$KJlIWAtJ$aE1YjCp9i5j924vlUXx.V.:15342:0:38:31:::
zappaf:$1$G2nb6Kml$2pWqFx8EHC5LNypVC8KFf0:15366:0:14:7:::
The listings are of the user name followed by the encrypted password. This is followed by a sequence of information about password expiration. In the above example, there are four numbers, but there could be as many as six. These numbers are in order:
- The number of days since January 1, 1970 that the password was last changed
- The minimum number of days required between password changes (this might be 7 if, for instance, we require that passwords not be changed more often than once per week)
- The maximum number of days that a password is valid (99999 is the default, here foxr’s password is valid for 38 more days whereas zappaf’s is only valid for 14 more days)
- The number of days until a warning is issued to alert the user that the password needs to be changed
- The number of days after password expiration that an account will become disabled
- The number of days since January 1, 1970 that the account has been disabled
These last two numbers do not appear in the example above because they had not been established for these two users.
What we see here is that foxr changed his password at some point in the recent past and zappaf did not, so zappaf’s password expires sooner than foxr’s. In 7 days, zappaf will be warned to reset the password. You can see through simple subtraction (14 – 7 for zappaf and 38 – 31 for foxr) that the system warns a user 7 days in advance of password expiration. If the user does not reset the password, the account becomes disabled.
In Linux, the passwd instruction is used to change a passwd. For a typical user, the command is just passwd. The user is then prompted for their current password to ensure that the user is allowed to change the password (imagine if you walked away from your computer and someone came up and tried to change your password without your knowledge!), followed by the new password, entered twice to confirm the new password. The passwd program will inform you of whether a password is a bad password because it is too short or because the characters of the password match or come close to matching a dictionary word.
As a system administrator, you can change any user’s passwd with the command passwd username, for instance, passwd foxr. As root, you are not required to enter the user’s current password before changing it. This can be useful for creating initial passwords or for changing mass passwords because of a policy change. But it can also be very dangerous as you may change someone’s password inadvertently, and if you enter the passwd command without the username, you will be changing the root password.
The passwd command has many useful parameters for a system administrator. With these, the administrator can enforce deadlines for changing passwords. The –f parameter forces the user to change the password at the next login. With –w days (where days is a positive integer), the warn field is set so that the user is warned in that many days to change their password. With –x max, the maximum field is set that establishes the number of days that the password remains valid before it must be changed. When combined, you are able to establish that a user must change a password in some number of days and be warned about it before that. For instance, passwd –w 7 –x 30 foxr would require that foxr change his password within 30 days, and if the password is not changed in the next 23 days, foxr receives a warning. The –l parameter locks the password entry so that it cannot be changed.
Hacking
The term hacking is meant to convey a programmer, someone who “hacks” code. In fact, hacking has several definitions. Another is applied to the hobbyist who likes to experiment with something new. But many people view a hacker as a person who attempts to break into computers by guessing user passwords (more appropriately, this is called cracking). There are many ways to break into a user’s account. We look at some of them here.
Password cracking: trying a variety of passwords such as no password at all (just the enter key), dictionary words, the user’s name, or the name of the user’s spouse, children, pets, parents, etc.
Social engineering: trying to get the user to give you their password, for instance, by calling on the phone and saying “This is Bob from IT, our server crashed and in order to restore your account, I need your password.” This is also called phishing.
Dumpster diving: many people write their passwords on post-it notes. A quick look around the person’s workplace or their trashcan may yield a password!
IP spoofing: by changing your IP address, you may be able to intercept Internet messages intended for someone else. It is possible (although not very likely) that passwords might be found this way.
The usermod command is used to modify a user’s account. You can use this command to change the user’s comment, home directory, initial group, other groups (See the section Role of a Group), login shell, user ID, password, account expiration date, and the number of days after a password expires before the account is permanently disabled. Two other options allow you to lock or unlock the user’s password.
As mentioned earlier, human users and software are given accounts. You might ask why software would be given an account. The reason is because of the use of permissions to control access to files and directories. This is covered in Permissions. Consider, however, that a piece of software will need to read and write files to a particular directory. We want to make sure that other users cannot write to that directory or to those files for security purposes (we may also want to restrict other users from reading the directory and files). When a user starts a process, the process is owned by that user. And therefore, if a file was not owned by that user, then the file may not be readable or writable to that program. If, instead, the program has its own account that owns the files, then the program can access those files even though the user who ran the program cannot. Therefore, in Linux, there are two types of user accounts, those for human users and those for software. It is common, as described earlier, that software accounts will not have a login shell (because the program will never log in) and may not have a home directory.
Windows
Early versions of Windows were intended to be single user systems, so there was no need to create user accounts. With Windows NT, a networked version of Windows, this changed. Now, user accounts are incorporated into each version of Windows. As with Linux, an initial user account is created during OS installation so that the user of the computer can log in as a non-administrator. Although the initial user account does not need a password, it is strongly recommended that the account have a password (and similarly for all future accounts created).
To create additional accounts, you must act as Administrator. You would do this through the User Accounts window, available through the control panel. The User Account function is made available through a GUI as shown in Figure 6.5.
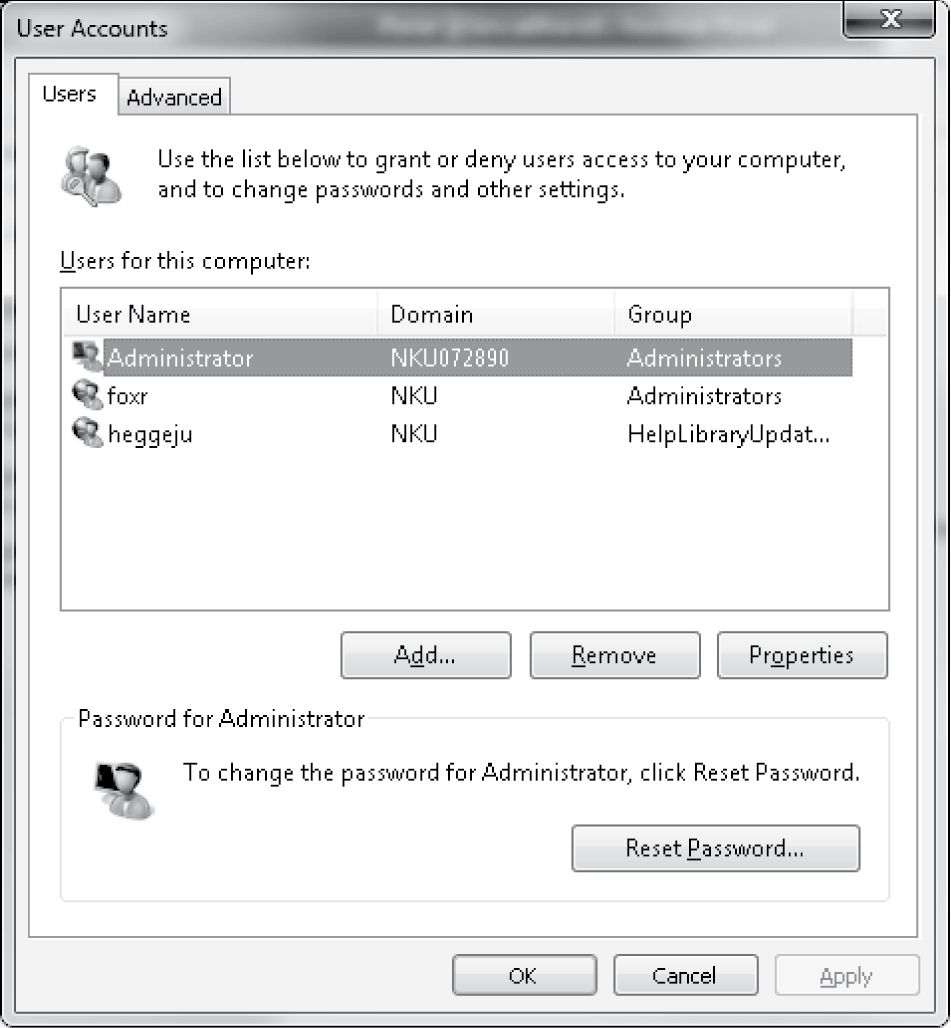
Similar to the Linux User Manager, you have the ability to add, remove, or alter the properties of users. Properties here, however, are limited to group placement. By default, there is only one group, Administrators. However, you can create additional groups as needed. In Figure 6.5, there are three accounts: the system administrator account (Administrator); foxr, who is also an administrator; and heggeju, who is in the group HelpLibraryUpdaters. This account is used by a member of IT to automatically update the computer’s system as needed. The advanced tab at the top of the User Account window permits one to change passwords, add groups, and alter group memberships. It is likely that if you are running Windows 7 on a home computer that you will have two accounts: Administrator and the account that you created when you installed the operating system. If there are multiple users who share the computer, you may or may not desire to give each user a separate account. By having separate accounts, you create not only file space for each individual user (under the C:Users directory), but you also can set file permissions so that different users are able to access different files and run different programs. If you are dealing with a Windows 7 machine that is shared among users in a work environment, then it is likely that each user has an account within the organization’s domain (domains are not covered in this text) and you are able to add an account for them to any of the computers in the domain.
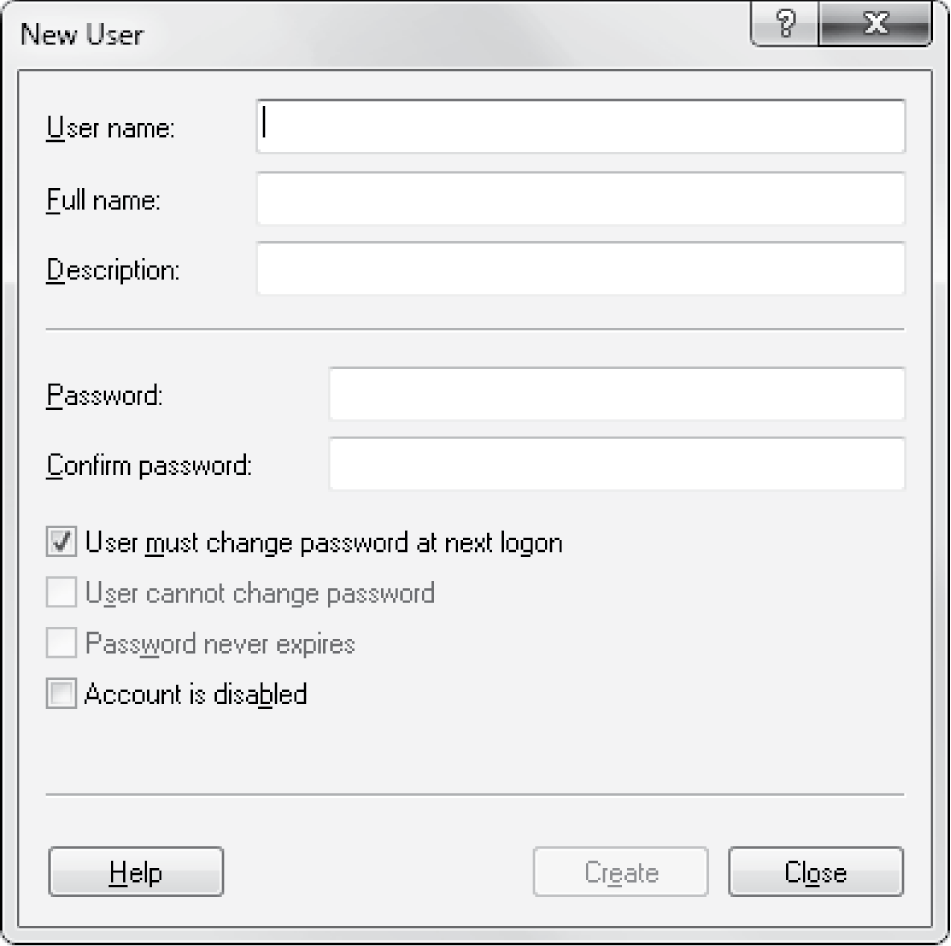
Users can also be added through the Computer Management tool. Right click on the Computer shortcut icon and select Manage. From the Computer Management tool, select System Tools and then Local Users and Groups. Right click on the Users icon and select New User. The New User window appears, as shown in Figure 6.6. Notice here that a password is required, unlike adding a new user through the window in Figure 6.5.
Role of a Group
An individual user creates and manages files. It is often desirable to share the files with others. However, there are some files where the access should be limited to specific users. The ability to control who can access a file and what types of access rights those users are granted is accomplished through permissions. In Linux, for instance, permissions can be established for three different classes of users: the file’s owner, those users who share the same group as the file’s owner, and the rest of the world. This requires that we have an entity called a group. Both Linux and Windows use groups so that access does not have to be restricted solely to the owner of the file and the rest of the world.
A group is merely a name (and an ID number) along with the list of users who are a part of that group. A file can be owned by both a user and a group. Permissions can be established so that the owner has certain access rights, and group members have different access rights. In this way, for instance, an owner might be able to read and write a file, whereas group members can read the file only and all other users have no access to the file.
Both Linux and Windows permit the creation of groups. In Linux, group creation can be accomplished through the User Manager GUI (see Figure 6.1, the Group tab is used) or through the groupadd instruction from the command line. As with users, groups are given ID numbers. When creating a group, like adding a user, you may specify the group ID number, or it can default to being 1 greater than the last created group. In Windows, group creation is handled through the Computer Manager window. Once a group is created, individual users can be added to the group.
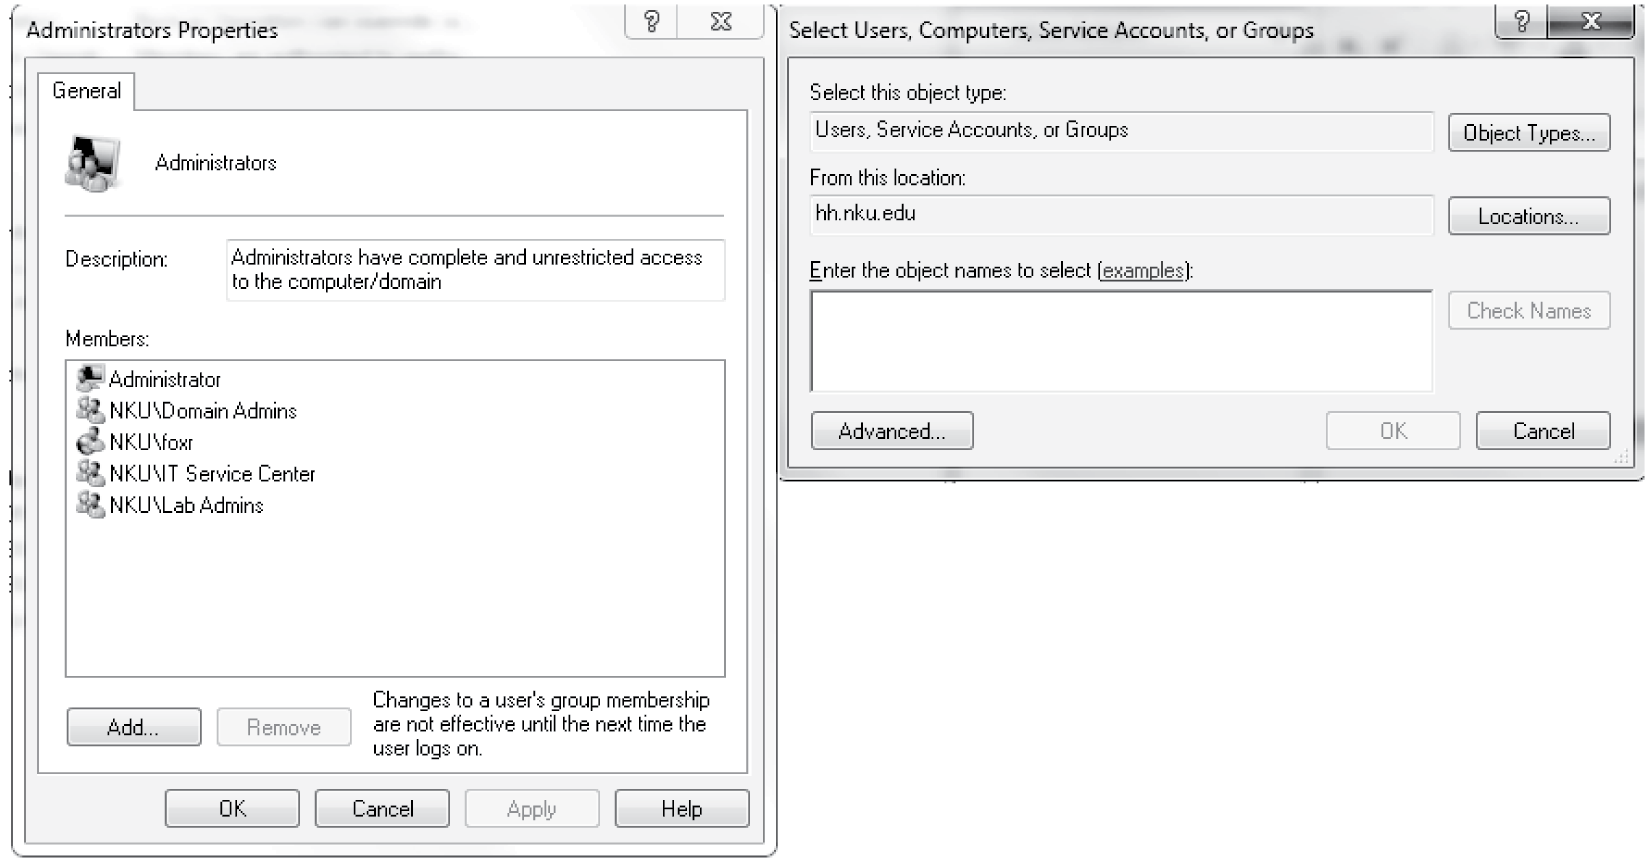
In Linux, users can be added or removed from groups through the User Management tool or from the command line. To add a user to an existing group, you can use either useradd with the –G parameter, or usermod (modify user). An example is usermod –G cit130 zappaf. This will add zappaf to the group cit130. Group information is stored in the file /etc/group. This file stores, for each group, the group name, the group ID number, a password for the group (as with /etc/passwd, this merely appears as an ‘x’), and the list of usernames who belong to that group. One could edit this file to change group memberships, although it is safer to use the usermod instruction. In Windows, users can be added or removed from groups through the Computer Manager Users and Groups selection, as shown in Figure 6.7.
In Linux, when creating a new user account, you are able to specify whether a private account should be generated for that user. This is typically the case. Creating a private group causes a new group whose name is equal to that of the user name to be created and added to the /etc/group file. The only member of that group will be the user. For instance, there will be a group called foxr with one member, foxr, and a group called zappaf with one member, zappaf. Any file created by a user, by default, is owned by that user’s private group. It is up to the file owner to change the group ownership. If foxr were to create a file f1.txt, it would initially be owned by user foxr and the group foxr. If foxr wanted to share the file with members of the cit130 group, foxr would have to change group ownership. The Linux command chown allows the owner of a file to change the owner to another user, and chgrp allows the owner of the file to change the group owner to another group.
These two Linux commands work as follows:
chown newuser filename
chgrp newgroup filename
For instance, if you have a file foo.txt owned by root, and as root you want to change it to be owned by foxr, the command would be chown foxr foo.txt. You might change the group ownership as well, for instance, as chgrp cit130 foo.txt. Notice that this command is changing group ownership not to foxr’s private group, but to cit130, presumably a group of more than one user.
If you want to change both owner and group, this can be done using chown alone:
chown newuser:newgroup filename
If you do not own a file, you would not be able to change the user or group ownership. However, if you are root, you can change the ownership or group of any file.
Permissions
Access control lists (ACLs) are used in some operating systems to implement protection of the system resources. For every resource, there is a list that describes for every user in the system, what their access rights are for that resource. Users with no access will not be listed. For instance, some file f1.txt might have an ACL of foxr:read,write,execute; zappaf:read,execute; underwoodr:read. The advantage of an ACL is that you are able to specify different access rights for every user. The disadvantages are that the ACLs require storage space that grows with each user that you add to the list, and the rather time-consuming nature of changing access rights. For instance, imagine that a new user, dukeg, is added to the system. We decide to give dukeg read access to every file in the system. Adding dukeg:read to every ACL, if not automated through some script, could be an unpleasant chore for an administrator.
Linux simplifies the use of an ACL by having three types of permissions—read, write, and execute—applied to three classes of users: the file’s owner, the file’s group, and the rest of the world. These permissions are placed on every system file and directory. Users have the option to alter any or all permissions from their default settings when the file /directory is created.
If a file is readable, it can be viewed or copied. If a file is writeable, it can be written to, overwritten (modified), or deleted. If a file is executable, it can be executed. We usually would not worry about the executability of nonprograms. Shell scripts are an exception. A shell script is not executed directly; it is instead executed by an interpreter. This should imply that the shell script need only be readable by the interpreter but, in fact, it needs to be both readable and executable. The interpreter would not be the owner of the file nor in the file’s group, so it would require read and execute access for the rest of the world.
Permissions on directories have a slightly different meaning than the permissions of files. If a directory is readable, then you can view its contents (i.e., do an ls). If a directory is not readable, not only can you not view its contents, but you would not be able to view the contents of individual files in that directory. If a directory is writable, then you are able to save files into that directory as well as copy or move files into that directory. If a directory is executable, then you can cd into it. If a directory were readable but not executable by you, then although you could use ls on the directory, you would not be able to cd into it.
The three classes of users in Linux permissions are the resource’s owner, the resource’s group, and everyone else in the world who can log into the Linux machine. We will refer to these as user (u), group (g), and other (o). This is unfortunately a little confusing because owner is represented by ‘u’ rather than ‘o’. For each of these three levels, there are three possible access rights that can be supplied: read (r), write (w), and execute (x). These letters are important as we will see below. Files and directories will default to certain permissions. In order to change permissions, you must own the file (or be root) and use the chmod (change mode) command. This is covered in the Linux subsection below.
In Windows, file access is slightly different. Access rights are full control, modify, read & execute, read, write, and special permissions. Full control is given to the owner who then has the ability to change the access rights of others. Modify means that the file can be written over, that is, the save command will work. Read & execute would be applied to an executable file, whereas read would be applied to a nonexecutable. Write allows one to save anew through save as, or resave. Any user or group can be given any combination of the above access rights. Access rights can be set to “Allow” or “Deny”. We look at modifying Windows permissions in the Windows subsection.
Linux
As stated, Linux has three levels of permission: owner (u for user), members of the group (g), and the rest of the world (o for others). Each level can be set to any combination of readable (r), writable (w), and executable (x). You are able to view the permissions of a file (or directory) when you use the command ls –l. The –l option means “long form”. The permissions are shown as a nine-character set showing for the owner if readable is set, writable is set, executable is set, and the same for group and world. For instance, a file that is listed as rwxr-x--x means that it is readable, writable, and executable by the owner, readable and executable by members of the group, and executable only by the world. The – indicates that the particular permission is not set. When doing an ls –l, this list of nine characters is preceded by a tenth character that represents the file type. Typically, this is either a hyphen (file) or ‘d’ (directory), and as we saw in Chapter 5, the letter ‘l’ means a link.
Figure 6.8 shows a typical long listing. The listing includes, aside from the permissions, the owner and group of the file, the file’s size, last modification date, and file’s name. Note that the ~ at the end of some file names indicates that it is a backup file. When you modify a file using certain editors (such as Emacs), the old file is still retained but labeled as an old file with the ~ character. Therefore, foo2.txt is a newer version and foo2.txt~ is an older version. Saving foo2.txt again would copy foo2.txt into foo2.txt~ to make room for the new version.
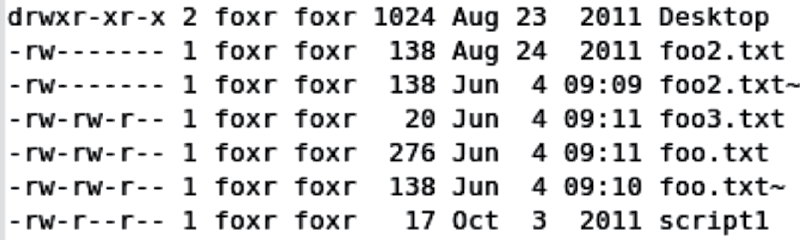
Let us take a look at a couple of items in Figure 6.8 to gain a better understanding of the information supplied by the long listing. First, Desktop has permissions of “drwxr-xr-x”. The ‘d’ indicates that this is a directory. The directory is owned by foxr and in foxr’s private group. The user foxr has rwx permissions (read, write, execute). Therefore, foxr can cd into the directory, ls the directory, read files from the directory (presuming those files are readable by the owner), write to the directory, and resave files to the directory (again, presuming those files are writable by the owner). Other users, whether in foxr’s private group (of which there would probably be no one) or the rest of the world have read and execute access to this directory but not write access. All other items shown in Figure 6.8 are files because their permissions start with the character ‘-’. The file foo2.txt is readable and writable by foxr only. No other user (aside from root) can read or write this file. The file foo3.txt is readable and writable by foxr and users in the group foxr (again, there are probably none other than foxr). It is read-only by the rest of the world.
To change permissions, you must either be the owner of a file or the system administrator. The command to change permissions is chmod (change mode). The command receives two parameters: the changes in permission and the name of the file. Changing the permissions can be done in one of three ways.
First, you can specify what changes you want by using a notation like this: u+w,g-x. The first letter in each group represents the type of user: user (u), group (g), other (o), recalling that user means owner and other means the rest of the world. The plus sign indicates that you are adding a permission, and the minus sign indicates that you are removing a permission. The second letter in the group is the permission being added or removed. In the above example, the owner is adding writability to himself and removing executability from the group. You can list multiple permission changes for each type of user such as through u-wx,g-rwx. This would remove both write and execute from the owner’s permissions and remove all permissions (rwx) from the group.
Second, you can specify the entire set of permissions by using the letters (u, g, o, r, w, x) but assigning the permissions through an equal sign instead of the plus and/or minus. For instance, we might use u=rwx,g=rx,o=x to give a file all of the permissions for owner, read and execute for the group, and execute only for the world. To specify no permission for a level, you immediately follow the equal sign with a comma, or leave it blank for o (other). For instance, u=rw,g=,o= would give the owner read and write access, and group and world would have no permissions.
You can combine the first and second methods as long as they are consistent. You would tend to use the first method if you want to change permissions slightly and the second method if you want to reset permissions to something entirely different (or if you did not know what the permissions were previously). Note that for both of these approaches, the letter ‘a’ can be used to mean all users (u, g, and o). So, for instance, a+r means everyone gains read access, or a=x means everyone is reset to only have execute access.
The third approach is similar to the second approach in that you are replacing all access rights with a new set; however, in this case you specify the rights as a three-digit number. The three digits will correspond to the rights given to user, group, and other, respectively. The digit will be between 0 and 7 depending on which combination of read, write, and execute you wish to assign. To derive the digit, think of how the file permissions appear using the notation rwxrwxrwx. Change each group of 3 (rwx) into three binary bits where a bit is 1 if you want that access right granted and a 0 if you do not want that access right granted. For instance, rwxr-x--x would be rewritten as 111 101 001. Now, convert each of these 3-bit numbers to decimal (or octal): 111 is 7, 101 is 5, 001 is 1, giving us 751. Therefore, the three-digit number matching the access rights rwxr-x--x is 751.
Another way to view the 3-valued number is to simply assign the values of 4 for readability, 2 for writability, and 1 for executability. Now, add up the values that you want for each of owner, group, and world to create your 3-valued number. If you want to combine readable, writable, and executable, this will be 4 + 2 + 1 = 7. If you want to permit only readable and writable, this will be 4 + 2 = 6. If you want to permit only readable and executable, this will be 4 + 1 = 5. If you want readability only, this will be 4. And so forth. You compute the sum for each of owner, group, and world. So the value 640 would be readable and writable for owner, readable for group, and nothing for world. The value 754 means that the owner would have all three types of access (r, w, x), the group would have read and execute permission and the world would have read access only.
The following are some other common values you might find for files and directories:
660—read and write for owner and group, nothing for the world
755—read, write, execute for owner, read and execute for group and world
711—read, write, and execute for owner, execute for group and world
444—a read-only file for everyone
400—read access for owner, nothing for group and world
000—no access for anything (only system administrator could access such a file)
The following are some values you would probably not see for files and directories:
557—there is no reason why the world would have greater access than the owner
220—a “write-only” file makes little sense without being able to open or read the file
420—this file is read only for the owner but write only for the group
777— although this is an allowable permission, it is dangerous to give the world write access
Furthermore, it is rare not to make a directory executable, whereas non-executable files are rarely given execute access. So we would tend to see 755 or 775 for directories and 644 or 664 for files.
Each of chmod, chown, and chgrp can alter multiple files at a time by listing each file. For instance, chown zappaf foo1.txt foo2.txt foo3.txt, will change the owner of all three files to the user zappaf.
Linux can also be enhanced with a feature called Security-Enhanced Linux (SELinux), which allows permissions to be allocated in a much finer grained manner. SELinux goes above and beyond the permissions discussed thus far and incorporates the use of ACLs to allow much greater levels of control and security. SELinux maintains a completely separate set of users and roles than the ones we have discussed so far. SELinux is much more complex than standard Linux file permissions, and the details of its use are beyond the scope of this text.
Windows
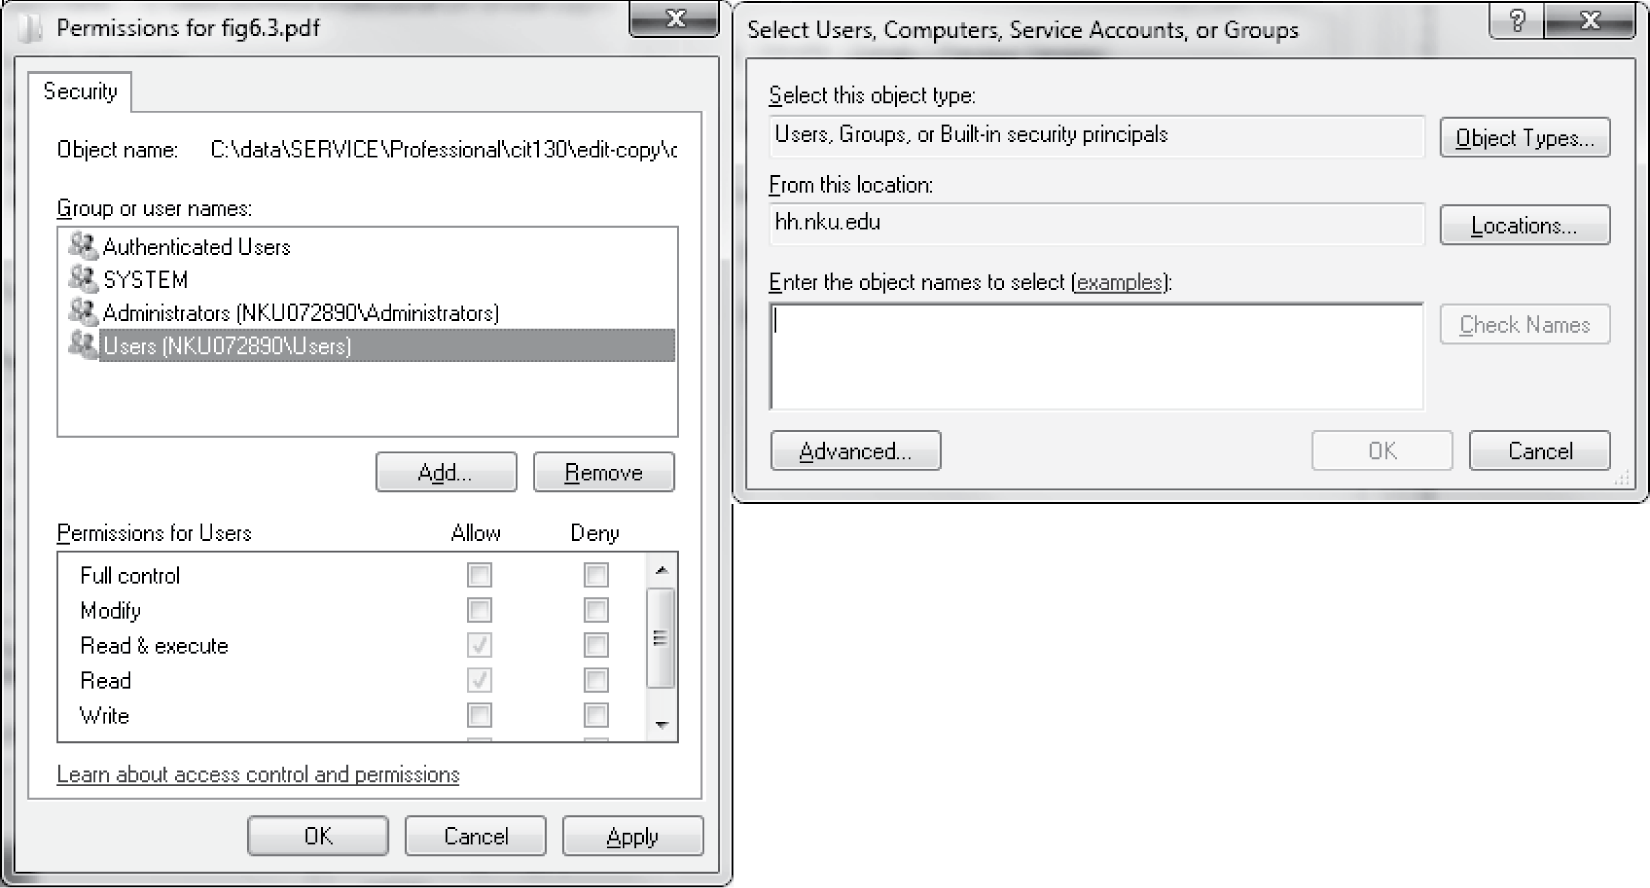
The Windows operating system uses a similar idea for permissions as in Linux. Changing permissions is not as easy (at least when you have a large number of files to change) and does not provide quite the amount of flexibility. To view the level of permissions on a file, from the file manager, right click a file’s icon and select properties. From the properties window, select the Security tab. You will see something like what is shown in Figure 6.9.
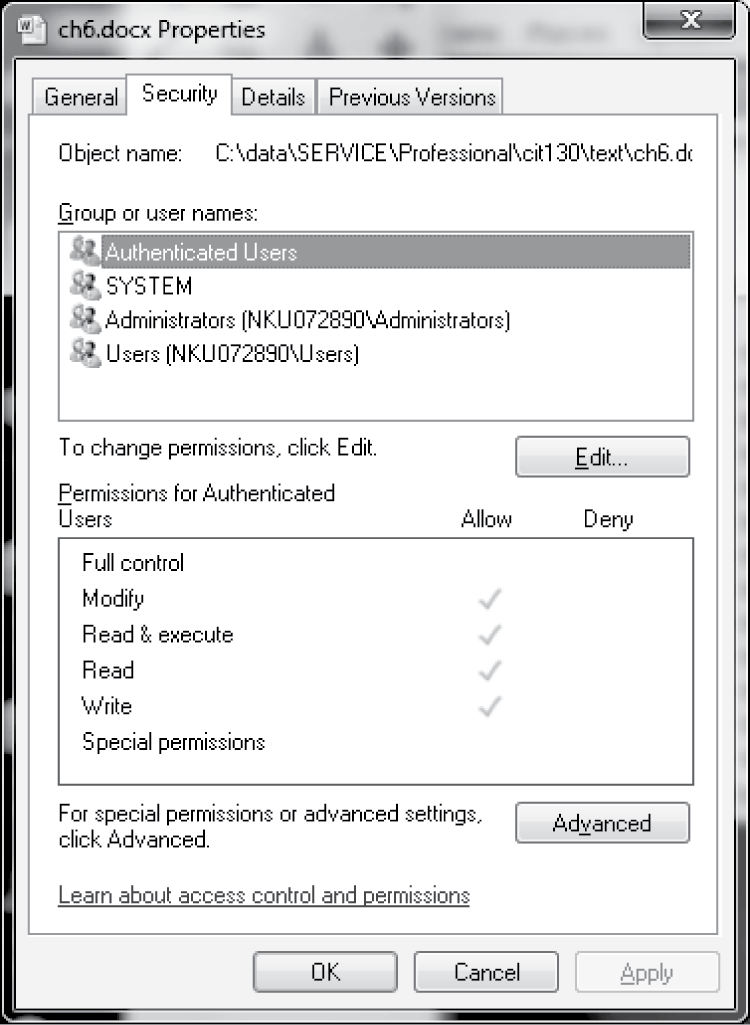
From the security tab on a file’s properties, you will see the various groups that have access to the file. They will include System, Administrators, and Users. In this case, we also see Authenticated Users. These are roughly equivalent to the system administrator and the world. Authenticated Users might constitute a group. Permissions are limited to full control, modify, read and execute, read, write, and special. If you give a user full control access, then you are allowing that user to change permissions of others. Changing permissions requires first that you select the Edit… button. From a new pop-up window, you can add or remove permissions by clicking in check boxes. You can also add or remove specific users and groups from the list. Thus, Windows gives you a way to add permissions for specific users without having to deal with group creation. See Figure 6.10.
Miscellaneous User Account Topics
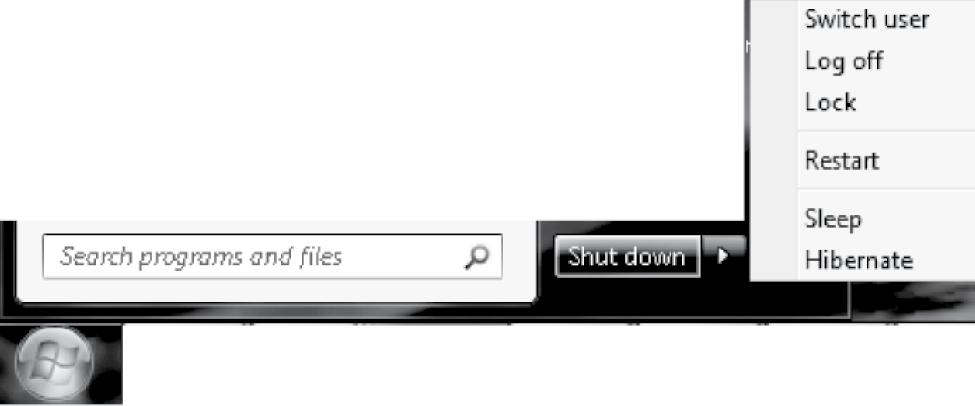
Consider the following situation. You are currently logged into your Windows 7 machine. You are editing a few files. One of your family members needs to quickly access a file of their own and e-mail it to a friend. Since that file is owned by that family member and they have secured the permissions to be readable only by their own account, you cannot simply let them use the computer for a minute. Instead, you would have to save your files, log out, let them log in, edit their file, e-mail it, log out, and then you would have to log back in and reopen your files. This task could take several minutes. Instead, Windows 7 has a switch user facility (this feature was first included in Windows XP and available in Vista). To switch user, go to the Start button, select the Shut down menu and select Switch user (Figure 6.11). This allows you to interrupt your own session, let your family member log in and do their work, and then return to your account. When you return to your account, you will find it exactly as you left it, with all of your windows still open and your programs running. It is probably best to save your work before switching users, however, in case your family member accidentally or mistakenly shuts the computer down rather than logging off. The switch user facility does not save any of your files.
In Linux, switching users is done in a much simpler fashion. If you are working in a shell window, you use the command su username. You will be asked to log in as the new user. Although you now are the new user in terms of access rights, interestingly, you will be still be in whatever working directory you were in before issuing the su command. Therefore, you might follow the su command with a cd ~ command to move to the new user’s home directory. To exit from the new shell session, type exit and you will be back to your previous log in (and the previous directory). If you issue the command su without a user name, you will be attempting to switch to root, the system administrator account. Note that if you are currently root, you can switch to any user without having to enter their password.
As has been noted before, every operating system has a special account, the system administrator (Administrators in Windows, root in Linux and Unix, and sometimes referred to as superuser in other operating systems). This account has access to every system resource. In Windows, there are a set of administrator programs and tools that are not available to ordinary users. In Linux, many of the administrator programs are only available to root, and these are often found either in /sbin or /usr/sbin. Among these programs are useradd, userdel, usermod, groupadd, groupdel, and groupmod (all of these are in/usr/sbin). If you do an ls –l on these files, you will see that they all have permissions of rwxr-x---, which means that only the owner and group members can read or execute these programs. The owner is root and the group is root, so only root can run them. There are other system programs that are only executable by root in both of these directories.
Consider in Linux that you might want to provide some form of permission to a subset of users by using groupadd. So you wish to create a group, add the subset of users to that group, and then change permissions on your file giving those users access. But if you look at the groupadd program (located in/usr/sbin), you will see that it is owned by root and in root’s private group. Furthermore, its permissions are “-rxwr-x---” meaning that it is not accessible to the average Linux user (only root or someone in root’s private group). Yet, as a system administrator, you would not want to encourage people to make their files open to the world in such cases, and there does not seem to be another option unless the user can convince the system administrator to use groupadd to create the new group. Linux does offer another approach, although this might be deemed a compromise between forcing users to set dangerous permissions and having the system administrator create groups on request. This approach is to permit one or a select group of users the ability to run specific system programs. This is done through the program sudo and a file called /etc/sudoers.
In order to use sudo, there are two steps. First, as root, you edit the sudoers file. While the file already has a number of entries, you would add your own, probably at the bottom of the file. An entry is of the form:
username(s) host = command
There can be more than one user listed if you wish to give the same access to multiple users. Usernames will be separated by commas. You can also specify members of a group by using
%groupname or %gid (the ID number of the group).
The value for host will either be localhost, all, or a list of host (computer) names. The word localhost means the machine that the sudoers file is stored on. This restricts users to having to be logged in to that machine and restricts the command to only be executed on that machine. The word all is used to indicate any machine on the network. The command can be a list of commands that are separated by spaces. The command must include the full path name, for example,
/sbin/mount or /usr/sbin/useradd.
The second step is to issue the sudo command. The sudo command is the word sudo followed by the actual command that the user wishes to issue. For instance, if you have been given sudoer privilege to run useradd, then you would perform the operation as
sudo /usr/sbin/useradd –d/home/cit130 –G cit130,students –m newguy
Here, in addition to the useradd command (which defines a different home directory location and adds the new user to two existing groups), the command is preceded by sudo. The sudo program, before attempting to execute the command, requires that the user enter their password. If the password matches, then the sudo program compares the username and command to the entries in the /etc/sudoers file. If a match is found, the command is executed as if the user was in fact root; otherwise, the user is given an error message such as:
foxr is not in the sudoers file. This incident will be reported.
Sudo access should not be granted on a whim. In fact, it should not be granted at all unless the user has been trained and the organization provides a policy that clearly states the roles and requirements of granting some system administration access. One general exception to this rule is the following sudoer entry:
%users localhost =/sbin/shutdown –h now
The shutdown command shuts down the machine. This command is issued by the GUI when the user selects shutdown. Therefore, all users will need to be able to shut down the computer whether by GUI or command line. The users group is a group of all users, automatically adjusted whenever users are added to the system.
User accounts permit tailored environments, known as shells in Linux, often referred to as the desktop in Windows. Information describing the tailored environment is stored in the user’s home directory. Upon logging in, the file(s) will be loaded into the shell or GUI environment. In this way, the user is able to create an environment for how things look, where things will be located, and shortcuts for executing commands. In Windows, this file, or profile, is saved automatically as the user adjusts the desktop. In Linux, there are several different files that can store profile information. For instance, if the user is using the Bash shell as their login shell, the user would most likely edit the .bashrc file stored in their home directory. We will explore Bash in more detail in Chapter 9.
Further Reading
There are no specific books that discuss user accounts or groups, or file permissions. Instead, those are topics in texts of various operating systems. For such texts, see Further Reading section of Chapter 4.
Review Terms
Terminology introduced in this chapter:
Access control list Account name
Account Execute access
Group Strong password
Group access Superuser
Owner Sudoers
Owner access Sudo
Password Switching user
Permission User
Read access World
Root account World access
SELinux Write access
Shell
Review Questions
- Why are user accounts needed in computer systems? Are user accounts needed if only one person is going to be use the computer?
- How does a normal user account differ from a software account?
- What is the difference between a user account and an administrator account?
- Examine a Linux/etc/shadow file. Can you figure out the length of any of the passwords given their encrypted form?
- Why do we need groups?
- How do you create a new user account in Linux from the command line?
- How do you change ownership of a file in Linux from the command line?
- How do you change group ownership of a file in Linux from the command line?
- What does the usermod command allow you to do in Linux?
- What is a file permission?
- What is the difference between read access and execute access in a directory?
- What does execute access mean for a file that is not an executable program?
- What does the sudoers file store? What does the sudo command do?
- Why would we allow all users in a Linux computer system the ability to issue the shutdown command?
Review Problems
- Provide Linux chmod instructions using the ugo= approach to match the following permissions:
foo.txt -rwxr-xr--
bar drwx--x--x
stuff.txt -rw-r--r--
notstuff.txt -r-x--x---
another.txt -rwxrw-r--
temp drwxrwxr-x
- Repeat #1 using the 3-valued approach in Linux.
- Assume all items in a directory are currently set at 644. Provide Linux chmod instructions using the ugo+/– approach to match the following permissions.
foo.txt -rwxr-xr--
bar drwx--x--x
stuff.txt -rw-r--r--
notstuff.txt -r-x--x---
another.txt -rwxrw-r--
temp drwxrwxr-x
- Repeat #3 using the 3-value approach in Linux.
- What is the difference between the Linux instruction useradd and usermod?
- What is the difference between the Linux instruction chown and chgrp? How can you use chown to change both file owner and file group?
- Write a Linux passwd command to force user marst to change his password within 10 days, issuing a warning in 7 days if the password has not been changed by then.
- How would you lock an account using the Linux passwd command? How would you force a user to change their password in the next login using the Linux passwd command?
Discussion Questions
- Organizations have different policies for computer usage by their users. Some questions that an organization may want to generate polices for include: How long should an account exist after the user has left the organization? Should users have disk quotas? If so, should all users have the same quota size? Can users store personal files in their storage space? Develop your own policies assuming that the organization is a small private university or college. How would your policies differ if it was a large public university?
- Repeat #1 for a small (10–20 employees) company. How would your policies differ if it was a large (1000+ employees) company?
- Do you find yourself with numerous computer accounts and different passwords for each? If so, do you have a system for naming and remembering your passwords? For instance, do you use the same password in each account? Do you write your passwords down? Do you use people’s (or pets’) names as passwords? Why are these bad ideas? Do you have any recommendations to help people who might have a dozen different computer accounts or more? As a system administrator, should you advise your colleagues on how to name and remember their passwords?
- In Linux, the /etc/passwd file is automatically modified whenever you use the useradd, userdel, or usermod instruction. Why should you always use these instructions rather than directly modifying the passwd file yourself? What might happen if you modified the file directly that would not happen if you used the proper Linux command(s)?
- Although the passwords are stored in an encrypted form, why was leaving the passwords in the /etc/passwd file a threat to system security? Attempt to explain how a user could use the encrypted password information to hack into other users’ accounts.
- Explain why groups are an important unit to help better support system permissions in an operating system. What would be the consequences on a user if groups were not available?
- Find a Linux system administrator reference and examine the commands available to the system administrator that are not available to ordinary users. From the list, can you identify any commands that you might want to make available to ordinary users, or even a few select users, via the sudo command? If so, explain which commands and why or in what circumstances they should be available via sudo.