In the previous chapter, we worked through the basics of using table views. In this chapter, we’ll go further by adding navigation controllers.
Table views and navigation controllers work together, but strictly speaking, a navigation controller doesn’t need a table view to function. As a practical matter, however, when using a navigation controller, you normally include at least one or more tables because the strength of the navigation controller lies in the ease with which it handles complex hierarchical data. On the iPhone’s small screen, hierarchical data is best presented using a succession of table views.
In this chapter, we’ll build an application step by step, just as we did with the Pickers application back in Chapter 7. When we have the basic navigation controller and the root view controller working, we’ll start adding more controllers and layers to the hierarchy. Each view controller we create reinforces some aspect of table use or configuration:
How to drill down from table views into child table views
How to drill down from table views into content views, where detailed data can be viewed and even edited
How to use multiple sections within a table view
How to use edit mode to allow rows to be deleted from a table view
How to use edit mode to let the user reorder rows within a table view
Navigation Controller Basics
The main tool you’ll use to build hierarchical applications, the UINavigationController, functions similarly to the UITabBarController in that it manages, and swaps in and out, multiple content views. The main difference between the two being the child view controllers of a UINavigationController are organized in a stack, which makes it well suited to working with hierarchies.
If you’re a previous software developer and understand stacks, you may want to skip over the next section or just scan it. But if you’re new to stacks, continue reading. Fortunately, stacks are a pretty easy concept to grasp.
Stacks
The stack, a commonly used data structure, functions using the principle of “last in, first out.” A common Pez dispenser (see Figure 9-1) provides a great example of a stack. Ever try to load one? According to the little instruction sheet that comes with each and every Pez dispenser, there are a few easy steps. First, unwrap the pack of Pez candy. Second, open the dispenser by tipping its head straight back. Third, grab the stack of candy, holding it firmly between your pointer finger and thumb, and insert the column into the open dispenser.

Figure 9-1. A Pez dispenser represents a simple implementation of a stack
Remember that we said a stack was last in, first out? That also means first in, last out. The first piece of candy you push into the dispenser will be the last piece that pops out. The last piece of candy you push in becomes be the first piece you pop out. A computer stack follows the same rules:
When you add an object to a stack, it’s called a push. You push an object onto the stack.
The first object you push onto the stack is called the base of the stack .
The object you most recently pushed onto the stack is called the top of the stack (at least until it is replaced by the next object you push onto the stack).
When you remove an object from the stack, it’s called a pop. When you pop an object off the stack, it’s always the last one you pushed onto the stack. Conversely, the first object you push onto the stack will always be the last one you pop off the stack.
A Stack of Controllers
Navigation controllers maintain a stack of view controllers and when you design your controller, you must specify the very first view the user sees. As discussed previously, we call that view’s controller the root view controller, or just root controller, which becomes the base of the navigation controller’s stack. As the user selects a new view to display, another controller gets pushed onto the stack, and its view appears. We refer to these new view controllers as subcontrollers. In this chapter’s application, Fonts, we include a navigation controller and several subcontrollers.
In Figure 9-2, notice the title centered in the navigation bar and the back button on the left side of the navigation bar. The title of the navigation bar gets populated with the title property of the top view controller in the navigation controller’s stack, and the title of the back button displays the name of the previous view controller. The back button acts similar to a web browser’s back button. When the user taps that button, the current view controller gets popped off the stack, and the previous view becomes the current view.
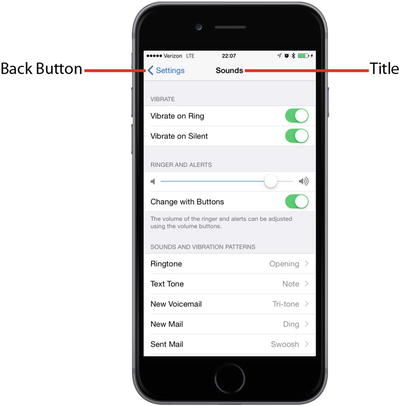
Figure 9-2. The Settings application uses a navigation controller. The back button at the upper left pops the current view controller off the stack, returning you to the previous level of the hierarchy. The title of the current content view controller is also displayed
This design pattern allows us to build complex hierarchical applications iteratively so we don’t need to know the entire structure to get everything up and running. Each controller only needs to know about its child controllers, so it can push the appropriate new controller object onto the stack when the user makes a selection. We can build up a large application from many small pieces this way, which we’ll be doing in this chapter.
The navigation controller provides the core to many iPhone apps; however, when it comes to iPad apps, the navigation controller plays a more marginal role. The Mail app depicts a typical example featuring a hierarchical navigation controller to let users navigate among all their mail servers, folders, and messages. In the iPad version of Mail, the navigation controller never fills the screen, but appears either as a sidebar or a temporary view covering part of the main view. We’ll work with that in Chapter 11.
Fonts: A Simple Font Browser
The application we’re about to build shows how to do most of the common tasks associated with displaying a hierarchy of data. When the application launches, we’re presented with a list of all the font families that are included with iOS, as shown in Figure 9-3. A font family groups closely related fonts, or fonts that are stylistic variations of one another such as Helvetica, Helvetica-Bold, Helvetic-Oblique, and other variations all included in the Helvetica font family.
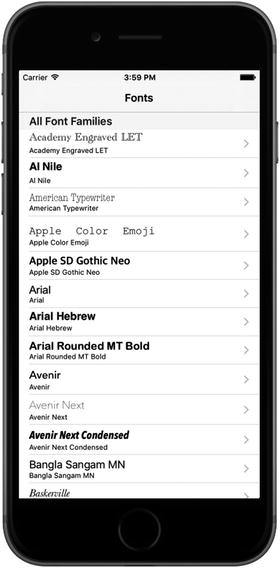
Figure 9-3. In our project, the root view controller displays accessory icons on the right side of each row in the view. This particular type of accessory icon is called a disclosure indicator, letting us know that touching that row drills down to another view of some kind
Selecting any row in this top-level view will push a new view controller onto the navigation controller’s stack. The small images on the far right of each row are called accessory icons. This particular accessory icon (the gray arrow) displays a disclosure indicator letting the user know that touching that row drills down to another view.
Subcontrollers of Our Fonts App
Before we actually start working on this chapter’s project, let’s examine each of the subcontrollers that we’ll be using.
The Font List Controller
Touching any row of the table shown in Figure 9-3 will bring up the child view shown in Figure 9-4.
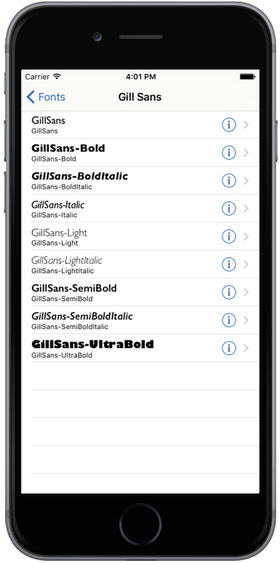
Figure 9-4. The first of the Fonts application’s subcontrollers implements a table in which each row contains a detail disclosure button
The accessory icon to the right of each row in Figure 9-4, called a detail disclosure, functions differently than the arrow we saw previously. Unlike the disclosure indicator, the detail disclosure button provides not just an icon but acts as a control that the user can tap independently. This means that you can have two different options available for a given row: one action triggered when the user selects the row, and another that is triggered when the user taps the icon. Tapping the small info button within this accessory should allow the user to view, and perhaps edit, more detailed information about the current row. Meanwhile, the presence of the right-pointing arrow should indicate to the user that there is some deeper navigation to be found by tapping elsewhere in the row.
The Font Sizes View Controller
Touching any row of the table shown in Figure 9-4 brings up the child view shown in Figure 9-5.
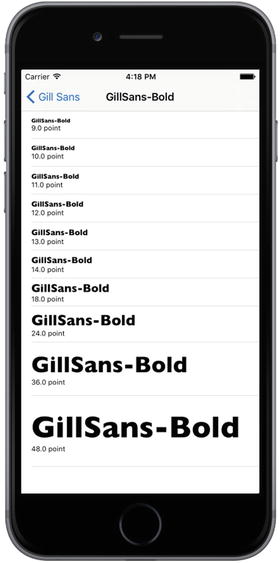
Figure 9-5. Located one layer deeper than the Font List View Controller, the Font Sizes View Controller shows multiple sizes of the chosen font, one per row
Using Disclosure Indicators and Detail Disclosure
Some guidelines for when to use each of these buttons:
To offer a single choice for a row tap, don’t use an accessory icon if a row tap will only lead to a more detailed view of that row.
Mark the row with a disclosure indicator (right-pointing arrow) if a row tap leads to a new view listing more items (not a detail view).
To offer two choices for a row, mark the row with either a detail disclosure indicator or a detail button. This allows the user to tap the row for a new view or the disclosure button for more details .
The Font Info View Controller
Our final application subcontroller—the only one not a table view—appears(see Figure 9-6) when you tap on the info icon for any row in the Font List View Controller shown in Figure 9-2.
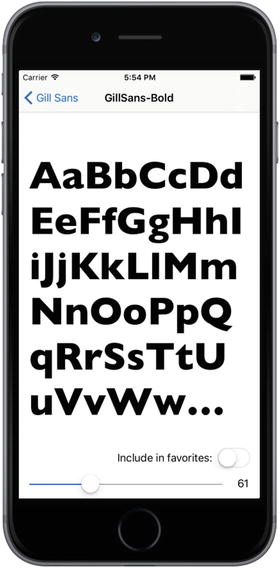
Figure 9-6. The final view controller in the Fonts application allows you to view the chosen font at any size you want
This view lets the user drag a slider to adjust the size of the displayed font. It also includes a switch that allows the user to specify whether this font should be listed among the user’s favorites. If any fonts are set as favorites, they appear within a separate group in the root view controller.
The Fonts Application’s Skeleton
Xcode offers a perfectly good template for creating navigation-based applications, and you will likely use it much of the time when you need to create hierarchical applications. However, we’re not going to use that template today. Instead, we’ll construct our navigation-based application from the ground up, so we get a feel for how everything fits together. We’ll also walk through it one piece at a time, so it should be easy to keep up.
In Xcode, press ⌘⇧N to create a new project. Select Single View Application from the iOS template list, and then click Next to continue. Set Fonts as the Product Name, Swift as the Language, and select Universal for Devices. Make sure that Use Core Data is not checked, click Next, and choose the location to save your project.
Setting Up the Navigation Controller
We’ll now create the basic navigation structure for our application. At the core of this will be a UINavigationController, managing the stack of view controllers that a user can navigate between, and a UITableViewController displaying the top-level list of rows we’re going to show. As it turns out, Interface Builder makes this easy to create.
Select Main.storyboard. The template has created a basic view controller for us, but we need to use a UINavigationController instead, so select the view controller in either the editor area or the Document Outline, and delete it to leave the storyboard empty. Now use the Object Library to search for UINavigationController and drag an instance into the editing area. You’ll see that you actually get two scenes instead of one, similar to what you saw when creating a tab view controller in Chapter 7. On the left is the UINavigationController itself. Select this controller, open the Attributes Inspector, and check Is Initial View Controller in the View Controller section to make this the controller that appears when the application is launched.
The UINavigationController has a connection wired to the second scene, which contains a UITableViewController. You’ll see that the table has the title Root View Controller. Click the Root View Controller icon in the Document Outline (the one below the Table View, not the one above it), open the Attributes Inspector, and then set the title to Fonts. If you don’t see the title change in the storyboard, you chose the wrong Root View Controller icon.
By setting it up this way, we get the view created by the navigation controller, a composite view that contains a combination of two things: the navigation bar at the top of the screen (which usually contains some sort of title and often a back button of some kind on the left) and the content of whatever the navigation controller’s current view controller wants to display. In our case, the lower part of the display will be filled with the table view that was created alongside the navigation controller.
We’ll see more about how to control what the navigation controller shows in the navigation bar as we go forward. You’ll also gain an understanding of how the navigation controller shifts focus from one subordinate view controller to another. For now, we’ve laid enough groundwork so that we can start defining what our custom view controllers are going to do.
At this point, the application skeleton is essentially complete. You’ll see a warning about setting a reuse identifier for a prototype table cell, but we can ignore that for now. Save all your files, and then build and run the app. If all is well, the application should launch, and a navigation bar with the title Fonts should appear. You haven’t given the table view any information about what to show yet, so no rows will display at this point, as shown in Figure 9-7.
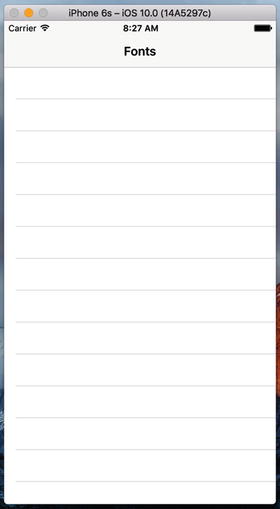
Figure 9-7. Our application skeleton without any data
Keeping Track of Favorite Fonts
At several points in this application, we’re going to let the user maintain a list of favorite fonts by letting them add chosen fonts, view a whole list of already-chosen favorites, and remove fonts from the list. In order to manage this list in a consistent way, we’re going to make a new class that will hang onto an array of favorites and store them in the user’s preference for this application. You’ll learn a lot more about user preferences in Chapter 12, but here we’ll just touch on some basics.
Start by creating a new class. Select the Fonts folder in the Project Navigator and press ⌘N to bring up the new file assistant. Select Swift File from the iOS Source section and then click Next. On the following screen, name the new file FavoritesList.swift and press Create. Select the new file in the Project Navigator and make the additions shown in Listing 9-1.
Listing 9-1. Our FavoritesList Class File
import Foundationimport UIKitclass FavoritesList {static let sharedFavoritesList = FavoritesList()private(set) var favorites:[String]init() {let defaults = UserDefaults.standardlet storedFavorites = defaults.object(forKey: "favorites") as? [String]favorites = storedFavorites != nil ? storedFavorites! : []}func addFavorite(fontName: String) {if !favorites.contains(fontName) {favorites.append(fontName)saveFavorites()}}func removeFavorite(fontName: String) {if let index = favorites.index(of: fontName) {favorites.remove(at: index)saveFavorites()}}private func saveFavorites() {let defaults = UserDefaults.standarddefaults.set(favorites, forKey: "favorites")defaults.synchronize()}}
In the preceding snippet, we declared the API for our new class. For starters, we declared a class property called sharedFavoritesListthat returns an instance of this class. No matter how many times this method is called, the same instance will always be returned. The idea is that FavoritesList should work as a singleton—instead of using multiple instances, we’ll just use one instance throughout the application.
Next, we declared a property to hold the names of our favorite fonts. Pay close attention to the definition of this array:
private(set) var favorites:[String] The private(set) qualifier means that the array can be read by code outside the class, but only code in the class implementation can modify it. That’s exactly what we want, because we need users of our class to be able to read the favorites list:
let favorites = FavoritesList.sharedFavoritesList.favorites // Read-access is OKBut we don’t want either of these to be allowed:
FavoritesList.sharedFavoritesList.favorites = [] // Not allowedFavoritesList.sharedFavoritesList.favorites.append("Comic Sans MS") // Not allowed
The class initializer is responsible for setting the initial content of the favorites array:
init() {let defaults = UserDefaults.standardlet storedFavorites = defaults.object(forKey: "favorites") as? [String]favorites = storedFavorites != nil ? storedFavorites! : []}
As you’ll see shortly, any time we add something to or remove something from this array, we save its contents to the application’s user defaults (which is discussed in detail in Chapter 12) so that the content of the list is preserved over application restarts. In the initializer, we check whether we have a stored favorites list, and if so, we use it to initialize the favorites property. If not, we simply make it empty.
The remaining three methods deal with adding to and removing from the favorites array. The implementations should be self-explanatory. Note that the first two methods both call saveFavorites(), which saves the updated value to the user defaults under the same key (favorites) as the initializer uses to read it. You’ll learn more about how this works in Chapter 12; but for now, it’s enough to know that the UserDefaults (NSUserDefaults) object that we use here acts like a sort of persistent dictionary, and anything that we put in there will be available the next time we ask for it, even if the application has been stopped and restarted.
Note
In Xcode 8 Apple made many of the former NS- objects more user-friendly for use in Swift; for example NSUserDefaults is now UserDefaults.
Creating the Root View Controller
Let’s get started developing our first view controller. In the previous chapter, we used simple arrays of strings to populate our table rows. We’re going to do something similar here, but this time we’ll use the UIFont class to get a list of font families, and then use the names of those font families to populate each row. We’ll also use the fonts themselves to display the font names, so that each row will contain a small preview of what the font family contains.
It’s time to create the first controller class for this application. The template created a view controller for us, but its name—ViewController—isn’t very useful, because there are going to be several view controllers in this application. So first select ViewController.swift in the Project Navigator and press Delete to delete it and move it to the trash. Next, select the Fonts folder in the Project Navigator and press ⌘N to bring up the new file assistant. Select Cocoa Touch Class from the iOS Source section and then click Next. On the following screen, name the new class RootViewController and enter UITableViewControllerfor Subclass of. Click Next and then click Create to create the new class. In the Project Navigator, select RootViewController.swift and add the bold lines in the snippet that follows to add a few properties:
class RootViewController: UITableViewController {private var familyNames: [String]!private var cellPointSize: CGFloat!private var favoritesList: FavoritesList!private static let familyCell = "FamilyName"private static let favoritesCell = "Favorites"
We’ll assign values to the first three of those properties from the onset, and then use them at various times while this class is in use. The familyNames array will contain a list of all the font families we’re going to display; the cellPointSize property will contain the font size that we want to use in all of our table view cells; and favoritesList will contain a pointer to the FavoritesList singleton. The last two are constants that represent the cell identifiers that we will use for the table view cells in this controller.
Set up all of this class’s properties by adding the bold code shown here to the viewDidLoad(), as shown in Listing 9-2.
Listing 9-2. The viewDidLoad Method for the RootViewController.swift File
override func viewDidLoad() {super.viewDidLoad()familyNames = (UIFont.familyNames() as [String]).sorted()let preferredTableViewFont =UIFont.preferredFont(forTextStyle: UIFontTextStyleHeadline)cellPointSize = preferredTableViewFont.pointSizefavoritesList = FavoritesList.sharedFavoritesListtableView.estimatedRowHeight = cellPointSize}
In Listing 9-2, we populated familyNames by asking the UIFont class for all known family names, and then sorting the resulting array. We then used UIFont once again to ask for the preferred font for use in a headline. We did this using a piece of functionality added in iOS 7, which uses a font size setting that can be configured by the user in the Settings app. This dynamic font sizing lets the user set an overall font scaling for system-wide use. Here, we used that font’s pointSize property to establish a baseline font size that we’ll use elsewhere in this view controller. Finally, we grabbed the singleton favorites list object and we set the estimatedRowHeight property of the table view to indicate roughly how tall our table’s rows will be. As it turns out, the table will calculate the correct size for each cell based on the cell’s content, provided that we set this property, leave the table view’s rowHeight property set to its default value of UITableViewAutomaticDimension, and use default table view cells (or use auto layout to construct custom table view cells) .
Before we go on, let’s delete the didReceiveMemoryWarning() method , as well as all of the table view delegate or data source methods that the template gave us—we’re not going to use any of them in this class.
The idea behind this view controller is to show two sections. The first section is a list of all available font families, each of which leads to a list of all the fonts in the family. The second section is for favorites, and contains just a single entry that will lead the user to a list of their favorite fonts. However, if the user has no favorites (for example, when the app is launched for the first time), we’d rather not show that second section at all, since it would just lead the user to an empty list. So, we’ll have to do a few things throughout the rest of this class to compensate for this eventuality. The first of these is to implement this method, which is called just before the root view controller’s view appears on the screen:
override func viewWillAppear(_ animated: Bool) {super.viewWillAppear(animated)tableView.reloadData()}
The reason for this is that there may be times when the set of things we’re going to display might change from one viewing to the next. For example, the user may start with no favorites, but then drill down, view a font, set it as a favorite, and then come back out to the root view. At that time, we need to reload the table view, so that the second section will appear.
Next, we’re going to implement a sort of utility method for use within this class. At a couple of points, while configuring the table view via its data source methods, we’ll need to be able to figure out which font we want to display in a cell. We put that functionality into a method of its own, as shown in Listing 9-3.
Listing 9-3. Figuring out Which Font We Want to Display
func fontForDisplay(atIndexPath indexPath: NSIndexPath) -> UIFont? {if indexPath.section == 0 {let familyName = familyNames[indexPath.row]let fontName = UIFont.fontNames(forFamilyName: familyName).firstreturn fontName != nil ?UIFont(name: fontName!, size: cellPointSize) : nil} else {return nil}}
This method uses the UIFont class to find all the font names for the given family name, and then grab the first font name within that family. We don’t necessarily know that the first named font in a family is the best one to represent the whole family, but it’s as good a guess as any. If the family has no font names, we return nil.
Now, let’s move on to the primary code in this view controller: the table view data source methods. First up, let’s look at the number of sections:
override func numberOfSections(in tableView: UITableView) -> Int {return favoritesList.favorites.isEmpty ? 1 : 2}
We use the favorites list to determine whether we want to show the second section. Next, we tackle the number of rows in each section:
override func tableView(_ tableView: UITableView, numberOfRowsInSection section: Int) -> Int {// Return the number of rows in the section.return section == 0 ? familyNames.count : 1}
That one’s also pretty simple. We just use the section number to determine whether the section is showing all family names, or a single cell linking to the list of favorites. Now let’s define one other method, an optional method in the UITableViewDataSource protocol that lets us specify the title for each of our sections:
override func tableView(_ tableView: UITableView, titleForHeaderInSection section: Int) -> String? {return section == 0 ? "All Font Families" : "My Favorite Fonts"}
This is another straightforward method. It uses the section number to determine which header title to use. The final core method that every table view data source must implement is the one for configuring each cell, and ours looks like Listing 9-4.
Listing 9-4. Our cellForRow (atIndexPath: ) Function
override func tableView(_ tableView: UITableView, cellForRowAt indexPath: IndexPath) -> UITableViewCell {if indexPath.section == 0 {// The font names listlet cell = tableView.dequeueReusableCell(withIdentifier: RootViewController.familyCell, for: indexPath)cell.textLabel?.font = fontForDisplay(atIndexPath: indexPath)cell.textLabel?.text = familyNames[indexPath.row]cell.detailTextLabel?.text = familyNames[indexPath.row]return cell} else {// The favorites listreturn tableView.dequeueReusableCell(withIdentifier: RootViewController.favoritesCell, for: indexPath)}}
When we created this class, we defined two different cell identifiers that we use to load two different cell prototypes from the storyboard (much like we loaded a table cell from a nib file in Chapter 8). We haven’t configured those cell prototypes yet, but we will soon. Next, we use the section number to determine which of those cells we want to show for the current indexPath. If the cell is meant to contain a font family name, then we put the family name into both its textLabel and its detailTextLabel. We also use a font from the family (the one we get from the fontForDisplay(atIndexPath:) method that we added earlier) within the text label, so that we’ll see the font family name shown in the font itself, as well as a smaller version in the standard system font.
Initial Storyboard Setup
Now that we have a view controller that we think should show something, let’s configure the storyboard to make things happen. Select Main.storyboard in the Project Navigator. You’ll see the navigation controller and the table view controller that we added earlier. The first thing we need to configure is the table view controller. By default, the controller’s class is set to UITableViewController. We need to change that to our root view controller class. In the Fonts Scene in the Document Outline, select the yellow icon labeled Fonts, and then use the Identity Inspector to change the view controller’s Class to RootViewController.
The other configuration we’ll need to do right now is to set up a pair of prototype cells to match the cell identifiers we used in our code. From the start, the table view has a single prototype cell. Select it and press ⌘D to duplicate it, and you’ll see that you now have two cells. Select the first one, and then use the Attributes Inspector to set its Style to Subtitle, its Identifier to FamilyName, and its Accessory to Disclosure Indicator. Next, select the second prototype cell, and then set its Style to Basic, its Identifier to Favorites, and its Accessory to Disclosure Indicator. Also, double-click the title shown in the cell itself and change the text from Title to Favorites.
Tip
The prototype cells that we are using in this example both have standard table view cell styles. If you set the Style to Custom, you can design the layout of the cell right in the cell prototype, just like you did when you created a cell in a nib file in Chapter 8.
Now build and run this app, and you should see a nice list of fonts. Scroll around a bit and you’ll see that not all of the fonts produce text of the same height, as shown in Figure 9-8. All of the cells are tall enough to contain their content. If you’ve forgotten why this works, refer back to the discussion of the code we added to the viewDidLoad() method earlier in this section .
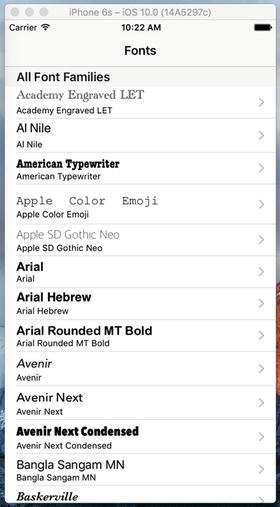
Figure 9-8. The root view controller displays the installed font families
First Subcontroller: The Font List View
Our app currently just shows a list of font families, and nothing more. We want to add the ability for a user to touch a font family and see all the fonts it contains, so let’s make a new view controller that can manage a list of fonts. Create a new Cocoa Touch class called FontListViewControlleras a subclass of UITableViewController. In the Project Navigator, select FontListViewController.swift, and add the following properties:
class FontListViewController: UITableViewController {var fontNames: [String] = []var showsFavorites:Bool = falseprivate var cellPointSize: CGFloat!private static let cellIdentifier = "FontName"
The fontNames property is what we’ll use to tell this view controller what to display. We also created a showsFavorites property that we’ll use to let this view controller know if it’s showing the list of favorites instead of just a list of fonts in a family, since this will be useful later on. We’ll use the cellPointSize property to hold the preferred display size for displaying each font, once again using UIFont to find the preferred size. Finally, cellIdentifier is the identifier used for the table view cells in this controller.
To initialize the cellPointSize property and set the table view’s estimated row height, add the code in Listing 9-5 to the viewDidLoad() method .
Listing 9-5. Our viewDidLoad Method for the FontListViewController.swift File
override func viewDidLoad() {super.viewDidLoad()let preferredTableViewFont =UIFont.preferredFont(forTextStyle: UIFontTextStyleHeadline)cellPointSize = preferredTableViewFont.pointSizetableView.estimatedRowHeight = cellPointSize}
The next thing we want to do is create a little utility method for choosing the font to be shown in each row, similar to what we have in RootViewController. Here it’s a bit different, though. Instead of holding onto a list of font families in this view controller we’re holding onto a list of font names in the fontNames property. We’ll use the UIFont class to get each named font, like this:
func fontForDisplay(atIndexPath indexPath: NSIndexPath) -> UIFont {let fontName = fontNames[indexPath.row]return UIFont(name: fontName, size: cellPointSize)!}
Now it’s time for a small addition in the form of a viewWillAppear()implementation. In RootViewController, we implemented this method in case the list of favorites might change, requiring a refresh. The same applies here. This view controller might be showing the list of favorites, and the user might switch to another view controller, change a favorite (we’ll get there later), and then come back here. We need to reload the table view then, and this method takes care of that, as shown in Listing 9-6.
Listing 9-6. Refreshing the View in Case Something Changes
override func viewWillAppear(_ animated: Bool) {super.viewWillAppear(animated)if showsFavorites {fontNames = FavoritesList.sharedFavoritesList.favoritestableView.reloadData()}}
The basic idea is that this view controller, in normal operation, is passed a list of font names before it displays, and that the list stays the same the whole time this view controller is around. In one particular case (which we’ll see later), this view controller needs to reload its font list.
Moving on, we can delete the numberOfSectionsInTableView() method entirely. We’ll only have one section here, and just skipping that method is the equivalent of implementing it and returning 1. Next, we implement the two other main data source methods, like Listing 9-7.
Listing 9-7. Our dataSource Methods
override func tableView(_ tableView: UITableView, numberOfRowsInSection section: Int) -> Int {// Return the number of rows in the section.return fontNames.count}override func tableView(_ tableView: UITableView, cellForRowAt indexPath: IndexPath) -> UITableViewCell {let cell = tableView.dequeueReusableCell(withIdentifier: FontListViewController.cellIdentifier,for: indexPath)cell.textLabel?.font = fontForDisplay(atIndexPath: indexPath)cell.textLabel?.text = fontNames[indexPath.row]cell.detailTextLabel?.text = fontNames[indexPath.row]return cell}
Neither of these methods really needs any explanation, because they are similar to what we used in RootViewController, but even simpler.
We’ll add some more to this class later, but first we want to see it in action. To make this happen, we’ll need to configure the storyboard some more, and then make some modifications to RootViewController. Switch over to Main.storyboard to get started.
Creating the Font List Storyboard
The storyboard currently contains a table view controller that displays the list of font families, embedded inside a navigation controller. We need to add one new layer of depth to incorporate the view controller that will display the fonts for a given family. Find a Table View Controller in the Object Library and drag one out into the editing area, to the right of the existing table view controller. Select the new table view controller and use the Identity Inspector to set its class to FontListViewController. Select the prototype cell in the table view and open the Attributes Inspector to make some adjustments. Change its Style to Subtitle, its Identifier to FontName, and its Accessory to Detail Disclosure. Using the detail disclosure accessory will let rows of this type respond to two kinds of taps so that users can trigger two different actions, depending on whether they tap the accessory or any other part of the row.
One way to make a user action in one view controller cause the instantiation and display of another view controller is to create a segue connecting the two of them. This is probably an unfamiliar word for many people, so let’s get this out of the way: segue essentially means “transition.” It is sometimes used by writers and filmmakers to describe making a smooth movement from one paragraph or scene to the next. Apple could have been a little straightforward and just called it a transition; but since that word appears elsewhere in the UIKit APIs, maybe Apple decided to use a distinct term to avoid confusion. I should also mention here that the word “segue” is pronounced exactly the same as the name of the Segway personal transportation product (and now you know why the Segway is called what it is).
Often, segues are created entirely within Interface Builder. The idea is that an action in one scene can trigger a segue to load and display another scene. If you’re using a navigation controller, the segue can push the next controller onto the navigation stack automatically. We’ll be using this functionality in our app, starting right now.
In order for the cells in the root view controller to make the Font List View Controller appear, you need to create a couple of segues connecting the two scenes. This is done simply by Control-dragging from the first of the two prototype cells in the Fonts scene over to the new scene; you’ll see the entire scene highlight when you drag over it, indicating it’s ready to connect, as shown in Figure 9-9.
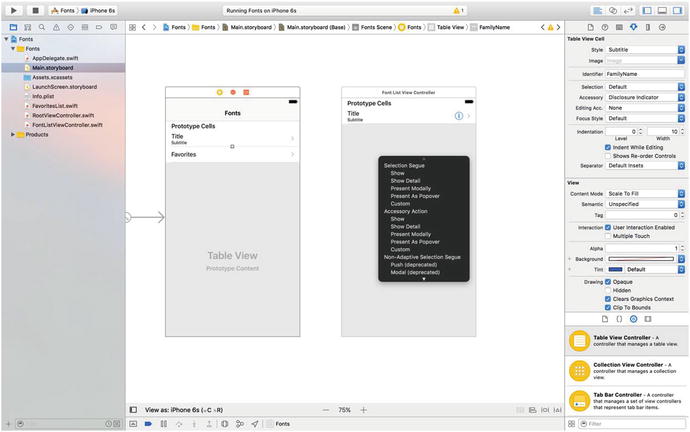
Figure 9-9. Creating a show segue from the font list controller to the font names controller
Release the mouse button and select Show from the Selection Segue section of the pop-up menu that appears. Now do the same for the other prototype cell. Creating these segues means that as soon as the user taps any of these cells, the view controller at the other end of the connection will be allocated and made ready.
Making the Root View Controller Prepare for Segues
Save your changes and switch back to RootViewController.swift. Note that we’re not talking about our latest class, FontListViewController, but instead its “parent” controller. This is the place where you’ll need to respond to the user’s touches in the root table view by preparing the new FontListViewController (specified by one of the segues you just created) for display and by passing it the values it needs to display.
The actual preparation of the new view controller is done using the prepareForSegue(_:sender:) method. Add an implementation of this method, as shown in Listing 9-8.
Listing 9-8. Preparing the New View Controller for Display
// MARK: - Navigationoverride func prepare(for segue: UIStoryboardSegue, sender: AnyObject?) {// Get the new view controller using [segue destinationViewController].// Pass the selected object to the new view controller.let indexPath = tableView.indexPath(for: sender as! UITableViewCell)!let listVC = segue.destinationViewController as! FontListViewControllerif indexPath.section == 0 {// Font names listlet familyName = familyNames[indexPath.row]listVC.fontNames = (UIFont.fontNames(forFamilyName: familyName) as [String]).sorted()listVC.navigationItem.title = familyNamelistVC.showsFavorites = false} else {// Favorites listlistVC.fontNames = favoritesList.favoriteslistVC.navigationItem.title = "Favorites"listVC.showsFavorites = true}}
This method uses the sender (the UITableViewCell that was tapped) to determine which row was tapped and asks the segue for its destinationViewController, which is the FontListViewController instance that is about to be displayed. We then pass some values along to the new view controller, depending on whether the user tapped a font family (section 0) or the favorites cell (section 1). As well as setting the custom properties for the target view controller, we also access the controller’s navigationItem property in order to set its title. The navigationItem property is an instance of UINavigationItem, which is a UIKit class that contains information about what should be displayed in the navigation bar for any given view controller.
Now run the app. You’ll see that touching the name of any font family shows you a list of all the individual fonts it contains (see Figure 9-10). Furthermore, you can tap the Fonts label in the header of the fonts list navigation controller to go back to its parent controller to select another font.
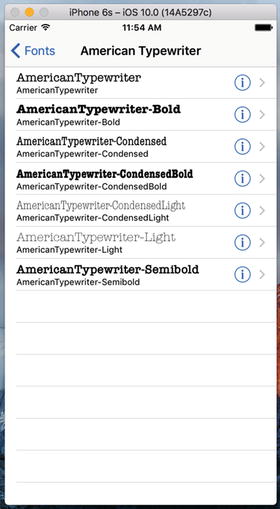
Figure 9-10. Showing the individual fonts contained in a font family
Creating the Font Sizes View Controller
What you’ll notice, however, is that the app currently doesn’t let you go any further. Figures 9-4 and 9-5 show additional screens that let you view a chosen font in various ways; we’re not there yet. But soon, we will be! Let’s create the view shown in Figure 9-4, which shows multiple font sizes at once. Using the same steps as you used to create FontListViewController, add a new view controller that subclasses UITableViewController, and name it FontSizesViewController. The only parameter this class will need from its parent controller is a font. We’ll also need a couple of private properties.
For starters, switch over to FontSizesViewController.swift and go ahead and delete the didReceiveMemoryWarning and numberOfSectionsInTableView: methods, along with all of the commented-out methods at the bottom. Again, you’re not going to need any of those. Now add the following properties at the top of the class definition:
import UIKitclass FontSizesViewController: UITableViewController {var font: UIFont!private static let pointSizes: [CGFloat] = [9, 10, 11, 12, 13, 14, 18, 24, 36, 48, 64, 72, 96, 144]private static let cellIdentifier = "FontNameAndSize"
The font property will be set by FontListViewController before it pushes this view controller onto the navigation controller’s stack. The pointSizes property is an array of point sizes in which the font will be displayed. We also need the following utility method, which gets a version of a font with a given size, based on a table row index:
func fontForDisplay(atIndexPath indexPath: NSIndexPath) -> UIFont {let pointSize = FontSizesViewController.pointSizes[indexPath.row]return font.withSize(pointSize)}
We also need to set the table view’s estimatedRowHeight property so that the table will automatically calculate the correct row heights for each row based on what it contains. To do that, add the following line to the viewDidLoad() method:
tableView.estimatedRowHeight = FontSizesViewController.pointSizes[0] It doesn’t actually matter what value we assign to this property, so we arbitrarily choose to use the smallest font point size that the table will need to display.
For this view controller, we’re going to skip the method that lets us specify the number of sections to display, since we’re going to just use the default number (1). However, we must implement the methods for specifying the number of rows and the content of each cell. Those two methods are shown in Listing 9-9.
Listing 9-9. The dataSource Methods for the FontSizeViewController Table View
// MARK: - Table view data sourceoverride func tableView(_ tableView: UITableView, numberOfRowsInSection section: Int) -> Int {return FontSizesViewController.pointSizes.count}override func tableView(_ tableView: UITableView, cellForRowAt indexPath: IndexPath) -> UITableViewCell {let cell = tableView.dequeueReusableCell(withIdentifier: FontSizesViewController.cellIdentifier,for: indexPath)cell.textLabel?.font = fontForDisplay(atIndexPath: indexPath)cell.textLabel?.text = font.fontNamecell.detailTextLabel?.text ="(FontSizesViewController.pointSizes[indexPath.row]) point"return cell}
There’s really nothing in any of these methods we haven’t seen before, so let’s move on to setting up the Storyboard for our user interface.
Creating the Font Sizes View Controller Storyboard
Go back to Main.storyboard and drag another Table View Controller into the editing area. Use the Identity Inspector to set its class to FontSizesViewController. You’ll need to make a segue connection from its parent, the FontListViewController. So find that controller and Control-drag from its prototype cell to the newest view controller, and then select Show from the Selection Segue section of the pop-up menu that appears. Next, select the prototype cell in the new scene you just added, and then use the Attributes Inspector to set its Style to Subtitle and its Identifier to FontNameAndSize.
Implementing the Font Sizes View Controller Prepare for Segue
Now, just like the last time we extended our storyboard’s navigation hierarchy, we need to jump up to the parent controller so that it can configure its child. That means we need to go to FontListViewController.swift and implement the prepareForSegue(_:sender:) method, as shown in Listing 9-10.
Listing 9-10. The FontListViewsController’s preparedForSeque Method
// MARK: - Navigationoverride func prepare(for segue: UIStoryboardSegue, sender: AnyObject?) {// Get the new view controller using [segue destinationViewController].// Pass the selected object to the new view controller.let tableViewCell = sender as! UITableViewCelllet indexPath = tableView.indexPath(for: tableViewCell)!let font = fontForDisplay(atIndexPath: indexPath)let sizesVC = segue.destinationViewController as! FontSizesViewControllersizesVC.title = font.fontNamesizesVC.font = font}
That probably all looks pretty familiar by now, so we won’t dwell on it further.
Run the app, select a font family, select a font (by tapping a row anywhere except the accessory on the right), and you’ll now see the multisize listing shown in Figure 9-11.
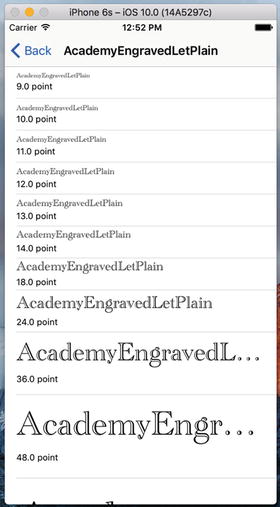
Figure 9-11. Our multisize table view list
Creating the Font Info View Controller
The final view controller we’re going to create is the one shown in Figure 9-5. This one isn’t based on a table view. Instead, it features a large text label, a slider for setting text size, and a switch for toggling whether the font that it uses should be included in the list of favorites. Create a new Cocoa Touch class in your project using UIViewControlleras the superclass, and then name it FontInfoViewController. Like most of the other controllers in this app, this one needs to have a couple of parameters passed in by its parent controller. Enable this by defining these properties and four outlets that we’ll use when we construct the user interface in FontInfoViewController.swift:
class FontInfoViewController: UIViewController {var font: UIFont!var favorite: Bool = false@IBOutlet weak var fontSampleLabel: UILabel!@IBOutlet weak var fontSizeSlider: UISlider!@IBOutlet weak var fontSizeLabel: UILabel!@IBOutlet weak var favoriteSwitch: UISwitch!
Next, implement viewDidLoad() and a pair of action methods that will be triggered by the slider and switch, respectively, as shown in Listing 9-10.
Listing 9-10. Our viewDidLoad(), slider, and switch Methods
override func viewDidLoad() {super.viewDidLoad()// Do any additional setup after loading the view.fontSampleLabel.font = fontfontSampleLabel.text ="AaBbCcDdEeFfGgHhIiJjKkLlMmNnOoPpQqRrSsTtUuVv"+ "WwXxYyZz 0123456789"fontSizeSlider.value = Float(font.pointSize)fontSizeLabel.text = "(Int(font.pointSize))"favoriteSwitch.isOn = favorite}@IBAction func slideFontSize(slider: UISlider) {let newSize = roundf(slider.value)fontSampleLabel.font = font.withSize(CGFloat(newSize))fontSizeLabel.text = "(Int(newSize))"}@IBAction func toggleFavorite(sender: UISwitch) {let favoritesList = FavoritesList.sharedFavoritesListif sender.isOn {favoritesList.addFavorite(fontName: font.fontName)} else {favoritesList.removeFavorite(fontName: font.fontName)}}
These methods are all pretty straightforward. The viewDidLoad() method sets up the display based on the chosen font; slideFontSize() changes the size of the font in the fontSampleLabel label based on the value of the slider; and toggleFavorite() either adds the current font to the favorites list or removes it from the favorites list, depending on the value of the switch.
Creating the Font Info View Controller Storyboard
Now head back over to Main.storyboard to build the GUI for this app’s final view controller. Use the Object Library to find a plain View Controller. Drag it into the editing area and use the Identity Inspector to set its class to FontInfoViewController. Next, use the Object Library to find some more objects and drag them into your new scene. You need three labels, a switch, and a slider. Lay them out roughly, as shown in Figure 9-12. Don’t worry about adding auto layout constraints yet—we’ll do that later.
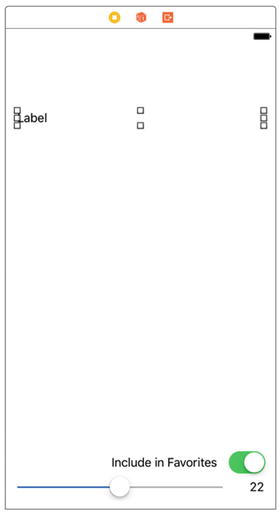
Figure 9-12. Label, switch, and slider layout
Notice that we left some space above the upper label, since we’re going to end up having a navigation bar up there. Also, we want the upper label to be able to display long pieces of text across multiple lines, but by default the label is set to show only one line. To change that, select the label, open the Attributes Inspector, and set the number in the Lines field to 0.
Figure 9-12 also shows changed text in the lower two labels. Go ahead and make the same changes yourself. What you can’t see here is that the Attributes Inspector was used to right-align the text in both of them. You should do the same, since they will both have layout constraints that essentially tie them to their right edges. Also, select the slider at the bottom, and then use the Attributes Inspector to set its Minimum to 1 and its Maximum to 200.
Now it’s time to wire up all the connections for this GUI. Start by selecting the view controller and opening the Connections Inspector. When we have so many connections to make, the overview shown by that inspector is pretty nice. Make connections for each of the outlets by dragging from the small circles next to favoriteSwitch, fontSampleLabel, fontSizeLabel, and fontSizeSlider to the appropriate objects in the scene. In case it’s not obvious, fontSampleLabel should be connected to the label at the top, fontSizeLabel to the label at the bottom right, and the favoriteSwitch and fontSizeSlider outlets to the only places they can go. To connect the actions to the controls, you can continue to use the Connections Inspector. In the Received Actions section of the Connections Inspector for the view controller, drag from the little circle next to slideFontSize: over to the slider, release the mouse button, and select Value Changed from the context menu that appears. Next, drag from the little circle next to toggleFavorite: over to the switch and again select Value Changed. The connections should look as shown in Figure 9-13.

Figure 9-13. The completed connections for our Font Info View Controller Storyboard
One more thing we need to do here is create a segue so that this view can be shown. Remember that this view is going to be displayed whenever a user taps the detail accessory (the little blue “i” in a circle) when the Font List View Controller is displayed. So, find that controller, Control-drag from its prototype cell to the new font info view controller you’ve been working on, and select Show from the Accessory Action section of the context menu that appears. Note that we just said Accessory Action, not Selection Segue (see Figure 9-14). The accessory action is the segue that is triggered when the user taps the detail accessory, whereas the selection segue is the segue that is triggered by a tap anywhere else in the row. We already set this cell’s selection segue to open a FontSizesViewController.
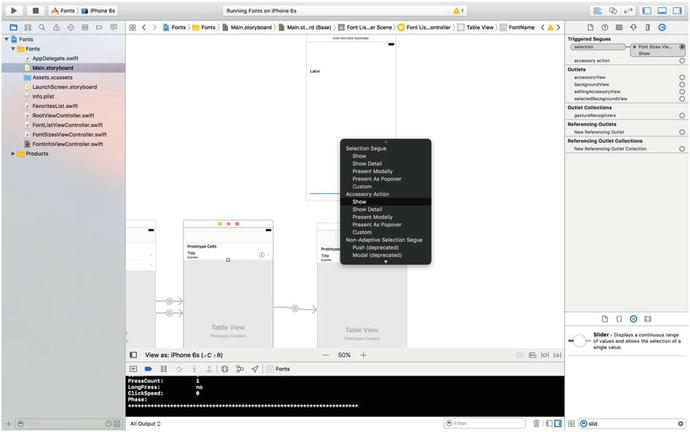
Figure 9-14. Setting the Accessory Action Show Segue
Now we have two different segues that can be triggered by touches in different parts of a row. Since these will present different view controllers, with different properties, we need to have a way to differentiate them. Fortunately, the UIStoryboardSegue class, which represents a segue, has a way to accomplish this: we can use an identifier, just as we do with table view cells.
All you have to do is select a segue in the editing area and use the Attributes Inspector to set its Identifier. You may need to shift your scenes around a bit, so that you can see both of the segues that are snaking their way out of the right-hand side of the Font List View Controller. Select the one that’s pointing at the Font Sizes View Controller and set its Identifier to ShowFontSizes. Next, select the one that’s pointing at the Font Info View Controller and set its Identifier to ShowFontInfo , as shown in Figure 9-15.
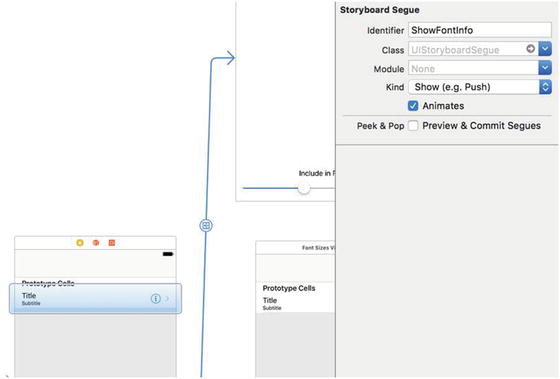
Figure 9-15. Identifying the segues
Setting Up Constraints
Setting up that segue lets Interface Builder know that our new scene will be used within the context of the navigation controller like everything else, so it automatically receives a blank navigation bar at the top. Now that the real confines of our view are in place, it’s a good time to set up the constraints. This is a fairly complex view with several subviews, especially near the bottom, so we can’t quite rely on the system’s automatic constraints to do the right thing for us. We’ll use the Pin button at the bottom of the editing area and the pop-up window it triggers to build most of the constraints we’ll need.
Start with the uppermost label. If you placed it too close to the top, first drag it down until it’s a comfortable distance below the navigation bar. Click Pin, and then, in the pop-up window, select the little red bars above, to the left, and to the right of the little square—but not the one below it. Now click the Add 3 Constraints button at the bottom.
Next, select the slider at the bottom and click the Pin button. This time, select the red bars below, to the left, and to the right of the little square—but not the one above it. Again, click Add 3 Constraints to put them in place.
For each of the two remaining labels and for the switch, follow this procedure: select the object, click Pin, select the red bars below and to the right of the little square, turn on the check boxes for Width and Height, and finally, click Add 4 Constraints. Setting those constraints for all three of those objects will bind them to the lower-right corner.
There’s just one more constraint to make. We want the top label to grow to contain its text, but to never grow so large that it overlaps the views at the bottom. We can accomplish this with a single constraint. Control-drag from the upper label to the Include in favorites label, release the mouse button, and select Vertical Spacing from the context menu that appears. Next, click the new constraint to select it (it’s a blue vertical bar connecting the two labels) and open the Attributes Inspector, where you’ll see some configurable attributes for the constraint. Change the Relation pop-up to Greater Than or Equal, and then set the Constant value to 10. That ensures that the expanding upper label won’t push past the other views at the bottom .
Adapting the Font List View Controller for Multiple Segues
Now head back over to good old FontListViewController.swift. Since this class will now be able to trigger segues to two different child view controllers, you need to adapt the prepareForSegue(_:sender:) method, as shown in Listing 9-11.
Listing 9-11. Handling Multiple Segues
// MARK: - Navigationoverride func prepare(for segue: UIStoryboardSegue, sender: AnyObject?) {// Get the new view controller using [segue destinationViewController].// Pass the selected object to the new view controller.let tableViewCell = sender as! UITableViewCelllet indexPath = tableView.indexPath(for: tableViewCell)!let font = fontForDisplay(atIndexPath: indexPath)if segue.identifier == "ShowFontSizes" {let sizesVC = segue.destinationViewController as! FontSizesViewControllersizesVC.title = font.fontNamesizesVC.font = font} else {let infoVC = segue.destinationViewController as! FontInfoViewControllerinfoVC.title = font.fontNameinfoVC.font = fontinfoVC.favorite =FavoritesList.sharedFavoritesList.favorites.contains(font.fontName)}}
Build and run the app to see how things worked out. Select a font family that contains many fonts (for example, Gill Sans), and then tap the middle of the row for any font. You’ll be taken to the same list you saw earlier, which shows the font in multiple sizes. Press the navigation button at the upper left (it’s labeled Gill Sans) to go back, and then tap another row; however, this time tap on the right-hand side where the detail accessory is shown. This should bring up the final view controller, which shows a sample of the font with a slider at the bottom that lets you pick whatever size you want.
Also, you can now use the Include in favorites switch to mark this font as a favorite. Do that, and then hit the navigation button at the top-left corner a couple of times to get back to the root controller view .
My Favorite Fonts
Scroll down to the bottom of the root view controller and you’ll see something new: the My Favorite Fonts section is now there. Selecting it shows you a list of all the favorite fonts that have been selected so far, as shown in Figure 9-16.
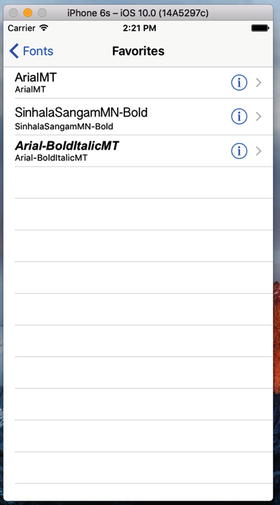
Figure 9-16. The list of favorite fonts selected so far
Adding Features
Now the basic functionality of our app is complete. But before we can really call it a day, there are a couple more features we should implement. If you’ve been using iOS for a while, you’re probably aware that you can often delete a row from a table view by swiping from right to left. For example, in Mail you can use this technique to delete a message in a list of messages. Performing this gesture brings up a small GUI, right inside the table view row. This GUI asks you to confirm the deletion, and then the row disappears and the remaining rows slide up to fill the gap. That whole interaction—including handling the swipe, showing the confirmation GUI, and animating any affected rows—is taken care of by the table view itself. All you need to do is implement two methods in your controller to make it happen.
Also, the table view provides easy-to-use functionality that lets the user reorder rows within a table view by dragging them up and down. As with swipe-to-delete, the table view takes care of the entire user interaction for us. All we have to do is one line of setup (to create a button that activates the reordering GUI), and then implement a single method that is called when the user has finished dragging .
Implementing Swipe-to-Delete
In this app, the FontListViewController class is a typical example of where this feature should be used. Whenever the app is showing the list of favorites, we should let the user delete a favorite with a swipe, saving them the step of tapping the detail accessory and then turning off the switch. Select FontListViewController.swift in Xcode to get started. Start by adding an implementation of the tableView(_:canEditRowAt: indexPath:) method:
override func tableView(_ tableView: UITableView, canEditRowAt indexPath: IndexPath) -> Bool {return showsFavorites}
That method will return true if it’s showing the list of favorites, and false otherwise. This means that the editing functionality that lets you delete rows is only enabled while displaying favorites. If you were to try to run the app and delete rows with just this change, you wouldn’t see any difference. The table view won’t bother to deal with the swipe gesture because it sees that we haven’t implemented the other method that is required to complete a deletion. So, let’s put that in place, too. Add an implementation for the tableView(_:commitEditingStyle:forRowAtIndexPath:) method as in Listing 9-12.
Listing 9-12. Allowing the deletion of rows from our favorites list
override func tableView(_ tableView: UITableView, commit editingStyle: UITableViewCellEditingStyle, forRowAt indexPath: IndexPath) {if !showsFavorites {return}if editingStyle == UITableViewCellEditingStyle.delete {// Delete the row from the data sourcelet favorite = fontNames[indexPath.row]FavoritesList.sharedFavoritesList.removeFavorite(fontName: favorite)fontNames = FavoritesList.sharedFavoritesList.favoritestableView.deleteRows(at: [indexPath],with: UITableViewRowAnimation.fade)}}
This method is called when an editing action in the table is being completed. It’s pretty straightforward, but there are some subtle things going on. The first thing we do is check to make sure we’re showing the favorites list and if not, we just bail. Normally, this should never happen, since we specified with the previous method that only the favorites list should be editable. Nevertheless, we’re doing a bit of defensive programming here. After that, we check the editing style to make sure that the particular edit operation we’re going to conclude really was a deletion. It’s possible to do insertion edits in a table view, but not without additional setup that we’re not doing here, so we don’t need to worry about that case. Next, we determine which font should be deleted, remove it from our FavoritesList singleton, and update our local copy of the favorites list .
Finally, we tell the table view to delete the row and make it disappear with a visual fade animation. It’s important to understand what happens when you tell the table view to delete a row. Intuitively, you might think that calling that method would delete some data, but that’s not what happens. In fact, we’ve already deleted the data! This final method call is really our way of telling the table view, “Hey, I’ve made a change, and I want you to animate away this row. Ask me if you need anything more.” When that happens, the table view will start animating any rows that are below the deleted row by moving them up, which means that it’s possible that one or more rows that were previously off-screen will now come on-screen, at which time it will indeed ask the controller for cell data via the usual methods. For that reason, it’s important that our implementation of the tableView(_:commitEditingStyle:forRowAtIndexPath:) method makes necessary changes to the data model (in this case, the FavoritesList singleton) before telling the table view to delete a row.
Build and run the app again, make sure you have some favorite fonts set up, and then go into the Favorites list and delete a row by swiping from right to left. The row slides partly off-screen, and a Delete button appears on the right (see Figure 9-17). Tap the Delete button so that the row disappears.

Figure 9-17. A favorite font row with the Delete button showing
Implementing Drag-to-Reorder
The final feature we’re going to add to the font list will let users rearrange their favorites just by dragging them up and down. In order to accomplish this, we’re going to add one method to the FavoritesList class, which will let us reorder its items however we want. Open FavoritesList.swift and add the following method:
func moveItem(fromIndex from: Int, toIndex to: Int) {let item = favorites[from]favorites.remove(at: from)favorites.insert(item, at: to)saveFavorites()}
This new method provides the underpinnings for what we’re going to do. Now select FontListViewController.swift and add the following lines at the end of the viewDidLoad method:
if showsFavorites {navigationItem.rightBarButtonItem = editButtonItem()}
I’ve mentioned the navigation item. It’s an object that holds the information about what should appear in the navigation bar for a view controller. It has a property called rightBarButtonItem that can hold an instance of UIBarButtonItem, a special sort of button meant only for navigation bars and tool bars. Here, we’re pointing that at editButtonItem, a property of UIViewController that gives us a special button item that’s preconfigured to activate the table view’s editing/reordering GUI: .
With that in place, try running the app again and go into the Favorites list. You’ll see that there’s now an Edit button in the upper-right corner. Pressing that button toggles the table view’s editing GUI, which right now means that each row acquires a delete button on the left, while its content slides a bit to the right to make room (see Figure 9-18). This enables yet another way that users can delete rows, using the same methods we already implemented.
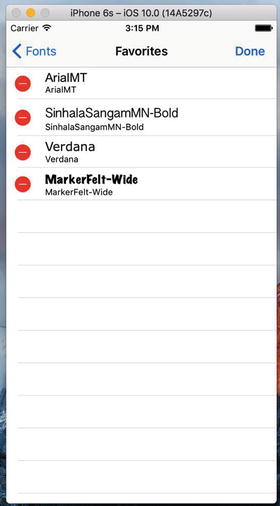
Figure 9-18. We’ve added the Edit feature in our favorites table
But our main interest here is in adding reordering functionality. For that, all we need to do is add the following method in FontListViewController.swift:
override func tableView(_ tableView: UITableView, moveRowAt sourceIndexPath: IndexPath, to destinationIndexPath: IndexPath) {FavoritesList.sharedFavoritesList.moveItem(fromIndex: sourceIndexPath.row,toIndex: destinationIndexPath.row)fontNames = FavoritesList.sharedFavoritesList.favorites:}
This method is called as soon as the user finishes dragging a row. The arguments tell us which row was moved and where it ended up. All we do here is tell the FavoritesList singleton to do the same reordering of its content, and then refresh our list of font names, just as we did after deleting an item. To see this in action, run the app, go into the Favorites list, and tap the Edit button. You’ll see that the edit mode now includes little “dragger” icons on the right side of each row, which you can use to rearrange items.
Summary
Although we worked a lot with table views in this chapter, our focus has really been on the use of navigation controllers and how we drill down into hierarchical content in a limited width space as we might have on most iPhone devices, especially in portrait orientation.
We created a font list view application that showed us not only how to drill down into more detailed views, but how to handle multiple segues from a single table view cell as we did with looking at either font sizes or font information.
Finally, we looked at tweaking our table views a bit to include the capabilities of deleting and moving rows within the view.