Chapter 18. Accounts (and Signing In)
For years, teachers, parents, tech directors, and computer lab instructors struggled to answer two difficult questions: How do you rig one PC so several different people can use it throughout the day without interfering with one another’s files and settings? And how do you protect a PC from getting fouled up by mischievous (or bumbling) students and employees?
Easy: Use a multiple-user operating system like Windows. Anyone who uses the computer must sign in—supply a name and password—when the computer turns on.
Since the day you installed Windows 10 or fired up a new Windows 10 machine, you’ve probably made a number of changes to your setup—fiddled with your Start menu, changed the desktop wallpaper, added some favorites to your web browser, downloaded files onto your desktop, and so on—without realizing that you were actually making these changes only to your account.
Ditto with your web history and cookies, Control Panel settings, email stash, and so on. It’s all part of your account.
If you create an account for a second person, then when she turns on the computer and signs in, she’ll find the desktop looking the way it was factory-installed by Microsoft: basic Start menu, standard desktop picture, default web browser home page, and so on. She can make the same kinds of changes to the device that you’ve made, but nothing she does will affect your environment the next time you sign on.
In other words, the multiple-accounts feature has two benefits: first, the convenience of hiding everyone else’s junk and, second, security that protects both the PC’s system software and everyone’s work.
Behind the scenes, Windows stores all these files and settings in a single folder—your personal folder, the one that bears your name. (Technically, your personal folder is in the This PC ![]() Local Disk (C:)
Local Disk (C:) ![]() Users folder.)
Users folder.)
Note:
Even if you don’t share your PC with anyone and don’t create any other accounts, you might still appreciate this feature because it effectively password-protects the entire computer. Your PC is safe from unauthorized casual fiddling when you’re away from your desk (or if your laptop is stolen)—especially if you tell Windows to require your sign-in password anytime the screen saver has kicked in (“Screen Savers”).
If you’re content simply to use Windows, that’s really all you need to know about accounts. If, on the other hand, you’ve shouldered some of the responsibility for administering Windows machines—if it’s your job to add and remove accounts, for example—read on.
Local Accounts vs. Microsoft Accounts
For most of Windows’ history, any account you created on your PC was a local account, meaning stored on the computer itself. All your stuff—your files, email, settings, passwords—sat on the PC itself.
Seems obvious, right? Where else would you store all those details?
Today, there’s an answer to that: online.
In Windows 10, you have the option to have Microsoft store your account details online (“in the cloud,” as the marketing people might say). You don’t sign in with a name like “Fizzywinks”; instead, you sign in with an email address that you’ve registered with Microsoft. If your name and password match, you’ve just succeeded in signing in with your Microsoft account instead of with a local one.
And why is that a good thing? Because it means you can sign into any Windows 8 or 10 computer anywhere—your other laptop, a friend’s PC, another company’s—and find yourself instantly at home. You won’t have your files, music collection, and movies, of course (unless you’ve stored them on your OneDrive). But you will find every possible account-related element ready and waiting, even on a computer you’ve never used before. Here’s what you’ll find:
Your email, Twitter, Facebook, LinkedIn, Hotmail, and other accounts. You’re supposed to link these to your Microsoft account. After that, no matter what computer you use, your People app, Skype program, and other address books will always be up to date and fully loaded.
Your online photos. Once again, your Microsoft account can store your links to services like Flickr and Facebook, so their contents are automatically available when you sign into any Windows 8 or 10 machine.
Your OneDrive. Any files you’ve stashed on OneDrive (“OneDrive”) are available to you.
Your settings. Here are your wallpaper, color scheme, Cortana settings, and many other settings. Many programs store their settings as part of your Microsoft account, too.
Your Xbox world. As described in “Xbox”, Windows 10 can show you all the details of your online Xbox universe; let you play an Xbox game on your computer; and let you play certain games against someone with an Xbox (while you’re on a Windows 10 machine). All that requires a Microsoft account.
Your web world. Your browser bookmarks (Favorites), browsing history, and even stored website passwords will be there waiting for you in Edge.
Note:
Your passwords don’t get synced until you make each computer a “trusted PC.” When you first sign into a new Windows 8 or 10 computer, a message asks if you want to “Trust this PC.” If you do, you’re asked to confirm that this is your message account by replying to an email or text message.
Your Microsoft Store apps. You can install a Microsoft Store app on up to 81 Windows machines. They don’t show up automatically when you sign into a brand-new computer, but you can open the Microsoft Store app and click “Your apps” to re-download them.
A Microsoft account is also, of course, your Microsoft wallet; you can use your Microsoft ID to buy apps, music, videos, and games from Microsoft. It’s also what you use to sign in if you have an Xbox (possible) or a Windows Phone (unlikely).
In fact, you can’t download new Microsoft Store apps from the app store at all without a Microsoft account!
A Microsoft account still lets you into your PC when you don’t have an Internet connection. You can turn off as many of the syncing features as you like, for privacy’s sake. The company swears it won’t send anything to the email address you use. And it’s free. In general, it’s the best way to sign into Windows.
And what about the alternative—a local account? If you have only one computer (and therefore don’t need the syncing business) and don’t plan to buy anything online, it’s fine, too. In fact, Windows 10 is much kinder to local accounts than Windows 8 was; for example, you can now use the built-in apps like Mail, Calendar, and People without having a Microsoft account.
You can always convert any account from Microsoft to local or vice versa.
Accounts Central
To set up and survey your computer’s accounts, open ![]() →
→![]() →Accounts. You see the panel shown in Figure 18-1.
→Accounts. You see the panel shown in Figure 18-1.
Here are all the accounts you’ve created so far. Here, too, is where you can create new accounts, edit the ones you’ve already made, or delete them, as described in the following pages.
First, though, it’s important to understand the differences between the two account types you may see in Settings: Administrator and Standard. Read on.
The Types of Accounts
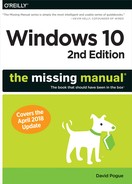
On your own personal PC, the word “Administrator” probably appears under your name in the panel shown in Figure 18-1. As it turns out, that’s one of two kinds of accounts you can create.
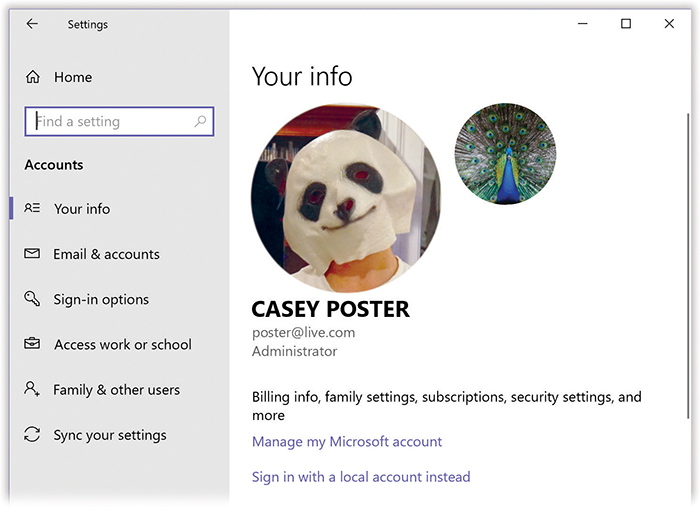
Figure 18-1. Here’s the Accounts panel of Settings, where the Accounts adventure begins. As you can see, under this person’s name, it says “Administrator,” meaning that the full world of account settings are available for changing. Microsoft takes it on faith that this person has a clue.
Administrator accounts
Because you’re the person who installed Windows, the PC assumes that you’re one of its administrators—the technical wizards who will be in charge of it. You’re the teacher, the parent, the resident . You’re the one who will maintain this PC and who will be permitted to make system-wide changes to it.
You’ll find settings all over Windows (and all over this book) that only people with Administrator accounts can change. For example, only an administrator is allowed to do the following:
Create or delete accounts and passwords.
Make changes to certain Control Panel programs.
See and manipulate any file on the machine.
Install new desktop programs (and certain hardware components).
Standard accounts
There’s another kind of account, too, for people who don’t have to make those kinds of changes: the Standard account.
Now, for years, people doled out Administrator accounts pretty freely. You know: The parents got Administrator accounts, the kids got Standard ones.
The trouble is, an Administrator account is a kind of security hole. Anytime you’re signed in with this kind of account, any nasty software you may have caught from the Internet is also, in effect, signed in—and can make changes to important underlying settings on your PC, just the way a human administrator can.
Put another way: A virus you’ve downloaded while running a Standard account will have a much harder time infecting the rest of the machine than one you downloaded while using an Administrator account.
Today, therefore, Microsoft recommends that everyone use Standard accounts—even you, the wise master and owner of the computer!
So how are you supposed to make important Settings changes, install new programs, and so on?
That’s gotten a lot easier. Using a Standard account no longer means you can’t make important changes. In fact, you can do just about everything on the PC that an Administrator account holder can—if you know the password of a true Administrator account.
Note:
Every Windows 10 PC can (and must) keep at least one Administrator account on hand, even if that account is rarely used.
Whenever you try to make a big change, you’re asked to authenticate yourself. As described in “Authenticate Yourself: User Account Control”, that means supplying an Administrator account’s password, even though you, the currently-signed-in person, are a lowly Standard account holder.
If you have a Standard account because you’re a student, a child, or an employee, you’re supposed to call an administrator over to your PC to approve the change you’re making. (If you’re the PC’s owner, but you’re using a Standard account for security purposes, you know the administrator password, so it’s no big deal.)
Now, making broad changes to a PC when you’re an administrator still presents you with those “prove yourself worthy” authentication dialog boxes. The only difference is that you, the administrator, can click Continue (or tap Enter) to bypass them, rather than having to type in a password.
You’ll have to weigh this security/convenience trade-off. But you’ve been warned: The least vulnerable PC is one on which everyone uses a Standard account.
Adding an Account
To create a new account, open ![]() →
→![]() →Accounts. The top tab, “Your info,” represents your account information—the account Windows created when you installed it (Figure 18-1).
→Accounts. The top tab, “Your info,” represents your account information—the account Windows created when you installed it (Figure 18-1).
Select “Family & other people.” If you see some accounts listed here, then one of these situations probably applies:
You created them when you installed Windows 10, as described in Appendix A.
You bought a new computer with Windows preinstalled and created several accounts when asked to do so the first time you turned on the machine.
You upgraded from an earlier version of Windows, and Windows 10 gracefully imported all your existing accounts.
The steps for adding another account depend on whether it’s for a family member or not. What’s the difference? Well, if it’s a family member, then when you sign into any other Windows 10 computer, the rest of your family’s accounts will appear on that machine, too, ready to use.
Also, if it’s a family member who’s a kid, you’ll get periodic email reports on what he’s been doing with his computer time, as described in “Family Safety (Parental Controls)”.
Finally, a family member must sign in with a Microsoft account, as described in “Local Accounts vs. Microsoft Accounts”. If you want to create a local account, you have to use the “Other users” option described in a moment.
Adding a Family Member
Let’s start with the steps for adding a family member. Assuming that you are, in fact, signed in with an Administrator account, start at ![]() →
→![]() →Accounts→“Family & other people.” Figure 18-2, top, shows you what this screen looks like.
→Accounts→“Family & other people.” Figure 18-2, top, shows you what this screen looks like.
Note:
Your Settings screens may refer to either “people” or “users,” but the steps are the same either way.
Select “Add a family member.” Now you see the screen shown at bottom in Figure 18-2.
Choose either “Add a child” or “Add an adult,” and then enter the email address for that person’s Microsoft account.
If this relative of yours has no email address: Choose “The person I want to add doesn’t have an email address.” You’ll be given the chance to create a free Outlook.com email address, which will become this person’s Microsoft account.
If this person has an email address but it’s not a Microsoft account: When you click Next, a “Sign up for a new one” link appears. Click it to enter your name, birthday, country, and a password, thus turning this person’s existing email address into a Microsoft account.
In both cases, the “See what’s most relevant to them” screen appears—it would be better named, “Please let us bombard you with junk email.” The first checkbox asks permission to use this person’s data to customize the ads she sees online; the second signs her up to get junk email from Microsoft. For most people, turning off both boxes is the smartest move.
You wind up on the “Your family” screen again (Figure 18-2, top), where your new family member’s email address—a Microsoft account—appears in place. You’ve created the account! The new family member is now listed on the “Your accounts” screen and can sign into this computer (or any other Windows 8 or 10 machine).
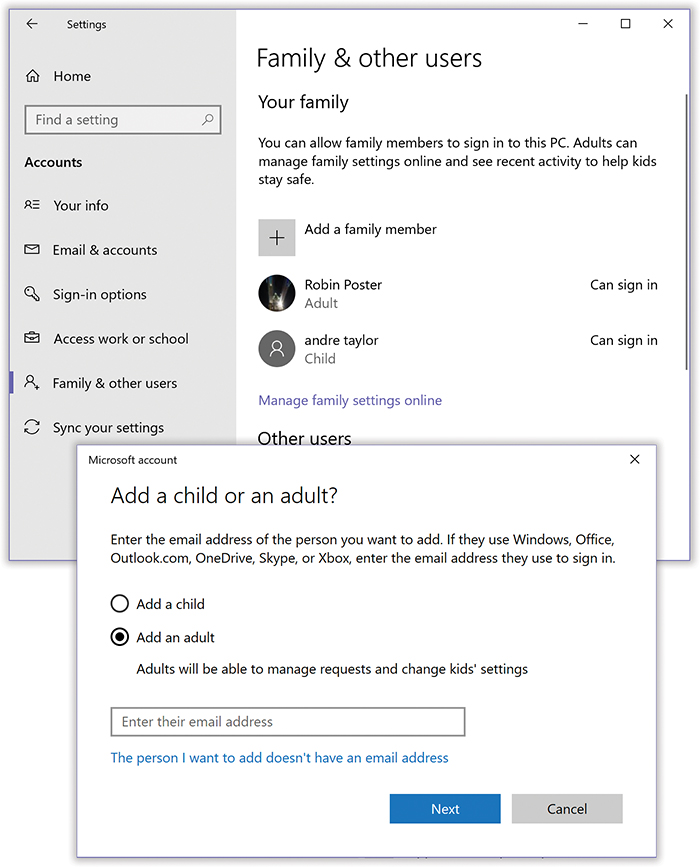
Figure 18-2. Top: This is the master list of people for whom you’ve set up accounts on this machine. There are two lists: One for family members (whose accounts will show up automatically when you sign in on another Windows 10 machine), and one for Other people.
Bottom: Windows wants to know if this is a child (whose online activities you can monitor and control) or an adult (who will be able to monitor the kids and change their settings).
Note:
When you first sign into a new Windows machine, your family members’ account names show up on the “Your family” screen. However, they can’t immediately sign in and start computing. You, the administrator, must click each non-administrator person’s name (where it says “Can’t sign in”) and then click Allow. It’s a security thing.
Similarly, if you sign in on a new PC and try to make some account changes, you’ll find (on the Accounts page of Settings) a message that says, “You need to verify your identity on this PC.” Microsoft will email or text you with a confirmation code, which you must enter now to confirm that you really are who you say you are.
Adding Someone Else
You can add a new account for someone who’s not a family member, too.
This time, you’ll have the chance to create a local account (“Local Accounts vs. Microsoft Accounts”), which lets the person sign in with his name instead of an email address. (Of course, a local account doesn’t offer the syncing and other features of a Microsoft account; it exists only on this computer.)
Tip:
It’s perfectly OK to create an “Other people” account even for someone who is a family member. You’d do that if you wanted your relative to have a local account, for example, or if you wanted to create an account for a relative who does not need control over the kids’ accounts.
The fun begins, as always, on the ![]() →
→![]() →Accounts→“Family & other people” screen. Under “Other people,” select “Add someone else to this PC” (Figure 18-3).
→Accounts→“Family & other people” screen. Under “Other people,” select “Add someone else to this PC” (Figure 18-3).
Windows now wants to know: “How will this person sign in?”
If he has a Microsoft account: Enter the email address or cellphone number on record for his Microsoft account in the box. Click Next and then Finish. The deed is done: He can now sign into this computer, or any Windows 8 or 10 computer, with that email address or phone number and his Microsoft account password.
If this person has an email address but it’s not a Microsoft account: When you click Next, you return to the list of accounts, with the new account in place.
Within a few minutes, your new account holder receives a confirmation email, at that address, from Microsoft. When he clicks Verify, he’s taken online to a web page where he can complete the process of turning that email address into a proper Microsoft account (complete with a complex password). At that point he’ll be able to sign into any Windows 8 or 10 machine with his email address and that password.
To create a local account: Click “The person I want to add doesn’t have an email address.” On the next screen, click “Add a user without a Microsoft account.”
You wind up on the “Create an account for this PC” screen, where you can make up a name and password.
Tip:
Having a local account means you can make up a very simple password, or no password at all—an attractive time-saver if this is your home computer and you don’t have (or aren’t worried about your) housemates. To set that up, just leave both password blanks empty. Later, whenever you’re asked for your password, leave the Password box blank. You’ll be able to sign on and authenticate yourself that much faster each day.
Figure 18-3. Top: You’re about to create an account for a non–family member (or a family member who doesn’t want a Microsoft account).
Bottom: This is where things get tricky. You’re about to tell Windows that this person has a Microsoft account, doesn’t have one but wants one, or doesn’t have one but doesn’t want one.If you provide a password, you must also provide a hint (for yourself or for whichever coworker’s account you’re operating on). This is a hint that anybody can see (including bad guys trying to sign on as you), so choose something meaningful only to you. If your password is the first person who ever kissed you plus your junior-year phone number, for example, your hint might be “first person who ever kissed me plus my junior-year phone number.”
Later, when you sign in and can’t remember your password, leave the Password box empty and hit Enter. You wind up back at the sign-in screen to try again—but this time, your hint will appear just below the Password box to jog your memory.
After a moment, you return to the Accounts screen, where the new account holder’s name joins whatever names were already there. You can continue adding new accounts forever or until your hard drive is full, whichever comes first.
Tip:
If you never had the opportunity to set up a user account when installing Windows—if you bought a PC with Windows already on it, for example—you may see an account named Owner already in place. Nobody can use Windows unless there’s at least one Administrator account on it, so Microsoft is doing you a favor here.
Just double-click it and click “Change the account name” to change the name “Owner” to one that suits you better. Make that account your own using the steps in the following paragraphs.
Editing an Account
Although the process of creating a new account is swift and simple, it doesn’t offer you much in the way of flexibility. You don’t even have a chance to specify the new person’s account picture (rubber ducky, flower, or whatever).
That’s why the next step in creating an account is usually editing the one you just set up. You make these sorts of changes in two places: in Settings, and (for Microsoft accounts) online.
Changing the Account Type
If you’re signed in with an Administrator account, you have the power to change other people’s account types (your choices: Administrator or Standard). To do that, open ![]() →
→![]() →Accounts→“Family & other people.”
→Accounts→“Family & other people.”
Select the account name, choose “Change account type,” and use the drop-down menu to choose Administrator or Standard User. Hit OK.
Changing Picture, Password, or Microsoft Account
On the “Your info” tab of ![]() →
→![]() →Accounts (Figure 18-1), you can make changes only to your own account. So if you’ve just created a new account for somebody, she’ll have to sign in, open this panel, and make the following changes herself:
→Accounts (Figure 18-1), you can make changes only to your own account. So if you’ve just created a new account for somebody, she’ll have to sign in, open this panel, and make the following changes herself:
Change your picture. The usual sign-in screen displays each account-holder’s name, accompanied by a little picture. When you first create the account, however, it assigns you a generic silhouette.
To choose something more personal, hit “Browse for one” (to choose an existing picture from your hard drive) or Camera (meaning “Take a picture of my head right now, using the computer’s camera”).
Note:
You may see other photos here. They represent account pictures you’ve used in the past, for easy re-selection.
Switch to a Microsoft or local account. If you have a local account, you can switch to a Microsoft account, or vice versa; either way, the button to click is right there at the top of your Accounts panel.
To change a local account to a Microsoft account: Click “Sign in with a Microsoft account instead.” You’re led through creating a Microsoft account to call your own. To change a Microsoft account to a local account: Click “Sign in with a local account instead.” After you enter your password, you’ll be asked to make up a name and password for a local account.
Change your sign-in options. Windows lets you sign in with many different kinds of “passwords”: a regular typed password, a four-digit number, a picture password (you draw lines on a photo you’ve selected), face or fingerprint recognition (on specially equipped machines), and so on. On the “Sign-in options” panel, you can create or change whatever you’ve set up. “Seven Ways to Sign In” has the details.
Change the wallpaper, color scheme, notifications, and other settings. All the settings you make in PC Settings apply only to your account.
And if you’ve created a Microsoft account, guess what? Most of these settings are stored online—and if you sign into another Windows 8 or 10 computer somewhere, you’ll find all your settings instantly recreated on that machine.
Settings You Change Online
Remember—a Microsoft account is stored on the Internet. It should come as no surprise, then, that Microsoft offers a website where you can make a lot of additional changes to your account.
On the ![]() →
→![]() →Accounts→“Your info” screen (Figure 18-1), click “Manage my Microsoft account.” Off you go into your web browser, where you arrive at the peculiar page shown in Figure 18-4, where the tabs at top let you change things like these (hit the > at the right end to see additional tabs):
→Accounts→“Your info” screen (Figure 18-1), click “Manage my Microsoft account.” Off you go into your web browser, where you arrive at the peculiar page shown in Figure 18-4, where the tabs at top let you change things like these (hit the > at the right end to see additional tabs):
Account. Edit your name and password (Figure 18-4, top). See a summary of all the stuff you’ve bought from Microsoft’s various online stores. Enjoy a list of all the computers you’ve signed into with this account. Buy or redeem Microsoft gift cards.
Your info. Edit your name (again). Change your account photo. Change the email or phone number associated with your Microsoft account.
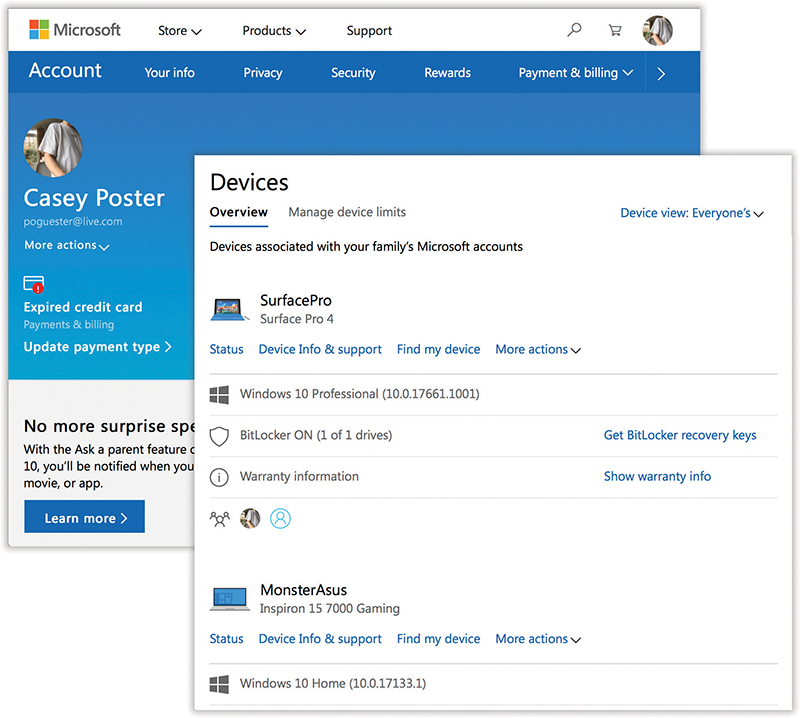
Figure 18-4. Here’s the central storage locker for all the information in your Microsoft account. If your computer gets broken or stolen, who cares? Your settings will be restored instantly the next time you sign in with a Microsoft account. The tabs here range from the very basics, like your account name and email address (top left), to the list of devices you’ve ever used this account to sign into (lower right).
Tip:
Using the “Manage your sign-in email or phone number” link, you can not only change the address or phone number associated with your Microsoft account, but you can also set up additional ones. If you have three email addresses, for example, you can register all three, so you don’t have to remember which one you’ve hooked up to your Microsoft account. Or when you sign into a Windows 10 machine, you can use whichever involves the least typing.
Privacy. Here’s your chance to see much of the data Microsoft has collected about you—search history, browsing history, locations, voice-command history, movie and TV watching, and so on—and, if you like, to delete it. Of course, almost everybody realizes that these big tech companies track our actions. But to see all of your data here, date-stamped, shivering and naked—well, it gives one pause.
Security. Change your password, change your other credentials, see where you’ve signed in recently.
Here, too, is your opportunity to delete your Microsoft account—for example, when you buy that Mac you’ve always wanted. (Joke! That’s a joke.)
To do that, choose “More security options”; sign in; scroll down; and choose “Close my account.” You’ll be guided through the process of closing down your association with Microsoft. (What do you want to do about your subscriptions? Your leftover account balance? Your kid accounts?)
Rewards. How much does Microsoft want you to use its Bing search page instead of Google, and its Edge browser instead of Chrome? Enough to bribe you. For every search you do in a day using Bing, you earn five Rewards points. You also get five points an hour for using the Edge browser. You can also get points by buying stuff on the Microsoft store. Earn enough points, and you can cash in for an Amazon or Starbucks gift card, Xbox and Windows gift cards, or Microsoft Store gift cards. Anyway, here’s the dashboard for your progress.
Payment & billing. Here’s the master list of stuff you’ve bought online from Microsoft: music, movies, apps, and so on. You can see your purchase history, change your credit card info, redeem gift cards, and so on.
Services & subscriptions. Here’s the dashboard for all the monthly payments you’re making to Microsoft: for Office 365, Xbox Live, extra OneDrive storage, and so on. Here, too, is where you cancel one of these accounts, change credit cards, and see when the next renewal and payment dates are.
Devices is the list of computers you’ve signed into using your Microsoft account (Figure 18-4, bottom). There are links to get help with one, find it (“Find My Device”), buy accessories for it, or remove it from the list.
Family. Here’s the master list of family-member accounts you’ve set up, as described earlier in this chapter—along with links to each person’s screen-time limits, website and game restrictions, and so on (“Family Safety (Parental Controls)”). You can also add and remove accounts here.
Seven Ways to Sign In
As you know from Chapter 1, which you’ve carefully memorized, you can sign into your account using any of several methods (Figure 18-5). Typing out a password is one of them, yes, but everybody hates passwords. So in Windows 10 you have all these ways to prove you’re you:
Draw three lines, dots, or circles on a photo you’ve selected.
Type in a four-digit number.
Type a traditional password.
Use your fingerprint, if your computer has a built-in fingerprint scanner.
Just look at the computer’s camera. If it recognizes your face, it signs you in.
Look into your computer’s eye scanner until it recognizes the iris of your eye.
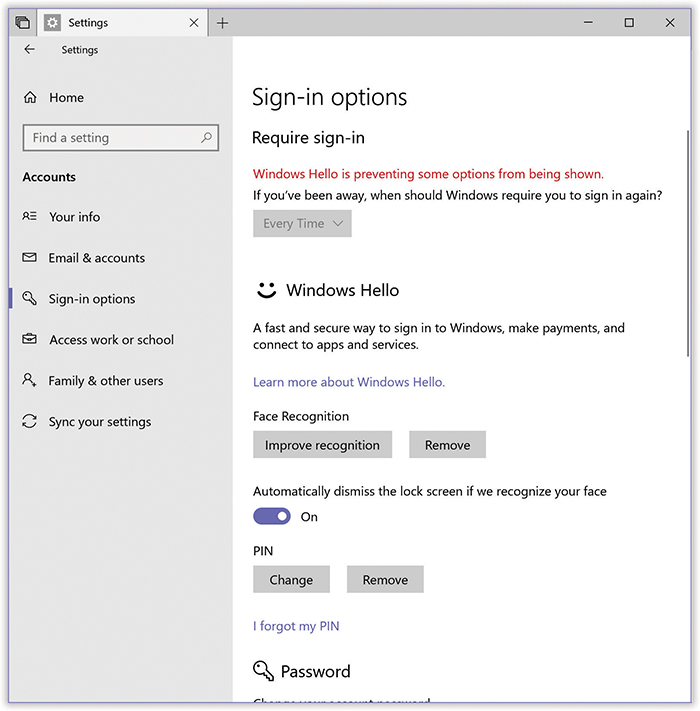
Figure 18-5. Windows 10 gives you a wide variety of ways to sign in—ways that don’t involve having to type in a password. Here in  →
→ →Accounts→“Sign-in options,” you can scroll down, and down, and down, to see all of them. Most people won’t see the Windows Hello section here—it appears only if your computer has special sign-in hardware—but the ones who do see it will have a blast signing in.
If you do have a Windows Hello–compatible machine, the April 2018 Update offers a quicker way to get to this screen: On the Lock screen itself, select “Sign in options.”
Note:
Those last three ways require specialized equipment; most computers don’t offer them. They’re part of a Windows 10 feature called Windows Hello. These days, in fact, Windows Hello does more than sign you into your PC. It can also sign you into a few apps (including Dropbox, Enpass, and OneDrive)—and, in theory, even certain websites, although they’re hard to find.
Skip the security altogether. Jump directly to the desktop when you turn on the machine.
So how do you specify which method you want? It all happens on the “Sign-in options” screen shown in Figure 18-5. Just follow the admirably simple steps in the sections that follow.
Note:
Every account still requires a regular text password; you’ll need it when, for example, installing new software or making system-wide Control Panel changes. The drawing-lines thing, the four-digit thing, the no-password-at-all thing, and Windows Hello are all additional ways to sign in.
Creating a Picture Password
This little stunt is perfect for touchscreens, especially tablets that lack physical keyboards, because it’s so much easier than typing a password.
The password screen will show a photograph you’ve chosen. You draw three lines or taps on top of it, something like what’s in Figure 18-6. The idea is that only you know how and where to draw these lines and taps. That’s your security.
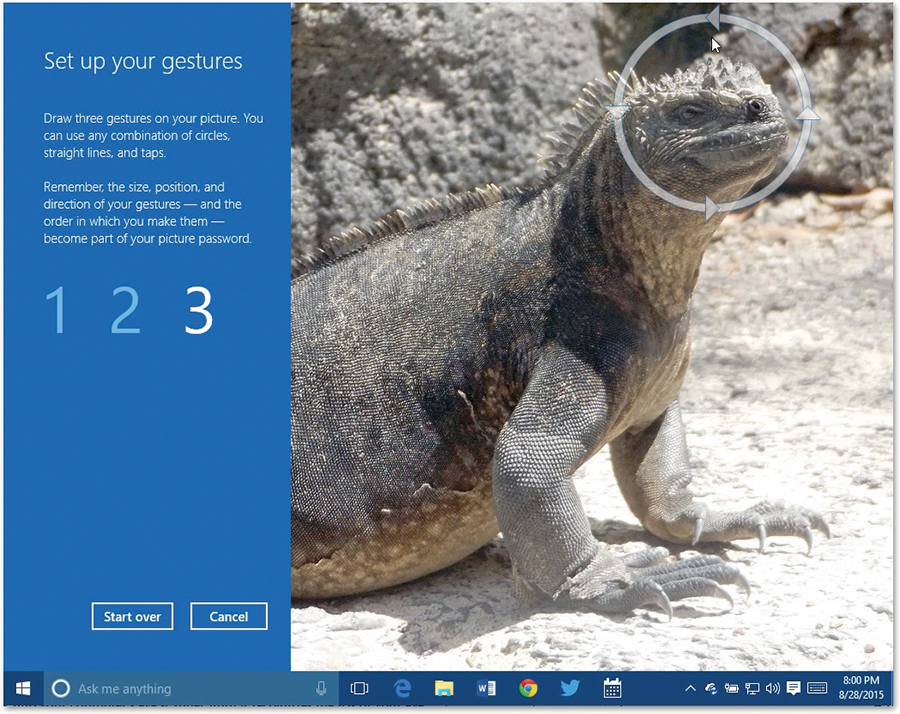
Figure 18-6. The rules are simple: Choose a photo from your Pictures folder. Draw three lines on it—circles, curves, or lines. Don’t forget them! (Although, if you do, the world won’t end; you can always use your regular typed password instead.)
Later, you’ll recreate those gestures to unlock the tablet, which is easier than having to type some password. (The lines don’t appear when you actually sign in. Wouldn’t want some bad dude sitting next to you to catch on!)
Note:
Truth is, picture passwords aren’t as secure as typed passwords. One reason is that bad guys might be able to learn your photo fingerstrokes by watching you from across the room.
But an even greater security hole is the finger grease you leave behind on your touchscreen. If you drag the same lines over and over, an evildoer can learn your fingerstrokes just by studying the finger-grease marks when the screen is turned off. You’ve been warned.
Here’s how to set up a picture password:
Open
→→Accounts. Choose “Sign-in options.”The “Sign-in options” screen appears (Figure 18-5).
Under “Picture password,” click Add. Enter your current typed password to prove that you’re not a criminal, and hit OK.
Now a screen appears where Windows explains the rules. Time to choose your photo!
Hit “Choose picture.”
You’re now shown the contents of your Pictures folder. Choose the one you want to draw on, and then hit Open (lower-right corner).
You now arrive at a “How’s this look?” screen, showing how the picture will appear on the sign-in screen. If the photo isn’t perfectly suited to your screen dimensions, you can drag it around to fit the screen better.
Pick “Use this picture.”
Now, on the “Set up your gestures” screen, you’re supposed to draw on the photo—three taps, lines, or circles in any combination (Figure 18-6). On a baby photo, for example, you might circle the baby’s mouth, tap her nose, and then draw an invisible antenna right out of her head. Just don’t forget what you did.
You’re asked to repeat the three gestures in the same order to make sure you and Windows have both got it.
If all went well, Windows says, “Congratulations!” If not—if your two tries weren’t similar enough—it prompts you to perform this step again.
Hit Finish.
Now test your picture password. In the ![]() menu, click your account photo (far-left column); from the shortcut menu, choose “Sign out.” You arrive back at the Lock screen.
menu, click your account photo (far-left column); from the shortcut menu, choose “Sign out.” You arrive back at the Lock screen.
Dismiss it with a swipe up or a keypress (and, if you see the names of more than one account, tap yours). You arrive at the Picture Password screen, with your photo magnificently displayed.
Draw your three lines or taps, as you’ve set them up. If you do a good enough job, Windows signs you into your account.
If you give up, you can always tap “Switch to password” and just type the darned thing.
The Four-Digit Passcode (PIN)
You might not think that a four-digit passcode, or PIN (personal identification number), is as secure as a full-blown, “f8sh^eir23h*$$%23”-style password. But in one way, it’s actually more secure—because it’s local. It’s stored only on this computer. It’s useless to your enemies or faraway hackers, even if they guess it, because it works only when you’re physically sitting in front of your machine.
Note:
Here again, you still have to create a regular text password for your account—as a backup method, if nothing else.
Open
→→Accounts. Choose “Sign-in options.”You see the screen shown in Figure 18-5.
Under PIN, select Add. Enter your current typed password to prove that you’re you, and hit OK.
Now make up a four-digit PIN (personal identification number): the last four digits of your mom’s phone number, the month and year of your birthday—whatever.
Enter your chosen PIN into both boxes, and then hit Finish.
Next time you sign in, you’ll be able to use your PIN instead of a password (Figure 18-7). You don’t even have to press Enter; after you type the fourth digit, bam—you’re signed in.
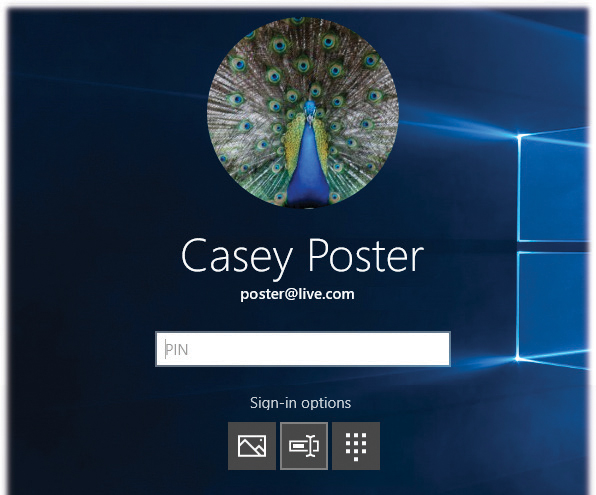
Figure 18-7. Once you’ve set up a picture password and/or a PIN password, your sign-in choices become more plentiful. If you click “Sign-in options,” you can choose a different way to sign in. In this example, the icons represent the picture password, the four-digit PIN, and the traditional password.
Note:
You’ll also be offered a link that says “Sign-in options” (Figure 18-7). When you choose that, you’re offered icons that represent all of the sign-in options you’ve created so far: picture password, PIN, Windows Hello biometric, and regular typed password. So if you can’t get in one way, you can try a different method.
Face Recognition
Here’s an absolutely brilliant feature: instant face recognition. When you sit down in front of your computer, it recognizes your face and unlocks the computer instantly. You can’t fool it with a photograph, a 3D model of your head, or even an identical twin!
This stunt requires an Intel RealSense depth-sensing camera, a fairly sophisticated device that actually uses three cameras—infrared, color, and 3D—in combination. You can buy this camera as a USB peripheral; some computer companies are building the RealSense camera into their laptops. Microsoft’s own Surface tablets have it, too.
If you’re one of the lucky ones, you’ll know it, because in ![]() →
→![]() →Accounts→“Sign-in options,” you’ll see a heading for Windows Hello—and below it, a “Set up” button for Face.
→Accounts→“Sign-in options,” you’ll see a heading for Windows Hello—and below it, a “Set up” button for Face.
In the welcome screen, hit “Get started.” Enter your PIN. (Yes, Windows Hello requires you to set up both a password and a PIN, so you’ll be able to get into your machine if something goes wrong with either your RealSense camera or your face.)
Now you’re asked to look into the camera. After just a couple of seconds, an “All set!” message appears; Windows now knows what you look like.
Tip:
If you wear glasses, hit “Improve recognition” and look into the camera again, this time without them (or with them, if you didn’t wear them the first time). Now Windows Hello will recognize you either way.
At this point, two more options await:
Automatically unlock the screen if we recognize your face. Um, isn’t that the entire point of this exercise? Turn it on.
Require turning your head left and right to unlock the screen. If you’re concerned that your PC might unlock accidentally, when it spots your face as you sit down or talk on the phone, turn on this option. Now the PC won’t unlock unless you look at the camera and turn your head left and right.
Fingerprint, Iris
If your PC has a fingerprint reader, you’ll see other Windows Hello options in Settings: Fingerprint and Iris.
The procedures are exactly like the one described above, except this time when you hit “Set up,” you’re asked to touch your finger to the reader a few times, or hold your eye up to the eye scanner.
When it’s over, you’ll be able to sign in just by touching your fingertip to the reader, or peeking into the eye reader—fast and secure.
Eliminating the Password Requirement
The usual computer book takes this opportunity to stress the importance of a long, complex password. This is excellent advice if you create sensitive documents and work in a big corporation.
But if you share the computer only with a spouse, or with nobody, you may have nothing to hide. You may see the multiple-users feature more as a convenience (keeping your settings and files separate) than a protector of secrecy and security. In these situations, there’s no particular urgency to the mission of thwarting the world’s hackers with a password.
That is, you may prefer to blow past the password screen, so you can get right down to work. You may wish you could turn off the requirement to sign in with a password.
No password required when waking
Fortunately, with one click or tap, you can eliminate the requirement for entering a password when you wake the computer. (You still need it when you turn it on or restart it.)
Open ![]() →
→![]() →Accounts→“Sign-in options.” Right there at the top, under “Require sign-in,” you can change the usual setting (“When PC wakes up from sleep”) to the much more convenient one: “Never.”
→Accounts→“Sign-in options.” Right there at the top, under “Require sign-in,” you can change the usual setting (“When PC wakes up from sleep”) to the much more convenient one: “Never.”
Now you won’t be asked for your password when you just wake the machine after it’s gone to sleep.
No password required, ever
With a little more work, you can eliminate the requirement to enter your password even when you’re restarting the machine:
Open the Run dialog box (press
+R.) In the Run box, type netplwiz. Hit OK.You now find yourself in the little-seen User Accounts dialog box (Figure 18-8, top). Most of the functions are the same as what you’d find in the Settings panel for accounts—it’s just that you don’t have to slog through several screens to get things done. Here you can add, remove, or edit accounts, all in a single screen.
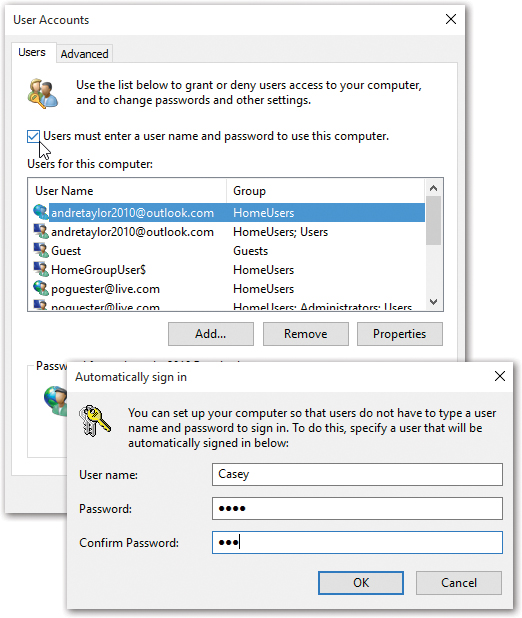
Figure 18-8. Top: Here’s the User Accounts box. It’s where you find the master switch for the requirement to enter a password when you sign in.
Bottom: In this box, enter your user name and your text password. You’re telling Windows to sign you in automatically from now on.But this older Control Panel program also offers a few features that you don’t get at all in the new one. For example:
Turn off “Users must enter a user name and password to use this computer.” Hit OK.
You’ve told Windows you want to sign in automatically. Now you have to tell it who gets to sign in automatically (Figure 18-8, bottom).
This lucky individual won’t have to specify any name and password at sign-in time and can instead turn on the PC and cruise directly to the desktop. (This feature works only at startup. If you choose “Sign out” from the Start menu, the standard sign-in dialog box appears so other people have the opportunity to sign in.)
Enter your account name and password (and the password again); hit OK.
This is your real text password, not some measly four-digit PIN.
The next time you restart your computer, you’ll gasp in amazement as it takes you all the way to the desktop without bothering to ask for your password. It’s a great setup, provided you recognize the security hole it leaves open.
Note:
To restore the password requirement, repeat these steps—but turn on “Users must enter a user name and password to use this computer” in step 2.
If you multiply the five seconds you’ve just saved by the thousands of times you’ll wake or start up your machine, why, you’ll wind up with literally minutes of free time!
After You’ve Signed In
When it comes to the screens you encounter when you sign into a Windows computer, your mileage may vary. What you see depends on how your PC has been set up. For example:
You Get the Accounts Screen
This is what people on standalone or workgroup computers see most of the time (Figure 18-9).
There’s no limit to the number of times you can try to type in a password. With each incorrect guess, you’re told, “The user name or password is incorrect,” and an OK button appears to let you try again. The second time you try, your password hint appears, too.
Tip:
If your Caps Lock key is pressed, another balloon lets you know. Otherwise, because you can’t see anything on the screen as you type except dots, you might be trying to type a lowercase password with all capital letters.
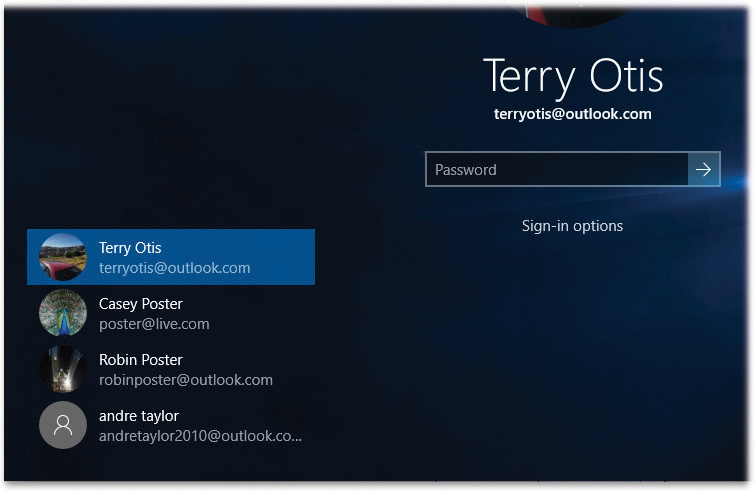
Figure 18-9. To sign in, click your account name or icon. If no password is required for your account, then you proceed to your desktop with no further interruption.
If there is a password associated with your account, you see a place for it. Type your password and then press Enter.
You Zoom Straight to the Desktop
If you’re the only account holder, and you’ve set up no password for yourself, you can cruise all the way to the desktop without any stops. The setup steps appear in “No password required, ever”.
This password-free scenario, of course, is not very secure; any evildoer who walks by your machine when you’re in the bathroom has complete access to all your files (and protected websites). But if you work in a home office, for example, where the threat of privacy invasion isn’t very great, it’s by far the most convenient arrangement.
You Get the “Press Ctrl+Alt+Delete to Begin” Message
You or your friendly network geek has added your PC to a domain while installing Windows and activated the “Require Users to Press Ctrl+Alt+Delete” option. This is the most secure configuration, and also the least convenient.
The Forgotten Password Disk
As described in “Adding Someone Else”, Windows contains a handy hint mechanism for helping you recall your password if you’ve forgotten it.
But what if, having walked into a low-hanging branch, you’ve forgotten both your password and the correct interpretation of your hint? In that disastrous situation, you don’t have to fling your worthless PC into the river quite yet. You have a few more options:
If you’ve forgotten your Microsoft account password, you can reset it at https://account.live.com/password/reset.
On a corporate network, the system administrator can reset your password.
Someone with an Administrator account can sign in and change your password for you. Even you can do that, if you remember the password for another Administrator account.
If you’ve forgotten your local account password, you can use a Password Reset Disk.
This disk is a clever solution-in-advance. It’s a USB flash drive that you can use like a physical key to unlock your account in the event of a forgotten password. The catch: You have to make this disk now, while you still remember your password.
To create it, insert a USB flash drive. Then search for password reset; in the results, select “Create a password reset disk.” (If it doesn’t open, open the Control Panel manually by right-clicking the Start menu and choosing its name; then search for password reset, and select “Create a password reset disk.”)
The Forgotten Password Wizard appears. Click through it, supplying your current password when asked. When you click Finish, remove the disk or flash drive. Label it, and don’t lose it!
Don’t leave it in plain sight, though; anyone with that drive can now get into your stuff.
Tip:
Behind the scenes, Windows saves a file onto the flash drive called userkey.psw. You can guess what that is.
When the day comes when you can’t remember your password, leave the Password box empty and hit Enter. You wind up back at the sign-in screen; this time, in addition to your password hint, you see a link called “Reset password.” Insert your Password Reset flash drive and then click that link.
A Password Reset Wizard now helps you create a new password (and a new hint to remind you of it). You’re in.
Even though you now have a new password, your existing Password Reset Disk is still good. Keep it in a drawer somewhere for use the next time you experience a temporarily blank brain.
Deleting Accounts
It happens—somebody graduates, somebody gets fired, somebody dumps you. Sooner or later, you may need to delete an account from your PC.
If you’re signed in with an Administrator account, you have the power to kill off other people’s accounts. To do that, open ![]() →
→![]() →Accounts→“Family & other people.”
→Accounts→“Family & other people.”
Select the account name, choose “Change account type,” and hit either Remove (to remove a local account) or Block (to prevent a Microsoft account holder from signing in). Use the drop-down menu to choose Administrator or Standard User. Confirm by choosing “Delete account and data” or “Block.”
A few more points about deleting accounts:
You can’t delete the account you’re signed into.
You can’t delete the last Administrator account. One must remain.
You can create a new account with the same name and password as one you deleted earlier, but in Windows’ head, it’s still not the same account. As described in the box in “UP TO SPEED Passwords Within Passwords”, it won’t have any of the original secondary passwords (for websites, encrypted files, and so on).
Don’t manipulate accounts manually (by fooling around in the Users folder). Create, delete, and rename them only using Settings or the Control Panel. Otherwise, you’ll wind up with duplicate or triplicate folders in the Users folder, with the PC name tacked onto the end of the original account name (Bob, Bob.DELL, and so on)—a sure recipe for confusion.
Tip:
If you’re an administrator, don’t miss the Users tab of the Task Manager dialog box. (Press Ctrl+Shift+Esc to get to the Task Manager.) It offers a handy, centralized list of all the people signed into your machine and contains buttons that let you sign them off or disconnect them. This can be handy whenever you need some information, a troubleshooting session, or a power trip.
Disabling Accounts
If you do expect that your colleague may one day return to your life, you might consider disabling the account instead of deleting it. A disabled account doesn’t show up on the sign-in screen or in the User Accounts program, but it’s still there on the hard drive, and you can bring it back when necessary.
There’s no pretty Settings link for disabling an account; you’ll have to get your hands greasy in the power-user underpinnings of Windows. Open the lusrmgr.msc console, as described in the next section—but instead of turning on “Account is disabled” for the Guest account, as shown in Figure 18-10, turn it on for whoever’s taking the long sabbatical.
The Guest Account
Believe it or not, Administrator and Standard aren’t the only kinds of accounts you can set up on your PC.
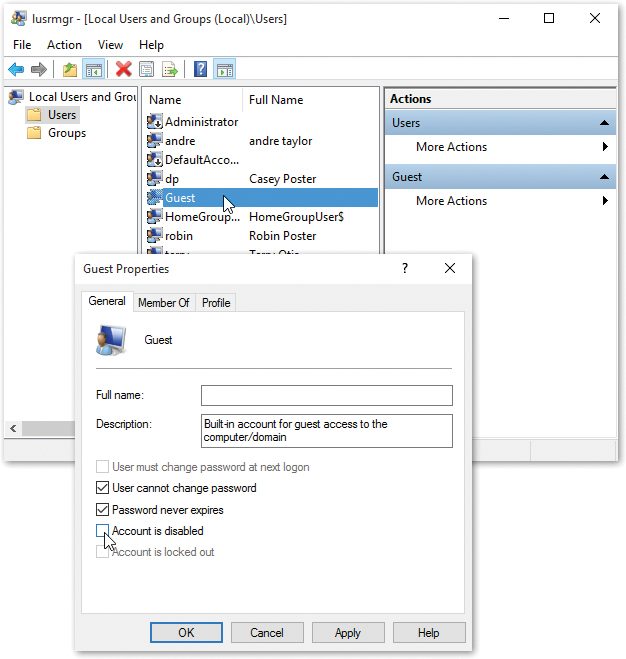
Figure 18-10. To turn on the secret Guest account, choose Users (left column). Double-click Guest (middle column). In the resulting dialog box (bottom), type a name (“Guest” works fine), turn off “Account is disabled,” and click OK.
A third kind, called the Guest account, is ideal for situations when somebody is just visiting you for the week. Rather than create an entire account for this person, complete with password, hint, little picture, and so on, you can just switch on the Guest account.
Guest accounts are pretty standard in computers these days, but you wouldn’t think so if you just poked around Windows 10; Microsoft has buried the feature under mounds of dust and rubble, and you can get to it only if you have Windows 10 Pro.
To turn on the Guest account, in the search box, type lusrmgr.msc. In the results, choose “lusrmgr.msc.”
The crazy window shown in Figure 18-10 appears; proceed as shown in the figure. (You can read more about this window in “NTFS Permissions: Protecting Your Stuff”.)
Tip:
If you’re a typing-out-commands sort of advanced person, you can also use the Command Prompt (running as administrator) for this purpose. Just type net user guest /active:yes and hit Enter.
Now, when the visitor tries to sign in, she can choose Guest as the account. She can use the computer but can’t see anyone else’s files or make any changes to your settings.
When the visitor is finally out of your hair, healthy paranoia suggests that you turn off the Guest account once again. (To do so, follow precisely the same steps, except turn “Account is disabled” on again.)
Fast User Switching
Suppose you’re signed in and you’ve got things just the way you like them. You have 11 programs open in carefully arranged windows, your web browser is downloading some gigantic file, and you’re composing an important speech in Microsoft Word. Now Robin, a coworker/family member/fellow student, wants to duck in to do a quick email check.
In the old days, you might have rewarded Robin with eye-rolling and heavy sighs, or worse. To accommodate the request, you would have had to shut down your whole ecosystem—interrupting the download, closing your windows, saving your work, and exiting your programs. You would have had to sign out completely.
Thanks to Fast User Switching, however, none of that is necessary. See Figure 18-11.
The words “Signed in” beneath your name indicate that you haven’t actually signed off. Instead, Windows has memorized the state of affairs in your account—complete with all open windows, documents, and programs—and shoved it into the background.
Robin can now click the Robin button to sign in normally, do a little work, or look something up. When Robin signs out, the Accounts screen comes back once again, at which point you can sign back in. Without having to wait more than a couple of seconds, you find yourself exactly where you began, with all your programs and documents still open and running—an enormous time-saver.
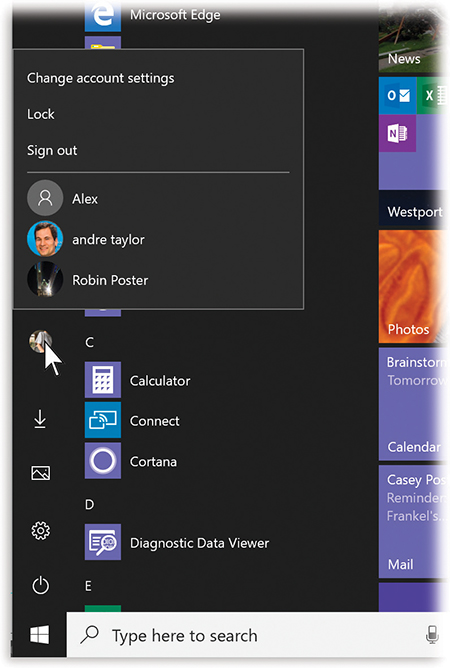
Figure 18-11. To sign in while someone else is signed in, just press the magic keystroke (to open the Start menu), and then click the current person’s account photo. Boom: There’s the list of people with accounts on this machine, including you.
Authenticate Yourself: User Account Control
Work in Windows long enough, and you’ll encounter the dialog box shown in Figure 18-12 at top. It appears anytime you install a new program or try to change an important setting on your PC. (Throughout Windows, a colorful ![]() icon next to a button or link indicates a change that will produce this message box.)
icon next to a button or link indicates a change that will produce this message box.)
Clearly, Microsoft chose the name User Account Control (UAC) to put a positive spin on a fairly intrusive security feature; calling it the IYW (Interrupt Your Work) box probably wouldn’t have sounded like so much fun.
Why do these boxes pop up? In the olden days, nasties like spyware and viruses could install themselves invisibly, behind your back. That’s because Windows ran in Administrative mode all the time, meaning it left the door open for anyone and anything to make important changes to your PC. Unfortunately, that included viruses.
Windows 10, on the other hand, runs in Standard mode all the time. Whenever somebody or some program wants to make a big change to your system—something that ought to have the permission of an administrator (“Administrator accounts”)—the UAC box alerts you. If you click Continue, Windows elevates (opens) the program’s permissions settings just long enough to make the change.
Most of the time, you are the one making the changes, which can make the UAC box a bit annoying. But if that UAC dialog box ever appears by itself, you’ll know something evil is afoot, and you’ll have the chance to shut it down.
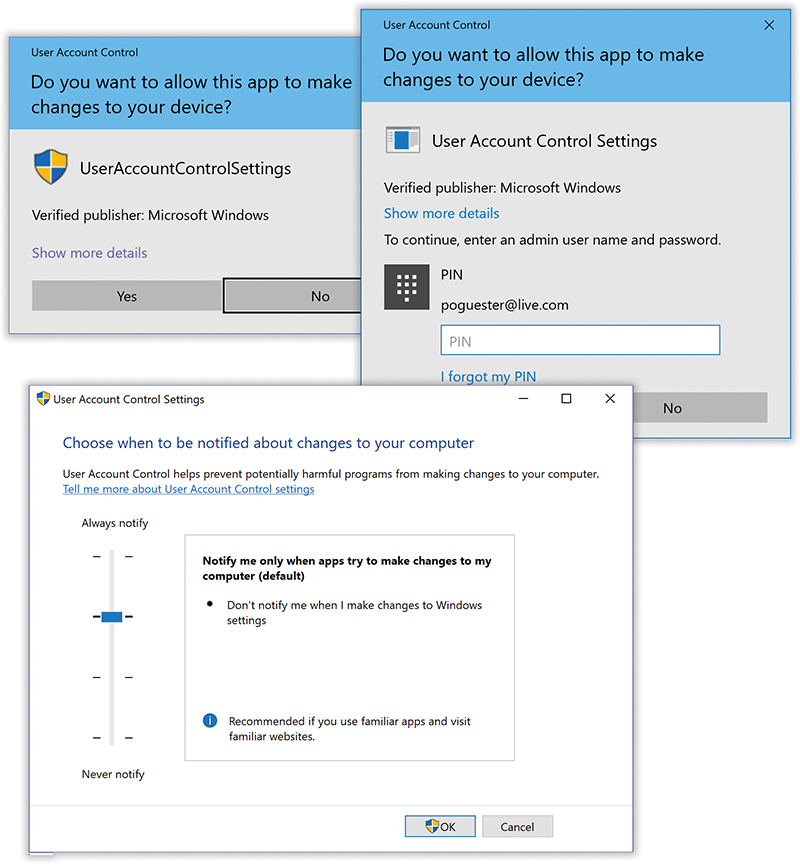
Figure 18-12. Top: When you try to make a major change to Windows, like deleting an account or installing a program, Windows wants to make absolutely sure that it’s you and not some virus doing the changing. So it stops the show to ask for confirmation that it’s you out there.
If you’re an administrator, just hit Yes (left). If not, you’ll have to get an Administrative account holder to authenticate (right).
Bottom: This dialog box offers a nuisance slider; you control where Windows stands on the security/interruption continuum by dragging it up (more alarmist) or down (no interruptions at all).
How you get past the UAC box—how you authenticate yourself—depends on the kind of account you have:
If you’re an administrator, the UAC box generally doesn’t appear at all. Even when you click a link marked with a
 icon, you either blow right past it or get the simple “Yes/No” box shown at top left in Figure 18-12.
If you’re a Standard account holder, the UAC dialog box requires the password (or sign-in PIN number) of an administrator (Figure 18-12, top right). You’re supposed to call an administrator over to your desk to indicate his permission to proceed by entering his own name and password.
Questions? Yes, you in the back.
Why does the screen go dark around the dialog box?
That’s another security measure. It’s designed to prevent evil software from tricking you by displaying a fake Windows dialog box. Windows darkens and freezes everything on the screen except the one, true Windows dialog box: the UAC box.
Can I turn off the UAC interruptions?
Well, yes. But listen: You should be grateful they don’t appear nearly as often as they used to, in earlier versions of Windows.
But if even the few remaining interruptions are too much for you, you can turn them off altogether. Open the
menu. Type uac; select Settings, and then hit “Change User Account Control settings.”You get the dialog box shown at bottom in Figure 18-12. If you drag the slider all the way to the bottom, you won’t be interrupted by UAC boxes at all.
This truly isn’t a good idea, though. You’re sending your PC right back to the days of Windows XP, when any sneaky old malware could install itself or change your system settings without your knowledge. Do this only on a PC that’s not connected to a network or the Internet, for example, or maybe when you, the all-knowing system administrator, are trying to troubleshoot and the UAC interruptions are slowing you down.
Three Advanced Features Worth Mentioning (Maybe)
Microsoft designed Windows in an era when only techies used computers. Lately, though, eyeing the success of companies like Apple, whose products are designed to appeal to the masses, Microsoft has been taking huge strides to hide the underlying complexity of Windows and make it appear simpler and cleaner.
But the old techy features are still there, hiding. Here are three advanced topics you can read more about in free online appendixes to this book.
Local Users & Groups
The control panels you’ve read about so far in this chapter are designed for simplicity and convenience, but not for power. Windows offers a second way to create, edit, and delete accounts: an alternative window that, depending on your taste for technical sophistication, is either intimidating and technical or liberating and flexible.
It’s the Local Users and Groups console. Mostly, it offers the same options as the ![]() →
→![]() →Accounts page described in this chapter—but for the technically proficient, it offers a few extra options. One is the ability to create account groups—named collections of account holders, all of whom have the same access to certain shared files and folders. They might be called, for example, Executives or Minimum-Wage Minions.
→Accounts page described in this chapter—but for the technically proficient, it offers a few extra options. One is the ability to create account groups—named collections of account holders, all of whom have the same access to certain shared files and folders. They might be called, for example, Executives or Minimum-Wage Minions.
The quickest way there: press ![]() +R to open the Run dialog box, type lusrmgr.msc, and authenticate yourself if necessary. (Microsoft swears that “lusrmgr.msc” is not short for “loser manager,” even though network administrators might hear that in their heads.)
+R to open the Run dialog box, type lusrmgr.msc, and authenticate yourself if necessary. (Microsoft swears that “lusrmgr.msc” is not short for “loser manager,” even though network administrators might hear that in their heads.)
For instructions from here, see the free downloadable PDF appendix “Local Users Console” on this book’s “Missing CD” page at www.missingmanuals.com.
Profiles
As you read earlier in this chapter, every document, icon, and preference setting related to your account resides in a single folder: the one bearing your name in the Local Disk (C:) ![]() Users folder. This folder’s friendly name is your personal folder, but to network geeks, it’s known as your user profile.
Users folder. This folder’s friendly name is your personal folder, but to network geeks, it’s known as your user profile.
Each account holder has a user profile. But your PC also has a couple of profiles that aren’t linked to human beings’ accounts.
Have you ever noticed, for example, that not everything you actually see on your desktop is, in fact, in your user profile folder?
Part of the solution to this mystery is the Public profile, which also lurks in the Users folder. It stores many of the same kinds of settings your profile folder does—except that anything in (C:) ![]() Users
Users ![]() Public
Public ![]() Desktop appears on everybody’s desktop.
Desktop appears on everybody’s desktop.
All this is a long-winded way of suggesting another way to make some icon available to everybody with an account on your machine. Drag it into the Desktop folder inside the Public folder. (This folder is ordinarily hidden; it appears only when you un-hide Windows’ protected files and folders; see “View Tab”.)
For more on profiles, see the free downloadable PDF appendix “Profiles” on this book’s “Missing CD” page at www.missingmanuals.com.
NTFS Permissions: Protecting Your Stuff
There’s one final aspect of user accounts that’s worth mentioning: NTFS permissions, a core part of Windows’ security system. Using this feature, you can specify exactly which coworkers are allowed to open which files and folders on your machine. In fact, you can also specify how much access each person has. You can dictate, for example, that Gomez and Morticia aren’t allowed to open your Fourth-Quarter Projections spreadsheet at all, that Fred and Ginger can open it but not make changes, and that George and Gracie can both open it and make changes.
Your colleagues will encounter the permissions you’ve set up like this in two different situations: when tapping into your machine from across the network or when sitting down at it and signing in using their own names and passwords. In either case, the NTFS permissions you set up protect your files and folders equally well.
Tip:
In Chapter 19, you can read about a very similar form of access privileges called sharing permissions. There’s a big difference between sharing permissions and the NTFS permissions described here, though: Sharing permissions keep people out of your stuff only when they try to access your PC from over the network.
Actually, there are other differences, too. NTFS permissions offer more gradations of access. And using NTFS permissions, you can declare individual files—not just folders—accessible or inaccessible to specific coworkers.
Using NTFS permissions is most decidedly a power-user technique because of the complexity it introduces. Entire books have been written on the topic of NTFS permissions alone.
An entire appendix to this chapter, too. Read the free PDF appendix “NTFS Permissions” on this book’s “Missing CD” page at www.missingmanuals.com.