Chapter 9. Networking, Network Security, and Service Mesh
Kubernetes is effectively a manager of distributed systems across a cluster of connected systems. This immediately puts critical importance on how the connected systems communicate with one another, and networking is the key to this. Understanding how Kubernetes facilitates communication among the distributed services it manages is important for the effective application of interservice communication.
This chapter focuses on the principles that Kubernetes places on the network and best practices around applying these concepts in different situations. With any discussion of networking, security is usually brought along for the ride. The traditional models of network security boundaries being controlled at the network layer are not absent in this new world of distributed systems in Kubernetes, but how they are implemented and the capabilities offered change slightly. Kubernetes brings along a native API for network security policies that will sound eerily similar to firewall rules of old.
The last section of this chapter delves into the new and scary world of service meshes. The term “scary” is used in jest, but it is quite the Wild West when it comes to service mesh technology in Kubernetes.
Kubernetes Network Principles
Understanding how Kubernetes uses the underlying network to facilitate communication among services is critical to understanding how to effectively plan application architectures. Usually, networking topics start to give most people major headaches. We are going to keep this rather simple because this is more of a best practice guidance than a lesson on container networking. Luckily for us, Kubernetes has laid down some rules of the road for networking that help to give us a start. The rules outline how communication is expected to behave between different components. Let’s take a closer look at each of these rules:
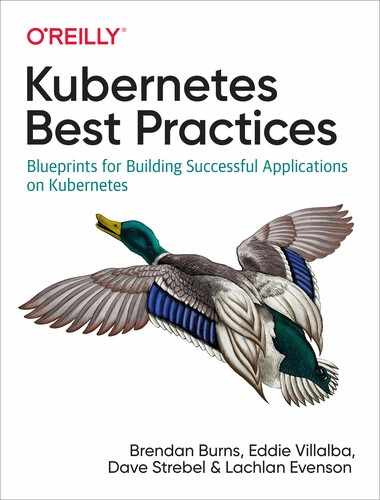
- Container-to-container communication in the same pod
-
All containers in the same pod share the same network space. This effectively allows localhost communication between the containers. It also means that containers in the same pod need to expose different ports. This is done using the power of Linux namespaces and Docker networking to allow these containers to be on the same local network through the use of a paused container in every pod that does nothing but host the networking for the pod. Figure 9-1 shows how Container A can communicate directly with Container B using localhost and the port number that the container is listening on.
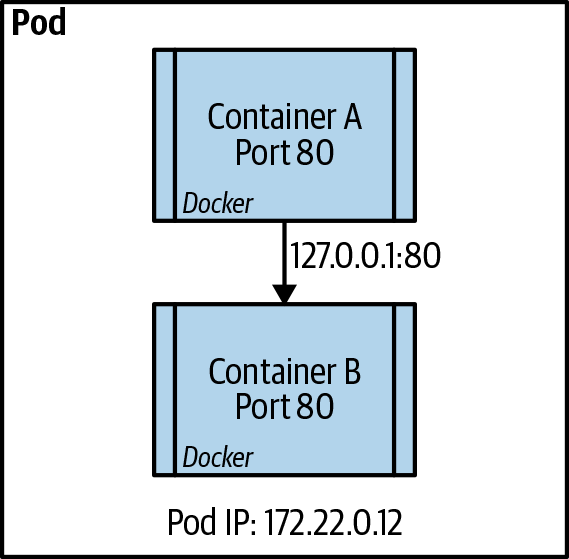
Figure 9-1. Intrapod communication between containers
- Pod-to-pod communication
-
All pods need to communicate with one another without any network address translation (NAT). This means that the IP address that a pod is seen as by the receiving pod is the sender’s actual IP address. This is handled in different ways, depending on the network plug-in used, which we discuss in more detail later in the chapter. This rule is true between pods on the same node and pods that are on different nodes in the same cluster. This also extends to the node being able to communicate directly to the pod with no NAT involved. This allows host-based agents or system daemons to communicate to the pods as needed. Figure 9-2 is a representation of the communication processes between pods in the same node and pods in different nodes of the cluster.
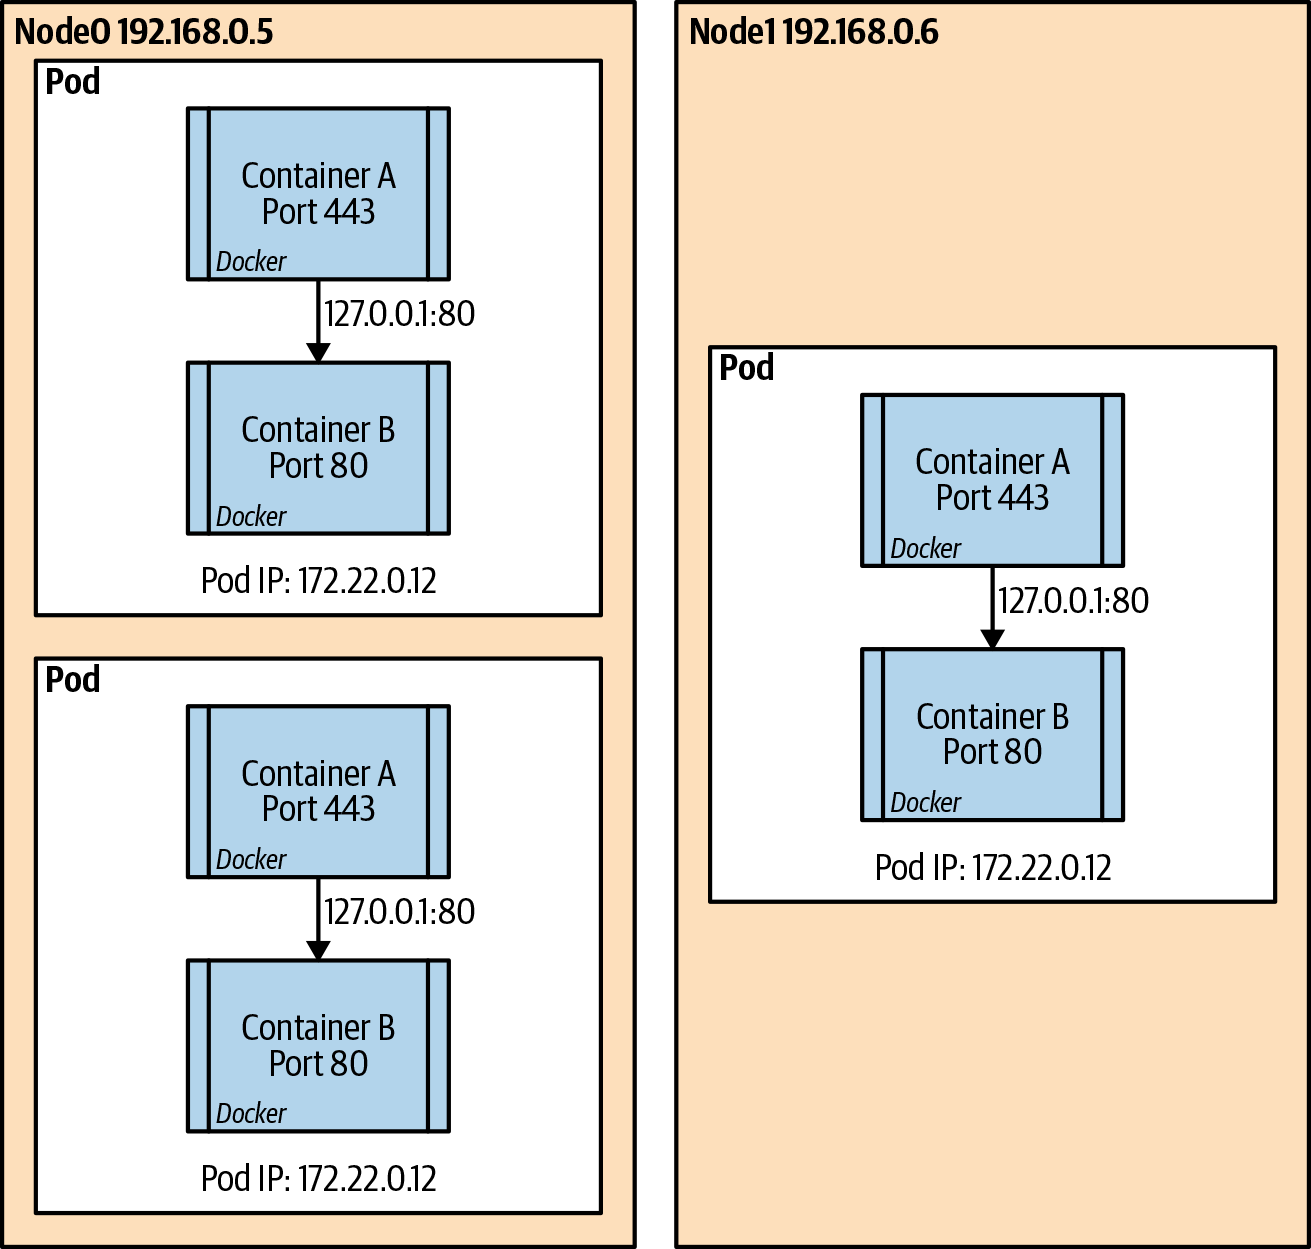
Figure 9-2. Pod to pod communication intra- and internode
- Service-to-pod communication
-
Services in Kubernetes represent a durable IP address and port that is found on each node that will forward all traffic to the endpoints that are mapped to the service. Over the different iterations of Kubernetes, the method in favor of enabling this has changed, but the two main methods are via the use of iptables or the newer IP Virtual Server (IPVS). Most implementations today use the iptables implementation to enable a pseudo-Layer 4 load balancer on each node. Figure 9-3 is a visual representation of how the service is tied to the pods via label selectors.
Figure 9-3. Service to pod communication
Network Plug-ins
Early on, the Special Interest Group (SIG) guided the networking standards to more of a pluggable architecture, which opened the door for numerous third-party networking projects, which in many cases injected value-added capabilities into Kubernetes workloads. These network plug-ins come in two flavors. The most basic is called Kubenet and is the default plug-in provided by Kubernetes natively. The second type of plug-in follows the Container Network Interface (CNI) specification, which is a generic plug-in network solution for containers.
Kubenet
Kubenet is the most basic network plug-in that comes out of the box in
Kubernetes. It is the simplest of the plug-ins and provides a Linux
bridge, cbr0, that’s a virtual Ethernet pair for the pods connected to it. The pod
then gets an IP address from a Classless Inter-Domain Routing (CIDR) range that is distributed across the
nodes of the cluster. There is also an IP masquerade flag that should be
set to allow traffic destined to IPs outside the pod CIDR range to be masqueraded. This obeys the rules of pod-to-pod communication because
only traffic destined outside the pod CIDR undergoes network address translation (NAT). After the packet
leaves a node to go to another node, some kind of routing is put in
place to facilitate the process to forward the traffic to the correct
node.
Kubenet Best Practices
-
Kubenet allows for a simplistic network stack and does not consume precious IP addresses on already crowded networks. This is especially true of cloud networks that are extended to on-premises datacenters.
-
Ensure that the pod CIDR range is large enough to handle the potential size of the cluster and the pods in each cluster. The default pods per node set in kubelet is 110, but you can adjust this.
-
Understand and plan accordingly for the route rules to properly allow traffic to find pods in the proper nodes. In cloud providers, this is usually automated, but on-premises or edge cases will require automation and solid network management.
The CNI Plug-in
The CNI plug-in has some basic requirements set aside by the
specification. These specifications dictate the interfaces and minimal
API actions that the CNI offers and how it will interface with the
container runtime that is used in the cluster. The network management
components are defined by the CNI, but they all must include some type of IP
address management and minimally allow for the addition and deletion of a
container to a network. The full original specification that was
originally derived from the rkt networking proposal is available.
The Core CNI project provides libraries that you can use to write plug-ins that provide the basic requirements and that can call other plug-ins that perform various functions. This adaptability led to numerous CNI plug-ins that you can use in container networking from cloud providers like the Microsoft Azure native CNI and the Amazon Web Services (AWS) VPC CNI plug-in, to traditional network providers such as Nuage CNI, Juniper Networks Contrail/Tunsten Fabric, and VMware NSX.
CNI Best Practices
Networking is a critical component of a functioning Kubernetes environment. The interaction between the virtual components within Kubernetes and the physical network environment should be carefully designed to ensure dependable application communication:
-
Evaluate the feature set needed to accomplish the overall networking goals of the infrastructure. Some CNI plug-ins provide native high availability, multicloud connectivity, Kubernetes network policy support, and various other features.
-
If you are running clusters via public cloud providers, verify that any CNI plug-ins that are not native to the cloud provider’s Software-Defined Network (SDN) are actually supported.
-
Verify that any network security tools, network observability, and management tools are compatible with the CNI plug-in of choice, and if not, research which tools can replace the existing ones. It is important to not lose either observability or security capabilities because the needs will be expanded when moving to a large-scale distributed system such as Kubernetes. You can add tools like Weaveworks Weave Scope, Dynatrace, and Sysdig to any Kubernetes environment, and each offers its own benefits. If you’re running in a cloud provider’s managed service, such as Azure AKS, Google GCE, or AWS EKS, look for native tools like Azure Container Insights and Network Watcher, Google Stackdriver, and AWS CloudWatch. Whatever tool you use, it should at least provide insight into the network stack and the Four Golden signals, made popular by the amazing Google SRE team and Rob Ewashuck: Latency, Traffic, Errors, and Saturation.
-
If you’re using CNIs that do not provide an overlay network separate from the SDN network space, ensure that you have proper network address space to handle node IPs, pod IPs, internal load balancers, and overhead for cluster upgrade and scale out processes.
Services in Kubernetes
When pods are deployed into a Kubernetes cluster, because of the basic rules of Kubernetes networking and the network plug-in used to facilitate these rules, pods can directly communicate only with other pods within the same cluster. Some CNI plug-ins give the pods IPs on the same network space as the nodes, so technically, after the IP of a pod is known, it can be accessed directly from outside the cluster. This, however, is not an efficient way to access services being served by a pod, because of the ephemeral nature of pods in Kubernetes. Imagine that you have a function or system that needs to access an API that is running in a pod in Kubernetes. For a while, that might work with no issue, but at some point there might be a voluntary or involuntary disruption that will cause that pod to disappear. Kubernetes will potentially create a replacement pod with a new name and IP address, so naturally there needs to be some mechanism to find the replacement pod. This is where the service API comes to the rescue.
The service API allows for a durable IP and port to be assigned within
the Kubernetes cluster and automatically mapped to the proper pods as
endpoints to the service. This magic happens through the aforementioned iptables or IPVS on Linux nodes to create a mapping of the assigned
service IP and port to the endpoint’s or pod’s actual IPs. The controller
that manages this is called the kube-proxy service, which actually runs
on each node in the cluster. It is responsible for manipulating the
iptables rules on each node.
When a service object is defined, the type of service needs to be defined. The service type will dictate whether the endpoints are exposed only within the cluster or outside of the cluster. There are four basic service types that we will discuss briefly in the following sections.
Service Type ClusterIP
ClusterIP is the default service type if one is not declared in the specification. ClusterIP means that the service is assigned an IP from a designated service CIDR range. This IP is as long lasting as the service object, so it provides an IP and port and protocol mapping to backend pods using the selector field; however, as we will see, there are cases for which you can have no selector. The declaration of the service also provides for a Domain Name System (DNS) name for the service. This facilitates service discovery within the cluster and allows for workloads to easily communicate to other services within the cluster by using DNS lookup based on the service name. As an example, if you have the service definition shown in the following example and need to access that service from another pod inside the cluster via an HTTP call, the call can simply use http://web1-svc if the client is in the same namespace as the service:
apiVersion:v1kind:Servicemetadata:name:web1-svcspec:selector:app:web1ports:-port:80targetPort:8081
If it is required to find services in other namespaces, the DNS
pattern would be <service_name>.<namespace_name>.svc.cluster.local.
If no selector is given in a service definition, the endpoints can be
explicitly defined for the service by using an endpoint API definition.
This will basically add an IP and port as a specific endpoint to a
service instead of relying on the selector attribute to automatically
update the endpoints from the pods that are in scope by the selector
match. This can be useful in a few scenarios in which you have a specific
database that is not in a cluster that is to be used for testing but you will
change the service later to a Kubernetes-deployed database. This is sometimes called a headless
service because it is not managed by kube-proxy as other services are, but you can directly manage the
endpoints, as shown in Figure 9-4.
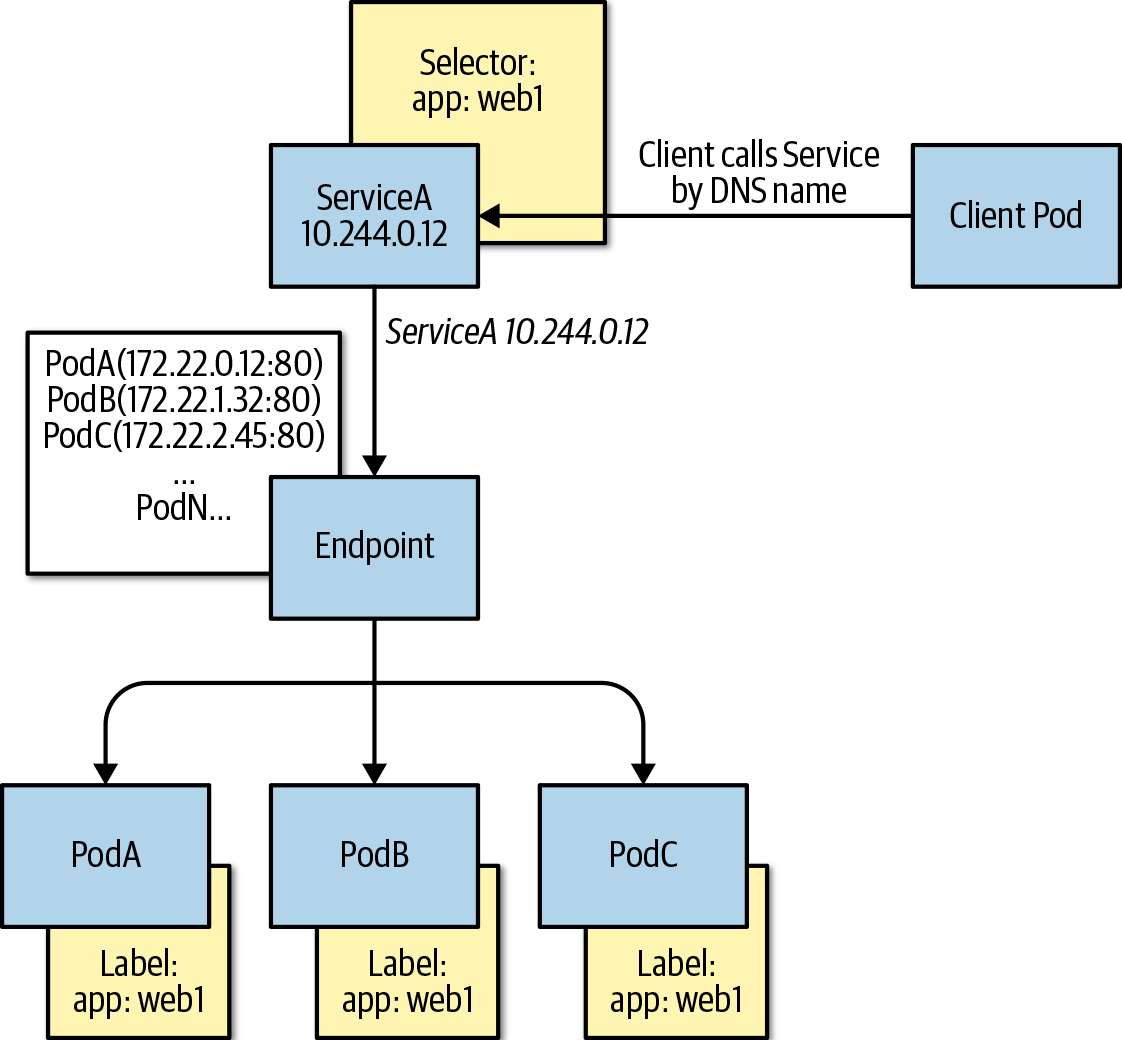
Figure 9-4. ClusterIPPod and Service visualization
Service Type NodePort
The NodePort service type assigns a high-level port on each node of the cluster to the Service IP and port on each node. The high-level NodePorts fall within the 30,000 through 32,767 ranges and can either be statically assigned or explicitly defined in the service specification. NodePorts are usually used for on-premises clusters or bespoke solutions that do not offer automatic load-balancing configuration. To directly access the service from outside the cluster, use NodeIP:NodePort, as depicted in Figure 9-5.

Figure 9-5. NodePort–Pod, Service and Host network visualization
Service Type ExternalName
The ExternalName service type is seldom used in practice, but it can be helpful for
passing cluster-durable DNS names to external DNS named services. A
common example is an external database service from a cloud provider that has a unique DNS provided by the cloud provider, such as
mymongodb.documents.azure.com. Technically, this can be added very
easily to a pod specification using an Environment variable, as discussed in
Chapter 6; however, it might be more advantageous to use a more generic
name in the cluster, such as prod-mongodb, which enables the change of the
actual database it points to by just changing the service specification
instead of having to recycle the pods because the Environment
variable has changed:
kind:ServiceapiVersion:v1metadata:name:prod-mongodbnamespace:prodspec:type:ExternalNameexternalName:mymongodb.documents.azure.com
Service Type LoadBalancer
LoadBalancer is a very special service type because it enables automation with
cloud providers and other programmable cloud infrastructure services.
The LoadBalancer type is a single method to ensure the deployment of the
load-balancing mechanism that the infrastructure provider of the
Kubernetes cluster provides. This means that in most cases, LoadBalancer will work roughly the same way in AWS, Azure, GCE, OpenStack, and
others. In most cases, this entry will create a public-facing load-balanced service; however, each cloud provider has some specific
annotations that enable other features, such as internal-only load
balancers, AWS ELB configuration parameters, and so on. You can also define the actual load-balancer IP to use and the source ranges to allow within the service specification, as seen in the code sample that follows and the visual representation in Figure 9-6:
kind:ServiceapiVersion:v1metadata:name:web-svcspec:type:LoadBalancerselector:app:webports:-protocol:TCPport:80targetPort:8081loadBalancerIP:13.12.21.31loadBalancerSourceRanges:-"142.43.0.0/16"

Figure 9-6. LoadBalancer–Pod, Service, Node, and Cloud Provider network visualization
Ingress and Ingress Controllers
Although not technically a service type in Kubernetes, the Ingress specification is an important concept for ingress to workloads in Kubernetes. Services, as defined by the Service API, allow for a basic level of Layer 3/4 load balancing. The reality is that many of the stateless services that are deployed in Kubernetes require a high level of traffic management and usually require application-level control: more specifically, HTTP protocol management.
The Ingress API is basically an HTTP-level router that allows for host-
and path-based rules to direct to specific backend services. Imagine
a website hosted on www.evillgenius.com and two different paths that
are hosted on that site, /registration and /labaccess, that are
served by two different services hosted in Kubernetes, reg-svc and
labaccess-svc. You can define an ingress rule to ensure that requests
to www.evillgenius/registration are forwarded to the reg-svc
service and the correct endpoint pods, and, similarly, that requests to
www.evillgenius.com/labaccess are forwarded to the correct endpoints of
the labaccess-svc service. The Ingress API also allows for host-based
routing to allow for different hosts on a single ingress. An additional
feature is the ability to declare a Kubernetes secret that holds the
certificate information for Transport Layer Security (TLS) termination on port 443. When a path is
not specified, there is usually a default backend that can be used to
give a better user experience than the standard 404 error.
The details around the specific TLS and default backend configuration are actually handled by what is known as the Ingress controller. The Ingress controller is decoupled from the Ingress API and allows for operators to deploy an Ingress controller of choice, such as NGINX, Traefik, HAProxy, and others. An Ingress controller, as the name suggests, is a controller, just like any Kubernetes controller, but it’s not part of the system and is instead a third-party controller that understands the Kubernetes Ingress API for dynamic configuration. The most common implementation of an Ingress controller is NGINX because it is partly maintained by the Kubernetes project; however, there are numerous examples of both open source and commercial Ingress controllers:
apiVersion:extensions/v1beta1kind:Ingressmetadata:name:labs-ingressannotations:nginx.ingress.kubernetes.io/rewrite-target:/spec:tls:-hosts:-www.evillgenius.comsecretName:secret-tlsrules:-host:www.evillgenius.comhttp:paths:-path:/registrationbackend:serviceName:reg-svcservicePort:8088-path:/labaccessbackend:serviceName:labaccess-svcservicePort:8089
Services and Ingress Controllers Best Practices
Creating a complex virtual network environment with interconnected applications requires careful planning. Effectively managing how the different services of the application communicate with one another and to the outside world requires constant attention as the application changes. These best practices will help make the management easier:
-
Limit the number of services that need to be accessed from outside the cluster. Ideally, most services will be ClusterIP, and only external-facing services will be exposed externally to the cluster.
-
If the services that need to be exposed are primarily HTTP/HTTPS-based services, it is best to use an Ingress API and Ingress controller to route traffic to backing services with TLS termination. Depending on the type of Ingress controller used, features such as rate limiting, header rewrites, OAuth authentication, observability, and other services can be made available without having to build them into the applications themselves.
-
Choose an Ingress controller that has the needed functionality for secure ingress of your web-based workloads. Standardize on one and use it across the enterprise because many of the specific configuration annotations vary between implementations and prevent the deployment code from being portable across enterprise Kubernetes implementations.
-
Evaluate cloud service provider-specific Ingress controller options to move the infrastructure management and load of the ingress out of the cluster, but still allow for Kubernetes API configuration.
-
When serving mostly APIs externally, evaluate API-specific Ingress controllers, such as Kong or Ambassador, that have more fine-tuning for API-based workloads. Although NGINX, Traefik, and others might offer some API tuning, it will not be as fine-grained as specific API proxy systems.
-
When deploying Ingress controllers as pod-based workloads in Kubernetes, ensure that the deployments are designed for high availability and aggregate performance throughput. Use metrics observability to properly scale the ingress, but include enough cushion to prevent client disruptions while the workload scales.
Network Security Policy
The NetworkPolicy API built into Kubernetes allows for network-level ingress and egress access control defined with your workload. Network policies allow you to control how groups of pods are allowed to communicate with one another and with other endpoints. If you want to dig deeper into the NetworkPolicy specification, it might sound confusing, especially given that it is defined as a Kubernetes API, but it requires a network plug-in that supports the NetworkPolicy API.
Network policies have a simple YAML structure that can look complicated, but if you think of it as a simple East-West traffic firewall, it might help you to understand it a little better. Each policy specification has podSelector, ingress, egress, and policyType fields. The only required
field is podSelector, which follows the same convention as any Kubernetes
selector with a matchLabels. You can create multiple NetworkPolicy
definitions that can target the same pods, and the effect is additive in
nature. Because NetworkPolicy objects are namespaced objects, if no
selector is given for a podSelector, all pods in the namespace fall
into the scope of the policy. If there are any ingress or egress rules
defined, this creates a whitelist of what is allowed to
or from the pod. There is an important distinction here: if a pod falls
into the scope of a policy because of a selector match, all traffic,
unless explicitly defined in an ingress or egress rule, is blocked. This
little, nuanced detail means that if a pod does not fall into any policy
because of a selector match, all ingress and egress is allowed to
the pod. This was done on purpose to allow for ease of deploying new
workloads into Kubernetes without any blockers.
The ingress and egress fields are basically a list of rules based on
source or destination and can be specific CIDR ranges,
podSelectors, or namespaceSelectors. If you leave the ingress field empty, it is like a deny-all inbound. Similarly, if you leave the egress empty, it is deny-all outbound. Port and protocol lists are also
supported to further tighten down the type of communications
allowed.
The policyTypes field specifies to which network policy rule types the
policy object is associated. If the field is not present, it will just
look at the ingress and egress lists fields. The difference again is
that you must explicitly call out egress in policyTypes and also
have an egress rule list for this policy to work. Ingress is assumed, and
defining it explicitly is not needed.
Let’s use a prototypical example of a three-tier application deployed to a
single namespace where the tiers are labeled as tier: "web",
tier: "db", and tier: "api". If you want to ensure that traffic is
limited to each tier properly, create a NetworkPolicy manifest
like this:
Default deny rule:
apiVersion:networking.k8s.io/v1kind:NetworkPolicymetadata:name:default-deny-allspec:podSelector:{}policyTypes:-Ingress
Web layer network policy:
apiVersion:networking.k8s.io/v1kind:NetworkPolicymetadata:name:webaccessspec:podSelector:matchLabels:tier:"web"policyTypes:-Ingressingress:-{}
API layer network policy:
apiVersion:networking.k8s.io/v1kind:NetworkPolicymetadata:name:allow-api-accessspec:podSelector:matchLabels:tier:"api"policyTypes:-Ingressingress:-from:-podSelector:matchLabels:tier:"web"
Database layer network policy:
apiVersion:networking.k8s.io/v1kind:NetworkPolicymetadata:name:allow-db-accessspec:podSelector:matchLabels:tier:"db"policyTypes:-Ingressingress:-from:-podSelector:matchLabels:tier:"api"
Network Policy Best Practices
Securing network traffic in an enterprise system was once the domain of physical hardware devices with complex networking rule sets. Now, with Kubernetes network policy, a more application-centric approach can be taken to segment and control the traffic of the applications hosted in Kubernetes. Some common best practices apply no matter which policy plug-in used:
-
Start off slow and focus on traffic ingress to pods. Complicating matters with ingress and egress rules can make network tracing a nightmare. As soon as traffic is flowing as expected, you can begin to look at egress rules to further control flow to sensitive workloads. The specification also favors ingress because it defaults many options even if nothing is entered into the ingress rules list.
-
Ensure that the network plug-in used either has some of its own interface to the NetworkPolicy API or supports other well-known plug-ins. Example plug-ins include Calico, Cilium, Kube-router, Romana, and Weave Net.
-
If the network team is used to having a “default-deny” policy in place, create a network policy such as the following for each namespace in the cluster that will contain workloads to be protected. This ensures that even if another network policy is deleted, no pods are accidentally “exposed”:
apiVersion:networking.k8s.io/v1kind:NetworkPolicymetadata:name:default-deny-allspec:podSelector:{}policyTypes:-Ingress
-
If there are pods that need to be accessed from the internet, use a label to explicitly apply a network policy that allows ingress. Be aware of the entire flow in case the actual IP that a packet is coming from is not the internet, but the internal IP of a load balancer, firewall, or other network device. For example, to allow traffic from all (including external) sources for pods having the
allow-internet=truelabel, do this:
apiVersion:networking.k8s.io/v1kind:NetworkPolicymetadata:name:internet-accessspec:podSelector:matchLabels:allow-internet:"true"policyTypes:-Ingressingress:-{}
-
Try to align application workloads to single namespaces for ease of creating rules because the rules themselves are namespace specific. If cross-namespace communication is needed, try to be as explicit as possible and perhaps use specific labels to identify the flow pattern:
apiVersion:networking.k8s.io/v1kind:NetworkPolicymetadata:name:namespace-foo-2-namespace-barnamespace:barspec:podSelector:matchLabels:app:bar-apppolicyTypes:-Ingressingress:-from:-namespaceSelector:matchLabels:networking/namespace:foopodSelector:matchLabels:app:foo-app
Service Meshes
It is easy to imagine a single cluster hosting hundreds of services that load-balance across thousands of endpoints that communicate with one another, access external resources, and potentially are being accessed from external sources. This can be quite daunting when trying to manage, secure, observe, and trace all of the connections between these services, especially with the dynamic nature of the endpoints coming and going from the overall system. The concept of a service mesh, which is not unique to Kubernetes, allows for control over how these services are connected and secured with a dedicated date plane and control plane. Service meshes all have different capabilities, but usually they all offer some of the following:
-
Load balancing of traffic with potentially fine-grained traffic-shaping policies that are distributed across the mesh.
-
Service discovery of services that are members of the mesh, which might include services within a cluster or in another cluster, or an outside system that is a member of the mesh.
-
Observability of the traffic and services, including tracing across the distributed services using tracing systems like Jaeger or Zipkin that follow the OpenTracing standards.
-
Security of the traffic in the mesh using mutual authentication. In some cases, not only pod-to-pod or East-West traffic is secured, but an Ingress controller is also provided that offers North-South security and control.
-
Resiliency, health, and failure-prevention capabilities that allow for patterns such as circuit breaker, retries, deadlines, and so on.
The key here is that all of these features are integrated into the applications that take part in the mesh with little or no application changes. How can all of these amazing features come for free? Sidecar proxies are usually the way this is done. The majority of service meshes available today inject a proxy that is part of the data plane into each pod that is a member of the mesh. This allows for policies and security to be synchronized across the mesh by the control-plane components. This really hides the network details from the container that holds the workload and leaves it to the proxy to handle the complexity of the distributed network. To the application, it just talks via localhost to its proxy. In many cases, the control plane and data plane might be different technologies but complementary to each other.
In many cases, the first service mesh that comes to mind is Istio, a project by Google, Lyft, and IBM that uses Envoy as its data-plane proxy and uses proprietary control-plane components Mixer, Pilot, Galley, and Citadel. There are other service meshes that offer varying levels of capabilities, such as Linkerd2, which uses its own data-plane proxy built using Rust. HashiCorp has recently added more Kubernetes-centric service mesh capabilities to Consul, which allows you to choose between Consul’s own proxy or Envoy, and offers commercial support for its service mesh.
The topic of service meshes in Kubernetes is a fluid one—if not overly emotional in many social media tech circles—so a detailed explanation of each mesh has no value here. I would be remiss if I did not mention the promising efforts lead by Microsoft, Linkerd, HashiCorp, Solo.io, Kinvolk, and Weaveworks around the Service Mesh Interface (SMI). The SMI hopes to set a standard interface for basic feature sets that are expected of all service meshes. The specification as of this writing covers traffic policy such as identity and transport-level encryption, traffic telemetry that captures key metrics between services in the mesh, and traffic management to allow for traffic shifting and weighting between different services. This project hopes to take some of the variability out of the service meshes yet allow for service mesh vendors to extend and build value-added capabilities into their products to differentiate themselves from others.
Service Mesh Best Practices
The service mesh community continues to grow every day, and as more and more enterprises help define their needs, the service mesh ecosystem will change dramatically. These best practices are, as of this writing, based on common necessities that service meshes try to solve today:
-
Rate the importance of the key features service meshes offer and determine which current offerings provide the most important features with the least amount of overhead. Overhead here is both human technical debt and infrastructure resource debt. If all that is really required is mutual TLS between certain pods, would it be easier to perhaps find a CNI that offers that integrated into the plug-in?
-
Is the need for a cross-system mesh such as multicloud or hybrid scenarios a key requirement? Not all service meshes offer this capability, and if they do, it is a complicated process that often introduces fragility into the environment.
-
Many of the service mesh offerings are open source community-based projects, and if the team that will be managing the environment is new to service meshes, commercially supported offerings might be a better option. There are companies that are beginning to offer commercially supported and managed service meshes based on Istio, which can be helpful because it is almost universally agreed upon that Istio is a complicated system to manage.
Summary
In addition to application management, one of the most important things that Kubernetes provides is the ability to link different pieces of your application together. In this chapter, we looked at the details of how Kubernetes works, including how pods get their IP addresses through CNI plug-ins, how those IPs are grouped together to form services, and how more application or Layer 7 routing can be implemented via Ingress resources (which in turn use services). You also saw how to limit traffic and secure your network using networking policies, and, finally, how service mesh technologies are transforming the ways in which people connect and monitor the connections between their services. In addition to setting up your application to run and be deployed reliably, setting up the networking for your application is a crucial piece of using Kubernetes successfully. Understanding how Kubernetes approaches networking and how that intersects optimally with your application is a critical piece of its ultimate success.