Chapter 17. Admission Control and Authorization
Controlling access to the Kubernetes API is key to ensuring that your cluster is not only secured but also can be used as a means to impart policy and governance for all users, workloads, and components of your Kubernetes cluster. In this chapter, we share how you can use admission controllers and authorization modules to enable specific features and how you can customize them to suit your specific needs.
Figure 17-1 provides insight on how and where admission control and authorization take place. It depicts the end-to-end request flow through the Kubernetes API server until the object, if accepted, is saved to storage.

Figure 17-1. An API request flow
Admission Control
Have you ever wondered how namespaces are automatically created when you define a resource in a namespace that doesn’t already exist? Maybe you’ve wondered how a default storage class is selected? These changes are powered by a little-known feature called admission controllers. In this section, we take a look at how you can use admission controllers to implement Kubernetes best practices on the server side on behalf of the user and how we can utilize admission control to govern how a Kubernetes cluster is used.
What Are They?
Admission controllers sit in the path of the Kubernetes API server request flow and receive requests following the authentication and authorization phases. They are used to either validate or mutate (or both) the request object before saving it to storage. The difference between validating and mutating admission controllers is that mutating can modify the request object they admit, whereas validating cannot.
Why Are They Important?
Given that admission controllers sit in the path of all API server requests, you can use them in a variety of different ways. Most commonly, admission controller usage can be grouped into the following three groups:
- Policy and governance
-
Admission controllers allow policy to be enforced in order to meet business requirements; for example:
-
Only internal cloud load balancers can be used when in the
devnamespace. -
All containers in a pod must have resource limits.
-
Add predefined standard labels or annotations to all resources in order to make them discoverable to existing tools.
-
All Ingress resources only use HTTPS. For more details on how to use admission webhooks in this context, see Chapter 11.
-
- Security
-
You can use admission controllers to enforce a consistent security posture across your cluster. A canonical example is the PodSecurityPolicy admission controller, which enables controls on security-sensitive fields of the pod specification, for example, denying privileged containers or usage of specific paths from the host filesystem. You can enforce more granular or custom security rules using admission webhooks.
- Resource management
-
Admission controllers allow you to validate in order to provide best practices for your cluster users, for example:
-
Ensure all ingress fully qualified domain names (FQDN) fall within a specific suffix.
-
Ensure ingress FQDNs don’t overlap.
-
All containers in a pod must have resource limits.
-
Admission Controller Types
There are two classes of admission controllers: standard and dynamic. Standard admission controllers are compiled into the API server and are shipped as plug-ins with each Kubernetes release; they need to be configured when the API server is started. Dynamic controllers, on the other hand, are configurable at runtime and are developed outside the core Kubernetes codebase. The only type of dynamic admission control is admission webhooks, which receive admission requests via HTTP callbacks.
Kubernetes ships with more than 30 admission controllers, which are enabled via the following flag on the Kubernetes API server:
--enable-admission-plugins
Many of the features that ship with Kubernetes depend on the enablement of specific standard admission controllers and, as such, there is a recommended set of defaults:
--enable-admission-plugins=NamespaceLifecycle,LimitRanger,ServiceAccount,DefaultStorageClass,DefaultTolerationSeconds,MutatingAdmissionWebhook,ValidatingAdmissionWebhook,Priority,ResourceQuota,PodSecurityPolicy
You can find the list of Kubernetes admission controllers and their functionality in the Kubernetes documentation.
You might have noticed the following from the list of recommended admission controllers to enable: “MutatingAdmissionWebhook,ValidatingAdmissionWebhook.” These standard admission controllers don’t implement any admission logic themselves; rather, they are used to configure a webhook endpoint running in-cluster to forward the admission request object.
Configuring Admission Webhooks
As previously mentioned, one of the main advantages of admission webhooks is that they are dynamically configurable. It is important that you understand how to effectively configure admission webhooks because there are implications and trade-offs when it comes to consistency and failure modes.
The snippet that follows is a ValidatingWebhookConfiguration resource manifest. This manifest is used to define a validating admission webhook. The snippet provides detailed descriptions on the function of each field:
apiVersion:admissionregistration.k8s.io/v1beta1kind:ValidatingWebhookConfigurationmetadata:name:## Resource namewebhooks:-name:## Admission webhook name, which will be shown to the user when any admission reviews are deniedclientConfig:service:namespace:## The namespace where the admission webhook pod residesname:## The service name that is used to connect to the admissionwebhookpath:## The webhook URLcaBundle:## The PEM encoded CA bundle which will be used to validate the webhook's server certificaterules:## Describes what operations on what resources/subresources the API server must send to this webhook-operations:-## The specific operation that triggers the API server to send to this webhook (e.g., create, update, delete, connect)apiGroups:-""apiVersions:-"*"resources:-## Specific resources by name (e.g., deployments, services, ingresses)failurePolicy:## Defines how to handle access issues or unrecognized errors, and must be Ignore or Fail
For completeness, let’s take a look at a MutatingWebhookConfiguration resource manifest. This manifest defines a mutating admission webhook. The snippet provides detailed descriptions on the function of each field:
apiVersion:admissionregistration.k8s.io/v1beta1kind:MutatingWebhookConfigurationmetadata:name:## Resource namewebhooks:-name:## Admission webhook name, which will be shown to the user when any admission reviews are deniedclientConfig:service:namespace:## The namespace where the admission webhook pod residesname:## The service name that is used to connect to the admission webhookpath:## The webhook URLcaBundle:## The PEM encoded CA bundle which will be used to validate the webhook's server certificaterules:## Describes what operations on what resources/subresources the API server must send to this webhook-operations:-## The specific operation that triggers the API server to send to this webhook (e.g., create, update, delete, connect)apiGroups:-""apiVersions:-"*"resources:-## Specific resources by name (e.g., deployments, services, ingresses)failurePolicy:## Defines how to handle access issues or unrecognized errors, and must be Ignore or Fail
You might have noticed that both resources are identical, with the
exception of the kind field. There is one difference on the backend,
however: MutatingWebhookConfiguration allows the admission webhook to
return a modified request object, whereas
ValidatingWebhookConfiguration does not. Even still, it is acceptable to define
a MutatingWebhookConfiguration and simply validate; there are security
considerations that come into play, and you should consider following the
least-privilege rule.
Note
It is also likely that you thought to yourself, “What happens if I define a ValidatingWebhookConfiguration or MutatingWebhookConfiguration with the resource field under the rule object to be either ValidatingWebhookConfiguration or MutatingWebhookConfiguration?” The good news is that ValidatingAdmissionWebhooks and MutatingAdmissionWebhooks are never called on admission requests for ValidatingWebhookConfiguration and MutatingWebhookConfiguration objects. This is for good reason: you don’t want to accidentally put the cluster in an unrecoverable state.
Admission Control Best Practices
Now that we’ve covered the power of admission controllers, here are our best practices to help you make the most of using them:
-
Admission plug-in ordering doesn’t matter. In earlier versions of Kubernetes, the ordering of the admission plug-ins was specific to the processing order; hence it mattered. In current supported Kubernetes versions, the ordering of the admission plug-ins as specified as API server flags via
--enable-admission-pluginsno longer matters. Ordering does, however, play a small role when it comes to admission webhooks, so it’s important to understand the request flow in this case. Request admittance or rejection operates as a logical AND, meaning if any of the admission webhooks reject a request, the entire request is rejected and an error is sent back to the user. It’s also important to note that mutating admission controllers are always run prior to running validating admission controllers. If you think about it, this makes good sense: you probably don’t want to validate objects that you are going to subsequently modify. Figure 17-2 illustrates a request flow via admission webhooks.
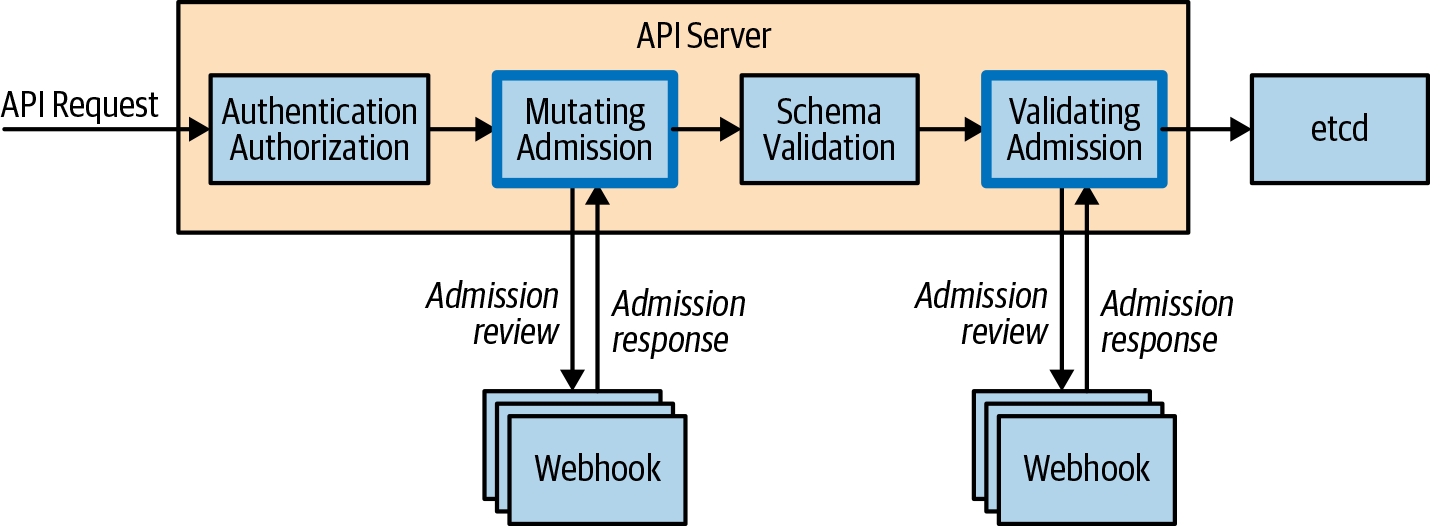
Figure 17-2. An API request flow via admission webhooks
-
Don’t mutate the same fields. Configuring multiple mutating admission webhooks also presents challenges. There is no way to order the request flow through multiple mutating admission webhooks, so it’s important to not have mutating admission controllers modify the same fields, because this can result in unexpected results. In the case where you have multiple mutating admission webhooks, we generally recommend configuring validating admission webhooks to confirm that the final resource manifest is what you expect post-mutation because it’s guaranteed to be run following mutating webhooks.
-
Fail open/fail closed. You might recall seeing the
failurePolicyfield as part of both the mutating and validating webhook configuration resources. This field defines how the API server should proceed in the case where the admission webhooks have access issues or encounter unrecognized errors. You can set this field to eitherIgnoreorFail.Ignoreessentially fails to open, meaning that processing of the request will continue, whereasFaildenies the entire request. This might seem obvious, but the implications in both cases require consideration. Ignoring a critical admission webhook could result in policy that the business relies on not being applied to a resource without the user knowing.One potential solution to protect against this would be to raise an alert when the API server logs that it cannot reach a given admission webhook.
Failcan be even more devastating by denying all requests if the admission webhook is experiencing issues. To protect against this you can scope the rules to ensure that only specific resource requests are set to the admission webhook. As a tenet, you should never have any rules that apply to all resources in the cluster. -
If you have written your own admission webhook, it’s important to remember that user/system requests can be directly affected by the time it takes for your admission webhook to make a decision and respond. All admission webhook calls are configured with a 30-second timeout, after which time the
failurePolicytakes effect. Even if it takes several seconds for your admission webhook to make an admit/deny decision, it can severely affect user experience when working with the cluster. Avoid having complex logic or relying on external systems such as databases in order to process the admit/deny logic. -
Scoping admission webhooks. There is an optional field that allows you to scope the namespaces in which the admission webhooks operate on via the
NamespaceSelectorfield. This field defaults to empty, which matches everything, but can be used to match namespace labels via the use of thematchLabelsfield. We recommend that you always use this field because it allows for an explicit opt-in per namespace. -
The
kube-systemnamespace is a reserved namespace that’s common across all Kubernetes clusters. It’s where all system-level services operate. We recommend never running admission webhooks against the resources in this namespace specifically, and you can achieve this by using theNamespaceSelectorfield and simply not matching thekube-systemnamespace. You should also consider it on any system-level namespaces that are required for cluster operation. -
Lock down admission webhook configurations with RBAC. Now that you know about all the fields in the admission webhook configuration, you have probably thought of a really simple way to break access to a cluster. It goes without saying that the creation of both a MutatingWebhookConfiguration and ValidatingWebhookConfiguration is a root-level operation on the cluster and must be locked down appropriately using RBAC. Failure to do so can result in a broken cluster or, even worse, an injection attack on your application workloads.
-
Don’t send sensitive data. Admission webhooks are essentially black boxes that accept AdmissionRequests and output AdmissionResponses. How they store and manipulate the request is opaque to the user. It’s important to think about what request payloads you are sending to the admission webhook. In the case of Kubernetes secrets or ConfigMaps, they might contain sensitive information and require strong guarantees about how that information is stored and shared. Sharing these resources with an admission webhook can leak sensitive information, which is why you should scope your resource rules to the minimum resource needed to validate and/or mutate.
Authorization
We often think about authorization in the context of answering the following question: “Is this user able to perform these actions on these resources?” In Kubernetes, the authorization of each request is performed after authentication but before admission. In this section, we explore how you can configure different authorization modules and better understand how you can create the appropriate policy to serve the needs of your cluster. Figure 17-3 illustrates where authorization sits in the request flow.

Figure 17-3. API request flow via authorization modules
Authorization Modules
Authorization modules are responsible for either granting or denying permission to access. They determine whether to grant access based on policy that must be explicitly defined; otherwise all requests will be implicitly denied.
As of version 1.15, Kubernetes ships with the following authorization modules out of the box:
- Attribute-Based Access Control (ABAC)
-
Allows authorization policy to be configured via local files
- RBAC
-
Allows authorization policy to be configured via the Kubernetes API (refer to Chapter 4)
- Webhook
-
Allows the authorization of a request to be handled via a remote REST endpoint
- Node
-
Specialized authorization module that authorizes requests from kubelets
The modules are configured by the cluster administrator via the following
flag on the API server: --authorization-mode. Multiple modules can be
configured and are checked in order. Unlike admission controllers, if a
single authorization module admits the request, the request can
proceed. Only for the case in which all modules deny the request will an
error be returned to the user.
ABAC
Let’s take a look at a policy definition in the context of using the
ABAC authorization module. The following grants user Mary read-only
access to a pod in the kube-system namespace:
apiVersion:abac.authorization.kubernetes.io/v1beta1kind:Policyspec:user:maryresource:podsreadonly:truenamespace:kube-system
If Mary were to make the following request, it would be denied because Mary
doesn’t have access to get pods in the demo-app namespace:
apiVersion:authorization.k8s.io/v1beta1kind:SubjectAccessReviewspec:resourceAttributes:verb:getresource:podsnamespace:demo-app
This example introduced a new API group, authorization.k8s.io.
This set of APIs exposes API server authorization to external services
and has the following APIs, which are great for debugging:
- SelfSubjectAccessReview
-
Access review for the current user
- SubjectAccessReview
-
Like SelfSubjectAccessReview but for any user
- LocalSubjectAccessReview
-
Like SubjectAccessReview but namespace specific
- SelfSubjectRulesReview
-
Returns a list of actions a user can perform in a given namespace
The really cool part is that you can query these APIs by creating resources as you typically would. Let’s actually take the previous example and test this for ourselves using the SelfSubjectAccessReview. The status field in the output indicates that this request is allowed:
$cat<< EOF | kubectl create -f - -o yamlapiVersion: authorization.k8s.io/v1beta1kind: SelfSubjectAccessReviewspec:resourceAttributes:verb: getresource: podsnamespace: demo-appEOFapiVersion: authorization.k8s.io/v1beta1 kind: SelfSubjectAccessReview metadata: creationTimestamp: null spec: resourceAttributes: namespace: demo-app resource: pods verb: get status: allowed:true
In fact, Kubernetes ships with tooling built into kubectl to make this
even easier. The kubectl auth can-i command operates by querying the
same API as the previous example:
$ kubectl auth can-i get pods --namespace demo-app
yes
With administrator credentials, you can also run the same command to check actions as another user:
$ kubectl auth can-i get pods --namespace demo-app --as mary
yes
RBAC
Kubernetes role-based access control is covered in depth in Chapter 4.
Webhook
Using the webhook authorization module allows a cluster administrator to
configure an external REST endpoint to delegate the authorization
process to. This would run off cluster and be reachable via URL. The
configuration of the REST endpoint is found in a file on the
master filesystem and configured on the API server via
--authorization-webhook-config-file=SOME_FILENAME. After you’ve configured it,
the API server will send SubjectAccessReview objects as part of the
request body to the authorization webhook application, which processes and
returns the object with the status field complete.
Authorization Best Practices
Consider the following best practices before making changes to the authorization modules configured on your cluster:
-
Given that the ABAC policies need to be placed on the filesystem of each master node and kept synchronized, we generally recommend against using ABAC in multimaster clusters. The same can be said for the webhook module because the configuration is based on a file and a corresponding flag being present. Furthermore, changes to these policies in the files require a restart of the API server to take effect, which is effectively a control-plane outage in a single master cluster or inconsistent configuration in a multimaster cluster. Given these details, we recommend using only the RBAC module for user authorization because the rules are configured and stored in Kubernetes itself.
-
Webhook modules, although powerful, are potentially very dangerous. Given that every request is subject to the authorization process, a failure of a webhook service would be devastating for a cluster. Therefore, we generally recommend not using external authorization modules unless you completely vet and are comfortable with your cluster failure modes if the webhook service becomes unreachable or unavailable.
Summary
In this chapter, we covered the foundational topics of admission and authorization and covered best practices. Put these skills to use by determining the best admission and authorization configuration that allows you to customize the controls and policies needed for the life of your cluster.