
Migrate to Lightroom Classic CC
If you’ve used a Mac for a while, your photo library may be in iPhoto or Aperture—both of which have been discontinued by Apple. The easiest path to bring your photos into the present is to upgrade to Photos for Mac, but as I’ve discussed elsewhere, I prefer Lightroom for many reasons. (For a discussion of the migration process to Photos, read Jason Snell’s Photos: A Take Control Crash Course.)
Moving to Lightroom Classic isn’t a straightforward process, however. Granted, if you want to move from iPhoto or Aperture (but not Photos), it’s easier now that Adobe includes a migration tool in Lightroom Classic—as a direct response to Apple tossing aside iPhoto and Aperture—but there are still details you need to be aware of. (Believe me, it’s now far easier than the process of moving from iPhoto to Lightroom Classic just a couple of years ago; if you own the first edition of this book, you know what I’m talking about.) Likewise, moving from Photos to Lightroom has some quirks, and you may not love the results, but it is possible.
What about moving to Photoshop Elements? Although the Elements Organizer is more capable in many ways, it’s not a significant improvement over iPhoto or Photos (in fact, its inflexible smart-album replacement—saved searches—are a downgrade). If you’re going to put the work into moving your iPhoto library, do it to a significantly better application such as Lightroom Classic.
Jumping from iPhoto or Photos to Lightroom CC also requires some thought. There’s no direct way to migrate into Lightroom CC, so the better approach is to follow the instructions in this chapter to migrate first to Lightroom Classic, and then migrate that library to Lightroom CC. (I detail the process in Take Control of Lightroom CC.) If you don’t want to do that, check out the instructions in Moving from Photos to Lightroom at the end of this chapter.
If you’ve decided that you’re ready to move to Lightroom Classic, this chapter will guide you. I first look at migrating from iPhoto or Aperture (just ahead) and then at Moving from Photos to Lightroom Classic.
Moving from iPhoto or Aperture to Lightroom Classic
Migrating your libraries to Lightroom Classic is a multi-step process, even with Adobe’s iPhoto and Aperture import tools. I recommend trying the steps below on a small iPhoto or Aperture library for an initial run-through, so you’re familiar with the process. It boils down to the following:
Create a new Lightroom Classic catalog.
Repair the iPhoto or Aperture library.
Import the iPhoto or Aperture library.
Add the imported photos to your main catalog.
If you’re just switching to Lightroom Classic and don’t have an existing Lightroom Classic catalog, skip step 4. I include it because I suspect that photographers kick the tires on new software by importing selected photos to see how it works.
Step 1: Create a New Lightroom Classic Catalog
If you already have a Lightroom Classic catalog, this step isn’t technically required—you can import an iPhoto or Aperture library into an existing Lightroom Classic catalog. However, I’m more comfortable doing the import into an empty vessel and doing any cleanup there than dumping the images into my main catalog, where it would be more difficult to extricate any images that didn’t import well.
In Lightroom Classic, choose File > New Catalog.
Choose a location for the catalog on your disk and give it a name; click Create.
Lightroom Classic first closes your open catalog and then creates the new, blank one.
Step 2: Repair the iPhoto or Aperture Library
To sanitize the incoming data as much as possible, I recommend running a couple of basic repairs on the iPhoto or Aperture library before you import it into Lightroom:
Hold the ⌘ and Option keys while opening iPhoto or Aperture to bring up the Photo Library First Aid dialog (Figure 86).
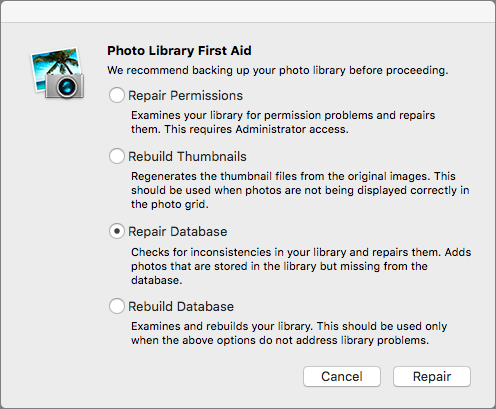
Figure 86: The Photo Library First Aid tool in iPhoto and Aperture will help clean up the library’s database. Select Repair Database and click Repair.
When the repair is finished, quit the program.
Step 3: Import the iPhoto or Aperture Library
Now that your library is prepped, it’s time to use Lightroom Classic’s tool to import the images:
Choose File > Plug-in Extras > Import from iPhoto (or Aperture) Library.
In the dialog that appears, click the Select button that corresponds to iPhoto Library and select the library you’re importing photos from (Figure 87).
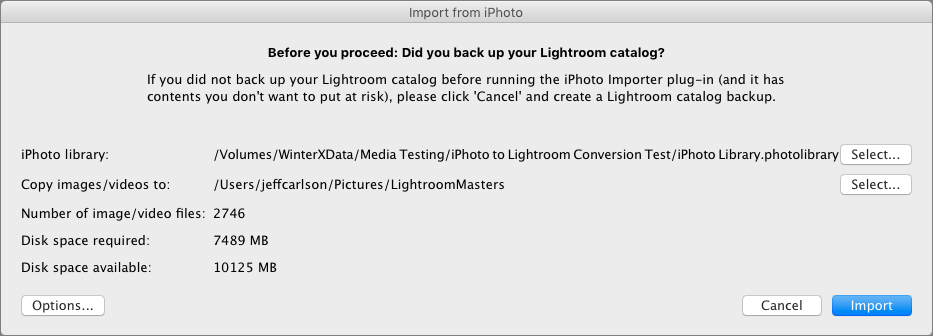
Figure 87: The Import from iPhoto tool is more functional than beautiful. Choose a destination by clicking the Select button for the Copy Images/Videos To option.
Click the Options button to change the import options (see the next sidebar, Import Photo Library Options).
Click the Import button to begin.
When the process is complete (which could take a long time, depending on the size of the imported library), you’re alerted to any problems, such as referenced originals that are missing. Select the option labeled “Write summary to LibraryImport.txt in the Documents folder.” The file that’s created can be used to track down any shots that weren’t imported.
Ratings, keywords, and other data remain intact in the imported photos. Here are a few things to be aware of:
Edited photos appear in a stack (a bound collection of images) with their originals (Figure 88). The number at the top-left corner tells you how many images make up the stack.
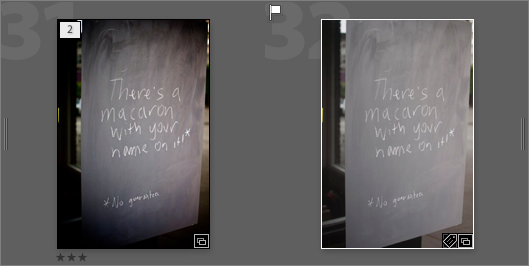
Figure 88: Adjusted images are grouped with their originals in stacks. Those edited photos also gain descriptive text in their filenames, based on titles you gave them in iPhoto or Aperture; for example, the adjusted image in the following figure is named
MacaronSign_iPhoto_preview.jpg.The previews, however, do not gain any of the metadata, such as keywords, that were applied to their originals.
Lightroom Classic creates a new collection set (which is like a folder) for your imported images, called From iPhoto (or From Aperture). Inside you’ll find collections containing just the edited photos, hidden photos, and the most recent import. This is also where events or projects are organized, again in collection sets, to replicate the organization structure of the previous software.
People identified using the Faces feature in iPhoto or Aperture are tagged with keywords matching the people’s names. They aren’t automatically recognized by Lightroom Classic’s People feature, although the application will scan the images to find faces when you go to the People view.
Smart albums, alas, do not transfer over as smart collections.
Other casualties are iPhoto-specific creations such as slideshows, books, calendars, and cards. You can save those as movies (in the case of slideshows) or PDF files (for the other items). Or, if you have the storage capacity, keep the old iPhoto library as a backup that you can open for the near future.
Step 4: Add the Imported Photos to Your Main Catalog
The last step is to combine the Lightroom Classic catalog you created for the imported photos with your main Lightroom Classic catalog:
Open your main catalog in Lightroom Classic.
Choose File > Import from Another Catalog.
Locate the catalog file containing the images you imported from iPhoto or Aperture (the filename ends in
.lcat). Click Choose.In the Import dialog that appears, all the images are selected for import; if you want to review and not include some of them, deselect folders in the Catalog Contents pane (Figure 89). Select the Show Preview box to view the photos themselves.
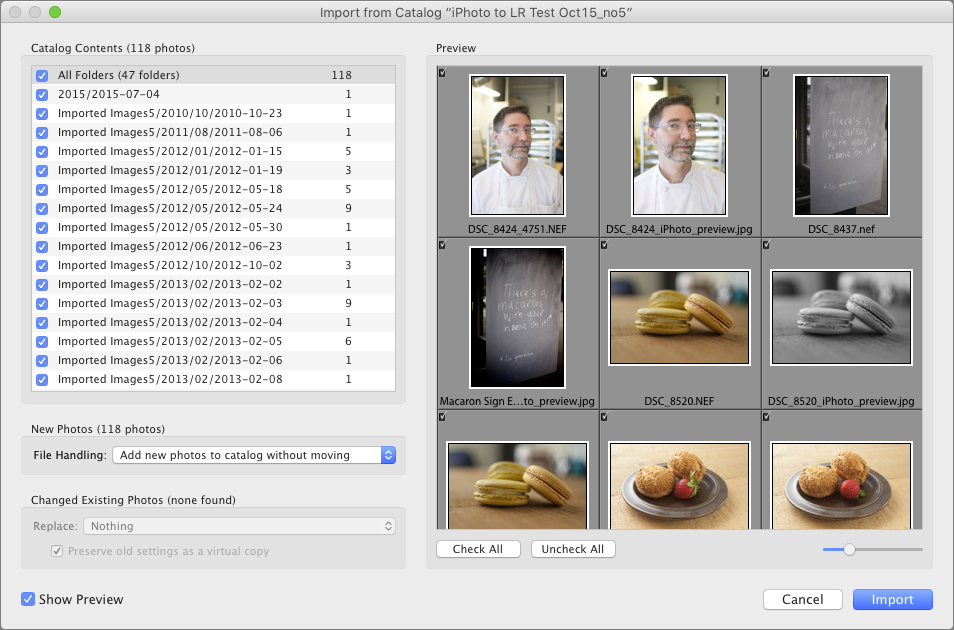
Figure 89: Import iPhoto or Aperture photos from the Lightroom Classic library you created into your main Lightroom Classic library. In the File Handling pop-up menu, choose where you want the image files to end up: in their existing locations or to a directory of your choice.
Click Import to bring the photos into your library.
Now your photos are in Lightroom Classic. Congratulations on escaping from iPhoto or Aperture.
Moving from Photos to Lightroom Classic
What if you’ve upgraded an iPhoto or Aperture library to Photos for Mac, but decided you want to move to Lightroom Classic after all? That path is currently somewhat rocky. Lightroom Classic’s import tools won’t open a Photos for Mac library (at this writing), which means a workaround is necessary.
And when I say “workaround,” I mean an ugly hack. Here’s the issue: You can export images from Photos, but only as JPEG (or TIFF or PNG) files, and you lose the ability to revert back to the original versions of images you’ve edited. Or, you can export the originals, but you lose any adjustments you’ve made. In either case, you lose the Favorite flag.
However, the task isn’t impossible. It involves creating a couple of smart albums and exporting their contents, and then bringing the image files into Lightroom Classic.
I suggest trying the steps below on a subset of your images in Photos for an initial run-through, so you know what to expect before you convert your entire library.
Here’s a method for migrating your Photos library to Lightroom Classic:
To preserve any favorites that you’ve marked in Photos, open the Favorites album.
Select all the images in the album, open the Info window, and add the keyword
favorite.Select all images in your Photos library and export the original versions to a new folder (choose File > Export > Export Unmodified Originals for X Photos). Make sure the Export IPTC as XMP checkbox is enabled to preserve your descriptions and keywords.
Create a new smart album that finds
[photo][is][edited]. Export the results as JPEGs (choose File > Export > Export X Photos) to a different folder than the one containing the originals. Make sure the checkboxes for including title, keywords, descriptions, and location information are marked (they are by default).In Lightroom Classic, choose File > Import Photos and Video and import the photos from the two folders.
The edited versions appear alongside their originals with metadata intact…except for favorites, that is.
To bring back your favorites, in Lightroom Classic’s Library module, do a text search for
favorite, select all the results, and then apply a flag by choosing Photo > Set Flag > Flagged (or press P); or, mark the photos with a rating or color label to set them apart.
I’ll admit that this isn’t a pretty solution, and you will likely have to do some cleanup, but it gets you most of the way there. I’m hoping that in time we’ll see an updated migration tool from Adobe, or better access to Photos for developers, that will streamline the process.