
Editing Tools, Transitions, Filters, and Other Basic Video Tools
Importing Media to the Timeline
Aside from capturing media, many methods can be used to bring media into Vegas. Vegas is format agnostic and resolution independent, meaning that nearly any form of media recognized by the Microsoft Windows-operating system can be imported to the Vegas timeline as an event.
Vegas has an Explorer that by default opens in the lower-left corner of the dockable tool space. This Explorer can be dismissed from view and recalled at any time by pressing ALT+1. The Explorer is a dockable tool that can be sent to a second monitor to preserve space on the timeline.
Open and view the Explorer. Any form of media that can be imported is shown in the Explorer. Media files, such as GIF, TGA, JPEG, BMP, PNG, TIFF, MOV, AVI, WMV, and MPG are all media file formats that can be opened in Vegas.
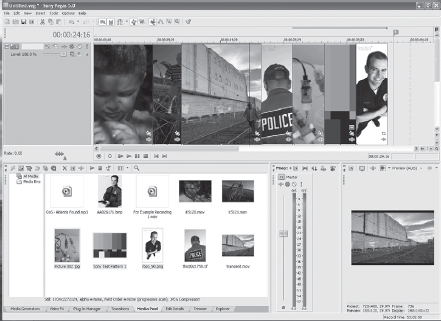
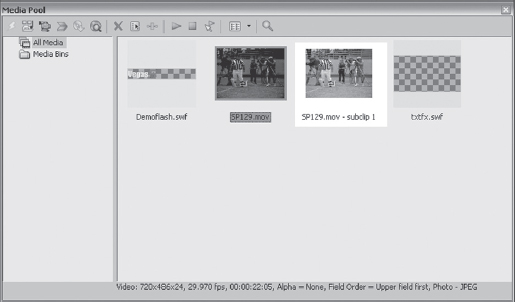
4.1 In this picture of the Media Pool, different media formats are placed as events on the Vegas time-line.
If QuickTime files are to be viewed and edited within Vegas, the QuickTime full install is required. Visit www.quicktime.com and download the current player. When installing, three choices are presented: Full Install (recommended), Custom Install, and Minimal Install. Choose full installation so that Vegas is able to access authoring tools for the QuickTime MOV file type. Without this installation, Vegas won’t be able to access or edit QuickTime files or TIFF files.
All media formats may be placed on the same track, which means that an AVI file might be next to a JPEG file, which in turn might be next to a QuickTime file, which might be next to a WMV file, and so on. About the only Windows-recognized media format that cannot be opened inside of Vegas is the REAL (rm.ram) file format, as this format is protected by Real’s protection algorithms.
To place media on the timeline, drag the media from the Explorer to the timeline, where the media becomes an event. If a track is not present, Vegas automatically creates one for the media that has been dragged and dropped. Double-clicking a file in the Explorer window automatically adds the file to the timeline as an event and creates a track for the file if a video track isn’t already present.
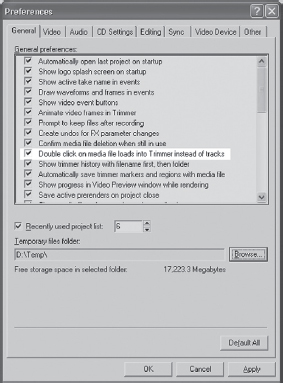
4.2 Selecting preferences for loading media in Trimmer.
To manually insert a new video track, right-click the track control pane and select INSERT | VIDEO TRACK or press CTRL+SHIFT+Q.
Media can also be opened in the Trimmer window. For those familiar with other NLE systems, the Trimmer window is much like a source window where media can be previewed and trimmed to the desired length/information before being placed on the timeline. To accomplish this task, right-click the media and select Open in Trimmer. Vegas can be set to open files directly in Trimmer, by going to the OPTIONS | PREFERENCES | GENERAL dialog and checking the “Double-click on media file loads into Trimmer instead of tracks” check box.
Media can also be dragged directly into the Media Pool, which is where Vegas stores location information for all media used in a project. Media can be stored in the Media Pool regardless of whether the media is found on the timeline or not. Any event or piece of media placed on the timeline, however, is automatically added to the Media Pool.
![]() Tip
Tip
In Vegas 6, “Media Pool” is now known as “Project Manager”.
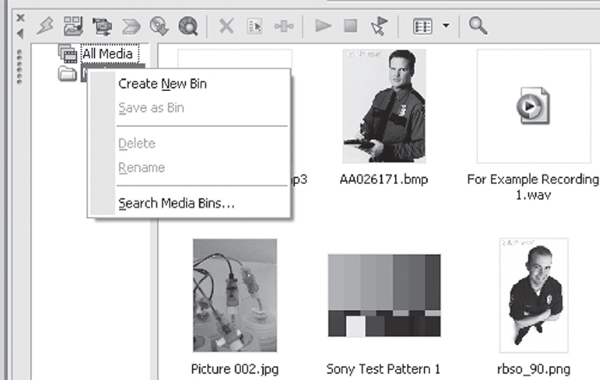
4.3 Creating and naming the media bins.
Vegas has media management features in the Media Pool. The use of media bins allows users to preset where media will be pointed to and how media is located. A master project bin resides in the Media Pool where all media is pointed to by default. This master bin is labeled “All Media Folder.” Beneath it is a folder labeled “Media Bins.” Right-clicking the Media Bins folder opens a menu/dialog that allows for new bins to be creaed nd named.
Be aware that Vegas does not copy media and place it in bins. There is no point nor value in having two copies of the same piece of media on the hard drive simply for the point of filling bins as some NLEs demand. On the contrary, Vegas points to a file from within the bin. While the media is always accessed from the bin, it truly resides wherever it was stored in the acquisition of the media. Bins are simply a means of collecting the storage points of all media and putting those indexes in one place.
Bins can be dragged from project to project in Vegas or stored as project bins so that they’ll always be found within the preferences of Vegas. Audio, video, graphics, and anything else for which you would like to specify bins can be created, with sub-bins for every bin format. This way, you’ll always know where media is stored.
Bins can be dragged from one open instance of Vegas to another open instance of Vegas.
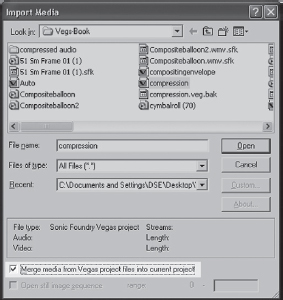
Media can also be imported from other projects by selecting FILE | OPEN, choosing the VEG file from which media is to be imported, and checking the “Merge media from Vegas project files into current project” check box, as shown in Figure 4.5. Media is then automatically added to the Media Pool in the same folders from which the imported Media Pool came. If the imported project has no bins specified in its Media Pool, Vegas will add media to the All Media Folder, where it can be dragged to specific bins within Media Pool for consistent file management.
Use bins to sort media by the name of the tape that media is captured from, a bin for bed music, a bin for various takes, or a bin for JPEGs, BMPs, or PNGs. Good project management starts with locating and knowing where all media is stored at all times. This process also assists in clearing out a project when it is finished.
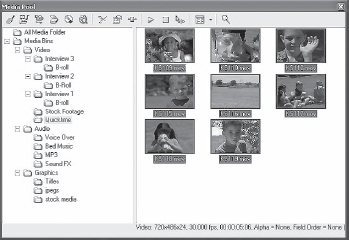
4.4 Bins separating various media types for efficient file location.
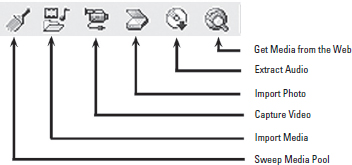
The Media Pool has several additional options for file import. Audio from CDs can be extracted directly from the Media Pool toolbar.
These options include the following:
• Sweep Media Pool—removes all media from Media Pool that is not in use on the timeline of current project.
• Import Media—imports media from other VEG files/Vegas projects to the Media Pool.
• Capture Video—opens the Video Capture application to transfer video from a camera to Media Pool.
• Import Photo—opens a scanner or camera attached to computer for importing photos to the Media Pool.
• Extract Audio—extracts, or rips, audio from a CD to the Media Pool.
• Get Media from the Web—provides a direct link to Sony’s partners, some of whom provide free media for your use.
4.5 Importing media from other Vegas projects, which are either open or closed.
![]() Tip
Tip
When Copying Media Bins from one project to another, the media itself is NOT copied. Be aware of this so you don’t lose any media thinking you have duplicates due to a copy/paste of the media bin.
4.6 Import buttons from the Media Pool.
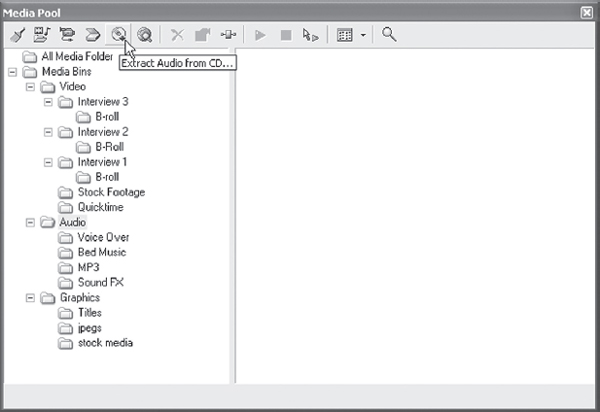
4.7 Choosing this button auto-extracts audio from a CD inserted in the CD/DVD player.
Imported media is placed in the All Media Files folder in the Media Pool and, once imported, can be dragged and dropped into a specific bin. Vegas supports import to the currently selected bin; bins only contain links or pointers to existing media.
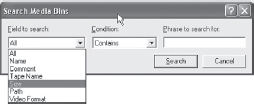
4.8 Search media bins to find elusive files that might not have been properly named or cataloged.
Bins are also searchable, which makes cataloging files very valuable. Comments inserted in the Batch Capture/Advanced Capture dialog can be searched/located in the bin search operation.
Located media can be dragged and dropped into any bin in the Media Pool.
The Media Pool toolbar contains other useful tools for managing the Media Pool contents, including the following:
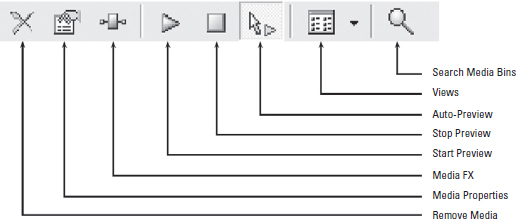
• Remove Media—removes media from the Media Pool or bins but does not delete media from the storage drive.
• Media Properties—opens a dialog indicating the type of media, storage location, length, size, and other properties of the media file.
• Media FX—allows FX to be placed on media before it’s placed on the timeline. This option is very useful for single, long-length files that need the same format, such as of color correction or special FX, but will be trimmed in the editing process. Select the file to be affected, then press the Media FX button, select the desired FX, and adjust accordingly. This process does not alter the original file.
• Start Preview—plays/previews selected media file in the Preview window.
• Stop Preview—stops playback of selected media in the Preview window.
• Auto-Preview—when pressed, any time a media file is selected, it will be displayed in the Preview window automatically. This process is exceptionally useful when quickly going through media, saving time.
• Views—determines how media is shown in the Media Pool, whether as icons, detailed information, or a list.
• Search Media Bins—uses keywords or attributes to locate media whether captured or imported and does not work over non-mapped network drives.
Vegas and its media management features are helpful, powerful, and useful. Take the time to use them correctly, and projets ill be much easier to manage.
4.9 File management viewing attributes in the Media Pool.
Editors coming from other NLE applications often ask about having subclips or selections appear in the Media Bins. Vegas does not have this as a destructive function unless subclips are rendered to new files. Subclips may be created in either the Trimmer or on the timeline, yet this does not discard remaining media from the original file. Rendering straight cuts to a new file is faster than real time, because nothing is actually done to the clip. However, some people won’t want to render subclips. For those, here is a workaround.
Open a clip in Trimmer. Make regional selections and name the regions. After selecting/naming all regions on a clip in Trimmer, right-click in the open area of the Trimmer and press S or select Save Markers/Regions, which will embed the markers/regions in the file.
In the Explorer window, enable the Regions view as shown here. Notice the regions created in the Trimmer tool are now visible in the Regions view of the Explorer. These regions will not show things such as effects or envelopes, but are a means of quickly locating selected regions especially if the regions have been named with a recognizbl name and then sorted by name.
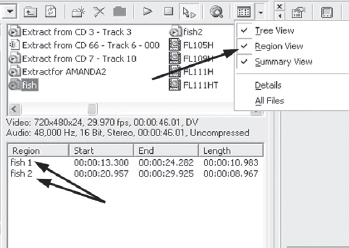
4.10 Enabling the Region view.
Subclips in Vegas
Vegas the ability to use subclips. What is a subclip? Well, in Vegas they might be better known as “sub-events” as they are reference files to a certain area in a larger event, often called “clips” in other DAW and NLE applications. Subclips may be created in a couple of different ways.
First, a file can be opened in the Vegas Trimmer, a selection made, and the subclip button pushed. A dialog opens, asking you to name the subclip. This does not affect the original event or clip in any way. In this dialog, you can also decide if you want the subclip to play in reverse from the original clip or not.
Second, an event loaded on the timeline might be edited on the timeline for length, selecting different in and out points. Right-click the file on the timeline and choose Create Subclip from the menu that appears. This will deposit the subclip in the Media Pool. The subclip may be renamed in the Media Pool.
Subclips in Vegas are different than subclips may behave in other applications. Creating a subclip is not destructive to the original file. If you used Regions in older versions of Vegas, sub-clips are effectively the same thing with greater access to the media. Subclips show up in the Media Pool as well, whereas Regions only show in Regions view.

4.11 Subclips are useful to identify sections to be reused or to discard unused media. Subclips may be copied from project to project using media bins found in the Media Pool.
If you are capturing analog tape and planning on editing it, the subclip feature is very useful. This will allow you to load your entire .avi into the Trimmer tool, select the sections you want to keep, and create subclips with them. If they are named sequentially (default) in the dialog boxes, they can be used almost like a storyboard and dragged to the timeline as one group by selecting all subclips in the Media Pool. Performing a “Save As” and choosing to copy all Media Pool will then save the subclips, and the origating .avi file may be deleted from the hard drive, leaving only the parts you wish to use in the overall project.
To copy subclips from one project to another, you will not be able to copy or paste them. You must create a new bin in the Media Pool, load the subclip into the new bin, and move the bin from one project to the new project
If for some reason you need to locate other scenes in the media that the subclip originated from, or you need to change the in or out points of the subclip, right-click the subclip in the Media Pool and choose Open in Trimmer. While in Trimmer, press the Select Parent Media button in the upper-right corner of the Trimmer, and the parent media will open with the subclip area indicated by the selection tool. In or out points may be shifted, and the subclip may be re-created with a new name or using the original name.
4.12 This is how subclips will appear in the Media Pool.
Subclips are clips of media, and therefore may not be dragged out on the timeline in a standard timeline editing function, as for all intent and purpose, the clip has been “cut” from the original media. If you need to extend the in/ or out point of an event that’s been inserted as a subclip, you’ll need to open the subclip in the trimmer and change its in/or out points, and then reinsert it to the timeline. Subclips may be added as takes, and therefore can be dropped onto slugs or empty events marking a time space. To open a subclip in the trimmer, simply right -click and select “Open in Trimmer.”
Use File>Save As and check the “Copy and trim media” box found in the Save As dialog box, to save subclipped media and delete any media that is not part of the finished project. This is great for saving space on the system hard drive. Be sure to sweep the Media Pool for unused media before saving.
Placing Media on the Timeline
The Media Pool is a great place to start building a project and makes for a much more efficient workflow. Getting media to the timeline from the Media Pool is well organized and easily traceable. The Media Pool is not the only way to work within Vegas, however.
Media can be dragged to the timeline directly from the Explorer within Vegas or from the Windows-Explorer. Notice that the Explorer window also has an Auto Preview button on the Explorer toolbar, just as the Media Pool does. Leaving this checked allows rapid preview of various media formats shown in the Preview window. A search can be done in the Windows-Find feature (START | FIND or START | SEARCH in Microsoft Windows-XP) and dragged directly to the Vegas timeline.
What if you happen to have a long AVI file and only want selected portions of that file?
You can open the file in the Trimmer in one of two ways. First, you can right-click the file and select Open in Trimmer. Second, you can set the general preferences to automatically open a file in the Trimmer by double-clicking the file.
Consider using the Windows Explorer rather than the Vegas Explorer to locate and identify files. Media may be dragged directly to the Vegas timeline from any window containing files, including the Windows Search application. Moreover, the Windows Explorer provides thumbnail images for video and still image files, making it more efficient to locate and place media on the timeline. The Windows Explorer may be kept open and on top of the Vegas workspace.
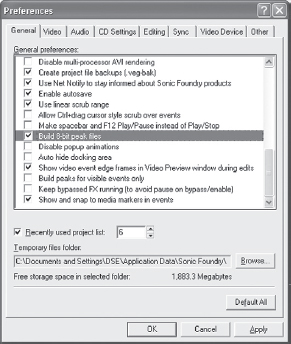
Notice that the file takes a moment to build an audio preview. This graphic represents the audio. This process can be sped up by checking the “Build 8-bit peak files” in te OPTIONS | PREFERENCES | GENERAL dialog.
![]() Tip
Tip
The graphic drawing reference files are stored in Vegas (and all other Sony products) as SFK files. These files may be deleted at any time. If a file is loaded that does not have a linked SFK file, Vegas will redraw the file and save as a new SFK file.
After the file is drawn in the Trimmer, select the portions of the media that are to be used. Place the cursor at the point that the video clip should begin and press I for In Point. Place the cursor at the point that the video clip should end and press O for Out Point. This process automatically creates a time selection in the Trimmer. Media can either be scrubbed over or the Play (SPACEBAR) button can be clicked in the Trimmer.
An alternative to pressing the I and O keys to select the in/out points is to draw the selection directly in the Trimmer. Place the cursor where the in point should be and draw by holding down the cursor and dragging the cursor to the out point. You can also work in reverse by placing the cursor where the out point is desired and dragging the cursor to where the in point should be. Notice that as the cursor is dragged the video plays in the Preview window. Dragging the cursor with the left-click button held down behaves like a scrubbing tool in the Trimmer window.
4.13 Reducing the size of screen peak draws will speed up screen draws in Vegas.
After a time selection is defined in the Trimmer, a few choices can be made as to how the media can be handled. Media can be placed directly on the timeline by pressing A for Add, it can be dragged directly from the Trimmer to the timeline, or a region can be created. If using the Add feature, place the cursor on the timeline where the added media should be placed. After adding the media tothetimeline, the media becomes an event.
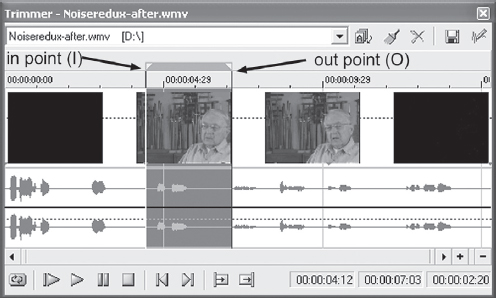
4.14 Time selection created in the Trimmer by pressing I and O for in/out points.
If no time selection is defined as a drawn area, as an in/out point or as a region, media can be selected from the start point to where the cursor is parked. By pressing A, media in the Trimmer is added from the start to the moment that the cursor is set. Alternatively, pressing SHIFT+A adds media up to the cursor to the end of the file.
When placing events on the timeline, keep a fast, visual reference to them by using the scribble strip on the Track Control pane. This feature also helps others quickly know what you are intending with the track. For example, a master track might be named as such, while a picture-in-picture track might be named “PIP track.” Good track management is critical, especially in the digital realm where file name on a hard drive can be extremely varied.
Regions are great, as a defined region will stay with the media even after Vegas is closed. To define a region, press R, and Vegas will open a field where the region name can be defined. Multiple regions can be defined, and region in/out points may overlap. When new media is loaded into the Trimmer and replaces the media containing regions, the defined regions will stay with the media file and will be shown any time a file is loaded into the Trimmer. (By default, this option is turned on in the OPTIONS | PREFERENCES | GENERAL dialog. It can be unchecked if for some reason this feature is not desired.)
4.16 Buttons found in the Trimmer tool act as shortcuts for the A or SHIFT+A commands.
Markers can also be used in the trimmer to serve as reminders for in or out points. Pressing M will drop a marker. Markers can be named if a name is desired. Should an unnamed marker need to be named later, right-click the marker and choose Rename from the menu. Double-click between two markers to create a time selection from which a region can be named. A region may contain many markers.
Markers and regions are exceptionally important for many editors, especially those that are creating keyframes by the frame or in very tight visual spaces. Vegas has the ability to see markers or regions inserted in the Trimmer on the timeline for greater consistency in editing. If a region is created in the Trimmer and several markers are placed at desired points inside that region, these markers (and regions) are visible in events on the timeline. Markers and regions cannot be edited on the timeline if added in the Trimmer. Events can be reopened in the trimmer however, and edited there if necessary.
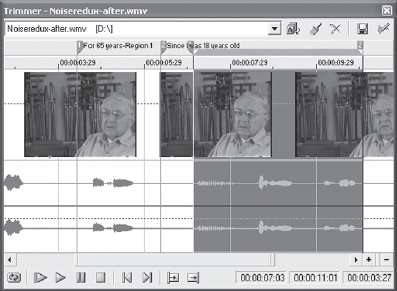
4.17 Regions may overlap and may also be named. No limit exists on the number of regions that can be created in the Trimmer.
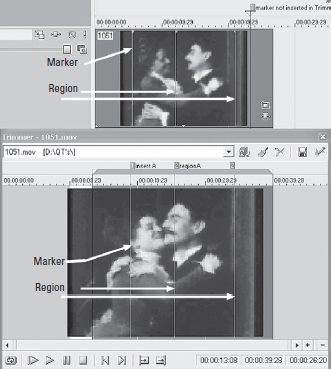
4.18 Markers/Regions inserted in Trimmer appear in events on the timeline.
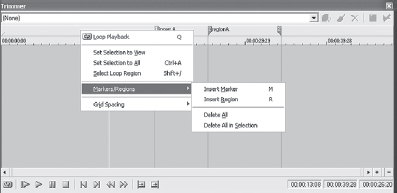
4.19 To clear markers/regions on events, open the event in the Trimmer, right-click the Marker bar, select Markers/Regions, and select Delete All or Delete All In Selection.
Placing Still Images or Graphics on the Timeline
Photos play a large role in creating video, regardless of the format. Vegas is capable of reading nearly every photo or image format that the Windows-environment will allow. Some formats, however, are more optimal than others. Whether scanning via the Vegas Get Photo option that uses your scanner utilities or scanning outside of Vegas, the process is essentially the same.
Scan photos at a resolution of not higher than 300 dots per inch (dpi). Because video has a resolution of 72 dpi, extremely high resolutions are not only extra effort, they can also cause your image to look poor if the resolution is set too high. If no pan or crop will be done with the photo, a resolution of 72 dpi is sufficient. Generally, a resolution of 150 dpi is recommended. This resolution is a comfortable size for Vegas to manage quickly and yet provides the ability to pan or crop the image without fear of pixilation. If the Pan/Crop tool will be used to zoom in very tightly on the image, a higher resolution of 300 dpi may be called for.
![]() Tip
Tip
Double click a gap in the Timeline. In the Trimmer, mark an In point, but don’t worry about an Out point. Now select the “A” key on your keyboard. This will Add the clip to the gap, filling the gap exactly. Should you need to move the In point of the event, simply slip edit that point (Alt-Drag left or right).
Earlier in the book, we looked at pixels in the computer world as being square and pixels in the DV world as being rectangular. This issue affects stills and graphics that will be inserted into the Vegas timeline, as Vegas treats graphics and stills as DV when they are square-pixel images from the digital still camera, image editing application, or other source.
With most DV editors, still images and graphics must be created with the correct aspect ratio in mind when planning on dropping the stills or graphics into the DV timeline. Vegas isn’t quite as rigid when it comes to this issue as the Pan/Crop tool allows the correct aspect to be maintained. When working with stills in an image editor, however, the correct size (NTSC) for a still image is 655 × 480. This size compensates for the square pixel being stretched in the non-square pixel world of DV. The math to derive this pixel aspect ratio (par) is as follows:
720 × .909 (par of DV) = 654.48
For those who like to round down, 654 works equally well. The correct aspect for PAL images is 704 × 576.
One experiment that demonstrates square versus non-square pixels is creating an image in your favorite image editor, such as Adobe Photoshop or Paint Shop Pro that is nothing but a circle at a project size of 720 × 480. Then drop the image straight into Vegas and don’t use the Pan/Crop tool. Create the same image at 655 × 480, place that image in Vegas, and notice the difference. Users of other NLE systems might be familiar with saving files at sizes of 720 × 534/NTSC. For example,
534 × .909 = 485.4
This format works equally well, and either format is usable.
![]() Tip
Tip
For best results, save still images, graphics, or titles created outside of Vegas at 655 × 480/150 dpi (NTSC) or 704 × 576/150 dpi (PAL). If you plan on zooming deeply into a photograph, consider doubling the resolution, or creating images at 1310 × 960.
Files should be saved as portable network graphics (PNG) files for optimum use in Vegas. Vegas reads JPEG, BMP, GIF, TGA, and most other formats, including the Adobe PSD file format, as well as the TIFF format. The Adobe Photoshop files, however, will not be broken down into individual layers; they will be shown as one layer. If an alpha channel is present, Vegas will recognize the alpha channel, and those areas will be transparent. TIFF files can be used in Vegas only if QuickTime is installed on the host system (www.quicktime.com). Because Vegas uses QuickTime to read the TIFF file format, TIFF files will slow down the rendering process somewhat. TIFF files also show problematic symptoms in automatically displaying alpha channels. PNG files are a lossless format, so the image is not compressed when saved in the image editing application.
Files may be scanned in at their normal aspect or size and then cropped within Vegas at any time to match aspect ratio, regardless of the original aspect ratio of the photo. This feature is a major timesaver. Sony has created a script (see Chapter 11 for more information on scripts) that will match aspect ratio on all images on the timeline.
In Chapter 7, the pan/cropping section demonstrates how to match aspect ratio of images when they are not of the correct aspect in order to fill the screen.
Editing Events on the Timeline
Each piece of media placed on the timeline becomes an event. Events are then edited to form the final production. Events may be on single or multiple tracks.
4.20 When the cursor is placed at the head or tail of an event, the cursor changes to a trim-editing cursor. This allows the event to be dragged out or dragged in, thereby lengthening or reducing the event.
Events containing video may be edited in any number of methods. One issue that exists with some NLE systems, however, is that a frame might be split. Vegas gets around this issue for videographers by offering a Quantize to Frames option, ensuring that frames are not split and forcing edits to occur on frame boundaries. When working with video, Quantize to Frames should nearly always be enabled by selecting OPTIONS | QUANTIZE TO FRAMES or pressing ALT+F8. When working with audio only, this feature may, and generally should be, disabled.
The first editing behavior is to edit on the timeline by extending/reducing the length of an event on the timeline. This type of editing is called trim-editing.
When a trim-edit occurs with the Ripple tool enabled, media subsequent to the edited event will slide to the left to fill the hole left by the shortened event or slide to the right to make room for the lengthened event. Trim-edits can be done with only a numeric keypad. Selecting keys on the keypad moves the cursor to the beginning or end of an event, and the keypad can be used to edit an event by frames or pixels.
Table 4.1 |
Keyboard Shortcuts Used in Trim-Editing |
| Shortcut | Description |
| Press 7 or 9 | Moves the cursor to the next event edge, either moving backward or forward. |
| Press 1 | Trims the event edge to the left by one frame. |
| Press 3 | Trims the event edge to the right by one frame. |
| Press 4 | Trims the event by one pixel to the left. |
| Press 6 | Trims the event by one pixel to the right. |
| Press 5 | Exits the numeric keypad trimming mode. |
| Press 0 | Creates a region/loop around the cursor. The length of the region is specified in OPTIONS | PREFERENCES | EDITING. |
Pressing and holding CTRL+ALT while the cursor is placed between two events will lengthen one event while the other event is shortened, depending on whether the cursor is dragged to the right or left. This feature allows both events to continue to occupy their current total length, while editing the point at which one event ends and the other event begins.
Slip-editing is another basic editing format that allows an event to remain a static length while changing the in/out points of the event. You can slip-edit by holding the ALT key down while moving the mouse inside an event. During slip-edits, the Preview screen shows the first frame and the last frame of an event based on the slip-edit point.

4.21 Slip-editing shows a split preview screen, displaying the in/out points of a slip-edited event.
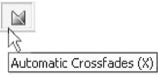
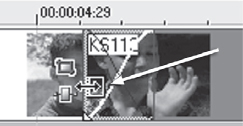
The second edit function is to perform a transition. The most basic transition is the crossfade, otherwise known as a dissolve in the rest of the video world. A crossfade occurs when two events overlap, and one blends into the other as one event fades out and the subsequent event fades in. By default, Vegas crossfades events together any time they are overlapped. Automatic crossfades can be turned off at any time uingth Automatic Crossfades button found on the timeline or by pressing X.
Place two events butted against each other on the timeline. Now drag the front of the second event partially over the end of the first event. An “X” appears in the space in which the two events overlap.
4.22 An example of a crossfade.
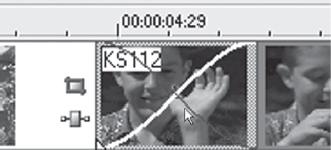
4.23 Crossfade is indicated by an “X” between the two events.
Now play the timeline by pressing the SPACEBAR or clicking the Play button found on the control bar of the timeline. The two events will fade from one to the other in equal time. If a faster crossfade is desired, drag the second event farther away from the first event, or trim either the end of the first event or the beginning of the second event directly on the timeline. This process is accomplished by placing the cursor in the middle edge of either of the events on the timeline and by clicking and dragging in either direction. This process shortens either the outgoing or incoming event and causes the crossfade to be shorter in duration.
The shape of the crossfade can also be controlled. Right-clicking a crossfade brings up a Cross-fade menu, which has several choices regarding the way the crossfade should occur.
4.25 Grabbing and dragging the end of the first event is shown by a small box-like icon indicating that the end of the outgoing event is being dragged.
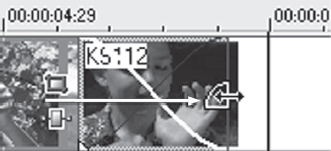
4.26 Grabbing and dragging the beginning of the incoming event is demonstrated by a small quarter-circle-shaped icon. This feature helps eliminate confusion as to which event is being edited.
![]() Tip
Tip
Create a time selection over a crossfade, beginning slightly before the crossfade and ending slightly after the cross-fade. Then press Q, which instructs Vegas to play continuously and loop over the crossfaded area. While playing over the area, all edits and adjustments are seen in real time in the Preview window as Vegas plays.
After right-clicking the crossfade, choose the Fade Type menu. A series of crossfade attributes opens. Choosing one causes this menu to close. Surprisingly, the attributes of a crossfade have a great impact on how some visual events mix.
Crossfade behaviors can also be applied to the head or tail of an event. Positioning the cursor at the top of the beginning or end of an event will change the cursor to the quarter circle form. The head or tail of the event cn hen be dragged inward to create a fade. This process creates a fade in or out from black.

4.27 Fading in from black is a common editing necessity.

4.28 Vegas offers many crossfade styles.
The default fade-in color can be changed by selecting OPTIONS | PREFERENCES | VIDEO and clicking the default colors.
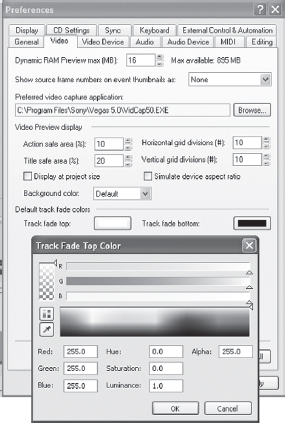
4.29 Track fade colors can be customized to create a specific background color.
Many of the popular music and children’s television shows use colorful backgrounds. Using a customized background is one means of achieving this without having to insert a graphic or generated media event.
A crossfade is a form of a transition. Vegas has hundreds of built-in transition possibilities, and several thousand more transitions can be installed from third-party vendors, such as Pixelan, Boris, and DebugMode.
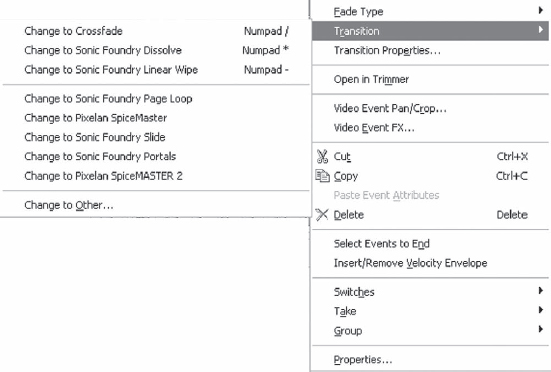
To change the transition from the default crossfade to another transition, select the Transitions tab in the lower-left corner of the dockable windows area to open the Transitions window. If you can’t see a tab, press ALT+7, and the Transitions window is displayed. This window is dockable and may be placed anywhere on the screen that is convenient. To change a transition from any style back to a crossfade, right-click the transition and select TRANSITION | CHANGE TO CROSSFADE or press the / key on the numeric keypad Other transition choices are also available if you right-click the Transition menu.
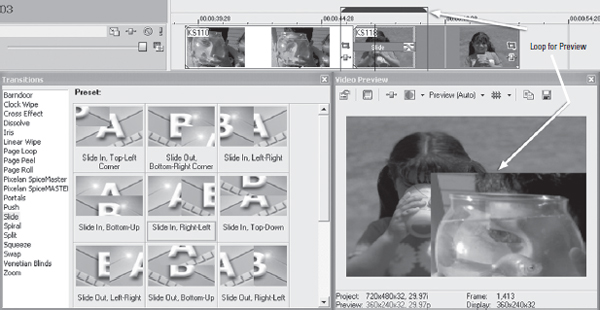
4.30 Slide Transition replacing crossfade and looped for real-time preview.
4.31 All transitions have dialog boxes to edit transition attributes. The Transition dialog box can be called at any time by right-clicking a transition and choosing the Transition Properties menu.
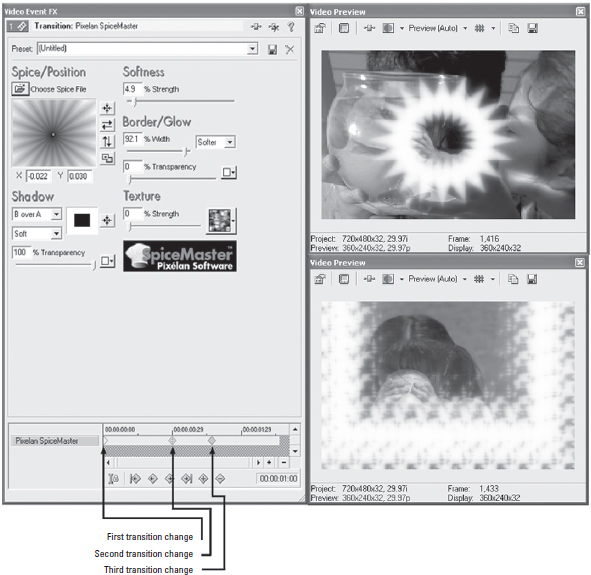
To preview transitions, click the different transition styles and pass the cursor over the choices. Each transition preset becomes active as the cursor moves over it. When you find a desired transition effect, click and drag the transition over the top of the “X” that defines the crossfade point. The transition dialog window will open, allowing for you to fine-tune the transition, adjusting colors, edges, softness, speed, and other parameters that vary with the different transitions.
Transition properties can be placed on fades as well. This feature is great for bringing in or sending out video for the beginning or end of a presentation.
By creating a fade in or out on a video event and then dragging a transitional element to the fade, the fade creates a transition from transparent black.
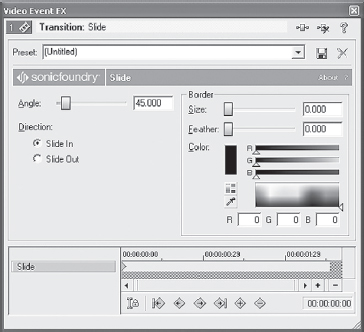
When the Transition properties dialog opens, at the bottom of every dialog is a keyframe timeline. This timeline allows for unique and defined behaviors of a transition in time by adjusting keyframes and the sliders around them. (See the “Using Keyframes in Vegas” section for more information on how to use keyframes.) Feathering edges, rates of transition, and color of borders all can be controlled with the available attributes of the specific transitions.
Right-clicking a crossfade or transition opens a dialog that allows for more transition choices. Vegas will also keep the last five types of transitions in meory sotha when you right-click, the last five transitions used are found for rapid access.
4.32 Transitional element applied to the fade in of an event. Notice how the transition flies out of black, which is the default track fade color.
4.33 Selecting other transition types with shortcut keys or by selecting in the menu.
Edited sequences can be quickly put together in Vegas using Cuts Only, in which events are butted against each other. Position the dursor at the point at which two events are butted up and press one of the following shortcut keys related to an automatic transition.
Press / to crossfade events
Press * to create a dissolve
Press - to create a linear wipe.
The two events are pulled together to create a crossfade, dissolve or linear wipe.
One unique feature in Vegas is that when an event is slid out of the area in which a transition occurs, Vegas will remember where the transitional element took place and recall all features of the transition. Whether the original event is placed back in the area in which the transition occurred or a new event is placed there, Vegas will still hold the transition location and information. This issue results from transitions living within events.
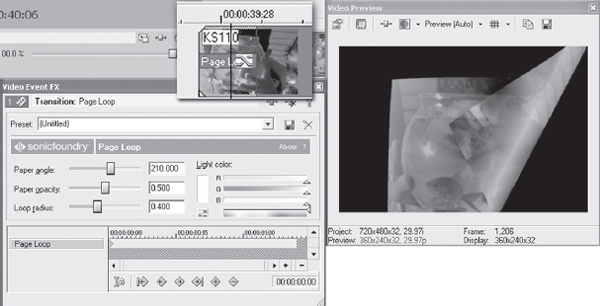
Users of older versions of Vegas will find new transitions in the Transition Selection menu, including Portals, Page Rolls, Page Loops, and more, as shown in Figure 4.34.
For experienced NLE users, Vegas’ method of displaying crossfades and transitions is definitely unorthodox. Vegas can display the traditional A/B roll as well, should this be the desired look in the workspace. Click the Expan Trek Lyers button found on each Video track to show the standard A/B roll.
4.36 Expand Track Layers button.

4.37 Vegas displays A/B roll views, although A/B roll views take up twice the amount of screen space as a single-track view.
4.38 Transition types may be selected by right-clicking any transition, and the last used transitions will be displayed and may be chosen in this submenu.
The concept behind hiding the A/B roll view and showing transitions as crossfades stems from Vegas’ origin as an audio editing tool, in which crossfades for audio are always viewed as single tracks. Further, it makes more sense in a real-estate-challenged environment, such as a computer screen, to bring as many elements together as possible.
And the Envelope Please…? Transitional Envelopes
Of course, we’ve seen how Vegas can easily drop in a transition and preview it on the fly to an external monitor, but there are other features and functions hidden in the transition process.
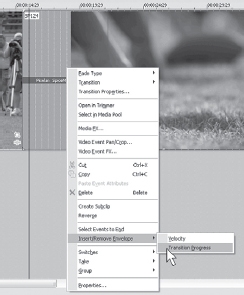
Crossfade or overlap two events to create a transition as described above. Drop a transition on the overlap. Any transition except the Dissolve will work for this. Now right-click the transition area, and select Insert/Remove Envelope>Transition Envelope from the submenu. This will insert an envelope in the transition area that is similar to a velocity envelope. By double-clicking on the envelope, envelope points or handles may be inserted.
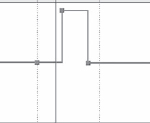
These points will allow the control of the transitional behavior over time. For instance, maybe the transition needs to reverse itself or perhaps only pause in mid-transition. Illustration 4.33b shows a transition reversing and pausing itself.
Transitional envelopes are great for building creative and unique transitions, but the feature may also be used for powerful compositing techniques. By using lengthy transitions coupled with transitional envelopes, entire composites and virtual transitions may be created with only three or four video events. To do this, you’ll need to reduce the opacity of the tracks containing the transitional envelopes and layer them over another video event on a lower track. This technique can yield beautiful results when combined with complementary media.
4.39 Right-click the transition for this submenu to appear.
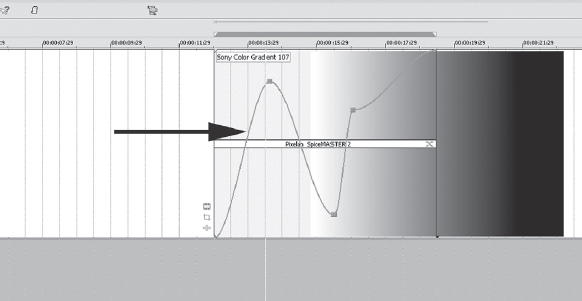
4.40 Where the envelope is pulled down, the transition will reverse. The flattened line indicates that the transition is paused and will hold in that position.
Vegas has always had a unique method of keyframing. Keyframes are often misunderstood and are sometimes difficult for newcomers to the world of video editing.
Keyframes are nothing more than indicators in time, defined by how an event should behave at a specific moment and an instruction sent to a process at a specific moment during that time. They animate sequences of images or control effect parameters over time.
We live our lives by keyframes. All of us have specific moments in time when we do certain things, such as going to bed, eating a meal, traveling to work, or making a phone call. Appointment books are nothing more than analog keyframes.
In the video editing world, animation world, and audio editing world, keyframes are used to instruct an event to color-correct, change speed, delay, move onscreen, pan, change volume, and much more at specific points in time. The tool that defines these instructions are keyframes. Key-famewinows are nothing more than standard clocks, but instead of being round, they are linear.
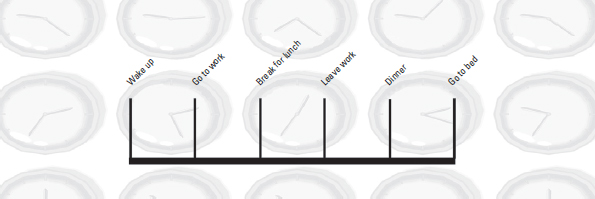
4.41 An average daily keyframe.
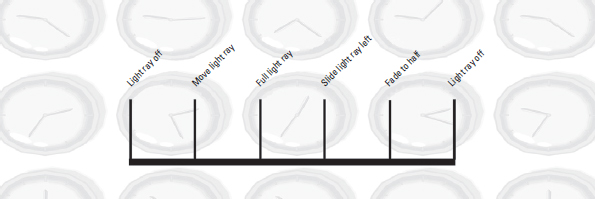
4.42 Keyframes in struck an event regarding how to behave over time.
Vegas departs from most applications in regard to keyframes in that Vegas is event-, track-, or project-based, and separate events can have their own sets of processing and keyframing within those processes, independent of the timeline. What this means is that an event can be moved on the timeline, and the keyframes will stay with it!
Imagine doing a 52-minute project for television, and, after the entire editing process is complete, a three-frame error is found in the first two minutes of the program. In most applications, if an event is moved even three frames, the entire project will be affected. With Vegas, this is simply not so. In fact, the entire series of events that exists in the hypothetical three seconds can be moved to the end of the timeline, with keyframes and processing intact.

4.43 The selected event length is displayed in the lower-right side of the timeline.
Notice that the length of the event illustrated is ten seconds and six frames in length. Double-click the event, and, in the lower-right corner of the editing timeline, Vegas displays the length of the event selection. You can also right-click the event and look at its properties, where the media length is displayed.
![]()
Insert the DVD found in this book and browse to the veg folder. Locate and open the VEG file titled Keyframes. The timeline will open with the video file shown in the example.
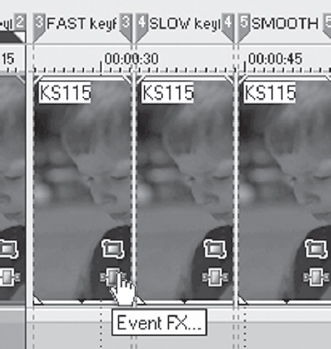
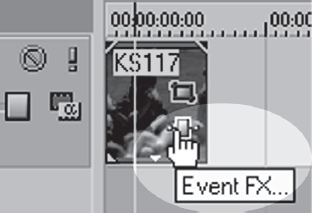
Now, click the Event FX icon found on the event. (If you don’t see the icon, go to the OPTIONS | PREFERENCES | GENERAL dialog and check the Show Video Event Buttons.)

4.44 Event properties are seen when the event is right-clicked and Properties is selected.
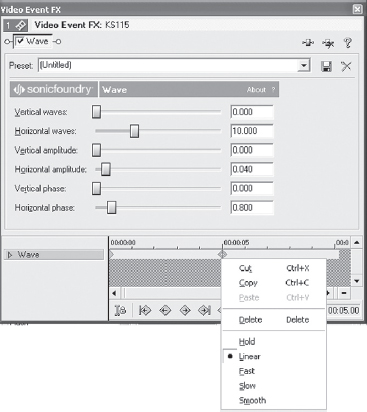
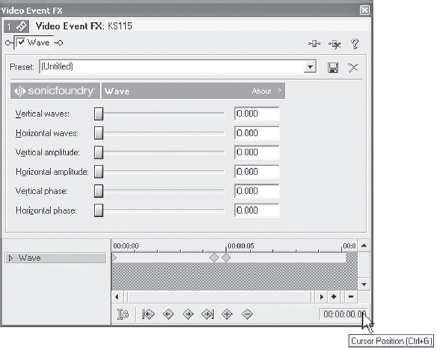
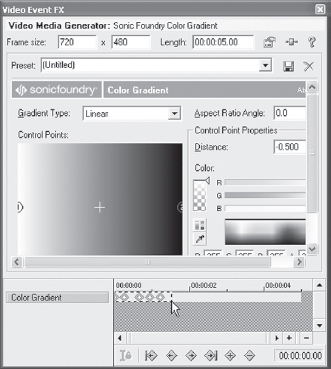
This process opens the Video FX plug-in folder. In this example and DVD project, the Wave plug-in has been selected.
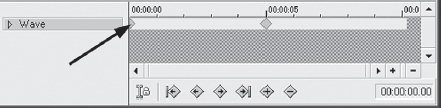
Note the first keyframe in the keyframe timeline, which is indicated by a small diamond.
Now click the five-second indicator on the timeline in the keyframe timeline window and select the Horizontal Only preset in the Preset dialog box. Notice that a new keyframe or diamond appears on the keyframe timeline. This diamond indicates that over time the slider will begin to move, causing the event image to gradually change over time, getting more and more wavy until at the five-second point, it reaches the full effect as dictated by the slider position.
4.45 The Event FX button is found on every event by default. This feature can be turned off in the OPTIONS | PREFERENCES | GENERAL dialog.
4.46 The first keyframe may be moved anywhere on the keyframe timeline. Attributes of the first keyframe are shown regardless of the position of the first keyframe, as it is the first indicator of time-based event/track/project behavior.
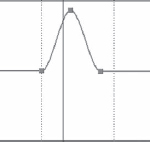
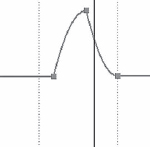
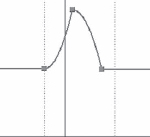
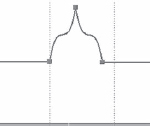
What if you don’t want the event to become more wavy over time but instead want the effect to come in only at a determined time? Click and hold the first keyframe and slide it to the right. Now right-click the keyframe and select one of the keyframe behaviors. Attributes that can be assigned to keyframes include Hold, Linear, Fast, Slow, and Smooth.
Hold instructs the keyframe to freeze the settings for the FX in place until a new keyframe is shown, at which point the process jumps to the new settings. Linear creates a gradual change with no curve in the manner in which the sliders move. Fast causes the instructed behavior to slope in quickly and then gradually slow to meet the setting dictated by the slider. Slow does just the opposite; it slowly slopes toward the settings for the second keyframe and speeds up as it reaches its indicated position. Smooth provides temporal and spatial behavior, appearing to start slowly, speed up, and slow down again in tmeas the controls reach their keyframed positions. All of these attributes are demonstrated on the DVD.
4.47 Keyframe velocities/attributes can be changed by right-clicking a keyframe.
Vegas is efficient in how it syncs the locations of keyframes to a cursor position. This feature can save hours of time trying to place keyframes correctly.
Move to Region 6 on the editing timeline of the Keyframes project. Place the cursor anywhere on the editing timeline inside the event contained in Region 6. Notice that inside the keyframe timeline, the cursor will move in sync to wherever the cursor is located on the editing timeline. Now move the horizontal amplitude slider. Notice that Vegas automatically inserts a keyframe at that moment in time.
Now double-click the time indicator inside the plug-in.
Be aware that with the automation features in Vegas, keyframes may be automatically created when looping video and adjusting filter attributes. This is a great feature, if you intend for this to happen. However, if multiple keyframes start appearing and they’re not desired, be certain to disarm automation in the video track. You’ll have to relaunch the plug-in. You can also disable the sync to cursor in the plug-in dialog.
Enter a new time of 00:00:06:10, which will move the cursor inside the keyframe timeline and will move the cursor to the same position on the editing timeline. Now slide the vertical amplitude slider all the way to the right. Notice how the preview of the event image changes to match the setting, while at the same time Vegas inserts a new keyframe at the position of 00:00:06:10. Either move the cursor tool with arrow keys or mouse or double-click the time indicator inside the keyframe tool or the main editing window time indicator to place the cursor with frame accuracy for keyframing effects or other processing.
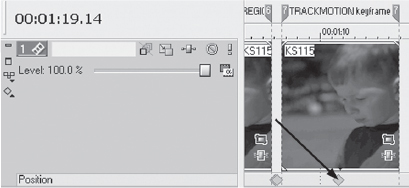
Nearly everything in Vegas is keyframeable. Pan/Crop settings can be keyframed, as can Track Motion behaviors. Track Motion will show up on the timeline of the main editing window. Region 7 of the Keyframes project contains track motion keyframes. Notice that they are displayed on the edit timeline. Track motion can dramatically affect how events are shown, and, to prevent confusion about oddly sized events on a track, these are displayed prominently.
Keyframes are unlimited as to their application. They can be applied to as many FX as necessary to make an event meet the desired appearance. Some effects seen on television today contain hundreds of keyframes in one-to-two seconds of video.
4.48 Double-click the time indicator inside the plug-in to place the cursor at the exact time.
4.49 Track motion keyframes can be viewed directly on the timeline by double-clikcking a track keyframe and expanding the Track Motion Keyframes view.
Keyframes can be copied and pasted inside the keyframe timeline. Move the cursor to the Region 9 eenton the editing timeline. Click the Edit Generated Media button in the upper-right corner of the event.

4.50 This event keyframes page contains 28 keyframes in less than three seconds of video. Multiple keyframes allow for powerful uses of FX.
The Edit Generated Media dialog will open, and five keyframes will show on the keyframe timeline. While holding the left mouse button down, draw around the five keyframes. When all keyframes are selected, they’ll have a white diamond in the middle of each keyframe and will become white in color. Copy the keyframes by either right-clicking and selecting Copy or pressing CTRL+C. Move the cursor inside the keyframe timeline to 00:00:01:15 by either clicking the cursor to position or by double-clicking the keyframe time display. Now paste the keyframes by right-clicking and selecting Paste or by pressing CTRL+V. Repeat the action again at 00:00:03:00. All five keyframes are now repeated three times. Play the media. Notice how it loops the keyframe attributes. These keyframes can also be copied and pasted into another keyframe timeline of a similar nature.
To complete the explanation of Vegas’ keyframing attributes and their incredible power, go to the editing timeline of the Keyframes project. Click and hold Region 1, Linear Keyframe setting. Slide it to the end of the project, past Region 8 Multiple keyframes-FX. Place the cursor at the front of Region 1 and play. Notice that the keyframes stayed with the event. Therefore, events can be copied and pasted, slid on the timeline, or moved to completely different tracks. If a keyframed event is copied in one instance of Vegas, it can be pasted into another instance of Vegas with keyframes intact. This feature is unique in the NLE world. Keyframes placed on Events stay with the events. Keyframes placed 4.51 Keyframes can be copied and pasted with in their own keyframe time-on a track will stay with the track. Tracks, however, may not be moved horizontally in time; they may only be moved vertically in priority. Keyframes may also be applied at the project setting. Any video plug-in that shows up in Vegas is keyframeable. Audio plug-ins are automatable, which is similar to keyframing, yet are managed and viewed differently. (Vegas uses keyframes to control the surround sound movement, which is discussed in Chapter 6.)
4.51 Keyframes can be copied and pasted with in their own keyframe time line or Pasted as event attributes to another event.
Learning to understand and manage keyframes is perhaps the most important and valuable lesson to be learned and understood in the video editing world, whether working with Vegas or other NLE systems. Various NLEs have unique keyframing attributes, but regardless of the system, all NLEs use keyframes in one form or another.
4.52 Click the Event Video FX button found on each event by default. It is seen on every visual event, regardless of whether it’s a stili photo, graphic, or video event.
4.53 Dragging FX or clicking an FX button on the Track Control pane has the same effect.
Filters in Vegas
Vegas is jam-packed with filters to enhance, correct, and design graphic and video events, either bringing substandard images to an acceptable level or allowing editors the expression of artistic freedom.
Filters, also known as plug-ins, are found in the plug-ins folder and are accessible from many points in Vegas. Opening the VIEW | PLUGINS menu will show the effects found in Vegas. Vegas comes with more than 40 plug-ins, ranging from color correction tools to swirls, waves, and pixilate filters.
While all filters/plug-ins have presets, learning the settings and behaviors of the plug-ins makes for very creative and powerful image processing in Vegas.
As with nearly all other aspects of Vegas, plug-ins can be inserted at the event-, track-, or project-level. Plug-ins can be dragged and dropped or selected from menus selected at the event-, track-, or project-levels.
Plug-ins dropped on
• An event affect only that specific event on the timeline
• A track affect all events on the track that are affected by the plug-in’s attributes
• Project/video output level affect every track, event, and final output in the project
• Media in the Media Pool will affect all Events relative to that media in the Media Pool.
To add plug-ins to an event, click the FX button on the event. These buttons are visible by default, but if for some reason they are not shown, the OPTIONS | PREFERENCES | GENERAL dialog has a check box for Show Video Event Buttons that should be checked. If having the buttons visible is not desired, uncheck this box. Events can also be right-clicked and Video Event Effects chosen from the menu.
FX can also be dragged directly onto events from the FX menus. To view all FX at one time, press ALT+8 or select VIEW | VIDEO FX to open the FX selection box.
To have a thumbnail preview of some FX properties, keep the FX window open and in the dockable windows section or drag it onto a second monitor. It also makes for a great space from which to drag and drop FX.
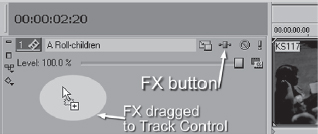
Dragging FX to a Track Control pane places FX on an entire track. Each track also has an FX button on it.
Any FX dragged to the Track Control pane will result in all events having FX applied to them. The only way to control FX on individual events is to use keyframes.
FX can be applied at the project-level by dragging FX to the Preview window or by clicking the Video Output FX button on the toolbar in the Preview window. All video, graphics, and still events on every track will be processed at the project- or output-level.
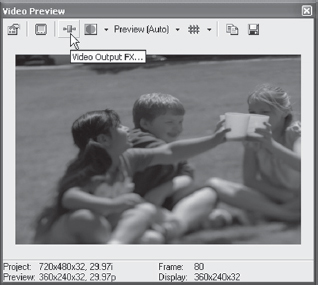
4.54 Inserting FX at the project-level.
The primary use for FX at the project- or output-level is for plug-ins along the lines of the
• Timecode plug-in
• NTSC/broadcast clamp
• Black restore
Any FX, however, can be placed on the project.
4.55 The timecode plug-in places a timecode burn on the project window.
As many FX as necessary can be applied to events, tracks, or the project. FX are arranged in the order in which they are applied; this order is easily changed by either dragging one plug-in to its plac on the plug-in bar or by clicking the “Shift plug-in left/shift plug-in right” button found on the FX Chooser plug-in bar.
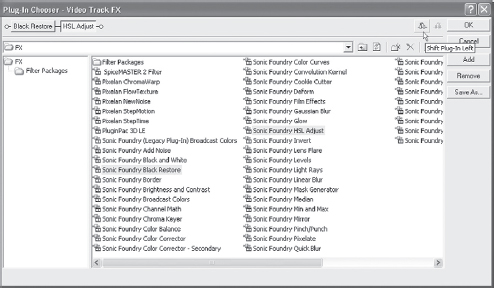
4.56 Arranging the order of plug-ins can be done via button press or by dragging plug-ins to the desired priority.
4.57 Find preset chains in the FX packages folder, which are shown each time FX are to be applied to events, tracks, or projects.
You can save chains of FX in Vegas. Many times, a project requires repetitive use of the same series of FX. Creating presets and inserting FX in sequence can be time-consuming. For example, a project might have poorly shot video and requires color correction, brightness adjustment, and broadcast color clamp. Rather than inserting these FX time after time, the series of FX, complete with presets, can be recalled after it is saved as a chain. This process saves tremendous time, especially in an editing house where a set flow of work exists. Each editor can create their own chains to suit their own workflow.
To save the chain of plug-ins as a preset:
1. Select the plug-ins and arrange their priority.
2. Click the Save-As button. The Chain dialog is displayed.
3. Name the chain/preset.
4. Press ENTER to accept the changes you’ve made to save the preset.
The chain preset is now displayed in the plug-in chooser and is available from the Filter Packages view. (The same process applies to audio presets.)
Vegas has a tremendously powerful feature that allows video output to be viewed at both pre-and post-process settings. Often times, editors find themselves wanting to see original video next to the processed video. This option has not been possible in the past without complex hardware. Now it is possible with Vegas’s split-screen preview.
The Split Screen View Selection Tool button is shown on the Preview Window toolbar.
Selecting this button in the Preview window makes Vegas automatically split the preview screen, which shows affected media on one half and original video on the other half. However, Vegas allows users to define the areas where preview or original video is viewed by drawing a square or rectangle over the screen. Drawing the shape on the preview screen creates a hole where original video is seen.

4.58 Split Screen View Selection Tool button.
4.59, 4.60 The area to view the original (a)versus processed video (b) is user-defined.
The split preview of processed and original video is also viewable on an external monitor, which makes color correction in Vegas advanced compared to even exceptionally high-end NLE systems. The capability to compare processed video to original video on an external monitor without rendering a file provides editors with a newfound speed, workflow, and freedom from concerns about accuracy in the editing workflow. This feature coupled with RAM renders allow editors to immediately see full motion/full frame-rate accurate views of edited media, limited only by RAM and processor speed.
The Split-Screen Preview window can be used to show contents of the clipboard during the preview of a timeline section. Position the cursor on the timeline and click the Copy Snapshot button in the Video Preview window to copy a frame as a still image to the clipboard. Move the cursor to another point on the timeline.
On the Split Screen View Selection Tool button, click the drop-down menu arrow and select the Clipboard. The contents of the clipboard are displayed in the Preview window or external monitor. The area in which the clipboard contents are displayed is defined by the area drawn with the cursor inside the Preview window area. If the entire clipboard clip is to be shown, redraw the cursor over the entire Preview window area. The underlying clip indicating the location of the cursor is no longer shown. Turn off the split-screen preview or redraw the viewing area to view underlying events. Double-clicking the Preview window returns the Preview window to its default state.
How Filters/Plug-ins Function
While far too many plug-ins are available in Vegas to describe the attributes of each, some common plug-ins are of great benefit to understand. Each plug-in has a series of presets but experimenting with the settings increases the power of the plug-in tremendously. A number of thir-party filters are available, some of which are described in the following list:
• Add Noise—adds grain or noise at various levels.
• Chromakey—removes colors from an image and replaces with other information, similar to the weaterperson on the television news.
• Convolution Kernel—embosses, finds lines, or creates a motion photograhic image from video.
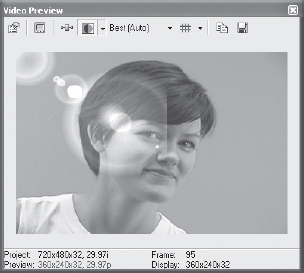
• Lens Flares—hide anomalies, make still images look more like video, and give flair to wide-video shots.
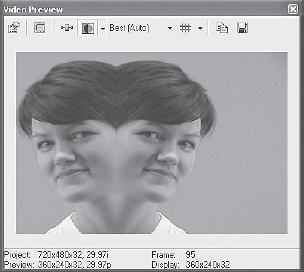
• Mirror—creates mirrored images of any portion of the screen. When used correctly with generated media, the plug-in can emulate a kaleidoscope.
• Pixelan’s ChromaWarp—provides infinite artistic choices for the beginning and experienced editor.
• DebugMode’s 3D Pak—adds some wonderful 3-D elements to the Vegas editing toolbox.
4.68 Color correction can be viewed in real time on an external or internal monitor.
These plug-ins are free and are included on the disk in this book.
Vegas has a feature that is often overlooked yet should not be. Vegas has the ability to build a RAM preview of the final appearance of an event so that it can be seen full-motion/full frame rate. The RAM preview is important to be able to see, particularly in situations where keyframes are inserted in tight time spaces. Slower processors or FX-heavy, multiple events can tax the processor so much that some keyframes simply can’t be drawn due to lack of processor power. Using a RAM render causes these sections to be drawn without creating a temporary file on a hard drive.
To initiate a RAM render, make a selection on the timeline. Pressing SHIFT+B instructs Vegas to begin rendering the time selection to RAM. The amount of RAM installed in the computer determines the length of time that RAM can render. This is why as much RAM as possible is best in most editing systems. By default, Vegas allocates 16MB of RAM to the RAM preview. Opening the OPTIONS | PREFERENCES | VIDEO dialog gives users the ability to adjust the amount of RAM to be used for RAM preview renders. Vegas subtracts 128MB of RAM from all available RAM for preview purposes. Even if only 128MB are available, Vegas makes allowances for up to 16MB of RAM. However, any available RAM in excess of 128MB can be used for RAM renders. (100 percent of RAM may not be used, as the operating system and Vegas require 128MB of RAM space to operate properly.)
While RAM renders benefit external previews, previews on external monitors are not full frame rate except in the faster machines. If full resolution/full frame rate are required for an external preview, a standard pre-render is required on edited/recompressed media. Pressing SHIFT+M opens the pre-render dialog.
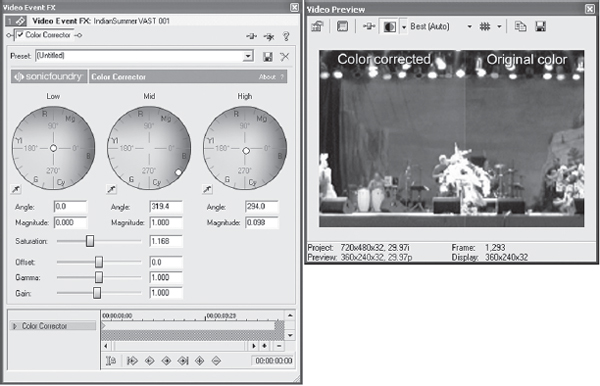
One of the more in-demand, necessary, and powerful plug-ins added is the Color Corrector tool. This palette-based tool offers extremely fast color correction, and, when combined with the Split-Pane Preview window, it’s simple to view changes in color on either an external monitor or on a gamma-corrected computer monitor.
4.69 The Secondary Color Corrector makes replacing colors easy and intuitive.
The Color Corrector plug-in can be dragged and dropped on an event, track, or entire project. It can be used to simulate color effects as well, such as those seen in the movies Payback or Traffic.
Double-clicking the dot in the color correction palettes resets the palette to zero. Most controls in Vegas act in this manner; double-clicking resets a control to default or null.
Colors can be sampled using the Eyedropper tool found in the low/mid/highlight palettes to assist in selecting the color curve.
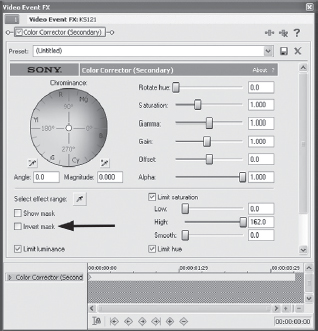
The Secondary Color Corrector in Vegas, adding an Invert Mask option. This allows the “Pleas-antville” look to be created quickly and easily. See Chapter 5 for more information on how to use this small but powerful update. Secondary Color Correction. It allows for a color or series of colors to be replaced or used as masks through which other media can show. Start by selecting a color to be replaced. Shut off external monitor preview while selecting colors. A single color or gradient of color can be selected. Best results are obtained by working with a single color and using more than one instance of the Secondary Color Corrector.
![]() Tip
Tip
Any time video has a final destination where it might be viewed on a television monitor of any kind, it is strongly advised that a good quality television or broadcast monitor be used to preview video; otherwise it is far too easy to have incorrect colors, borders, or margins. If video will only be seen on a computer monitor as streaming media or intranet media, an external monitor is unnecessary.
One of the most sought-after looks in DV production is the ability to have video appear more film-like. While shooting and production are a huge part of this process, there are some steps that can be taken to make video more film-like.
Making video look more like film has been a goal of videographers since desktop video was a concept. Video simply cannot look exactly like film, due in part to the perfection of video and the conversion process, the compression process, and the interpretation of imagery. Film, shot on celluloid, is an analog format that has its own warts but warts that have defined how our eyes see images. Someone once said, “video is what the eye sees, film is what the imagination sees.” Kodak’sTom Wallis commented, “Film feels organic to audiences, and that’s why they associate a film look with fantasy and video with reality.” There is a great amount of truth to this, hence the desire to make video look more like film.
Many companies offer “cure-all” plug-ins to make video more film-like, but in the opinion of all but the most amateur, these plugs merely make video look like video treated to look like film. Compared to the real deal, it’s pretty clear what is what. Some of the more expensive tools, such as Magic Bullet from Red Giant, can do an excellent job with video shot like film, but Vegas can approximate most of that same look without the plug-in tools.
First off, to make video more film-like in appearance, the video must be shot like film would be shot. Great lighting, shadows, and depth of field are critical. DV cameras allow for too much depth of field in most cases, so videographers who are aware of this also are aware of the many work arounds to get a good shot with tight foreground focus and weak background focus. For instance, using a Neutral Density filter and opening the iris to full helps. Blurred backgrounds quickly indicate a sense of “unreality” and go a long way to getting video to look more film-like. Shooting through pantyhose behind the lens or shooting through a Tiffen Black Mist filter can help soften the look too. Opening the iris and reducing the amount of light that can pass the filter will call for more and better lighting, too. With cams like Sony’s PD150/170, you can easily underexpose and then correct in post if you know what you are doing. Be cautious of this workflow with cameras that are noisy in low light. Take careful notes, either as voice notes on the tape or have an assistant write down the settings. Starting each roll with a gradient or shot color bars will help define colors under conditions when it comes time to correct in post.
Next on the list is cadence. NTSC video is shot at 29.97 fps, and PAL video is shot at 25.00 fps. Film cameras shoot at 24.00 frames per second. The 24 frame “stutter” gets DV closer to film pretty quickly. Many great film makers that find themselves having to work with digital video shoot PAL cameras, as it’s not a big thing at all to match 25 frames to 24 frames per second. In fact, if you plan on making a feature that looks like it was shot on film, acquiring a PAL camera should be a consideration. Panasonic offers the DVX100, a DV cam that shoots at 24 fps. Some folks don’t care for the video quality while they love the cadence of 24 fps. Some folks just aren’t interested in learning another camera or another format. Another difference is the interlaced format of NTSC video and film being progressive scan. But what if you don’t have a PAL or 24 fps camera?
This is where Vegas and its format-agnostic, resolution-independent feature set comes in. Vegas is indeed optimized for capture, editing, and output of DV files, yet it does offer other alternatives, too, thereby removing the limitations so many applications impose on the editing process.
Vegas is capable of working with 24p natively, performing what’s known as 3:2 pulldown during playback. This is referred to as “inverse telecine.” Telecine is the process of converting 24 fps to 29.97 fps. Therefore, pulling the frames back out is known as inverse telecine or IVTC. For a simple explanation about pulldown, go here:
Vegas will easily convert 29.97 fps footage (commonly referred to as 60i) to 24p, which is actually 24.976 fps. This creates the cadence of film, where during the process essentially 6 frames or 12 half-frames per second are removed from the stream. Another way of expressing the difference between 24p and 60i or 50i is: NTSC is 59.94 fields (60i) per second, PAL is 50 (50i) fields per second. Film is 24 full frames per second. NTSC and PAL have the look of reality because of the smooth motion rendition. Part of the film look is the much slower 24 fps acquisition rate. To simulate this with video, you must throw away or blend fields to create 24, 29.97, or 25 frames per second instead of twice as many fields per second. The interpolation of the removed frames is prettycritical to making this all look right. Also important to consider is working with 24p titles, transitions, generated media to keep the image accurate. To my knowledge, Vegas is currently the only application working with native 24p transitions, titles, FX, and generated media. Nevertheless,
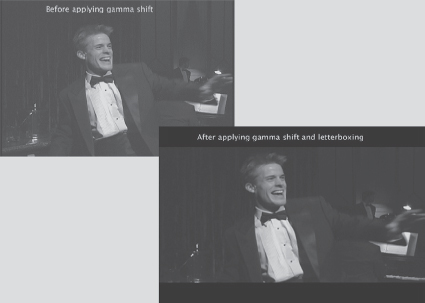
4.70 Letterboxing goes a long way to helping video look more film-like. These images are before and after film-like processing as described here.
First, edit your media on the timeline as individual events and cuts-only. Do not do any transitions, titles, FX at this time. You might want to leave heads and tails on the rendered events for future transitions or edit requirements. Render these individual clips out by double clicking the event to select the event as its own region. These events will be rendered out to a compressed or uncompressed 24p format. Save the .veg file. Some users might have issues with the render to DV instead of uncompressed, but the Vegas codec holds up just great, and most users will have no issue with the quality of image going from DV to DV. Once all the events have been edited, render them individually by creating a template containing the following settings:
1. Set the Project Properties/Deinterlace mode to Blend Fields (default).
2. Choose File>Render As.
4. Name the file, choose .avi as the file format, and select NTSC or PAL DV (inserting 2:3 Pulldown).
4. If you wish to render Uncompressed, Select the Custom button, In General tab, select rendering quality of Best. Select Video tab, in the Video Format dropdown box, and select “Uncompressed.”
5. Render this event to a folder where it can be located later. Render all events as 24p (NTSC-DV or Uncompressed) .
After all events have been edited, open the saved .veg if you’ve closed it down, and set the Project Properties to 24p (NTSC or PAL). If you’ve rendered to uncompressed, replace the events in the Media Pool with the 24p uncompressed files you created earlier. Do the same if you’ve rendered to 24pDV. As soon as all the events in the Media Pool have been replaced, notice that any uncompressed events are letterboxed. (DV compressed files won’t have this issue.) This is due to uncompressed media being square pixel aspect ratio and DV media being non-square pixels. To correct this, right-click the first event on the timeline and select Properties. In the Properties dialog, select the Media tab.
Aspect Ratio
If you’ve rendered uncompressed media, select the Pixel Aspect Ratio dropdown in the Media tab and choose .909 as the aspect ratio. The first event’s image will no longer be letterboxed in the Preview window.
Uncompressed or DV, right-click the first event again and choose Switches>Disable Resample. This will prevent the project from trying to reinsert the missing frames for playback.
Copy the first event, then right-click the second event and choose “Select Events to End.” Right-click again and select Paste Event Attributes. This will cause all events to have the resample disabled and correct pixel aspect ratio. Now you can begin editing.
One of the first things viewers associate with the film look is letter boxing or 16:9 screen. So, using Pan/Crop on the first event, choose the 16:9 crop preset from the Pan/Crop dropdown menu. If you choose this option, you’ll need to apply this to all events on the timeline, so once again copy the first event, select events to end, and choose Paste Attributes. This will apply the letterbox to all events on the timeline. Depending on the framing of the shots, you might need to adjust individual events for composition.
If you’re working with HDV, the pixel aspect ratio of the graphic in Photoshop or other graphic editor should be 1.333, not .909 that DV requires.
Apply transitions as necessary. Apply titles and any other overlays. These will be generated at 24 fps, progressive scanned as determined by the project properties.
Color correction can be applied at the track level to create a similar look for all events. However, if individual events were shot under different lighting circumstances, it might be advisable to put all similar events on single tracks or save color correction presets per shot location so that color correction may be quickly applied to groups of shots.
Gamma
Another difference in film from video is Gamma, or an adjustment between input and output, and how the eye perceives the difference between film and video. While Vegas doesn’t have a specific plug-in for Gamma compensation, it does have Color Curves which essentially accomplish the same goals. Drop the Color Curves filter on the Preview window to apply it to the entire project.
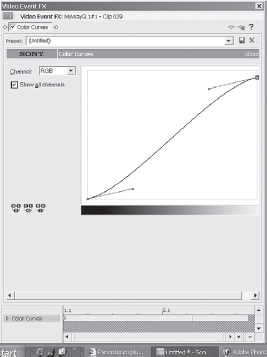
4.71 Notice this curve and how it compensates for differences in gamma. View this on an external monitor and be very surprised at how powerful this underestimated tool is.
Experiment!
After applying these basics, the next steps are entirely subjective and experimental and subject to personal preferences and will vary depending on the desired final output appearance. However, adding an HSL filter to saturate the colors, adding a touch of Glow will go a long way to getting a great film-like look. For the demo file, I used the Zenoté Glow set to 1/4 Tiffen, plus the Zenoté Film Grain set to 35mm plug-ins. Sony has a good glow filter as well, I find I like the Zenoté a little better as it’s slightly smoother, and the Film Grain are a little more quick to use, but the Sony Film Grain can be tweaked to look similar to the presets of the Zenoté plug. Adding Motion Blur to pans or transitory elements can also make a difference in a shot. Consider using SuperSampling on Motion Blur shots. Don’t forget that Pixelan has some excellent film look plugins for Vegas as well. Their Spicefilters are some of the coolest plugs available for Vegas.
From this point it’s entirely related to your desire, experimentation, and quality of original video that will determine the final output. The demo video was shot entirely with existing light, backlit, and generally poorly composed, but the quality of color shift and film-like imagery is clear to see regardless of its original quality. Had it been lit correctly and shot with an eye for film-like composition, it would be even more effortless to create a film-like appearance. It can’t be stressed enough that the lighting, shooting technique, and composition make all the difference in the world. Don’t expect to shoot with a palmcorder and no tripod with a digital zoom and expect to have imagery that looks like it was shot with an Arriflex. It’s not only a pipe dream, it’s impossible. Even the most expensive, top-end plug-ins can’t work these sorts of miracles, but Vegas surely comes close to being a miracle worker with bad footage, and can make really good footage look fantastic.
4.72 The Zenoté plug-ins go a long way to creating a film-like appearance.
Shooting Modes
When shooting with most any DV camera, shoot in interlaced mode rather than in frame or “film mode” as some of the cameras call it. Otherwise you are throwing away pixels that otherwise add to the quality of the original image. Some cameras actually cut the frame rate to l5 fps when shooting in a Progressive mode. Other cams simply shift pixels to create a film look.
It’s generally better to do de-interlacing at the NLE rather than throw away data that can otherwise improve the picture. Spend some time studying lighting, contrast, and camera angles. Experiment with ND filters and lighting, and you’ll find your image not only improves substantially, but you’ll become a better shooter and editor for it. Hollywood rarely uses a zooming lens, but rather uses a prime lens (a fixed focal length) and a dolly or jib to move into or out of a shot. Try shooting without using a zoom. You’ll find a better look, and a more disciplined shooting style will help you plan shots better.
Output
In case it’s not immediately obvious, to print this to tape requires a camera or deck capable of receiving a 24p stream. If you already have a camera, most of this tutorial is of no value, so we’ll set that aside. This technique is most valuable for printing to DVD, and competing with some of the bigger fish in the market when it comes to film look. I showed a video that was created with these techniques at a small film festival in Milwaukee, WI September of 2004. A reasonably well-known director asked me what kind of film I’d shot it on. He was shocked when I told him it was shot on a pair of DV cameras. The video won first place in the children’s category. It was shown from DVD. Render the project out using the Vegas 24p NTSC or PAL template. You can render it as a DVD Architect NTSC/PAL video stream if you intend on rendering an AC3 file for the audio or render as a 24p NTSC/PAL file where the audio will be packaged with the video stream.
![]() Tip
Tip
Be sure to check out the ReelPak products by David Jimerson, as they mimic many popular film looks, and are very fast to render.
These small tips should help you to create a look that approaches film fairly easily. It is indeed a process in terms of the steps required; at the same time it provides a great alternative means to a 24p camera and more importantly as the 24p formats and technologies develop, it allows owners of typical DV cams to have the 24p look without buying a new cam. The greatest advantage of this workflow is that up to 25 percent more media can be stored off on to a DVD when the media is 24p. In order to preview this media on an external monitor, you’ll need to insert the pulldown, but Vegas can also do that on the fly. (See chapter 10 for more information) Playback might be a little slower due to the inserted frames in real time, but it’s still capable of being viewed on an external monitor for color correction and other filter tweaking. (The output framerate must be at 29.97/NTSC or 25.00/PAL fps to be viewed on an external monitor.)
Opacity Envelopes
Each video track in Vegas has an opacity control, although no shortcut key is available. Opacity is the level at which an event is visible. At zero percent opacity, an event is completely transparent, and at 100 percent opacity, the event is completely visible with zero transparency, which is the opposite of how Photoshop and Ulead control opacity.
The opacity of a track can be altered in one of two methods. The first method is in the Track Control window, where level/opacity for the entire tack can be set. This is not controllable over time but rather sets the level or opacity for every event on the track.
4.73 Track Control pane-level adjustment.
![]() Tip
Tip
Be sure your opacity levels are always at 100%. If you have a track that seems to be rendering too slow, this is sometimes an indicator that the opacity slider has been moved.
4.74 Adjusting opacity over time. No limit exists as to how many handles/nodes can be placed on the track timeline.
The second method is to set an Opacity Envelope in the track, which is done by right-clicking the Track Control pane and selecting Insert/Remove Envelope and then selecting Composite Level from the submenu that will open. This process will insert a blue line (default color) at the top of the video track. Double-clicking this blue line inserts handles or nodes. These handles/nodes allow the compositing envelope to be pulled down and adjusted for opacity level at any point on the video track. To delete a node, right-click it and select Delete.
The following are the envelope modes you have to choose from:
• Linear—Straight line fades with no velocity or curve to the actions
• Smooth—Smooth fade ramps slightly into the event before ramping back down.
• Fast—Fast fade quickly raises or quickly lowers settings.
• Slow—Slow fade gradually moves in or out.
• Sharp—Sharp fade moves quickly to the peak movement.
• Hold—Hold position has no subtle movement at all and is fairly harsh and obvious.
Using the opacity envelope or envelopes, events can be faded to another event on a different track or to a transparent black.
![]()
Open the project called Compositing Envelope.veg, which is on the tutorial DVD. Two video tracks are on the timeline. Track 1 already has a compositing envelope on it. On the control pane for track 2, right-click and select Insert/Remove Envelope, and then select Composite Level. A blue line, similar to the line found on track 1, will appear. Double-click at the first marker on this line to insert handles/nodes. Pull the handle down to 50 and notice how the gradient found on track 3 becomes visible.
By using compositing envelopes, you can create beautiful fades over multiple layers of video. Compositing envelopes also allow for rapid transition from one event to another with overlay or multiple images. With compositing envelopes in place, as many tracks as the imagination might create can be visible.
If multiple cameras are used on the same shoot, the opacity envelope is an indispensable tool. Place video from multiple cameras on different tracks on the timeline, lining up their sync with the audio on each track, so that all video tracks are lined up with sync. Delete the audio tracks that are unused, keeping only the audio master track.
For this example, we’ll assume three tracks of video and one track of audio are being used. On video tracks 1 and 2, insert compositing envelopes. Leave video track 3 without any adjustment at this time. Play the video until you’d like a fade or cut to occur and drop a marker at that point, pressing M. Stop playback and double-click the compositing envelope at the top of video track 1 to insert a handle. Double-click again slightly after the first handle. Now pull the opacity envelope all the way down to the bottom of video track 1. Now the events in video track 2 are visible. Play the timeline again, until another fade or cut is desired. Drop another marker and repeat the actions performed above at the new edit point. Now video track 3 is visible. Again play the video until a new fade or cut should occur. Now events from track 2 or track 1 can be brought in by double-clicking the bottom of either video track on the compositing envelope, inserting two points, and pulling the compositing envelope up. In this manner, an entire show can be roughed out quickly.
After all fades and cuts have been made using the opacity envelope, each time a track has been removed from view with the opacity envelope, you can place the cursor on the event, making sure the event is selected. Press S to split the event. Repeat the split at the point in the event just before it fades in again. Now the middle portions of the event can be deleted.
![]()
Open the compositingenvelope#s2.veg project from the DVD. (This project also includes the use of the Pan/Crop tools, discussed earlier in this chapter.) This project demonstrates the use of the same video track, panned and cropped, to create the false image of a three-camera shoot from one camera.
The compositing envelope is used to create the original edit points. In this project, you’ll need to split out the unused video. Removing the unused portions of the event is not necessary, merely helpful in viewing the overall project.
Compositing envelopes may be automated, including Mutes, just as Volume, Pan, and other envelopes may be automated. If you own a Mackie Universal Control, you’ll be able to use the faders as compositing controls for video, thus giving you an automated video switching system as well as an audio mixer.
Velocity Filters
Velocity filtering allows for media to speed up, slow down, reverse, or freeze-frame, all without cutting clips of media into individual pieces as previously required in most applications. Velocity filtering, or envelopes, as they are known in Vegas, can be applied to any number of clips. The speed at which the envelope interactswith the media can be controlled as well via keyframes. Every effect, envelope, or filter can be keyframe-controlled in Vegas, with a variety of shapes for the envelope properties.
![]()
Open the velocitytraining.veg file found on the DVD.
Notice that on the timeline a green (default color) line is in the midde O the event. This line demonstrates how the velocity envelope is adjusted. The second event on the timeline is for you to adjust your own velocity envelope.

4.80 Velocity envelope inserted, with regions expressing each change in velocity. Handles have various envelope settings on them.
Start by previewing the first clip. Notice how it slows down during the first moments of the event, slowly climbs back to regular speed, and then freezes frame at the end? (You might need to perform a RAM render [SHIFT+B] if the processor cannot draw the video at normal speed.)
In the second half of the event, the video actually reverses to give an instant replay type of feel. Again, the event freezes frame at the end, allowing time for a blur, added title, special effect, or just a simple dissolve to the subject shot. This option is especially effective with video of high motion, such as sports, chases, or fight scenes. Notice how during the freeze frame, the Pan/Crop tool is used to create an artificial camera zoom. Another great space to use the velocity envelope is when you have a series of camera zooms that maybe weren’t as smooth as they could have been. The envelope can slow down the jerkiness of a poor zoom or speed up a zoom that was too slow. A velocity envelope applied to speed up a fast zoom makes it faster, more frantic, and draws immediate attention to the subject on the screen.
To insert a velocity envelope into a media clip, right-click the clip and select Insert/Remove Velocity Envelope. A green line will appear. (This line is green by default in v4 and blue by default in v4.) The line will be set by default to normal speed, or 100 percent. Double-click the timeline, and a node or handle will appear. Move down the timeline a few seconds and double-click again, inserting a second handle. These handles are similar to keyframes, allowing the setting of velocity or speed on the individual event. To delete a node, right-click it and select Delete.
Now, move the handle up or down to set the desired speed. If the desired percentage of speed change can’t be precisely achieved by moving the handle up and down, right-click the handle. The dialog box shows the fade choices and speed settings. Select Set T and type in the desired setting. Slow the envelope down just as the zoom reaches its end and make sure the handle on the keyframe is set to Smooth if the media is being sped up or slowed down over a short number of frames. By setting the envelope handle to Smooth, the media won’t appear to jerk or jump from slow to fast or from fast to slow.
As the event is sped up or slowed down, artifacts can occur, particularly in Vegas 2.0. Avoid this problem by right-clicking the clip, selecting Properties, and checking the Resample box. This process causes the render to slow down somewhat, yet carefully resamples the video to assure smooth picture and motion in almost every instance.
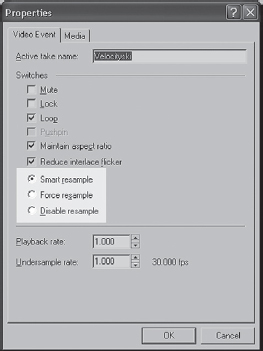
4.81 Resampling features found in Vegas provide for smooth slow motion and velocity events.
In Vegas, a feature for resampling has been created, which allows for smart, forced, or disabled resampling, as shown in Figure 4.81. If Smart Resample is enabled, which is the default option, Vegas determines whether the event requires resampling or not. Force Resample is similar to the resampling found in older versions of Vegas, in which Vegas is instructed to resample the event whether it requires it or not. Disable Resample turns resampling off.
Velocity envelopes have been used in nearly every form of special effect there is and can be used for titles, movement control, color keying, and other forms of effects. One favorite is to use an envelope during a title shot, slowing or freezing the subject matter, panning/cropping the media as though the camera zoomed in on the subject, and dropping the opacity of the media so that he title can punch through. This method is exceptionally effective when coupled with a mask and moving media behind the text. Velocity envelopes can be applied to all moving media, including GIF files.
![]() Tip
Tip
Here’s a tip for using velocity envelopes on long files: use the Split tool (S key) to split the clip before the actual change/handle of the velocity envelope. Otherwise, the envelope affect te entire file and slows down the render process if the rate is accidentally set to any level but 100 percent, when only a small portion of the event needs to be affected and perhaps resampled.
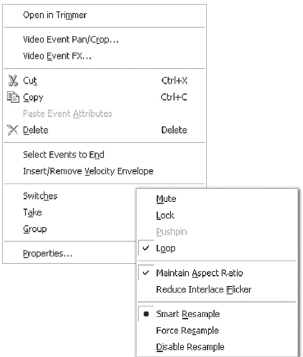
4.82 Right-clicking oan event calls up the Switches dialog.
Event Switches in Vegas
Right-clicking any event in Vegas calls up a Switches dialog. These switches dictate how selected events are treated. Events can be muted, locked, looped, video events maintained to aspect ratio, interlace flicker reduced, and audio events normalized. As mentioned previously, Smart Resample, Force Resample, and Disable Resample are also options in the Switches dialog.
4.83 Looping events is helpful for extending titles and generated media.
Muting a selected audio event or video event prevents the event from being heard or seen on the timeline. Muted events are dark on the timeline, demonstrating the muted status.
Locking an event prevents it from being moved or edited. Locking events is good practice when a section is complete in a long-form video. Locking events causes those events to be grayed out, indicating that they are locked.
Looping events causes events to repeat if they are dragged past their actual end. This option allows events to be extended on the timeline.
If FX have been applied to an event that is being looped, the FX holds at the last keyframe. This option can be a valuable artistic editing tool with titles, generated media, and backgrounds. If a loop is applied to a generated media event, keyframes loops with the generated media length.
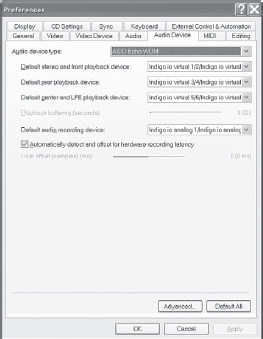
4.84 Setting the level at which normalization peaks.
Normalizing an audio event is typically for bringing audio to its maximum volume, based on the highest peak found in the audio. When normalizing is used, Vegas looks for the loudest point of the audio and adjusts the entire file to the loudest possible level without clipping. The maximum level for normalization can also be set manually, if necessary.
Aspect ratio lock can be applied to an event as well. This option prevents Vegas from stretching the aspect of the events’ contents should it not match the project settings.
Sometimes graphics or stills that are converted to video do not display well on an interlaced monitor, depending on the colors and resolution. Reducing interlace flicker generally repairs this condition. Without applying the reduce interlace flicker, graphics and stills often show fringing on video edges or show crawling lines on the screen.
When editing long-form video and some short-form videos, it’s helpful to be able to lock various events together in a group. By doing this, cut, copy/paste, and delete can be executed simultaneously, and multiple events can be moved simultaneously. It’s also an efficient means of tracking sectionalized video. To create a group:
1. Select all events to be included in a group.
2. Press G or right-click any event.
4. Select GROUP | CREATE NEW in the submenu that opens.
No limit exists as to how many groups may be created; however, no two groups may share the same event.
Groups may be shifted, copied and pasted, or deleted together. After a group is created, right-click any event in the group to select all events in the group. Select GROUP | SELECT ALL from the submenu.
Audio and video files are grouped by default when placed on the timeline. To remove audio or video from a group or to separate them, select the event to be removed from the group and press U to ungroup that event. The event will be removed from the group.
To remove all events from a group, right-click any event in the group and select Clear.
Grouping can be temporarily ignored by clicking the Ignore Event Grouping button on the toolbar.
This option instructs Vegas to ignore the groups temporarily, while allowing events to be moved. After this button is released/selected again, however, the group is restored with all event members.
Groups or individual events can be locked on the timeline to prevent them from being moved.
The Shuffle feature, which is part of the new Ripple Editing toolset, is also a powerful and efficient means of creating a storyboard and rough cut on a single Vegas timeline.
At Sundance Media Group, we commonly use one instance to rough cut, one instance to edit/ finish, and a third instance rendering in the background.
In a facility that uses multiple editing stations, one editor creates the rough cuts and saves them as a rough-cut VEG file. A second editor grabs the VEG file without ever copying media and does the color correction and finish work on the project. With a network, this workflow is exceptionally fast, particularly in a small company setting.

4.85 Six events are grouped. Notice the dark color at the top and bottom of the events. The seventh event is not grouped. Notice the white at the top and bottom, which indicates that this event is not part of the group.
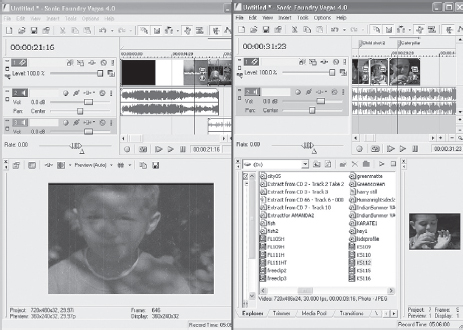
4.86 Two open windows of Vegas. The first instance, or copy-to instance, doesn’t need the Explorer, Trimmer, or other tools open. The second instance, or copy-from timeline, is where media location, sequencing, markers, and other finishing aids are created.
Some NLE systems use a layout concept called storyboarding, which uses thumbnails that can be dragged into a specific order and placed on the timeline for fine editing. Vegas does not have this feature. The following two methods, however, can be used for those desiring to edit with a storyboard workflow.
AVI clips in the Windows-Explorer (not the Vegas Explorer) show thumbnails if the thumbnail view is enabled. Clips can be shuffled from position to position in the Explorer, creating a sort of storyboard that works for most general purposes.
A more powerful and useful method of storyboarding is to have two instances of Vegas open at one time. The first instance is the active editing workspace, and the second instance is used for creating a storyboard/rough cut that is then copied and pasted into the first instance. What makes this option the more powerful storyboarding tool is that comments, markers, regions, and trims, in addition to storyboarding capabilities, are retained in the second instance. With either a single or dual monitor setup, this is a fast and powerful way to storyboard and edit.
Create a rough cut in the second instance, copy the timeline by selecting a region (press CTRL+A) or the entire timeline (press CTRL+C) and then paste into the first instance (press CTRL+V). Be certain to ave “Automatically save markers and regions” enabled in the OPTIONS | PREFERENCES | GENERAL dialog. Othewis, markers and regions created in the copy-from instance will not be carried over into the copy-to instance.
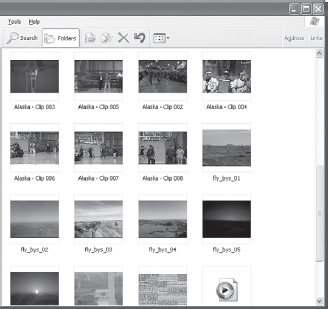
4.87 Notice that clips are not in numeric order, rather they have been shuffled to create a storyboard.