
Output and Export
Last Steps with Vegas
Vegas is unique in that it is currently the only end-to-end NLE or digital audio workstation (DAW). Vegas contains tools for output to every web format, CD/VCD format, serial digital interface (SDI), high-definition broadcast quality, and multiple audio format. Vegas is formidable. No wonder it’s the choice of many large encoding and finishing houses!
As mentioned previously, Vegas started life as an audio-only tool. As a result, the audio features in Vegas are what first brought attention to the application years ago. Development for audio has continued, and Vegas is currently one of the most open-ended output DAW systems in existence on any platform.
Output Formats
After a mix is completed, it needs to be output in a format that others can hear or distribute or that a replicator can work with.
Open a multitrack mix in Vegas. Assuming all parts of the mix are satisfactory, the multichannel mix needs to be mixed to a two-track mix that can be put on a CD and prepped for distribution. This process is called the mixdown. Mixing down multiple tracks is the next-to-last step in the finishing process.
To mix the multichannel mix to a two-track mix, select FILE | RENDER AS and render the mix to a Stereo WAV mix.
When rendering the multiple tracks to a final two-track mix, be certain that if any buses were used they all point to the master output. This issue only occurs if multichannel hardware has been used, with outputs assigned to other devices.
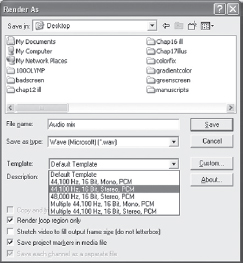
11.1 Rendering multitrack to a two-track mix, ready to be mastered.
If the project has been recorded at any sample rate other than 16 bit, 44.1 KHz, the mixdown process is not where the sample rate should be dithered to 44.1. Keep files in their higher resolution state where applicable. They’ll be dithered to a 16/44.1 state later in the process.
After this process has been performed with each song, or multichannel audio project, the multiple two-track mixes are ready to be mastered. Vegas has excellent mastering tools—tools that have been used to master/produce my Grammy-winning and Grammy-nominated recordings.
Mastering
The mastering process is not to be taken lightly. This stage is the final one before sending the master disc to a replicator. It is generally advisable to do the mastering in a familiar room, using familiar monitors. It’s rarely a good idea to master on the same monitors that were used in the mixing stage, as it is entirely possible for monitors to mask or enhance problems in a mix. The entire point of mastering is to discover anomalies or errors in a mix and to bring all cuts of a project to a state of consistency so that regardless of sequencing, tracks compliment each other and flow comfortably from one cut to another. Mix on a different set of speakers if possible. Move to a different room, if possible. If nothing else, check the mastered mix multiple times on different stereo systems to assure a consistent and balanced master. In one studio years ago, we installed an FM transmitter that was fed by our master tape deck. We then went out to the car in the parking lot and listened to the mix over an FM receiver. To this day, all mixes at Sundance Media Group are checked on an old Craig boom box, a standard home stereo system, and a high-end car audio system before being sent off for replication.
Mastering is not mixing. Mixing is blending several channels of audio together, placing elements in different portions of the sound field while using EQ, reverb, delay, and other tools to create a sense of depth and space. An analogy might be that mixing is like baking a cake, whereas mastering is the decorating part that pretties things up.
Mixing is an entire book in itself, so this section covers mastering only. See Chapter 6 for more information on mixing.
Mastering is taking the 2-channel, 4-channel, 5.1, 7.1, and 16.1 final mix and finishing it for the audio space/delivery mechanism. The primary preparation is making sure that all audio is of maximized level, in phase, properly faded in/out, with all hum, pops, and noises removed, proper compression applied where/if needed, relative level adjustment between cuts of audio matched, and other tweaks applied to give the audio that final sparkle. Mastering is rarely done in the same room as the audio mix was done in, as a different set of speakers in a different environment tells the tale when poor audio practices, sneaky noise, or other anomalies are present but were not heard in the original recording environment. Mastering is also generally done by a mastering engineer, rather than by the engineer who mixed the audio. A fresh set of ears is invaluable at this point, even if it’s just a friend with good ears who can make comments on how something sounds.
If you’ll be mastering for surround 5.1 or 7.1, be certain that you have a high-quality audio tool, such as the Echo Audio Layla, Mona, M-Audio Delta Series, or a similar tool. A low-quality audio card will create problems in any instance at this point. Higher-quality cards allow for synchronous playback of multiple channels of audio, whereas a low-end sound card with surround ability will have slur and phase issues in most instances. Worse still, many low-end audio cards induce noise into the audio path. (With Microsoft’s Windows-Media 9, you’ll need a surround-capable card in order to prep audio for the new codec/delivery tools.) Remember, this stage is the last stage in preparing your audio for the world to hear. If you’ve worked hard to have a mix, video, or other project that sounds great, you’ll want to put your best foot forward, especially when presenting the product for sale or broadcast.

11.2 Delta 1011.
![]()
11.3 Echo Audio Layla (back view).
Meters are critical to this endeavor. Vegas has two meter display spaces: one is the master and the other is for buses/auxes. For this section, we’re only concerned with the master volume meters. Notice the small lock icon on the master meters. This locks right and left together, so that both channels are identical. They may be unlocked by clicking the icon.
Ideally, during the mix process, the audio was mixed to a level not exceeding 0dB and not less than -6dB at peaks, which are the loudest points in the audio mix. Audio that is too quiet won’t be heard well over the television or stereo system on which the video is played or on which the CD is played. In addition, in the event of poor playback equipment, audio that is too quiet can cause any noise associated with the poor playback equipment to shine through, making your finished product sound unfinished or of poor quality.
Many ways exist to bring up audio levels in the digital world. One is to apply a simple volume adjustment. In Vegas, volume can be increased by 12dB at the track slider and decreased infinitely until to the point of no volume whatsoever. Vegas’ track pane setting for volume is 0dB, at which point there is no increase or decrease in the volume of the audio.
Another means of raising volume is to normalize the audio levels. Normalizing in Vegas instructs the application to search the various peak levels of the audio information and set the loudest point to a prespecified level. To normalize in Vegas, right-click the audio file and select PROPERTIES | NORMALIZE. This step can also be done by selecting EDIT | SWTCHES | NORMALIZE from the Vegas menu bar.
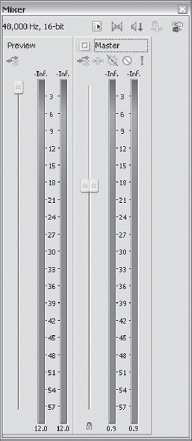
11.4 Disable locks on master faders if separate control of right/left channels is necessary.
Change the Normalize Default Level in the OPTIONS | PREFERENCES | AUDIO dialog. Normalize defaults to -.1dB in Vegas.
Yet another method to bring audio to the maximum level is to use a maximizing tool, such as Sony’s Wave Hammer or the industry favorite, WAVES Ultramaximizer. Maximizers are fantastic for bringing audio to an optimum level without distortion. These are usually applied last in the chain however.

11.5 WAVES Ultramaximizer plug-in is great for mastering output levels.
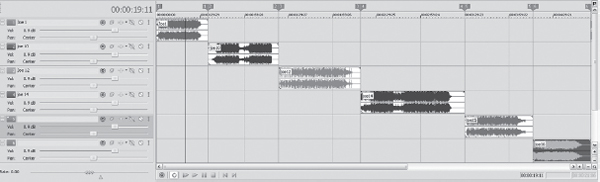
11.6 All audio cuts on separate tracks provide the greatest control.
During mastering, effects, such as delay and reverb, are rarely applied. These are more mix tools than master tools. However, EQ, compression, and audio wideners are all commonly applied. Filters/processes can be applied either at a track-level or at an event-level in Vegas. Generally, it is best to apply filters at the track-level, only for purposes of maintaining consistency and clear processing paths.
To begin the mastering process, place all audio to be included in the final output on the time-line in the desired order. This process can be done either with each event on its own track or each event on the same track. It makes no difference other than catering to individual workflow preferences. (Leave exactly two seconds of blank space at the head of the first track, if the audio will be burned to a Redbook/duplicatable CD.) Vegas can auto-insert these two seconds as well, which is defined in the OPTIONS | PREFERENCES | EDITING dialog. Audio CDs have specific areas for specific info, such as in the first 46mm of the CD, where the lead-in occurs. Lead-in is where indexing, table of contents, data information, logical block address (LBA), and length of track information is stored. If anything more or less than two seconds is defined at the head of the CD, Vegas will give an error message indicating that the error must be repaired.
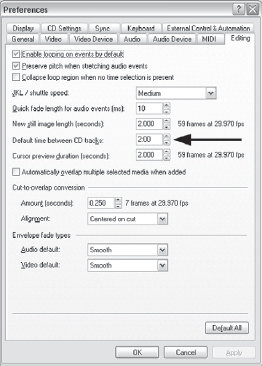
11.7 Set default time between tracks at 2.00 seconds in the OPTIONS | PREFERENCES | EDITING dialog.
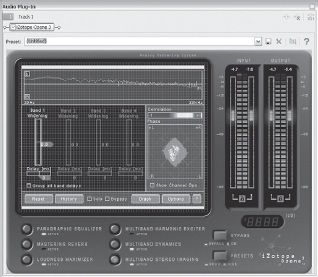
11.8 Ozone contains tools specifically for video editors and voice over artists, as well as being very musical and warm.
Listen to the timbre/tonal differences between pieces of audio. Perhaps one has more or less bass than another, or more high-end or less mid-range information. This might be desirable or it might not be. The first part of the process is to determine how to make each event complement the next, without appearing to have jumps in bass, midrange, treble, volume, or pan/right-left information. The transition from one event to the next should be fairly seamless, regardless of whether it’s musical or not.
To add EQ to an event at the event level, select TOOLS | AUDIO | APPLY NON-REALTIME EFFECTS, choose an EQ, and click Add. Graphic or parametric choices are available and depend predominantly on the engineer’s requirements. Graphic EQs are broader in terms of frequency adjustability, and parametric EQs allow for specific frequency controls.
Here is where plug-ins really shine. While Vegas does come with a selection of audio plug-ins, many third-party plug-ins are available. For instance, the WAVES Q series or Renaissance plug-in tools are very natural, yet powerful tools. They are very musical and have great control.
Ultrafunk also has some great plug-ins available as well, and their EQs are very musical and warm-sounding. Apply EQ sparingly and lean more toward smoothing out harshness, rather than attempting to fix a problem with the overall EQ from the mix. If the track requires a tremendous amount of EQ at this point, it’s probably a good idea to revisit the mix. If the master file is audio from a video file, pay attention to the weaknesses in EQ and compensate in future times with better mic techniques and attention to room acoustics.
Applying a touch of bass at the 150 Hz setting will add punch to the mix, while adding any frequencies below 90 Hz will most likely enhance any low-end rumble or noise. It’s generally a good idea to roll these lower frequencies off with an EQ, using the high-pass filter setting. Adding 1 to 3dB of gain in the higher ranges, 8 KHz to 12 KHz, will give a little sparkle to the overall mix, but again, too much can create resonant frequencies that are painful to the ear and difficult to control. Watch for harshness in the 1 KHz to 2 KHz regions. When working with audio recorded in a large reflective room, such as a warehouse, bathroom, or conference room, pay close attention to the frequencies around the 500 Hz point. This combination often creates a boomy sound in the audio and should be compensated for or removed if overt and noticeable to the average listener.
Listen to the applied filter and determine if the sound is to satisfaction. If so, then move on to the next event. Notice that when the non–real-time plug-in is applied, a new file is written for the event. Track-level mastering/processing becomes valuable at this point, as real-time effects can be applied without writing a new file. To apply filters/processing at the track-level, open the track filter/processing dialog by clicking the FX Filter button found on the Track Control pane. The dialog box will show a noise gate, compressor, and EQ already in place, with check marks showing that the processors are selected. There is also a Plug-In Chain button in the upper-right corner, which allows you to insert other real-time effects and processes. Click this button to add a real-time effect, from the Cakewalk, Sony, WAVES, Ultrafunk, iZotope, or other DX plug-in. Keep in mind that this effect will affect every piece of audio on the track, which is why placing each piece of audio on its own track is a good idea for the mastering process.
When all audio is finished, it is ready to be output. To output to an MP3 format file, select FILE | RENDER AS, and choose MP3 from the Save As Type drop-down menu. The file will be rendered as an MP3 file. Using this same method, Vegas can output AIFF, Ogg Vorbis, or Windows-Media Audio files.
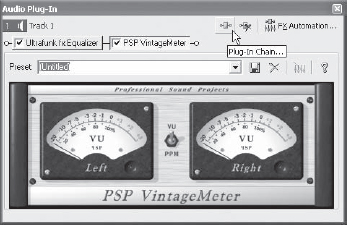
11.9 The Plug-in Chain switch/button in the Vegas plug-in chooser.
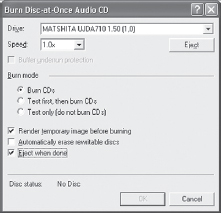
11.10 The Burn Disc-at-Once Audio CD dialog offers speed, testing, and performance options.
With all tracks processed to satisfaction, all levels checked, compression at correct settings per cut, and a master compression or EQ setting for the overall project (if it needs a master compressor or EQ), the project is nearly ready to be burned to a CD. Track indexes must be inserted so that listeners have track numbers to skip around to. This process is quite easy in Vegas; just double-click each audio event/track event and press N for a new index point. If subindexes/chapter markers are required, use Shift+N to insert subindex markers. Index points can also be laid out automatically in Vegas 6. Select TOOL | LAY OUT AUDIO CD FROM EVENTS. Vegas will inspect events on the timeline and auto-create index markers. However, if events overlap, Vegas will not see the-individual beginning/end of events and therefore not assign a track index marker. Check each event beginning to ensure it has a track index marker if this is desired. Auto-layout can also be achieved by right-clicking the Marker toolbar, visible only whenat east one marker is on the timeline.
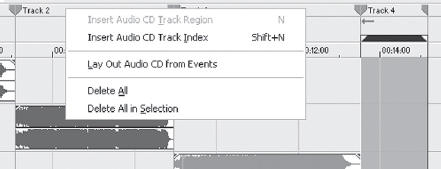
11.11 Vegas is capable of automatically creating track indexes for audio CDs.
With markers inserted to indicate track indexes, Vegas is ready to burn a CD. Vegas is capable of Disc-at-Once (DAO) CD burns or Track-at-Once (TAO) CD burns. If a Redbook Master is required for duplicating, Disc-at-Once is the only option. Redbook standards do not support TAO-burned discs. (Redook is a mastering/duplicating standard.)
![]() Tip
Tip
All CDs have errors, which is a fact of digital media creation regardless of the authoring application used. However, errors can be minimized. CDs destined for a duplicator will contain fewer errors when burned at lower burn speeds. Although errors cannot usually be heard, they are seen by replicating equipment in most professional duplication houses. Minimize burn errors by burning CDs at the 1x speeds where possible.
Audio CDs have specific areas for specific information, such as the lead-in in the first 46mm of the CD. For burning a Redbook-compliant CD, there must be exactly two seconds of dead space/silence before the beginning of the first track. Some burners will allow more than two seconds but all require not less than two seconds of blank space. Up to 99 tracks are allowed on a Redbook-compliant CD.
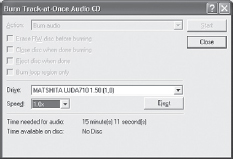
11.12 Track-at-Once (TAO) burns are efficient for getting a session burned to disc for referencing the session’s work.
Track-at-Once CDs
TAO CDs can be burned from Vegas. TAO burns are handy for capturing tracks as they are mixed for reference purposes or when merely getting the audio to a CD is necessary.
To burn a TAO, have the track/cut to be burned to a disc on the timeline and select TOOLS | BURN DISC | TRACK AT ONCE. Select the burn speed and burn device, and finish.
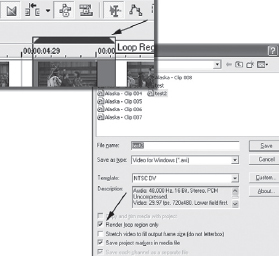
In TAO mode, Vegas can also burn a region to a disc from the timeline. Select the Burn Loop Region Only check box. This option is useful for authoring Sony’s ACID loops, for sending an advanced digital recording (ADR) loop section out, or for burning a section of a track that needs to be reviewed without cutting and pasting sections of the track.
Mastering Audio for Video
Mastering for video broadcast is different from mastering for audio CD or DVD. Broadcast standards require deep bass and ultra highs to be rolled off or they’ll be chopped off at the limiter/compression stage at the broadcast facility. It’s better to have control over the amount of cut off and roll off at the editing/mastering stage than to be unhappy about processing during the broadcast stage. While no set standard exists for audio roll off in the NTSC or PAL broadcast world, the average is an –18dB per octave roll off at 80 Hz and a –9dB per octave roll off starting at 12 KHz in most houses. Going beyond these ranges almost ensures that you’ll have frequencies cut off and compressed at broadcast. DVD and CD playback allow for almost any levels of audio, so long as levels don’t exceed 0dBfs. (See Chapter 5 to refresh yourself on the differences between analog and digital zero.)
Using Compression in Vegas for Video
Audio for video should not have a dynamic range of greater than 20dB. Generally, a dynamic range of less than 15dB is preferable, depending on the content or attitude of the video and the desired effects. A scary visual might call for a 20dB dynamic range, going from sublime to extreme to elaborate a particular shot, but in the general norm, dynamic ranges for video should be fairly limited.
Vegas comes with a good compressor. Here again, however, is where a third-party tool can really shine. The Ozone compressor from iZotope has a very warm and broad sound, as they use analog emulation in their application. The maximizer, stereo widener, and compressor alone are worth the price of admission with this tool.
Ozone has to be the sexiest-looking plug-in around, worthy of a Hollywood appearance. Sonic-Timeworks Compressor is also fantastic, with a warm sound, soft or hard compression, and a great look and ease of use, too, as are the WAVES, Ultrafunk, and Cakewalk plug-ins.
Compression must be used sparingly at the mastering point; generally settings of less than 3:1 are used at the mastering stage, as audio should have been compressed in the mix stage if the mix process was done to standards. Compression is applied to smooth out dynamic range. If desired, a compressor can bring quiet passages up to a nominal level, while reducing loud passages to a manageable point. Compression is used to get maximum levels while maintaining control over distortion and output levels.
A compression tool can be used at this stage as well when only one or two frequencies are causing the audio to go beyond rational norms. A dynamics compressor, which is a compressor that works only on specific frequencies, is invaluable at this point. Troublesome frequencies can be specified, and the amount of compression of those specific frequencies can be controlled. This option helps smooth out sibilant or plosive sounds from a poor interview mic or helps take down the overdriving pulse of a train that might be in the background of a wide shot mic’d with a handheld or shotgun.
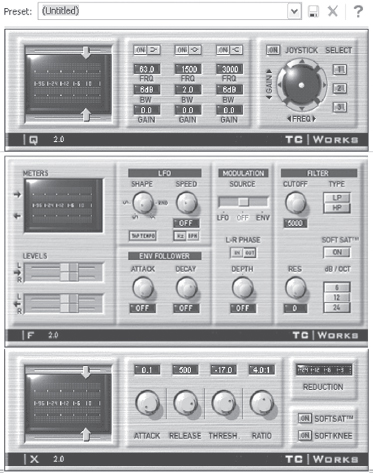
11.13 TC Works have great plug-ins, and they are quite reasonably priced. These tools will tremendously improve the quality of your audio whether for audio production or audio for video.
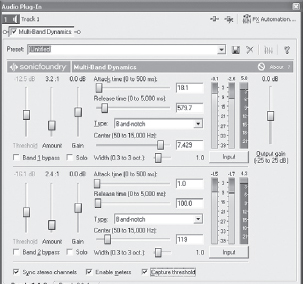
11.14 A dynamics compressor is excellent in the finishing stages to suppress irritating frequencies, particularly from background sounds interfering with primary dialog or primary audio information.
To tune a compressor, listen to the audio closely and notice the peaks and valleys in the spoken word or music. These can be watched at the same time as being listened to. Notice how the peaks seem to jump out and how the valleys need special attention to be heard.
The space between these peaks and valleys is dynamic range. Too much dynamic range creates fatigue on the ear and creates a sense of overdriven sound, even though the audio might be clean. It’s a quick way to tire out viewers.
Using Equalizers
A touch of EQ may be added at the final stage as well to bring the overall product to a consistent EQ attitude. The addition of EQ at this last stage, however, should be very minimal and only used to balance out inconsistencies that might arise or to create a final personality in the mix. Most professionals, however, do not add a final EQ as the proper EQ will have been applied during the initial stages of mastering. Keep in mind, there have been two previous opportunities to add EQ to each event/track in the mixing and mastering processes, and it’s usually a mistake to apply much EQ to a final master stage. Often, EQs are mistakenly used here to compensate for error in the initial master, mix, or recording stage. If EQ is used in the finishing/mastering stages for video, it should be sparing and applied as an overall mix setting.
Dithering Audio in Vegas
Dither is valuable when audio is going to be printed to a CD, and the original recording was at a sampling rate higher than 44.1 KHz or at a bit rate of other than 16 bit. Of course, this is valuable when working with audio for video as well, rather than simply truncating bits in the sample rate change. This process is not the same as resampling but is part of the resampling process. Sony has a dithering plug-in, and a demo of the iZotope Ozone plug-in is on the DVD in this book.
The dithering plug-in should be applied to the master bus in order to ensure that the last audio process is dither.
Sony’s dithering plug-in is Type triangular and the noise shape high pass contour should be similar to the Ozone Type 2, simple shape. The Ozone Type 1 is rectangular; Type 2 is triangular. Triangular is recommended regardless of which dither you’re using, and high-pass shaping is good in both plug-ins. For more advanced noise shaping, the Clear shape for acoustic stuff is highly recommended. It’s not as aggressively shaped as the psychoacoustic shapes. The Clear shape sounds natural, but it still has less perceived noise than a simple high-pass shape.
Fade in/out will be the most noticeable applications of dithering. Highlight the last part of a fade, turn it up fairly loud, and compare right when the audio fades into the noise floor. With the in/out check boxes on plug-ins, it’s pretty easy to A/B. No dither (just truncation) will make the end of the note fade sound like a buzz, harmonic distortion, or metallic. It will most likely have a zipper sound before it fades out completely. Add dither and get a smoother tail but more noise. Add dither and some noise shaping, such as the Sony or Ozone Type 2, Clear shape, and you’ll get a smooth tail but less noise on the fade. (iZotope has excellent information on dithering on their website at www.izotope.com. There’s also a dithering guide from iZotope on the DVD found in this book.)
Rendering Options in Vegas
Vegas is amazingly flexible when it comes to outputting video whether to tape, CD, DVD, the Internet, or a hard drive. AVIs, QuickTime, Windows-Media, REAL media, MPEG-1, MPEG-2, MPEG-4, and any other codec installed on the computer can be used for output. (See Chapter 10 for information on outputting streaming media files.)
Vegas has the option of either rendering an entire project or merely doing a print to tape. The difference is that with a print to tape, Vegas temp-renders sections of the project that require recompression. These sections are written as multiple AVI files. A full render writes an entirely new file as one long file. Either method works as well as the other, and the choices are up to the user’s workflow and time constraints. A video that needs to be moved off the hard drive and back to tape quickly might be best handled as a print to tape. For final archiving or for multiple file-type outputs, a full render is recommended. If the same media will be output to Windows-Media, QuickTime, REAL, and DVD, all of these processes will go much faster if working from an AVI file, rather than from a project file.
Save the file before rendering, just as a precaution. Writing long video files is taxing on a hard drive and processor, and some older systems cannot handle multiple drives getting very hot and will shut down.
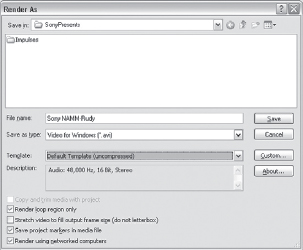
11.15 The Render As dialog box provides a choice for the destination of the rendered file. Notice the new Network Rendering option for Vegas 6.
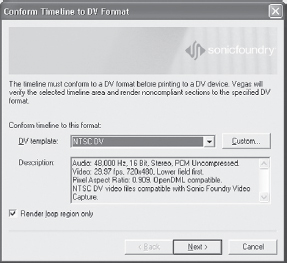
Select FILE | RENDER AS to render to an AVI format file. In the Render As dialog box, click the Custom button.
In the Project tab of the Custom Template dialog, select Best. This option will slow down the rendering time slightly, yet ensures that the best rendering options will take place. Under the Video tab, the “Create an OpenDML compatible file” check box may be unchecked. Unchecking this option will prevent users from rendering a file larger than 2GB. You might need to uncheck this box to be compatible with some third-party applications. Leave this box checked if the file contains alpha channels that will need to be accessed later in another editing session.
For a standard AVI file to be printed to tape using the Vegas Capture tool, leave the settings under the Audio tab, including the codec and aspect settings, at their default positions for a successful print to tape. The video must be 720x 480 for an NTSC-DV print to tape and 720 × 576 for a PAL-DV print to tape, and audio must be 48 KHz/16 bit. Otherwise, the camera, converter, or whatever is being used to get the video to a DV tape will not be capable of accepting the media.
To print to tape without rendering the entire project, select TOOLS | PRINT VIDEO TO DV TAPE. This option opens a series of dialogs that mkesur te project is prepped correctly to print.
11.16 First dialog box in the print to tape process. Be sure you have the entire region selected if leaving the Render Loop Region box checked.
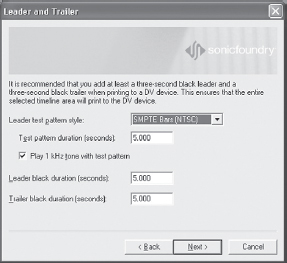
11.17 Second dialog box in the print to tape process. Here is where color bars and test tones are chosen.
Clicking Next in the first dialog leads to the second dialog. In the second dialog, test tones and color bars can be specified. Color bars are standard SMPTE color bars, and the test tone is a 1 KHz test tone, output at -20dB. Color bars can be substituted for any test pattern by using the choices in the menu in this second dialog. These bars and tones are necessary, even required by most replication houses and broadcast houses. If this is a print to tape for personal use or to a VHS tape deck, the tones/bars are not required.
Click Next in the second dialog; a third box is displayed. This box asks whether you want automatic control of a tape machine or manual control. Automatic control will start printing to tape after a series of prerenders are finished wherein all recompressed media on the timeline is written to a temp file. This option should be selected when long prerendering times are anticipated. This option is useful for the overnight Tenderer, or for those users who edit during the day or evening and then render and print to tape late at night while all the world is sleeping.
The tones in previous versions of Vegas were at -12dB.
Vegas 6 has output tones in alignment with the new Advanced Television Standards Committee (ATSC) output standards (www.atsc.org). If any products are calibrated to the old output standard, recalibration will be necessary.
11.18 Vegas warns users if the render process appears to be a lengthy task.
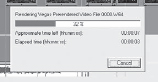
11.19 The rendering progress window indicates how long a render will take.
Manual tape control is useful for DV decks that cannot be controlled by the computer or for printing to an analog tape deck, such as a VHS or Beta deck. Selecting the manual option still allows users to walk away from the computer during renders, as Vegas gives a countdown option to printing manually.
After this selection is made, click the Finish button. Vegas then does one of two things:
• Vegas will start to print to tape immediately if no prerenders are left to complete, or if there are very few prerenders, it will complete those and begin the printing or countdown process.
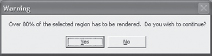
• Vegas will give a warning that more than 80 percent of the project must be rendered and will ask if you wish to proceed. In either event, instruct Vegas to complete the process.
Click OK from the warning, unless a standard render is determined to be more time-efficient.
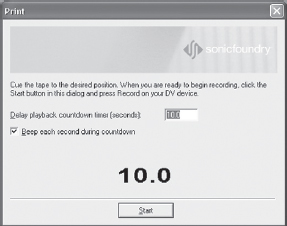
11.20 Vegas allows users to define the length of a countdown.
After Vegas has completed the render process, if automatic control was selected in the Print to Tape dialogs, Vegas will start the DV machine automatically and print the project to tape with no further input/involvement from the user. In a situation in which manual control has been selected in the Print to Tape dialog, Vegas will prerender the recompressed sections and then wait for a click in a countdown box. Vegas will then count down from ten, providing a beep at each second, until it reaches three seconds. It will then start to print to tape. To effectively use this manual feature, allow Vegas to count down and, when the counter reaches three and no more beeps are heard, click Record on the tape machine. These steps usually provide enough leader time for various tape machines to get up to speed and begin the recording process.
Exporting Events to Third-party Applications
Sometimes it is necessary to export video events from Vegas to use in a third-party application, such as Adobe After Effects or Pinnacle Commotion. When exporting, files should be exported at the best possible resolution, and choices are therefore limited. If files are exported from Vegas using the standard NTSC-DV settings, most third-party applications can read the files, but until Sony opens their codec up to other applications to use, those third-party applications can’t write back to the Sony codec. Using the Microsoft codec really isn’t a solution either, as it limits quality output too much. Therefore, an uncompressed codec is the answer.
In the FILE | RENDER AS | CUSTOM dialog, an uncompressed setting can be chosen. Understand that using this output method will exponentially increase render times.
Be certain to uncheck the “Create an OpenDML compatible file” option. Most third-party applications cannot read these file types yet.
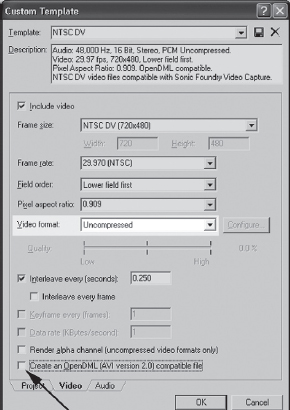
11.21 Select Uncompressed in the Video tab in the rendering options. This option also allows the uncompressed file to retain an alpha channel, should one exist or have been created in the editing process.
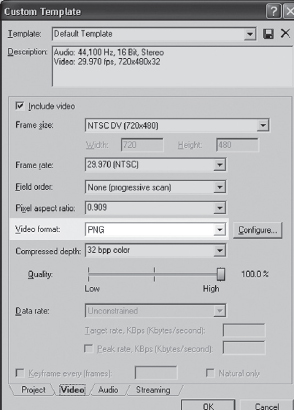
11.22 Rendering to a PNG/QuickTime format is a high-quality output method for exporting to a third-party application.
Another option is to use QuickTime for output, with its numerous options. A few users of Vegas have found great success using the PNG codec as an output option that both Vegas and most third-party applications can read. The PNG format is a lossless compression format that keeps file sizes more manageable and render times slightly faster than using a standard uncompressed output.
To render to the QuickTime format and its various codecs, select the part of the file or event that requires export. Select FILE | RENDER AS, choose QuickTime/.mov from the Save As menu. Click the Custom button. In the General tab, select Best. In the Video tab under the Video Format menu, select PNG. Adjust the quality slider to 100 percent.
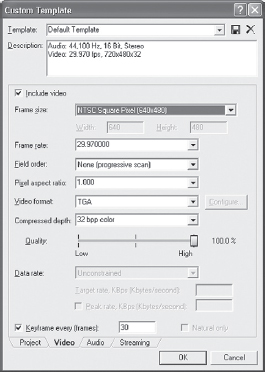
11.23 Render a Targa file by using the QuickTime option in the Render As dialog. The QuickTime authoring tools must be installed on the system to access this menu.
Animators and rotoscope artists often require Targa files (TGA) for their editing applications. Render to QuickTime format, select the Video tab, and select FORMAT | TGA. Set the frame rate, pixel aspect, and frame size in their menus according to the requirements of the importing application.
If audio is part of the export and sync is important, move to the Audio tab and change the default output sample rate to 48 KHz/16 bit, rather than 44.1/16 that QuickTime asks for.
Files exported and imported in these formats will be clean and without quality loss. Using any codec or compressed format between applications runs a risk of loss of quality, so experiment with various outputs to discover what is best for each particular situation. Upsampling/downsampling is a foolish thing to do, as video always loses some information in the up/downs-ample. Some applications upsample imported DV as 4:2:2 or 4:4:4. Use caution and check files carefully for color accuracy when upsampling or downsampling between images.
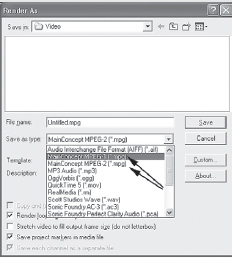
11.24 Select the MPEG format you wish to work with from the Save As Type dropdown menu.
EDLs and Vegas
One of the perceived weak points in Vegas is the lack of OMF, AAF, and EDL support. Before saying anything else, I’ll comment that Vegas is a finishing tool. It’s designed to be used as a start-to-finish solution.
That said, Vegas now provides scripting tools for CMX 3600-style EDL export that will support standard editing functions. Several steps must be taken to have accurate EDL value.
First, make sure your tapes are clearly and cleanly labeled, as the third-party application will likely require recapturing of the media on the tape. Most applications will not be able to read the timecode from Vidcap.
Second, edit the media as a cuts-only project. Most systems will not be able to read wipes and color correction. Set your project up as a drop-frame project rather than non-drop frame.
Third, use the Tools>Scripting>Export EDL feature. This will generate an EDL to be provided to whoever will be using the edits to finish their final project.
On the audio side, there are those times that something must be imported or exported from ProTools, AVID, SAW, SadlE, and other applications. Perhaps someone is sending you a file generated in another application and you want to use their EDL information in Vegas, or perhaps you prefer to work in Vegas but your coworker prefers another application. This used to be a problem. However, there is now a new product available from Cui-Bono Software that will convert most any format of EDL to another format of EDL. This company, based in Germany, has perceived the difficulties of all the various studio formats out there and has created a killer product that works for more than just Vegas users, since this is an industrywide issue.
EDL Convert Pro is a great application that no professional studio should be without. It’s capable of dealing with fades, markers, and in and out points and is basically just a series of clicks. EDL Convert Pro will examine the project settings of the original EDL and set up the conversion based around those settings. You only need to alter these settings if you are taking the EDL to a project that has different settings, but in most instances, you’ll use the default properties.
This tool will work in most any format you can imagine, converting Vegas files to or from Samplitude/Sequoia, Auditon/Cool Edit Pro, SAW, Wavelab, SADiE3 & 4, Sonic Studio, Discreet edit, AES31, OpenTL, OMFI formats. If you are working with a SONAR user, you’ll use the OMFI format to import and export for Vegas.
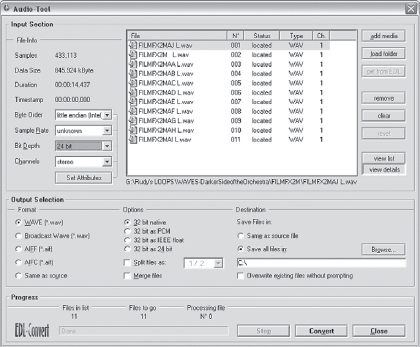
11.25 This tool will allow you to convert most any audio EDL to a format that Vegas can read, or format that Vegas files can be read in.
Check out the demo on the DVD in the back of this book or visit the Cui-Bono website: http://www.cuibono-soft.com/Products/products.html.
Outputting Other than AVI Files
Vegas has output capability for nearly every output format, including MPEG-1 and MPEG-2.
While Vegas does a reasonable job of outputting MPEG-1, the primary MPEG format output focus is on MPEG-2, which is used for DVD encoding and authoring. The primary benefit of an MPEG-1 file is that although it’s an old codec and not of top quality, MPE-1 files do indeed play on just about any player in the world.
![]() Tip
Tip
If working with DVD Architect to author DVDs, rendering to an MPEG file is not necessary at this time. DVD Architect works with multiple file formats, and users of Vegas+DVD might find it in their best workflow interest to work with AVI files or native file formats until the project is ready to burn. Vegas 4 provides a render template for DVD Architect in the render settings, while DVD Architect has similar encoding qualities to Vegas 6. See Chapter 10 for more information.
MPEG Rendering Improvements
Vegas 6 has an excellent MPEG rendering process that provides options for two-pass encoding, among other new features. Two-pass encoding allows the encoder to scan the media in the project, allocating bits for which sections need more attention in the encoding process as opposed to single-pass encoding, which merely encodes what is put into the encoder.
Two-pass encoding is much slower than single-pass encoding, but for high-motion or highcontrast video projects, it’s well worth the end result.
To use the two-pass encoding process after you’ve edited your video, go to File>Render>MPEG2 and press the Custom button in the render dialog. Then select the Video tab.
In this dialog, you’ll see several options. To access the two-pass encoding, you’ll need to select the VBR (variable bit rate) radio button. Notice the check box for two-pass encoding. Check this box, and set the rest of the encoding parameters to desired settings.
In the two-pass encoding process, Vegas will first scan the project and write a log file containing information about what’s in the project media, noting what’s found in the project media. It then begins the scanning process again, encoding the media based on information contained in the log file. Static media, media that contains little movement, or little contrast will not substantially benefit from two-pass encoding. It’s a good idea to render short sections of your project to see if there is a discernable difference between the two-pass or single-pass process of encoding. In most instances, there should not be a large difference from one to the other. If your project contains a lot of still images, remember to set the video rendering quality to Best. This will lengthen the render time, but will providea cleaner encode quality.
MPEG-2 file types are fairly ubiquitous, and it is the file format of choice for DVD. Vegas uses the MainConcept codec to encode files to the MPEG format, although the Sony version of the MainConcept codec should not be confused with other applications using this codec. Each group of software engineers from the various NLE manufacturers have written individual interfaces to the codec.
To render to MPEG codecs, select FILE | RENDER AS and choose MPEG-1 or 2 from the Save As Type drop-down menu. Selecting MPEG-1 renders an MPEG-1 format video that can be placed on a CD or on the web for download. Selecting the MPEG-2 option renders the MPEG-2 file for use on CD or for sending to a DVD authoring application. (When using Vegas with DVD Architect, files are not required to render to MPEG until DVD Architect prepares the media for the DVD burn.) Audio files in the MPEG-2 format are rendered to an MPEG-2 audio format.
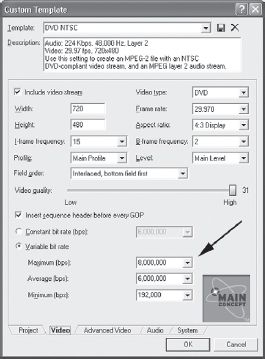
11.26 Bit rate can be selected in the CUSTOM | VIDEO tab.
MPEG files can be rendered as progressive scan or as interlaced files. MPEG files should be rendered to a progressive scan output for best appearance if the targeted display is a computer screen or progressive scan television. If the file will predominantly be played on television sets, leave the file interlaced. If the primary target is for computer viewing, set the file format as progressive scan. In the event that a progressive scan file is displayed on a television that does not have progressive scan settings, the television or output device will interlace the video. The settings for progressive scan/interlaced are found under the Custom button in the Render As dialog box.
The bit rate (encoding depth) can be selected in the Custom dialog as well. This option is found in the Video tab. Bit rate for standard DVDs should be 8 Mbps variable bit rate (VBR). Using VBR allows the encoder to determine the quality of frames based on motion in the various frames.
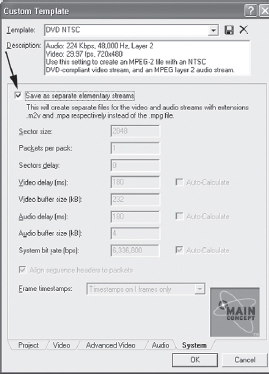
11.28 Create separate audio/video streams for DVD authoring applications that require separate streams.
Some DVD authoring applications require separate video and audio streams. Vegas can output separate streams to meet these requirements. To output separate video/audio streams, select the FILE | RENDER AS | MPEG-2 | CUSTOM | SYSTEM tab. Place a check mark in the “Save as separate elementary streams” box in this dialog. Vegas will create two separate files: one labeled m2v for the video stream and one labeled mpa for the audio stream. Import these two streams into the DVD authoring application.
Unless you are exceptionally well informed about MPEG encoding functions, you shouldn’t change anything else in the MPEG output settings. For more MPEG setting information, see the Sony MPEG white paper on the DVD included with this book.
Outputting an AC-3 Format File
One of the features of Vegas is the ability to output AC-3 audio files. AC-3 is a compression scheme devised and overseen by Dolby Laboratories (www.dolby.com). AC-3 can be output in stereo or 5.1 channel formats. The primary benefit of AC-3 is that it allows for audio to be compressed, leaving more space for video on a DVD. AC-3 audio delivers high-quality audio in an encoded format that most consumer and computer DVD players can decode. This option gives viewers the best possible audio experience.
To output AC-3 files, select FILE | RENDER AS and select AC-3 from the menu. Vegas will ignore the video file and render the audio as a stereo or 5.1 audio file, depending on project settings. If the project is a stereo project, audio will be rendered as a stereo/two-channel AC-3 file. If the project is a 5.1 surround project, the AC-3 file will render as a 5.1 file.
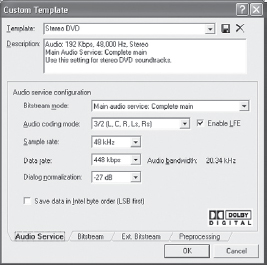
11.28 Stereo or 5.1 surround, Vegas offers a number of choices for output formatting.
For most purposes, the AC-3 presets in Vegas are designed to function as they are built. Experienced AC-3 encoders, however, might find some of the menu options quite valuable for creating a better listening experience. Changing AC-3 settings could possibly create an invalid render in the output file, so experiment on projects that are not time-critical.
![]() Tip
Tip
Create a custom template for AC3 files by setting the Dialog Normalization to -31dB, and setting the Preprocessing Film setting to None. This will cause the AC3 file to more closely approximate the audio heard during the monitoring process.
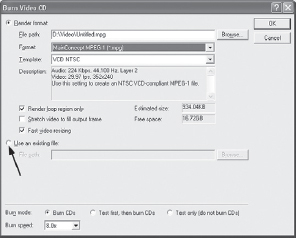
Creating a VCD/SVCD
Burning a super video compact disc (SVCD) or video compact disc (VCD) is a one-step process in Vegas, with or without a rendered project. VCD is only capable of reading an MPEG-1 file. SVCD is capable of reading several file formats.
With a project on the timeline, rendered or not, select TOOLS | BURN CD | VIDEO CD. This selection will open a dialog that allows either a non-rendered project or a previously rendered project to be specified.
If the project has not been rendered to an MPEG-1 format file, Vegas will render to this format automatically when it is instructed to burn a VCD. The new file will need to be named, which will be the name/title that appears in the header file of the burned CD when it is complete. Vegas will indicate the required amount of disc space that the finished render will use. If the file size exceeds the amount of disc space, Vegas will indicate this before the burn.
The menu choices in the VCD dialog are few, as the VCD spec is very narrow. The only options are to burn an NTSC CD or a PAL CD.
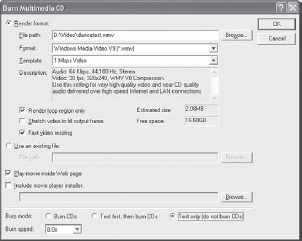
Burning an SVCD is a much more open option. QuickTime, REAL, Windows-Media, AVI, MPEG-1, and MPEG-2 are all SVCD-capable formats. To burn the SVCD, the project does not need to be rendered separately from SVCD authoring. The file will require rendering in its final format; this can be done directly from the SVCD burn dialog. Select TOOLS | BURN CD | MULTIMEDIA CD.
In the dialog that opens, select the destination for the final render. Then select the file format to which the SVCD file will be rendered. Select a file template based on the file type chosen. NTSC and PAL variants are available for AVI and MPEG file formats.
As with all other render formats, a loop region can be defined as the only area to be rendered.
Defining a loop region allows you to select a smaller area of a larger file to be rendered without splitting, copying and pasting, or rendering new sections.
11.29 Select the “Use an existing file” check box and browse to locate and burn a previously rendered MPEG-1 file to create a VCD if the project is finished.
11.30 Menu options include playing video inside a web page and including a player/installer with the SVCD
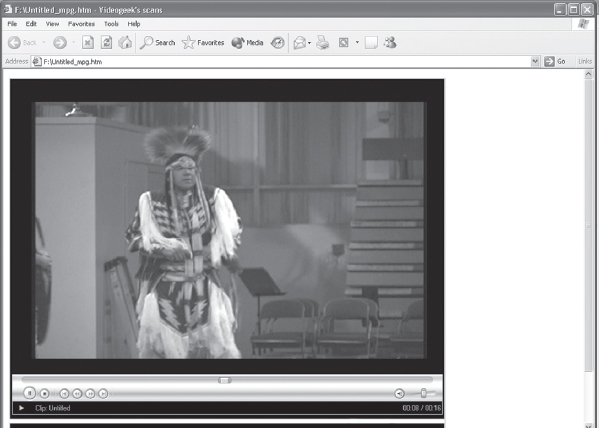
11.31 The vieo can be played inside a company web page or inside any form of HTML document.
If including a player/installer on the disc to be distributed, be sure that the executable file (EXE) is the extension seen on the file. Players can be found at www.microsoft.com, www.quicktime.com, www.real.com, or at several third-party player sites. For any distribution other than personal/internal distribution, a license is required from the appropriate owner of the player software.
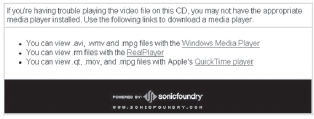
11.32 Viewers of the file who do not have an appropriate player will receive this message complete with links to downloadable installers.

11.33 When the disc has been burned, a successful burn message is displayed.
Vegas has additional rendering options available, giving users a wide variety of choices. As an example, a loop region can be defined on the timeline by creating a selection and pressing Q, which will turn on the Looping tool. In the Render As dialog, rendering only a loop region is an option that is valuable when only selections need to be rendered out.
Another option is to stretch the video to fill the screen. This option prevents black bars from being added to the top, bottom, or sides of a video render that is of a different aspect ratio than the project. Check this box in the RenderAs options if you want to stretch to fill the aspect ratio.
11.34 Defining a loop region for rendering allows select sections to be rendered for output or export.
11.35 Pillar Boxed rendered for RGB output/Windows Media.

11.36 Stretched image, using the Stretch to Fill Screen option.
Network Rendering
A favorite, fantastic, and powerful feature in Vegas that everyone will be excited about is network rendering. Sometimes this is referred to as “render farming” because processors from multiple computers are used to render a project, or rather, pieces of the project are “farmed out” to other locations to “grow” the final project file.
If you’re a typical computer geek, you likely have more than one machine and will have a network of some sort installed in your office or home. Vegas can now take advantage of all the processors on your network, saving hours of rendering time. This allows you to keep working on a project in Vegas while rendering is taking place in the background, over the network, with very little load on the host machine.
It’s as though each computer on the system is taking part in the render and the host machine (where your editing version of Vegas is installed) assembles all the small rendered sections from the various computers into one finished file. The host machine decides which computers on the network receive which portions of a file for rendering. Vegas uses two different types of workload distribution for network rendering. The first is non-distributed network rendering, which behaves much like a single rendering machine. This format is best used for streaming or other encoded renders requiring multiple bitrates. Using this type of rendering distribution instructs one assigned computer to complete the entire rendering process on a file. In non-distributed rendering choices, multiple files may be queued up for rendering as single files on each machine. However, projects may not be broken down so that portions of a file are rendered on various machines.
Non-distributed renders are also best for audio-only projects, as Vegas renders video first in a rendering process.
Vegas sets render tasks in either Distributed or Non-Distributed assignments. Use Distributed rendering for DV and uncompressed file types for fastest rendering results. Each machine on the network will render small portions of the timeline and the host machine assembles the small pieces into one finished file.
Non-Distributed rendering is best for encoding to .mpg, multiple bitrate, or audio-only render tasks. This uses one machine per finished file, with no portions being rendered separately, and no portions being assembled or stitched together to form a complete file. (MPEG, AC3, and MP3 files cannot be rendered on a client-only license of Vegas.)
Distributed rendering causes Vegas to send out small packets or portions of a timeline to be rendered over various machines on the network. The host, or parent machine, then assembles all of the various rendered portions in to one large, finished file. This is best for .mpg or .avi file formats to be rendered quickly.
If you intend on using this feature regularly, you should find it beneficial to set up a “File Server” on which all files for projects are stored. Not only will this allow for multiple users or machines to access the same files easily, it will also allow for a fast and simple set up for the Network Render feature.
Setting Up the Rendering Network (Render Farming)
The components of a render farm are critical to the system functioning correctly. Without all components set up, render farming will not work.
You need:
• A minimum of two computers, each with at least 256 MB of RAM. More RAM is advised. At least one machine must have a full version of Vegas 6 installed, and other machines must either have full versions or render-client-only versions of Vegas installed on them.
• A switched network. A wired hub will not work; go purchase a switch. They cost slightly more money, but they’re necessary, as a switch will not determine workflow speed like a hub will.
• A wired 100Mbps network. Using a wireless network, sexy as they are, simply will not function for this. There is too much data that needs to pass through the network. If you have a gigabit network, it’s all the better for rendering speed.
• Shared folders to hold the veg file, all media, and all assets to the project to be rendered over the network. All folders must have permissions set to read, write, delete, and create files on the network.
The machines used for rendering that are not the host machine, are known as clients. Each client machine must have either a full version of Vegas installed, or a render-client version of Vegas installed on it. Render-client licenses are available from Sony, the cost of which was not determined at the time of this writing. MPEG, AC3, and MP3 file formats cannot be rendered on render-client-only machines due to the way files are stitched together, so if you plan on rendering a number of these licensed file formats, you’ll do best to purchase full versions of Vegas for each client machine. (Just prior to printing of this book, Sony announced that rendering these file types over a network, see Sony’s website for more information. Install the software on the client machines.
On the rendering-client machines, start the rendering service. It may take a moment to load, as the application is going to search for any machines connected to the network prior to displaying the user interface. This application will determine how the network renders your project files. You’ll need to be logged into each machine to be used on the network prior to rendering. Start the VegSrv50.exe application. You can create an icon on the desktop for this. Simply browse from the Desktop shortcuts menu to the C:Program FilesSonyVegas 6 folder and locate this file, and an icon will be created on the desktop. When you run the application, an icon will appear in the system tray. This may also be used to determine how a network render will function.
You do not need to start the rendering service for each rendering job, but as mentioned previously, you’ll need to be logged on to each client prior to rendering. Once logged on, if the client or host machine sees a project, it will automatically be ready to start working for you.
In the Rendering Services application, you should see each machine logged onto the network that is able to be used as a client machine. Click the Renderers tab to select which machines will be used to render the project.
Depending on your network configuration, you may need to modify TCP settings on the host machine. This is rarely necessary, however, some systems may require it. If you are unsure of what to do, consult an IT person in your company, or call an IT specialist to help you set up the rendering network.
The following steps may be necessary for some systems:
1. Exit the Vegas Network Render Service application if it is running.
2. Open the NetRenderService.config file in a text editor such as Notepad. This file is located at C:Program FilesSonyVegas 6.
3. Edit the <channel ref=“tcp” port=“53704” /> tag in the file to reflect the port you want to use.
4. Save the modified file information.
5. Relaunch the Vegas Network Render Service.
You’ll need to know the name of each computer on the network in order to assign and access it from within the Vegas Network Render Service. To locate the name of each computer on the network, right click the My Computer icon on the desktop or in the application menu and choose Properties. Choose the Computer Name tab, and the computer’s full name will be displayed. You can copy and paste this name into the Renderers tab of the Network Render Service dialog to connect the client machine to the host machine.
To connect the client machines to the host machine, select the Renderers tab. In the Host dialog box, input either the IP address or computer name you wish to add to the render service. Press Enter and the Render Service application will then communicate with the client machine. If the machines communicate successfully, the Render Services application will show “ready” in the Status box. If the two machines fail to communicate, a “Failed to add” dialog will open up. If this error occurs, double-check the IP address or name of the client machine you are attempting to connect to, and try again. Be sure you are logged on to the client machine. If the client machine is in a room far from your host machine, log on to the client machine and use Ctrl+Alt+Delete to lock the machine while communicating with the client machine via the host machine.
To set up a distributed network render:
1. Save the project.
2. From the File menu, select Render As.
3. Use the Render As dialog to determine the file type and location where you want to save your finished project file. The location of the finished file must be in a shared folder.
4. Select the Render using networked computers check box in the Render As dialog, and click the Save button. The Network Render dialog will be displayed.
5. Select the Distribute Rendering Among Peers check box in the Network Render dialog.
6. From the Stitch Host dropdown list, choose the computer you want to use to assemble the rendered segments. If you are planning to be working on the host machine during network rendering, it’s advisable to select another machine as the Stitch Host for best results during the editing-while-rendering process.
7. Choose a file format for your rendered segments.
8. Select the Use Final Render Template check box if you want to render segments using the format you chose for your final output in the Render As dialog.
9. Use this option when you’re working with DV or uncompressed files. In this case, using the rendering template for rendered segments makes the final stitching process fast because the segments are copied and assembled without being re-encoded.
11. Clear the Use Final Render Template check box and choose settings from the “Save as Type” and Template dropdown lists if you want to render segments using a format other than your final output format. You can create your own templates for final output, and these custom templates often come in handy.
Use this option when you’re rendering to a format that uses temporal compression, such as MPEG, QuickTime, RealMedia, or Windows Media. Rendering segments as uncompressed or DV AVI files allows transitions and composited tracks to be rendered in a high-quality format. When the segments are stitched, the project is re-encoded using the format you chose for your final output in the Render As dialog.
At the time of this writing, AC3, MPEG 2, and MP3 rendering were not supported over the network because of recompression issues. Due to the method in which these file types are created, segments may not be stitched together without recompressing the file, causing a loss in quality.
11. Click OK to start rendering. The segments of the project will begin rendering on the various machines as instructed in the Network Rendering Services application dialog.
For non-distributed network rendering:
1. Save the project.
2. If you want to render only a portion of the project, create a time selection that includes the segment to be rendered.
3. From the File menu, choose Render As.
4. Use the Render As dialog to choose the file type and output location where you want to save the finished file. The location of the output file must be in a shared folder.
5. Select the “Render loop region” only check box in the Render As dialog if you want to render the selected portion of your project.
6. Select the “Render using Networked Computers” check box in the Render As dialog, and then click Save. The Network Render dialog will be displayed.
7. From the Render Host drop-down list, choose URL or location of the Tenderer you want to use to render your project.
8. Click OK to start rendering.
9. To add a project to the queue, open the project and repeat above instructions.
You can select a different render client for each project or time selection if you want to render the files at the same time on separate machines. If you choose the same client, the rendering jobs will be queued to run sequentially on that machine.
Monitoring Rendering Progress
You can monitor the progress of a project render by right-clicking the Network Services icon found in the system tray and choosing Show from the submenu. The Rendering Services dialog will open and show rendering progress on the system. Details or a summary may be viewed by selecting Detail or Summary from the Progress dropdown menu.
11.37 Monitor Network renders from the Render Services application.
File Mapping
File mapping tells render clients where to locate media assets used in a project. When you import media assets from a local disk, the file paths saved in your project are usually valid only on the local machine. This can be the case even if the media resides in a shared folder. Generated media needs and contains no such location information.
Use the File Mappings tab to map local folders to universal paths.
1. Right-click the icon in your system tray and choose Show from the menu to display the Sony Vegas Network Render Service window.
2. Select the File Mappings tab. The tab displays a list of local folders and their universal paths.
3. Click on a blank row in the table.
4. In the Local box, type the path to the local folder (c:media, for example).
5. In the Universal box, type the UNC path or mapped drive letter to the folder. An example might read similar to (\project file media in the Universal box.
Do not place media in a root directory. Network rendering will not be able to locate it and the render will not complete.
If you get a Failed To Initialize Network error:
1. Open a DOS window.
2. From the Start menu, choose Run to display the Run dialog.
3. In the Open box, type CMD.
4. Click OK. A DOS window will be displayed.
5. Type ipconfig at the command prompt.
6. Your Windows IP Configuration information is displayed. Note the Connection-specific DNS suffix setting in the display.
7. Update your machine’s DNS suffix:
6. Right-click My Computer on your desktop and choose Properties from the shortcut menu (or press the Windows key + Pause) to open the System Properties dialog.
7. Select the Computer Name tab.
8. Click the Change button to display the Computer Name Changes dialog.
9. Click the More button to display the DNS Suffix and NetBIOS Computer Name dialog.
11. In the Primary DNS suffix of this computer box, type the DNS suffix you recorded in step 2.
11. Click OK to close all dialogs and restart your system.
Keep in mind that your End User License Agreement does not permit running Vegas on more than one machine at a time, so you’ll need to choose a machine on the network that will be used for network rendering, that you won’t be editing with. One system needs to be loaded with the client-only version of Vegas. Additional licenses may be purchased from Sony on its website.
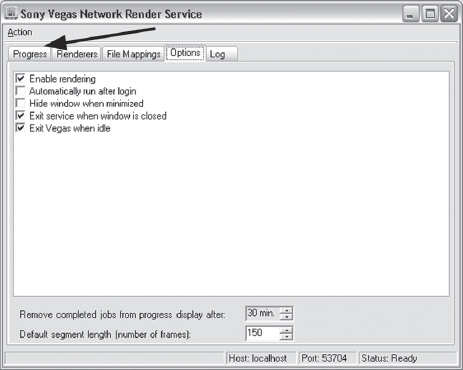
Additional Functions of the Network Rendering Application
The Network Rendering application has several options that you can specify to make the rendering process as efficient as you’d like it to be. For example, the local host may be used as a rendering machine or not. You make that choice.
To access these choices, right click the Network Rendering icon in the system tray and choose Show from the submenu that is displayed. This will open the dialog.
At the time of this writing, the Network Rendering feature is still undergoing testing and writing. Please check the Sony Media Software website for updated information.
Vegas also brings the ability to edit and output high-definition media in 720p, 1080i, and 1080p formats. Currently, Vegas does not have the ability to capture high-definition media, so any hardware card used for the capture of high definition will require the use of any capture utility associated with the hardware card. At the time of this writing, Black Magic Design was nearly ready to release a 10-bit high-definition video card that is compatible with Vegas. Black Magic also has announced an SD (Standard Definition) video card to support Vegas. These cards were no available at the time of this writing. Visit www.decklink.com for more information.
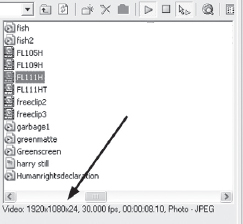
11.38 Project Properties in Vegas include high definition settings.
24p has some very significant benefits and support in Vegas. Transitions, titles, and filters are optimized in Vegas for 24p. Vegas also has specific support for the new Panasonic DVX100 camera and cameras with similar features. Vegas auto-detects 2-3 and 2-3-3-2 pulldown at capture and previews and prints to tape in the 24p format when using the Panasonic DVX100 camera. The 2-3 and 2-3-3-2 pulldowns are performed on the fly in Vegas with no additional hardware required. Vegas also allows for preview on external monitors at 24p.
On the output side, Vegas can output a still image sequence up to 2048 ¥ 2048, is capable of outputting 1080i or 720p at the 24p frame rate, and can print to tape at 24p as well. Windows-Media 9 has support for 24p/HD, and streaming file sizes are smaller at 24p than at 29.97. 24p also offers up to 25 percent additional disk-space savings on a DVD.
Given that 24p renders twice as fast as 60i (standard NTSC frame rate) and that 24p offers a look closer to film, this format will continue to grow.
Vegas edits and prints media at 720p with frame rates of up to 60 fps, at resolutions of 1080p with frame rates of 24 fps and 29.97 fps, and at 1080i with frame rates of 60 fps (29.97 interlaced). With the output capability of 24 fps/progressive scan, video shot with the newer 24p will stay in their native format with no pulldown.
When working with high-definition media, full frame rate playback is very difficult to achieve because of the load on the processor. Be aware that playback at full frame rate is unlikely on all but the fastest systems. On a Pentium 3 with 1.8 GHz processor with 1GB of RAM, the best playback achieved was less than 15 fps. Rendering to RAM allows for full motion playback; however, for most circumstances, a different workflow may appeal to most users.
With Vegas’ ability to recapture media via the Project Media or to work with originally captured media, try to capture using a dual-stream card where possible, so that a low-resolution/compressed capture takes place at the same time as the high-definition media is being captured. Most high-definition cards allow for this to take place. Edit on the timeline using the lower-resolution media and replace media with the high-definition video in the Project Media when you finish editing. This process will allow editing to take place with full motion and full resolution without taxing the processor as heavily as native high-definition media. Rendering to a RAID, the media can then either be printed to tape using a high-definition card, capture tool, and high-definition tape machine, or using the RAID delivered to a service bureau for final print and replication for distribution. This is a form of offline/online editing but can be done natively with Vegas as both a rough cutting and finishing tool. By using the Super Sampling Envelope tool, even DV can be effectively upsampled to HD output. Bear in mind that render times will be fairly slow on longer projects. Up-sampling from resolutions of 720 × 480 to 1920 × 1080 will more than double the resolution of DV.
When working with high-definition media, current IDE drive speeds will prove to be unsatisfactory for most users. SCSI drives/RAIDS with a 320-controlle crd are considered good starting points for most high-definition editing practices.
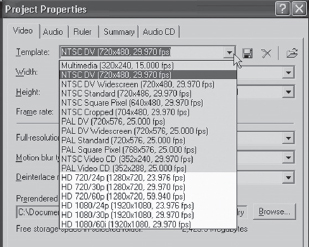
11.39 Rendering/output settings include high-definition capability in Vegas.
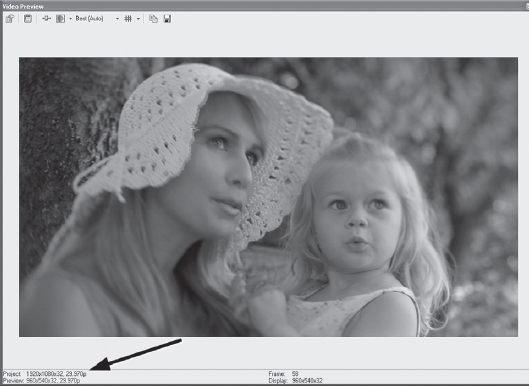
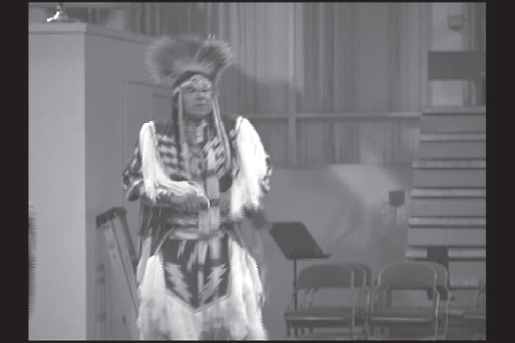
11.40 This high-definition footage from Artbeats fills most of a standard monitor even at three-quarter size (Artbeats Family Lifestyles HD library).
4:2:2 MPEG Capability:
Vegas is also capable of rendering broadcast streams for delivery to a media server in a broadcast facility such as a Telestream or Matrox VideoServer. This functionality is not for the typical Vegas user but designed exclusively for professional broadcast delivery formats. 4:2:2 broadcast streams have a delivery data rate of up to 80Mbs, compared to a DVD delivery data rate of up to 15Mbps. Most DVDs are at a substantially lower bitrate, but the spec allows for a higher than the currently used delivery bitrate .
The 4:2:2 format provides for greater luma and chroma information in the stream, allowing for higher quality video broadcast display instead of the standard 4:2:0 delivery of consumer-oriented DVD MPEG delivery.
While it might be tempting to render to this format, there is nothing to be gained by the end user, unless it’s as an archival format. No set-top player can play back files at this datarate. If you intend to deliver an MPEG-encoded project for broadcast, check with the broadcast house in advance to learn what datarate they’d like to see the project come in at.
In Vegas, there is a new 4:2:2 YUV codec. This is of great benefit to those rendering files to archive or for multi delivery. Faster than rendering uncompressed, and enabling better image quality than 4:2:2 media, this is great for those doing SD-based (Standard Definition) projects as well.
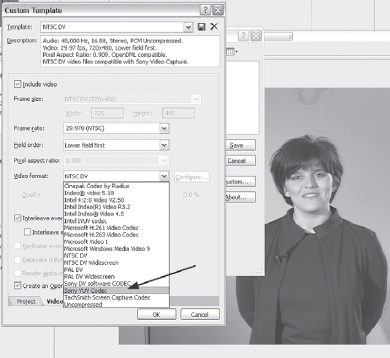
11.41 Sony has created a 4:2:2 YTUV codec, found in Vegas 6.
Where this is of value to DV editors is when a project needs to be archived or delivered in multiple formats. Render the project to the 4:2:2 YUV codec, and then use the new .avi file to render MPEG, streaming media, and any other secondary format. Using this as an intermediary codec serves no value if delivering to a final MPEG format, for instance. Encoding MPEG from the timeline is always a best proposition if MPEG is the only delivery format.
When DV is dropped on the Vegas timeline, the video is already compressed at 4:1:1. When color correction, transitions, and other changes to the media are applied, Vegas upsamples those changes to 4:4:4, or uncompressed media in these processes. The uncompressed sections then become compressed when the final file is rendered. Rendering to 4:2:2 keeps the new media at a higher quality than the 4:1:1 render. However, when media is rendered from the timeline to MPEG, it’s rendered at 4:2:0, creating yet a third transcode in the process of rendering. Therefore, if you are rendering any sort of project to a single delivery format, it’s always best to render to that format directly from the timeline, saving transcodes and time. However, if there are multiple delivery formats required, it’s a good idea to render to either uncompressed or to the higher quality 4:2:2 format to input to a batch encoder, assuring that the original source file is of the highest quality available depending on allotment of time in the final rendering process.
There is no benefit of rendering 4:1:1 DV project files to 4:2:2, and then rendering the 4:2:2 to MPEG, unless again, the final source files will be delivered in some format other than DV, and in one or more other delivery formats. If you were to render to 4:2:2, then convert that to 4:1:1 again for print to DV tape, information is actually lost in the process due to transcoding.
Rendering to the 4:2:2 YUV codec is slower than rendering to the 4:1:1 Sony codec, as one might expect.
Scripting
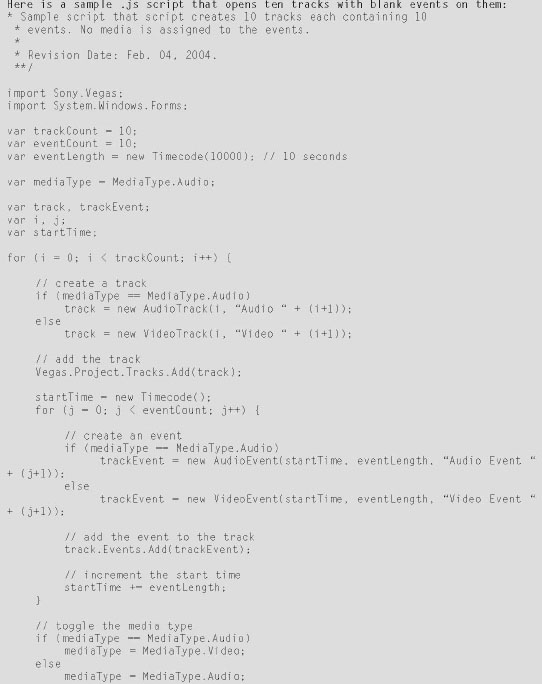
Vegas has a feature that is terrific for users needing customized output and processing options. This feature uses JavaScript to define these behaviors. Vegas can literally be instructed to render several file types, to batch process, to match aspect ratios, even to build a video at random with random transitions from media in the Project Media! Scripts basically provide an open-ended function for Vegas users to implement code in order to instruct Vegas to provide unique behaviors.
To use scripting, you’ll need to have the Microsoft .NET framework installed. The .NET framework can be downloaded at no cost from Microsoft. Visit http://www.microsoft.com/net/ to order a CD or download the framework.
Many scripts are available on the Sony website, as well as on the VASST website http://www.vasst.com. Writing scripts is a challenge for those not familiar with Visual Basic or JavaScript authoring. You can write scripts with any plain text editor, even Notepad. The Microsoft developer’s website (msdn.microsoft.com) probably has the most authoritative reference for the NET scripting languages, but other tutorials are available on the web. In addition, several bok on JScript .NET and Visual Basic .NET are available from Amazon.com and other bookstores.
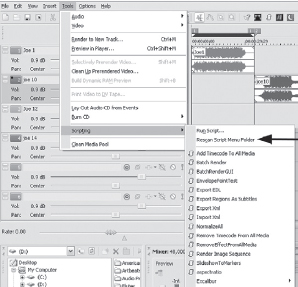
11.42 Access the scripts by seleccting TOOLS | SCRIPTING | RUN SCRIPT.
Running scripts can also appear to be intimidating, when in truth, running scripts is quite straightforward. After locating/downloading scripts, place them in a directory. The default location for scripts in Vegas 6 is C:Program FilesSonyVegas 6.0Script Menu. To run a script, select TOOLS | SCRIPTING | RUN SCRIPT, which will open a browse dialog box. Browse to where the .vb or .js scripts are stored. After adding scripts to the folder, go to Tools|Scripting|Rescan Script Menu Folder. This will place scripts in the Tools|Scripting dropdown menu. This will save time in not needing to search out scripts in other folders.
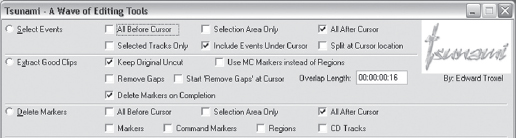
Select the script you wish to run, which will start the script. Scripts are like trading cards that are available from many Vegas users, and a small cottage industry has sprung from this concept of having an open engine. Batch Render Pro, Neon, Tsunami, and Excalibur are all for-purchase tools that take advantage of scripting operations, potentially saving users inestimable time, depending on the sort of workflow used. It’s easy to become dependent on scripts, as they can perform many mundane tasks with one button. And with keymapping, you can map scripts to any button you’d like, making Vegas a totally personal system. At the time of this writing, over 100 scripts were available, and can be found at www.vasst.com/login.htm site.
Scripts will continue to add to the power of Vegas and offer users a tremendous number of options.
One aspect of scripting that creates exceptional ease of use is to create a button on the toolbar for the script. This option allows rapid access to commonly run scripts. Up to ten scripts may be associated with ten buttons on the toolbar.
If you have Vegas 4 and want to import scripts from Vegas 4 into Vegas 6, you’ll need to edit the line in the script text that calls for SonicFoundry.Vegas to Sony.Vegas. Otherwise the scripts will not function correctly.
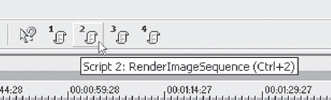
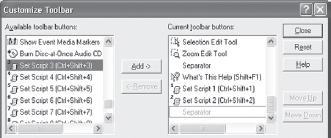
To place a button/script on the toolbar, double-click the toolbar, which will open the Customize Toolbar dialog. Select a script button to add to the toolbar. In Figure 11.46, Script 3 is selected to be placed in the toolbar. This step places a button on the toolbar that can be associated with a script by pressing Ctrl+Shift+3 or by clicking the Script button. Vegas will open a browser window that allows you to select a specific script to be assigned to that button.
Another method of assigning a script to a toolbar button is to select TOOLS | SCRIPTING | SET SCRIPT and choose the script number to which you wish to assign a script. This action will open the Browse Scripts window as well, from which a script can be assigned to a script number. This same script number can be associated with a button by following the steps outlined earlier.
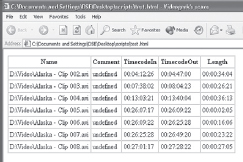
11.43 The script used in this instance locates in and out timecodes for all files on the timeline, lists their running time/length, and saves them as an HTML file.
11.44 The Batching script renders multiple forms of Windows-media from one timeline and one action.
11.45 Assign a script to a button on the toolbare in Customize Toolbars.
11.46 Select scripts for use in the Script browser.
11.47 Buttons can be created on the toolbar for scripts.
Using Vegas with DVD-Architect
To use Vegas with DVD Architect, render the project as either an MPEG-2 or as an AVI file. If the project is to be 5.1 at final output, render the file as an MPEG-2 file. Insert markers in the file for chapter points if desired. DVDA will recognize these markers as chapter points and will insert them as such if instructed to do so in DVDA.
Audio that is to be associated with the MPEG file, regardless of whether it is stereo or mono, should be rendered as an AC-3 file. DVDA will automatically convert stereo audio to an AC-3 file during the DVDA render/burn process. (See Chapter 10 for more information.) Audio in a 5.1 channel project file will not be embedded in the MPEG file in any form. (See the previous sections in this chapter on creating AC-3 audio for DVD Architect.)
Files that are rendered as 24p files will not be transcoded/recompressed in DVDA; they will stay in their native format. This feature allows 20 percent more video media to be placed on the DVD, which can be monitored/previewed in DVDA as well. Export of 24p NTSC MPEG-2 for DVD Architect is also supported as an output format in Vegas. Bear in mind that to view 24P media on an external monitor, the frames will have to have pulldown added, creating a 60i or 50i video stream that the external monitor can comprehend.
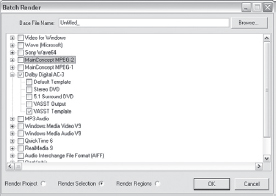
The best workflow I’ve found for rendering files for MPEG 2 and AC3 files while leaving the system unattended is to use the Batch Render script found in Vegas 6. Go to Tools>Scripting>Batch Render and run the script. An interface will open, looking like the one you see here.
In this interface, expand the MainConcept MPEG option. In this subset, select the format of MPEG you wish to use. Do not simply check the MPEG tick box without expanding. During beta testing, I did this for a project containing 11 regions as I hadn’t expanded the subset.
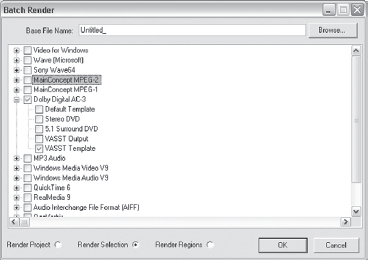
It rendered all night, and the next morning, I had 209 files! Nineteen templates rendered for all 11 regions, and it created a mess. I’ve accidentally done this for AC3 as well. If you check only the file format, Vegas will render a version of the file for each template setup in your preferences. Expanding the subsets allows you to select the specific format you’d like files rendered to.
For standard export to DVD Architect, choose the DVD Architect NTSC or PAL video stream and tick the box next to that subset option. Contract the MPEG set, and choose the AC3 subset. Select either the Stereo DVD or 5.1 Surround DVD check box, depending on the project type. Let the project render, and when it’s finished, you’ll have both file types of the same name, stored in the same folder. DVD Architect 2 will locate the audio with the video, and you’ll be set. This batch script is great for rendering to .avi, .mpg, and streaming media while you’re gone for the night or out to lunch. Long projects don’t need as much babysitting.