
CHAPTER 7
Debugging and Error Handling
Debugging technique is an often overlooked part of a developer's set of skills. In this chapter, we are going to explore some debugging techniques that will save you time when troubleshooting your code, and make you a more efficient coder.
Error handling is another area in which we often find ourselves taking shortcuts. We will also look at error handling methods in this chapter, and we'll see how to deliver user-friendly messages to our users.
Debugging
Debugging is the process of stepping through code to find inconsistencies due to coding errors when output is not what you expected, or to find the cause of errors at runtime.
Here are some examples of output not displaying what's expected:
- When reading file names from an array, the file you expected does not open. Something causes your code to find the incorrect array element. How do you determine where that incorrect value came from?
- You're reading data from a database but there is nothing there, or the data is not the data you expected. Is your SQL correct? Is the database there?
- You're reading information from a collection but the collection is empty. Why is the collection empty?
To determine what's happening under the covers while our code is running, we need the ability to see inside the variables as they are populated with data. We need to be able to follow our code through any looping or branching structures, and we need a way to stop code at a predetermined point (or points), or based upon whether certain conditions are met.
The Debugger's Toolkit
The VBE gives us tools to do all of the above and more. The Debug menu, shown in Figure 7-1, contains the VBE's debugging command. The Debug toolbar (Figure 7-2) contains commonly used commands from the Debug menu.
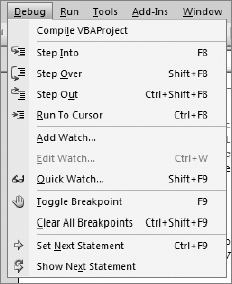
Figure 7-1. The Debug menu
Figure 7-2. The Debug toolbar
Table 7-1 describes the commands on the Debug menu and shows the corresponding Debug toolbar button for that command when one is available. Table 7-2 describes the remaining commands on the Debug toolbar.
Table 7-1. Descriptions of the Debug Menu and Toolbar Commands
There are a few additional commands available to us on the Debug toolbar. Some are common commands from the Debug menu and others are commonly used items from the View menu. They are described in Table 7-2.
Table 7-2. Description of the Debug Toolbar Commands
So there we have the tools we'll use to search out errors in our code. Before we begin putting these to work and seeing what they can do for us, though, let's take a very quick look at one line of code that the VBE will add for you that can help eliminate some coding errors from the start: Option Explicit.
Option Explicit
The default installation of any Microsoft Office product and the VBE do not require variable declaration before use. VBA will create the variable automatically the first time it is used. If you include a call to Option Explicit at the top of your code modules, VBA will require that each variable be declared before use.
Tip Why go to the trouble? Option Explicit helps the compiler catch any variable names you may have mistyped. It also helps you avoid confusion when the scope of a variable may not be clear.
To turn Option Explicit on, do the following:
- From any Excel workbook, open the VBE.
- From any open workbook, choose the Visual Basic command from the Code tab of the Developer ribbon, or press Alt+F11.
- In the VBE, choose Tools
 Options to display the Options dialog box, as shown in Figure 7-3.
 - If it's not already checked, in the Code Settings section in the top half of the Options dialog box, click the Require Variable Declaration check box. In Figure 7-3, the arrow cursor points to this item.
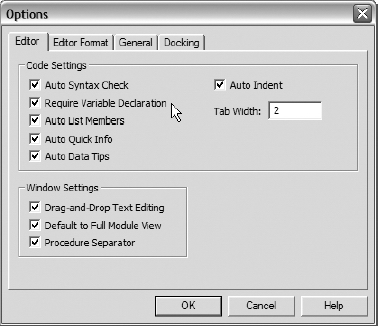
Figure 7-3. The VBE's Options dialog box
- Click OK to save the changes and close the Options dialog box.
Once this is done, any time you create a new code module or open the code module attached to any worksheet, the Option Explicit command will already be inserted at the top of the module.
Quick Debugging
The VBE provides us with a couple of easy-to-use tools for simple debugging needs. There will be times where running code through the debugger may be more than you need. In those cases, here are the tools available to us:
Message boxes: These are used to display information about the code while it's running.
The
Debugobject: TheDebugobject hosts two methods that will ease our debugging efforts while code is running as well. These areAssert.
Displaying Information with Message Boxes
Message boxes are useful tools for simple debugging. They allow us to display the values of variables inside our code while the code is running, and they interrupt the running of the code. Let's take a look at an example in which we are not getting an expected result and we'd like to see what's happening under the covers.
Note No one is perfect! As I was writing the code for this example, I actually made the typo we are going to troubleshoot. When I ran the code to make sure it worked (my plan was to break the code for this example), I did not get the result I expected!
- In the Download section for this book on the Apress web site, find the file named
DebugExample01.xlsmand open it. This file contains sample sales data, but we'll ignore that for the time being. - Open the VBE by choosing the Visual Basic command from the Code tab of the Developer ribbon, or by pressing Alt+F11.
- Open Standard Module1 by double-clicking its folder in the VBA Project window, as shown in Figure 7-4.
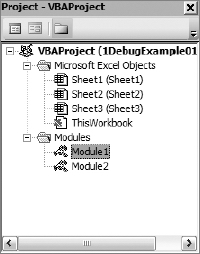
Figure 7-4. Opening Standard Module1
On Module1, you'll find a very useful function named BirthYear, as shown in Listing 7-1.
Listing 7-1. The BirthYear Function
Function BirthYear(Age As Integer, HadBDay As Boolean)

Dim iReturn As Integer

Dim iCurrYear As Integer


  iCurrYear = Year(Date)

  iReturn = iCurrYear = Age


  If Not HadBDay Then

    iReturn = iReturn - 1

  End If


  BirthYear = iReturn

End Function
This function takes two inputs—an Integer containing your age and a Boolean flag denoting whether you've had your birthday yet this year—and it returns your birth year. Let's run the code in the Immediate window.
- Open the Immediate window from the VBE by choosing View Immediate Window or by pressing Ctrl+G.
- Type in the following: ?BirthYear(30,True).
- Press Enter to see the result.
Note In the Immediate window, when you precede a command or variable name with the ? character, the result of the command (or contents of the variable) will be output to the Immediate window. Otherwise, the command will just run, unless there are errors.
We passed in 30 as the Age parameter (you didn't think I'd put my real age in there, did you?) and set the flag to True, indicating that the birthday had passed for this year. This code was run in the year 2007, so the result I would expect to see is 1977—but that's not what we see in Figure 7-5, is it?
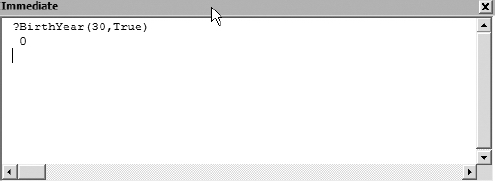
Figure 7-5. Unexpected result in Immediate window
Let's check our variables and make sure they're holding correct values by inserting a few message boxes. You can create message boxes by calling the MsgBox function. As shown in Figure 7-6, the MsgBox function takes a few arguments, but since we're not presenting these to a user at this time, we'll just pass in the first argument, the prompt or message.

Figure 7-6. The MsgBox function's argument list
- In the
BirthYearfunction, add the following code above theIf...End Ifstatement:
MsgBox "Current Year: " & CStr(iCurrYear)

MsgBox "Birth Year before If: " & CStr(iReturn)
- Insert a blank line after the
If...End Ifstatement. - Add the following code:
MsgBox "Birth Year after If: " & CStr(iReturn)
Your code should now look like Listing 7-2.
Listing 7-2. BirthYear Function with MsgBox Debugging
Function BirthYear(Age As Integer, HadBDay As Boolean)

Dim iReturn As Integer

Dim iCurrYear As Integer


  iCurrYear = Year(Date)

  iReturn = iCurrYear = Age


  MsgBox "Current Year: " & CStr(iCurrYear)

  MsgBox "Birth Year before If: " & CStr(iReturn)

  If Not HadBDay Then

    iReturn = iReturn - 1

  End If

  MsgBox "Birth Year after If: " & CStr(iReturn)


  BirthYear = iReturn

End Function
We're checking to see that the Year function is returning the correct value, and we're checking our return value before and after the If...End If statement to see if the code fell into it and possibly changed there.
- Run the code in the Immediate window, clicking OK at each message box.
Figures 7-7, 7-8, and 7-9 show us that our current year value looks good but the iReturn value has a problem. The problem must lie in our logic.
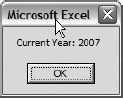
Figure 7-7. Current Year is correct.
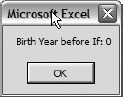
Figure 7-8. The iReturn variable is incorrect before the If...End If statement.

Figure 7-9. The iReturn variable did not fall into the If...End If statement, and it is still incorrect.
Now we know we've got an issue at the point in the code where we set the iReturn variable value. Let's take a look at that line of code:
iReturn = iCurrYear = Age
It's fairly obvious at this point, but instead of subtracting the age from the year, this code is creating a conditional statement setting iReturn to True or False if the year equals Age.
- Change the second
=to a minus sign (−) so that the code reads as follows:
iReturn = iCurrYear - Age
- In the Immediate window, run the code again (clicking OK on each message box, which should now hold the correct value for
iReturn). The result should look like Figure 7-10.
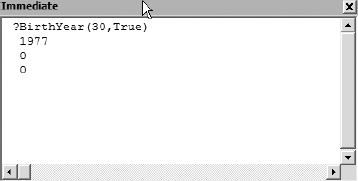
Figure 7-10. The correct value is returned.
Using the Debug Object
The Debug object contains two methods that we can use to debug our code: Print and Assert. The Print method directs output to the Immediate window, and the Assert method lets us set a condition that puts our code in break mode if the condition fails.
Whereas the MsgBox function interrupts the execution of our code, the Debug.Print method allows the code to run through to finish, sending its output to the Immediate window. This is especially useful when debugging code in a loop.
- As a very simple example, enter the code from Listing 7-3 on Standard Module1 in the
DebugExample01.xlsmproject.Listing 7-3. Simple Routine Using Debug.Print to Send Output to the Immediate Window
Sub DebugLoop()

Dim i As Integer


  For i = 1 To 15

    Debug.Print "Debug loop: " & i

  Next i

End Sub
- Run the code in the Immediate window, as shown in Figure 7-11, by typing the following command and pressing Enter:
debugloop
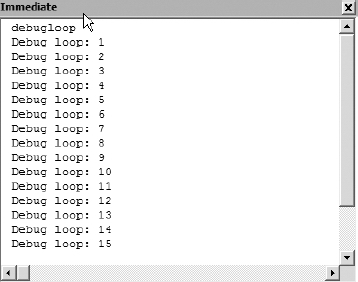
Figure 7-11. Debugging a loop
Imagine checking the value of the variable i with a message box. No fun there, and that's a small loop! Let's modify the BirthYear function to use Debug.Print instead of MsgBox so our code can run without interruption and still show us the variable values as the code runs.
- On Standard Module1, replace each instance of
MsgBoxwithDebug.Print. The code should look like Listing 7-4.Listing 7-4. BirthYear Function Using the Debug.Print Method
Function BirthYear(Age As Integer, HadBDay As Boolean)

Dim iReturn As Integer

Dim iCurrYear As Integer


  iCurrYear = Year(Date)

  iReturn = iCurrYear - Age


  Debug.Print "Current Year: " & CStr(iCurrYear)

  Debug.Print "Birth Year before If: " & CStr(iReturn)

  If Not HadBDay Then

    iReturn = iReturn - 1

  End If

  Debug.Print "Birth Year after If: " & CStr(iReturn)


  BirthYear = iReturn

End Function
- In the Immediate window, run
BirthYear, passing inFalseto theHadBdayargument, by typing the following:
?birthyear(30, False)
Press Enter to run the code. The output to the Immediate window is shown in Figure 7-12.
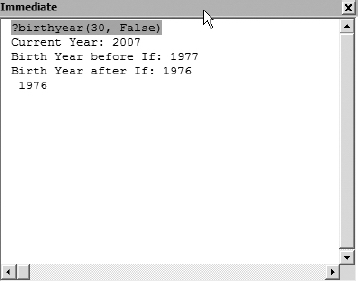
Figure 7-12. Output of BirthYear function sent to Immediate window
We see the three messages we were looking for, plus the bottom line shows us the return of the function. Here we see that our code did fall into the If...End If statement where it subtracted one from the result because the birthday did not yet occur this year.
Tip Message boxes are easy to add, but don't forget to remove (or comment) them when your code goes into production. Otherwise, you'll have some very confused users.
Debug.Print statements, on the other hand, only appear in the Immediate window. Although it's wise to remove or comment them, your users won't see the output.
Debug.Assert
Assertions are another tool you can use to check for conditions within your code. Assertions are conditional statements that you create that will put your code in break mode if the conditions are not met. Listing 7-5 shows a sample method you can use as an example.
Listing 7-5. Sample Subroutine Using Debug.Assert
Sub TestAssert()

Dim iTest As Integer

  iTest = 10

  Debug.Assert iTest = 9

  Debug.Print "Test Value: " & iTest

End Sub
- Copy the code in Listing 7-5 into Standard Module1 in the
DebugExample01.xlsmfile. - Open the Immediate window by choosing View Immediate Window or by pressing the Ctrl+G shortcut keys.
- In the Immediate window, type TestAssert.
- Press Enter.
Our assertion is testing to see if the iTest variable equals 9. Since we set that variable to 10 in the line of code preceding the assertion, it will return a value of False and put the code in break mode. Figure 7-13 shows the code in break mode as it stops on the assertion.
Of course, we forced this false condition, but if we need to know when a condition other than what we expect might happen when testing our code, assertions provide us with that option.
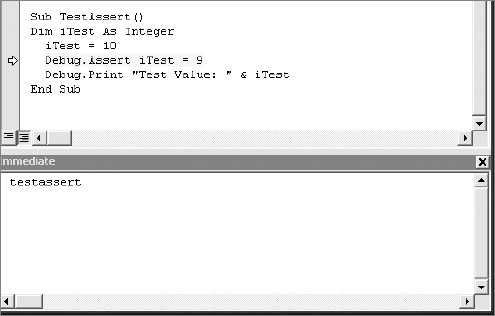
Figure 7-13. A false condition in the Assert method puts the code in break mode.
A Deeper Look
Let's take a look at some of the other tools we can use to make our debugging more efficient. In this section, we'll look at the following:
- Step-through options
- The Immediate window
- The Locals window
- The Watch window
- The call stack
Stepping Through Code
Assertions are great at stopping code if a condition is false, but we need a method to move back and forth through our code if we are to find out why our condition failed. The VBE has commands we can use to move through our code line by line, and to move directly to a line of code as well. Figure 7-14 shows the step section of the Debug menu.
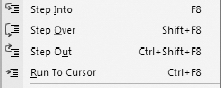
Figure 7-14. Step-through-code options from the Debug menu
Earlier in this chapter, Table 7-1 gave a quick overview of these functions. Now we'll take a closer look at them.
In Standard Module1 in the DebugExample01.xlsm file, add the code from Listing 7-6.
Listing 7-6. Sample Code for Debugging
Function TestLoop() As Long

Dim i As Integer

Dim lngResult As Long


  lngResult = 1

  For i = 1 To 10

    lngResult = lngResult * i

    ExternalProcess lngResult

 Next i


TestLoop = lngResult

End Function


Sub ExternalProcess(TheValue As Long)

  If TheValue > 10000 Then

    TheValue = 0

  End If


End Sub
We're going to use this code to explore the various ways we can step through our code line by line, and we'll also see how to make use of additional tools like the Immediate window and the call stack.
The code in Listing 7-6 is a simulation of a construct we see often in our code. In the TestLoop function, we have a loop that runs a fixed number of times (in real-life situations, this may or may not be the case) and returns a value at the end of the process. Within that loop, we call a procedure to act on or process data or perform an action based on the value of variables in the loop. In this case, we have the appropriately named ExternalProcess subroutine.
Our TestLoop function is designed to multiply a value by the loop counter; the expected result of our process is the value 3628800. The ExternalFunction procedure is purposely coded to give an incorrect result. Let's run the code.
- Open the VBE.
- Show the Immediate window by choosing View Immediate Window or by pressing Ctrl+G.
- In the Immediate Window, type ?testloop.
The result is shown in Figure 7-15.
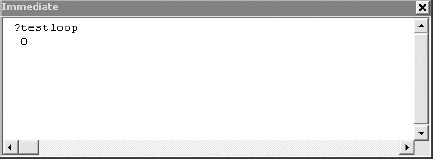
Figure 7-15. The TestLoop function returns an incorrect value.
Let's begin debugging by inserting a breakpoint in our code.
- In the code window, find the
TestLoopfunction. - Move the mouse pointer to the gray left margin next to the start of the
For...Nextloop, and click. A maroon break marker is inserted, as shown in Figure 7-16.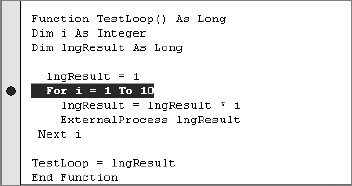
Figure 7-16. Breakpoint inserted
- In the Immediate window, run the code again by typing
TestLoopand pressing Enter. - The code runs as far as the beginning of the loop, and then stops, as shown in Figure 7-17.
Once you're in break mode, the break line text (the code at the breakpoint) and the execution line text (the currently executing line of code as you step through) are highlighted. The default highlight color is maroon for the break line text and yellow for the currently executing line of text. This color coding is user-definable on the Tools ![]() Options menu on the Editor Format tab, as shown in Figure 7-18.
Options menu on the Editor Format tab, as shown in Figure 7-18.
At the first breakpoint, you will get a combination of the break and execution line colors.
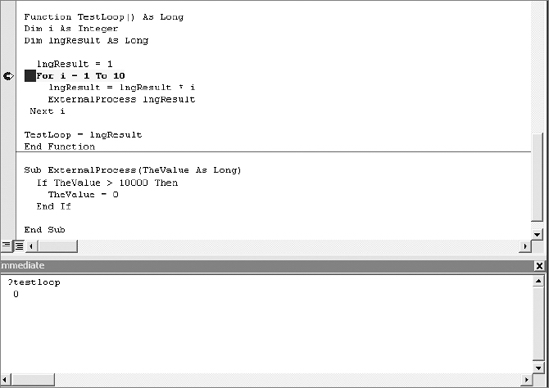
Figure 7-17. VBE enters break mode when a breakpoint is reached.
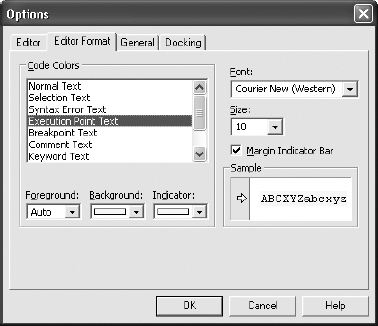
Figure 7-18. Options dialog box showing VBE color options
- The Step Into command moves you through your code one line at a time. Press the F8 key (or choose Debug Step Into) to move to the first line of code inside the loop. The color coding should now be more easily seen, as in Figure 7-19.
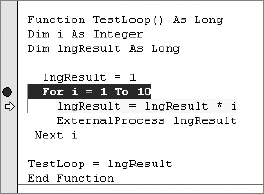
Figure 7-19. Better view of the break and execution lines of code
- Press the F8 key twice to move the execution line to the
ExternalProcessroutine. - Press F8 again to move the execution line into the
ExternalProcessprocedure.
As you can see, the Step Into command moves you through the code one line at time. When it encounters another procedure call, it moves you into that procedure. At the moment, our execution point is inside the ExternalProcess subroutine. To move out of this procedure without moving line by line, use the Step Out command by choosing Debug ![]() Step Out or by pressing Ctrl+Shift+F8. The Step Out command moves you out of the current procedure and to the next line of code in the procedure that called the current procedure.
Step Out or by pressing Ctrl+Shift+F8. The Step Out command moves you out of the current procedure and to the next line of code in the procedure that called the current procedure.
- Press Ctrl+Shift+F8 to move the execution point back into the
TestLoopfunction at the end of the loop structure, as shown in Figure 7-20.
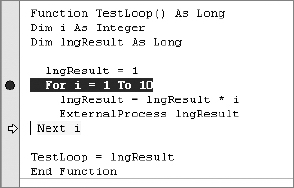
Figure 7-20. Result of Step Out command
- Press F8 two times. The execution point should be back on the call to
ExternalProcess, as shown in Figure 7-21.
If you don't have a need to step through this external procedure and want to skip over this call, you can use the Step Over command.
- Choose Debug Step Over or press Shift+F8.
- The execution point moves to the bottom of the loop without stepping through the procedure call, as shown in Figure 7-22.

Figure 7-21. Execution point on a procedure call
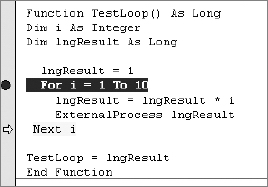
Figure 7-22. The execution point moves directly to the next line of code when the Step Over command is used.
What if you decide that you should have stepped into the procedure you just stepped over? (In a loop like this, you may need to test that procedure with the current counter variable in place.) The VBE gives us a command called Set Next Statement that makes this very easy to do.
To bring the execution point back to the call to ExternalProcess, do the following:
- Put the cursor on the line of the next statement that you want executed (in this case, the call to
ExternalProcess). - Choose Debug Set Next Statement or press Ctrl+F9.
The result is shown in Figure 7-23.
Figure 7-23. The Set Next Statement command moves the execution point to the selected line of code.
The Set Next Statement command can be used to move the execution point forward as well as backward. You can also use the mouse to drag the execution arrow (shown in the gray margin on the left side of the code window in Figure 7-23) to the location of the code you'd like to run.
Warning The Set Next Statement command can be used to move the execution point backward or forward in the code. It will not reverse values in a loop. If you need to see counters or incremented values as they happen, remember to check them in their current context in a loop.
One last command you can use is the Run To Cursor command. The Run To Cursor command lets you place the cursor on a line of code, and when that line is reached, the code will resume break mode.
Let's bring the execution point to the cursor location as follows:
- Put the cursor on the last line of code in the
TestLoopfunction. - Choose Debug Run To Cursor or press Ctrl+F8.
The execution point moves to the last line of code, as shown in Figure 7-24.
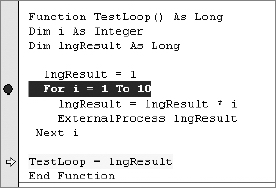
Figure 7-24. The Run To Cursor command moves the execution point to the cursor location.
Checking Variables in Break Mode
Our execution point is on the last line of code before the function is finished. Don't move the execution point just yet. We have the ability in the VBE to view the values of variables in our procedures as they change in real time.
We can use any of the following to view variable values:
- The Immediate window
- The Locals window
- The code window
To check the value of a variable in the Immediate window, simply type the name of variable and its value will be displayed.
- In the Immediate window, type ?i.
- Press Enter.
- In the Immediate window, type ?lngResult.
- Press Enter.
Figure 7-25 shows that this returns the values 11 (since our loop reached its last iteration) and 0, respectively.
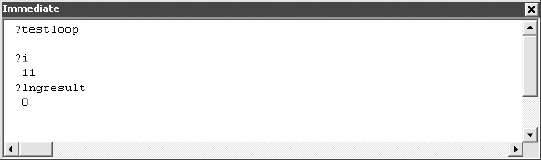
Figure 7-25. Checking the value of variables in the Immediate window
- To run the code to the end from the current execution point, press F5.
Tip Did you know that you can test loops from within the Immediate window? Just type them using the following syntax:
for i = 1 to 5:debug.print "Test " & i:next i
The result of running this is shown in Figure 7-26.
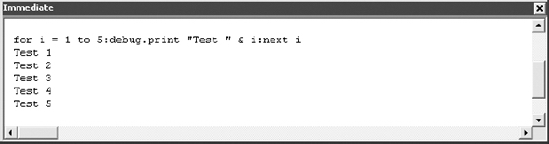
Figure 7-26. Testing loops in the Immediate window
The Locals window lets you see all current variables and their values in break mode in one place. To see the Locals window at work, we are going to run an existing macro in the DebugExample01.xlsm file against the sales data on Sheet1.
We saw this data and code in our 1-MacroExample01.xlsm file in Chapter 1. In this example, the data has been slightly modified and will generate an error that we'll track down using the tools explained thus far.
- In the Excel window, open Worksheet1 in the
DebugExample01.xlsmfile. - Open the Developer ribbon and click the Macros command to open the Macros dialog box.
- Run the AddSalesTotal macro.
A type mismatch error occurs, as shown in Figure 7-27.
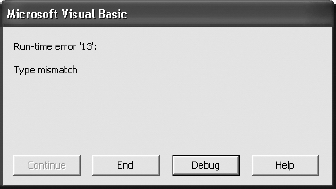
Figure 7-27. Type mismatch error 13
- Click the Debug button to put the code in break mode.
- Open the Locals window by choosing View Locals Window.
The Locals window will open, as shown in Figure 7-28.
Looking at the Locals window in Figure 7-28, we see the values for the GetSalesTotal function and for the variables currReturn, temp, and cell. We also see the values for the range we pass into the function, RangeToTotal.
GetSalesTotal and currReturn both have a value of 0, as they are not set until the end of the function. The variable temp, which is set during the loop that walks the range, has a value of 303 so far.
The cell variable is a bit different, as is the RangeToTotal variable. These variables are references to range objects. This means that they have more than just a value. They have properties—and lots of them!
- Click the plus sign to the left of the
cellvariable. - Scroll down until you see the
Value2property.
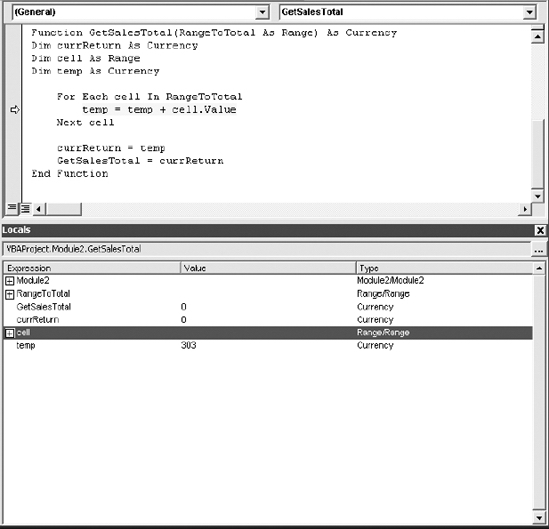
Figure 7-28. The Locals window displays values for all in-scope variables.
The Value2 property stores the current cell's value. In this case, it's the string N/A. It looks like someone didn't have a value for DVD sales in the East region, and entered a string rather than leaving it blank or entering a 0. We've found our problem.
Before we fix the issue, let's take a look at a feature that's available from the Locals window as well as the View menu: the call stack. The call stack lists any procedures that are currently running, starting with the first procedure you ran. In this case, we ran the AddSalesTotal macro, which in turn called the GetSalesTotal function.
Click the ellipsis button (...) at the top-right corner of the Locals window to open the Call Stack window (you can also choose View ![]() Call Stack or press Ctrl+L). The Call Stack window for our currently running code is shown in Figure 7-29.
Call Stack or press Ctrl+L). The Call Stack window for our currently running code is shown in Figure 7-29.
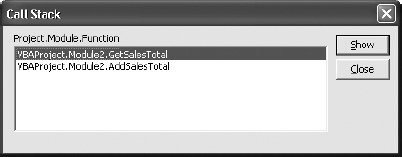
Figure 7-29. The Call Stack window shows all functions called in the current process.
You'll notice in Figure 7-29 that the most current procedure call is at the top of the stack. Once GetSalesTotal completes and execution returns to AddSalesTotal, it will be removed from the stack.
- Close the Call Stack window.
With the code still in break mode, we're going to look at one last method of checking variable values. Then we'll fix our problem and run the code successfully.
The Code Window
The code window also has the ability to show us the values of variables. By simply holding your mouse pointer over any in-scope variable, you can see its value in a tool tip–style pop-up.
In the VBE code window, move the mouse pointer over any variable to see its value. Figure 7-30 shows the mouse hovering over the cell.Value variable, showing its value, N/A.
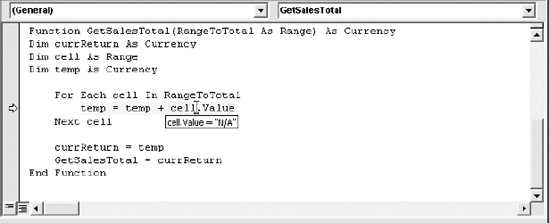
Figure 7-30. Checking variable values in the code window
Stop the code from running by clicking the Reset button on the toolbar, as shown in Figure 7-31.

Figure 7-31. The Reset button stops code execution.
Let's fix the error and rerun the code. On Sheet1 in Excel, change the value of cell D4 to 0, or leave it blank and run the AddSalesTotal macro again. Figure 7-32 shows Sheet1 with the total added after successfully running AddSalesTotal.
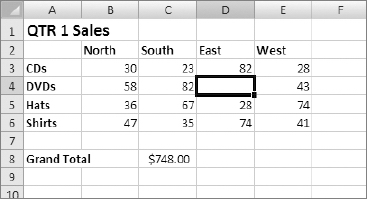
Figure 7-32. The worksheet after fixing the data
The Watch Window
The Watch window is a tool that allows you to set conditions on which you can put your code into break mode. The Watch window, shown in Figure 7-33, has a few options as to how to handle watched values.
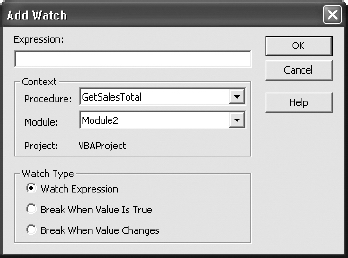
Figure 7-33. The Watch window
You enter an expression in the Expression text box, and then select the context of the expression from the Procedure and Module drop-down lists. Then you select a watch type. Watch types are described in Table 7-3.
| Watch Type | Description |
| Watch Expression | Code execution will not be stopped. In break mode, the values of watched expressions will be displayed in the Watch window. |
| Break When Value Is True | Code execution will enter break mode when the watched value is True. |
| Break When Value Changes | Code execution will enter break mode when the value of the watched expression changes. |
In this example, we'll add a watch to the GetSalesTotal function and set it to break when the value is True.
- Open the VBE and open Standard Module2.
- Display the
GetSalesTotalfunction. - Right-click any occurrence of the variable cell in the
For Each...Nextloop. - Select Add Watch from the shortcut menu, as shown in Figure 7-34.
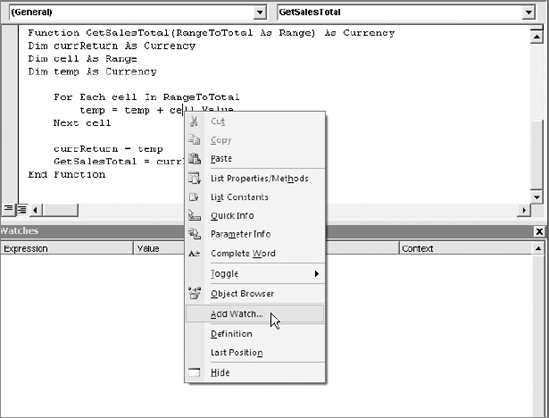
Figure 7-34. Selecting the Add Watch command
- Enter the information shown in Figure 7-35 into the Add Watch dialog box.
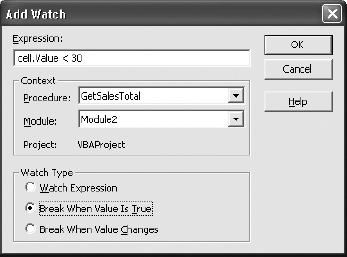
Figure 7-35. Adding a watch expression
Tip If you put the insertion point anywhere on the variable you want to watch and add the watch, the variable name will automatically be inserted in the Expression box for you.
- Click OK to close the Add Watch dialog box.
- If not already open, open the Watch window in the VBE by clicking View Watch Window. Figure 7-36 shows the Watch window with our expression added.
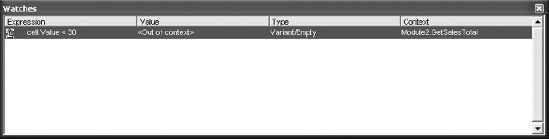
Figure 7-36. Watch expression added to Watch window
Notice that the value is currently out of context because the code is not yet running.
- Run the AddSalesTotal macro from Worksheet1 in Excel. The code enters break mode in the
For Each...Nextloop, and the Watch window shows us that the value of our condition isTrue, as shown in Figure 7-37.
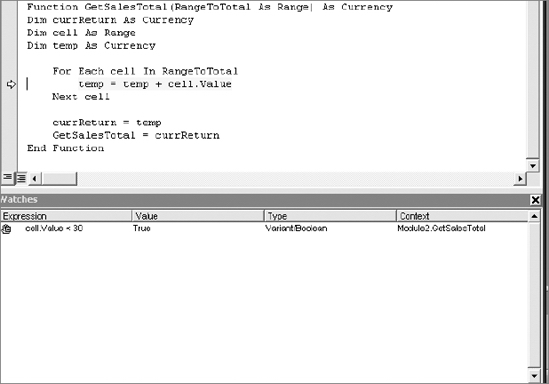
Figure 7-37. Watch window showing the true condition with the code in break mode
- Press F5 to continue running the code. Any time the watch encounters a cell value of less than 30, the code will enter break mode.
- Press F5 until the code runs to completion.
Now that we've seen how to debug and troubleshoot our code, let's take a look at how to prevent errors from occurring and how to graciously notify users of errors.
Error Handling
Effective error handling is one of the major keys in providing a friendly experience to your users. It's right up there with UI design in importance, and it can be the difference between a dream and a nightmare from the user's perspective.
The Microsoft Office suite of tools is still VBA-based. Therefore we are still limited to the On Error GoTo syntax for error handling. Be that as it may, we will look at some methods of handling errors, and then we'll see how to deliver user-friendly messages to our users.
Is the File There?
One common error occurs when we try to open a file that is not available. In Chapter 3, we opened files that contained various information ranging from CD lists to employee data. What if the file wasn't there or was misnamed?
In the Download section for this book on the Apress web site, find the file named ...XML_data.xlsm, and open the file. This is a blank workbook that includes code modules from Chapter 3.
- Open the VBE by clicking the Visual Basic command on the Code tab of the Developer ribbon, or by pressing Alt+F11.
- Open Standard Module1.
- Find the
GetXMLDatasubroutine. It is shown in Listing 7-7.Listing 7-7. GetXMLData Procedure Before Modification
Sub GetXMLData()

  ActiveWorkbook.XmlImport URL:=

    "C:Chapter 3filescds.xml", ImportMap:=

    Nothing, Overwrite:=True, Destination:=Range("$A$1")

End Sub
Note The path to the XML file will vary based on where you are storing the files that came with this book.
- In the
GetXMLDatasubroutine, change the name of the XML file we're opening tocd.xml. The subroutine should look like Listing 7-8 now.Listing 7-8. GetXMLData Procedure After Modification
Sub GetXMLData()

  ActiveWorkbook.XmlImport URL:=

    "C:Chapter 3filescd.xml", ImportMap:=

    Nothing, Overwrite:=True, Destination:=Range("$A$1")

End Sub
In Excel, make Worksheet1 the active sheet.- From the Macro dialog box, run the
GetXMLDataprocedure. We get a very ugly error, as shown in Figure 7-38.
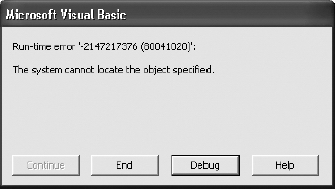
Figure 7-38. A non-intuitive error message is presented to the user.
- Click the End button.
In cases like this, where it's an issue of resource availability, we don't need to code an actual error handler to assist the user. What we need to do is check for the existence of the file before we try to open it. If the file is not present, we'll tell the user in a friendlier and more understandable manner.
In the VBE, add a standard code module. Add the code from Listing 7-9.
Listing 7-9. The FileExists Function
Function FileExists(FilePathName As String) As Boolean

Dim blnReturn As Boolean

  blnReturn = Len(Dir(FilePathName)) > 0


  FileExists = blnReturn

End Function
On Standard Module1, modify the GetXMLData subroutine as in Listing 7-10.
Listing 7-10. GetXMLData Subroutine with Modifications
Sub GetXMLData()

Dim sFileName As String


  sFileName = "C:BookChaptersChapter 3filescd.xml"

  If FileExists(sFileName) Then

    ActiveWorkbook.XmlImport URL:= _

      sFileName, ImportMap:= _

      Nothing, Overwrite:=True, Destination:=Range("$A$1")

  Else

    MsgBox "Could not find the requested file", vbOKOnly, "File Not Found"

  End If

End Sub
Let's take a look at what we changed:
- We took the string containing the file name out of the
XmlImportmethod call and assigned it to the variablesFileName. - We then wrapped our
XmlImportmethod call in anIfstatement. Based upon the existence of the file, we either import the data or present the user with the friendly message shown in Figure 7-39.
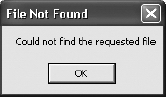
Figure 7-39. Friendly error message: File Not Found
The moral of this story in this case is that the best defense is a good offense. By considering in advance where our code might fail, we can avoid errors and provide users with feedback they can use.
Trapping Specific Errors
A rule of thumb when considering error handling is that error handling should not be an afterthought or something to add later. Trap your errors when you create your code.
Tip Three good error handling rules to live by are (1) check for the error, (2) handle it, and (3) proceed accordingly.
Returning our attention to the DebugExample01.xlsm file, let's trap for the type mismatch error we got in our first go around with this file. We'll begin by resetting the file as follows:
- On Sheet1, enter N/A in cell D4.
- If there is a totals row present, delete it.
- Save the file.
A type mismatch error is error number 13, and occurs when you try to place a value of one data type into an incompatible data type (in this example, a string into a numeric data type). See Figure 7-27 in our earlier example for an example of a type mismatch error. We are going to modify our code to trap for error 13 and display a friendly message to the user.
Open the VBE by clicking the Visual Basic command on the Code tab of the Developer ribbon, or by pressing Alt+F11. Open Standard Module2, and find the GetSalesTotal function.
In the GetSalesTotal function, we have a loop (Figure 7-40) that uses a temporary placeholder variable, temp, to hold the running total value of the cells in the range passed in. This variable is defined as a Currency data type. The Currency data type can hold an awfully large numeric value, but it cannot hold a string.
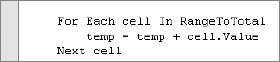
Figure 7-40. The looping structure totals the cells in the temp variable.
There are a couple of things we have to do to set up a procedure for error handling:
- Turn error handling on (also known as enabling error handling).
- Add line labels so our code knows where to go when an error condition is fired.
- Handle the error.
- Resume code execution at the appropriate location.
Let's modify the GetSalesTotal function and add an error handler.
- Add a variable declaration after the declaration for
temp:
Dim sErrMsg As String
The sErrMsg variable will hold the text of the message we'll show our users should an error occur. The variables should now look like those in Listing 7-11.
Listing 7-11. Variable List for GetSalesTotal
Dim currReturn As Currency

Dim cell As Range

Dim temp As Currency

Dim sErrMsg As String
- Immediately below the variable declarations, add the following line of code to enable error handling:
On Error GoTo Err_Handle
Here is where we tell the compiler where in our code to go if an error is fired. Err_Handle is a line label that refers to a specific point in our code. We'll add it in just a moment.
- Add two blank lines between the last two lines of code in the
GetSalesTotalfunction, as follows:
currReturn = temp


GetSalesTotal = currReturn - Put your cursor in the second blank line and add the following line label:
Exit_Function:
Insert a blank line above theEnd Functionline and type the following:
Exit Function
The code after the loop should now look like Listing 7-12.
Listing 7-12. Exit_Function Line Label Added
    currReturn = temp


Exit_Function:

    GetSalesTotal = currReturn

    Exit Function

End Function
So far, with the exception of enabling error handling, our code works just like it did originally. Now let's write code to handle the type mismatch error.
- Put the insertion point at the end of the
Exit Functionline of code and press Enter. - Type the following line label:
Err_Handle:
- Press Enter.
When we enabled error handling by adding the On Error GoTo statement, we referred it to this label. You can name yours according to your own naming convention. Just be sure the label used at the top of the procedure is the same as that used to name the error handler section of code at the bottom of the procedure.
- Add the following code at the insertion point:
  If Err.Number = 13 Then

    sErrMsg = "A value in your data may not be numeric. Please check your

data"

  Else

    sErrMsg = "An unexpected error " & Err.Number & " has occurred"

  End If


  MsgBox sErrMsg, vbOKOnly, "Error"

  Resume Exit_Function
If an error occurs, the code redirects to the Err_Handle section. Here we placed conditional logic that looks for a specific error number. If we were aware of other error conditions, we could simply add them to the If...Else block or even use a Select Case statement.
Inside the If statement, we are assigning the appropriate error message to the sErrMsg variable based on what error occurred. Then we show the user the message. The last line of the error handler section tells the code where to resume once the error is dealt with. In this case, we're telling it to resume at the line label Exit_Function where we assign an output value to our function.
Our friendly message is displayed to the user informing her of the issue with the data, as shown in Figure 7-41.
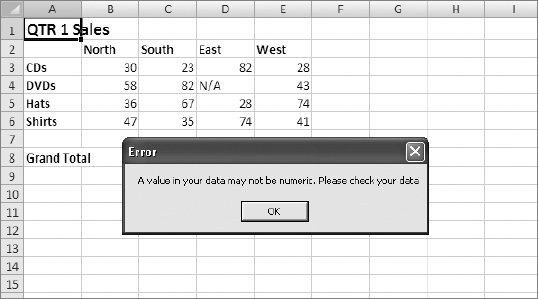
Figure 7-41. User-friendly error message
- Click OK to continue.
As shown in Figure 7-42, there is a small issue with the output from the GetSalesTotal function. It returned a value of 0.
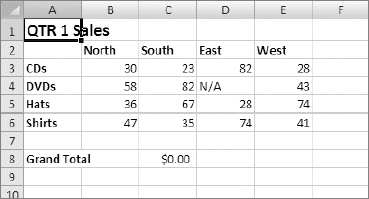
Figure 7-42. Zero value returned from GetSalesTotal function
Let's see what happened. Return to the VBE and look at the GetSalesTotal function (Listing 7-13).
Listing 7-13. GetSalesTotal Function with Error Handling
Function GetSalesTotal(RangeToTotal As Range) As Currency

Dim currReturn As Currency

Dim cell As Range

Dim temp As Currency

Dim sErrMsg As String

  On Error GoTo Err_Handle


    For Each cell In RangeToTotal

        temp = temp + cell.Value

    Next cell


    currReturn = temp


Exit_Function:

    GetSalesTotal = currReturn

    Exit Function

Err_Handle:

  If Err.Number = 13 Then

    sErrMsg = "A value in your data may not be numeric. Please check your data"

  Else

    sErrMsg = "An unexpected error " & Err.Number & " has occurred"

  End If


  MsgBox sErrMsg, vbOKOnly, "Error"

  Resume Exit_Function

End Function
Debugging the Error Handler
After our error message is displayed, we tell our code to resume at the Exit_Function line label. Since we know the code worked fine with all numeric values in our original example and our error message was displayed successfully upon trapping the error, lets add a breakpoint at the point where we resume execution, as shown in Figure 7-43.
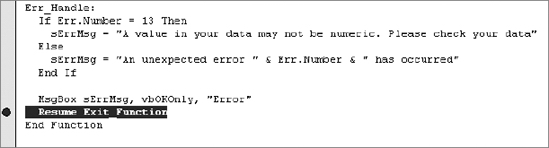
Figure 7-43. Breakpoint added in error handler
- Return to Excel.
- Run the AddSalesTotal macro.
- Click OK when the error message appears, and the code will go into break mode.
- Press F8 once to step to the next line of code. The execution point will move into the
Exit_Functionsection. - Hold your mouse pointer over the
currReturnvariable to check its value. As shown in Figure 7-44, it has a0value.
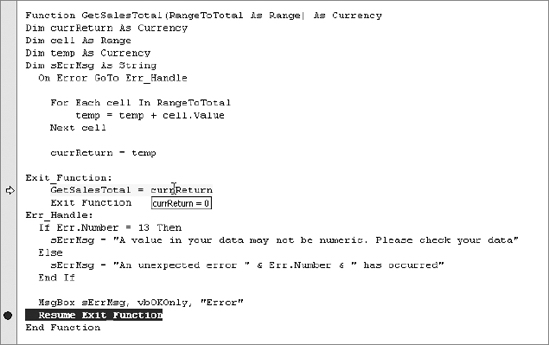
Figure 7-44. Checking the value of currReturn
- Press F5 to let the code run to finish.
Since our loop never finished running, currReturn was never assigned a value. We have a couple of choices on how to handle this. We can show no total in case of an error, or we can show the total of the numeric values.
To show a total and get the loop to finish running, we need to modify the behavior of our Resume statement. The Resume statement has three forms, as shown in Table 7-4.
Table 7-4. The Resume Statement
| Statement | Description |
Resume |
Resumes code execution with the statement that caused the error. If the error was not handled, it becomes fatal. |
Resume Next |
Resumes code execution with the statement following the statement that triggered the error. |
Resume Line |
Resumes code execution at a line label or number within the procedure containing the error handler. |
Our type mismatch error occurs in our loop, and in order to populate currReturn with a value, we'll need to complete the loop.
- Remove the breakpoint.
- In the
GetSalesTotalfunction error handler, change theResumestatement to read as follows:
Resume Next
- In Excel, run the AddSalesTotal macro again.
- Click OK when the error message is displayed. The correct total for the numeric values will be displayed, as shown in Figure 7-45.
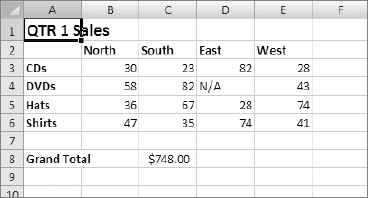
Figure 7-45. Result of using Resume Next to complete our loop
Our On Error GoTo statement refers to a specific line label to handle errors. If you know that any errors you might encounter in a routine are not going to be fatal and can be skipped, you can use the On Error Resume Next statement.
Listing 7-14 shows a modified version of the GetSalesTotal function that uses On Error Resume Next.
Listing 7-14. GetSalesTotal Function Using On Error Resume Next
Function GetSalesTotal(RangeToTotal As Range) As Currency

Dim currReturn As Currency

Dim cell As Range

Dim temp As Currency

Dim sErrMsg As String

  On Error Resume Next


    For Each cell In RangeToTotal

        temp = temp + cell.Value

    Next cell


    currReturn = temp


Exit_Function:

    GetSalesTotal = currReturn

    Exit Function

End Function
On Error Resume Next essentially turns error trapping off. If there's a chance that another section of your code could throw an error, you can turn error trapping back on by adding an On Error GoTo statement inside your code. Figure 7-46 shows the GetSalesTotal function with error trapping turned off for the loop, but turned back on again for the return variable assignments.
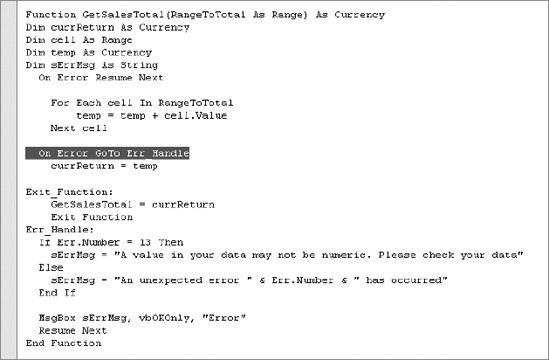
Figure 7-46. Error trapping turned on by adding an On Error GoTo statement
Now if an error should occur after the loop runs, we can trap it and handle it appropriately in the error handler.
Summary
The VBE in Excel 2007 provides us with many tools to debug our code. The better we get at using these tools, the faster we can correct our code, and the more our productivity will increase. In this chapter, we looked at the Debug menu and the Debug toolbar, and we explored their commands.
The ability to step through code and move the execution point forward and backward are invaluable assets when debugging code. The Immediate window provides us with an easy way to run code and to view the values of in-scope variables. In this chapter, we explored these aspects of the Immediate window, and even how to run a loop from it. The Locals window provides a great way to view all the variables and their values in one place. The Locals window also shows us objects and their properties as we step through our code in break mode.
We also learned about setting breakpoints to stop our code to help us pinpoint issues. We explored some concepts to apply before coding to help prevent errors, including the Option Explicit command, which forces us to declare all variables before using them.
In the next chapter, we'll look at ways Excel can interact with other Microsoft Office products like Word and PowerPoint.