
Solutions in this chapter:
The Edge Server seems to be one of the least understood Office Communications Server (OCS) components, and one that causes the most confusion. The Edge Server installation is straightforward; the wizard makes things easy. Most of the confusion comes from not understanding the underlying network requirements, having problems with certificates, or improper security configuration. In the following sections, I will clear up some of the mystery by walking you through an Edge Server deployment, step by step. To start, I’ll give you some background on the Edge Server.
The Edge Server connects your OCS deployment to the outside world. There are four main reasons for you to deploy the Edge Server. You need the Edge Server if your organization requires:
Users to access OCS from outside the firewall without a virtual private network (VPN) connection
Users to send and receive instant messages (IMs) with public IM providers (MSN, Yahoo!, or AOL)
External parties to participate in your OCS-hosted Live Meetings
The ability to federate with other organizations that are using OCS or Live Communications Server (LCS)
To accomplish this functionality, the Edge Server has main three services (also called roles): the Access Edge, A/V Edge, and Web Conferencing Edge. The Access Edge service is responsible for external user authentication allowing home or mobile users to connect. The A/V Edge service gives remote users the ability to utilize OCS audio and video capabilities. And the Web Conferencing Edge service allows external users to connect to the Live Meeting service hosted by OCS.
You can choose to enable all of this functionality, or just a subset; it’s not an “all or nothing” proposition. For example, if you want your users to be able to connect to OCS from home but not to use voice or video, you would simply not activate the A/V Edge service on your Edge Server. The Edge Server is flexible, and you can tailor it to meet your needs.
In this section, we will discuss how to install all three services on a single server—the “consolidated” approach. If you are looking for maximum scalability, you can also install each service separately on three different servers. Most of the concepts in the consolidated approach apply to the distributed approach as well.
Before I move on to the actual installation, it is worth spending some time planning for the Edge Server. As I mentioned in the introduction, the installation is easy; it’s the planning and understanding that take time and attention.
I recommend using a dedicated server for the Edge Server—don’t try to put it on an existing machine that is already running applications in your perimeter network. Even though this is technically possible, you will save yourself hours of troubleshooting by giving the Edge Server its own server with dedicated hardware. It’s also worth noting that Microsoft doesn’t recommend or support the Edge Server on a virtual server. One of the main reasons is performance: If you are using your Edge Server as an A/V Edge service, it will be handling voice and video streams, and virtual servers are notoriously bad at handling real-time communications such as these. Another reason to avoid virtualization is the complexity of the network requirements, which I will address in the next section.
To configure your consolidated Edge Server with all three services, you will need at least four network interface cards (NICs) in your server: one for each of the three services, and a fourth “internal” interface for communications with the OCS front-end. Although it is possible to use fewer than four NICs, I have found that configuration is much simpler when you allocate a separate NIC to each function. I’ll explain why it’s a bad idea to try to assign multiple Internet Protocol (IP) addresses to the same NIC later in this section.
Planning for domain name system (DNS) and IP addresses ahead of time will save you major headaches. Because the Edge Server requires so many different addresses and fully qualified domain names (FQDNs), you will find yourself forgetting which address does what.
Each of the three services in the Edge Server needs an FQDN, such as sip.contoso.com for the Access Edge service, conference.contoso.com for the Web Conferencing Edge service, and av.contoso.com for the A/V Edge service. These are the names that external clients and servers use to reach each service. Once you decide on FQDNs for your three services, create the corresponding “A records” in your external DNS server.
Tip
When deciding on a name for the FQDN for each service, try to use something that describes the service rather than the actual server name. This makes the Edge services more “portable” to a new server when you need to upgrade hardware or move an Edge service to its own server. By choosing a name such as sip.company.com rather than server01.company.com for the Access Edge service, you will be making it much easier on yourself in the future.
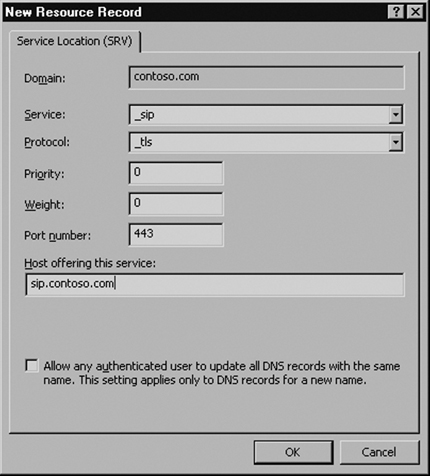
If you want your external clients to be able to automatically connect to your Edge Server without manually specifying a server name, you need to create an external DNS SRV record. The SRV record that the OCS clients look for is _sip._tls.contoso.com pointing to sip.contoso. com on port 443. If you are using a Windows DNS server to manage your external DNS, the entry would look like the screenshot in Figure 5.1.
If you are planning to federate with other companies, you may want to consider an SRV record that enables “enhanced” federation. This record will automatically direct federated partners to your Edge Server without them having to know the name of your Edge Server. The record for enhanced federation would be _sipfederationtls._tcp.contoso.com pointing to sip.contoso.com on port 5061.
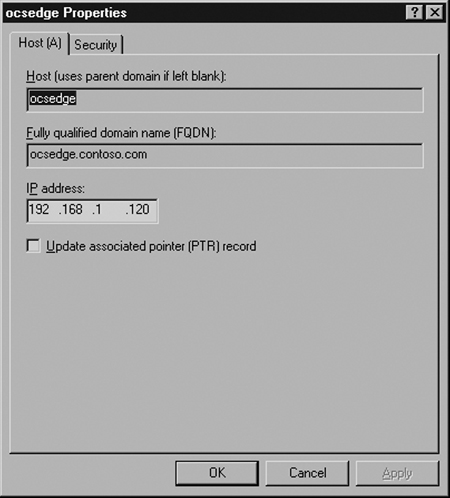
You will create only one internal DNS record for the Edge Server: the record for the internal interface. This should be a record with the FQDN in your internal DNS namespace, such as edge01.company.local, and it should resolve to an internal, private IP address. Even though the Edge Server will not be installed in your domain, it does require a DNS record, as shown in Figure 5.2.
Each of your three FQDNs needs a publicly routable IP address, because external users will be accessing all three external services: Access Edge, A/V Edge, and Web Conferencing Edge. Your Internet service provider (ISP) assigns these publicly routable IP addresses. In most networks, the public IP addresses typically will terminate on your firewall.
Some people have complained that the Edge Server requires too many public IP addresses, too many FQDNs, and consequently, too many Secure Sockets Layer (SSL) certificates. You could use just one FQDN and public IP address for all three Edge services, but I don’t recommend this unless you really have a good grasp of the Transmission Control Protocol/ Internet Protocol (TCP/IP), OCS, certificates, and firewalls. Departing from the default ports requires you to change these port numbers in several locations, making your deployment more complex than it needs to be. It becomes difficult to troubleshoot when you aren’t sure which ports are supposed to be in use and which are not.
Why all the fuss? Under normal circumstances, using a single IP address would create TCP port conflicts. All three of the Edge services use TCP port 443; if you are using only on IP address, you can’t have multiple services using the same port. OCS does allow you to specify different ports for different services, but this will lead you astray from most of the published OCS documentation. I have heard of people getting this to work successfully, but it is certainly not the most straightforward and easily supported method.
Our OCS deployment will have three different networks. The Edge Server will touch each one.
As noted earlier, an Edge Server with all three roles installed needs four NICs. Each NIC should have a single IP address bound to it. Your Edge Server Network Connections window should look something like the screen shown in Figure 5.3.
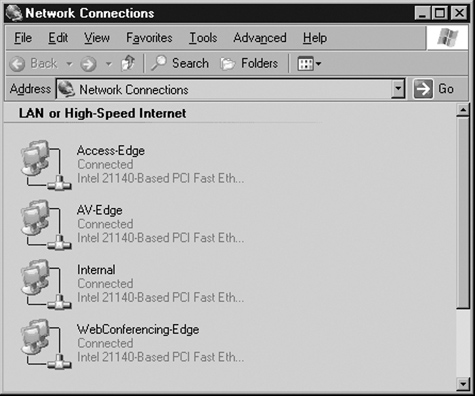
I recommend renaming all your connections the way I have in Figure 5.4. You will be working with the network connections quite a bit, and it will help to have more descriptive names than the default “LAN Connection 1” and so forth.
Warning
Do not try to assign multiple IP addresses to the same NIC; this can have strange and unpredictable results on the Edge Server. Although many other applications seem to have no trouble using several IP addresses bound to the same NIC, many times I have seen OCS in general and the Edge Server in particular not functioning reliably with this configuration.
For example, if you assign the internal and external IP addresses to the same NIC, the Edge Server will not allow any external OCS clients to log in. Save yourself the time and effort by sticking to the Microsoft-recommended (and supported!) method of assigning only one IP address to each NIC.
I will explain this further in the “Dealing with Security Issues” section later in this chapter, but for now it’s important to know that the A/V Edge service must have a public IP address assigned to it.
Some people will want to put the “internal” interface in the DMZ segment; others will be fine with having it connect directly to the internal network. In our setup, I have the Access Edge and Web Conferencing NICs in the DMZ, with the Internal NIC connected directly to the internal network segment.
When you assign IP addresses, you are also prompted to enter a default gateway for each IP address. On the Edge Server, enter a default gateway only on your A/V Edge service. For the rest of your addresses, do not add a default gateway; this will cause the Windows routing table to behave erratically and you will definitely have problems getting the Edge Server to work.
To be able to route to the rest of your segments, you will need to create static routes on the Edge Server.
Because the Edge Server will use addresses on three networks but will have only one default gateway, you will need to configure a couple of static routes on your Edge Server for it to be able to reach all the necessary networks.
As I said in the prior section, the A/V Edge will have a default gateway, so it’s the other two networks that need the static routes. In our scenario, these networks are in the 192.168.1.0 and 172.16.1.0 range. To configure static routes to these networks follow these steps:
Open a command prompt on your Edge Server by selecting Start | Run and typing cmd.
Once the command window opens, type the following command:
C:
oute add –p 192.168.0.0 MASK 255.255.0.0 192.168.1.1
C:
oute add –p 172.16.0.0 MASK 255.255.0.0 172.16.1.1
Once the routes are added, type the following command:
C:
oute print
You will see that the routes we have added appear at the bottom of the route table. They show up as persistent routes (that’s what the –p switch in the command does) because they will remain even after a server reboot.
Once you add the static routes, reboot the server for the changes to take effect. When the server comes back, be sure you can connect to servers on all three networks.
Now that we’ve taken great pains to ensure that our underlying networking components are set up correctly, we can move to the installation of the Edge Server. Note that you should install the Edge only after you have deployed your OCS front-end and back-end servers internally. (The only exception to this rule is if you happen to be migrating from LCS to OCS. In that case, the Edge Server is typically deployed first.)
Install the Edge Server on a Windows Server 2003 or Windows Server 2003 R2 platform. The machine on which you install the Edge Server should not be a member of the domain, but rather a stand-alone workgroup.
Tip
You can install OCS Edge into a domain, but it just should not be the same domain where the rest of your OCS servers exist. If you make the mistake of installing the Edge Server into your primary domain, be sure to deactivate the server before removing or rebuilding it. You can deactivate the server by right-clicking on it in the OCS admin interface and selecting Deactivate. This removes all the Active Directory objects and configurations associated with the server.
You can install the Edge Server using either the OCS Enterprise Edition or the OCS Standard Edition server. In either case, you will need to copy the OCS installation files to the Edge and run setup.exe.
The Deployment Wizard will prompt you to install the Microsoft Visual C++ 2005 SP1 Redistributable. Click Yes to install the file and proceed. You will also be prompted to install the Microsoft .NET Framework 2.0. Click Yes to install the .NET Framework.
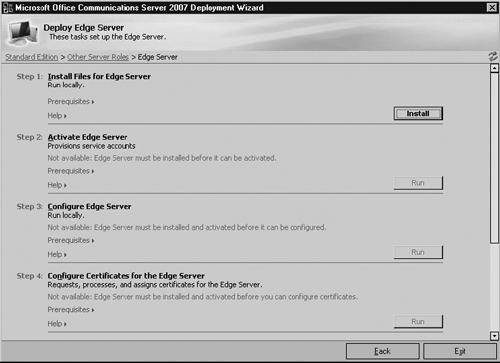
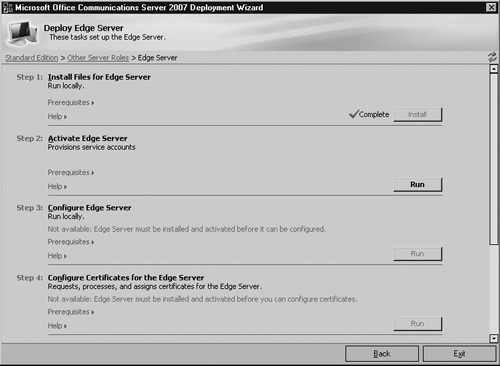
Once these installations complete, the OCS Wizard will begin. Click on Deploy Other Server Roles. This will bring up the screen with options for installing other server roles besides the front-end server. Click Deploy Edge Server. This starts the Edge Server deployment process.
In the Step 1: Install Files for Edge Server section, click Install (see Figure 5.4).
After starting the installation, a Welcome screen greets you. Click Next to proceed. The wizard prompts you to accept the license agreement. Click Next once you’ve read the agreement and accept the terms.
The next screen asks you for your username and organization. Fill these out as appropriate and click Next.
The default directory for OCS Edge Server files is C:Program FilesMicrosoft Office Communications Server 2007Server—under most circumstances, you won’t need to change this. Click Next to install the Edge Server program files. As the wizard executes, you will notice that this step also creates a number of security groups and sets all relevant permissions needed by the Edge Server. Click Close to finish.
You are now ready to activate the Edge Server. The Activation step determines which Edge Server roles you will deploy on this server. As I mentioned at the beginning of the chapter, you will be installing all the roles on this server; this is known as the “consolidated” topology.
Click Run in Step 2 (see Figure 5.5).
A Welcome screen greets you; click Next to proceed (see Figure 5.6).
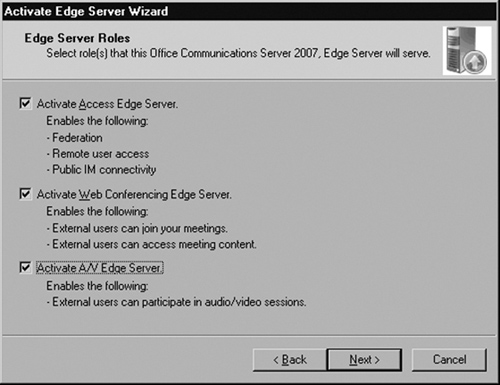
Check all the roles that you want to activate on this machine, then click Next.
Note
If you are planning to use separate servers for each Edge role, select only one role at this point. You can always rerun this wizard at a later date to add additional roles.
The next screen prompts you for a service account and password. Remember, this machine is not part of your domain, so you will most likely need to create a new account here. The default name for the account is RTCProxyService. I recommend keeping this name. Enter a password for this account and click Next.
Warning
The OCS Installation Wizard will fail to install the Edge Server properly (or any of the roles, for that matter) if you choose a password with any quotation marks (“ ”, ‘ ’) or spaces. For some reason, the wizard does not handle this and the services will not start. If you would like to use one of these characters, you can always go back after the installation and change the password through the Users and Groups administrative snap-in.
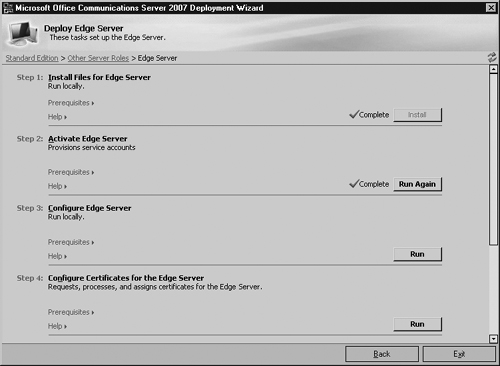
The wizard then gives you an opportunity to review the settings you have chosen. Click Next to proceed. Once the activation completes, the wizard will ask whether you would like to view the log file. Be sure to check the log file if the wizard completes with any warnings or failures. Click Finish to return to the main OCS installation page.
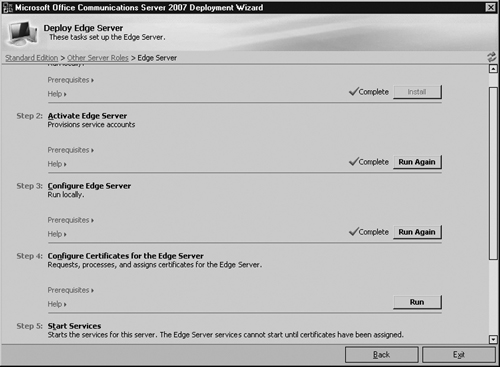
Once the Edge Server activation completes, you are ready to configure all the necessary components. To continue with the process, click Run in Step 3 (see Figure 5.7).
The Welcome Wizard greets you at the first screen. Click Next to continue.
The next screen asks you whether you are importing Edge Server settings from a previous install; assuming this is your first Edge Server, do not check the box. Click Next to continue.
You now must configure the internal interface of the Edge Server.
In the first drop-down menu, select the IP address of your Edge Server that sits in your internal network. You will see that the wizard recognizes all IP addresses assigned to your server. In this example, the 192.168.1.120 address is in my internal network (see Figure 5.8).

Here you also need to enter the internal FQDN of your Edge Server. Because I am using contoso.com for my internal and external domain names, I’ve entered ocsedge.contoso.com. That is the actual server name (ocsedge) plus my internal domain name. If you are using something such as contoso.internal or contoso.local for your internal domain, you must use that suffix here. Notice that the wizard shows you all the ports that this IP address will use and the different functions for each port. Click Next to continue.
The next page contains the external interface configuration.
The Access Edge and the Web Conferencing NICs will sit in my DMZ network; here I’ve assigned them 172.16.1.x addresses (see Figure 5.9). The A/V Edge, however, sits in my public segment and therefore has a public IP address. I explain the reasons for this later in the chapter, in the section “Using Network Address Translation (NAT).”
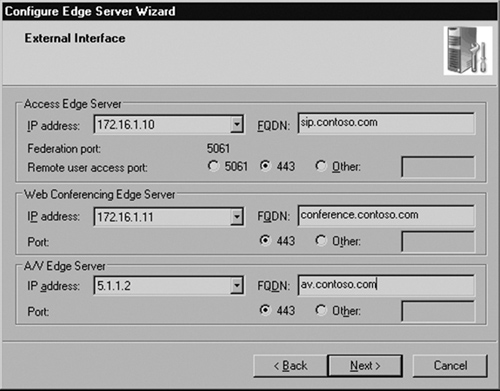
You are also assigning the external FQDNs for each service here. These names must have corresponding DNS entries on a public DNS server and be reachable from outside your network. For further detail on this, see the section “Creating DNS Entries,” earlier in this chapter. Click Next to continue.
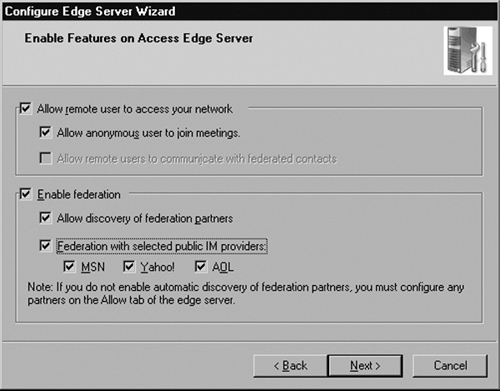
Now you need to enable features on your Edge Server.
Checking the first box, Allow remote user to access your network, enables users to connect their OCS clients from home, from hotels, or from any other outside location without requiring a VPN connection.
If you check the second box, Allow anonymous user to join meetings, people outside your organization (i.e., any non-employee without an Active Directory account) will be able to join Live Meetings hosted by your OCS server (see Figure 5.10).
Note
By selecting this checkbox, you are not enabling all Live Meetings to be accessible to anonymous participants; you are really only saying that you want users to be able to invite anonymous users to some meetings. You can enable or disable this feature on a per-user or per-meeting basis.
Check the box labeled Enable federation to allow your users to communicate with other organizations that run LCS and OCS. Federation normally requires you to define explicitly the partners with whom you would like to federate in a separate list.
However, you also have a second method to enable federation: “open” federation. When you select the checkbox that says Allow discovery of federation partners, this allows companies to use your DNS record to automatically locate your Access Edge Server and connect to you without needing to explicitly define them as a federated partner. This was known as unrestricted enhanced federation in LCS 2005 SP1. Allowing automatic discovery potentially raises some security concerns. I will address those later in the chapter.
Lastly, this screen gives you the opportunity to enable Public IM Connectivity (PIC). Check the boxes of the IM providers with whom you plan to federate. You will need to license this capability separately by purchasing an external connector license from Microsoft.
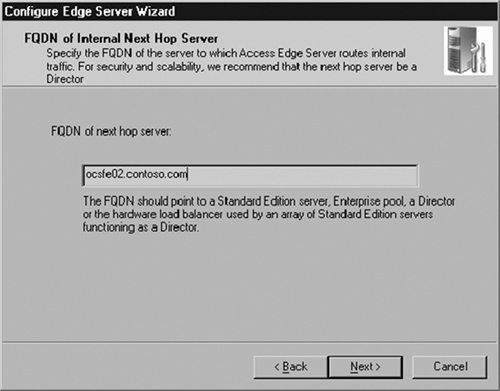
Click Next to continue. Enter the name of the OCS Standard Edition server to which the Edge will be connecting. If you are using Enterprise Edition, enter the name of the OCS pool rather than the name of a front-end server. If you are using an OCS director, enter its name here. Note that you need the entire FQDN (OCSFE02.contoso.com), not just the NetBIOS name (OCSFE02) of the server (see Figure 5.11).
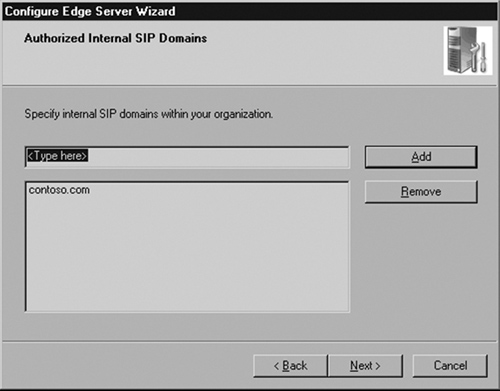
Enter the name of the Session Initiation Protocol (SIP) domain that your Edge Server will be using (see Figure 5.12). If the Edge is routing SIP requests for more than one domain, enter the additional domains here.
Click Next to continue.
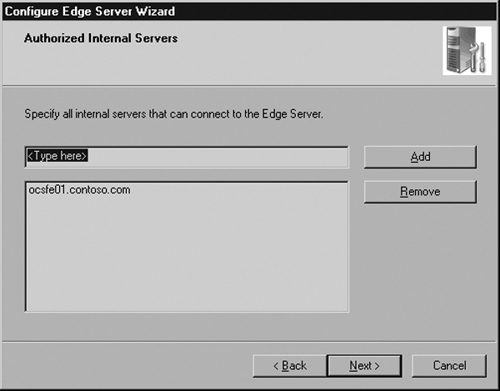
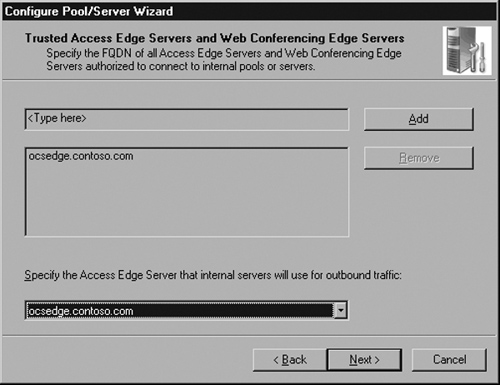
Enter the FQDNs of the servers authorized to connect to the Edge Server (see Figure 5.13). This includes all Standard Edition servers and Enterprise Edition front-end pools. If you are migrating from LCS 2005, enter the name of the legacy LCS pool.
Click Next to continue. The wizard gives you a chance to review the settings in the configuration.
Click Next to apply the configuration. The wizard will complete shortly; if there are any errors or warnings, you will be notified here.
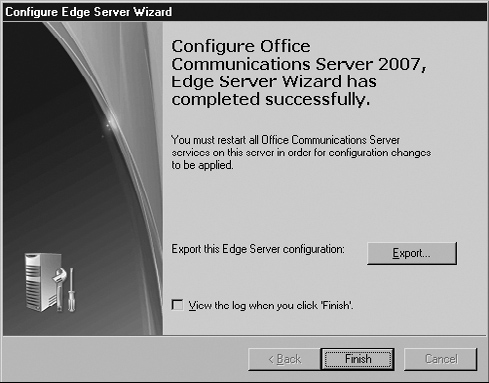
You may want to export your Edge Server settings in the event that you need to rebuild your Edge Server. To do so, click Export now. Otherwise, click Finish (see Figure 5.14).
The main OCS wizard appears again. The next step in the wizard is to work with certificates. But before you do this, leave the Edge Server for the moment. This is a good time to configure the front-end server to work with the Edge. Once we complete that, you can return to the Edge Server configuration.
Browse to your OCS 2007 installation directory and rerun setup.exe on your front-end server. This will launch the OCS Installation Wizard. Click on Deploy Standard Edition Server. If you are using Enterprise Edition, choose the corresponding option. You will then see the wizard with the steps you completed when you originally installed the front-end server (see Figure 5.15).
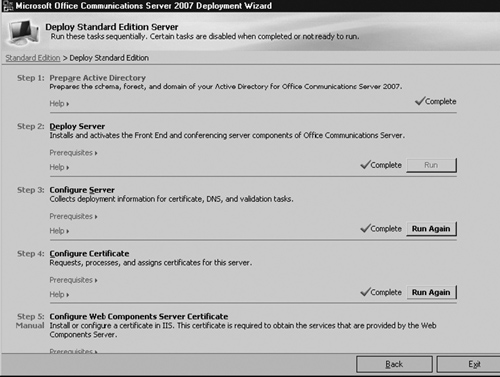
Now you need to reconfigure the front-end server. Click Run Again in Step 3. This launches the Front End Configuration Wizard.
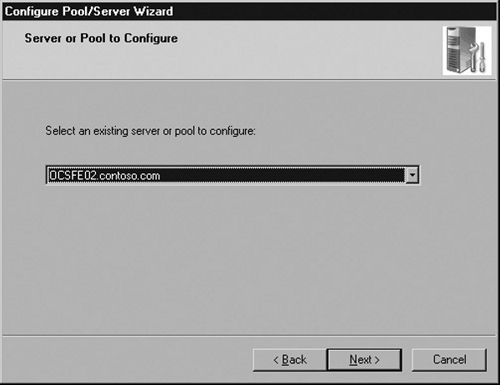
Click Next at the Welcome screen. Then choose the front-end server or pool that you want to configure for external connectivity (see Figure 5.16).
Click Next to continue. Leave the existing SIP domains in the next screen and click Next. In the Client Logon Settings screen, you can leave the options unchanged and click Next. The same goes for the SIP Domains for Automatic Logon screen. Click Next.
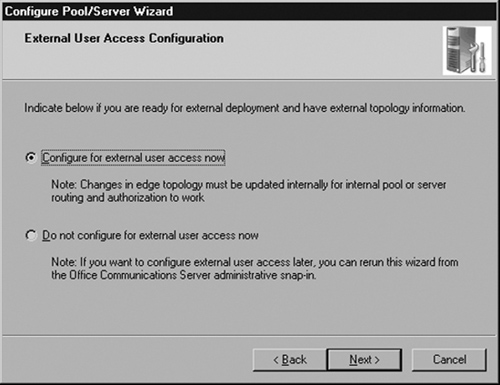
The wizard prompts you to configure external access. Select the radio button that says Configure for external user access now and click Next (see Figure 5.17).
Next, select the method you would like to use to route incoming traffic from the Edge Server. If you have an OCS director role installed, choose that method. If you do not have a director installed, choose Route directly to and from internal pools and servers (see Figure 5.18).

Click Next to continue.
Now you need to enter the name of the Edge Server as a trusted server. You need to enter only one name here, because our Edge Server is both an Access Edge and a Web Conferencing Edge. If we had broken the Edge into multiple servers, each with a different role, you would enter both server names here. Notice that I have entered the internal interface name here, even though the wizard is asking for Access Edge and Web Conferencing Edge FQDNs (see Figure 5.19). Do not enter the external names here; enter only the internal FQDN.
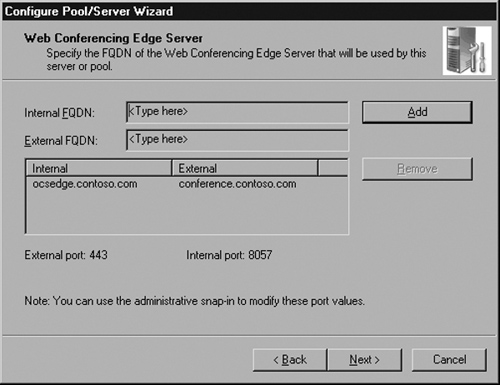
Configure the internal and external names of your Web Conferencing Edge server. For the internal FQDN, enter the internal name of the Edge Server: ocsedge.contoso.com. Externally, users will connect to conference.contoso.com (see Figure 5.20).
At the next screen, you need to enter the name and port of your A/V Edge server (see Figure 5.21).

Unlike the previous screen, this is asking only for the internal name of the Edge Server hosting the A/V Edge service. Enter the FQDN: OCSEDGE.contoso.com. The A/V Edge service listens on port 5062 by default.
Warning
Do not enter the A/V Edge’s external name here; the wizard is only looking for the internal FQDN of the Edge Server.
You can always change this value at a later date by viewing the Global Properties page in the OCS Administrative Console. Click Next to continue.
If you specified multiple A/V Edge servers here, the next screen will ask you for one server. Because we have only the one A/V Edge server, you can accept the default and click Next.
The wizard now gives you a chance to review your settings. Click Next to apply the settings. The wizard should complete successfully. Check the log file for details if you received any warnings or failures.
Stop and start the Front-End Services for these changes to take effect.
The front-end server has a few other settings that you need to configure for full Edge Server functionality. The first is to enable users to be able to invite external anonymous participants to meetings. Go to the OCS Administrative Console and right-click on the forest. Choose Properties | Global Properties. Click on the Meetings tab (see Figure 5.22).
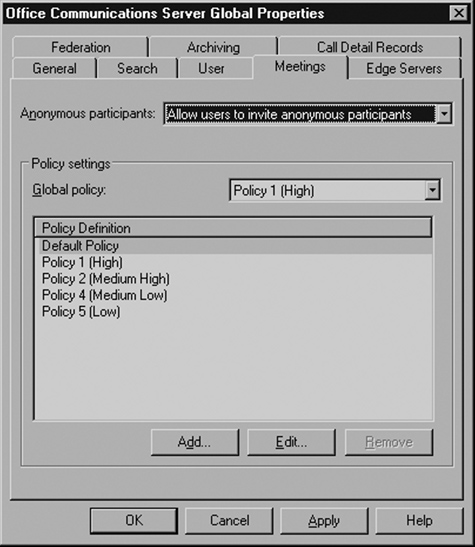
The drop-down menu at the top of the page gives you three options:
Allow users to invite anonymous participants.
Disallow users to invite anonymous participants.
Enforce per user.
Select Allow users to invite anonymous participants. Click OK.
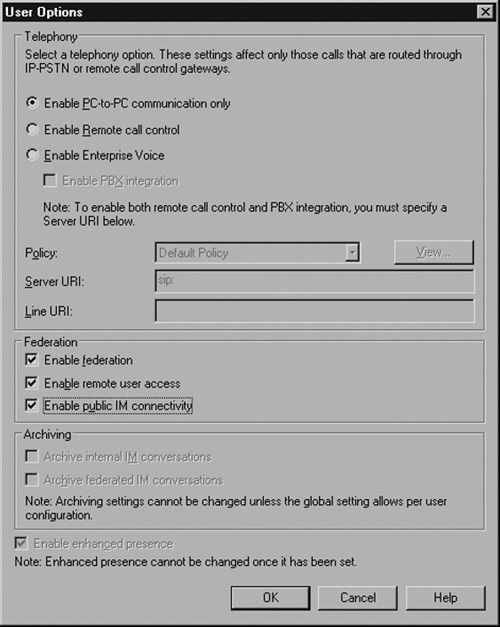
Next, you need to enable users to utilize the Edge services. Open a user in the OCS Administrator Console. In the section called Additional Options click Configure.
Check Enable federation, Enable remote user access, and Enable public IM connectivity to enable these features for a user (see Figure 5.23). You can choose to enable or not enable any combination of these features for each user. Click OK. Users will need to log out and log back in for these settings to take effect.
As with the other OCS roles, the Edge Server requires SSL certificates for all communications. This chapter assumes that you have installed and configured an Enterprise Root certificate authority (CA) in your Active Directory domain as part of your front-end server deployment. All OCS internal server-to-server communications are encrypted using SSL certificates issued by your internal Enterprise Root CA.
However, unlike the other OCS roles, the Edge also requires a few certificates issued by public CAs. Public certificates issued by trusted CAs are generally required for any secure communication with external users. And because the Edge Server is responsible for all communication with external users and public IM providers, the Edge Server therefore requires public certificates. If you wanted to use an internal CA for this, everyone connecting to your OCS server would need to add the CA’s root certificate to their local machines’ list of trusted roots. You may be able to get your users to do this, but it’s unlikely that anyone outside your organization will want to just join a Live Meeting or federate. Not using a public CA for the Access Edge cert would also prevent you from connecting to any of the public IM providers.
You can obtain public certificates from many different vendors. VeriSign and Entrust are among the most common.
To configure Edge Server certificates for the first time we must go back to the Edge Server installation wizard.
Click Run in Step 4 to proceed with the certificate configuration (see Figure 5.24).
The Certificate Wizard will greet you with a Welcome screen; click Next to continue. At the first screen, select Create a new certificate and click Next.
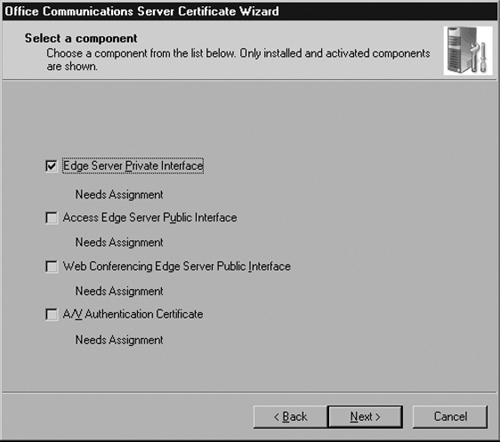
The wizard prompts you to select the component to which you will be assigning a certificate. Choose Edge Server Private Interface. You can process only one certificate at a time, so we will start with the internal interface first. Click Next (see Figure 5.25).
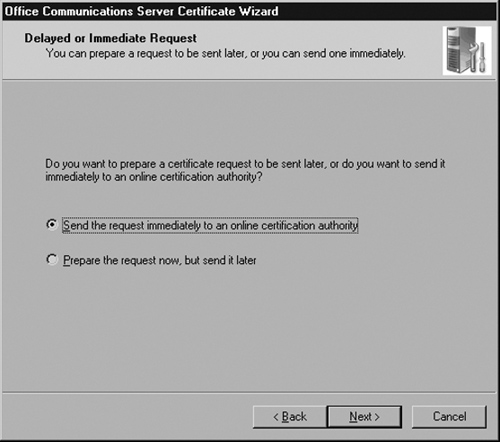
Choose Send the request immediately to an online certification authority; we will be sending the request to our Enterprise CA. Click Next to continue (see Figure 5.26).
Give the certificate a name and mark it as exportable. Click Next to continue. When prompted, enter your relevant organization, department, and geographic information. Click Next to continue. You now need to enter the subject name (see Figure 5.27).
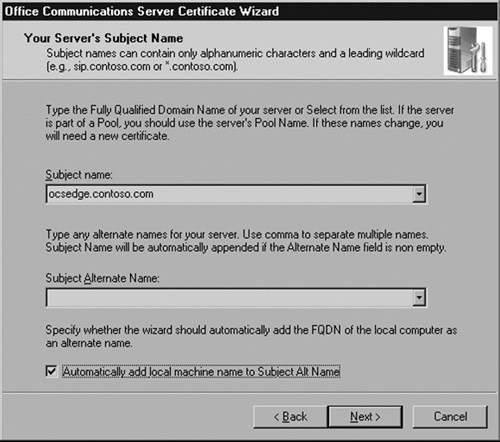
Enter the full internal FQDN of your Edge Server. This name needs to match what you entered during the Edge Server setup for the internal interface name. You can also check the box for Automatically add local machine name to Subject Alt Name. Click Next.
Enter the relevant geographic information about your organization and click Next.
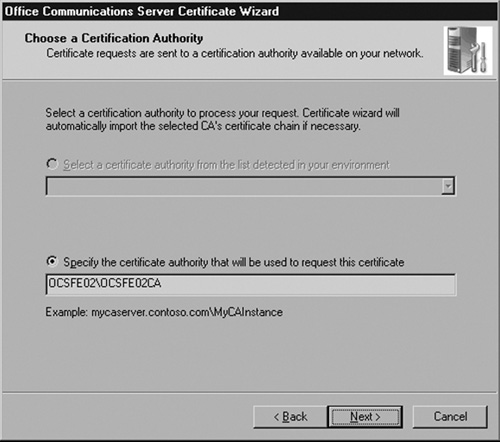
You now are prompted for the name of the CA to which you are sending the request. We are using the CA that I’ve installed on my OCS front-end server. In production environments, the CA would never be installed on an OCS server. Enter your CA’s information and click Next (see Figure 5.28).
You will be prompted for credentials to log in to your CA server. Enter them in the dialog box. Click Next to proceed. The wizard will then finish and let you know whether your request was successful.
Tip
If your request was not successful, make sure you spelled the name of your CA server correctly and that you have the right name for the CA service on your server. Also check to make sure you can ping the CA server from the Edge Server. If not, check your firewall to make sure communication between the Edge and CA server is open.
If all else fails, you can run through the wizard again, this time preparing your certificate as a text file and copying it over to the CA server manually.
Your CA should automatically issue the certificate based on the request you sent it. If not, you need to go to the CA and manually issue the certificate from the Pending Certificates container.
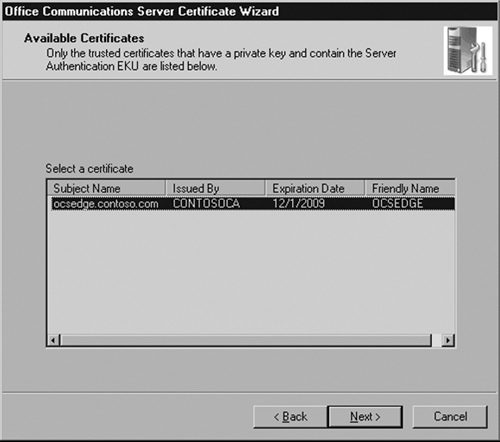
Once the CA issues the certificate, you need to assign the certificate. To do this, click Run in Step 4 of the Edge Server installation wizard (Configure Certificates for the Edge Server). This time, choose Assign existing certificate in the Certificate Wizard. Click Next to view a list of the available certificates.
Choose the certificate that was just issued by the CA and click Next (see Figure 5.29).
Now check the box that says Edge Server Private Interface and click Next (see Figure 5.30).

To assign the certificate, click Next. The wizard finishes and warns you of any problems.
Tip
If you were unable to send the certificate request to the CA automatically, you may also need to add the CA’s root certificate to your Edge Server. Because the Edge Server is not a member of the domain, the certificate issued by the internal CA may not be trusted by default. To remedy the problem, we need to install the CA’s root certificate into the Edge Server’s trusted root container.
This problem won’t occur if you were able to send the certificate request to the CA automatically.
The external certificate process is the same as the internal process we just used for the internal certificate.
Run through the process three more times: once each for the Access Edge, A/V Edge, and Web Conferencing Edge. The main difference with the public certificates is that you won’t be sending your certificate requests to your internal CA, you’ll be sending them to a public CA. Most public CAs ask that you send the request in a text file. The CA will then process the text file and send you a secure certificate in return. (Each vendor handles the request and processing differently; you will need to follow the instructions on the CA vendor’s Web site.)
Install the public certificates into your Edge Server’s certificate store using the MMC Certificates snap-in. Once you install the certificates, run through the Edge Server Certificate Wizard to assign them. Note that you can assign only one certificate at a time.
Because the Edge interacts with the outside world, you need to pay special attention to security. In this section, we’ll cover some of the most important aspects of a secure Edge deployment.
The Edge Server communicates extensively with the OCS front-end server components as well as with the outside world; most of this communication will traverse your firewall. Correctly configuring your firewall will ensure that your OCS deployment is both secure and functional.
In the simplest configuration, your network will have a single perimeter firewall that terminates your Internet connections. You could deploy multiple firewalls (one on each side of your OCS Edge), but I will concentrate on a single-firewall configuration here.
You need to open TCP port 443 for each one of your Edge roles, along with port 5061 for federation and public IM connectivity.
The Edge Server also requires you to open a large range of User Datagram Protocol (UDP) ports for A/V connectivity: ports 50,000 through 59,999. This is quite a span and may cause some concern. However, OCS is not actively listening on these ports—in other words, they are not open all the time waiting for someone (an attacker or otherwise) to connect to them. A port is opened only when an external client has established an A/V session. When the session is finished, the port is closed and is no longer actively listening.
Your Access Edge service and your Web Conferencing Edge service sit in the DMZ segment. These services must be able to communicate with the outside world as well as with your internal network. Make sure your internal network is able to reach the internal interface of your Edge Server on all the required ports.
DMZ segments are commonly assigned their own range of private IP addresses. The firewall then uses NAT to translate the public IP addresses to private ones. The Access Edge and Web Conferencing IP addresses can be configured using NAT in this fashion.
However, the A/V Edge address cannot use NAT. This means the IP address you assign to the Edge Server’s NIC dedicated to the A/V service must be the same as the public IP address assigned to the external interface on your firewall.
Note
OCS requires a public IP address on the A/V Edge service and will not work properly without it. OCS uses Simple Traversal of UDP over NAT (STUN) to make the VPN-less connection, and STUN requires a public IP address for public-facing applications. This is called out in STUN RFC 3489, Section 6. Any application using STUN has the same requirements. For further information on STUN, view the entire STUN RFC at www.faqs.org/rfcs/rfc3489.html.
This often can cause security administrators to panic. But don’t let them forget that having a public IP address does not mean the firewall isn’t protecting the server. Most firewalls will support this kind of firewalling.
To do this securely you must configure your firewall to route requests “transparently” to the NIC dedicated to the A/V service. Different firewall vendors support transparent firewalling in different ways, so consult your vendor for details on how to configure transparent firewalling.
If your firewall doesn’t support a transparent mode, you will need to find a different way to secure your server. Under no circumstances should you put your Edge Server’s A/V NIC on your public Internet segment without protection; this would be a major security risk. Instead, you may want to consider some other form of protection, such as a software-based firewall.
It is critical that you use a publicly routable IP address for the A/V service; using a private address via NAT will cause unpredictable results with external users and voice/video calls as well as Live Meeting audio and video. I have tested a private IP address for the A/V service and encountered issues each time. In fact, I opened a support case with Microsoft Support and the first thing the engineer told me was that I needed to change the IP address to a public one. I protested to him that it shouldn’t matter, but he correctly pointed out that the requirements are the requirements. I took his suggestion and within minutes of changing to a public IP, all of my A/V Edge problems disappeared.
OCS 2007 uses ISA to publish the address book to external users. The front-end server compiles an address book that contains a list of all the users in your organization. Each time users log in to their OCS clients, they receive a new copy of the address book from the server. The front-end server stores the master copy of the address book in a secure Web site hosted in Internet Information Server (IIS). The OCS clients retrieve copies by automatically connecting to this site using SSL.
For internal clients, the connections to the front-end server use the internal FQDN of the pool, such as https://ocspool.company.internal. And logically, it follows that the certificate that is bound to this site has the subject name ocspool.company.internal. In this way, clients make secure connections to retrieve the address book.
However, external users trying to download the address book will have trouble unless you are publishing the address book with ISA (or any other reverse-proxy server). As I mentioned earlier, the front-end server stores the master copy of the address book, and the front-end server, unlike the Edge Server, does not sit in the perimeter network. It should not be accessible to external users, and therefore, external users will not be able to retrieve the address book without going through ISA.
To avoid using ISA, you may be tempted to just open a port on your firewall to allow access into the front-end server. That is a bad idea for two reasons. First, it unnecessarily exposes your front-end server to the outside world and this poses a security risk. But also, and more important, this method won’t work. The reason comes back to SSL and certificates: Because the directory where the address book is stored must use SSL, it must have a certificate bound to it. And because this directory must be accessible to internal as well as external users, it must have a certificate with the internal FQDN as the subject and the external FQDN as a subject alternate name. Unfortunately, subject alternate name certificates are not supported for this use: You must pick either the internal name or the external name.
This is where the ISA server comes in. The ISA server sits in your perimeter network and securely publishes your address book to the outside world. You can assign an external FQDN such as addressbook.contoso.com and have ISA publish your internal address book to the outside with the new name.
Tip
You set the URL that clients use to download the address book during the Standard Server configuration (or front-end pool, if you are using Enterprise Edition). Misleadingly, the wizard calls this the External Web Farm FQDN. This is really the external URL for the address book download as well as a few other components. Many people breeze right through this step without understanding exactly what it is. The unfortunate part is that once you’ve set this parameter in the wizard, you can’t change it through any method on the OCS administrative console. You can’t even change it by rerunning the setup! I recommend that you use the command-line utility lcscmd.exe for this purpose.
The best way to test the Access Edge Server is to log in to your OCS client from a machine outside your firewall and test as many features as possible. This section walks you through the way to test most aspects of the Edge Server.
Log in to the client and make sure all your contacts, including federated or public contacts, appear. If the client logs in successfully, the Access Edge Server is working properly. Send IMs to your contacts and make sure their presence appears correctly in your client. Test to see whether your public and federated contacts can send you IMs.
If you are unable to log in to the OCS server from outside the firewall, you most likely have a problem with either the Edge Server or the underlying network components. You should test the network components first before poking around with your Edge configuration.
The first thing you should do is make sure name resolution is working from the outside. Try to ping sip.company.com from a command prompt. Make sure it resolves to the right IP address. If the correct public IP address comes back, you know DNS is working. Oftentimes, firewall administrators will not allow ping or other ICMP traffic through, so your ping may fail even if the name resolved to the correct public IP address.
If you are using NAT on your firewall, make sure you have the correct NAT rule set up to translate from your public IP address to your private IP address. Also make sure the firewall is configured to allow port 443 traffic into your private IP address.
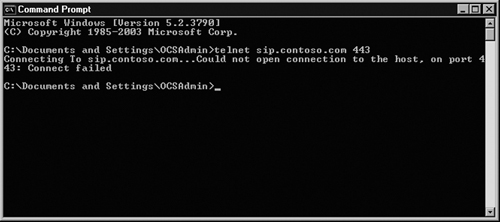
The way to verify that your server is online and listening for requests is to use the command-line utility telnet to connect to sip.company.com on port 443. The Edge Server is listening for client connections on port 443 and by using telnet, we can test to see whether any connections are allowed through the firewall to the Edge Server.
Tip
Windows Vista no longer enables the Telnet client by default. To enable the client, go to the Control Panel and click on Programs and Features. Click on the link for Turn Windows Features On or Off. Check the box next to Telnet Client and click OK.
A successful Telnet connection will show a blank screen with a blinking cursor. An unsuccessful Telnet connection will look like Figure 5.31.
However, if you are able to telnet to your Edge Server on port 443, it is likely that the Edge Server is unable to pass the authentication through to your front-end server or directors. Run the Edge Server Validation Wizard to make sure it makes all the proper connections back to the front-end server.
If the Validation Wizard comes back with no errors, run the Front End Server Validation Wizard to make sure it can connect to the Edge Server.
Tip
The command-line tool NBTSTAT is your friend. If you are having problems connecting, run NBTSTAT –ab from a command prompt on the Edge. Its output will tell you whether the server is listening on the correct ports.
If all else fails, don’t forget to use the Windows event logs. The application log and the OCS log provide lots of good information about any errors that occur. Check both the Edge Server event logs as well as those on the front-end server.
To test the A/V service log in to a client from outside the firewall and make a communicator-to-communicator call to another user who is inside the firewall. Try making a call to another user who is outside your firewall. If you have a Webcam installed on your machine, make the same calls again, but this time use video. Ensure that the A/V conferencing service works by making a voice call to another user, then conferencing in a third party.
The Edge Server is a required component if you plan to have your OCS deployment connected with the outside world. The Edge has multiple roles that handle different types of external connectivity; you can choose to enable some or all of the roles on your Edge Server.
The Edge requires the use of several IP addresses, FQDNs, certificates, and several available ports on your firewall. Planning these underlying network and security components will be important to ensure a successful Edge deployment. Once you have settled on these components, the actual installation of the Edge Server will be straightforward.
Make sure you have all public IP addresses and DNS entries ready. | |
Install the Edge into a server that is not a member of the domain. | |
Pay attention to port numbers and FQDNs during the configuration. |
Be sure to have an Enterprise Root CA in your Windows Active Directory domain. | |
Be prepared to purchase certificates from a public CA for your Edge Server’s externally facing roles. | |
Make sure you install the certificates to your computer’s certificate store before trying to apply them to the Edge Server. |