
Chapter 8
Information gathering
Information in this chapter:
In the course of researching penetration test targets, a tester can often find it helpful to consult various sources of publicly available information as a portion of his or her efforts. In these days of common participation in various social media outlets such as Twitter, Facebook, and a plethora of blogging platforms, as well as more corporate-oriented tools such as job posting boards, we have a number of great information sources available to us.
Additionally, a large amount of information ends up on the Internet in less-than-intentional ways in the form of metadata attached to documents, pictures, and other files, and all of it is available for our perusal.
In many cases, the sheer volume of information available to us serves as somewhat of a measure of protection against it actually being found. If we are forced to manually sift through all this information, the task is overwhelming and we may never find what we need.
Fortunately, we can apply automation to these efforts. We can take advantage of the existing tools available to us, such as Google, and apply our own layer of automation to them in order to get results that are more in line with what we are looking for. We can also assemble scripts to parse data from Web sites, scan files for metadata, and other similar tasks. We can make use of some of the scripting tools we have discussed throughout the book, such as shell scripting or Perl, in order to help us with these efforts.
Information Gathering for Penetration Testing
Information gathering and research can be of great value in penetration testing, particularly in the case of a penetration test in which we do not have inside knowledge of the targets or the environment. A number of data sources, and quite a few different tools, are available for us to use in the course of our efforts.
Sources of information
We have access to a great many sources for our information gathering efforts, some public and some not. Putting these to use in our penetration testing efforts can often greatly ease our tasks, and may very well make the difference between success and failure.
On the public side of things, we have, as we discussed earlier in this chapter, the vast wealth of information stored in social networking tools and sites to consider. Many of the individuals using these tools are not careful about the information they are giving away, and may be sharing a great deal of information about their jobs, where they live, who they associate with, and so on, often in excruciating detail. This can be a gold mine of information for the penetration tester.
NOTE
Depending on the geographic area in which we reside, we might need to take care when gathering information of a personal or sensitive nature. The laws that govern such information range from nonexistent to draconian, so it may pay to find out what restrictions we are working under before jumping in.
Additionally, if we look to online forums, job posting boards, and other similar sites, we may find information regarding specific technologies, implementations, and infrastructure equipment in use at a particular target or location. Such items of information can be treasures.
We may also be able to find quite a bit of information regarding the networks and systems of our targets by interrogating the publicly available domain name system (DNS) records, looking over the records kept on the domain names in use, and other similar information. Here we can put tools such as dig to use, as well as online informational sites, of which a great number exist for any given purpose, such as whois lookups, domain ownership history, and other similar interesting bits of information.
On the nonpublic side, when we are on a system or in an environment already, we may have access to quite a few bits of interesting information as well. We may be able to see stored data from browsers, such as cache, history, or bookmarks, which can often make for interesting reading. If we have access to stored e-mail or an account, we have a potential gold mine of information, if we are able to search it for the information we seek.
We may also have access to files—public, nonpublic, or both. Depending on the files in question, they may contain data of interest in a direct and immediately viewable fashion, or we may have to dig for it a bit, a topic we will discuss later in this section when we cover metadata in documents and in files.
Patterns in information
When we are searching for information, whether in plain text from documents or Web pages, metadata in files, compiled code in application binaries, or nearly any other source, we can often look for particular patterns that relate to the information we are looking for. Particularly in the case of searching for specific information—an IP address or credit card number, for instance—the search for this type of information can be greatly simplified, and can save us a great deal of pain.
As we discussed in Chapter 3 when we covered Perl, regular expressions (regex) are very handy for searching for these patterns, at least when we have something specific which we would like to find. If we can put together a regex for e-mail addresses, credit card numbers, serial numbers, and so on, we can often take a task that would require extensive manual drudgery and hand it off to a computer, only needing to look at it when we want to see the results.
We can also make use of even simpler tools, such as the strings utility, in order to carry out more general searches for information. In the case of the strings tool, we can search for strings of text within files, such as a binary file or a document file. Strings can match against strings of a specified length which are followed by a nonprinting character, such as a space, newline, or carriage return. Although this sometimes returns nothing other than garbage strings of text from a file, it will often give us back entries of potential interest. Fortunately, strings is one of the tools that lends itself well to scripting, which we will discuss later in this chapter.
Being able to find patterned data in a large quantity of information is a very handy skill to have in the penetration testing world, and can be well worth the effort we might put forth to learn how to do it skillfully. This is also a great skill to learn in general, and can be applied in many technology-oriented situations, even outside the security industry.
Metadata
Metadata has the potential to provide us with some excellent sources of information around which we can base our penetration testing efforts, from social engineering attacks to password guessing or cracking, in order to gain entry to a system.
Metadata is data about data. For example, if we look at a given file in most operating systems, whatever it happens to be, we will find information related to the file, but not specifically pertaining to the contents. These items of metadata may store the size of the file, the timestamps for creation, modification, or access, and other such items. Depending on the file type and the application that created it, we may also find quite a bit of other information stored in the metadata, such as the physical location where the file was created, as we may see in video files or pictures, or account names and file system paths in the case of many text documents. These two file types often contain more interesting data.
Document metadata can be a particularly fruitful source of data for us in the course of penetration testing. The tools we use to create documents often keep a large amount of metadata stashed in our documents, invisible to us through the normal interface of the application. Although a careful user of these applications can generally clear out some portion of this data, such as the name of the document creator and a few other items of information, the document itself may hold quite a bit of other data we cannot clear. This may include the full paths, for either the local file system or network locations, where the document has been saved in the past, often for the past several saves.
We can also generally find the names or usernames of the various accounts that have edited the document, a handy thing to have for a pen test. Additionally, we may be able to find previous revisions of some portion of the text within the document. This can also be very beneficial if the document has been edited for public release by removing sensitive internal information.
Image and video metadata often stores an entirely different set of information than we find in documents, although certainly no less in quantity. From the devices that actually create such files directly, we will often find metadata embedded which contains information about the image or video itself, such as the settings on the camera used to take the images. On devices equipped with a Global Positioning System (GPS) receiver, we can often find the coordinates at which the image or video was created as a portion of the metadata as well.
Additionally, we may find other items handy from a general security perspective, such as the specific model and serial number of the device used to create these files. We will discuss how exactly we can interface with metadata with various tools and scripts later in this chapter.
What can we do with the information?
Once we have gone to all the trouble of researching and gathering this information, to what uses can we put it? The answer to this question is manyfold, and potentially complex, but a couple of major uses present themselves immediately: We can use this information for social engineering efforts, and we can use it to do a bit of advanced footprinting of the environments and systems we will be testing.
In social engineering efforts, this type of information can be invaluable. If we are able to harvest people’s names, account names, phone numbers, job titles, specific model numbers, or any of a huge set of other information, this begins to give us a framework on which to hang a social engineering attack. If we are trying to pass ourselves off as someone who works in the target environment and we can find out that Jim Bob Jones actually goes by the nickname Sparky, we have a much greater chance of success in our efforts. Likewise for any other small details we can pick up to make our social engineering attack more credible to those it targets.
On the technical side, we can also use our gathered information for the purposes of footprinting systems, environments, or networks.
As we discussed earlier, we may be able to find information about equipment in use posted in job listings. At the least, we will often be able to find information regarding the particular vendors of the equipment in use, if not more specific information, such as models or revisions. This can often give us a starting place to begin looking for potential vulnerabilities we might put to use. The same is likely true for software in use and particular versions.
Beyond this, we may be able to suss out information regarding the network structure by examining it from the outside, including the use of network tools to comb through DNS entries, examining the banners, headers, and other information displayed by Internet-facing servers providing e-mail, Web, and file transfer capabilities, wireless networks, and any other portions of the infrastructure available to us from outside the environment.
With most such tools, we can put together a collection of scripts to automate, screen-scrape, and generally ease the task of gathering and parsing the large amounts of data that will likely result from our efforts.
Talking to Google
Google is an absolutely awesome tool for penetration testers. We may think Google is just a search engine that gives us mostly porn results back when we ask it for something, but we just need to learn to be a bit more specific when we talk to it. If we finesse Google properly, we can soon have it handing back exactly the results we are looking for, presuming they are present in the first place.
Google indexes a truly staggering amount of information. In early to mid-2011, the size of the Google page index was approaching 40 billion pages [1]. This means Google has indexed millions of resumes, blogs, job postings, random files put out on Web servers, and all manner of other miscellanea.
In all this information, we can find bits and pieces that can be of great use to us in the course of a penetration test. It may seem like much of the information on Google is relatively useless trivia, but if we know how to ask for it, we can find all manner of interesting information.
Google hacking
The term Google hacking refers somewhat more specifically to the general practice of using Google to find information that is of interest to those in the world of security, particularly penetration testers. When we engage in Google hacking, we make use of Google and the advanced search operators to find security flaws, insecure devices, passwords, reports from vulnerability assessments and penetration testing engagements, and all manner of other such data that should absolutely not be freely floating about on the public Internet. There isn’t much better material than a report from a vulnerability tool or a document outlining all the security flaws in the environment we, as a penetration tester, could hope to find.
A great resource for Google hacking is Google Hacking for Penetration Testers, Volume 2 (ISBN: 978-1-59749-176-1, Syngress), by Johnny Long. This book walks through the basics of Google hacking, and includes quite a few tips and tricks along the way. This is overall a great read and shows us all manner of interesting bits and pieces we can make use of in our Googling.
Another fantastic resource we can use for such efforts is the Google Hacking Database (GHDB).1 The GHDB is a regularly maintained repository of interesting information that shows up on Google, and the exact searches needed to find it. The major categories in the database are as follows: [2]
• Footholds (examples of queries that can help a hacker gain a foothold into a Web server)
• Files containing usernames (but no passwords)
• Web server detection (links demonstrating Google’s ability to profile Web servers)
• Error messages (silly error messages that reveal far too much information)
• Files containing juicy information (but no usernames or passwords)
• Sensitive online shopping information (including customer data, suppliers, orders, credit card numbers, etc.)
• Network or vulnerability data (pages containing such things as firewall logs, honeypot logs, network information, IDS logs, etc.)
• Pages containing log-in portals (log-in pages for various services)
• Various online devices (including things such as printers, video cameras, and other devices)
• Advisories and vulnerabilities (i.e., vulnerable servers; these searches are often generated from various security advisory posts, and in many cases are product- or version-specific)
In about three clicks from the main GHDB page, we can be looking at plaintext passwords sitting out on the Internet for the world to see, and a huge amount of other interesting information. Using the advanced operators for Google we will discuss in the next section, we can very easily narrow this information down to a particular target, a very handy capability to have in the penetration testing world.
Advanced operators
One of the main keys to searching Google is the use of advanced operators. Advanced operators allow us to be much more specific in our searching and will help us weed out the trash results that plague so many of our searches.
There are a great many advanced operators of which we can make use. A good resource which shows many of these operators can be found at the GoogleGuide Web site,2 but even this is not entirely complete, and a few new or previously unknown operators crop up from time to time. A few of the main advanced operators we might want to take a look at are site:, filetype:, and link:.
The site: operator is one of the handiest operators in the entire list, particularly for narrowing down our search results. This operator allows us to restrict our search results to a particular site or domain. Let’s say we are searching for a particular book on cyber warfare. If we go to Google and type “Cyber Warfare” book into the search field, we will get upward of 750,000 results back. This is quite a lot to wade through if we don’t remember the exact title of the book. If, however, we use the site: operator and type site:syngress.com “Cyber Warfare” book, we will get something on the order of five or six results back, most of which will point us exactly where we want to go. Much better.
With the link: operator, we can take a look at pages that link to a particular URL. If we use our aforementioned book as an example, we can run a Google search such as link:www.syngress.com/hacking-and-penetration-testing/Cyber-Warfare/. We should get a few hits back. If we are still coming up with too many hits, we can use multiple operators in combination and add the site: operator in so that we have a search along the lines of link:www.syngress.com/hacking-and-penetration-testing/Cyber-Warfare/ site:syngress.com. We can also use operators here in a negative sense by adding a dash just before the particular operator. So, in this case, link:www.syngress.com/hacking-and-penetration-testing/Cyber-Warfare/ -site:syngress.com would be looking for links to our URL that specifically were not located on syngress.com.
Lastly, let’s take a look at the filetype: operator. We can use the filetype: operator to find only files of a specific type, which can be handy if we are looking for targets from which to mine metadata, which we will talk about later in the chapter in more detail. We’ll choose a richer target here and put together a search such as site:elsevier.com filetype:doc. In this case, we looked on elsevier.com and searched only for Microsoft Word documents. We should get back somewhere around 600 documents with this search, a fairly solid body of material for our later mining efforts.
A huge number of these advanced operators exist for us to play with, and it is well worth the time to become familiar with them. Let’s see what we can do to put a little automation behind these and make them do a bit of work for us.
Automating Google discovery
Here we’ll be putting together a quick and dirty Perl script to get us a listing of files from Google. In this particular script, we’ll be using Perl with the LWP::UserAgent module in order to handle our Web tasks. There are better and more elegant ways to do this, and we will be looking at some of them later in the chapter, but for now, this will get the job done.
#!/usr/bin/perl
use LWP::UserAgent;
use HTML::Parse;
$filetype = @ARGV[1];
$searchurl ="http://www.google.com/search?hl=en&q=site%3A$site+filetype%3A$filetype";
$useragent = new LWP::UserAgent;
$useragent->agent(’Mozilla/4.0 (compatible; MSIE 5.0; Windows 95)’);
$request =HTTP::Request->new(’GET’);
$request->url($searchurl);
$response = $useragent->request($request);
$body = $response->content;
$parsed = HTML::Parse::parse_html($body);
for (@{ $parsed->extract_links(qw(a)) }) {
($link) = @$_;
if ($link =~ m/url/){
print $link . " ";
}
}
Let’s look at what we did here. At the top, we have our shebang to point out the interpreter, as well as a few lines to set up our module usage for the script. Here we will be using the LWP::UserAgent and HTML::Parse modules to do the heavy lifting for us. We also take in a couple of arguments: The name of the site goes into $site and the file type we are looking for goes into $filetype.
Next, we put together our search URL for Google. The string in $searchurl is a simple Google search, with the values in $site and $filetype plugged in, in the appropriate places. We then set up our user agent and its handle, $useragent, as well as setting the agent string to Mozilla/4.0 (compatible; MSIE 5.0; Windows 95). The agent string is an option here, but if we don’t set it, Google will not talk to us, as it will think we are a script and not a real browser, so we really do need it here.
WARNING
The Google search used in this script is not the approved way to talk to Google with automation. If we’re not careful and we abuse this type of connection, Google will get mad and ban our IP address. Google has helpfully documented3 the proper way for us, and we should really be using that. This is a bit out of scope for what we’re doing here, but the documentation will get us there for constructing our queries in the approved manner.
After this, we request our page using HTTP::Request. We instantiate a new object, with $request as the handle, use that to request our page, place the response into $response, and pull out the actual content of the page into $body.
In the last block, we pull out the actual URLs in which we are interested. Here we use our HTML::Parse module to parse the contents of $body out into something we can work with a little more easily than just the straight text, and place that into $parsed. We then put together a for loop to go through our lines, looking only for the links and, of those links, only the links of the a href variety, discarding images and other links in which we are not interested. For each remaining link, we run a small regex, looking for the text string url in the line. In the format of the results that Google sends, these are the lines in which we are actually interested. Lastly, we print out our filtered results.
We can run the script as ./download.pl cnn.com doc, or something along those lines, and we should get a result back that looks like Figure 8.1.
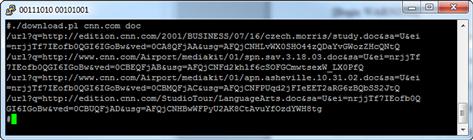
FIGURE 8.1 download.pl Output
So, as we said, this does get the job done, but we can definitely put something nicer together to use that does more than just list a few links. In the next section, we will discuss how we can better use Perl in order to interact with Web pages, and we will be working with a Perl module called WWW::Mechanize that will allow us a bit more freedom and utility when we work with such targets.
Web Automation with Perl
In the preceding section, we briefly looked at what we could do with Perl in order to talk to a Web site. When we look at any given task in Perl, or any of the other modern scripting languages, for that matter, there are a number of ways we can approach any given task. The particular module we looked at in the preceding section, LWP::UserAgent, works admirably for the simple task we put together, but it is only one way to approach what we need to do. In this section, we will take a look at a couple of the alternatives we have for getting similar jobs done.
Pulling information from Web sites
Let’s look at a very quick and easy method to pull a page from a Web site. Earlier we used LWP::UserAgent to carry out a similar task, but we can simplify things a bit more by using a similar module, called LWP::Simple. We can even do this from a single command line:
perl -MLWP::Simple -e "getprint ’http://www.cnn.com’"
This should get us a result like that shown in Figure 8.2.
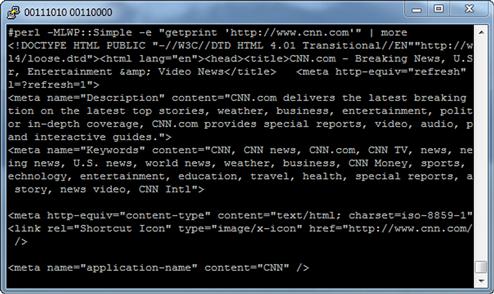
FIGURE 8.2 LWP::Simple Output
All we did here was invoke the Perl interpreter, tell it to use the LWP::Simple module, and tell it to get and print the URL specified. That was pretty simple, right?
We end up with a fairly raw version of the Web page, but this is just fine if all we’re planning to do with it is something simple, such as parsing strings out of the page. As we said, we can approach this task in several ways, and we can go to the other end of the feature spectrum with the WWW::Mechanize module.
WWW::Mechanize
The WWW::Mechanize module is a great and (potentially) complex beast. We can do nearly anything from WWW::Mechanize that we can do from a Web browser with a person operating it. We can authenticate to Web pages, follow links, download and upload files, run searches, and a great deal more. The nice thing about WWW::Mechanize is that we can still do things in a relatively simple fashion if the task we need to carry out doesn’t call for great complexity, but the full set of features is still there if we need to access it.
Let’s revisit the code we wrote earlier in the chapter, to pull file URLs from Google, but this time we’ll use WWW::Mechanize instead of LWP::UserAgent:
#!/usr/bin/perl
use WWW::Mechanize;
$site = @ARGV[0];
$searchurl="http://www.google.com/search?hl=en&q=site%3A$site+filetype%3A$filetype";
$mech = WWW::Mechanize->new();
$mech->agent_alias(’Windows Mozilla’);
$mech->get($searchurl);
@links = $mech->find_all_links(url_regex => qr/d+.+.$filetype$/);
for $link (@links) {
$url = $link->url_abs;
$filename = $url;
$filename =~ s[.∗/][];
print "downloading $url ";
$mech->get($url, ’:content_file’ => $filename);
}
We can see here that this code is generally similar to the earlier code using the other module. This is because WWW::Mechanize is largely an extension of the functionality in LWP::UserAgent, and some large portion of it functions very similarly.
TIP
WWW::Mechanize, developed by Andy Lester [3], is such a commonly used tool that it has been implemented in other languages as well, including Python and Ruby. These implementations can be found at wwwsearch.sourceforge.net/mechanize/ and http://mechanize.rubyforge.org/mechanize/, respectively. Thanks for such a great tool, Andy!
We start with the usual shebang, module usage, and assignment of the site and the file type for which we are searching into the variables $site and $filetype, respectively. We also assemble the search URL for Google, just as in our earlier script, and place it in $searchurl.
Next, we create a new instance of WWW::Mechanize and assign it to $mech as a handle. We also set the user agent string, and then use the object to retrieve the search URL.
Once we have the resultant page, we can sift through the links. The WWW::Mechanize module lets us handle this search a little more precisely. We start by parsing out all the links in the results page, then putting those through a regex that checks for the file type we specified earlier, placing the results in the array @links.
Once we have the links we need, we set up a for loop to go through each element. Inside the loop, we get the absolute URL for our link so that we do not depend on any indirect links, and place this in $url. We do a quick substitution in order to separate the filename from its path, then echo out a line to indicate which file we are downloading. Lastly, we use the get method and content_file to download the particular file we want, naming it after the value in $filename. We continue to loop through the @links array for as many elements as we have.
We call this script in the same way we did the earlier version: with ./mechanize.pl syngress.com ppt. This should get us back a handful of files, and the output for the script should look something like Figure 8.3.
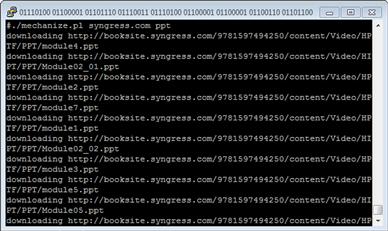
FIGURE 8.3 Mechanize.pl Output
This is a little bit slicker than what we wrote in the earlier section, and we can use it to build on for the tool we will be putting together in the next section. This code does have its issues, some of which we will discuss later in this chapter.
Working with Metadata
As we talked about earlier in the chapter, metadata can provide us with all sorts of interesting information we might make use of in the course of a penetration test. We may be able to find names, usernames, paths, network information, and all manner of other interesting bits and pieces. We know the information might be there, but how do we find it, and how do we pull it out of the files we have?
Finding metadata
To a certain extent, we may be able to find metadata by making use of the applications that created or exist to manipulate the files with which we are dealing. For instance, if we open a Microsoft Word document in recent versions of Word, and choose File | Info | Check for Issues, this will bring up the Document Inspector dialog and allow us to see what metadata Word thinks is present, as well as allowing us to remove the majority of such data.
Such tools as Word and Adobe Acrobat are relatively good about displaying such data in recent versions, but this is not always the case with every tool or file we might have at hand. An old standby for hunting down such data is the strings utility.
As a quick demonstration of what we can do with strings, let’s take a look at a file we might not normally be able to get very much from, which is pretty much any file in binary format. In this case, we have an excellent example in the strings tool itself. On BackTrack 5, strings is located at /usr/bin/strings. If we run cat /usr/bin/strings, we will get a mess of data that scrolls by quickly, some of which has human-readable data and some of which does not. If, however, we run strings /usr/bin/strings, we will get a nice list back of all the readable strings from the file, as shown in Figure 8.4.
FIGURE 8.4 strings Output
We can make use of strings to sort through all the files in a directory with just a tiny bit of scripting:
#!/bin/bash
find . -name "∗.ppt" | while read filename;
do
echo -e "∗∗∗∗∗∗∗∗∗∗∗∗∗∗∗∗∗∗∗∗∗∗∗∗∗∗ $filename ∗∗∗∗∗∗∗∗∗∗∗∗∗∗∗∗∗∗∗∗∗∗∗∗∗∗ " >> stringsreport.txt;
strings $filename >> stringsreport.txt;
done
So here we do a quick find, searching for the .ppt files in the directory from which we are executing the script, passing the results off to a while loop. Inside the loop, we echo a line out to our report file so that we can delineate the different files in the report, then run strings against the filename in $filename and echo those to the file as well.
We could play with this idea a bit and expand our script to add other features as well. We could make it recurse directories, so we can get documents present in subdirectories as well. We could make it search for specific file types based on an argument from the command line, instead of hard-coding the file type. We might also be able to combine this with another search tool, such as grep, or include the use of a few regular expressions in order to search through our results.
Document metadata
When we are searching for document metadata, we can put together several of the resources we have discussed in this chapter to help us with the job. We can make use of Google (or other similar search engines), regular expressions, and text searching in combination in order to feed documents through our data searching process.
Using the advanced operators for searching Google we discussed earlier in the chapter, we can search for specific document types. For instance, if we only want to find a particular document type in a particular domain, we can use the filetype: advanced operator here in order to pull down these documents from our target domain. This gives us a great starting place and potentially a good set of documents through which to comb.
From here, we might want to use a few regular expressions in order to filter for particular types or patterns of data. This might be a good place to use some of the regex we talked about in Chapter 3. In particular, those that will find e-mail addresses, file system paths, network paths, and other similar information might be useful. It is possible we might find information of inherent value in this way, such as credit card or Social Security numbers, but this is relatively unlikely in documents we have scraped off a public Web site, FTP server, and so forth. Although it never hurts to try, and it generally doesn’t cost us much to do so with an automated process.
Lastly, we can do a bit of general searching with something like strings, and just dump out all the text strings we can find in a given document. This will likely result in a certain amount of garbage, but may produce results that surprise us. We can certainly record the results of such searches off to a report or set of files for later perusal, and may find we can pick out the occasional treasure from all the trash in the file. Documents from dedicated text manipulation software, in particular, such as Microsoft Word or Adobe Acrobat, will tend to give us back a rather large quantity of spurious results when we do this.
Metadata in media files
In media files, we can find all manner of interesting metadata. We may be able to find data on the setting used on the camera or software that created or has been used to manipulate the image, geographic location information, thumbnails of the original image, and quite a few other bits of information. Given that the format of the file is largely binary-encoded data, the human-readable strings in the file are relatively easy to parse, even with the naked eye. This makes the job particularly easy for tools such as strings, or even grep, for that matter.
If, for example, we wanted to search through a list of images in order to find those that contained a particular item of information, such as a particular model or serial number of a camera, we could very easily do this with a short bit of script in bash. Let’s take a look at what we can see in a JPEG file that was generated by a digital camera by running strings on it. In the case of the results shown in Figure 8.5, we got back some interesting bits.
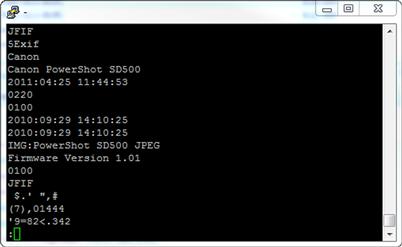
FIGURE 8.5 strings Output from a JPEG
This may or may not be the type of information we are after, but we can make use of another tool to squeeze a little more information out of the file. The metadata we have been discussing, as it specifically relates to media files (both images and audio files), is commonly referred to as Exchangeable Image File Format (EXIF) data. BackTrack 5, conveniently, ships with a tool designed specifically to read this data, and can give us considerably more information back than we can find with strings.
To run the tool, we just need to supply the name of the file, such as exiftool biopic.jpg. This should get us back a rather large quantity of information:
ExifTool Version Number : 7.89
File Name : biopic.jpg
Directory : .
File Size : 47 kB
File Modification Date/Time : 2011:04:25 10:44:55-06:00
File Type : JPEG
MIME Type : image/jpeg
JFIF Version : 1.01
Exif Byte Order : Little-endian (Intel, II)
Make : Canon
Camera Model Name : Canon PowerShot SD500
Orientation : Horizontal (normal)
X Resolution : 72
Y Resolution : 72
Resolution Unit : inches
Modify Date : 2011:04:25 11:44:53
Y Cb Cr Positioning : Centered
Exposure Time : 1/60
F Number : 3.5
Exif Version : 0220
Date/Time Original : 2010:09:29 14:10:25
Create Date : 2010:09:29 14:10:25
Components Configuration : Y, Cb, Cr, -
Compressed Bits Per Pixel : 5
Shutter Speed Value : 1/60
Aperture Value : 3.5
Max Aperture Value : 3.5
Flash : Auto, Fired, Red-eye reduction
Focal Length : 12.5 mm
Macro Mode : Normal
Self Timer : Off
Quality : Superfine
Canon Flash Mode : Red-eye reduction (Auto)
Continuous Drive : Single
Focus Mode : Single
Record Mode : JPEG
Canon Image Size : Large
Easy Mode : Full auto
Digital Zoom : None
Contrast : Normal
Saturation : Normal
Sharpness : 0
Camera ISO : Auto
Metering Mode : Evaluative
Focus Range : Auto
AF Point : Auto AF point selection
Canon Exposure Mode : Easy
Lens Type : Unknown (-1)
Long Focal : 23.1 mm
Short Focal : 7.7 mm
Focal Units : 1000/mm
Max Aperture : 3.6
Min Aperture : 9
Flash Bits : E-TTL, Built-in
Focus Continuous : Single
AE Setting : Normal AE
Zoom Source Width : 3072
Zoom Target Width : 3072
Spot Metering Mode : Center
Manual Flash Output : n/a
Focal Type : Zoom
Auto ISO : 283
Base ISO : 50
Measured EV : 0.38
Target Aperture : 3.6
Target Exposure Time : 1/60
Exposure Compensation : 0
White Balance : Auto
Slow Shutter : Off
Shot Number In Continuous Burst : 0
Optical Zoom Code : 3
Flash Guide Number : 2.59375
Flash Exposure Compensation : 0
Auto Exposure Bracketing : Off
AEB Bracket Value : 0
Control Mode : Camera Local Control
Focus Distance Upper : 0.99
Focus Distance Lower : 0
Bulb Duration : 0
Camera Type : Compact
Auto Rotate : None
ND Filter : Off
Self Timer 2 : 0
Flash Output : 45
Num AF Points : 9
Valid AF Points : 9
Canon Image Width : 3072
Canon Image Height : 2304
AF Image Width : 1536
AF Image Height : 230
AF Area Width : 276
AF Area Height : 41
AF Area X Positions : -276 0 276 -276 0 276 -276 0 276
AF Area Y Positions : -42 -42 -42 0 0 0 42 42 42
AF Points In Focus : 5
Primary AF Point : 5
Thumbnail Image Valid Area : 0 0 0 0
Canon Image Type : IMG:PowerShot SD500 JPEG
Canon Firmware Version : Firmware Version 1.01
File Number : 168-6876
Owner Name :
Canon Model ID : PowerShot SD500 / Digital IXUS 700 / IXY Digital 600
Date Stamp Mode : Off
My Color Mode : Off
User Comment :
Flashpix Version : 0100
Exif Image Width : 196
Exif Image Height : 274
Interoperability Index : R98 - DCF basic file (sRGB)
Interoperability Version : 0100
Related Image Width : 3072
Related Image Height : 2304
Focal Plane X Resolution : 10816.90141
Focal Plane Y Resolution : 10816.90141
Focal Plane Resolution Unit : inches
Sensing Method : One-chip color area
File Source : Digital Camera
Custom Rendered : Normal
Exposure Mode : Auto
Digital Zoom Ratio : 1
Scene Capture Type : Standard
Compression : JPEG (old-style)
Thumbnail Offset : 2366
Thumbnail Length : 4109
Image Width : 196
Image Height : 274
Encoding Process : Baseline DCT, Huffman coding
Bits Per Sample : 8
Color Components : 3
Y Cb Cr Sub Sampling : YCbCr4:2:0 (2 2)
Aperture : 3.5
Flash Exposure Compensation : 0
Drive Mode : Single-frame shooting
Flash Type : Built-In Flash
ISO : 141
Image Size : 196x274
Lens : 7.7 - 23.1 mm
Lens ID : Unknown 7-23mm
Red Eye Reduction : Off
Shooting Mode : Full auto
Shutter Curtain Sync : 1st-curtain sync
Shutter Speed : 1/60
Thumbnail Image : (Binary data 4109 bytes, use -b option to extract)
Focal Length : 12.5 mm
Lens : 7.7 - 23.1 mm
Light Value : 9.0
If this were taken on a device with GPS support, we would also see the information regarding the location where the file was created. On higher-end devices, we may see more information yet, including things such as network settings if the device was so equipped. This is one of those information overload areas, but we never know what might end up being useful.
Of course, since this is a command-line tool which has simply formatted text output, we could easily incorporate this into the scripts we discussed earlier in the chapter. This could potentially allow us to do something along the lines of searching for all image-file-formatted files (.jpg, .gif, .tif, etc.) and doing a quick search on them to pull out the bits of information in which we are interested. Having a capability like this can quickly give us potentially interesting information, perhaps including the locations where a particular person lives, works, and visits frequently, an item that might be handy to have as a basis for a social engineering attack.
Putting It All Together
Let’s take a look at what we can put together for a script to do some of the things we have discussed in this chapter. We’ve talked about pulling information from Google, using Web automation, and searching files for metadata, so we’ll get that all together in one package.
#!/usr/bin/perl
use WWW::Mechanize;
$site = @ARGV[0];
$filetype = @ARGV[1];
$searchurl ="http://www.google.com/search?hl=en&q=site%3A$site+filetype%3A$filetype";
$mech = WWW::Mechanize->new();
$mech->agent_alias(’Windows Mozilla’);
$mech->get($searchurl);
@links = $mech->find_all_links(url_regex => qr/d+.+.$filetype$/);
for $link (@links) {
$url = $link->url_abs;
$filename = $url;
$filename =~ s[.∗/][];
print "downloading $url ";
$mech->get($url, ’:content_file’ => $filename);
}
@files = glob("∗.$filetype");
for $file (@files){
print "running strings against $file ";
’echo -e "∗∗∗∗∗∗∗∗∗∗∗∗∗∗∗∗∗∗∗∗∗∗∗∗∗∗ $filename ∗∗∗∗∗∗∗∗∗∗∗∗∗∗∗∗∗∗∗∗∗∗∗∗∗∗ " >> stringsreport.txt’;
’strings $file >> stringsreport.txt’;
if ($filetype =~ /pdf/i){
print "running exiftool against $file ";
’echo -e "∗∗∗∗∗∗∗∗∗∗∗∗∗∗∗∗∗∗∗∗∗∗∗∗∗∗ $filename ∗∗∗∗∗∗∗∗∗∗∗∗∗∗∗∗∗∗∗∗∗∗∗∗∗∗ " >> exifreport.txt’;
’exiftool $file >> exifreport.txt’;
}
Here we have combined some of the things we put together throughout the chapter. Down to about line 20, we have the same script we used earlier to download files from Google. The bits at the end will be working with those files to pull the metadata from them.
One of the first new pieces we have to look at is the line @files = glob("∗.$filetype");. This line makes use of the glob function in Perl in order to return us a list of files that match the extension we have stored in $filetype, and place that list of files in the array @files. Now that we have the list of files, we can do a little work with it, similarly to the bash scripting with strings we did earlier in the chapter. This work is all done inside our for loop.
Inside the loop, we iterate through the list of files in @files and, very much as we did in our bash script, we run strings against each of them. Here we are using backticks (’) in order to run the command we need and to echo our text to the report file. We also have an if statement inside the loop to check for pdf being the string in $filetype, running exiftool against the file in $file (yes, exiftool supports PDFs), and generating a separate report for the EXIF data.
We can run the tool as ./filegrubber.plsyngress.comppt and we will get back the resultant files from Google, as well as the output from strings in stringsreport.txt. If we run it as ./filegrubber.pl elsevier.com pdf, we will also engage the additional logic to run exiftool against the files, so we should end up with the files stringsreport.txt and exifreport.txt.
We can improve on this script in several areas:
• Presently, we will only download the first page of results from Google. We can use WWW::Mechanize to move through all the results pages, if we so desire. We may also want to take in the number of documents we want to pull from the Google results as an argument from the command line.
• We may want to search for multiple file types at once, such as PDF, DOC, and XLS. We should be able to handle these through additional arguments and a bit more looping to work through each file type.
• We have very limited usage for exiftool presently. However, we could expand the regex in our if statement to include more of the file types that exiftool can handle (quite a lot, actually).
• We are presently dumping our downloaded files in the directory from which the script is being run. It would be nice to put these in their own directory, or perhaps in /tmp.
Our example here works reasonably well and serves to illustrate some of the things we can do with the metadata in various files and how we might go about finding it. For a fully developed example of an application that does some of these same things and has similar functionality, be sure to check out the tool MetaGooFil4 by Christian Martorella. MetaGooFil is very good at pulling interesting information such as usernames and file paths out of documents, and scales rather well to do this over large bodies of documents. MetaGooFil is written in Python, which we discussed in Chapter 2, so those interested in seeing exactly how it works can dig into the source code as well.
Summary
Information gathering can potentially be of great use to us in the course of a penetration test. It can enable us to collect information on the people, system, and environments which are our targets and, based on this information, to attack them. There are many potential uses for the information we have harvested, but two of the primary purposes to which we might put such information are in social engineering efforts and in footprinting the target or targets of our attack.
One of the great potential sources of information we have access to is Google. Searches conducted in Google’s massive indexes can return us specific information on people, equipment, documents and files from which to harvest metadata, and all manner of other interesting information, provided we know how to conduct these searches properly. Additionally, we can apply automation to our efforts to ease this task.
As we discussed in Chapter 3, Perl is a wonderful tool to use for parsing text. We can also use Perl to automate the navigation and search of Web pages or applications, saving ourselves a great deal of work in the process. We can do quite a bit with the various Web-oriented Perl modules to automate moving through, parsing, and interacting with the Web.
The metadata, or data about data, that is attached to nearly all documents, files, visual media, and other such structures intended for digital storage of information, can be invaluable to us in the course of a penetration test. Metadata can provide us with usernames, file system paths, network server names and paths, deleted sensitive data, and all manner of other such interesting items. Such information can often be easily recovered from documents through the use of utilities such as strings, or through the use of similar searching tools.
ENDNOTES
1. Kunder M de. The size of the World Wide Web. WorldWideWebSize.com. [Online] 2011. [Cited: April 27, 2011.] www.worldwidewebsize.com/.
2. Offensive Security. Google hacking database. Exploit Database. [Online] 2011. [Cited: April 12, 2011.] www.exploit-db.com/google-dorks/.
3. Lester A. Andy Lester. cpan.org. [Online] 2011. [Cited: April 29, 2011.] http://search.cpan.org/~petdance/.