
Chapter 5. Extending HBase with coprocessors
- Coprocessors and how to use them effectively
- Types of coprocessors: observer and endpoint
- How to configure and validate coprocessor installation on your cluster
Everything you’ve seen of HBase as an online system is centered on data access. The five HBase commands introduced in chapter 2 are exclusively for reading or writing data. For the HBase cluster, the most computationally expensive portion of any of those operations occurs when applying server-side filters on Scan results. Even so, this computation is extremely specific to accessing the data. You can use custom filters to push application logic onto the cluster, but filters are constrained to the context of a single row. To perform computation over your data in HBase, you’re forced to rely on Hadoop MapReduce or on custom client code that will read, modify, and write data back to HBase.
HBase coprocessors are an addition to our data-manipulation toolset that were introduced as a feature in HBase in the 0.92.0 release. With the introduction of coprocessors, we can push arbitrary computation out to the HBase nodes hosting our data. This code is run in parallel across all the RegionServers. This transforms an HBase cluster from horizontally scalable storage to a highly capable, distributed, data-storage and -processing system.
Warning
Coprocessors are a brand-new feature in HBase and are untested in production deployments. Their integration with HBase internals is extremely invasive. Think of them as akin to Linux kernel modules or RDBMS stored procedures implemented in C. Writing an observer coprocessor is tricky to get right, and such a coprocessor can be extremely difficult to debug when running at scale. Unlike client-side bugs, a buggy coprocessor will take down your cluster. The HBase community is still working out exactly how to use coprocessors effectively.[1] Caution is advised.
1 The HBase blog has an excellent overview of coprocessors that is appended periodically with new details of current and future work: Mingjie Lai, Eugene Koontz, and Andrew Purtell, “Coprocessor Introduction,” http://mng.bz/TzuY.
In this chapter, we’ll introduce you to the two types of coprocessors and show examples of how to use each one. We hope this will open your mind to the possibilities so you’ll be able to use coprocessors in your own applications. You never know: maybe you can be the one to write the blog post describing the canonical coprocessor example! Please make it more interesting than WordCount.
As with much of the rest of the Hadoop ecosystem, coprocessors come to the open source community by way of Google. The idea for HBase coprocessors came from two slides[2] in a talk presented in 2009. Coprocessors are cited as crucial for a number of horizontally scalable, low-latency operations. These operations include machine translation, full-text queries, and scalable metadata management.
2 Jeff Dean, “Designs, Lessons and Advice from Building Large Distributed Systems,” LADIS ’09, http://mng.bz/U2DB, pages 66-67.
5.1. The two kinds of coprocessors
Coprocessors come in two flavors: observers and endpoints. Each serves a different purpose and is implemented according to its own API. Observers allow the cluster to behave differently during normal client operations. Endpoints allow you to extend the cluster’s capabilities, exposing new operations to client applications.
5.1.1. Observer coprocessors
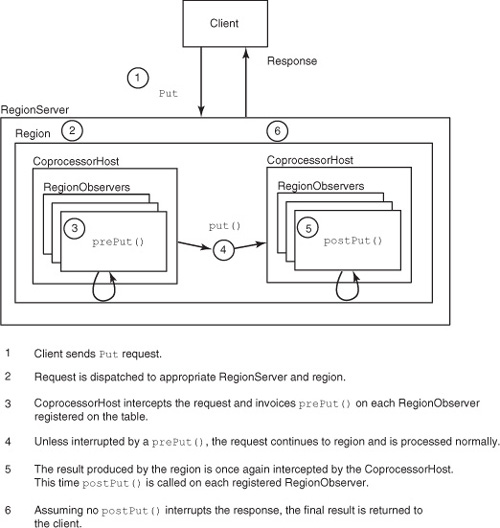
To understand observer coprocessors, it helps to understand the lifecycle of a request. A request starts with the client, creating a request object and invoking the appropriate method on the HTableInterface implementation. For example, a Put instance is created and the put() method called. The HBase client resolves the RegionServer that should receive the Put based on the rowkey and makes the RPC call. The RegionServer receives the Put and delegates it to the appropriate region. The region handles the request and constructs a response, which is passed back to the client. Figure 5.1 illustrates this path.
Figure 5.1. The lifecycle of a request. A Put request dispatched from the client results directly in a put() call on the region.

Observers sit between the client and HBase, modifying data access as it happens. You can run an observer after every Get command, modifying the result returned to the client. Or you can run an observer after a Put command, performing manipulation on the data that a client writes to HBase before it’s persisted. You can think of observer coprocessors as analogous to triggers from a relational database or to advice from aspect-oriented programming (AOP). Multiple observers can be registered simultaneously; they’re executed in priority order. The CoprocessorHost class manages observer registration and execution on behalf of the region. Figure 5.2 illustrates a RegionObserver intercepting a Put command.
Figure 5.2. A RegionObserver in the wild. Instead of calling put() directly, the region calls prePut() and postPut() on all registered RegionObservers, one after the next. Each has a chance to modify or interrupt the operation before a response is returned to the client.
Bear in mind that coprocessors are executed in the same process space as the RegionServer. This means code in a coprocessor has full rights and privileges of the HBase user process on the server. It also means a buggy coprocessor can potentially crash the process. No isolation guarantees are in place at this point. You can follow along with the efforts to resolve this potential issue by tracking the JIRA ticket.[3]
3 “[Coprocessors] Generic external process host,” Apache Software Foundation, http://mng.bz/9uOy.
As of HBase version 0.92, three kinds of observers are available:
- RegionObserver—This observer hooks into the stages of data access and manipulation. All of the standard data-manipulation commands can be intercepted with both pre- and post-hooks. It also exposes pre- and post-hooks for internal region operations such as flushing the MemStore and splitting the region. The RegionObserver runs on the region; thus there can be multiple RegionObservers running on the same RegionServer. Register RegionObservers through either schema updates or the hbase.coprocessor.region.classes configuration property.
- WALObserver—The write-ahead log (WAL) also supports an observer coprocessor. The only available hooks are pre- and post-WAL write events. Unlike the RegionObserver, WALObservers run in the context of a RegionServer. Register WALObservers through either schema updates or the hbase.coprocessor.wal.classes configuration property.
- MasterObserver—For hooking into DDL events, such as table creation or schema modifications, HBase provides the MasterObserver. For example, you can use the postDeleteTable() hook to also delete secondary indexes when the primary table is deleted. This observer runs on the Master node. Register MasterObservers through the hbase.coprocessor.master.classes configuration property.
5.1.2. Endpoint Coprocessors
Endpoints are a generic extension to HBase. When an endpoint is installed on your cluster, it extends the HBase RPC protocol, exposing new methods to client applications. Just like observers, endpoints execute on the RegionServers, right next to your data.
Endpoint coprocessors are similar to stored procedures in other database engines. From the client’s perspective, invoking an endpoint coprocessor is similar to invoking any other HBase command, except that the functionality is based on the custom code that defines the coprocessor. The request object is created, it’s passed to the HTableInterface to execute on the cluster, and the results are collected. This arbitrary code can do anything for which you can write code in Java.
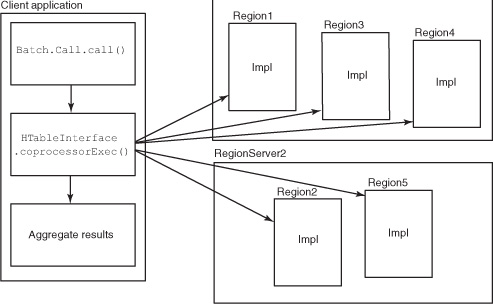
At their most basic, endpoints can be used to implement scatter-gather algorithms. HBase ships with an Aggregate example: an endpoint that computes simple aggregates like sum and average. AggregateImplementation instances calculate partial results on the nodes hosting data, and the AggregationClient computes the final result in the client process. Figure 5.3 illustrates the Aggregation example in action.
Figure 5.3. An endpoint coprocessor at work. The regions deploy an implementation of the interface consumed by the client. An instance of Batch.Call encapsulates method invocation, and the coprocessorExec() method handles distributed invocation. After each request completes, results are returned to the client and aggregated.
We’ll show you how to implement both kinds of coprocessors and demonstrate activation of these implementations on your HBase installation.
5.2. Implementing an observer
You can use coprocessors as part of TwitBase. Think back to the follows relationship table you created in the last chapter. Instead of manually maintaining the secondary index in followedBy, let’s write an observer to maintain that relationship.
This example shows how you might maintain a secondary index using coprocessors. In practice, we don’t recommend this approach when throughput is a consideration. Updating a secondary index likely requires communication with a region hosted on a different RegionServer. That communication is additional networking overhead and will impact cluster performance.
That said, if your application doesn’t require maximum throughput, this is a pretty simple way to offload that work. Under such a scenario, you can reduce client latency by making the postPut operation asynchronous, removing it from the critical path of the write. Then you can use a MapReduce job to rebuild the index periodically, catching records that fell through the cracks.
5.2.1. Modifying the schema
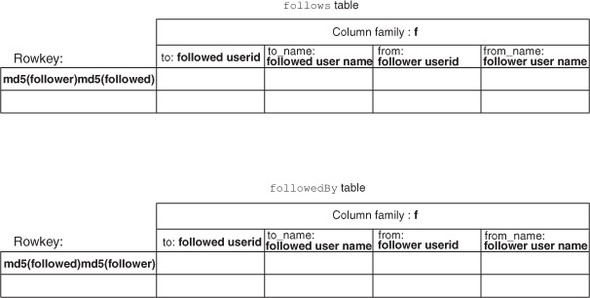
To accomplish this goal, you’ll implement a RegionObserver and override its post-Put() method. Inside of postPut(), the only relevant context you’ll have is the Put instance sent by the client. That means you need to slightly modify the follows and followedBy schema you defined in the previous chapter. Why’s that? Start by studying the entity diagram of the follows and followedBy tables, illustrated in figure 5.4.
Figure 5.4. Schema for follows and followedBy tables as optimized for space and I/O efficiency. The follows table stores half of a relation entity indexed according to the follower participant. The followedBy table stores the other half of the same relation entity indexed according to the followed participant.

Writing a new record to the follows table requires the cell {id_followed:name_followed}. That’s the only information contained in the Put instance available to the observer. Writing to the followedBy table requires the cell {id_follower:name_follower}. This portion of the relation isn’t available. In order to implement the observer, a single Put instance to the follows table must contain the entire relation.
Because a Put to the follows table now must contain the entire relation entity, you can store the same entity in the followedBy table. That way both tables have a complete entity stored per row. The updated entity diagram is illustrated in figure 5.5.
Figure 5.5. Schema for the updated follows and followedBy tables. Now both tables store a full relation entity in each row.
With the full context available in the Put, you can go about implementing the observer.
5.2.2. Starting with the Base
You’ll implement your own FollowsObserver to maintain these relationships. Doing so requires extending BaseRegionObserver and overriding the postPut() method:
public class FollowsObserver extends BaseRegionObserver {

  @Override
  public void postPut(
      final ObserverContext<RegionCoprocessorEnvironment> e,
      final Put put,
      final WALEdit edit,
      final boolean writeToWAL)
    throws IOException {
    ... // implementation
  }
}
The FollowsObserver keeps track of Puts against the follows table, watching for new follower relationship entries. When a new entry is found, it constructs the inversion of that relationship and writes it back to the followedBy table. The first step is detecting the correct context. Check the column family name used in the incoming Put request:
if (!put.getFamilyMap().containsKey("follows"))
  return;
This check is necessary because coprocessors installed via configuration in hbasesite.xml are applied to all tables. For your purpose, you only want to operate on the follows table. This check verifies that you’re not operating on some other table. Find out which table context the observer is executing under by inspecting the RegionCoprocessorEnvironment object. It holds a reference to HRegion and associated HRegionInfo:
byte[] table
  = e.getEnvironment().getRegion().getRegionInfo().getTableName();
if (!Bytes.equals(table, Bytes.toBytes("follows")))
  return;
If this isn’t a Put you’re interested in, be sure to return right away. The coprocessor is executing as part of the path of data flow. Time spent here is time the client spends waiting for a response!
With the correct condition detected, it’s time to do some work. Step two is extracting the relevant components from the incoming Put command. You’ll use these components as parameters to creating the inverted relation. To do that, reach into the Put instance and retrieve the parameters you need using the method Put.get(byte[] family, byte[] qualifier). It returns a list of KeyValues matching the parameters requested. You know the first KeyValue is the one you’re interested in because the Put contains only a single version for this cell:
KeyValue kv = put.get(Bytes.toBytes('f'), Bytes.toBytes("from")).get(0);
String from = Bytes.toString(kv.getValue());
kv = put.get(Bytes.toBytes('f'), Bytes.toBytes("to")).get(0);
String to = Bytes.toString(kv.getValue());
The final step is writing the new relation back to HBase. You can reuse the connection information to operate on the same table as the original. Remember, the new row is likely hosted on a different RegionServer, so a network operation is often required:
![]()
Normally you wouldn’t want to mix client and server code as you’ve done here. You reuse the RelationsDAO to keep the focus on adding a followed relation rather than constructing that Put.
In this example, you’re spinning up a new HBase client and interacting with the cluster—from within the cluster! That is to say, a client Put against the follows table results in a client Put against the followed table. An observer implemented thoughtlessly could result in yet another client Put against the followed table, and so on. Such code would wreak havoc on a perfectly innocent HBase cluster. In this case, the base case is verified by checking the direction of the relationship. Be mindful of these kinds of scenarios when implementing your own observers.
Writing back to HBase using the RelationsDAO requires an HTablePool instance. You can use an instance variable to manage it by hooking into the coprocessor lifecycle. The start() and stop() methods are provided for this purpose, although their documentation isn’t terribly verbose:
@Override
public void start(CoprocessorEnvironment env) throws IOException {
  pool = new HTablePool(env.getConfiguration(), Integer.MAX_VALUE);
}

@Override
public void stop(CoprocessorEnvironment env) throws IOException {
  pool.close();
}
The complete FollowsObserver is shown in the following listing.
Listing 5.1. FollowsObserver


5.2.3. Installing your observer
It’s time to test it. There are two methods of installing an observer coprocessor: a table schema change or through configuration in hbase-site.xml. Unlike the configuration method, installation via schema change can be done without restarting HBase, but it does require taking the table offline temporarily.
Let’s try the schema update method first. To install FollowsObserver, you need to package it in a JAR. Do so the same way you did before:
$ mvn package
...
[INFO] ------------------------------------------------------------------
[INFO] BUILD SUCCESS
[INFO] ------------------------------------------------------------------
...
Now open the HBase shell and install the observer:
$ hbase shell

HBase Shell; enter 'help<RETURN>' for list of supported commands.
Type "exit<RETURN>" to leave the HBase Shell
Version 0.92.0, r1231986, Mon Jan 16 13:16:35 UTC 2012

hbase(main):001:0> disable 'follows'
0 row(s) in 7.0560 seconds

hbase(main):002:0> alter 'follows', METHOD => 'table_att',
'coprocessor'=>'file:///Users/ndimiduk/repos/hbaseia-
twitbase/target/twitbase-1.0.0.jar
|HBaseIA.TwitBase.coprocessors.FollowsObserver|1001|'
Updating all regions with the new schema...
1/1 regions updated.
Done.
0 row(s) in 1.0770 seconds

hbase(main):003:0> enable 'follows'
0 row(s) in 2.0760 seconds
Disabling the table take all of its regions offline. This allows the process classpath to be updated, a requirement of the installation process. The alter command updates the table schema to be aware of the new coprocessor. This online installation is only available to observer coprocessors. The coprocessor attribute parameters are delimited by the | character. The first parameter is the path to the JAR containing your coprocessor implementation. The second parameter is the coprocessor implementation class. The third parameter is the coprocessor priority. When you load multiple observers, they’re executed in priority order. For any given invocation, a previous coprocessor has the opportunity to interrupt the execution chain, preventing later coprocessors from executing. The final parameter, omitted in this example, is a list of arguments passed to the coprocessor implementation’s constructor.
If all went well, you can describe the follows table and confirm the presence of your new coprocessor:
hbase(main):004:0> describe 'follows'
DESCRIPTION                                      ENABLED
{NAME => 'follows', coprocessor$1 => 'file:///U true
 sers/ndimiduk/repos/hbaseia-twitbase/target/twi
 tbase-1.0.0.jar|HBaseIA.TwitBase.coprocessors.F
 ollowsObserver|1001|', FAMILIES => [{NAME => 'f
 ', BLOOMFILTER => 'NONE', REPLICATION_SCOPE =>
 '0', VERSIONS => '1', COMPRESSION => 'NONE', MI
 N_VERSIONS => '0', TTL => '2147483647', BLOCKSI
 ZE => '65536', IN_MEMORY => 'false', BLOCKCACHE
  => 'true'}]}
1 row(s) in 0.0330 seconds
The next time you add a new record to the follows table, the FollowsObserver coprocessor will kick in, updating the inverted index for you. Verify by inserting a relationship:
$ java -cp target/twitbase-1.0.0.jar
  HBaseIA.TwitBase.RelationsTool follows TheRealMT SirDoyle
Successfully added relationship
$ java -cp target/twitbase-1.0.0.jar
  HBaseIA.TwitBase.RelationsTool list follows TheRealMT
<Relation: TheRealMT -> SirDoyle>
$ java -cp target/twitbase-1.0.0.jar
  HBaseIA.TwitBase.RelationsTool list followedBy SirDoyle
<Relation: SirDoyle <- TheRealMT>
When installing coprocessors into a schema, be careful. The coprocessor specification isn’t validated until runtime. HBase won’t notice any errors, such as extra whitespace or an invalid JAR path. You won’t know the installation failed until the next client operation when your observer doesn’t run. We suggest you smoke-test your coprocessor deployment before you assume everything is in place.
In this example, you’ve installed the coprocessor JAR from a path on the local file system. This may be simple if your cluster is managed with a tool like Chef (www.opscode.com/chef/) or Puppet (http://puppetlabs.com). HBase can also load JARs from the HDFS. In practice, the HDFS deployment model is much easier than dealing with copying your application JARs to the individual nodes.
5.2.4. Other installation options
Observer coprocessors can also be installed via configuration. Doing so requires that the observer classes be available in the HBase classpath. In this case, the observer is registered for all tables, so you must take care in intercepting operations within the intended context. Configuration is the primary mechanism for registering instances of the MasterObserver coprocessor.
Observers registered via the hbase-site.xml file won’t show up when you describe a table in the shell, as you did previously. The only method available to validate that the observer is registered is to exercise it, preferably via an automated post-deploy test of some kind. Don’t say we didn’t warn you.
If you want to register two MasterObserver coprocessors, you can do so by adding this property to your hbase-site.xml file:
<property>
  <name>hbase.coprocessor.master.classes</name>
  <value>foo.TableCreationObserver,foo.RegionMoverObserver</value>
</property>
This snippet registers the class TableCreationObserver as the highest priority observer, followed by RegionMoverObserver.
5.3. Implementing an endpoint
Tracking these relationships is important for maintaining the connected network of people using TwitBase. We hope this digital connectivity between people allows for real human relationships to flourish. Realistically, though, the only reason to keep track of such things is to see if you have more followers than the other guy. A TwitBase user wants to know exactly how many followers they have right now. In this case, waiting for a MapReduce job to complete is unacceptable. Even the overhead of all the data moving over the wire during a standard scan won’t do. You’ll build this feature into TwitBase using an endpoint coprocessor.
For an individual user, you can implement an on-demand follower count feature using a Scan. Doing so is simple enough. Define the scan range, and count the results:

The scan approach works just fine. Why would you want to make this any more complicated? It could be that every millisecond matters. This scan may be in your application’s critical path. Every Result returned is taking up bytes over the wire—even if you omit all data, you still have rowkeys to transmit. By implementing this scan as an endpoint, you keep all that data on the HBase nodes. The only data transmitted is the sum.
5.3.1. Defining an interface for the endpoint
To implement followers count as an endpoint, you’ll start with a new interface. The interface serves as the contract for extending the RPC protocol and must match on both client and server:
public interface RelationCountProtocol extends CoprocessorProtocol {
  public long followedByCount(String userId) throws IOException;
}
Here you define the RelationCountProtocol, which exposes the single method followedByCount(). This is the building block on which both the client and server code can be written. Let’s start with the server.
5.3.2. Implementing the endpoint server
Creating a scanner in the region looks a little different from the client API. Unlike a scan executed via the client API, this scan is reading over data on the machine executing the scan. This object is called the InternalScanner. InternalScanners are identical in concept to Scanners in the client API. The difference is that they reside in the RegionServer and interact with the storage and caching layers directly. Remember, implementing an endpoint is programming the RegionServer directly.
Create an instance of InternalScanner like this:
byte[] startkey = Md5Utils.md5sum(userId);
Scan scan = new Scan(startkey);
scan.setFilter(new PrefixFilter(startkey));
scan.addColumn(Bytes.toBytes('f'), Bytes.toBytes("from"));
scan.setMaxVersions(1);

RegionCoprocessorEnvironment env
  = (RegionCoprocessorEnvironment)getEnvironment();
InternalScanner scanner = env.getRegion().getScanner(scan);
InternalScanners are specific to the region where the coprocessor is running. Access that region via the getRegion() helper method provided by the calling environment. That environment is exposed via getEnvironment() on BaseEndpointCoprocessor. In this case, you can use local buffers instead of copying bytes over the wire. It’s much faster, but the interface is a little different. Read the scan results:
long sum = 0;
List<KeyValue> results = new ArrayList<KeyValue>();
boolean hasMore = false;
do {
  hasMore = scanner.next(results);
  sum += results.size();
  results.clear();
} while (hasMore);
scanner.close();
return sum;
Unfortunately, InternalScanner doesn’t implement the usual java.util.Iterator interface. To make sure you receive all batches of results, use a do-while form as you see here, rather than a standard while loop. The alternative is to duplicate the logic within your loop: once to read the first page, and again in the normal while form. This style of iteration is more common in C programs.
The results returned by InternalScanner are raw KeyValue objects. This is a notable difference from scanners in the client API. Those scanners return Result instances that represent an entire row. InternalScanners iterate over KeyValue instances corresponding to individual cells. By carefully limiting the data returned by the scan, you guarantee that a single KeyValue represents a single row in the desired result set. It also limits the amount of data that must be read off disk.
Putting it all together, the complete RelationCountImpl is shown next.
Listing 5.2. RelationCountImpl.java: server half of implementing an endpoint

5.3.3. Implement the endpoint client
With the server portion of your custom endpoint in place, it’s time to build the client. You’ll put this code in the existing RelationsDAO you built previously. As is clear by the interface definition, the server portion expects a userId to query. But the table still needs to know a key range over which the coprocessor will be invoked. This range is translated into a set of regions to call it against and calculated on the client side. As it happens, that code is identical to the client-side scanner range calculation:

The fun begins in aggregating results. Executing the endpoint is a three-step process. Step one is to define a Call object. This instance does the work of invoking your specific endpoint; the details of your RelationCountProtocol are contained entirely within. You can define an anonymous Call instance inline:
Batch.Call<RelationCountProtocol, Long> callable =
  new Batch.Call<RelationCountProtocol, Long>() {
    @Override
    public Long call(RelationCountProtocol instance)
        throws IOException {
      return instance.followedByCount(userId);
    }
};
The second step is to call the endpoint. This is done directly from the HTableInterface:
HTableInterface followers = pool.getTable(TABLE_NAME);
Map<byte[], Long> results =
  followers.coprocessorExec(
    RelationCountProtocol.class,
    startKey,
    endKey,
    callable);
When the client code executes the coprocessorExec() method, the HBase client sends the invocation to the appropriate RegionServers based on the startKey and endKey. In this case, it’s splitting the scan range according to region assignments and sending the invocation only to the relevant nodes.
The final step in executing an endpoint is aggregating the results. Your client receives a response for each invoked RegionServer and must sum the results. Loop over the region name to value pairs and sum the results:
long sum = 0;
for(Map.Entry<byte[], Long> e : results.entrySet()) {
  sum += e.getValue().longValue();
}
Thus you have a simple scatter-gather approach to computing. For this example, the client-side scan is about as fast as implementing the scan in an endpoint because you’re working with a small amount of data. But the network I/O consumed by the client-side scan increases linearly with the number of rows scanned. When the scan is pushed to the endpoint, you save on the network I/O by not having to return the scan results to the client. The other thing is that the endpoint coprocessor executes in parallel on all regions that contain the relevant rows. A client-side scan is likely a single-threaded scan. Making it multithreaded and distributed over regions brings in the complexity of managing a distributed application, which we talked about earlier.
In the long run, pushing the scan down into the RegionServers with an endpoint introduces a little deployment complexity but is far faster than a traditional client-side scan.
The client code in its entirety is shown in this listing.
Listing 5.3. Client portion of the endpoint; snippet from RelationsDAO.java

5.3.4. Deploying the endpoint server
Now that the server portion is ready, let’s deploy it. Unlike the observer example, endpoints must be deployed via configuration only. You need to edit two files, both of which are found in the $HBASE_HOME/conf directory. The first is hbase-site.xml. Add RelationCountImpl to the hbase.coprocessor.region.classes property:
<property>
  <name>hbase.coprocessor.region.classes</name>
  <value>HBaseIA.TwitBase.coprocessors.RelationCountImpl</value>
</property>
You also need to ensure that HBase can find your new class. That means updating hbase-env.sh as well. Add your application JAR to the HBase classpath:
export HBASE_CLASSPATH=/path/to/hbaseia-twitbase/target/twitbase-1.0.0.jar
5.3.5. Try it!
Does it work? Let’s find out. Rebuild the code, and restart HBase so your new configuration will take effect. You already had one relationship stored; add another. You only need to define it in one direction; your observer is still registered and handles updating the index:
$ java -cp target/twitbase-1.0.0.jar
  HBaseIA.TwitBase.RelationsTool follows GrandpaD SirDoyle
Successfully added relationship
Now verify that the relationships are in place, and hit your endpoint:
$ java -cp target/twitbase-1.0.0.jar
  HBaseIA.TwitBase.RelationsTool list followedBy SirDoyle
<Relation: SirDoyle <- TheRealMT>
<Relation: SirDoyle <- GrandpaD>
$ java -cp target/twitbase-1.0.0.jar
  HBaseIA.TwitBase.RelationsTool followedByCoproc SirDoyle
SirDoyle has 2 followers.
It works! Not only is your observer updating the inversion view of the followers relationship, but you can have follower counts in record time.
5.4. Summary
The coprocessor API provides a powerful extension point for HBase. Observers give you fine-grained control over the data pipeline. Endpoints allow you to build custom APIs into HBase. Coprocessors are relatively young, and users are still figuring out how to use the feature. They’re also no substitute for a well-designed table schema. Still, coprocessors are a flexible tool for your toolbox and may be just what the doctor ordered to get you out of a bind. The only way to find out is to build an application!