
Chapter 19. Azure containers
Containers, Docker, and Kubernetes have gained a huge following in a few short years. In the same way that server virtualization started to change how IT departments ran their datacenters in the mid-2000s, modern container tools and orchestrators are now shaking up how we build and run applications. There’s nothing that inherently connects the growth of containers with cloud computing, but when combined, they provide a great way to develop applications with a cloud-native approach.
Entire books have been written on Docker and Kubernetes, but let’s go on a whirlwind introduction and see how you can quickly run containers in Azure. There’s a powerful suite of Azure services dedicated to containers that aligns more with the PaaS approach. You can focus on how to build and run your applications, rather than how to manage the container infrastructure, orchestration, and cluster components. In this chapter, we examine what containers are, how Docker got involved, and what Kubernetes can do for you. To see how to quickly run either a single container instance or multiple container instances in a cluster, we explore Azure Container Instances (ACI) and Azure Kubernetes Service (AKS).
19.1. What are containers?
There’s been a huge wave of interest and adoption around containers over the last few years, and I’d be impressed if you haven’t at least heard of one company that has led this charge: Docker. But what, exactly, is a container, and what does Docker have to do with it?
First, let’s discuss a traditional virtualization host that runs VMs. Figure 19.1 is like the diagram we looked at back in chapter 1, where each VM has its own virtual hardware and guest OS.
Figure 19.1. With a traditional VM infrastructure, the hypervisor on each virtualization host provides a layer of isolation by providing each VM with its own set of virtual hardware devices, such as a virtual CPU, virtual RAM, and virtual NICs. The VM installs a guest operating system, such as Ubuntu Linux or Windows Server, which can use this virtual hardware. Finally, you install your application and any required libraries. This level of isolation makes VMs very secure but adds a layer of overhead in terms of compute resources, storage, and startup times.

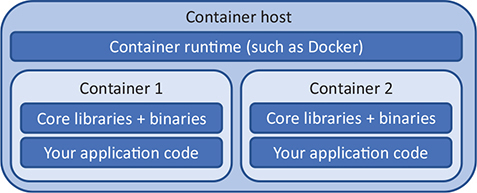
A container removes the virtual hardware and guest OS. All that’s included in a container are the core applications and libraries required to run your app, as shown in figure 19.2.
Figure 19.2. A container contains only the core libraries, binaries, and application code required to run an app. The container is lightweight and portable, because it removes the guest OS and virtual hardware layer, which also reduces the on-disk size of the container and startup times.
Many VMs can run on a single hypervisor, each VM with its own virtual guest OS, virtual hardware, and application stack. The hypervisor manages requests from the virtual hardware of each VM, schedules the allocation and sharing of those physical hardware resources, and enforces the security and isolation of each VM. The work of the hypervisor is shown in figure 19.3.
Figure 19.3. In a traditional VM host, the hypervisor provides the scheduling of requests from the virtual hardware in each VM onto the underlying physical hardware and infrastructure. The hypervisor typically has no awareness of what specific instructions the guest OS is scheduling on the physical CPU time, only that CPU time is required.

Multiple containers can also run on a single host. The container host receives the various system calls from each container and schedules the allocation and sharing of those requests across a shared base kernel, OS, and hardware resources. Containers provide a logical isolation of application processes. The work of the container runtime is shown in figure 19.4.
Figure 19.4. Containers share a common guest OS and kernel. The container runtime handles the requests from the containers to the shared kernel. Each container runs in an isolated user space, and some additional security features protect containers from each other.

Containers are typically much more lightweight than VMs. Containers can start up quicker than VMs, often in a matter of seconds rather than minutes. The size of a container image is typically only tens or hundreds of MBs, compared to many tens of GBs for VMs. There are still security boundaries and controls in place, but it’s important to remember that each container technically shares the same kernel as other containers on the same host.
It takes a few minutes to create an Azure Kubernetes Services cluster for use in the upcoming exercises, so complete the following steps and then continue reading the chapter.
1. Open the Azure portal, and select the Cloud Shell icon from the top menu.
2. Create a resource group. Provide a name, such as azuremolchapter19, and a location, such as eastus. Region availability of Azure Kubernetes Service may vary, so pick a major region such as eastus or westeurope. For an up-to-date list of region availability, see https://azure.microsoft.com/regions/services:
az group create --name azuremolchapter19 --location westeurope
3. To create a Kubernetes cluster, all you need to specify is --node-count. In this example, create a two-node cluster:
az aks create
--resource-group azuremolchapter19
--name azuremol
--node-count 2
--generate-ssh-keys
--no-wait
Why do you also generate SSH keys? Each node is a VM that has some additional components installed. These components include a container runtime, such as Docker, and some core Kubernetes components, such as the kubelet. The final --no-wait parameter returns control to the Cloud Shell while the rest of your cluster is created. Keep reading while the cluster is deployed.
Docker joined the container party with a set of tools and standard formats that defined how to build and run a container. Docker builds on top of existing Linux and Windows kernel-level features to provide a portable, consistent container experience across platforms. A developer can build a Docker container on their laptop that runs macOS, validate and test their app, and then run the exact Docker container, without modification, in a more traditional Linux or Windows-based server cluster on-premises or in Azure. All the required application binaries, libraries, and configuration files are bundled as part of the container, so the underlying host OS doesn’t become a design factor or constraint.
The importance of Docker shouldn’t be missed here. The terms container and Docker are often used interchangeably, although that’s not technically accurate. Docker is a set of tools that helps build and run containers in a consistent, reliable, and portable manner. The ease of using these tools led to rapid adoption and brought the underlying container technology that had been around in one shape or another for over a decade into the mainstream. Developers embraced containers and the Docker platform, and IT departments have had to play catch-up ever since.
Docker participates in the Open Container Initiative. The format and specifications that Docker defined for how a container should be packaged and run were some of the founding principles for this project. The company’s work has continued and has been built upon by others. Large contributors in the container space include IBM and Red Hat, contributing some of the core designs and code that powers the current container platforms. The Open Container Initiative and design format for container packaging and runtimes is important because it lets each vendor layer its own tools on top of the common formats, allowing you to move the underlying container between platforms and have the same core experience.
19.1.1. The microservices approach to applications
If containers offer a concept of isolation similar to VMs, can you run the same kind of workloads you do in a VM? Well, yes and no. Just because you can do something doesn’t necessarily mean that you should! Containers can be used to run whatever workloads you’re comfortable with, and there are benefits in terms of portability and orchestration features that we examine later in the chapter. To maximize the benefits of containers and set yourself up for success, take the opportunity to adopt a slightly different mental model when you start work with containers. Figure 19.5 compares the traditional application model with a microservices approach.
Figure 19.5. In a traditional monolithic application, the entire application runs as a single application. There may be various components within the application, but it runs from a single install and is patched and updated as a single instance. With microservices, each component is broken down into its own application service and unit of execution. Each component can be updated, patched, and scaled independently of the others.

A standard VM includes a full guest OS install, such as Ubuntu or Windows Server. This base OS install includes hundreds of components, libraries, and tools. You then install more libraries and applications, such as for the NGINX web server or Microsoft SQL Server. Finally, you deploy your application code. This VM typically runs a large part, if not all, of the application. It’s one big application install and running instance. To improve performance, you may add more memory or CPU to the VM (vertical scaling, discussed in previous chapters) or increase the number of instances that run your application (horizontal scaling, as with scale sets). Creating multiple application instances only works if your application is cluster-aware, and it often involves some form of shared storage to enable a consistent state across the application instances. This traditional form of deployment is called a monolithic application.
A different approach to how you design, develop, and run applications is to break things down into smaller, bite-sized components. This is a microservices approach to application development and deployment. Each microservice is responsible for a small part of the wider application environment. Microservices can grow, scale, and be updated independently of the rest of the application environment.
Although this model may offer challenges at first while development and IT teams learn to adopt a different way to build and deploy applications, containers are a great fit for the microservice approach. Developers are empowered to deploy smaller, more incremental updates at a quicker pace than the monolithic approach to application development. Microservices and containers are also a great fit for continuous integration and continuous delivery (CI/CD) workflows where you can more easily build, test, stage, and deploy updates. Your customers receive new features or bug fixes faster than they would otherwise, and hopefully your business grows as a result.
This chapter mainly focuses on Docker containers and orchestration with Kubernetes, but there’s another Azure service that’s similar in how it moves application development toward a microservices model. Azure Service Fabric has been around for a number of years and was historically a Windows-centric approach to building applications where each component was broken down into its own microservice. Service Fabric keeps track of where each microservice component runs in a cluster, allows the services to discover and communicate with each other, and handles redundancy and scaling.
Many large Azure services use Service Fabric under the hood, including Cosmos DB. That should give you a sense of how capable and powerful Service Fabric can be! Service Fabric itself runs on top of virtual machine scale sets. You know a thing or two about scale sets, right?
The Service Fabric platform has matured, and it can now handle both Windows and Linux as the guest OS, so you can build your app with any programming language you’re comfortable with. Here’s another example of choice in Azure: you have the flexibility to choose how you want to manage and orchestrate your container applications. Both Service Fabric and Azure Kubernetes Service have excellent benefits and use cases.
As a good starting point, if you currently develop, or would like to develop, microservices outside of containers, Service Fabric is a great choice. It provides a unified approach to handle both more traditional microservices applications and container-based applications. If you then choose to adopt containers for other workloads, you can use the same Service Fabric management tools and interface to manage all of your application environments. For a more container-focused application approach from the get-go, Azure Kubernetes Service may be a better choice, with the growth and adoption of Kubernetes providing a first-class container experience.
19.2. Azure Container Instances
Now that you understand a little more about what containers are and how you can use them, let’s dive in and create a basic instance of the pizza store. This is the same example from earlier chapters, where you created a basic VM that ran your website, or deployed the app to web apps. In both of those cases, you had to create the VM or web app, connect to it, and then deploy a basic web page to it. Can the power of containers make your life that much easier? Absolutely!
A neat service called Azure Container Instances (ACI) lets you create and run containers in a matter of seconds. There are no upfront network resources to create and configure, and you pay for each container instance by the second. If you’ve never used containers and don’t want to install anything locally on your computer, ACI is a great way to try the technology.
19.2.1. Creating a single container instance
To see how you can quickly run your pizza store, let’s create a container instance. It takes only one command to run a container instance, but figure 19.6 shows how you bring together many components to make this happen behind the scenes. We look at the components of a Dockerfile and Docker Hub after you have the container instance up and running.
Figure 19.6. A Dockerfile was used to build a complete container image, azuremol. This image was pushed to an online public registry called Docker Hub. You can now create a container instance using this prebuilt public image from Docker Hub, which provides a ready-to-run application image.

To create an Azure container instance that runs a basic website, complete the following steps.
1. Open the Azure portal, and select the Cloud Shell icon from the top menu.
2. Create a container instance. Specify that you’d like a public IP address and to open port 80. This exercise uses a sample image that I’ve created for you, which we’ll examine a little more once the container is up and running:
az container create
--resource-group azuremolchapter19
--name azuremol
--image iainfoulds/azuremol
--ip-address public
--ports 80
3. To see what was created, look at the details of the container:
az container show
--resource-group azuremolchapter19
--name azuremolIn the Events section, you can see as the image is pulled (downloaded) from Docker Hub, a container is created, and the container is then started. Some CPU and memory reservations are also assigned, which can be adjusted if needed. A public IP address is shown, along with some information on the container such as the provisioning state, OS type, and restart policy.
4. To open the basic website that runs in the container, you can query for just the assigned public IP address:
az container show
--resource-group azuremolchapter19
--name azuremol
--query ipAddress.ip
--output tsv
5. Open the public IP address of your container instance in a web browser. The basic pizza store should be displayed, as shown in figure 19.7.
Figure 19.7. When you create a container instance, the pizza store website runs without any additional configuration. All the configuration and content are included within the container image. This quick exercise highlights the portability and power of containers—once the container image has been prepared, your app is up and running as soon as a new container instance is deployed.

Let’s examine the container image. I don’t want to get too far into the weeds of Docker and how to build container images, but it’s important to understand where this image came from and how it runs the website without any additional configuration.
The image is built from a configuration definition called a Dockerfile. In a Dockerfile, you define what the base platform is, any configuration you wish to apply, and any commands to run or files to copy. Dockerfiles can be, and often are, more complex than the following example, which was used to build the azuremol sample container:
FROM nginx

EXPOSE 80:80

COPY index.html /usr/share/nginx/html
When this Dockerfile was used to build a Docker container image, NGINX was used as the source image, and the sample web page was copied into it. This container was then pushed to Docker Hub, an online, public repository that Docker provides to share and deploy containers. To deploy the container instance, you provided iainfoulds/azuremol as the container image to use. Azure looked in Docker Hub and found a repository named iainfoulds and, within it, an image named azuremol.
Let’s examine each line of the Dockerfile:
- FROM nginx—In previous chapters, you created a basic VM, connected to it with SSH, and then manually installed the NGINX web server. In the example Dockerfile, all of that is accomplished in one line. This line says to base the container on an existing container image that’s preinstalled with NGINX.
- EXPOSE 80:80—To allow access to your VM in previous chapters, you created an NSG rule that allowed port 80. In the Dockerfile, this line tells the container to open port 80 and map it to the internal port 80. When you created your container instance with az container create, you also specified that the Azure platform should permit traffic with --ports 80. That’s all the virtual networking you have to think about!
- COPY index.html /usr/share/nginx/html—The final part is to get your application into the container. In previous chapters, you used Git to obtain the sample pizza store web page and then push that to your web app. With the Dockerfile, you COPY the index.html file to the local /usr/share/nginx/html directory in the container. That’s it!
For your own scenarios, you can define a Dockerfile that uses a different base image, such as Node.js or Python. You then install any additional supporting libraries or packages required, pull your application code from source control, such as GitHub, and deploy your application. This Dockerfile would be used to build container images that are then stored in a private container registry, not a public Docker Hub repo like that in the example.
You may think, Docker Hub sounds great: does Azure have such a wonderful thing? It does! Because you need to create a Dockerfile and build a container image, unfortunately it’s not a two-minute exercise, and there’s a lot to cover in this chapter. You can build your own images from a Dockerfile in the Cloud Shell, though, and I encourage you to explore this if you have time. But Azure Container Registry (ACR) is the route I’d choose to store my container images, for a couple of reasons.
First, it’s a private registry for your container images, so you don’t need to worry about potential unwanted access to your application files and configuration. You can apply the same RBAC mechanisms we discussed in chapter 6. RBAC helps you limit and audit who has access to your images.
Second, storing your container images in a registry in Azure means your images are right there in the same datacenters as the infrastructure used to run your container instances or clusters (which we look at next). Although container images should be relatively small, often only tens of MB in size, that can add up if you keep downloading those images from a remote registry.
ACR also provides built-in replication and redundancy options you can use to place your containers close to where you deploy and run them for users to access. This region locality is similar to how you used Cosmos DB global replication in chapter 10 to make those milliseconds count and provide your customers with the quickest possible access time to your applications.
If all this sounds exciting, check out the ACR quick starts to be up and running with your own private repository in a few minutes: http://mng.bz/04rj.
19.3. Azure Kubernetes Service
Running a single container instance is great, but that doesn’t give you much redundancy or ability to scale. Remember how we spent entire chapters earlier in the book talking about how to run multiple instances of your application, load balance, and automatically scale them? Wouldn’t it be great to do the same with containers? That’s where you need a container orchestrator.
As the name implies, a container orchestrator manages your container instances, monitors their health, and can scale as needed. Orchestrators can, and often do, handle a lot more than that, but at a high level, a primary focus is handling all the moving parts involved in running a highly available, scalable, container-based application. There are a few container orchestrators, such as Docker Swarm and datacenter operating system (DC/OS), but one has risen above the rest to become the go-to orchestrator of choice—Kubernetes.
Kubernetes started as a Google-led and -sponsored open source project that grew out of the company’s internal container orchestration tooling. Widely accepted by the open source community, Kubernetes is one of the largest and fastest-growing open source projects on GitHub. Many large technology companies, including Red Hat, IBM, and Microsoft, contribute to the core Kubernetes project.
In this section, let’s take the same sample web app from the previous exercise with ACI to run a redundant, scalable deployment in Kubernetes. You’ll end up with a few components, as shown in figure 19.8.
Figure 19.8. Your sample container from Docker Hub runs on a two-node Kubernetes cluster that you create in Azure Kubernetes Service. The Kubernetes deployment contains two logical pods, one on each cluster node, with a container instance running inside each pod. You then expose a public load balancer to allow your web app to be viewed online.

19.3.1. Creating a cluster with Azure Kubernetes Services
In chapter 9, we looked at how virtual machine scale sets reduce the complexity of deploying and configuring the underlying infrastructure. You say how many VM instances you want in a scale set, and the rest of the network, storage, and configuration is deployed for you. Azure Kubernetes Service (AKS) works in much the same way to offer a resilient, scalable Kubernetes cluster, with management handled by the Azure platform.
To view the information on your AKS cluster, complete the following steps.
1. Open the Azure portal, and select the Cloud Shell icon from the top menu.
2. Earlier in the chapter, you created a Kubernetes cluster. The process took a few minutes, but hopefully it’s ready now! Look at the status of cluster as follows:
az aks show
--resource-group azuremolchapter19
--name azuremolprovisioningState should report Succeeded.
3. If your cluster is ready, obtain a credentials file that allows you to use the Kubernetes command-line tools to authenticate and manage resources:
az aks get-credentials
--resource-group azuremolchapter19
--name azuremol
That’s all it takes to get Kubernetes up and running in Azure! You may be wondering, “Can’t I just build my own cluster with VMs or scale sets, and manually install the same Docker and Kubernetes components?” You absolutely can. The parallel is the IaaS and PaaS approach of VMs versus web apps. The web app approach offers many benefits: you only worry about high-level configuration options, and then you upload your application code. A managed Kubernetes cluster, as offered by AKS, reduces the level of complexity and management—your focus becomes your applications and your customers’ experience.
In the same way that you may choose VMs over web apps, you may choose to deploy your own Kubernetes cluster rather than use AKS. That’s fine—both approaches end up using the same Azure services components. VMs, scale sets, load balancers, and NSGs are all topics you’ve learned about in previous chapters, and all are still present with AKS clusters, although they’re abstracted away. From a planning and troubleshooting perspective, you should have the skills to understand what’s happening under the hood to make the managed Kubernetes offering work. Your comfort level, and how much time you want to spend managing the infrastructure, will help guide your decision-making process as you build a new application around containers in Azure.
19.3.2. Running a basic website in Kubernetes
You created a Kubernetes cluster in the previous section, but there’s no application running. Let’s change that! You now need to create the Kubernetes deployment that you saw earlier in figure 19.8; see figure 19.9.
Figure 19.9. With the Kubernetes cluster created in AKS, you can now create a Kubernetes deployment and run your app. Your container runs across both nodes, with one logical pod on each node; you need to create a Kubernetes service that exposes a public load balancer to route traffic to your app.

To deploy an application to your Kubernetes cluster, complete the following steps.
1. You interact with a Kubernetes cluster using a command-line utility called kubectl. Use the same iainfoulds/azuremol container image from Docker Hub that you ran as a container instance:
kubectl run azuremol
--image=docker.io/iainfoulds/azuremol:latest
--port=80
2. It may take a minute or so to download the container image from Docker Hub and start the application in Kubernetes. The application runs in a pod: a logical construct in Kubernetes that houses each container. Pods can contain additional helper-components, but for now, monitor the status of your container by looking at the pod:
Even when the status of the pod reports as Running, you won’t be able to access your application. The container instance you created earlier could route traffic over a public IP address directly to that one instance, but what do you think is needed for a Kubernetes cluster to route traffic to containers? If you guessed, “a load balancer,” congratulations! Right now, you have only one pod—a single container instance. You scale out the number of pods in the end-of-chapter lab, and for that to work, you need a way to route traffic to multiple instances. So, let’s tell Kubernetes to use a load balancer.
Here’s where the integration between Kubernetes and Azure becomes cool. When you tell Kubernetes that you want to create a load balancer for your containers, under the hood, Kubernetes reaches back into the Azure platform and creates an Azure load balancer. This Azure load balancer is like the one you learned about in chapter 8. There are frontend and backend IP pools and load-balancing rules, and you can configure health probes. As your Kubernetes deployment scales up or down, the load balancer is automatically updated as needed.
3. To expose your application, tell Kubernetes that you want to use a load balancer. Add a rule to distribute traffic on port 80:
kubectl expose deployment/azuremol
--type="LoadBalancer"
--port 80
4. As before, watch the status of your service deployment:
kubectl get service azuremol --watch
5. Once the public IP address is assigned, that means the Azure load balancer has finished deploying, and the Kubernetes cluster and nodes are connected. Open the public IP address of your service in a web browser to see your web application running.
Application deployments in Kubernetes are often much more involved than this basic example. You typically define a service manifest, similar to a Resource Manager template, that defines all the characteristics of your application. These properties can include the number of instances of your application to run, any storage to attach, load-balancing methods and network ports to use, and so on. What’s great about AKS is that you don’t have to worry about the Kubernetes installation and configuration. As with other PaaS services like web apps and Cosmos DB, you bring your applications and let the Azure platform handle the underlying infrastructure and redundancy.
Remember to clean up and delete your resource groups so you don’t end up consuming lots of your free Azure credits. As you start to explore containers, it becomes even more important to pay attention to what Azure resources you leave turned on. A single web app doesn’t cost much, but a five-node AKS cluster and a few Container instances with georeplicated Azure Container Registry images sure can!
ACI instances are charged for by the second, and the cost quickly adds up if they’re left running for days or weeks. An AKS cluster runs a VM for each node, so if you scale up and run many VMs in your cluster, you’re paying for one VM for each node.
There’s no charge for the number of containers each of those AKS nodes runs, but as with any VM, an AKS node gets expensive when left running. What’s great about Kubernetes is that you can export your service configurations (the definition for your pods, load balancers, autoscaling, and so on) to deploy them elsewhere. As you build and test your applications, you don’t need to leave an AKS cluster running—you can deploy a cluster as needed and deploy your service from a previous configuration.
This has also been a warp-speed introduction to containers and Kubernetes, so don’t worry if you feel a little overwhelmed right now! Manning has several great books that can help you dive further into Docker, microservices application development, and Kubernetes. Check them out if this chapter sounds exciting and you want to explore further!
19.4. Lab: Scaling your Kubernetes deployments
The basic example in this chapter created a two-node Kubernetes cluster and a single pod that runs your website. In this lab, explore how you can scale the cluster and number of container instances:
1. You can see how many nodes are in your Kubernetes cluster with kubectl get nodes. Scale up your cluster to three nodes:
az aks scale
--resource-group azuremolchapter19
--name azuremol
--node-count 3
2. It takes a minute or two to scale up and add the additional node. Use kubectl again to see the status of your nodes. Look at your current deployment with kubectl get deployment azuremol. Only one instance was created earlier. Scale up to five instances, or replicas:
kubectl scale deployment azuremol --replicas 5
3. Use kubectl again to examine the deployment. Look at the pods, the running container instances, with kubectl get pods. Within a matter of seconds, all those additional replicas were started and were connected to the load balancer.