
Photography by Frank Ford
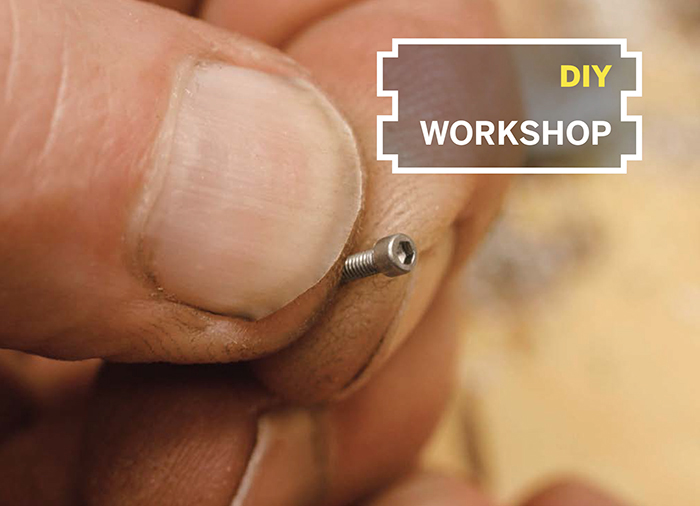
HERE’S THE ESCAPEE: A 0-80 nonmagnetic stainless steel socket-head cap screw.
LOST SCREW FINDER
An easy vacuum attachment that filters small nonmagnetic parts.
By Frank Ford

MATERIALS
Plastic CD-ROM spindle container
Finally, a use for one of these!
Small wire screen I cut mine from an old kitchen strainer.
1" diameter PVC plumbing: two 90° elbows, one 45° elbow, and 2' of pipe
Silicone glue
A vacuum, plus any adapter needed to fit it to the PVC My shop vacuum’s 1½" hose fit the PVC pipe after a bit of filing, no adapter necessary.
TOOLS
Hacksaw or PVC pipe cutter
Utility knife
Metal file
Scissors or wire cutter
Stapler or staple gun
Ever drop a screw or other teeny part, look around like crazy, and finally have to give up? Wish you had a magic magnet that could attract plastic or brass parts out of the debris on your shop floor?
Well, that’s never happened to me … but if it ever does, I’ll be glad I made this little gizmo. It’s a vacuum attachment that captures small bits in a little canister so I can sort through them.
1. Using a knife along with a short piece of PVC pipe as a template, mark and cut 2 holes in the base of the CD spindle. Neatness doesn’t count for much here, but the holes should just clear the diameter of the pipe and shouldn’t be too irregular.
2. Cut ¼" sections off 1 end of each of the 90° elbows. Again, accuracy isn’t important. My weapon of choice is a hacksaw, but any saw or pipe cutter will do.
3. Using a file, taper the uncut end of one 90° elbow so that it fits the hose of your vacuum or attachment. This is your outlet elbow. My vacuum takes a 1½" input, but your mileage may vary, so here’s where you’ll improvise.
4. Cut a ¾" section of pipe and squidge on a bunch of silicone glue as you fit it into the cut end of the second 90° elbow. Fit the pipe through one of the holes in the plastic spindle base, and secure it on the inside with more adhesive and the ¼" ring you cut off. This is the inlet pipe (Figure A).
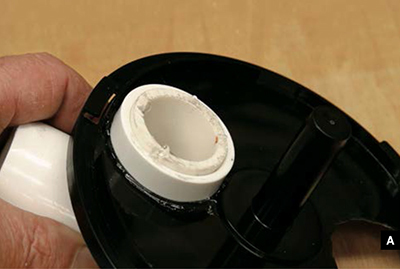
Fig. A: Fit the inlet pipe through one of the holes in the plastic spindle base, and secure it on the inside with more adhesive.
5. Make your outlet pipe the same way, but use a 1½" section of pipe. It should stick in 1" or so into the CD spindle base.
6. Fashion a little screen “boot” that slips over the end of the outlet pipe (Figure B). I hacked away at my screen with scissors, and trial-fit the shape onto a spare piece of pipe. When I got a form that worked, I stapled around the form to hold the shape in place.
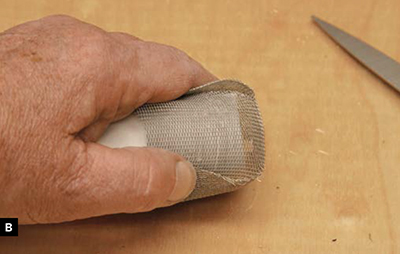
Fig. B: Fashion a little screen “boot” that slips over the end of the outlet pipe.
7. Glue the screen boot onto the end of the outlet pipe with a lot of that silicone goo, and use more to seal up its ragged edges.
8. Glue a 2" section of pipe into the inlet elbow, and glue the 45° joint onto the other end, angled back down toward the spindle base (Figure C). Fit in a longer section of pipe, to serve as the nozzle. I didn’t glue this last section, so that I could switch to different lengths as needed.
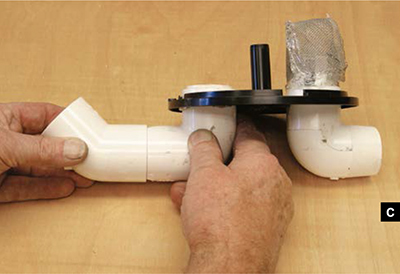
Fig. C: Glue a 2" section of pipe into the inlet elbow, and glue the 45° joint onto the other end, angled back down toward the spindle base.
9. Screw the spindle-cover canister into place (Figure D), and it’s ready for use!
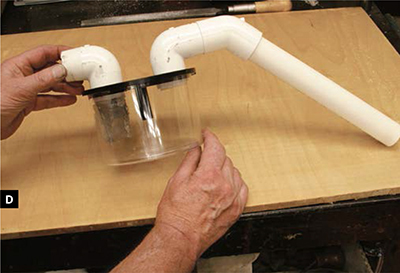
Fig. D: Screw the CD spindle-cover canister into place.
Putting It to Use
Using the Lost Screw Finder is a simple affair. Sweep the area where the errant part was last suspected, round up everything, and check the contents of the dragnet. Most suspects stick to the screen, right where you’d expect them.
Frank Ford is a founder of Gryphon Stringed Instruments in Palo Alto, Calif., where he has been a full-time luthier since 1969. He’s a prolific writer, appearing in books, magazines, and his website, frets.com.