PROJECTS
Marie Kaziunas
CNC Maker Bench
Create custom, opensource CNC tables for your workshop using AtFAB’s parametric program — or just download and fabricate MAKE’s design.
Written by Anna Kaziunas France
Time Required:
2 Weekends
Cost:
$100–$180
Anna Kaziunas France
is the digital fabrication editor at MAKE. She’s also the dean of students for the Global Fab Academy program, the co-author of Getting Started with MakerBot, and the editor of the book Make: 3D Printing.
WE HAD JUST MOVED INTO MAKE’S OFFICE IN PROVIDENCE, AND WE NEEDED FURNITURE.
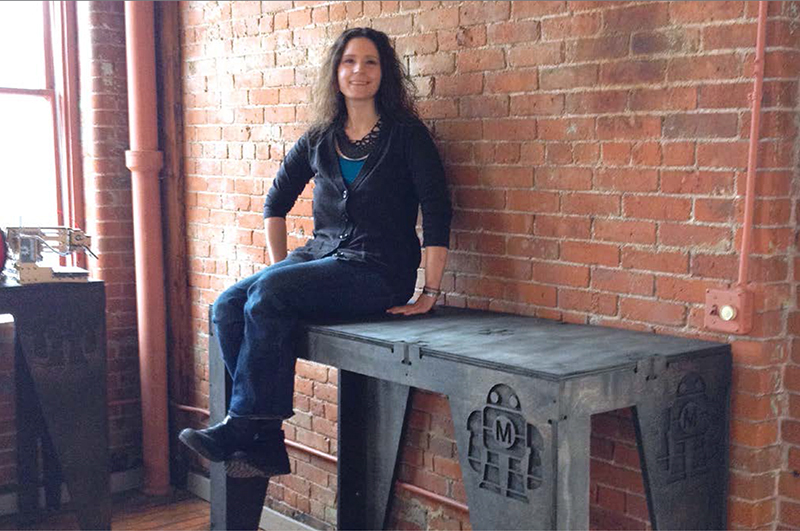
I decided to create a set of standing-height plywood workbenches to house our 3D printers and other CNC machines. I have access to a large CNC router, and I wanted to design custom tables tailored to my measurements. And I prefer to stand when I’m wrenching on machines, rather than sitting in a desk chair.
So I used AtFAB’s parametric, open-source table configuration software (atfab.co) to create a table to my personalized ergonomic dimensions. I then adjusted the files in a CAD program, programmed the toolpaths, and cut the plywood on a ShopBot CNC router. Finally, the plywood was sanded and stained to give it the look of reclaimed, weathered wood, and then the bench was assembled by hand.
Depending on the tools and supplies on hand in your shop, you can build this CNC Maker Bench for as little as $100 unfinished, and up to about $180 nicely finished.
1. Measure your workspace
Mark off the area with masking tape, and check that light switches and other fixtures will still be accessible.
2. Make your ergonomic and design decisions
Where do your arms rest when you’re standing? For good ergonomics, this table’s height should be at or just below your bent elbow height.
WHERE TO GET CNC ACCESS?
All over the world, there are FabLabs, makerspaces, hackerspaces, and TechShops where you can access a large CNC router. Costs vary widely; at AS220 Labs, where I cut these files, 2 hours of machine time was just $25. You can also have independent fabricators like Fabhub and 100kGarages cut the files for you.
Find a machine near you: makezine.com/where-to-get-digital-fabrication-tool-access


Determine the dimensions of your table and record them. You’ll need to enter them into the AtFAB parametric app. My table is 600mm wide, 1,520mm long, and 1,042mm high.
3. Procure your materials
I optimized my files for 18.5mm (¾" nominal) plywood. Buy the nice veneer; it looks better and resists tearout during routing. Take care to get 2 straight sheets, without veneer gaps or “voids,” from the same pallet if possible. And bring your calipers — if thickness varies radically (by say, a full millimeter), choose sheets that are closer to the same dimensions. For more tips, see the project page at makezine.com/projects/cnc-maker-bench.
4. Measure your plywood (again)
Record each sheet’s thickness at several points along its length and width. To ensure that your joints fit together, you’ll input your maximum thickness measurement into the parametric app.
5. Create the CAD files
Now you’ll actually design your table using computer-aided design (CAD) software. I used AtFAB’s Parametric “One to Several” Table program, which runs on the desktop in Processing. (It’s slated to be available soon as an online app at the AtFAB site.)
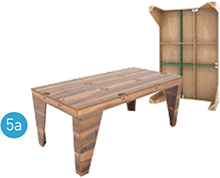
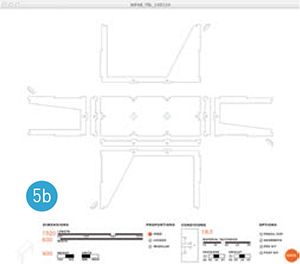
This table, created by award-winning architects Filson and Rohrbacher (filson-rohrbacher.com) can be configured into many different variations on the Processing app (Figures 5a and 5b). You can also buy it preconfigured from atfab.co, along with 5 other furniture designs, or download those files for free from opendesk.cc/atfab.


» Plywood, ¾" (18.5mm), 4’×8’ sheets (2) with a decent-looking veneer. I used Home Depot Pure Bond Plywood in birch ($48) and poplar ($40).
» Sandpaper, 80 and 100 grit
» Tack cloth
» Dropcloth
» Rags
» Work gloves
» Wood screws You can use dowels and glue for assembly, but our MAKE design uses #6 × 15/8" drywall screws, Grip Rite #158SDDW1.
» Dowels (optional)
» Wood glue, clear (optional) such as Loctite Power Grab
For staining (optional):
» Wood stain I used Minwax Oil-Based Ebony Wood Finish Interior Stain.
» Pre-stain treatment I used Minwax 1-Qt. Pre-Stain Wood Conditioner.
» Stain application pad
» Gloves, latex or nitrile
» CNC router, minimum 4'×6' cutting area 4'×8' preferred.
» Calipers, digital
» Drill with 5/16" bit and Phillips driver bit (optional) if you use screws for assembly
» Clamps (optional) if you use glue. They’re cheap at Harbor Freight (harborfreight.com).
» Computer with software:
» CAD or drawing software that can manipulate vectors and open and export DXF files, such as Rhino, Illustrator, AutoCAD, or Inkscape
» Processing, version 2.2.1 processing.org/download/?processing
» ControlIP5 library, version 1.5.2 code.google.com/p/controlp5/downloads
» AtFAB “One to Several Table” parametric design program github.com/akaziuna/cnc-standing-height-workbench
Open the “One to Several” sketch in Processing, enter your values into the AtFAB parametric design app (see Chart A), and Save your custom design to a DXF file.
PROJECTS
CNC Maker Bench
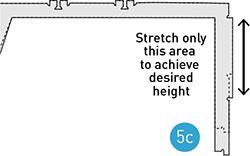
Lengthen the legs. The parametric app is awesome, but it doesn’t lengthen the table legs to standing height. Use your favorite CAD program to lengthen them to your chosen height. Stretch only the straight middle portions of the legs, leaving the joints and feet intact (Figure 5c, preceding page).
Join vectors. Ensure that the vectors for each individual part are joined into one continuous shape. You’ll need closed shapes to generate the toolpaths for machining. You can do this in your CAD program or use the Join tool in PartWorks or V-Carve Pro CAM software.
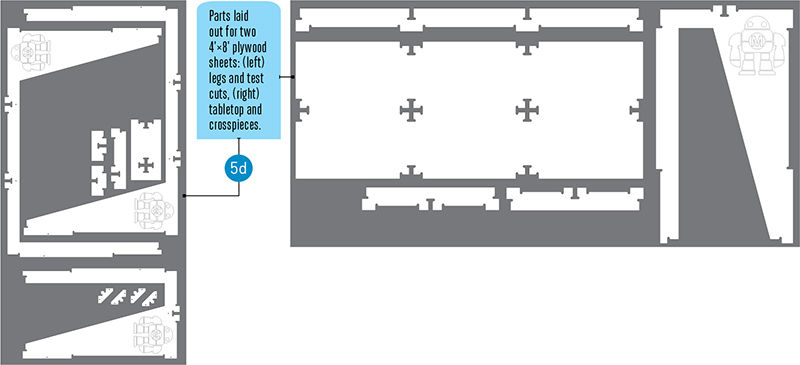
Rearrange the parts. Set your canvas size (sheet size) to 1,219.2mm × 2,438.4mm to avoid any possible resizing issues when importing into CAM software (DXFs exported from the app are in millimeters). You’ll probably need to use screws to secure the wood to the router bed, so use an offset tool to create a 25.4mm border inside the canvas to avoid hitting these screws.
Then rearrange the parts to fit onto two 4'×8' sheets of plywood (Figure 5d). I used downspiral bits that pack the sawdust into the kerf, so I didn’t need to create tabs to hold the parts in place while cutting. You can grab my final files at github.com/akaziuna/cnc-standing-height-workbench.
6. Program the toolpaths
You can cut your workbench with just 2 toolpaths: one inside cut (the “cross” or “plus” notches on the tabletop) and one outside cut for the rest of the file. (Inside and outside cuts refer to what side of the vector the router bit cuts on.) But if you’re adding drill holes, or a decorative image etched into the surface of the wood (like the MAKE robot in this project), you’ll need to create additional toolpaths. Before you start, download the machining and assembly instructions from opendesk.cc/atfab/one-to-several-table.
Plan toolpaths. If you’re using dowels to assemble your table, you’ll need to drill holes for them. I used screws instead and marked their locations with shallow 6.5mm (¼") holes.
Toolpaths must be cut in the proper order: first etching or “pocketing,” then drilling, inside cuts, and finally, outside cuts. (You don’t want to cut out a part and then try to drill or etch the loose part!)
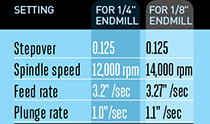
Select bits. Preview your toolpaths in your CAM software, and make sure your router bit is small enough to cut any small features (Chart B).
![]() VALUES ENTERED INTO ATFAB APP
VALUES ENTERED INTO ATFAB APP

![]() BIT SIZES FOR TOOL PATHS
BIT SIZES FOR TOOL PATHS

![]() FEEDS AND SPEEDS FOR SHOPBOT PRS STANDARD
FEEDS AND SPEEDS FOR SHOPBOT PRS STANDARD
![]() For more on bit selection and chip load, see the full tutorial at makezine.com/projects/cnc-maker-bench.
For more on bit selection and chip load, see the full tutorial at makezine.com/projects/cnc-maker-bench.
Feeds and speeds. I've provided feeds and speeds settings for different sizes of 2-flute bits that worked well for me (Chart C). However, these numbers will vary according to your CNC's capabilities, the tooling used, and material machined. You want to move the tool as fast as the “chip load” for your bit will allow, without breaking the bit or sacrificing finish quality. If you move too slowly, the tool will heat up, wear out faster, and possibly burn the wood.
Create toolpaths. To do it in PartWorks, follow ShopBot’s fantastic tutorial at shopbottools.com/msupport/tutorials.htm.
7. Make some test cuts Cut your “Test cuts” toolpaths and slot your test pieces together. Ideally, you should be able to fit 1–3 business cards through the assembled joints, although mine were much tighter. You may need to adjust your files to get your parts to fit properly; for tips, check the OpenDesk machining and assembly instructions.
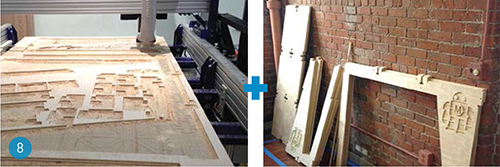
8. Cut the files This is the fun part, time to let the sawdust fly! Remember to wear eye and ear protection.
Load and secure the plywood, zero your axes, warm up your machine, load the appropriate bit, and cut your toolpaths in the correct order. (Drill or pocket cuts first, then profile cuts.) To see how I routed the MAKE robot, check out the videos on the project page.
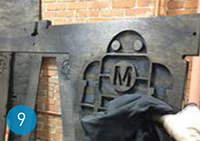
9. Finish the wood (optional) I sanded and stained my tables for a dark, weathered look with visible grain. For more details, see the project page online.
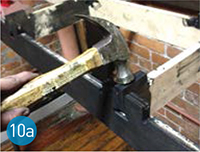
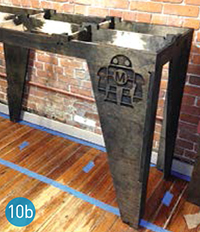
10. Assembly Assemble the workbench in the following order, or it won’t fit together properly: crosspieces, back, side, front, other side, top.
If the joints are a little too tight, give them some encouragement with a mallet and the plywood will give. If your screw heads are too big to fit inside the ¼" drill holes, chuck a 5/16" bit into your drill to countersink them.
Then, making sure the parts are aligned, screw everything together. Plywood tends to bow a bit, so I used clamps to tightly align the leg joints when adding the screws.
You’re done. Stand back and admire your work. Then put your machines on it!
Share Your Design. We want to see your parametric table variations! Send your designs and stories to [email protected].![]()
Get your CNC on! Complete step-by-step documentation at: makezine.com/projects/cnc-maker-bench
Share it: #CNCMakerBench