![[Chapter 6] Creating your Canvas](https://imgdetail.ebookreading.net/cover/cover/202311/EB9781681985800.jpg)
[CHAPTER 6]Creating your Canvas
One of the most popular themes for lensball captures is incorporating natural landscapes. There are many different colors and compositions that exist in the wild and it’s up to you as the photographer to use them meticulously. There are three components that matter the most to me when shooting outdoors, two of which we’ve already discussed: color contrast and composition. The third, which we’ll discuss in this chapter, is lighting.
Understanding how light works when building an image is the most important job of any photographer. Without light, there will be no photo. In terms of natural light, the use of sunlight will affect your images differently depending on the time of day you shoot. I could go into an entire tutorial just to discuss the different avenues of natural light, but for this guide I will condense it down to four types: hard and direct light, dappled light, diffused light, and reflected light.
Direct Light
Hard and direct light is what you would typically see on a cloudless day around noontime. This type of light is great if you want images with high contrast and defined highlights and shadows. This is the most difficult light to work with in terms of shooting a lensball because the quality of light is very harsh. You may have difficulty capturing colors or getting proper reflections in your lensball. Your camera also may not have a wide enough dynamic range to take in all the detail within the shot. The highlights may be washed out or details can be lost in the shadows.
Many photographers find this direct light uninspiring and will shoot at an earlier or later time of day. During this lighting condition, you will find me capturing shots under trees or in shaded areas since that type of light better fits my style. If you are stuck shooting with harsh lighting, try to position the sun behind you so that the backdrop in front of you is properly lit.
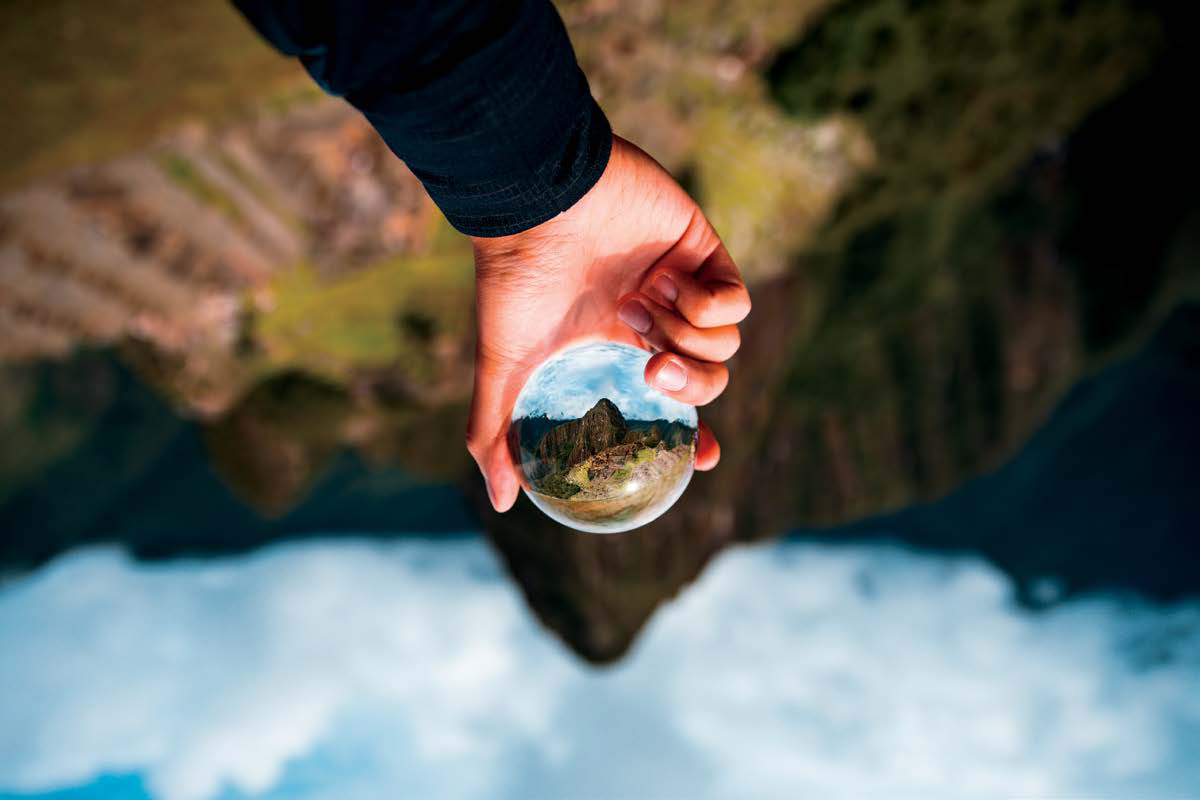
Figure 6.1
24mm | F/2.8 | 1/2500s | ISO 100
This image was captured in front of Machu Picchu around noontime, when the sun was the strongest. The difference between the highlights and shadows is fairly apparent. It is difficult to balance out the contrast even in post-production.
One thing to take note of is that you may want to use wider lenses when shooting in direct light. Because shadows are more pronounced under midday sun, you can obtain a more interesting backdrop when using a focal length under 50mm. Also, be wary that the lensball functions just as well as a magnifying glass and might burn your hand under direct sunlight!

Figure 6.2
50mm | F/2.8 | 1/2500s | ISO 100
You can use the bright sunlight to your advantage to create strong contrast with the bright reflections and shadows. This can help make your image seem more vibrant and eye-catching. For this shot, I used a mini tripod to elevate the ball so it wasn’t submerged in the pond, and I was able to achieve a clear lensball reflection in camera.
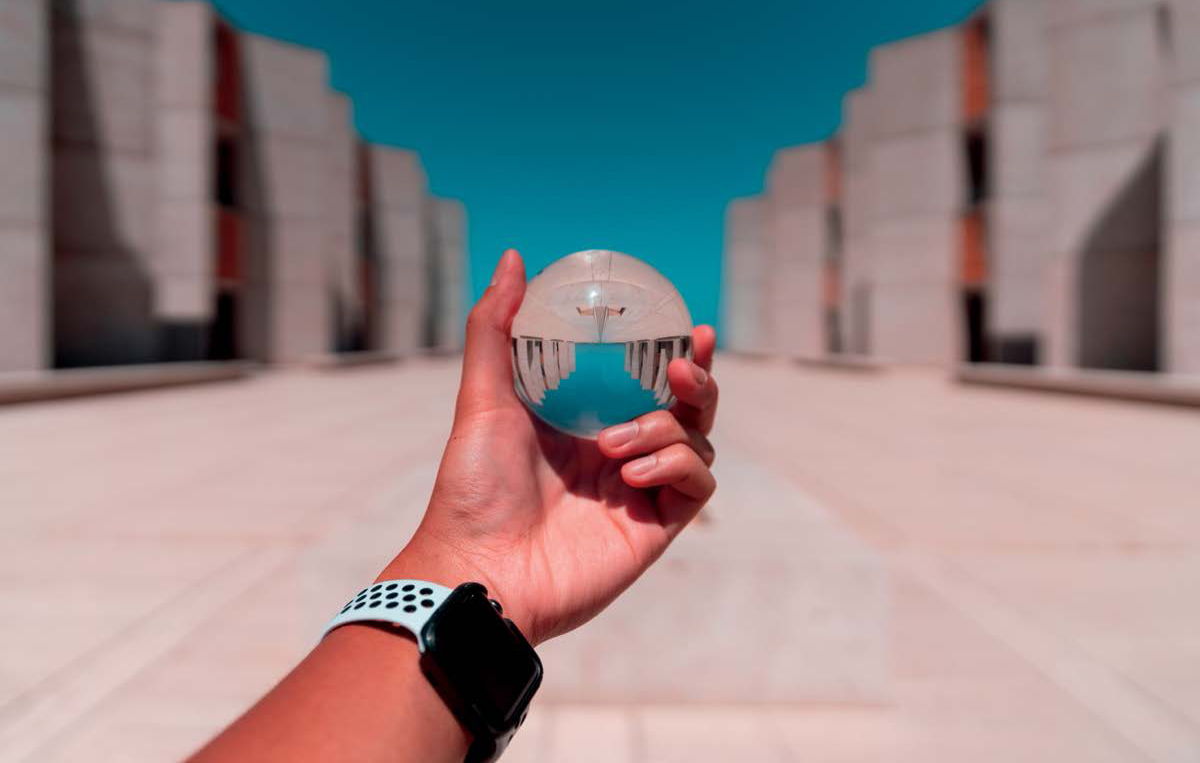
Figure 6.3
24mm | F/2.8 | 1/8000s | ISO 100
This is an example of how shooting in harsh, direct light can drain out the interest in a scene. On location, it was difficult to hold the lensball up to the camera, as the sun would burn my hand if exposed for too long. Also, the lack of gradient in the sky and shadows on the ground left the image feeling two-dimensional.
Dappled Light
Dappled light is sunlight that has been filtered through the leaves of trees or other plants. This effect usually works best in the morning or late afternoon. This can be a hit or miss if you are a portrait photographer, as unwanted hot spots can appear on your subject’s face during the shoot. However, for lensball photos I really enjoy using the scattered light as my backdrop, especially during the fall and spring when the sun travels at a lower angle in the sky. When photographing a scene with trees or flowers, you will notice that the colors of the leaves and petals are accentuated and give the image an overall better color contrast (figure 6.4). In the summertime, the strong light tends to wash everything out and drains out most of the interest in the photo.
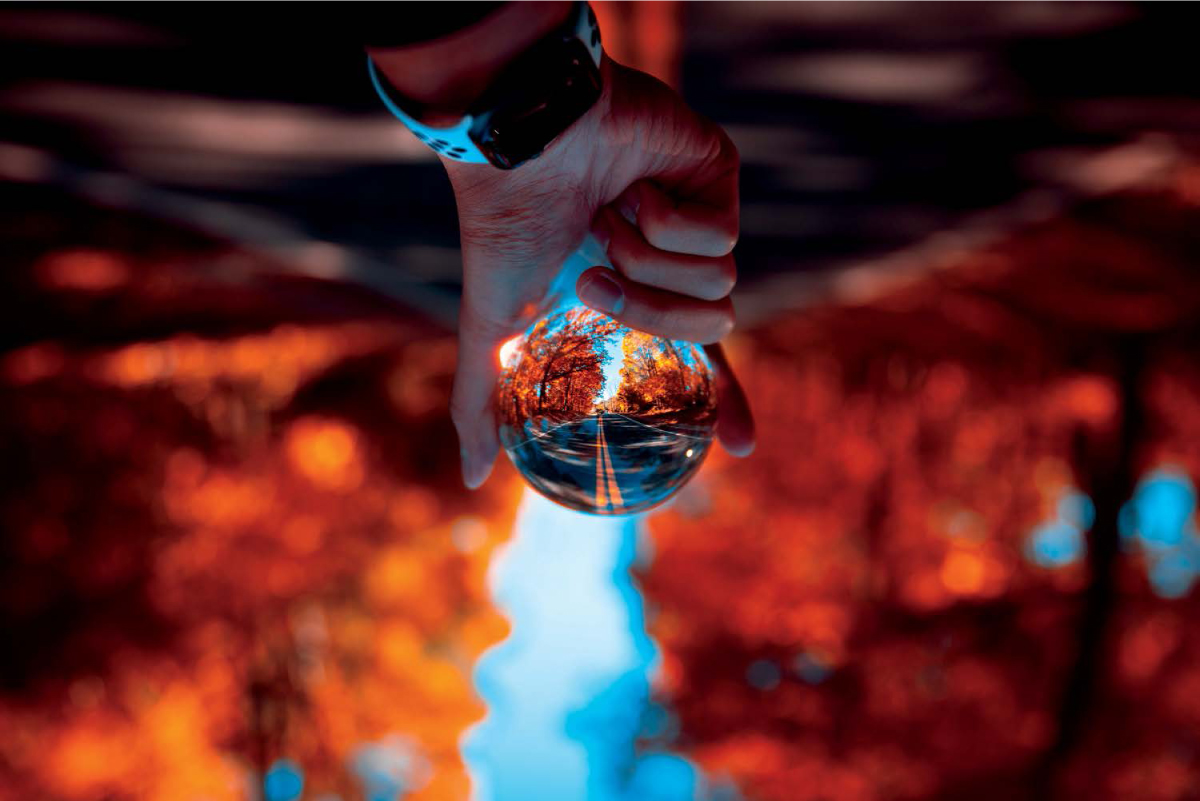
Figure 6.4
35mm | F/2.8 | 1/400s | ISO 100
Experiment with shooting under a canopy of trees to capture a high color contrast. This can be done either midday or during low sun.
The distance between the ball and a dappled light backdrop will affect how scattered the highlights are in the photo. The one challenge you will face in this lighting situation is metering the image appropriately. Your in-camera metering may pick up the scattered highlights and shadows individually, which can cause underexposure or overexposure, respectively. I try to align the lensball or subject in a well-balanced area and expose for that accordingly.
Diffused Light
Soft and diffused light is usually found on a cloudy day or during a sunrise or sunset. It is great if you are looking for mild shadows and blended edges. This lighting scenario is ideal if you want an overall flat image for more control during post-processing.
During these situations, I focus on compositional elements rather than color contrast to build my framing (figure 6.5). Some locations to look out for with overcast weather are places with a lot of trees or moving water. Leaves, bark, and branches create subtle contrasts that can work in your favor (figure 6.6a). Things like waterfalls and long-exposure seascapes appear smooth and well exposed in this lighting. Do not get discouraged from shooting just because it is a cloudy day. There are always unique photos you can capture, and practicing will only make you that much better of a photographer.
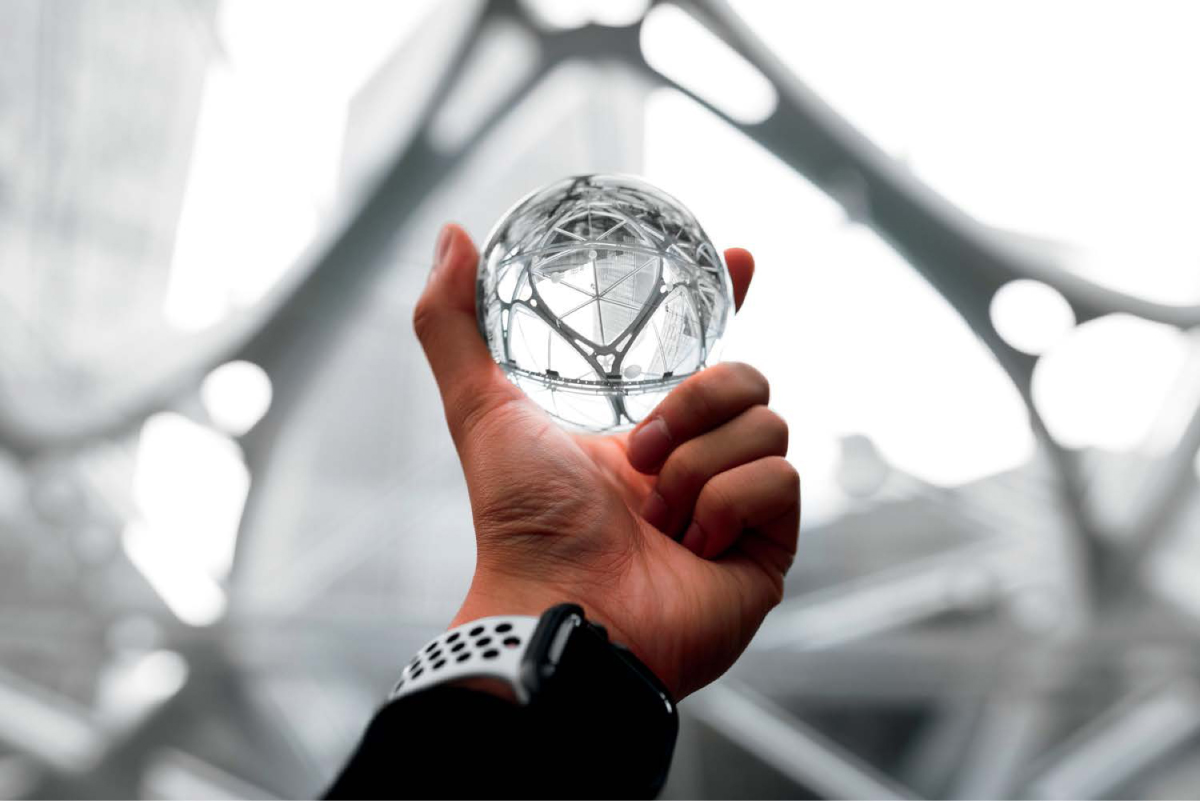
Figure 6.5
35mm | F/2.8 | 1/250s | ISO 100
Take advantage of an unsaturated scene to focus on monochromatic photos. Use the available architecture and landscape elements to enhance your photo in a diffused-light setting.
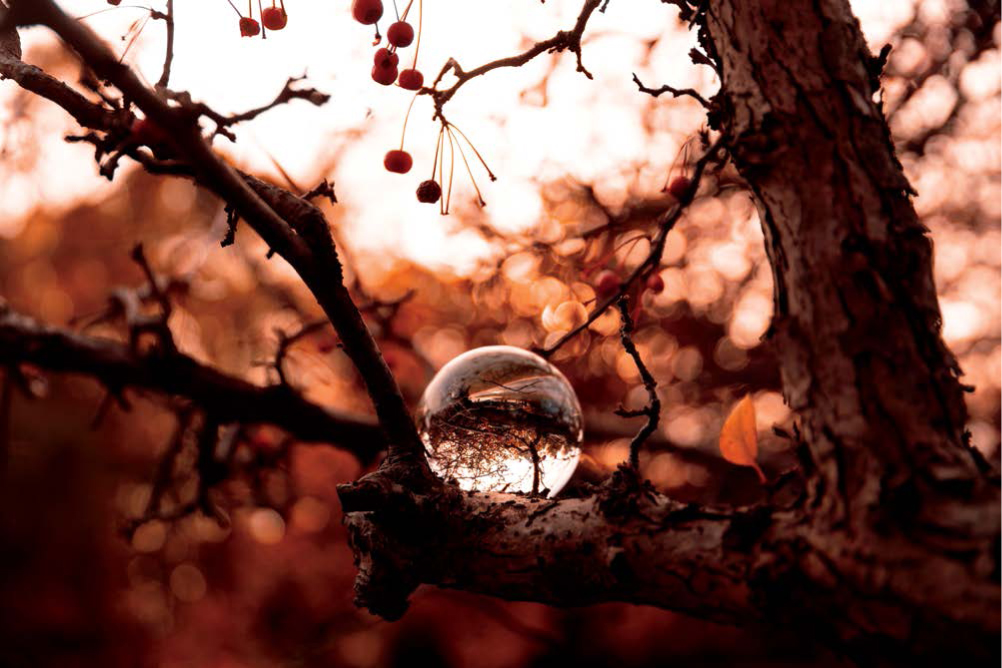
Figure 6.6a
50mm | F/2.8 | 1/250s | ISO 100
Placing the lensball on branches will exemplify the minute textures in the wood, as they are both in the same focus plane. Angling the branch down toward camera-right allows for a nice falloff in the photo.
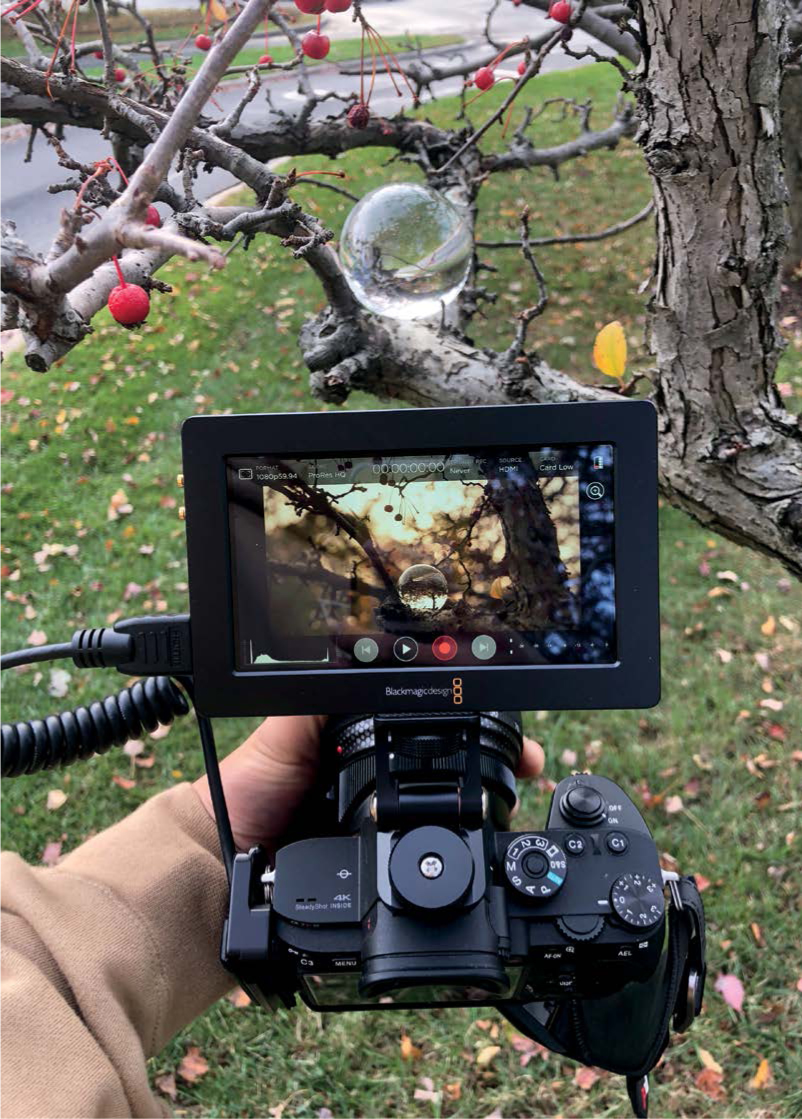
Figure 6.6b
Using an external monitor can help you frame an image without being at the mercy of your camera’s flip screen or viewfinder.
Figure 6.7
70mm | F/2.8 | 1/160s | ISO 100
The soft tones in this image are primarily the result of diffused lighting. There are no abrupt separations of color, which allows the overall image to seem coherent.
Reflected Light
Lastly, my favorite lighting condition is reflected light. This is described as a soft color cast or the glow from light bouncing off objects. Reflected light will affect your image differently depending on what type of surface it hits. Light bouncing off grass will have a different feel than light reflecting off of water. Harsh reflected light can add brilliant colors to your lensball photos. This can be produced by placing the lensball in water or on reflective surfaces. I honestly feel this is where the product shines, and I have seen many photographers compose really creative images with this lighting scenario. The natural in-camera contrast you obtain in these photos will make it much easier to bring out colors when editing.
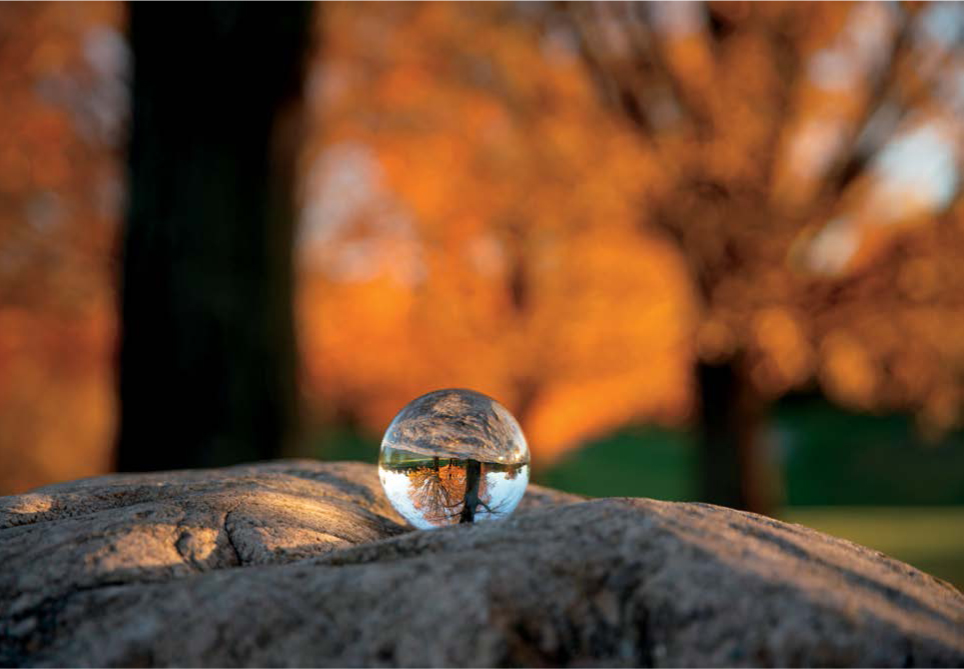
Figure 6.8a
70mm | F/2.8 | 1/250s | ISO 100
In this image, reflected light is bounced off the boulder and autumn leaves for a soft color contrast. The photo was captured an hour before sunset at a nearby park. Shooting at eye level with the ball will provide you with sharp details in the rock while compressing the background.
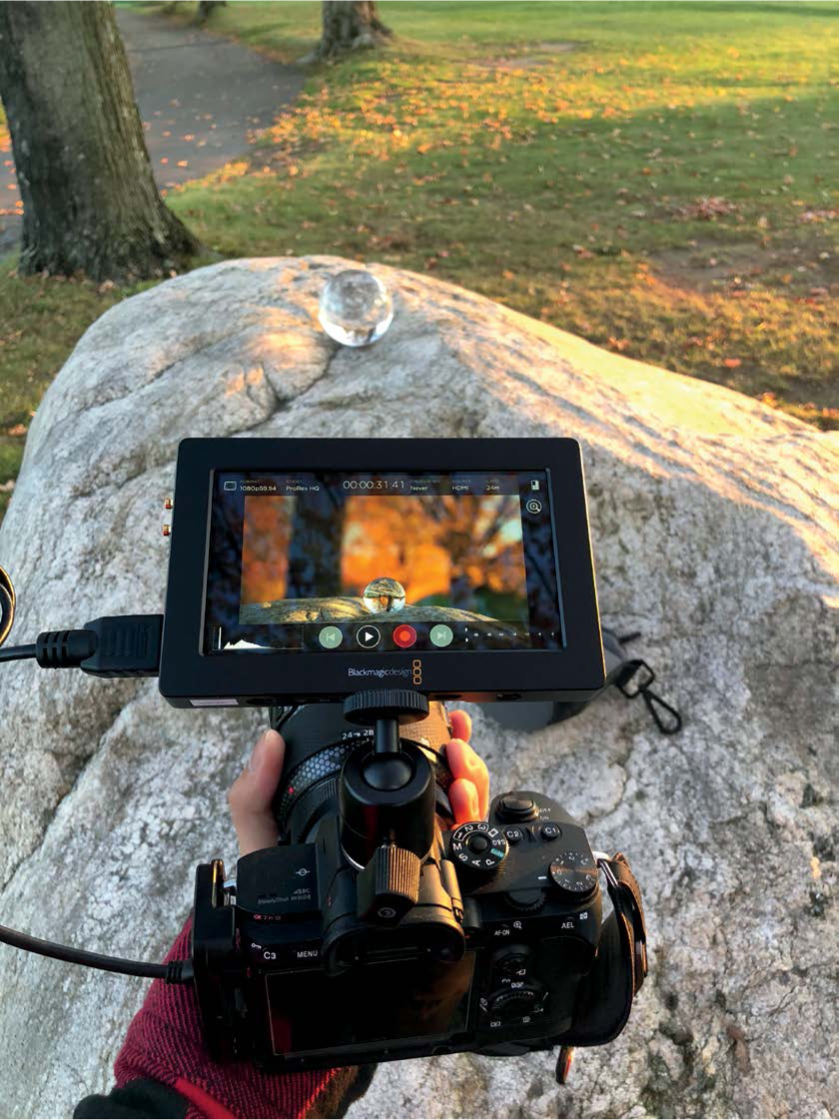
Figure 6.8b
This is a behind-the-scenes capture of figure 6.8a. Leveling the ball and camera at the same height will create a large distance between the foreground (rock) and background (trees) for strong subject separation.
Figure 6.9a
33mm | F/2.8 | 1/800s | ISO 100
Sunsets can add beautiful colors into reflective surfaces like still water. This is most apparent on semi-cloudy days because you need the sunlight to bounce off the clouds to contrast the blue in the sky.
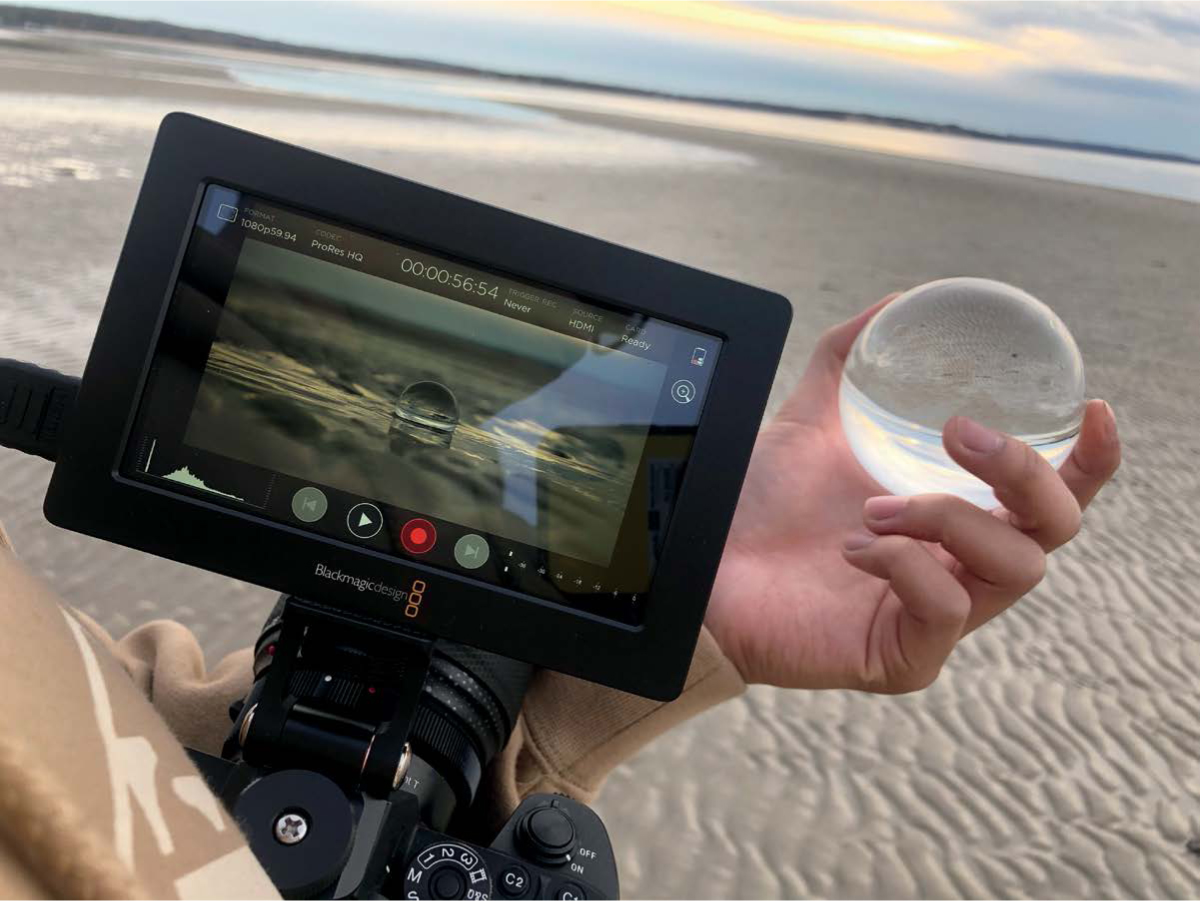
Figure 6.9b
A behind-the-scenes shot to illustrate how a boring location can make for a great image.
Figures 6.10a–6.10d illustrate how reflected light affects your images based on the focal length at which you shoot. You will notice that as you use more telephoto lenses, the lighting in the back becomes softer and loses contrast. The photographs shot at 24mm (figure 6.10a) and 35mm (figure 6.10b) appear more vibrant because the light bounces off more surfaces. The images shot at 50mm (figure 6.10c) and 70mm (figure 6.10d) showcase more of the light reflected from the tree leaves and less from the grass.
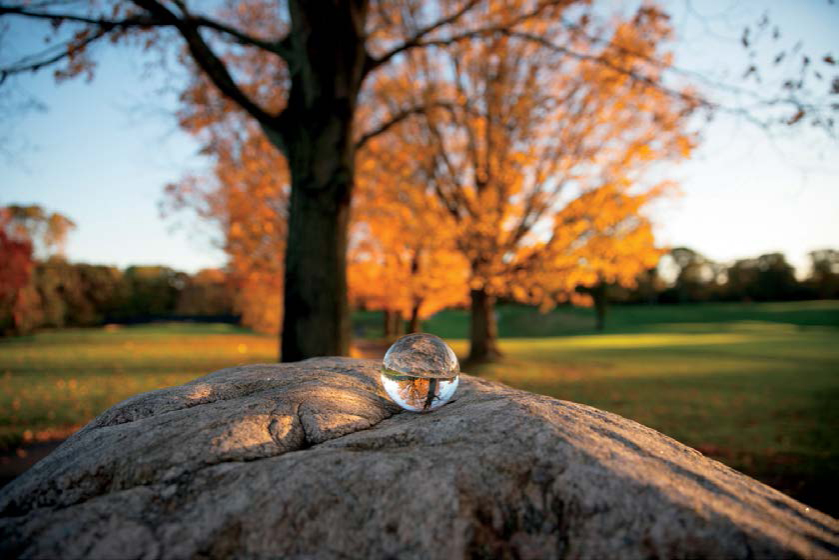
Figure 6.10a
24mm
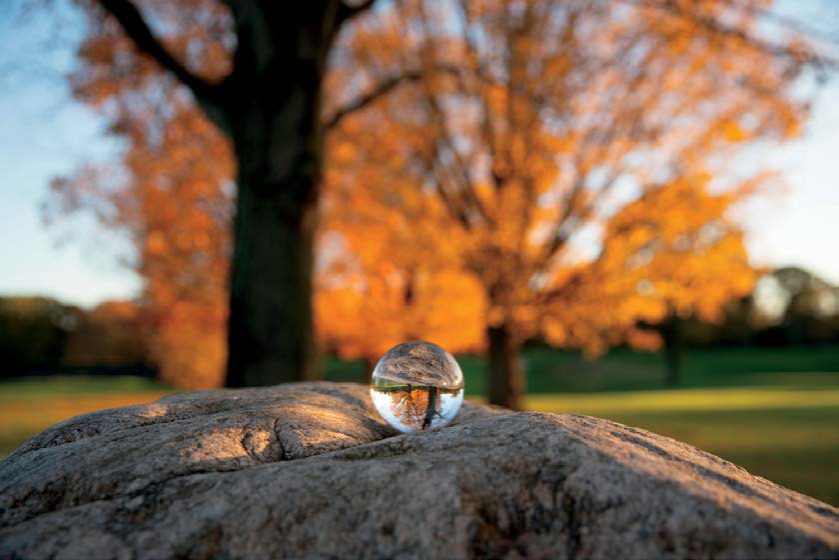
Figure 6.10b
35mm
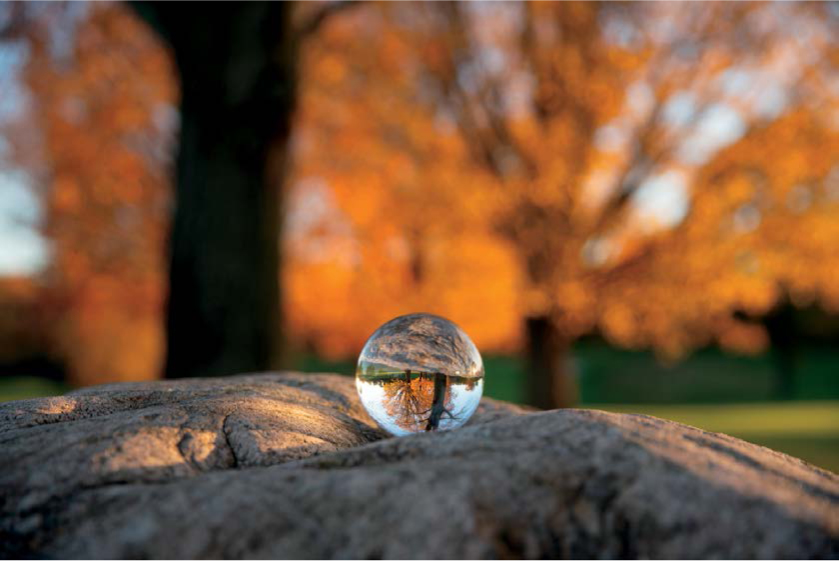
Figure 6.10c
50mm
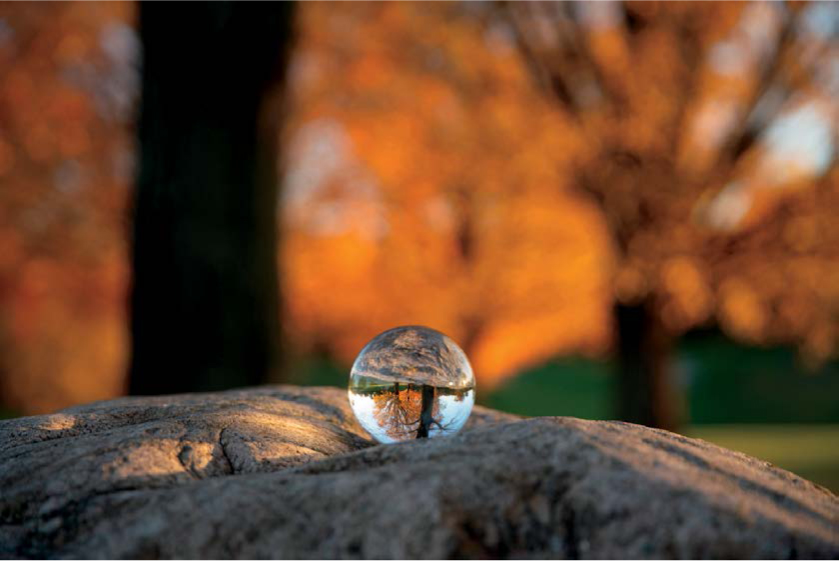
Figure 6.10d
70mm
Overall, there really isn’t ever “bad” lighting in nature; rather, it is whether or not the light works for your vision.
Capturing a City
When it comes to putting compositional theories into practice, urban areas are a great training ground to hone in your craft. Cities are packed with rigid lines and defined architecture, which work really well with lensball photography. My main goal for shooting in urban environments is to look for elements that give my shots more of an impact. For me, these photos concentrate less on color and more on contrast and composition.
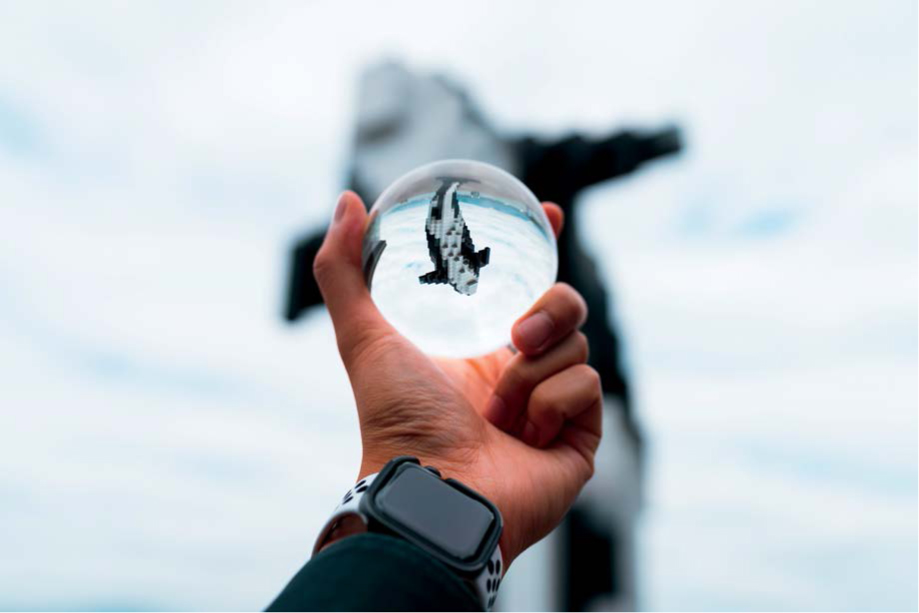
Figure 6.11a
35mm | F/2.8 | 1/1600s | ISO 100
A capture of the Digital Orca from Vancouver. I always thought it looked neat, regardless of whether it would work well in a lensball photo. I had to shoot upward toward the sculpture to remove the ground within the lensball.
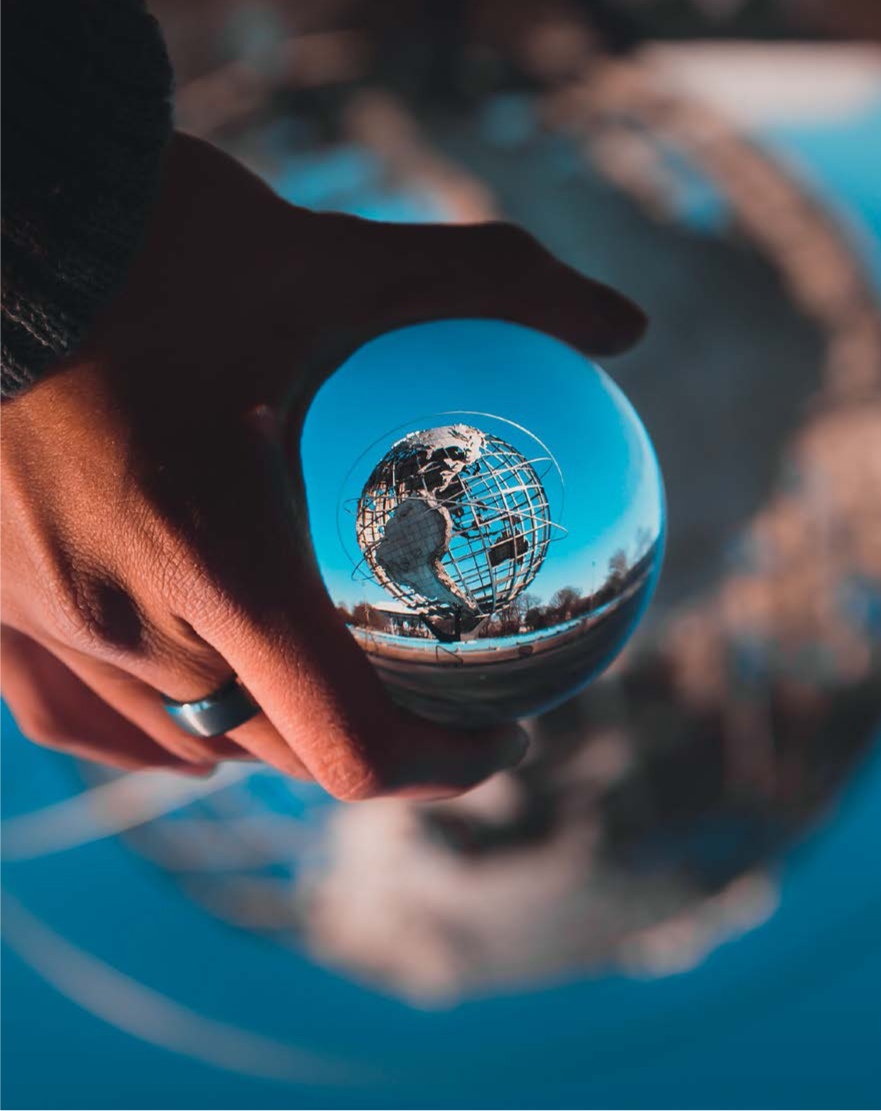
Figure 6.11b
24mm | F/2.8 | 1/3200s | ISO 100
Circular sculptures like the Unisphere in Flushing Meadows Corona Park can act as both framing elements as well as fitting subjects for lensball images. In this image, the globe in the background frames the lensball, which then frames the globe within.
Unlike with a scenic nature shot, cities are full of reflective surfaces and artificial light. You can use this to your advantage, as the weather has less of an effect on the outcome of your image. Even when it rains you can find buildings with unique interior corridors or interesting lighting setups. In addition, puddles can be a huge benefactor when you’re looking to spice up a photo. Puddles on concrete or metal help create a better mirrorlike reflection than they do in a natural setting such as on sand or mud. The reason for this is that the puddle is generally more controlled in an urban environment and there will be fewer ripples or shifting in the water. I’m not saying you should be placing your lensball in random puddles in the city, but you can take a strategic approach and carry a bottle of water with you to create your own puddles. The more prepared you are, the better control you have of the environment.
Take your time to research the different monuments and building structures in the city you want to visit. You can take some really awesome lensball photos where you “capture” famous landmarks in the ball (figures 6.11a and 6.11b).
Lighting is just as important for urban shots as it is for nature photography, and it will heavily influence your photos depending on the time of day as well as weather conditions. This is especially important when you’re photographing locations with tall buildings or reflective surfaces. The sun will cast shadows at different angles in the morning, midday, and evening times, which will affect the overall lighting contrast within the lensball. Whenever I travel to the city, I like to take notes of when certain locations have the best light, while also noting the direction and strength of light. This is especially handy when planning out different captures, as portrait and landscape photography prefer different qualities of light.
Figure 6.12
35mm | F/2.8 | 1/320s | ISO 100
Try to plan your location in advance based on where the sun will be during the specific time you want to shoot. I have a few apps I use to track the sun, but the weather app built into the iPhone works just as well.
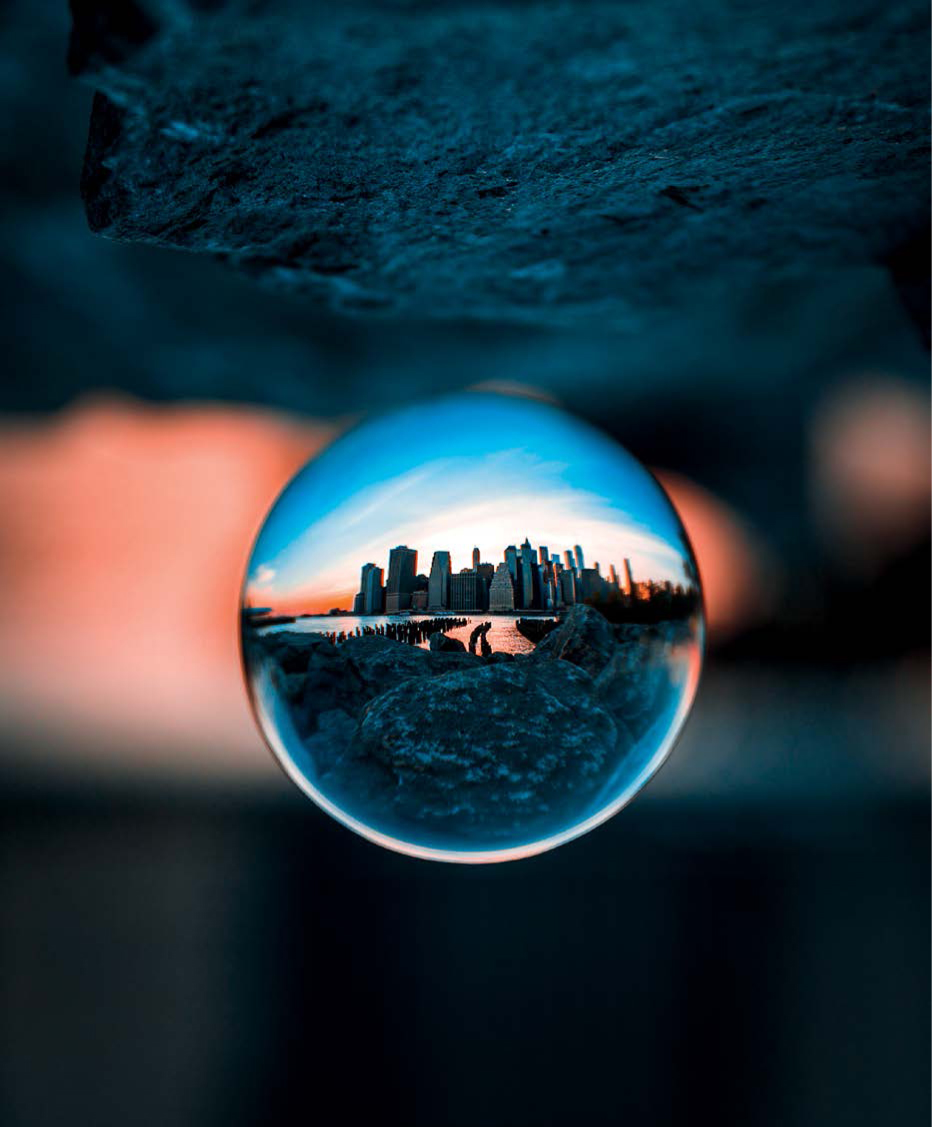
Figure 6.13
70mm | F/2.8 | 1/100s | ISO 100
A capture of the Manhattan skyline through a lensball. I waited a little too long to shoot and the sun passed the horizon, giving this more of a silhouette look. The floating effect was created by using the lensball stand and then removing it in post-processing.
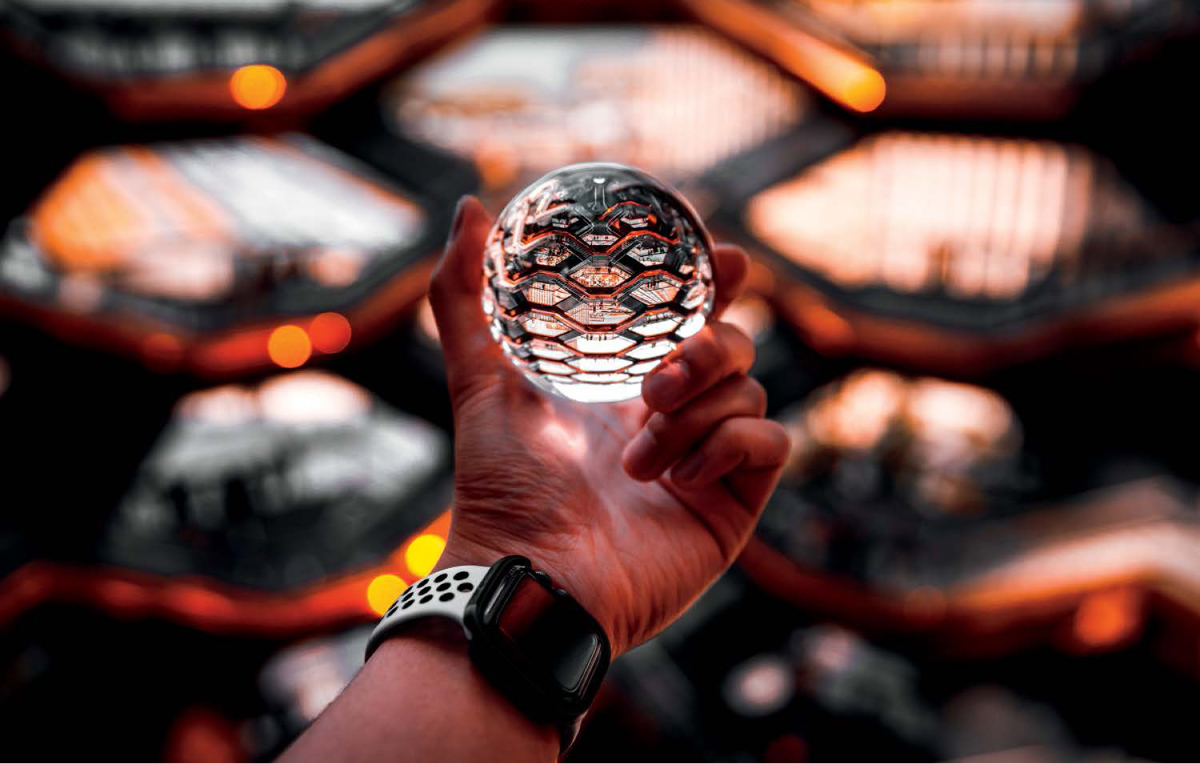
Figure 6.14
35mm | F/2.8 | 1/1000s | ISO 100
Figure 6.14 was captured at the Vessel in New York City. A widerangle lens was used to incorporate the repeating pattern in the background instead of leaving it too compressed. Shooting this at my usual 70mm focal length would have not left enough breathing room for the ball. To acquire a full pattern within the lensball, I had to aim it down because I was near the top of the structure. Shooting this leveled would have led to more of the white sky bleeding in from the bottom of the sphere. Even though this was shot at a wider focal length, because there was a good amount of distance between the ball and the background, it still produced a shallow-depth-of-field look. The lighting in this shot was reflective, as I relied on the sun to bounce off the metal structure to create a high-contrast image. The shot was taken midday to early afternoon, which helped draw out the defined highlights and shadows. I would have liked to have captured it with the sunset, but during this season the sunset was eclipsed by an adjacent building after five o’clock.
Capturing iconic structures like the Manhattan Bridge within a lensball makes the shot stand out more than a two-dimensional image of just the bridge as your subject (figure 6.15b). figure 6.15a was taken on a cloudy afternoon in Dumbo, Brooklyn, under diffused lighting. The overcast weather gave the photo an even, flat light throughout the scene. I used a telephoto focal length for this capture to bring out more detail from within the ball. Shooting at 50mm or lower would have weakened the separation between the ball and the bridge and allowed further distractions from the surroundings to creep into the image. Be sure to visit these locations at off-peak times to avoid tourists. Although I visited during a weekday, I still had to Photoshop a few people out of the lensball.
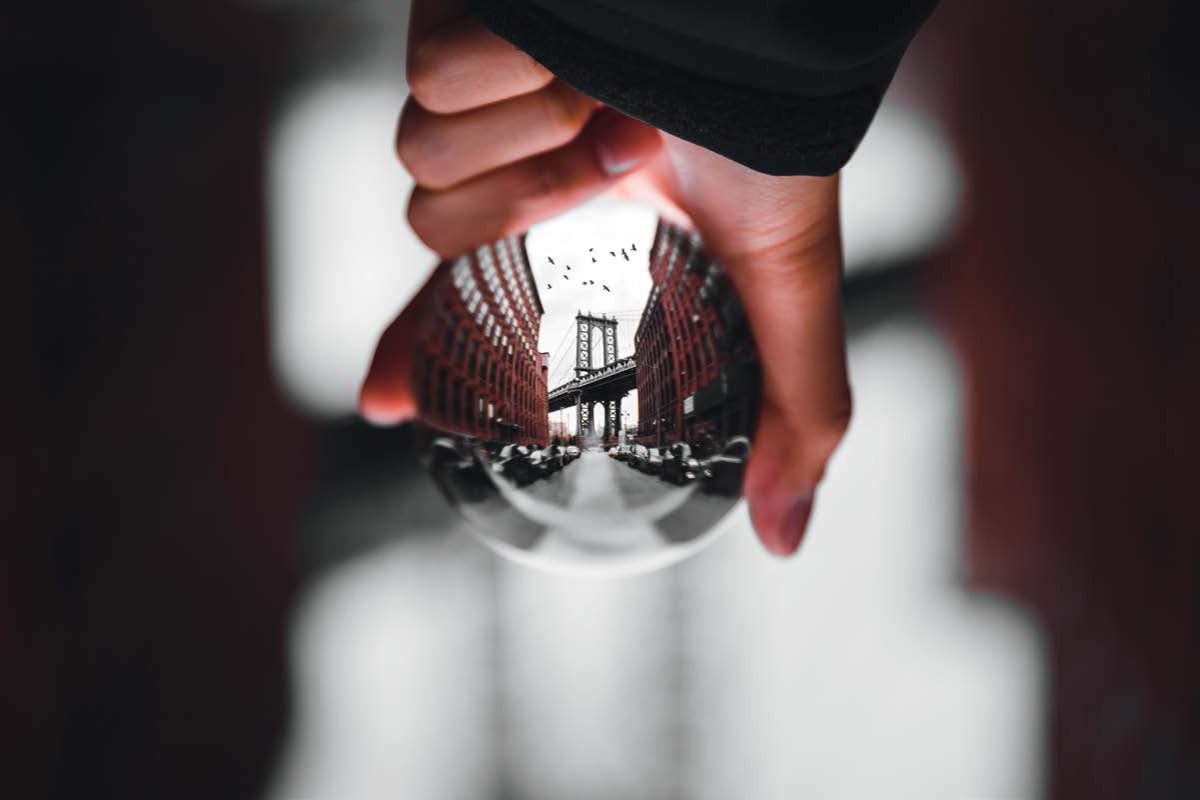
Figure 6.15a
70mm | F/2.8 | 1/320s | ISO 100

Figure 6.15b
24mm | F/22 | 1/160s | ISO 800
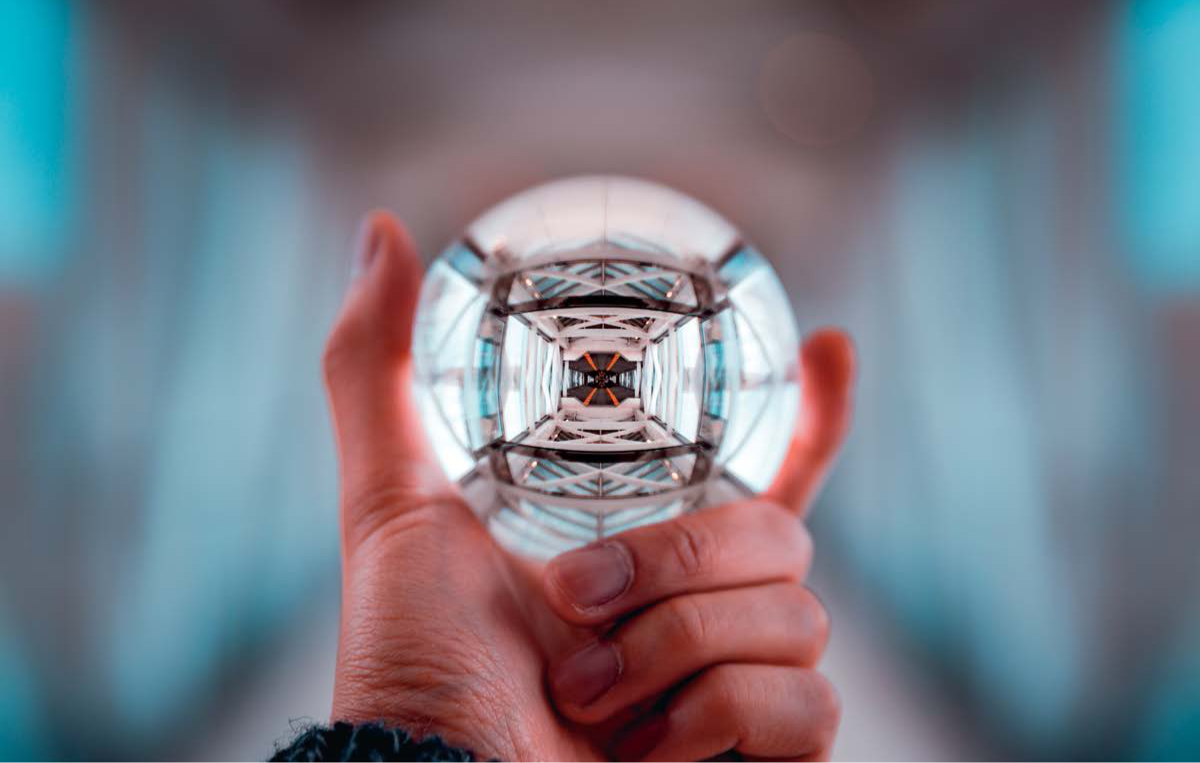
Figure 6.16a
70mm | F/2.8 | 1/125s | ISO 100
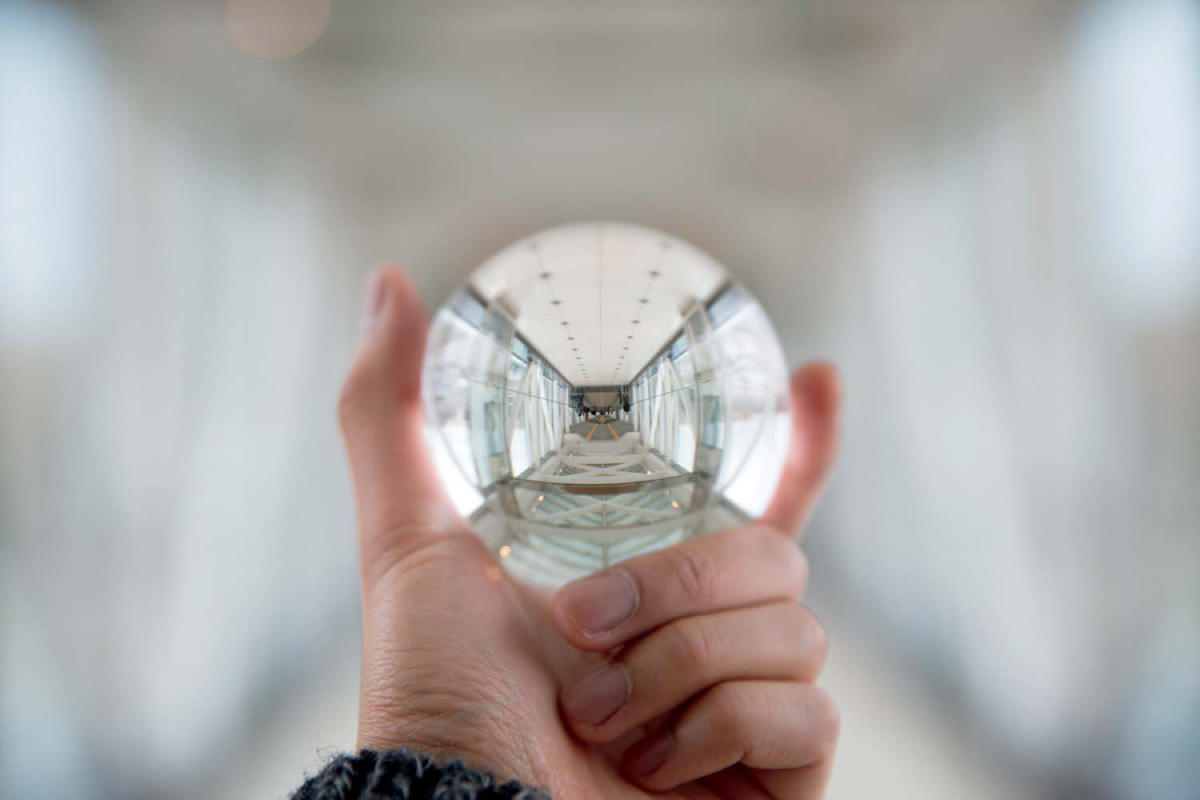
Figure 6.16b
Long hallways and corridors are excellent for defining leading lines in your shot. Be sure to stand directly in the middle and align the lensball so that the lines of the background lead into that of the foreground. Since the ball reflection and the background work inversely, any slight movement can throw you off alignment. I captured figure 6.16a on a bridge that connected two parts of a mall together. I focused on aligning the ceiling and floor edges with the compressed bokeh lines in the back to create cohesive leading lines between the two compositions. I then edited the inside of the ball to incorporate a flipped ceiling, as it was more interesting to look at than the floor (figure 6.16b).
Architectural elements such as ceilings can be great compositional tools. Be sure to look up next time you enter a tall building or structure to see if you can find anything unique to capture. You may be surprised that simple things like windows and stairways can become a main subject for your lensball photos. I would advise using a wide-angle lens for these types of images to capture more of the environment. As mentioned earlier in this chapter, circular backdrops create a unique frame for these types of captures (figures 6.17 and 6.18). Square and rectangular backdrops may not be as interesting, but it is always worth trying them out (figure 6.19).
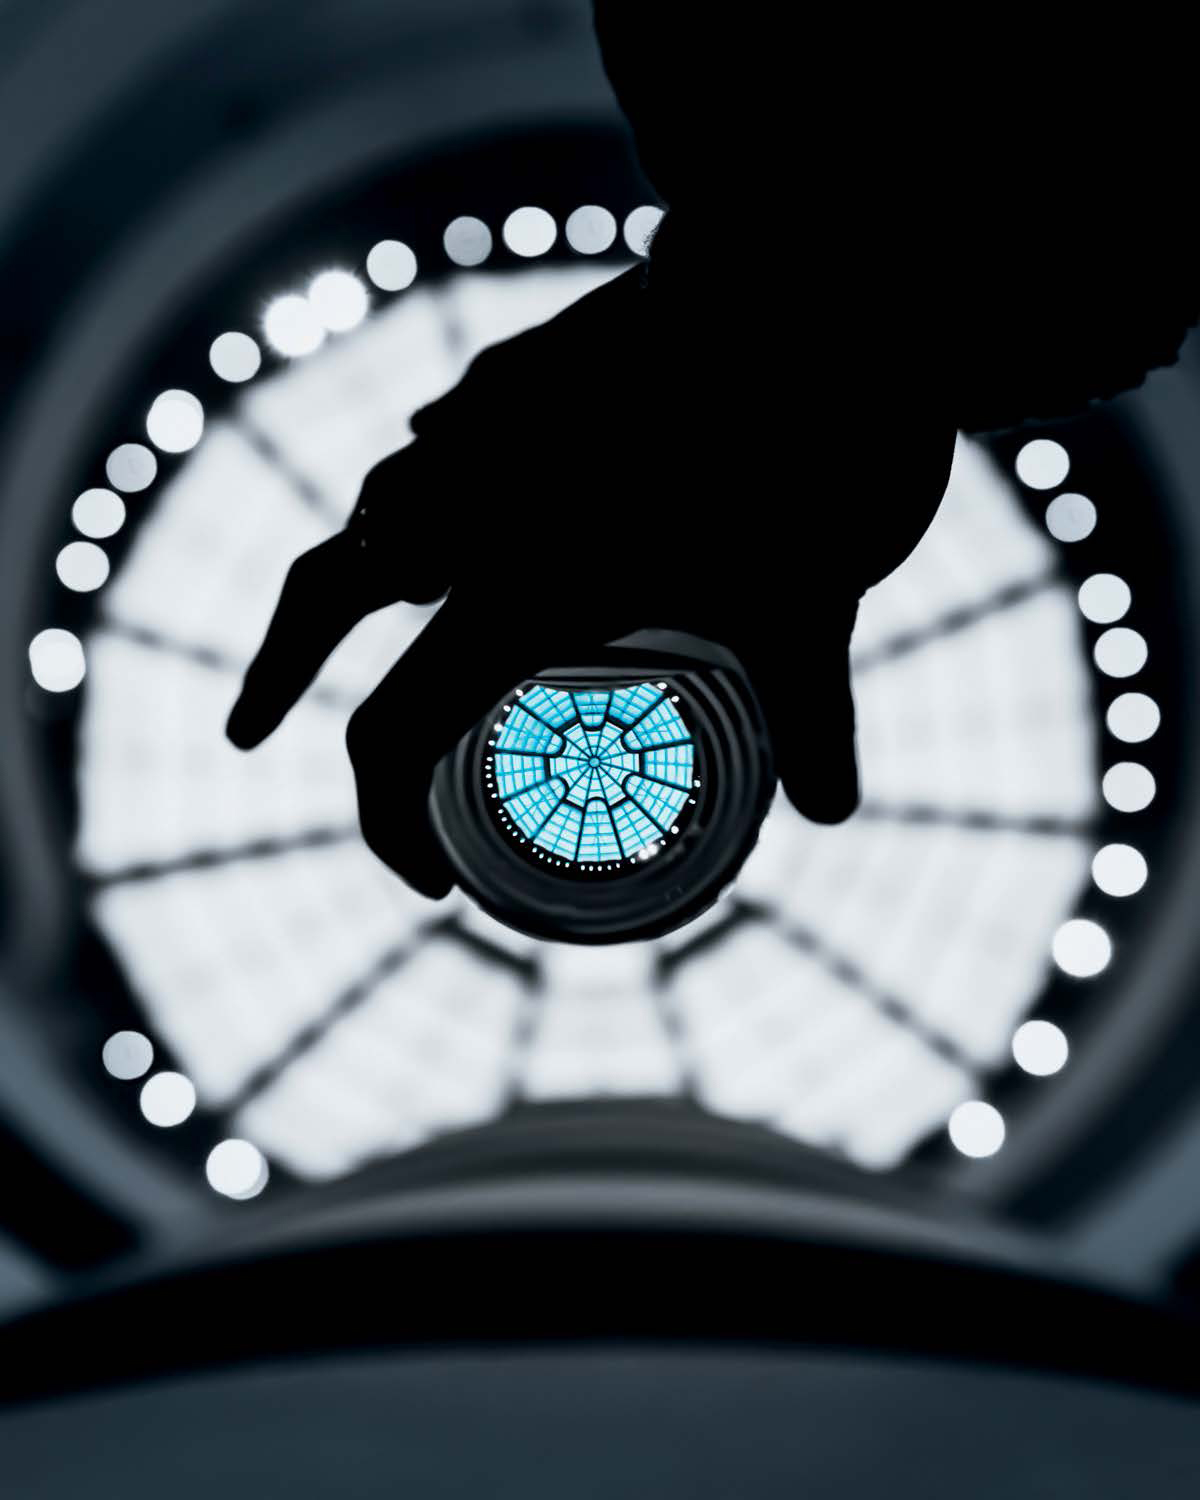
Figure 6.17
24mm | F/2.8 | 1/60s | ISO 100
I captured this image by aligning the lensball with the glass ceiling of the Guggenheim museum in New York.
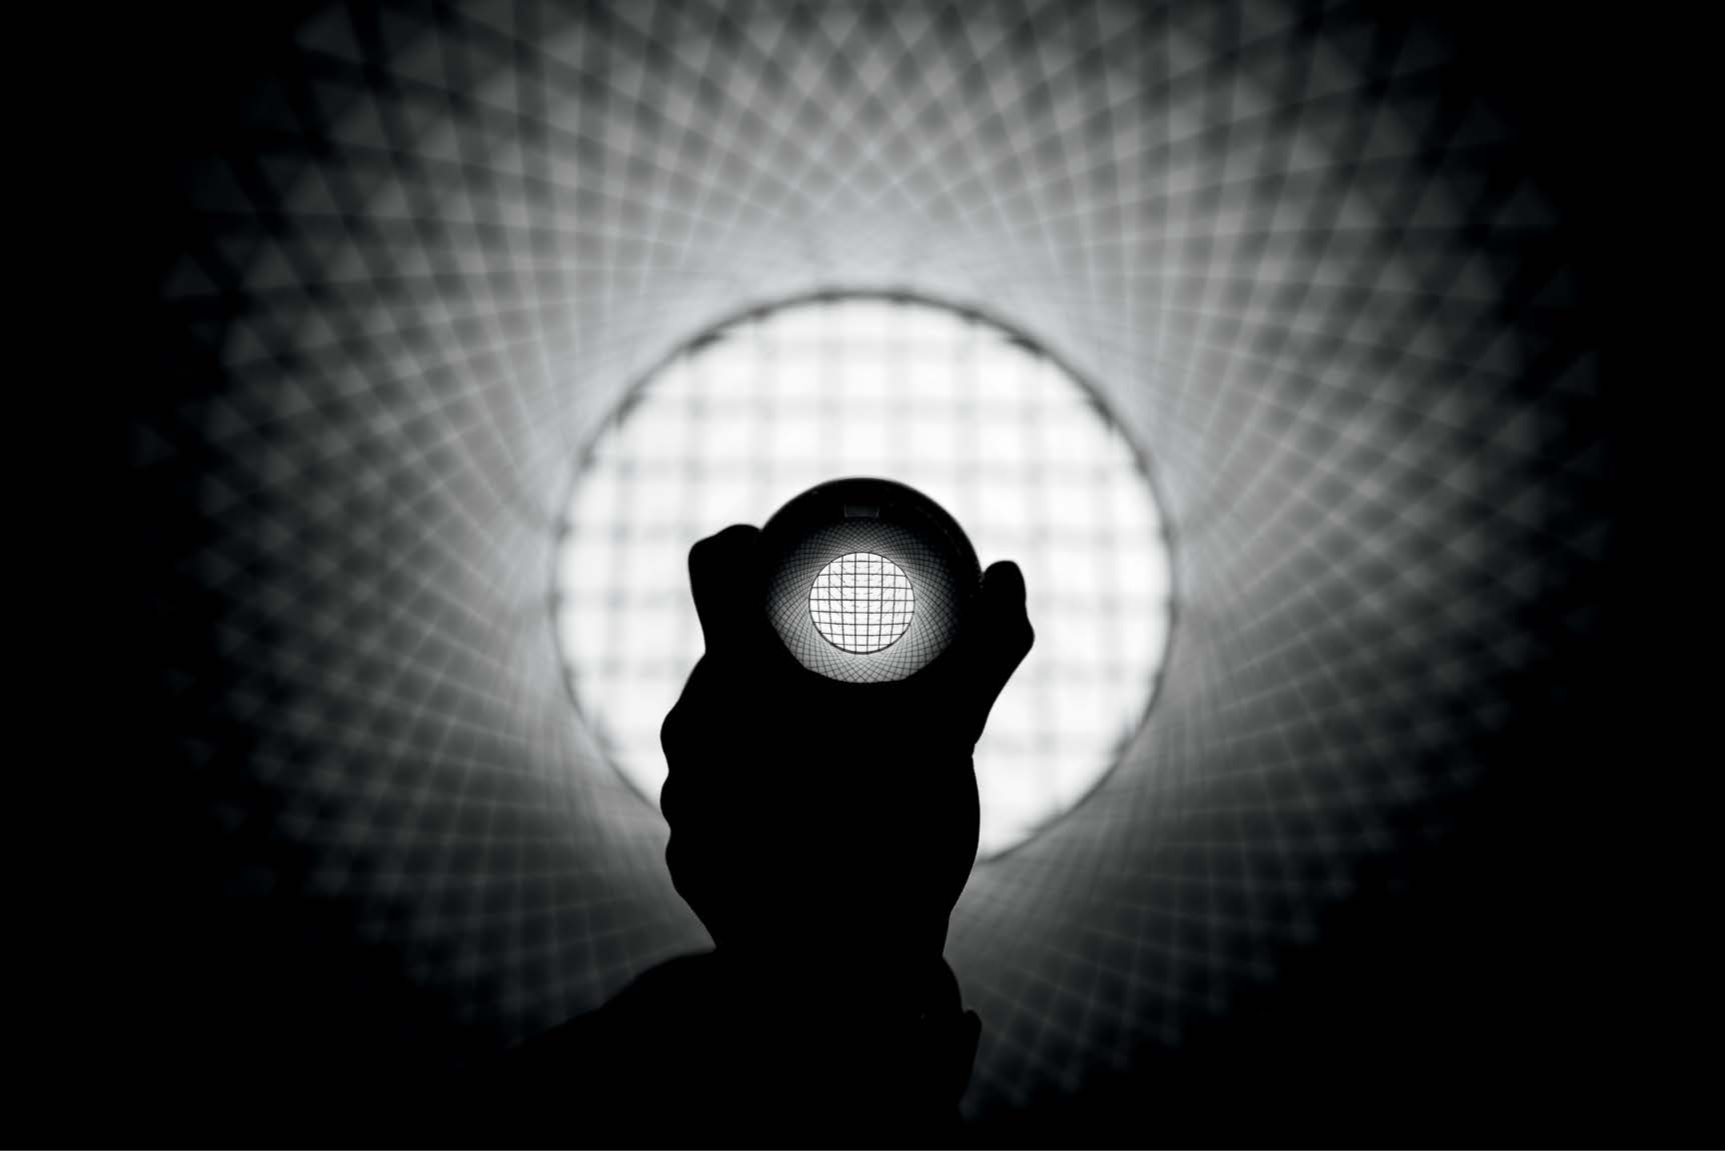
Figure 6.18
24mm | F/2.8 | 1/250s | ISO 100
To create the composition for this image, I stood directly underneath the Fulton Street subway station ceiling.
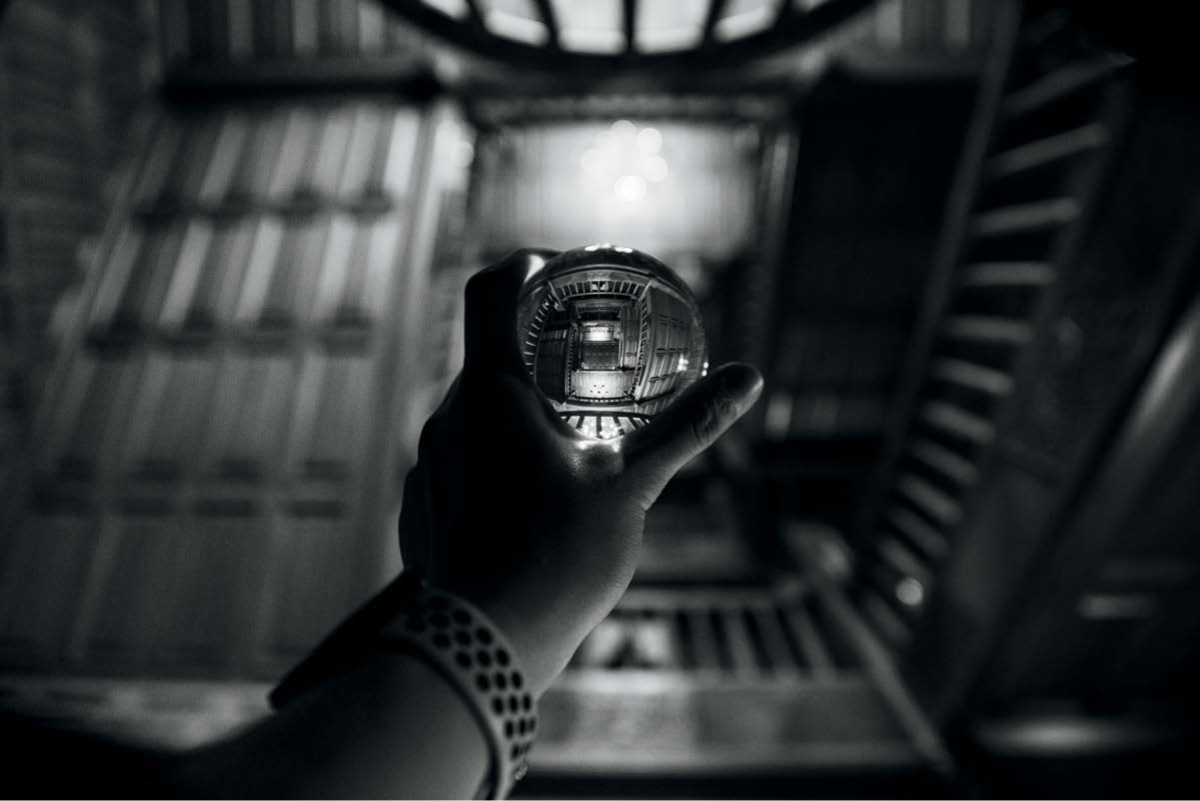
Figure 6.19
24mm | F/2.8 | 1/125s | ISO 1600
An example of utilizing stairways to frame a shot. I edited this as a monochromatic image to exemplify the compositional details.
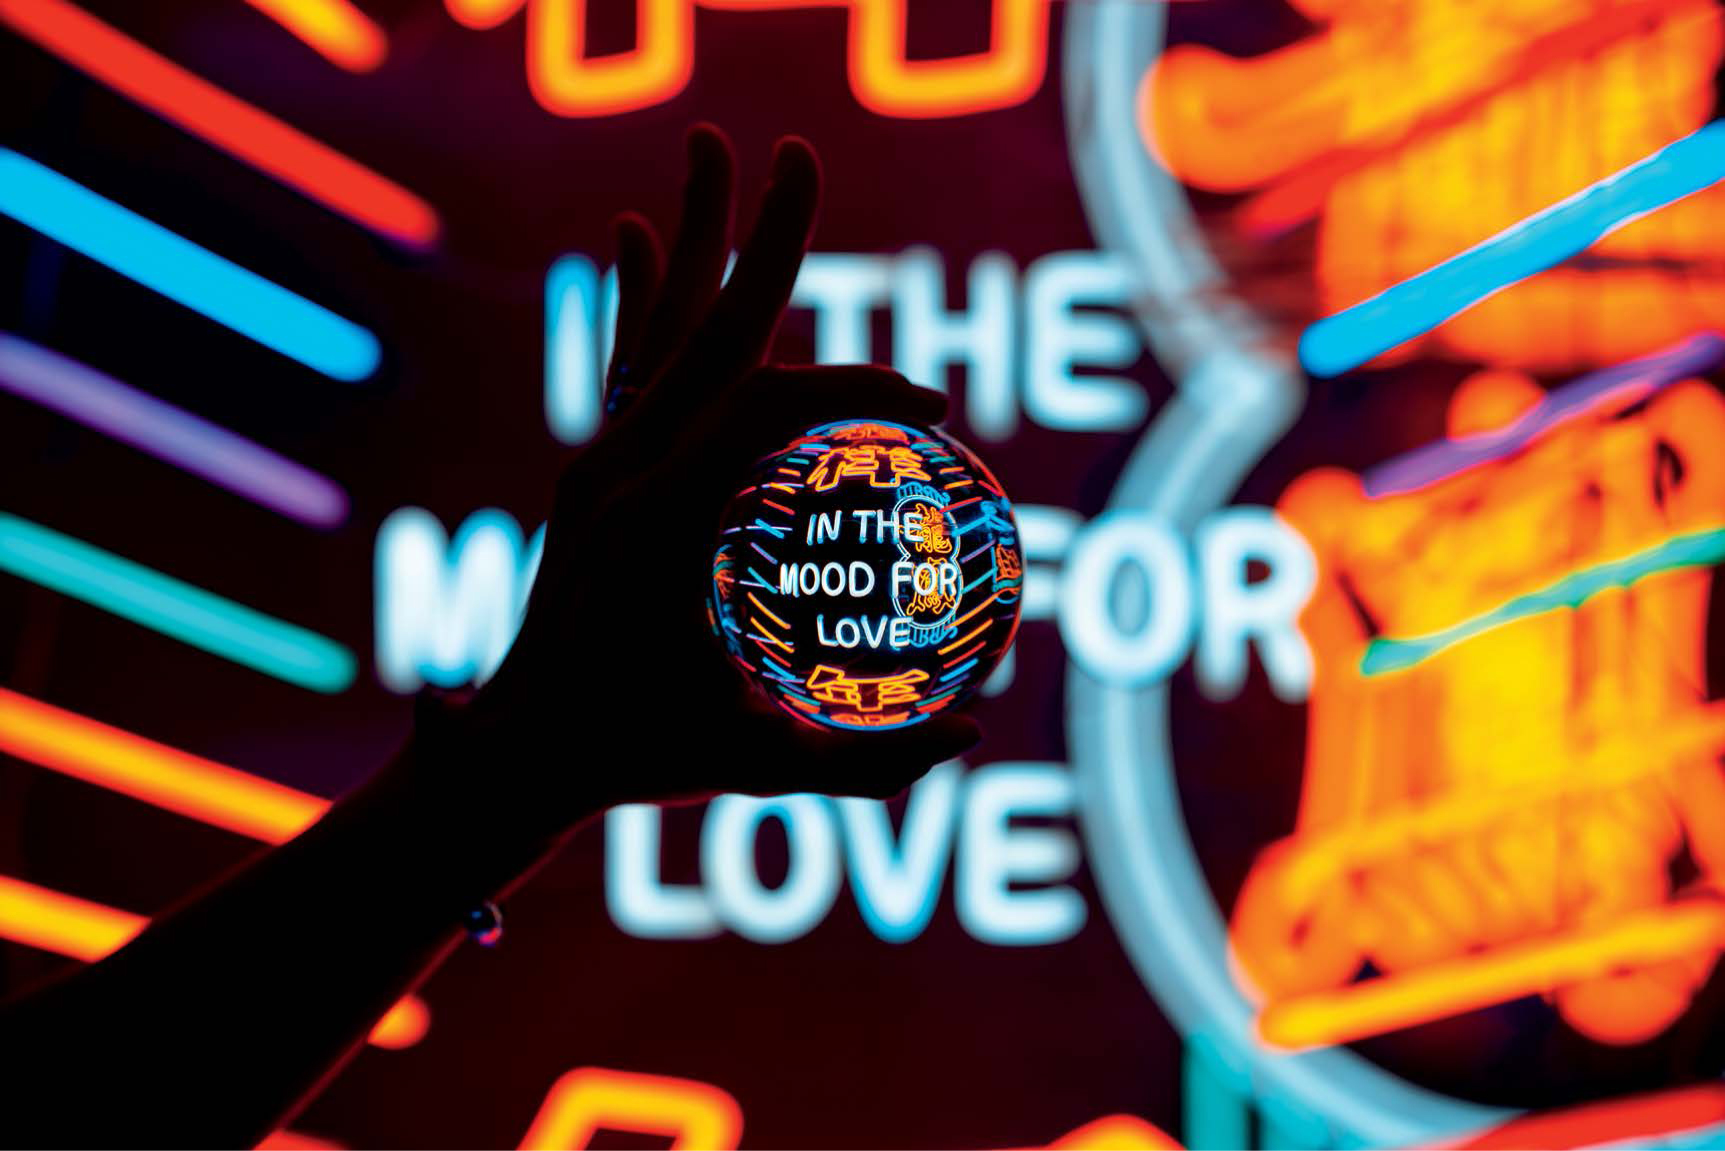
Figure 6.20
85mm | F/2.8 | 1/200s | ISO 100
I shot this image in front of a neon sign at an art exhibit in Manhattan. Because I was using an 85mm telephoto prime lens, I had my fiancé, Nicole, hold up the ball for me, as the minimum focusing distance was longer than my arm. I flipped the projection inside the lensball during post-production because I wanted the words to align with the backdrop.
Lastly, neon and LED lights can be used as strong subjects and backgrounds. Although lights are not tied specifically to the city, you will find they are more common in the streets or inside art exhibits. The best time to capture these scenes outside would be immediately after sunset. Capturing lights can also work during the nighttime, but you run the risk of the environment being too dark and introducing motion blur if you’re shooting with Auto or Aperture-priority settings (figure 6.22). It is easier to darken a properly exposed image than brighten an underexposed one. You can also find a good amount of colorful lights in arcades and at carnivals.
Figure 6.21
50mm | F/2.8 | 1/100s | ISO 100
For this photo, I placed the lensball over an interactive LED panel at a Sony pop-up exhibit in the city. I used a triangular glass prism to reflect the light pattern from the back to help frame the image.
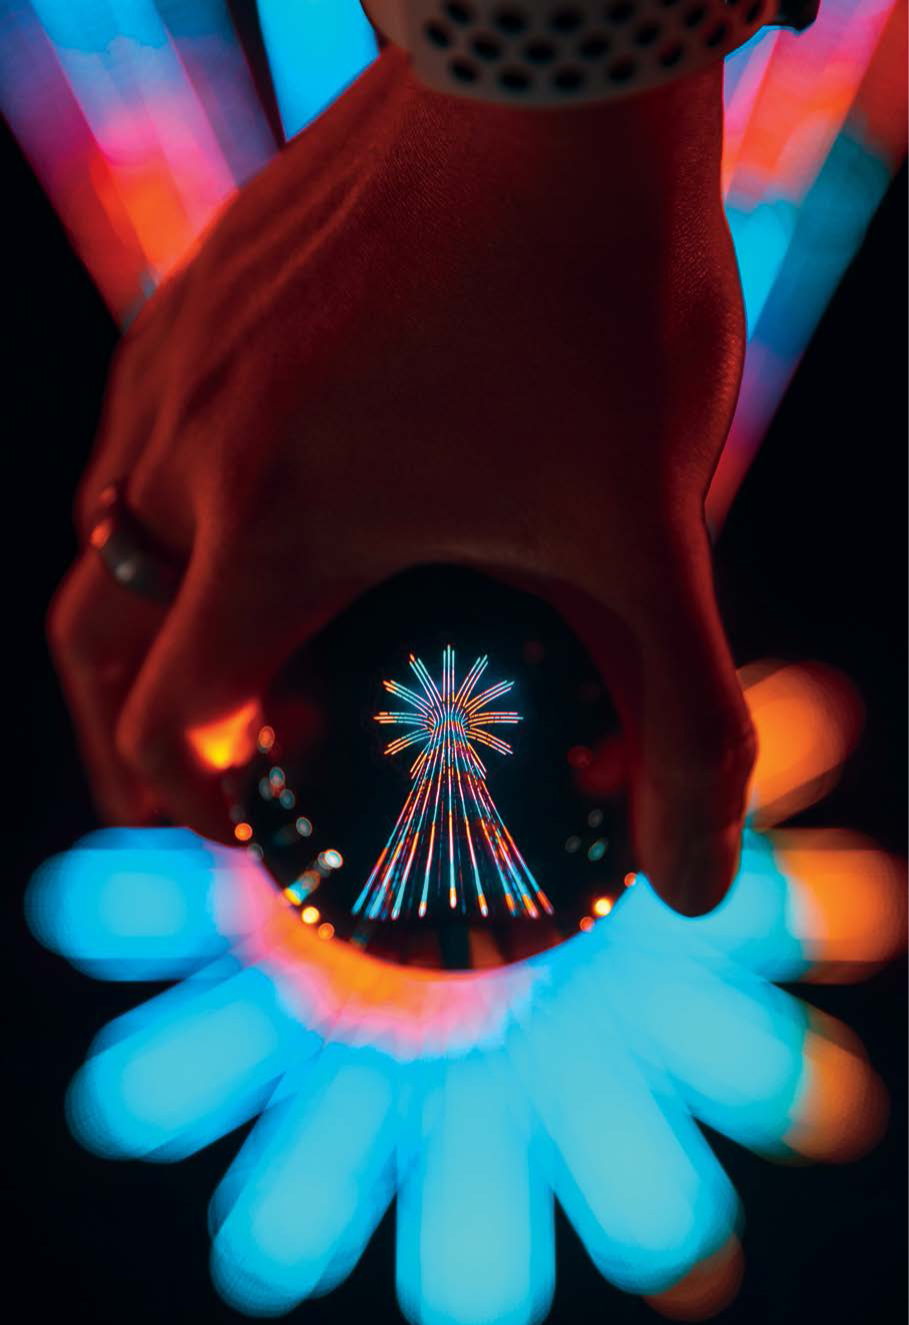
Figure 6.22
50mm | F/2.8 | 1/80s | ISO 800
I took this photo at Coney Island Park in Brooklyn, New York. It was way past sunset and there was limited lighting to maintain a balanced exposure between my hand and the background. I also had to increase my ISO and drop my shutter speed to get a decent shot.
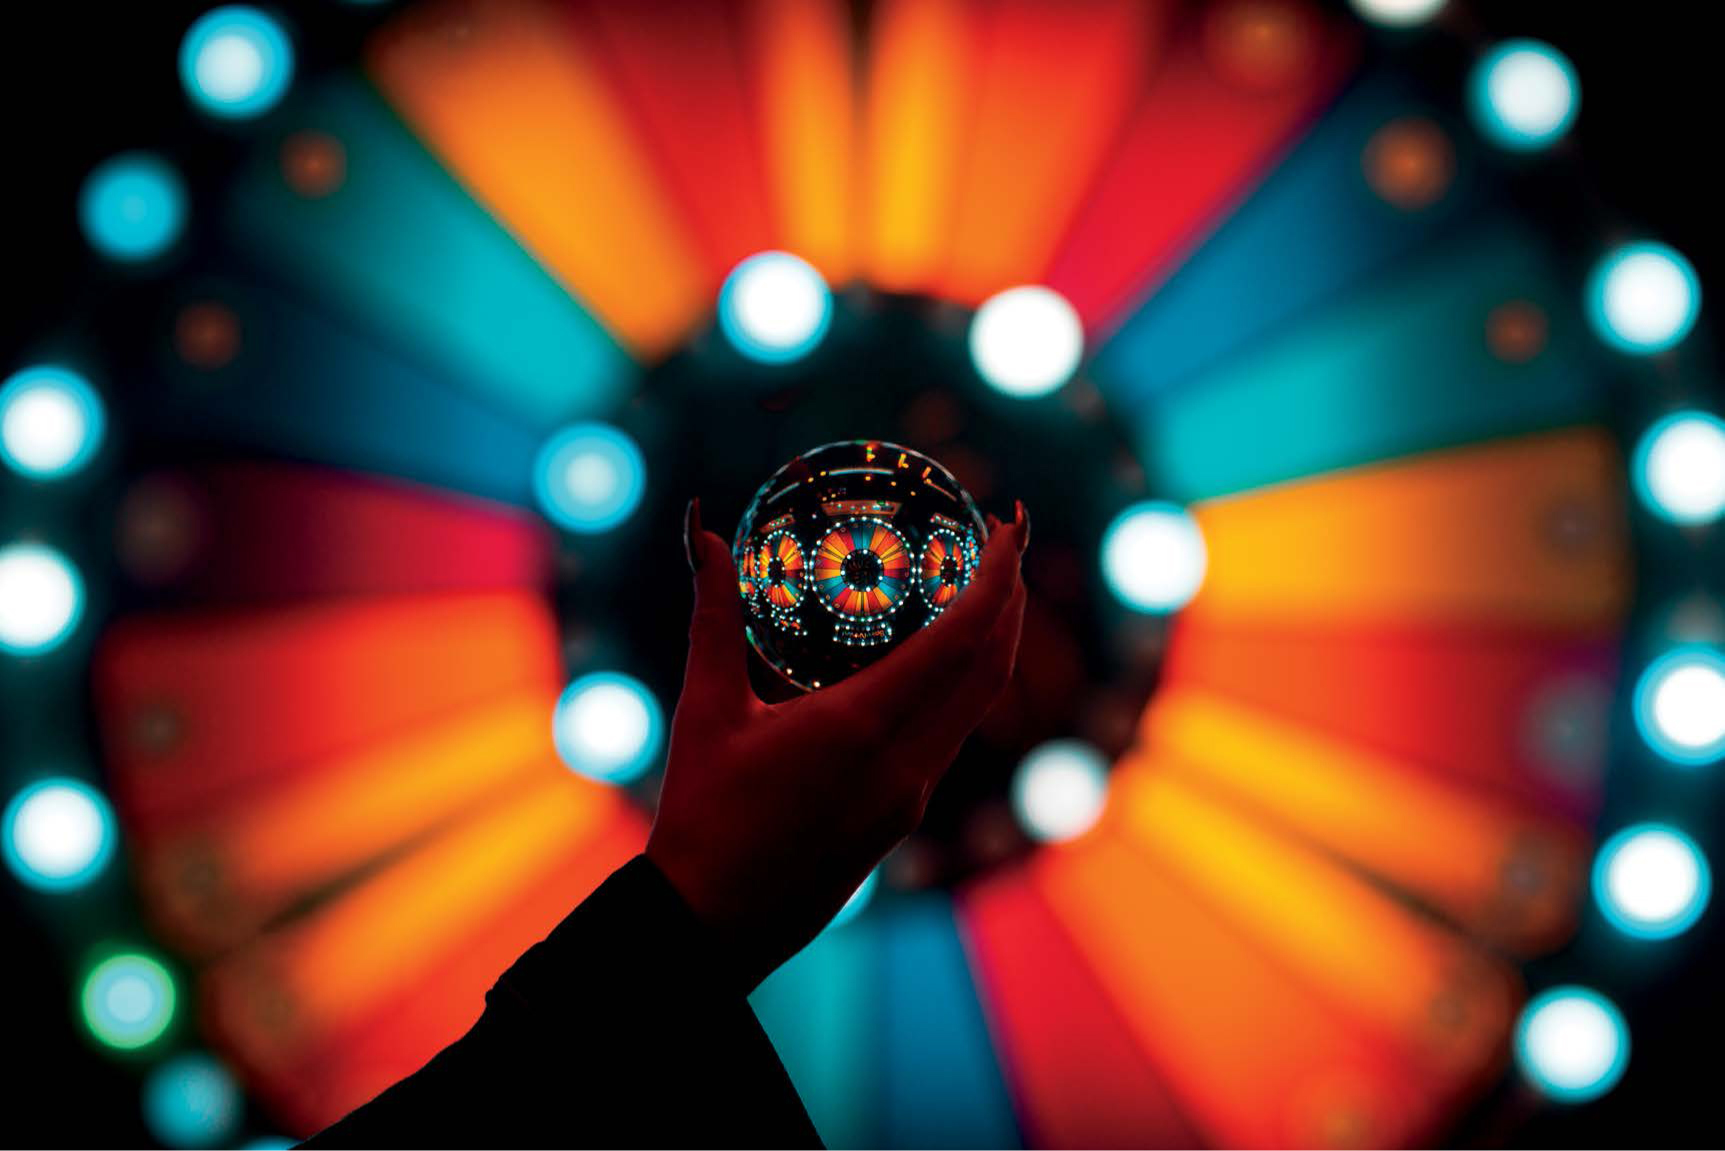
Figure 6.23
85mm | F/2.8 | 1/250s | ISO 640
Find ways to use lighting to frame the shot. Not every photo needs to have the main focus inside the lensball. I took this photo at a local arcade near my house, with the lensball held up by my friend Danielle.
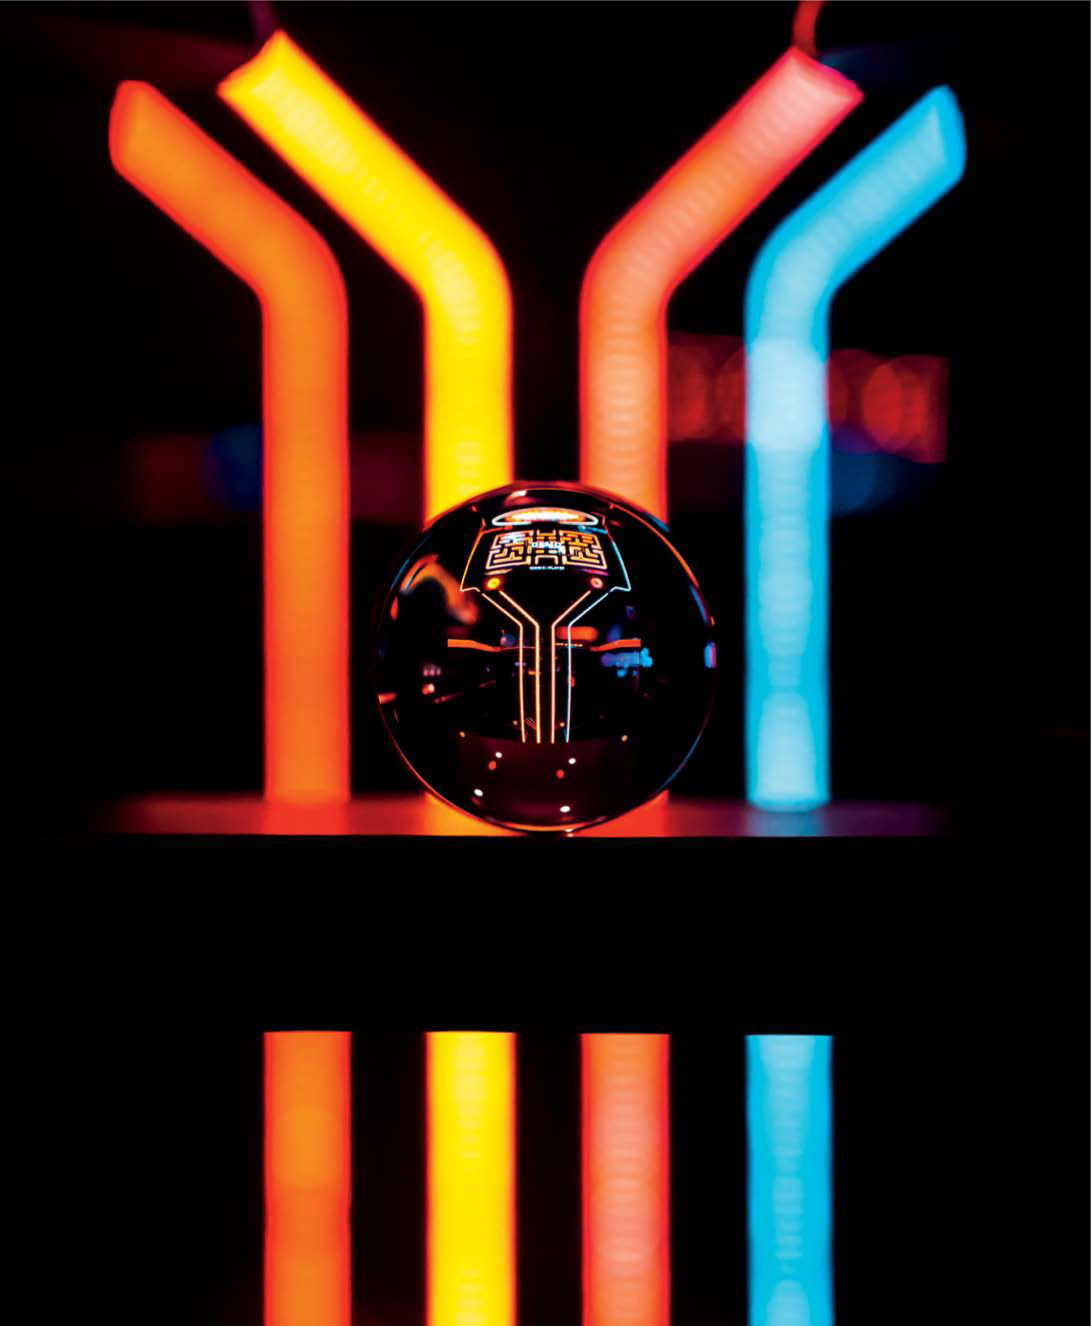
Figure 6.24
85mm | F/2.8 | 1/250s | ISO 4000
For this image, I positioned the lensball on the ledge between two Pac-Man machines. The ISO was pumped up to 4000 to maintain a high shutter speed so that motion blur would not be apparent in the final image.