Autopsy is an opensource web application that is meant to be a GUI frontend for using the Sleuth Kit. It is built on the traditional LAMP stack. You may upload image files to Autopsy and then examine and analyze them. It provides the same basic functionality of other, more advanced forensic suites such as X-ways, Encase, or FTK, in that you can manage many different cases, export data, easily view metadata, and perform string searches. However, you cannot perform other more advanced functions, such as carve for files.
To use Autopsy, go to the Forensics section of the Applications menu and click on Autopsy. Autopsy is a web-based application, so a terminal window will open and start Autopsy's services. You'll need to leave this window open. Closing this window will kill the running services:

As shown in the preceding image, to use Autopsy, open a web browser and go to http://localhost:9999/autopsy. The home page will open, allowing you to set up a new case or open an existing case. Since this is the first time, we will open a new case. Autopsy doesn't have a login, so it is best to use this only on a protected network. Also note in the following screenshot that the site gives you a warning that Java Script is enabled. We are using this on a protected network with no Internet access so this isn't a problem (love the hound dog):

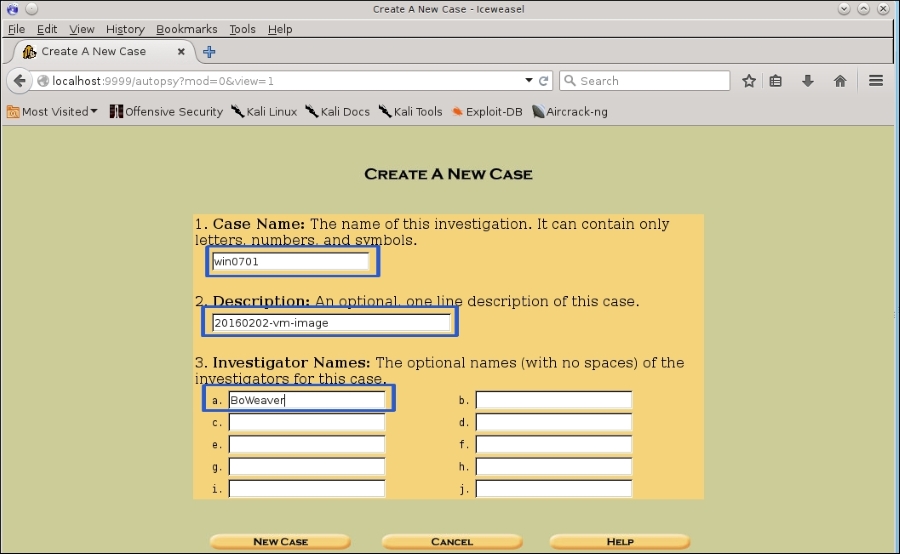
Click on the NEW CASE button to create a new case. This will take you to the following page:
- Enter a Case Name. This name cannot have special characters or blank spaces, only numbers and letters.
- (Optional step) Add a description if you like. If you do a lot of these, it is probably a good idea to have a clear description.
- Add an investigator's name. This is used to label data in the different processes, which is handy in reports and is absolutely necessary when gathering legal evidence.
- Click the NEW CASE button:
Next you will be asked to add a host:

- Fill out the host name using the machine's FQDN.
- (Optional Step) Add a description if you like.
- Enter the Time zone. If left blank it will use the system's time.
- (Optional Step) You can also set a Timeskew to show how many seconds the target computer differs from standard time, which normally isn't needed.
- (Optional Step) Since we are setting up a new host with a new image, we will not need to add a path to the hash databases.
- Click on the Next button to continue:

This takes you to the following page to add the disk image to the case. Click the ADD IMAGE button:

You will then be given the following page. Click on ADD IMAGE FILE:

We're going to use the Windows 7 image we pulled using Guymager earlier. Our images are on a mounted USB drive and our path in this demo is /media/root/usbdisk/win70020160202B.*. This is a disk image we pulled using the .dd format. When we pulled this image, an info file was also created along with the .dd data image. As shown in the following, when adding the file path to the image, end the image name with .*. This will wildcard the image and read both the info file and the data file. This is also helpful when using an Encase image that has been divided into image slices. When using this with Encase, or Guymager outputting in Encase format, you'll have several data files ending in .Exx (that is, E01, E02, E03). Using the wildcard in the filename will find all these image slices and combine them in a usable and searchable format. The info file will import the metadata from the cloning process for investigation.
Since this is an image, pick the Image radio button.
If you have a standalone system for this task with a large amount of space you can choose either Copy or Move radio button. Since we are using a USB disk version with not much space, we have chosen the Symlink radio button. This allows the actual data to remain on the mounted disk and just imports the necessary metadata and sets up symlinks to the actual data into Autopsy. This saves on local storage space. Click the Next button to start the process:

The next page shows you the files found to verify before running the analyzed image. In the following, we see the image file and the info file. Click next to verify the files:

This being a Vmware image, it doesn't know the filesystem type. This is OK; however, in this mode you cannot see the file tree. All of the data is still searchable and retrievable by the sectors rather than through a file tree. Since this was made using the dd tool, this is a disk image, so pick the Disk Image radio button. Since this is Windows, pick dos as the file system type from the drop-down menu. Then click on the OK button:

Next, you are presented with the Disk Image Details page. Here you can set up a verifiable hash for the file system. This is needed in legal information. The hash is a proven way the data has not been tampered with. If you do choose to run the hash, be sure and pick the Verify the hash after importing check box to check that things worked fine. Click the ADD button:

This will take a while, depending on the size of the image. Once you have done a couple of dozen, you will be able to gauge approximately how long it takes for your setup to run the analysis. Get a cup of coffee, and relax:

Once this is run, you will see the following page. This shows the details of the import, the hash value of the import, and the evidence locker image name. Note that you have the ability to add another image by clicking on the ADD IMAGE button. This will take you back through the same steps to import another image to the same Case. If you have only one image, then click OK to continue:

Once all your images are added and you have clicked OK, you are brought to the Gallery page:

Clicking on the details link will get you a page showing the details of the imported image. You are also given an EXTRACT STRINGS button. On the first setup of an image, you will want to run this. It will take a while, but it will speed up your searches:

If you have clicked the EXTRACT STRINGS button, you will see the following screen:

Once this is run, you'll see the results. Clicking Image Details gives you a page with the images details. The Keyword Search link takes you to the search page:

After clicking the Keyword page, you can use regular expressions to search the sectors for data in either in ASCII or Hex. Previous searches and default searches are listed as buttons near the bottom of the page:

If we run a search for password =, we get the following result. We have clicked one of the links in the left-hand column. The info pane shows that we have pulled up a configuration file for the IIS email service:

In our next example, we will use an actual hard disk image from a Windows 7 machine. In this example, you can see that we have basically mounted the file system, and have a file tree to work with. Using this method, we have a lot more search tools, including the ability to recover deleted files.
First we set up a new case as we did in the previous example, right up to where we Add a New Image. This time, we pick partition instead of disk, as we did in the previous example.
As seen in the following, first enter the path to the disk image. Then click the Partition and the Symlink radio buttons and click NEXT button:

This time we are going to ignore calculating a hash for the image to save you from reviewing the hashing process, and to save time in the exercise. Do not skip this step if you are processing real physical evidence. Note that this time we have a section where we set a mount point, and set the file system type to NTFS in the drop-down box. By default, the mount point set is C; if this was a different drive on the original machine, change it to match the original drive set up:

After clicking the ADD button we get the following page. Clicking OK will start the testing of the partition:

Clicking the ANALYZE button starts the process and sets up the symlink table:

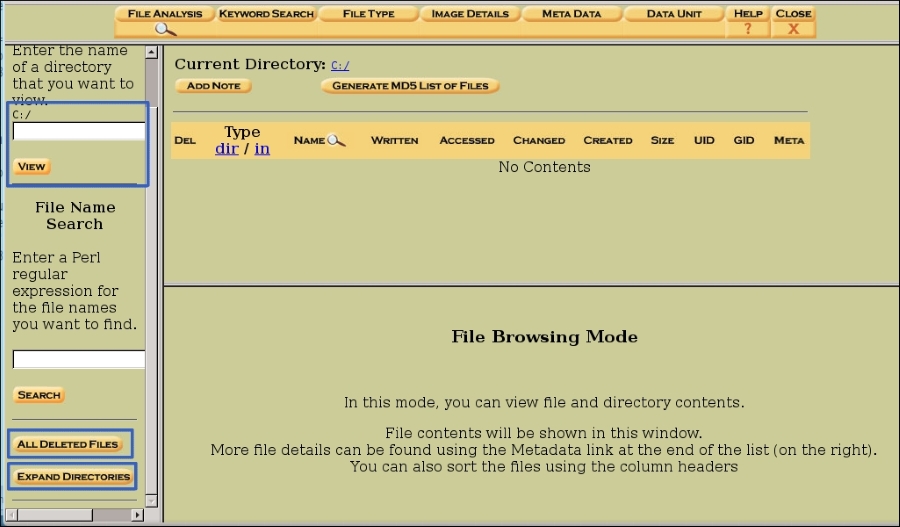
You get an instruction page asking how you want to analyze the disk. Pick FILE ANALYSIS:

This brings you to the File Browsing page. We haven't searched yet, so the content area is empty. To the left, we have three ways to browse the disk. The first section you can view by naming a directory to browse, by entering the name of the directory in the text files and clicking VIEW. Next, you can search the whole disk for files containing the results of a regular expression search. The third section you can browse for deleted files, and in the last you can expand the disk to see all the directories on the disk.
First, let's look for deleted files by clicking the ALL DELETED FILES button:
After clicking the ALL DELETED FILES button, Autopsy runs a search of deleted data. By clicking the link, the raw data of the file shows in the window below the file tree. Bear in mind this is deleted data, so some information in these files could be corrupted:

By clicking the EXPAND DIRECTORIES button, we see the file tree of the partition. As you can see in the following example, hidden system directories can be seen and viewed. Deleted information is shown in red:

Below, we are going into the C:Users directory and pulling a file's information. Going into the Users directory, we find an account called whalton. Going into this account, we find the working data for this book:

When you click the Report link, Autopsy generates a report on the file, which includes hidden system metadata. Using the Export link, this report can be exported for later use in a report.
By clicking the FILE TYPE button we can view by file types. Using this, you can sort the image and pull a copy of the sorted files to a directory on the Kali machine. You can also set it to just pull images, and save them as thumbnail images. Since we are using a small VM, and inspecting a disk dump from a real laptop, we won't have room to make a copy of the sorted files. In an investigation, you would want to do this so that you can search the copied files without really touching the disk image in evidence. The same is true when using the photo image tool.
Click the OK button, and Autopsy starts to analyze and sort the files by file types. This will take a while. Time for more coffee:

The following image shows the filetype analysis running:

OK, after a good cup of coffee, and a walk in the woods, we now have sorted data. The summary gives a breakdown of the number and types of files on the system. We can also see the number of non-files and reallocated file names. We also have a list of the number of each type of file on the machine:

When clicking on the Sort Files by Type link, we get an error that Autopsy does not support viewing sorted files, but you can view the files at the path shown. (Seems they could have made this a link). No worries. Copy the path shown, and open another tab in your browser and paste the path in the address bar of the new tab and hit Enter:

After entering the file path on the new tab, you will see the following page, with links leading to the file information by type:

By clicking one of the links, we see the file information. Let's click documents and do a little looking. Once the documents page has loaded, we can use the browser's Find command to search for document names. Here we are searching for files with the string password in the name:

This has explained the basic functions of Autopsy. For more information and full documentation, please see their website at http://www.sleuthkit.org/informer/.