The simulator package Gazebo was introduced in Chapter 2, Creating Your First Two-Wheeled ROS Robot (in Simulation). If you run the examples there using the differential drive robot, dd_robot, you should have a good understanding of Gazebo, including how to load models and worlds and manipulate the environment.
To run the simulator, you need to install the TurtleBot software, as described in the previous section. If you view the tutorials of TurtleBot Gazebo from the ROS wiki, make sure that you select Indigo since that should be your distribution of ROS.
To start the simulation, open a new terminal window and type the following command:
$ roslaunch turtlebot_gazebo turtlebot_world.launch
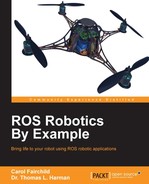
If all goes well, you will see a screenshot similar to this one:
TurtleBot simulated in Gazebo
If you do not see Gazebo start, refer to the following Problems and troubleshooting section. If that is the case, there are a few issues that may help you if you are having problems with the simulation and the use of Gazebo. TurtleBot is in the approximate center of the world view, as seen from an overhead camera.
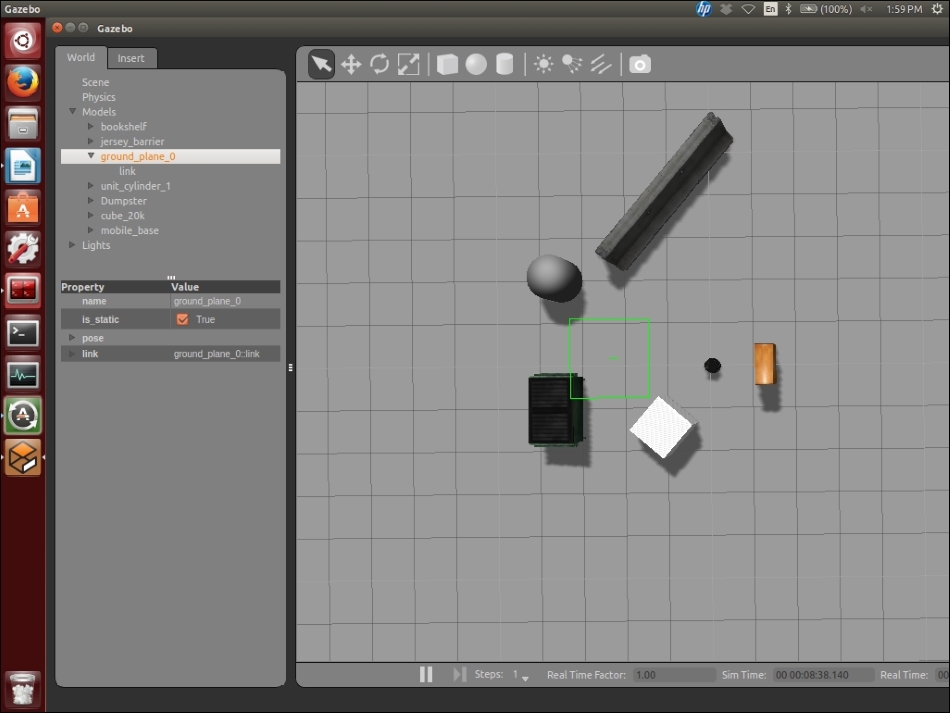
Right-click on the scene over TurtleBot, and from the menu that appears, select View and Joints to see the x, y, and z axes used by the TurtleBot simulator. Of course, TurtleBot will only move along its own x axis and rotate about its z axis. The following screenshot shows the result of zooming in on the TurtleBot and displaying the axes from choosing Joints:
TurtleBot simulated with joint axes shown
If you have modified the scene, you can take a picture of it by left-clicking on the camera icon on the toolbar. You can save the world using the Edit tab on the menu bar.
The authors have tried their best to present the material in a clear manner so that you can follow along and achieve the same results. However, computers may differ in their abilities to run simulations that rely heavily on graphics, as Gazebo does.
We have run the code on relatively new laptops, older laptops, and on a powerful workstation. On a laptop, the response to commands from the keyboard may be slow, sometimes painfully so! Be patient: if the software is working, the TurtleBot will respond if commanded to move.
Some serious problems that may occur are as follows:
- On some older laptops, the hardware accelerator will not allow Gazebo to run, but this can be fixed by adding the following statement to
.bashrcfile, which disables the hardware accelerator:exportLIBGL_ALWAYS_SOFTWARE=1 - You may need to execute the
roslaunchcommand several times if Gazebo fails to come up on the first or second try - Sometimes, it is necessary to close all the windows and start over if the system does not respond
- If you execute the
roscoreorroslaunchcommand, and you have changed your ROS Master address using anexportcommand to be linked to the TurtleBot network, as described later in this chapter, you may receive an error message similar to this:ERROR: unable to contact ROS master at [http://<IP Address>:11311]
The traceback for the exception was written to the log file
It probably means that the ROS Master address is incorrect for your local machine. Usually, the problem can be fixed by issuing the following command:
$ export ROS_MASTER_URI=http://localhost:11311This returns the ROS Master control to your local computer to run the simulator. You must run this
exportcommand in each new terminal window that is opened.Check the results for these environment variables with the following command:
$ env | grep ROSMake sure that the
ROS_MASTER_URIvariable points to the proper location.
For more information on computer and network addresses, refer to the Networking the netbook and remote computer section in this chapter.
In the left-hand side pane of the Gazebo window, the list of models will appear when you click on Models. Notice, particularly, the mobile_base link. You can find the position and orientation of the base with the rosservice command. In a new terminal window, type the following command:
$ rosservice call gazebo/get_model_state '{model_name: mobile_base}'
The output of the preceding command is as follows:
pose:

  position:
    x: 0.00161336508139
    y: 0.0091790167961
    z: -0.00113098620237
  orientation:
    x: -5.20108036968e-05
    y: -0.00399736084462
    z: -0.0191615228716
    w: 0.999808408868
twist:
  linear:
    x: 9.00012388429e-06
    y: 6.54279879125e-05
    z: -1.4365465304e-05
  angular:
    x: -0.000449167550145
    y: 0.000197996689198
    z: -0.000470014447946
success: True
status_message: GetModelState: got properties
Looking at the position and orientation, we can see that the TurtleBot base is approximately at the center (x=0, y=0, z=0) of the grid as you can see by zooming out in the world view. Since so many decimal places are shown, it appears that the TurtleBot is off center.
However, if you notice, the first two decimal places in the position are zeros, and you can see that the values are very small, near zero. The orientation is also near zero and is represented in a special notation called a quaternion.
To see the complete list of services, type the following command:
$ rosservice list
You can also use the rosnode list or rosmsg list ROS commands, as was shown in Chapter 1, Getting Started with ROS, to list the nodes or messages.
With ROS commands, you can move the TurtleBot as we did with the turtle in Turtlesim in Chapter 1, Getting Started with ROS. First, find the topic that will control the mobile_base link since that is the name given in Gazebo's left panel:
$ rostopic list | grep mobile_base
The output is as follows:
/mobile_base/commands/motor_power
/mobile_base/commands/reset_odometry
/mobile_base/commands/velocity
/mobile_base/events/bumper
/mobile_base/events/cliff
/mobile_base/sensors/bumper_pointcloud
/mobile_base/sensors/core
/mobile_base/sensors/imu_data
/mobile_base_nodelet_manager/bond
Now you can find the message type published by the rostopic /mobile_base/commands/velocity that moves the base by typing the following command:
$ rostopic type /mobile_base/commands/velocity
The output is as follows:
geometry_msgs/Twist
From the previously shown screen printout of the rosservice command to call gazebo/get_model_state, you can see that the twist is a six-dimensional value although all six need not be specified. The values represent velocities, which in the case of the TurtleBot represent the linear velocity along its forward x axis and the angular velocity about the vertical z axis. A reference is available at
https://en.wikipedia.org/wiki/Screw_theory.
If you drive the turtle with a command, the possible motions are linear along its x direction and angular rotation about the z axis since the TurtleBot moves on the xy plane and cannot fly. To drive it forward, run the following command:
$ rostopic pub -r 10 /mobile_base/commands/velocity geometry_msgs/Twist '{linear: {x: 0.2}}'
Notice that the TurtleBot moves forward slowly until you stop it or it drives off the screen or it hits one of the objects in the environment. To stop its motion, press Ctrl + C. To bring the TurtleBot back, change the value of x to x: -0.2 in the rostopic command and execute it.
There are many other features of Gazebo that can be explored, and you are encouraged to try various selections on the menu bar (File, Edit, View, Window, and Help). Also, you can open the rightmost third panel and change the values of Force, Position, or Velocity for the TurtleBot simulator.
A command to launch the teleop mode using the keyboard keys to move TurtleBot on the screen is as follows:
$ roslaunch turtlebot_teleop keyboard_teleop.launch
This command allows keyboard keys to maneuver the TurtleBot on the screen. The keys to command the motion are as follows:
Control Your Turtlebot!
---------------------------
Moving around:
   u    i    o
   j    k    l
   m    ,    .
q/z : increase/decrease max speeds by 10%
w/x : increase/decrease only linear speed by 10%
e/c : increase/decrease only angular speed by 10%
space key, k : force stop
anything else : stop smoothly
CTRL-C to quit
currently:  speed 0.2  turn 1
Think of the letter k as the center of TurtleBot looking down on it. Start with the letter i to move the TurtleBot straight ahead along its x axis and try the other keys.
Remember to click on the window in which you executed the roslaunch command to move TurtleBot. This is termed focusing on the window.
The reference for TurtleBot teleoperation is found at:
http://wiki.ros.org/turtlebot_gazebo/Tutorials/indigo/Explore%20the%20Gazebo%20world
For now, we leave Gazebo and concentrate on installing software to control the real TurtleBot. However, even if you do not have access to a real TurtleBot, many of the commands and scripts that will be presented can also be used with the simulated TurtleBot. In fact, ideally, the Gazebo simulation should reflect the motion of the real TurtleBot in its environment.
For example, we later present a Python script that moves the real TurtleBot forward. You can use the command to run the script with Gazebo also.