Crazyflie is a quadrotor that is classified as a micro air vehicle (MAV), as it only weighs 27 grams and can fit in your hand. It was developed and manufactured by Bitcraze AB and comes as a kit—ready to assemble with no soldering required. The designers of Crazyflie wanted to build a small flying electronic board that had minimal mechanical parts. They provide it and support it as an open source development platform, encouraging others to contribute to both Crazyflie hardware and software development. For this book, the Crazyflie 2.0 model was used for testing purposes, but the Crazyflie ROS software indicates that it is compatible with both Crazyflie 1.0 and 2.0 models embedded with stock firmware. The Crazyflie 2.0 model is shown in the following figure and is the model referred to in the rest of this chapter:
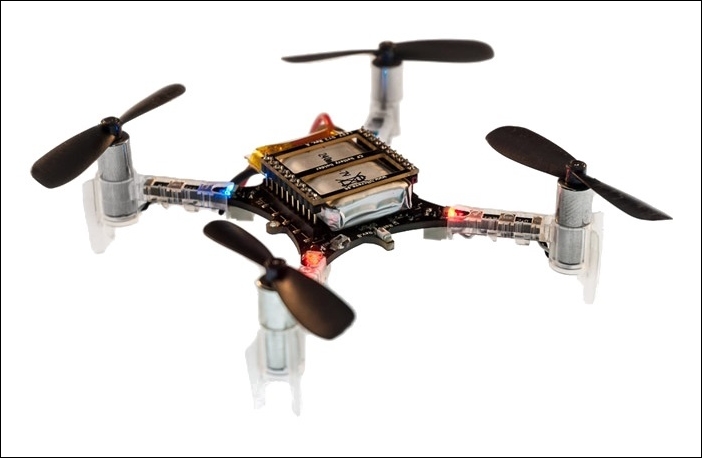
Crazyflie 2.0
The size of the assembled Crazyflie is 92 mm (3.6 inches) square motor to motor and 29 mm (1.1 inches) high.
The Crazyflie 2.0 system design is based on dual microcontroller architecture, as shown in the following diagram. The STM32F405 Microcontroller Unit (MCU) controls the flight of the Crazyflie through power to the motor driver. The STM32 also reads data from the 10-DOF IMU which includes a three-axis accelerometer, three-axis gyroscope, three-axis magnetometer and a high precision pressure sensor. It can control telemetry to other components through the expansion port. The other MCU is a Nordic Semiconductor nRF51822. The main tasks of this MCU are to handle the radio communication and the power management for the Crazyflie. Both Bluetooth Low Energy (BLE) and Compressed Real-Time Protocol (CRTP) are supported by the nRF51. The CRTP mode is compatible with radio communication provided by the Crazyradio. The nRF51 also handles logic from the on/off button and power to the other components in the system:
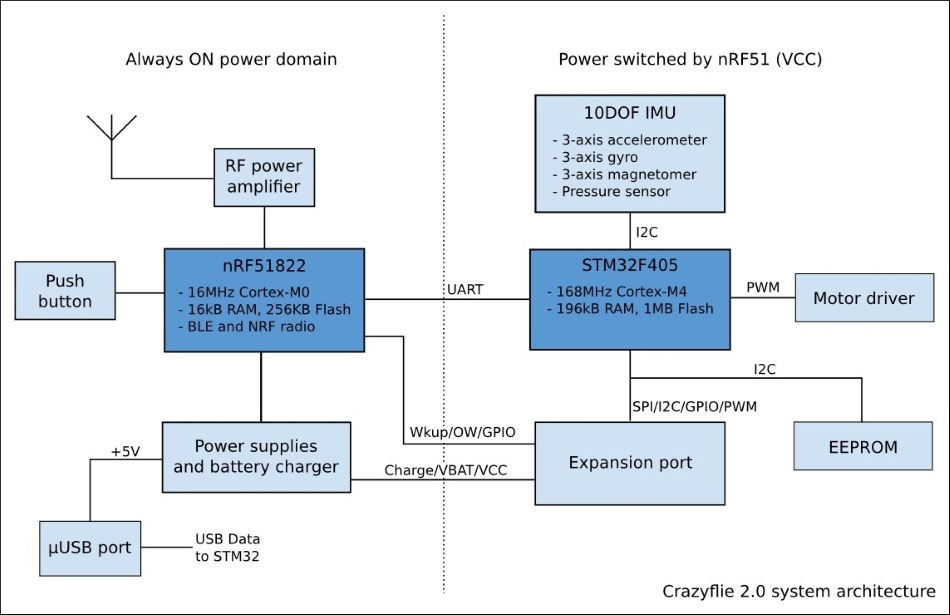
The Crazyflie is charged through an on-board μUSB port and requires a 40-minute charge cycle for the stock battery. Flight time is up to 7 minutes.
The Crazyflie 2.0 is priced under $ 200 and is available at www.seeedstudio.com. Its local distributors are listed at the website www.bitcraze.io/distributors.
Bitcraze provides excellent documentation to take you from unpacking your Crazyflie to getting it in the air. Instructions for assembling Crazyflie and getting it ready to fly can be found at https://www.bitcraze.io/getting-started-with-the-crazyflie-2-0/.
For any problems that arise, refer to the support forum at https://forum.bitcraze.io/.
Crazyflie can be controlled through a number of host devices over BLE or a Crazyradio communication channel. A BLE link to Crazyflie limits the flying range to 20 meters. The best communications link, Crazyradio PA, extends the communication range to 1000 meters. Either communication method is supported by the Crazyflie Python client (PC) software available for computers running Linux, Windows, or MAC OS. Bitcraze has also configured its own Virtual Machine (VM) that imports into the Oracle VirtualBox to make it easy to start on Crazyflie development projects. For more information on the Bitcraze VM, visit https://wiki.bitcraze.io/projects:virtualmachine:index.
For the latest release of the Crazyflie PC client, visit https://github.com/bitcraze/crazyflie-clients-python/releases.
Instructions for installing the Crazyflie PC client can be found at https://github.com/bitcraze/crazyflie-clients-python.
The Crazyflie PC client can be used to upgrade and flash the Crazyflie firmware over the Crazyradio link. Refer to the following website for instructions: https://wiki.bitcraze.io/projects:crazyflie2:upgrading:index.
Application software also exists for controlling the Crazyflie from an Android OS (4.4 or newer) or iOS (7.1 or newer) device. Refer to the appropriate app store for the Crazyflie software:
For Android users: https://play.google.com/store/apps/details?id=se.bitcraze.crazyfliecontrol2.
For iOS users: https://itunes.apple.com/us/app/crazyflie-2.0/id946151480?mt=8.
For Raspberry Pi enthusiasts, check out the client version of software for Raspbian at https://wiki.bitcraze.io/projects:crazyflie:binaries:raspberrypi#download.
For user input control, Crazyflie can use any gamepad with a minimum of four analog axes. The primary joystick controllers are the Xbox 360 USB controller, the PS 3 USB controller and the PS4 USB controller. Other controllers can be configured to work with the Crazyflie by modifying the Crazyflie client software.
In order to use Crazyflie 2.0 with ROS, a Crazyradio or Crazyradio PA is necessary to provide wireless radio communication to the Crazyflie. The Crazyradio resides on a small circuit board mounted on a USB dongle to interface with a computer, tablet, or smart phone. It has radio amplification to 20 dBm power output and a line-of-sight (LOS) range of greater than 1 kilometer. The design is based on the nRF24LU1+ chip from Nordic Semiconductor that operates at the 2.4 GHz band of radio communications. It provides 125 radio channels and offers 2 Megabits per second (Mbps), 1Mbps, and 250Kbps communication data rates. Firmware for the Crazyradio is open source and is upgradeable through a bootloader that comes embedded with the hardware.
The following figure shows the Crazyradio PA with its antenna extended. Additional information on the Crazyradio PA can be found at https://www.bitcraze.io/crazyradio-pa.
For the latest stable release of the Crazyradio firmware, go to https://github.com/bitcraze/crazyradio-firmware/releases.

Crazyradio PA
The next sections will focus on using ROS to command and control the flight of the Crazyflie quadrotor. A ROS metapackage for the Crazyflie has been developed by Wolfgang Hoenig with current information found at the GitHub site: https://github.com/whoenig/crazyflie_ros.
We thank Mr. Hoenig for his generous support in helping us prepare this section.
This software supports both the Crazyflie 1.0 and the Crazyflie 2.0 quadrotors embedded with stock firmware.
The Crazyflie ROS software for Crazyflie can be added to the catkin workspace catkin_ws created in Chapter 1, Getting Started with ROS, and then used in Chapter 2, Creating Your First Two-Wheeled ROS Robot (in Simulation), for our package ros_robotics. However, we provide instructions here to install the crazyflie metapackage into a catkin workspace of its own identified as crazyflie_ws. This workspace will provide you with the chance to examine the existing Crazyflie ROS packages and be a development space for new software you might wish to create. If you wish to use the catkin_ws workspace for your Crazyflie ROS software, skip to the step where the command sudo apt-get update is issued. (Afterwards, remember to replace the crazyflie_ws name in each of the command lines with catkin_ws.)
To create the Crazyflie workspace crazyflie_ws, type the following commands:
$ mkdir -p ~/crazyflie_ws/src
$ cd ~/crazyflie_ws/src
$ catkin_init_workspace
Build and install the Crazyflie workspace:
$ cd ~/crazyflie_ws
$ catkin_make
Next, source the setup.bash file within the Crazyflie workspace to overlay this workspace on top of the ROS environment for the workstation:
$ source ~/crazyflie_ws/devel/setup.bash
Remember to add this source command to your .bashrc file:
$ echo "source ~/crazyflie_ws/devel/setup.bash" >> ~/.bashrc
Make sure the ROS_PACKAGE_PATH environment variable includes the path you just sourced:
$ echo $ROS_PACKAGE_PATH
The path /home/<username>/crazyflie_ws/src should be displayed as one of the paths on the screen.
Now that the Crazyflie catkin workspace has been created, update the system information on the newest versions of packages and their dependencies:
$ sudo apt-get update
Next, move to the Crazyflie workspace source directory and download the software from GitHub:
$ cd ~/crazyflie_ws/src
$ git clone https://github.com/whoenig/crazyflie_ros.git
Move to the root of the Crazyflie workspace and build the packages:
$ cd ~/crazyflie_ws
$ catkin_make
These instructions install the latest version of the crazyflie metapackage, which has no dependencies on the Bitcraze Crazyflie SDK. To be able to fly Crazyflie with a joystick, ensure that the hector_quadrotor software is also installed. The instructions were presented earlier in this chapter.
ROS packages from the crazyflie metapackage are described here:
crazyflie_controller: This package contains a PID controller used during autonomous navigation operations like hovering and waypoint navigation. It is used with an external motion capture system like VICON.crazyflie_cpp: This package contains a C++ library for Crazyflie and for Crazyradio.crazyflie_demo: This package contains a varied set of launch files and Python scripts to provide the user with sample operations of Crazyflie. Use these files as a starting point to create your own operational setup for Crazyflie.crazyflie_descriptionThis package provides the URDF file and mesh files to create a simulation model of the Crazyflie. This model is based on the Crazyflie 1.0.crazyflie_tools: This package contains helpful tools for Crazyflie. The only tool at the present time isscan, which scans for Crazyflie(s) and reports their URI(s).crazyflie_driver: This package contains two important launch files. Thecrazyflie_server.launchfile launches thecrazyflie_servernode. Thecrazyflie_servernode communicates with all Crazyflies that have been dynamically added viacrazyflie_add. Thecrazyflie_add.launchfile launches thecrazyflie_addnode to establish communication with a Crazyflie. These operations are explained in more detail in subsequent sections.
On the computer workstation, Ubuntu uses udev to manage system devices and dynamically create and remove device nodes in the /dev directory to handle external devices. When the Crazyradio USB dongle is plugged in, udev is notified and special system configuration rules, udev rules, link any user-defined device information. These udev rules are stored in a file in the directory /etc/udev/rules.d.
The following instructions create rules that will set permission for a user to use the Crazyradio without requiring root privileges.
The following commands create the group plugdev to which users can be added who wish to communicate with Crazyflie via the Crazyradio dongle:
$ sudo groupadd plugdev
$ sudo usermod -a -G plugdev <username>
Next, the udev rules are created to provide vendor and product identification and user privileges for the Crazyradio and the Crazyflie. Using the command sudo <editor> to access your favorite editor, create the file /etc/udev/rules.d/99-crazyradio.rules and within the file add the following line:
SUBSYSTEM=="usb", ATTRS{idVendor}=="1915", ATTRS{idProduct}=="7777", MODE="0664", GROUP="plugdev"Using sudo <editor>, create the file /etc/udev/rules.d/99-crazyflie.rules and add the following line:
SUBSYSTEM=="usb", ATTRS{idVendor}=="0483", ATTRS{idProduct}=="5740", MODE="0664", GROUP="plugdev"Restart the computer and prepare to communicate with your Crazyflie!
It is advisable to mark the right front (M1) leg of the Crazyflie with something bright. This marking will help you keep track of the forward direction for your Crazyflie. Due to the symmetrical design, it is easy to lose the orientation of the Crazyflie.
The Crazyflie should be placed on a stable surface. As you will see, the startup sequence involves spinning the motors and sensor calibration. In the following figure of Crazyflie, identify the on/off power button (near the M1 leg) and push it on.
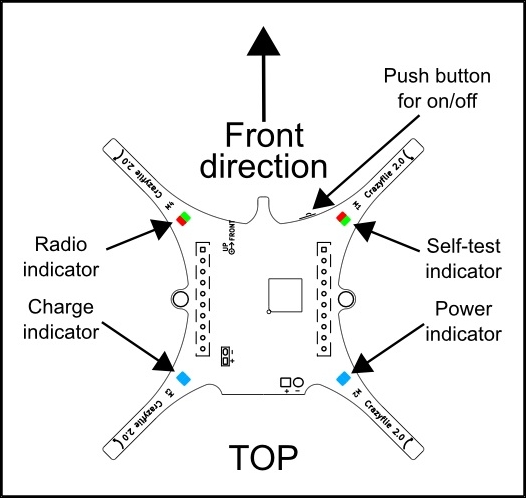
Top view of Crazyflie
After the Crazyflie is powered on, the power-on sequence will spin all four propellers in order. If a propeller does not spin, be sure to check the motor connections. The blue LED lights on the rear of the UAV should be lit to indicate that the power is on. The front right red LED light should be pulsing at 1 Hz to indicate the vehicle's heartbeat. When Crazyradio communication is established with the Crazyflie, the red and green LED lights on the front left will be flashing to indicate communication is being exchanged.
Next, insert the Crazyradio into a USB 2.0 slot on your computer and the joystick controller into another USB slot. Check that the joystick knobs are in their center positions so that the throttle is set to zero. You are now ready to start the Crazyflie ROS software.
Before flying Crazyflie for the first time, it is recommended to tie the UAV to a heavy object, attaching string to the mounting holes on either side of the Printed Circuit Board (PCB) body.
Before communicating with your Crazyflie, you need to find the Uniform Resource Identifier (URI). This URI is associated with the communication protocol of the nRF51 MCU. The format for the URI is as follows:
Interface Type:// Interface Id/Interface Channel/Interface Speed
For the radio interface, this sequence is as follows:
radio://USB dongle number/radio channel number/radio speed
The package crazyflie_tools provides the program scan to identify all the URIs that are transmitting. Open a terminal window on your computer workstation and enter the following command:
$ rosrun crazyflie_tools scan
The output will be similar to the following two lines:
Configured Dongle with version 0.53

radio://0/80/250K
The URI for your Crazyflie may be different. For our Crazyflie, the USB dongle number is 0, the radio channel is 80, and the radio speed is 250K. This means that our communication link is over a 2480 MHz channel.
The package crazyflie_demo contains a spectrum of example launch files to use with Crazyflie. Launch files are given for using the Xbox 360 controller or the PS3 controller to teleoperate the Crazyflie. To fly your Crazyflie with an Xbox 360 controller, type the command:
$ roslaunch crazyflie_demo teleop_xbox360.launch uri:=<CrazyflieURI>
Replace <CrazyflieURI> with the URI found from the scan command. In the screen, look for the message:
SYS: Crazyflie is up and running!You should see something similar to this:

Starting screen for the teleop_xbox360.launch
The window on the left is running rviz and the two rqt_plot windows on the right are for temperature and battery data. In rviz, IMU sensor data will be displayed on the grid.
If you are anxious to feel the joystick controls in your hands, proceed to using the left and right stick controls to navigate your Crazyflie. The stick controls are similar to those used for Hector Quadrotor:
- Left Stick – Forward (Up): Throttle provides lift
- Left Stick – Backward (Down): No throttle
- Left Stick – Right: Clockwise yaw
- Left Stick – Left: Counter clockwise yaw
- Right Stick – Forward (Up): Pitch forward
- Right Stick – Backward (Down): Pitch backward
- Right Stick – Right: Roll right
- Right Stick – Left: Roll left
You are now ready to use the Xbox 360 joystick to fly your Crazyflie around!
The teleop_xbox360.launch file performs a number of operations to launch ROS nodes, pass arguments, and set ROS parameters. The following list highlights the tasks performed:
- The
crazyflie_server.launchfile in thecrazyflie_driverpackage is executed. This file launches the nodecrazyflie_server. This server handles communication with the Crazyflie as soon as it is dynamically added by thecrazyflie_add.launchfile. - The
crazyflie_add.launchfile in thecrazyflie_driverpackage is executed. This file launches the nodecrazyflie_addusing the URI parameter that is passed intoteleop_xbox360.launch. Other parameters that are set are as follows:tf_prefix: This is the tf prefix for the Crazyflie frame(s)roll_trim: This is the roll trim in degrees (negative value if drift is to the left)pitch_trim: This is the pitch trim in degrees (negative value if drift is forward)enable_logging: This is the flag to log data
- The
joynode is launched to handle the joystick controller input. - The
xbox360.launchfile is included to launch the nodequadrotor_teleop(in thehector_quadrotor_teleoppackage) and set the parameters for the joystick controller. These parameters includex_axis,y_axis,z_axis,yaw_axis,x_velocity_max,y_velocity_max,z_velocity_max, andyaw_velocity_max. - The
crazyflie_demo_controllernode in thecrazyflie_demopackage is launched via the scriptcontroller.py. - The
rviznode in packagervizis launched and thecrazyflie.rvizconfiguration file in thecrazyflie_demopackage launch directory is used to configure rviz. - Two
rqt_plotnodes from packagerqt_plotare launched. One node plots the temperature of the Crazyflie, and the other node plots the battery level.
Take a look at this figure to see some of the relationships between the nodes and topics. The large rectangle marked Crazyflie is the namespace for the enclosed nodes and topics:

Crazyflie ROS teleop nodes and topics
A number of ROS parameters are initialized at the start of this program. Of particular interest are the roll_trim and pitch_trim parameter values set by the crazyflie_add.launch file.
When first flying your Crazyflie, use the roll_trim and pitch_trim values in the crazyflie_add.launch file to adjust the response of your craft. Begin with a straight forward push on the Left Stick of the joystick (throttle). The Crazyflie should lift straight up into the air. If not, adjust these two parameters accordingly and try it again. (The battery may also be moved forward and back to change the pitch balance. It is recommended to mark the battery position when you get it into the desired spot.)
Prior to flying the Crazyflie, using the rostopic list command allows us to see the names of the topics that are available. Of primary importance is the /crazyflie/cmd_vel topic that is similar to the same topic for Hector. This topic is published by the quadrotor_teleop node and the data fields for this topic are as follows:
angular.z: The yaw rate value is -200 to 200 degrees per secondlinear.x: The pitch value is -30 to 30 degreeslinear.y: The roll value is -30 to 30 degreeslinear.z: The thrust value is 10,000 to 60,000 for pulse-width modulation (PWM) output
The crazyflie_server node publishes sensor data from the Crazyflie as sensor_msgs:
- The
imutopic contains gyroscope and accelerometer data and updates every 10 milliseconds (ms). The covariance matrices and orientation fields are not set. - The
temperaturetopic contains data from the barometer in degrees Celsius. This message is updated every 100 ms. - The
magnetic_fieldtopic contains data from the magnetometer and is updated every 100 ms. - The
pressuretopic contains readings from the pressure sensor in hectopascals (hPa) or millibars (mbar). This message is updated every 100 ms. - The
batterytopic contains readings from the battery in volts and is updated every 100 ms. The stock battery is a 3.7 volt 240 mAh Lithium Polymer battery.
From this point, feel free to try the rostopic echo command with any of the topics listed previously to see the data being passed, especially between the computer and the Crazyflie. The ROS tool rqt can also be used to monitor these topics (Topic Monitor) and publish messages (Message Publisher) to the Crazyflie.
The crazyflie_demo package contains launch files to use the Crazyflie with external motion capture systems like
VICON or Virtual-Reality Peripheral Network (VRPN). With an external motion capture system, you can get your Crazyflie to hover at a given location or navigate autonomously to a set of waypoints. For example, to get Crazyflie to hover a meter above its starting location using a VICON system, use the following command:
$ roslaunch crazyflie_demo hover_vicon.launch uri:=<CrazyflieURI>
frame:=<CrazyflieTFframe> x:=0 y:=0 z:=1
Replace <CrazyflieURI> with your Crazyflie's URI and <CrazyflieTFframe> is the tf-frame of your Crazyflie. The hover_vicon.launch file will automatically run vicon_bridge.
The crazyflie_demo package also contains launch files for flying multiple Crazyflies at the same time. To accomplish this, each Crazyflie must have a different address. If Crazyflies are to share communication on the same Crazyradio USB dongle, they should share the same channel and data rate to provide optimum performance. Up to three Crazyflies have been successfully flown over one Crazyradio dongle. Performance degrades as the number of Crazyflies increase due to limitations in bandwidth.
To command and control multiple Crazyflies using the Xbox 360 joystick controller, use the following command:
$ roslaunch crazyflie_demo multi_teleop_xbox360.launch uri1:=radio://0/100/2M/E7E7E7E7E7 uri2:=radio://0/100/2M/E7E7E7E705
The URIs used in the multi_teleop_xbox360.launch command are left as examples of the duplication of the radio channel and data rate but the difference in the address.