Part of the software that needed to perform this cooperative mission has been installed in previous chapters:
- The ROS software installation of the
ros-indigo-desktop-fullconfiguration is described in the Installing and launching ROS section of Chapter 1, Getting Started with ROS - The installation of Crazyflie ROS software is described in the Loading Crazyflie ROS software section of Chapter 7, Making a Robot Fly
Software for the Kinect v2 to interface with ROS requires the installation of two items: libfreenect2 and iai_kinect2. The following sections provide the details of these installations.
The libfreenect2 software provides an open-source driver for Kinect v2. This driver does not support the Kinect for Xbox 360 or Xbox One. Libfreenect2 provides for the image transfer of RGB and depth as well as the combined registration of RGB and depth. Image registration aligns the color and depth images for the same scene into one reference image. Kinect v2 firmware updates are not supported in this software.
The installation instructions can be found at https://github.com/OpenKinect/libfreenect2. This software is currently under active development, so refer to this website for changes made to these installation instructions. The website lists installation instructions for Windows, Mac OS X, and Ubuntu (14.04 or later) operating systems. It is important to follow these directions accurately and read all the related troubleshooting information to ensure a successful installation. The instructions provided here are for Ubuntu 14.04 and will load the software into the current directory. This installation can be either local to your home directory or systemwide if you have sudo privileges.
To install the libfreenect2 software in your home directory, type the following:
$ git clone https://github.com/OpenKinect/libfreenect2.git
$ cd ~/libfreenect2
$ cd depends
$ ./download_debs_trusty.sh
A number of build tools are required to be installed as well:
$ sudo apt-get install build-essential cmake pkg-config
The libusb package provides access for the Kinect v2 to the USB device on your operating system. Install a libusb version that is either greater than or equal to 1.0.20:
$ sudo dpkg –i debs/libusb*deb
TurboJPEG provides a high-level open-source API for compressing and decompressing JPEG images in the memory to improve CPU/GPU performance. Install the following packages for TurboJPEG by typing:
$ sudo apt-get install libturbojpeg libjpeg-turbo8-dev
Open Graphics Library (OpenGL) is an open-source cross-platform API with a variety of functions designed to improve graphics processing performance. To install OpenGL packages, type the following commands:
$ sudo dpkg -i debs/libglfw3*deb
$ sudo apt-get install –f
$ sudo apt-get install libgl1-mesa-dri-lts-vivid
The
sudo apt-get install –f command will fix any broken dependencies that exist between the packages. If the last command produces errors showing conflicts with other packages, do no install it.
Some of these packages may already be installed in your system. You will receive a screen message indicating that the latest version of the package is installed.
Additional software packages can be installed to use with libfreenect2, but they are optional:
- Open Computing Language (OpenCL) creates a common interface despite the underlying computer system platform. The
libfreenect2software uses OpenCL to perform more effective processing on the system.The OpenCL software requires that certain underlying software be installed to ensure that the libfreenect2 driver can operate on your processor. OpenCL dependencies are specific to your computer system's GPU. Refer to the detailed instructions at https://github.com/OpenKinect/libfreenect2.
- Installation instructions for CUDA (used with Nvidia), Video Acceleration API (VAAP) used with Intel, and Open Natural Interaction (OpenNI2) are provided at the libfreenect2 website.
Whether or not you install the optional software, the last step will be to build the actual Protonect executable using the following commands:
$ cd ~/libfreenect2
$ mkdir build
$ cd build
$ cmake .. -DCMAKE_INSTALL_PREFIX=$HOME/freenect2 -DENABLE_CXX11=ON
$ make
$ make install
Remember that udev rules are used to manage system devices and create device nodes for the purpose of handling external devices, such as Kinect. Most likely, an udev rule will be required so that you will not need to run Protonect for the Kinect with sudo privileges. For this reason, it is necessary to copy the udev rule from its place in the downloaded software to the /etc/udev/rules.d directory:
$ sudo cp ~/libfreenect2/platform/linux/udev/90-kinect2.rules /etc/udev/rules.d
Now you are ready to test the operation of your Kinect. Verify that the Kinect v2 device is plugged into power and into the USB 3.0 port of the computer. If your Kinect was plugged in prior to installing the udev rule, unplug and reconnect the sensor.
Now run the program using the following command:
$./libfreenect2/build/bin/Protonect
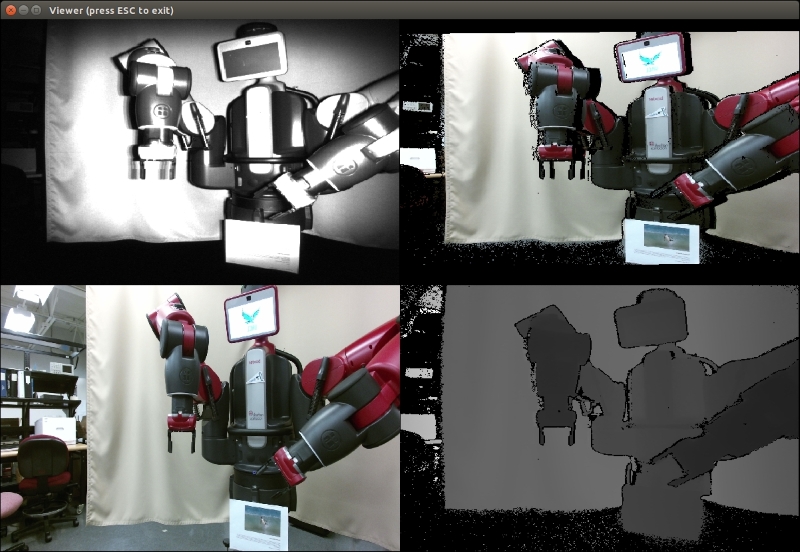
You are successful if a terminal window opens with four camera views. The following screenshot shows our Kinect pointed at Baxter:

Protonect output
Use Ctrl + C keys in the terminal window to quit Protonect.
At this time, the libfreenect2 software is being updated frequently. So if you are experiencing problems, check GitHub for the latest master release.
If you experience errors, refer to the FAQs at https://github.com/OpenKinect/libfreenect2 and the issues at https://github.com/OpenKinect/libfreenect2/wiki/Troubleshooting.
The iai_kinect2 software is a library of functions and tools that provide the ROS interface for Kinect v2. The libfreenect2 driver is required for using the iai_kinect2 software library. The iai_kinect2 package was developed by Thiemo Wiedemeyer of the Institute for Artificial Intelligence, University of Bremen.
Instructions for the installation of the software can be found at https://github.com/code-iai/iai_kinect2.
For a cooperative mission, you can decide to either add the software to the crazyflie_ws workspace or create a new catkin workspace for this software. The authors decided to create a new catkin workspace called mission_ws to contain the software for the iai_kinect2 metapackage and the crazyflie_autonomous package developed for this mission.
To install the iai_kinect2 software, move on to your catkin workspace src directory and clone the repository:
$ cd ~/<your_catkin_ws>/src/
$ git clone https://github.com/code-iai/iai_kinect2.git
Next, move into the iai_kinect2 directory, install the dependencies, and build the executable:
$ cd iai_kinect2
$ rosdep install -r --from-paths .
$ cd ~/<your_catkin_ws>
$ catkin_make -DCMAKE_BUILD_TYPE="Release"
Now it is time to operate the Kinect sensor using the kinect2_bridge launch file. Type the following command:
$ roslaunch kinect2_bridge kinect2_bridge.launch
At the end of a large amount of screen output, you should see this line:
[ INFO] [Kinect2Bridge::main] waiting for clients to connectIf you are successful, congratulations! Great work! If not (like the authors), start your diagnosis by referring to the kinect2_bridge is not working/crashing, what is wrong? FAQ and other helpful queries at https://github.com/code-iai/iai_kinect2.
When you receive the waiting for clients to contact message, the next step is to view the output images of kinect2_bridge. To do this, use kinect2_viewer by typing in the following:
$ rosrun kinect2_viewer kinect2_viewer
The output should be as follows:
[ INFO] [main] topic color: /kinect2/qhd/image_color_rect
[ INFO] [main] topic depth: /kinect2/qhd/image_depth_rect
[ INFO] [main] starting receiver...
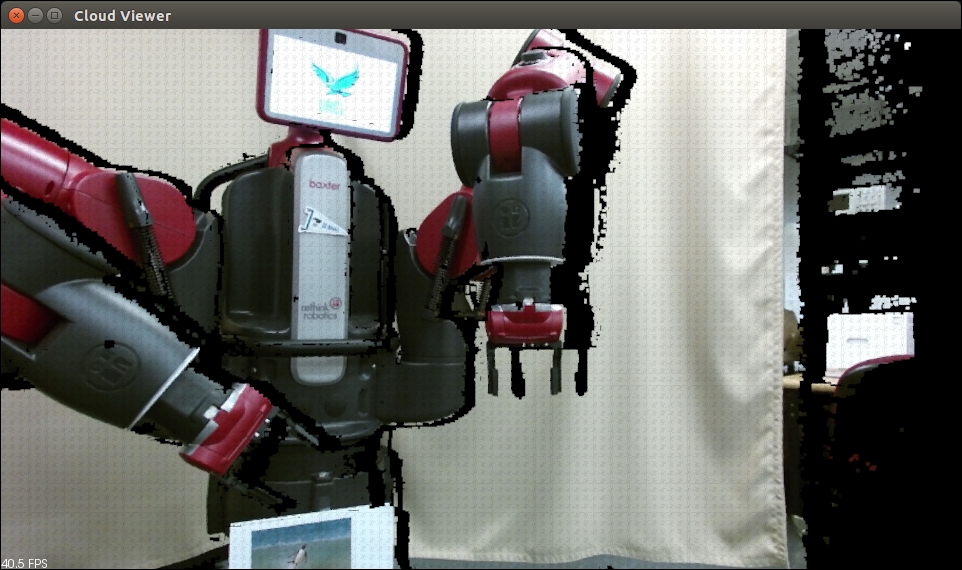
Our screen showed the following screenshot:

kinect2_viewer output
Use Ctrl + C in the terminal window to quit kinect2_viewer.
As shown in the preceding screenshot, kinect2_viewer has the default settings of
quarter high definition (qhd) , image_color_rect, and image_depth_rect. This Cloud Viewer output is the default viewer. These settings and other options for kinect2_viewer will be described in more detail in the following section.
The next section describes the packages that are contained in the iai_kinect2 metapackage. These packages make the job of interfacing to the Kinect v2 flexible and relatively straightforward. It is extremely important to calibrate your Kinect sensor to align the RGB camera with the
infrared (IR) sensor. This alignment will transform the raw images into a
rectified image. The kinect2_calibration tool that can be used to perform this calibration and the calibration process is described in the next section.
The IAI Kinect 2 library provides the following tools for the Kinect v2:
kinect2_calibration: This tool is used to align the Kinect RGB camera with its IR camera and depth measurements. It relies on the functions of the OpenCV library for image and depth processing.kinect2_registration: This package projects the depth image onto the color image to produce the depth registration image. OpenCL or Eigen must be installed for this software to work. It is recommended to use OpenCL to reduce the load on the CPU and obtain the best performance possible.kinect2_bridge: This package provides the interface between the Kinect v2 driver,libfreenect2, and ROS. This real-time process delivers Kinect v2 images at 30 frames per second to the CPU/GPU. Thekinect2_bridgesoftware is implemented with OpenCL to take advantage of the system's architecture for processing depth registration data.kinect2_viewer: This viewer provides two types of visualizations: a color image overlaid with a depth image or a registered point cloud.
Additional information is provided in later sections.
The kinect2_bridge and kinect2_viewer provide several options for producing images and point clouds. Three different resolutions are available from the kinect2_bridge interface: Full HD (1920 x 1080), quarter Full HD (960 x 540), and raw ir/depth images (512 x 424). Each of these resolutions can produce a number of different images, such as the following:
image_colorimage_color/compressedimage_color_rectimage_color_rect/compressedimage_depth_rectimage_depth_rect/compressedimage_monoimage_mono/compressedimage_mono_rectimage_mono_rect/compressedimage_irimage_ir/compressedimage_ir_rectimage_ir_rect/compressedpoints
The kinect2_bridge software limits the depth range for the sensor between 0.1 and 12.0 meters. For more information on these image topics, refer to the documentation at https://github.com/code-iai/iai_kinect2/tree/master/kinect2_bridge.
The kinect2_viewer has the command-line options to bring up the different resolutions described previous. These modes are as follows:
hd: for Full High Definition (HD)qhd: for quarter Full HDsd: for raw IR/depth images
Visualization options for these modes can be image for a color image overlaid with a depth image, cloud for a registered point cloud, or both to bring up both the visualizations in different windows.
The kinect2_calibration tool requires the use of a chessboard or circle board pattern to align the color and depth images. A number of patterns are provided in the downloaded iai_kinect2 software inside the kinect2_calibration/patterns directory. For a detailed description of how the 3D calibration works, refer to the OpenCV website at http://docs.opencv.org/2.4/doc/tutorials/calib3d/table_of_content_calib3d/table_of_content_calib3d.html.
The iai_kinect2 calibration instructions can be found at https://github.com/codeiai/iai_kinect2/tree/master/kinect2_calibration.
We used the chess5x7x0.03 pattern to calibrate our Kinect and printed it on plain 8.5 x 11 inch paper. Be sure to check the dimensions of the squares to assure that they are the correct measurement (3 centimeters in our case). Sometimes, printers may change the size of objects on the page. Next, mount your pattern on a flat, moveable surface assuring that the pattern is smooth and no distortions will be experienced that will corrupt your sensor calibration.
The Kinect should be mounted on a stationary surface and a tripod works well. The Kinect will be positioned in one location for the entire calibration process. Adjust it to align it with a point straight ahead in an open area in which you will be moving around the calibration chess pattern. The instructions mention the use of a second tripod for mounting the chess pattern, but we found it easier to move the pattern around by hand (using a steady hand). It is important to obtain clear images of the pattern from both the RGB and IR cameras.
If you wish to judge the effects of the calibration process, use the kinect2_bridge and kinect2_viewer software to view and take the initial screenshots of the registered depth images and point cloud images of your scene. When the calibration process is complete, repeat the screenshots and compare the results.
First, you will need to make a directory on your computer to hold all of the calibration data that is generated for this process. To do this, type the following:
$ mkdir ~/kinect_cal_data
$ cd ~/kinect_cal_data
To start the calibration process, set up your Kinect and run:
$ roscore
In a second terminal window, start kinect2_bridge but pass the parameter for setting a low number of frames per second. This will reduce the CPU/GPU processing load:
$ rosrun kinect2_bridge kinect2_bridge _fps_limit:=2
Notice as the software runs, similar output should come to the screen:
[Info] [Freenect2Impl] 15 usb devices connected
[Info] [Freenect2Impl] found valid Kinect v2 @4:14 with serial 501493641942
[Info] [Freenect2Impl] found 1 devices
[ INFO] [Kinect2Bridge::initDevice] Kinect2 devices found:
[ INFO] [Kinect2Bridge::initDevice]   0: 501493641942 (selected)
Your data will be different, but note the serial number of your Kinect v2 (ours is 501493641942). When the waiting for clients to connect text appears on the screen, type the following command:
$ rosrun kinect2_calibration kinect2_calibation <type of pattern> record color
Our <type of pattern> is chess5x7x0.03 pattern. This command will start the process for calibrating the color camera. Notice the output to the screen:
[ INFO] [main] Start settings:
       Mode: record
     Source: color
      Board: chess
 Dimensions: 5 x 7
 Field size: 0.03
Dist. model: 5 coefficients
Topic color: /kinect2/hd/image_mono
   Topic ir: /kinect2/sd/image_ir
Topic depth: /kinect2/sd/image_depth
       Path: ./
[ INFO] [main] starting recorder...
[ INFO] [Recorder::startRecord] Controls:
   [ESC, q] - Exit
 [SPACE, s] - Save current frame
        [l] - decrease min and max value for IR value rage
        [h] - increase min and max value for IR value rage
        [1] - decrease min value for IR value rage
        [2] - increase min value for IR value rage
        [3] - decrease max value for IR value rage
        [4] - increase max value for IR value rage
[ INFO] [Recorder::store] storing frame: 0000
As the screen instructions indicate, after you have positioned the pattern board in the image frame, hit the spacebar (or S) key on the keyboard to take a picture. Be sure that the cursor is focused on the terminal window. Every time you hit the spacebar, a .png and .yaml file will be created in the current directory (~/kinect_cal_data).
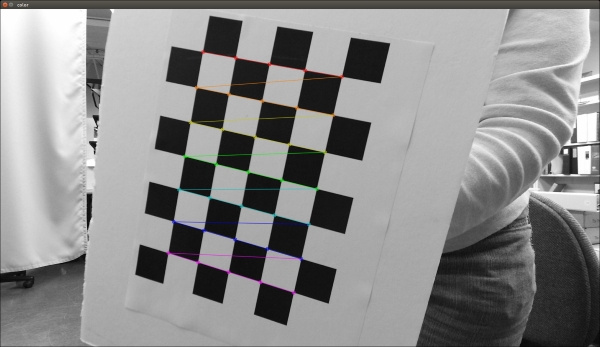
The following screenshot shows a rainbow-colored alignment pattern that overlays the camera image when the pattern is acceptable for calibration. If this pattern does not appear, hitting the spacebar will not record the picture. If the complete pattern is not visible in the scene, the rainbow colors will all turn red because part of the board pattern cannot be observed in the image frame:

Calibration alignment pattern
We recommend that you run the following command in another terminal window:
$ rosrun kinect2_viewer kinect2_viewer sd image
The image viewer will show the image frame for the combined color/depth image. This frame has smaller dimensions than the RGB camera frame in Full HD, and it is important to keep all your calibration images within this frame. If not, the calibration process will try to shrink the depth data into the center of the full RGB frame and your results will be unusable.
Move the pattern from one side of the image to the other, taking pictures from multiple spots. Hold the board at different angles to the camera (tilting the board) as well as rotating it around its center. The rainbow-colored pattern on the screen will be your clue as to when the image can be captured. It is suggested to take pictures of the pattern at varying distances from the camera. Keep in mind that the Kinect's depth sensor range is from 0.5 to 4.5 meters (20 inches to over 14 feet). In total, a set of 100 or more calibration images is suggested for each calibration run.
When you have taken a sufficient number of images, use the Esc key (or Q) to exit the program. Execute the following command to compute the intrinsic calibration parameters for the color camera:
$ rosrun kinect2_calibration kinect2_calibration chess5x7x0.03 calibrate color
Be sure to substitute your type of pattern in the command. Next, begin the process for calibrating the IR camera by typing in this command:
$ rosrun kinect2_calibration kinect2_calibration chess5x7x0.03 record ir
Follow the same process that you did with the color camera, taking an additional 100 pictures or more. Then, compute the intrinsic calibration parameters for the IR camera using the following command:
$ rosrun kinect2_calibration kinect2_calibration chess5x7x0.03 calibrate ir
Now that the color and IR cameras have been calibrated individually, it is time to record images from both the cameras synchronized:
$ rosrun kinect2_calibration kinect2_calibration chess5x7x0.03 record sync
Take an additional 100 or more images. The extrinsic calibration parameters are computed with the following command:
$ rosrun kinect2_calibration kinect2_calibration chess5x7x0.03 calibrate sync
The following command calibrates depth measurements:
$ rosrun kinect2_calibration kinect2_calibration chess5x7x0.03 calibrate depth
At this point, all of the calibration data has been computed and the data must be saved to the appropriate location for use by the kinect2_bridge software. Recall the serial number of your Kinect that you noted earlier with the kinect2_bridge screen output. Create a directory with this serial number under the kinect2_bridge/data directory:
$ roscd kinect2_bridge/data
$ mkdir <Kinect serial #>
Copy the following calibration files from ~/kinect_cal_data to the kinect2_bridge/data/<Kinect serial#> directory you just created:
$ cp ~/kinect_cal_data/c*.yaml <Kinect serial#>
Your kinect2_bridge/data/<Kinect serial#> directory should look similar to the following screenshot:

Kinect v2 calibration data files
Running kinect2_viewer again should show an alignment of the color and depth images with strong edges at corners and on outlines. The kinect2_bridge software will automatically check for the Kinect's serial number under the data directory and use the calibration data if it exists.
